sterling软件操作说明(详细版)
Insight3.4操作手册
Insight3.4操作手册Insight 3.4软件应用手册一、开机1、合上电源,打开计算机,用户名:USER 密码:无2、电脑打开后,点击桌面“Insight 3.4”图标,弹出一快捷工具栏。
二、系统操作1、点击“Graphics”图标,弹出主画面,双击画面中央,弹出总系统画面,可选择你需要观察的系统,双击该图标,弹出该系统的画面,画面上即直观又详细的注明了各参数的数据。
若要查看其他系统的参数,可双击下方蓝色图标,回到总系统画面,再选择你要观测的系统,双击该图标。
2、画面上的数据都可打开,查看其具体参数,将鼠标移到需要查看的数据上,鼠标会改变形状,双击,打开“Commander”对话框,其中:Ⅰ、“Point Name”是该数据点的名称。
Ⅱ、“Current Value”是该点的数值。
Ⅲ、“Current Status”是该点的状态,若为“NORMAL”表示该点处于正常状态;若为“FAILED”表示该点处于不正常状态,出现该现象,请与我司联系;若为“PRI3”表示该点处于报警状态。
Ⅳ、“Current Priority”是数值的优先权,若为“NONE”表示该点处于自动状态,可依据程序来控制;若为“OPER”表示该点处于手动状态,不受程序的控制。
Ⅴ、“Disable Alarm Printing”左边的方框若打勾,表示取消该点在报警时的打印功能。
Ⅵ、“Alarm by Command”左边的方框若打勾,表示手动制造一个报警状态。
Ⅶ、“Command”在改变某个点的数值时,按Command表示确认Ⅷ、“Operator”一旦某个点的数值或状态被人工修改后,其颜色会变成黄色,按Command确认后,该点的Current Priority为OPER。
Ⅸ、“None”当某个点的Current Priority为OPER时,点击,使其颜色变为黄色,再按Command确认,此时该点的Current Priority为NONE。
斯普克特精密地理测量软件说明书
Enabling Field to Finish Workflows with ConfidenceSpectra Precision Survey Office SoftwareComplete Software Solution Comprehensive workflows for Survey and GIS professionalsto create deliverables from traditional data types or the latest point cloud and imagery data from terrestrial, mobile and aerial sensors. One software does it all: eliminating historically disjointed workflows, supporting the needs and flexibility of multidisciplined businesses and reducing costs of software purchases and trainingData IntegrationCombine data from GNSS, total stations, and levels to achieve the most accurate horizontal and vertical results. Enhance visualization and data richness with points clouds, imagery, BIM and CAD models as well as PDFs to create the ultimate in complete project deliverables. Market-leading data integration allows users to easily adopt new sensor technology to respond to evolving customer needs. InteroperabilityWork with, not against, other software packages from Autodesk, Bentley, ESRI, and more with import and export support for a variety of third-party file types. Connect to file geodatabasesor Bentley ProjectWise or leverage DigitalGlobe background imagery, all from within SPSO.Confidence Inspiring ResultsSPSO is loaded with all the necessary tools to control, manage and check your data–ensuring the most accurate and precise results. Don’t put up with fragmented data sets or questionable data that cause costly mistakes and jeopardizes your business reputation. SPSO provides the confidence to ensure every project is correct.Rich DeliverablesSPSO enables you to deliver a multitude of application based deliverables such as QA reports, surfaces, CAD plans, and complex alignment/corridor designs. Integration with the Trimble Clarity web-based platform offers a new way to collaborate and share your geospatial data with clients and other surveyors alike.Supported WorkflowsStart in SPSO. Stay in SPSO.Control SurveyingConfidently produce reliable control coordinates for your entire survey or construction projectCreate projects with a wide selection of coordinate systems and geoid modelsReview, edit and process GNSS, total station, and leveling observationsPostprocess static GNSS data with Trimble’s HD-GNSS processing engine for morereliable positionsAdjust traverses and complete networks containing GNSS, total station, and leveling observationsField to FinishEasily create CAD-ready deliverables directly from your survey dataImport any existing raster and vector data for bidding estimates and project planningProcess feature codes, compute volumes, and automatically model terrainCreate surfaces and contours from points and breaklines to accurately model terrainPlot and save your survey designs in a variety of CAD and GIS formatsGIS Feature CollectionExpand the utilization of your survey systems by creating GIS deliverables for your clientsCreate and manage rich feature libraries matching attribute schema, layers and symbologyfrom GIS and CADProcess feature codes to automatically create geometry and attributesImport and export features to a variety file formats including ESRI shape files and geodatabaseXML filesConnect directly to the GIS data system of record to extract schema and data enablingefficient GIS operationsCustomize SPSO to your workflowsA customizable user interface enhances the SPSO experience. For users who wish to maximize their efficiency, the SPSO ribbon interface makes functions easy to find and understand.Add frequently used functions to the quick access toolbar Create ribbon tabs with streamlined workflows Specify any website as the start pageData PrepMake sure your data is clean, up-to-date, and delivered in the right format to get the job done Import and organize CAD and PDF dataRapidly extract and digitize data from vector PDFsElevate 2D contours, points, lines, and polygons into 3D modelsRemove blank text objects, unused layers and styles, and join small gaps in geometryDraftingProduce your final survey and roadway design plots with easeUse Dynaviews to efficiently place your model space data into plotting sheetsEfficiently add dynamic labels, line and curve tables, scale bars, and other map elements Automatically plot profiles and crosssections for alignment based surfaces or corridors Create 3D PDFs for easy communication and collaboration with project team members and clientsTerrestrial and Aerial PhotogrammetryMeasure and model from Trimble VISION and UAS data with highly automated workflows images in the comfort of your officeAccurately extract 3D geometry and features from images to create rich CAD and GIS deliverablesCreate high resolution point clouds, orthomosaics and elevation raster DSM and DTMs Create accurate 3D terrain models for volumetric computations and design Seamlessly integrate UAS deliverables with other survey data typesScanningEfficiently view, manage, and extract data from terrestrial, mobile, and aerial point cloud sensors Extract 3D geometry and features from point cloud data to generate accurate CAD geometry Create rich deliverables for modeling, surfaces, corridor designCreate accurate 3D terrain models for volumetric computations, topo maps, or as-built conditionsImport point cloud data from any source and integrate with your survey dataJoin the SPSO Family TodayOur mission is to serve Survey and GIS professionals with the best solutions possible We are a team of survey and GIS professionals and understand what it takes to get the job done right. Together with our world class distribution network we are making sure we support your business needs. Starting to use new software can often be intimidating. We offer a variety of helpful materials and a world-class support network to make you productive quickly. Learning new software has never been easier. Take a look at some of our resources below.A Spectra Precision Survey Office Edition Matched to your Business RequirementsA comprehensive and scalable toolset for every workflow Base Edition: Supports quality-check workflows, network adjustment, feature code processing, COGO, CAD, reporting and L1 GPS processingIntermediate Edition: All of the features of the SPSO Base Edition plus site calibration, full GNSS processing, surfaces, volumetrics, more advanced CAD, and point cloud tools Advanced Edition: All of the features of the IntermediateEdition plus more-automated CAD, corridor/alignment design, plotting, cadastral workflows, integration with Trimble Clarity and support for Trimble VISION terrestrial photogrammetry.Aerial Photogrammetry Module: Data processing anddeliverable production for Trimble UAS utilizing UAS Master integrated workflow.Advanced Drafting Module: Simplified, highly-automated plotting of survey data including sectional views as well ascadastral workflows with parcel and legal description generation Data Prep Module: Existing drawing cleanup and conversion of 2D drawings into actionable 3D modelsGIS Module: Seamless connection to geodatabases to integrate high-accuracy survey operations with GISScanning Module: Powerful tools to manage, view, and extract quality deliverables from any type of point cloud sensorSystem RecommendationsOperating systemMicrosoft Windows ® 7 (64-bit version)Microsoft Windows 8 (64-bit version)Microsoft Windows 10 (64-bit version)ProcessorRecommended:- Intel ® Pentium ® Dual-Core E2160 (1.80 GHz, 1 MB L2 Cache, 800 FSB) or betterRecommended for Aerial Phtogrammetry and Scanning Module:- Quad-Core 2.8 GHz (Intel i7-860 2.8 GHz) or betterRandom Access Memory (RAM)Minimum:- 2 GBRecommended:- 8 GB or moreRecommended for Aerial Photogrammetry and Scanning Module:- 32 GB or moreHard diskRecommended:- 5 GB or moreRecommended for Aerial Photogrammetry and Scanning Module:- Solid State 100 GB or moreAdditional Graphics:- DirectX 9 (or higher) compatible graphics card with 512 MB memory or more Note: To display point cloud data, graphics card must support Open GL 3.2 or higher Monitor:- 1280x1024 or higher resolution with 256 or more colors (at 96 DPI)I/O Ports:- USB 2 0 port Supported Languages Chinese Simplified Danish DutchEnglish US English UK French GermanItalian Japanese Korean Portuguese Russian Spanish SwedishSpectra Precision Survey Office SoftwareSpecifications subject to change without notice.©2017 Trimble Inc. All rights reserved. Spectra Precision is a Division of Trimble Inc. Spectra Precision and the Spectra Precision logo are trademarks of Trimble Inc. or its subsidiaries. All other trademarks are the property of their respective owners. (2017/11)Contact Information:AMERICAS10368 Westmoor DriveWestminster, CO 80021, USA +1-720-587-4700 Phone888-477-7516 (Toll Free in USA)EUROPE, MIDDLE EAST AND AFRICA Rue Thomas EdisonZAC de la Fleuriaye - CS 6043344474 Carquefou (Nantes), France +33 (0)2 28 09 38 00 PhoneASIA-PACIFIC80 Marine Parade Road #22-06, Parkway ParadeSingapore 449269, SINGAPORE +65-6348-2212 Phone。
Sterling_Trader_Manager_User_Guide
Sterling Trader® Manager User Guide v. 6.0Table of ContentsINTRODUCTION (3)CHAPTER 1 – TRADER LIST (4)Edit Trader (5)Data Columns (8)CHAPTER 2 – ACCOUNT LIST (9)Edit Account (10)Data Columns (18)CHAPTER 3 – MAIN MENU (19)Menu Headings (20)View-Settings (24)Group Risk (25)Options Risk (28)Position Minder and Trading Monitor Special Features (29)CHAPTER 4 – MONITORING RISK (32)EXHIBIT A (37)EXHIBIT B (39)EXHIBIT C (40)INTRODUCTIONSterling Trader® Manager is our comprehensive, real-time risk management system, providing the tools you need to efficiently manage permission and risk settings for your traders and accounts. From monitoring real-time profit and loss, to managing buying power and exposure limits, Sterling Trader® Manager’s suite of risk controls will help you effectively manage your firm’s risk and keep your traders on track. Here is a quick sample of what you can expect from Sterling Trader® Manager.Real-Time profit and loss by account and by user-defined groups of accountsReal-Time position monitoring of all accountsMaximum Loss enforcement, max position and order quantity enforcementDetailed buying power and margin controls, assignable per accountTrading monitors reporting the trading activity of each accountAssignable commission plans for end of day reportingShort-Sale and Odd-Lot controlsFull front-end DMA order entrySterling Trader® Manager also includes trading functionality found in the front-end trader platform, Sterling Trader® Pro, so you can watch the markets, make trades for your clients if necessary, or close out positions to cover margin calls or other risk situations.Confidently manage your business with Sterling Trader® Manager.CHAPTER 1 – TRADER LISTINTRODUCTION – Because risk management does not take place until log-ins to the trading platform and accounts to trade in exist, we will go over the process of setting up traders and accounts. Traders will be first.Traders are set up in the Trader List window. To access the Trader List window, either select Trader List from the “Windows” menu in the Main Menu or right click in the Main Menu and select Trader List.The Trader List window lists all of the traders with your firm that are using either Sterling Trader® Pro, Sterling Trader® Elite, or Sterling Trader® Manager software.The Trader List available columns to display can be found in the “View” menu under Settings. The columns give a quick overview of each Trader’s attributes.EDIT TRADERThere won’t be anything to see in the columns, however, without adding Traders!To add a new Trader:1. Click on the “Actions” menu, or right click in the Trader List window and select “Add Trader”. The “Add Trader”screen pops up. It is a tabbed screen, defaulted to the “General” tab.2. Enter the following:Trader – The log in ID you wish to give the new TraderDesc – Description. This can be anything you would like to us to further identify the Trader. In theexample above, we selected the date the Trader was created.Firm – Name of the firm requesting the new user.Type – “Backed” or “Proprietary”.Category – “Trader”, “Manager”, or “Super Manager”. Traders use Sterling Trader® Pro, Managers useSterling Trader® Manager.Password – The password the Trader will use to log on.Expires – Date to expire the Trader. (If applicable)Status – “Enabled”, meaning the Trader log in is ready for use. “Disabled” or “Suspended”, meaning theTrader will not be able to log on and use the platform. “Disabled for Deletion”, meaning the trader ID willbe permanently removed during routine maintenance.3. Alternatively, you can import an existing trader as a template by entering the trade name in the Import Trader box.4. The User data fields, Notes, and Equity Trading Limits fields are optional and not necessary to complete theTrader.The remainder of the Trader properties are set up under the following tabs:GENERAL– This tab, shown above, is where a manager can create or edit account information.PERMISSIONS – Enables various trader abilities, such as allocations, trailing stops, API, and options trading.SUPER MANAGER – If your user is designated a Super Manager, you can assign certain permissions to other Trader Managers from this screen. You can also set a stock watch symbol limit for the selected Trader (You don’t need to be a Super Manager to set a symbol limit).Trading Regions are set in this tab. If a trader will be trading any or all offered regions, these boxes must be checked. They do not need to be checked if the trader is only receiving data from these regions. Please note that for Pro users there are additional fees per trading region, so a region should not be assigned to a trade without proper approval.ACCOUNTS – Assign accounts that a Trader will have linked to it from this tab. To add an account to a Trader simply highlight the desired account and double left-click on it.TRADERS – This tab functions exactly the same as the “Accounts” tab, except you can assign Traders to Managers with authority to monitor those traders.COMMISSION – This tab also functions the same as “Accounts” and “Traders”, except that you assign pre-set commission schedules (created in the back office) to a Trader.DESTINATIONS – Assign destinations to a Trader. Simply check the appropriate box next to each destination. Please note, checking a destination will not make it available in any of the Trader’s accounts. The routing must also be set up in the Account List, which is discussed in chapter 2.QUOTES – This tab allows you to assign the quote feeds a user will see. Simply check the appropriate box next to each quote feed (Please see following page).DATA COLUMNSOnce the new Trader is set up, you will be able to see it in the Trader List window.As noted on page 4, you can select columns to view in the “View” menu, under Settings.Please note the column shown titled “Attributes”. This is a catch-all column showing what a trader is enabled for. This saves the need for a spread out Trader List with a separate column for each enabled attribute. To view a description of the attributes each letter refers to, go to the “View” menu and select Trader Attributes Legend. Or, go to Exhibit B at the end of this guide. Once you are familiar with these letter codes, you will be able to easily check what a specific trader is enabled for. Of course, you can always right-click on a Trader name and select Edit Trader to double check permissions as well.CHAPTER 2 – ACCOUNT LISTThe Account List window gives you a snapshot of all your accounts and their current settings. In the screenshot below, the Account, Group, Commission Rate, Max Loss, Day Buying Power, and Night Buying Power are listed. There are many more informational columns available, but first we are going to examine the set up screen where that information is entered and the accounts are created.To access the additional columns, click the “View” menu and select Settings. In the Account List Settings window you will be able to select a preset color scheme and columns to display.To access the Edit Account (or Add Account) window, right click on an account and select Edit Account, or click the “Actions” menu and select Edit Account.The Add Account window is a multi-tabbed window. Each tab will be discussed, beginning on the next page.EDIT ACCOUNTGENERAL – Create new accounts for trading or edit information of on existing account. New accounts can be created from scratch, or a previous account may be imported as a template. To create a new account from scratch:1. In the Account List, right click and select “Add Account”. (Brings up same screens as Edit Account).2. Name the account.3. Select the Instrument the account will trade. (Equities and options, Futures, etc.)4. Select the Status. (Enabled by default)5. Select the Type (Agency or Principal), Class – such as Margin or DVP – and Origin.6. Enter a base currency. (especially important for accounts trading multiple regions, where the currencies differ)7. Enter a description of the account8. Enter the Back Office account (for clearing purposes) as well as the Group the account will belong to. 9.Click OK.All those fields must be filled in to successfully create the account. Once that is done, the permissions in the remaining tabs can be set.To import an account as a template:1. In the “From” box on the bottom right of the General tab, select the account to use.2. Click the Import button.3. This template will carry over risk and commission settings4.Make any necessary changes and click OK.FEES / COMMISSION – Enables creation and assignment of commission plans. Commission plans are set up by Sterling Support, in a separate application, at the request of the Broker, but managers may input a basic plan, such as .01/share with a 3.00 minimum.RISK (EQUITY) – Controls rule enforcements for short and long selling, as well as odd-lot and mixed-lot transactions for the account being created or edited..The following screenshot from the Risk(Equity) tab defines the Short sale / Long sale rules:Explanation of Short/Long sale position rules enforcement in regards to Strict with Splitting: Strict with Splitting for Short Sale means – Split sell long orders into sell long and sell short orders if order quantity exceeds current long position. Strict with Splitting for Long sale means – Split sell short orders into sell long and sell short orders if order quantity exceeds current long position.RISK II (EQUITY) – Controls buying power for equities and options. There are two options, Buying Power Control or Margin Control. We’ll discuss both, but first there is Net liq/maint excess .Seen below, “Net liquidating / maintenance excess” is the basis for all buying power calculations. For Buying Power Control, it is the number multiplied by the Day and Night multiplier. For Margin Control, it is the number reduced by the appropriate percentage of each order. These are detailed next.Buying Power Control – Enable a buying power figure and a multiplier. For example, an account could have $50,000 USD buying power with a 4x multiplier, meaning a total of $200,000 USD buying power. There is day and night buying power, night meaning after the core market session closes. It is important to note that the buying power is calculated off the Net liq/maint excess. So clicking the Update BP button will multiply the Net liq/maint excess by the multiplier.Margin Control – If Enable Margin Control is selected instead of Buying Power Control, you will have to set up howstocks and options are margined both on the buy and the sell side (selling refers to short selling for stocks). Total margin available will be the Net liq/maint excess.To add Margin for equities:1. Click Add. The Add Margin Price Tier screen pops up.2. Select Equity as the instrument.3. Select a price “and up”. In the example above, it’s all stocks $5.00 and up.4. For “Margin required” you can select % of market value, or $ per share. In this example we chose 25% of marketvalue.5. You can add further margin requirements by checking “Plus” and selecting the additional requirement.6. Click OK. The new requirements will now show under the Risk II (Equity) tab.In this example, stocks $5.00 and up are set to charge 25%. To set margin requirements for stocks priced 0.00 – 4.99, repeat the above steps and select 0.00 for the price. Set margin requirement at 100% or whatever is desired. To set margin for options, repeat the above steps, but select options as the instrument.The Net Liq/Maint Excess number is reduced for each trade by the percentage entered in the Margin Control scheme. Use Leveraged ETF margin control (Equity) – Refers to FINRA regulations for 2x and 3x margin on leveraged ETFs. Use Canadian margin control rules – For traders residing in Canada.RISK III (EQUITY) – This tab enables a manager to control, to an extent, how much loss an account can generate intraday. There are two choices, P/L Control and Balance Control. Both may be activated at the same time.With “Enable P/L control” checked and a maximum loss figure entered, a manager can select an automatic course ofaction should that max loss figure be exceeded. In this example, max loss is set at $2500. If the account loses more than $2500 it will be set to allow only closing transactions and cancelling of open orders.With “Enable balance control” checked, an account falling below the set minimum balance will trigger an automatic action set by the manager. Per the screenshot above, only a warning message will be displayed. SYMBOLS – Allows a manager to set up limits on a per-symbol, or all symbol, basis.In this screenshot, the maximum MSFT position account JETEST1 can hold is 7000 shares. The maximum quantity of any order entered in MSFT is 500 shares.To set up symbol limits:1. Right click in the window and select “Add” or click the “Add” button on the bottom of the screen. The Add symbolControl screen pops up.2. Enter a symbol.3. Select from the following limits:Max Position: The total shares an account may hold of the selected symbol.Max Position Value: The total dollar value the account may hold of the selected symbol.Max Order Quantity: The total share amount that can be traded at one time in the account.Max Order Dollars: The total dollar value allowed for each order.Max Open Orders Per Side: Total number of open buy or sell orders allowed at any given time.Day Multiplier: If the account is using Buying Power Control, you can give the account a lower multiplierspecifically for the selected symbolNight Multiplier: Same as Day Multiplier.4. Click OK. The parameters selected above (For IBM) now appear under the symbols tab.The account can hold $15,000.00 worth of IBM and each order may be only up to 200 shares.5. A manager could set limits for ALL symbols by entering * in the symbol box of the Add Symbol Control screen.RISK (OPTIONS) – The additional settings this tab lets a manager control are specific to options. You can set a maximum number of contracts an account can hold (applies to all option contacts) and a max order quantity, give an account the ability to sell to open and enter simultaneous buy and sell orders on the same symbol.ROUTING – Select which routes to give an account by checking the box next to the corresponding destination.RISK (FUTURES) – Control margin, max loss, and minimum balance for futures. These features are similar to the controls under Risk III (Equities) tab. For futures trading, there is no buying power with multiplier. There is only the Margin Control option.CONTRACTS – Control the margin requirements, maximum position, and maximum quantity for futures contracts. This window functions the same as the equities “Symbols” window.To add a contract1. Click the “Add” button on the bottom left of the screen. The Add Contract Control screen pops up (see followingpage).2. Enter a contract root, such as ES.3. The current margin populates automatically. You can then select the Margin% desired (Margin% is thepercentage of the margin requirement per the exchange for that product). 4. Select a max position and max quantity per order, if desired.5. Click OK. The contract shows up in the Contracts screen. Please note, you must check Enable Position Limitand Enable Order Size Limit shown above to set those in the Add Contract Control screen.DELETE ACCOUNT – To delete an existing account, right click on the account row and select “Delete Account”.DATA COLUMNSThere are many more columns available to view in the Account List window once you have completed adding accounts.This is a small sampling of data you might want to see when checking how your accounts are set up. The Attributescolumn is similar to the Trader List Attributes column. The letters are explained at the end of this guide. Or you can click on the “View” menu and select Account Attributes Legend.Both the Trader List and Account list are primarily to show you what accounts you have and the settings for those accounts. Real-Time risk is managed from the Main Menu of Sterling Trader® Manager.CHAPTER 3 – MAIN MENUThe Sterling Trader® Manager Main Menu is your gateway to the management functionality available in the platform. The window consists of the menu headings, the icons for opening trading windows, and the list of current accounts formonitoring risk.This Chapter will only be concerned with the menu headings and other general functionality. Using the Main Menu in a risk control environment will be the key to Chapter 4.Please note, the icons beneath the menu headings are quick links to open the trading windows found under the“Windows” menu. Those windows are the same as those found in Sterling Trader® Pro. Please review the Sterling Trader® Pro user guide for the functionality of those windows. The only exceptions are the Group Risk and Options Risk windows. Group Risk is available only in Sterling Trader® Manager and Options Risk is not discussed in the Sterling Trader® Pro user guide.The rest of this chapter will flow as follows,1. Individual menu headings2. Group Risk3. Options Risk4. Special features of the Position Summary and Trading Monitor windows in Sterling Trader® Manager.MENU HEADINGSThere are six menu headings , Actions, Filter, Edit, View, Windows, and Help. Each provides valuable functionality in the Main Menu.ACTIONS MENU – The “Actions” menu features the links to create or restore a backup of your current settings or restore a backup, or manage the open windows. Please see below.If you create a backup of your settings, we recommend saving to a folder not related to Sterling Trader® Manager. FILTER MENU – In this menu you can remove current filters on the account list, save the current filter, or load a previously saved filter.Filters are criteria you choose to select what data you will view within a window, in this case the Main Menu. You select filter criteria by column. For example, if you had more than one group, you could filter by the Group column to view one particular group only. Or you could filter by the $Total P/L column by filtering out all positive numbers, so you could see only the accounts currently with a negative P/L. However, you can’t create a new filter from this menu because the filters are created by column. Therefore, you may find it more convenient to disregard the “Filter” menu in favor of right-clicking on a column heading, which will give you the same options of the “Filter” menu PLUS the ability to create a new filter based on that column. Here is the pop-up menu if you right click on a column heading.Please see the following page for examples on how to create a new filter.To create a filter:1.In this example, we will filter by $Unreal (Unrealized P/L). First, right click on the $Unreal column.2. Select “Add/Edit Filter”. The add/edit screen pops up.3. In this example we selected a condition where $Unreal is <= -200 are the only values that will show in thewindow. Notice that this filter is by Value. That is because the $Unreal column is a number column. Columns with text in them will allow you to filter by specific text or preset List. 4. After you have chosen the condition, click Filter.5. Your window will now be filtered by your condition (see next page).The accounts now showing are only the accounts with an unrealized P/L of less than or equal to -200 ($200.00 loss).EDIT MENU – In the “Edit” menu you can copy all or selected data in the main menu window to clipboard. That data can then be pasted to another application, such as Excel.VIEW MENU – Available options in the “View” menu depend on what you are permissioned for. Here is a rundown of themenu and a brief description of each link.Login Status will list all your users and their log in status, including what software version they are on, if they are logged in, and, if not, when they last logged in. In this case TRADER ABC is on version 5.3.4 and is currently logged in. By clicking the Logout button on the bottom right, TRADER ABC can be logged out of the platform.Easy-To-Borrow Lists – There are two choices, Maintenance and Reload. Reload allows you to select a currentETB list and reload it. Maintenance, shown on the next page, allows you to update a list for a specific symbolExecution Destinations – Lists all the routing options available to your firm. New destinations can be added by clicking the “Add” button.Commission Schedules – Lists all commission schedules on file with a description of each one, including any group the rate is assigned to. You can add a new commission schedule by clicking the “Add” button in the Commission Schedules screen and selecting the desired ratesInterest Rates – Shows the current interest rate. It is not a real-time function, so the data can be manually updated.Spreads – Create spreads to monitor the price difference between two stocks or option contracts. Please see the Sterling Trader® Pro user guide for this functionality.Symbol Lookup – Look up a symbol by company name, or a company name by symbol.Settings – Brings up the Global Order Entry settings. These settings are exactly the same as the settings in Sterling Trader® Pro, with two exceptions. Those exceptions are listed below. Please consult the Sterling Trader® Pro user guide for the remaining Global Order Entry settings.Please note, Hot Keys do not function in Sterling Trader Manager, so that screen is grayed-out.The special Global Order Entry settings for Sterling Trader® Manager are in the Manager folder in the settings menu. The settings screens are “General ” and “Highlighting”. General is shown below.In the General screen you can set what columns you want to see in the Main Menu. Simply check or uncheck the box next to the desired column. You can also select the color scheme and other visual options, as well as the Double-click event setting. Please note the settings for updating Manager. The update times are important as you will be viewing client account balance data, so you need to set the update time to a time you are comfortable with. For column descriptions, please see Exhibit A.Highlighting – A risk management tool.There are several options for highlighting for risk. Above you will see options to highlight rows or columns based on percentages of buying power used and loss sustained. If an account meets any of the percentages you set, they will behighlighted in the specified color on the main menu.Server Info keeps track of what IP and Port you are connected to should you run into a technical issue and need to call support.WINDOWS MENU – The “Windows” menu offers the same direct access real-time trading screens as the windows menu in Sterling Trader® Pro, except that the data applies to all accounts linked to the Manager. So, a position summary window will list all the positions of every account linked to that Manager, a trading monitor will show all trades for all accounts. Please consult the user guide for Sterling Trader® Pro for the basic functionality of these windows. The exception is the Group Risk window, available in Sterling Trader® Manager, and some extra features in Trading Monitor and Position Summary. Group Risk is discussed next. Trading Monitor and Position Summary will follow in a later chapter.GROUP RISKThis window gives you a snapshot of buying power currently being used on a group level. In the Sterling risk system, accounts are assigned to groups. One firm may have several groups of accounts. In the Main Menu window, you see all the accounts individually. In the Group Risk window, you view whole groups on one line. You can combine more than one group into a group risk entry.When you first bring up the Group Risk window, it will be blank. Click on the actions menu and select “Add Group” to start adding groups to the list.The Master Group Setup window pops up with the groups you can choose from. In this example, there are two test groups.To set up a new Master Group:The columns shown above are the only columns available in the Group Risk window. They are:Master Group – The groups you have created.$Buying Power – Total buying power for the group as assigned in the Master Group setup window. As areminder, the buying power here is not enforced on the accounts in the group, it is for monitoring purposes only.$BP Used – The total buying power currently being used.$Max BP Used – This number reflects the largest amount of BP used on the day. So, if the $BP Used currentlyis 29K, but earlier in the day the group had 200K in use at one time, than 200K would show in the $Max BP Used column.%BP Used – The percent of the total BP that is currently being used.$Real – Realized Profit / Loss.Total Qty (Total Quantity) – Total shares bought and/or sold short intraday (does not include previous day’strades).In the “View” menu you can select Settings to set the criteria for highlighting a Master Group.Now, any Master Group will highlight if Warning or Critical percentage is met.OPTIONS RISKOptions Risk looks at stocks and the option contracts that have been bought or written against those stocks as a whole position. This information is used to enable an auto-hedge function. Take a look at the below example.Accounts JETEST1 and JETEST2 hold 300 shares of IBM each. However, the Position Delta is very different for each account. If you right-click on the first IBM position, you can select Details from the pop-up menu. The Position Summary window pops up for this position. As you can see, this account is long 3 IBM calls. So, both IBM and the calls IBMGB are factored in to the one-line quote in Options Risk.The account JETEST2 has written 3 covered calls against their IBM position, which is why the position delta differs from the IBM position that also carried 3 long call options. The difference in these strategies corresponds to the difference in Pos Delta and the P/L numbers.These option positions are bundled with the underlying stock in the Options Risk window to give the manager a complete overview of the entire position. The columns shown above in the Options Risk window are the total columns available with the exception of AH (Auto-Hedge, which, by design, does not function on Manager). They can added or removed from the “View – Settings” menu.POSITION SUMMARY and TRADING MONITOR SPECIAL FEATURESThis section is a quick look at the special features available in Sterling Trader® Manager Position Summary and Trading Monitor windows. These features allow you to adjust individual positions and trades and are only available in the right-click pop-up menu. These are the functions:Position Summary – Opening PositionTrading Monitor – MaintenanceTrading Monitor – Maintenance Close SelectedOpening Position – Allows you create a new position or adjust a current one. To create a new opening position:1. Right click on any position and select “Opening Position – Create” from the pop-up menu. The Create OpeningPosition screen pops up.2. Select the account.3. Enter the Symbol, Instrument, Opening Position quantity, and Opening Price (Mark to MKT not necessary).4. Click OK and the new position will show up in the Position Summary for the selected account.。
INSIGHT操作说明书1

Insight软件操作说明及注意事项BMS系统Insight操作说明及注意事项一、操作步骤1、开机步骤:显示器电源保持常开,打开主机电源开关,计算机自检后将自动进入NT或WIN2000系统,出现登录提示信息后,同时按下“Alt”+“Ctrl”+“Delete”后,输入用户名和密码后按“Enter”键,自动进入NT或WIN2000系统,并按照图一双击BA系统软件Apogee Insight(MAIN)。
BA操作NT或WIN2000 用户名:abc密码:abc双击图一Insight启动完毕后,在屏幕的右上方将出现一条带状图标,即为Insight主菜单。
鼠标单击“Graphic”图标,如图二所示。
图二操作员请按照图二中箭头所指位置点击”G raphics”菜单,默认Insight图形即可打开。
图三显示楼控系统主操作界面,该系统包括新风机组、11台空调机组、冷水机组,以及冬夏季节转换。
图三操作员进入主操作界面后,逐一检查各设备运行情况,并通过点击相关链接点进入其他图形。
2、关机步骤:单击Insight带状菜单条的左上方,出现下拉菜单(如图四),选中Exit后单击,先退出Insight;然后点击屏幕左下角的“开始”按钮,选择“关机”,再选择“关机”,系统即会自动关机。
图四二、操作图例说明1、冷水机组如图五所示1图五冷冻站设备系统监测和控制的范围如下监视内容:冷冻机运行状态、故障;冷冻/冷却水泵运行状态、故障、手/自动点;冷冻/冷却蝶阀状态,冷冻供/回温度、供/回水压力、冷冻水流量;冷却水供/回水温度、供/回水压力;冷冻系统供/回水压力。
控制内容:冷冻机启停控制、冷冻/冷却水泵启停控制、冷冻/冷却蝶阀启停控制冷冻供/回水平衡阀调节。
说明:现场DDC控制器监控上述各参数,并经网络系统上传到计算机主站在显示器屏幕上显示,冷冻系统运行时应严格按照开机/关机流程操作,确保须运行的冷水机组蝶阀开启;DDC实时采集到冷冻系统供/回水压差和用户设定的供/回水压差设定值进行比较,按照控制程序实现对冷冻平衡阀自动调节,保持系统压差平衡。
Sterling 软件设置说明
蓝色为系统功能快捷键
自设下单快捷键
添加或编辑快捷键可以自设下单快捷键。 在添加自己的快捷键之前删除所有默认快捷键。 股数、价格、账户、Time in Force、Display Quantity、Mode均选择Default即可
股数: 股数: Default:Equities菜单设置的默认股数 : 菜单设置的默认股数 Current:当前 :当前Level II中的股数 中的股数 Open Pos:当前进仓相同股数 : Half Pos:当前进仓一半股数 :
Settings-General-General 设置-常规-常规
进入软件时: •载入上次关闭时的布局; •载入自己设定的布局设置 (Layout)。 报价 小数点后的位数: 小数点后的位数:若做 NSDQ小股票则选择 位, 小股票则选择4位 小股票则选择 其他选择2位即可 其他选择 位即可 未实现利润的显示方式, 非期权:选择 选择Bid/Ask 选择 Price
Activity Log 纪录 Notification Log 通知纪录
Trading Monitor 交易监视窗口 Trade Summary 交易一览 Position Summary 仓位一览
Chart 图表 Time and Sales 成交窗口
News 新闻窗口 Alerts 警报窗口
Clock 时钟 Messenger 消息
Executions 执行窗口,显示已执行的单子,在Settings中将 执行窗口,显示已执行的单子, 中将 Executions中显示的 中显示的Column中的 中的Acct去掉,添加Liq 去掉,添加 中显示的 中的 去掉 (Liquidity) )
Position Summary 仓位一览
泰格软件使用手册

泰格软件商霸管理系统用户手册.前言泰格商霸管理系统可以有效的帮助企业对物流、资金流和信息流进行集成管理,做到内部网络和互联网络的高度统一,实现企业从数据-信息-决策-控制的完善管理,为企业管理决策提供及时和科学的依据。
泰格商霸管理系统不仅可以帮助客户快速有效地管理仓库、存货、进货、批发、零售、应收款、应付款、合同、供应商、客户等各项业务,还可以帮助商业企业合理控制进销存各个环节,降低库存成本和管理成本,提高资金的利用率和结算速度,实现管理的高效率、实时性、安全性、科学化、智能化。
泰格商霸管理系统的推出,不仅凝聚了泰格全体工作人员的心血和智慧,同时也有众多的泰格产品用户为此付出的努力,但有可能存在不完善的地方,希望广大的用户提供更多的宝贵意见,以待今后的版本中进一步的改进和提高,更好地满足用户的需要。
在此,对所有支持泰格公司的朋友以及广大用户表示衷心的感谢!(泰格公司保留使用手册的解释权及软件更新权利)目录第一部分系统概述 (1)第二部分后台业务管理 (3)第一章系统通用操作 (3)第二章系统设置 (16)第三章基本信息 (26)第四章进货管理 (45)第五章批发管理 (54)第六章仓库管理 (61)第七章财务管理 (73)第八章卖场管理 (78)第九章联营管理 (105)第十章总经理查询 (109)第十一章系统管理 (111)第十二章工资管理 (115)第十三章配送管理 (119)第十四章连锁分店业务管理 (127)第十五章二代机接口模块 (129)第三部分前台POS收银管理 (130)第一章POS前台系统设置 (130)第二章税控设置 (135)第三章功能键介绍 (137)第四章商品销售 (139)第五章付款方式 (144)第六章会员卡 (146)第七章查询交易/重新打印小票 (148)第八章前台盘点 (149)第九章前台销售日结 (149)第一部分系统概述首先感谢您购买并使用泰格软件,本系统共分为两部分:前台POS销售系统,和后台业务管理系统。
Sterling软件中S-STOP和T-StOP的用法
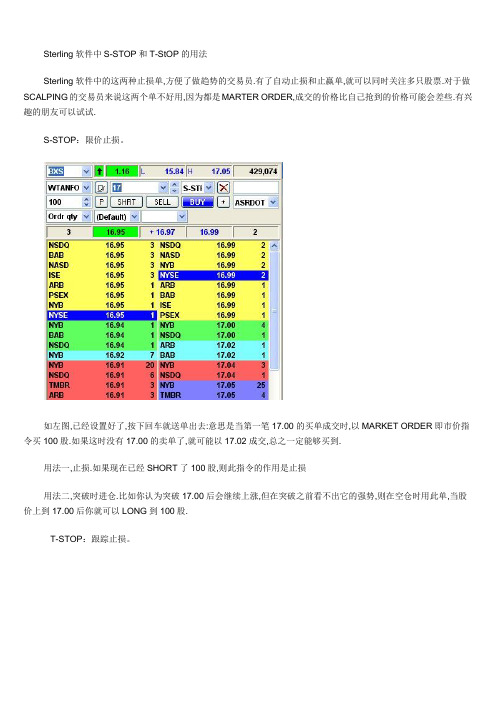
Sterling软件中S-STOP和T-StOP的用法Sterling软件中的这两种止损单,方便了做趋势的交易员.有了自动止损和止赢单,就可以同时关注多只股票.对于做SCALPING的交易员来说这两个单不好用,因为都是MARTER ORDER,成交的价格比自己抢到的价格可能会差些.有兴趣的朋友可以试试.S-STOP:限价止损。
如左图,已经设置好了,按下回车就送单出去:意思是当第一笔17.00的买单成交时,以MARKET ORDER即市价指令买100股.如果这时没有17.00的卖单了,就可能以17.02成交,总之一定能够买到.用法一,止损.如果现在已经SHORT了100股,则此指令的作用是止损用法二,突破时进仓.比如你认为突破17.00后会继续上涨,但在突破之前看不出它的强势,则在空仓时用此单,当股价上到17.00后你就可以LONG到100股.T-STOP:跟踪止损。
按左图(注意股价的地方填的是跟踪价差,此处是5分钱)送出单后,不会即时成交:比如你下单的时候成交了一笔16.92的单子.则这个单就是当股价涨到16.97时以市价买进100股.当股价跌到16.90时,买入价自动调整到16.95;当股价上涨时,买入价保持不变.用法:止赢.如果你在17.00SHORT了100股.左图这个单当前止赢价格就是16.97.如果股价下跌到16.80,则止赢价自动调整到16.85,锁定15元的利润.注意:设置止赢时价差很重要,否则很可能你看对了趋势,结果却被晃出去了.止损单的type是s-stp;止损单虽然是挂单,但它属于打单成交,扣费的;止损单不存在优先成交等级,它只是程序对成交数据的检测后然后迅速实施行动的程序机械反映;与其他ecn通道的挂单一样,ecn选择上随意,个人选择的原则是成交最快的----止损单的原则是保证一定成交,打单成交,但它不保证成交价格和止损单上指定的价格一致,有时候会低一点又时候会高一点,但不会有太大的误差;止损单功能只是一个工具,它本身无所谓什么对与错。
Insight 操作说明解析
12 点选”设置“ 阈值模式 ---- 改为手动 斑点阈值 ---- 根据现场状况设定,凡是高于该设定值的区域才能被查找到。 斑点颜色 ---- 选择白色,表示是在黑色区域里面查找白色的斑点 边界 ---- 选中,表示已查找框的边界开始算起 最小区域 ---- 很据现场设置到合适的一个值 最大区域 --- 设置无限大 假设斑点区域面积为X, 也就是说当 最小区域<X<最大区域时候,面积为X的斑 点才能被查找到。
8 设置图案工具 合格阈值 在之后拍得的图像中,超过该值为查找正确。 旋转公差 设定可允许的旋转角度,本项目产品几乎无旋转,可放到3度以下 水平偏移 本项目忽略 垂直偏移 本项目忽略 模型类型 可选择边模型,可区域模型。本项目建议使用区域模型。
9 点选”检查部件“
10 选择”存在/不存在工具 选择斑点工具 双击确定。即在图像中出现区域框,拖动该框至需检查的区域上。
软件操作 1. 点选桌面的软件图标---In-sight Explore
2. 打开软件如下图
3. 点击 ----查看----INSIGHT网络----点选已连接相机
4. 如果电脑已经连接相机,在INSIGHT网络中则有相机存在,双击该相机进入编辑 界面。
界面简介
1 任务栏界面 2 图形操作界面
3 操作步骤 4 图形显示 5 参数编辑区域
本项目检测工具编辑
1 点选“已连接”按钮 2 双击相机选择连接到相机
打开相机1050的编辑界面
3 点选设置图像
出现“采集/加载图像”对话框
可用来触发拍照或者看实况图像
以及从电脑中加载已保存的图像
- 1、下载文档前请自行甄别文档内容的完整性,平台不提供额外的编辑、内容补充、找答案等附加服务。
- 2、"仅部分预览"的文档,不可在线预览部分如存在完整性等问题,可反馈申请退款(可完整预览的文档不适用该条件!)。
- 3、如文档侵犯您的权益,请联系客服反馈,我们会尽快为您处理(人工客服工作时间:9:00-18:30)。
- e.g.:
TT– TRADER
SS– SHORT
CC– CASH
AA– ACCOUNT
C– CLO
L– STP LMT
R– S-STP LMT
S– STOP
T– T-STP
V– S-STP
D– DAY
E– EXT
G– GTC
I– IOC
N– NOW
O– OPG
X– GTX
A– ARCA
B– BATS
.Expanded View模式就变成下图的样子了.
Sterling Trader Pro可以同一时间开启多个
Level 1 Order Entry的窗口.事实上,系统不会限制交易员开启Level 1 Order Entry的窗口.但是,交易员可以开启多个Level 1 Order Entry的窗口,然后把它们缩小,放在电脑屏幕上.
如果交易员要恢复被自己去掉的选项,可以右击Level 1 Order Entry的窗口,然后单击“VIEW” ,选择自己想恢复的选项就行了.操作过程如下图所示.
.如果交易员选择”VIEW “里的Quote Bar ,然后单击自己想要的资料.
,
上图所示的资料只是很小的一部分.其全部资料如下:
Sym –股票代码
在这里,交易员可以选择Level 1窗口资料显示栏里重点强调的资料的.虽然它有显示size, Bid price, Last price, Ask size, Ask price.但是,通常我们建议交易员工选择Bid price和Ask price就行了.
Miscellaneous
Number of decimal places:
CS–CSCO
A– Ask/Offer
B– BID
C– MKT CLO
D– OpB
E– CLO
K– OpA
L– LAST
M– MKT
P– PEG
Y– YCLO
Account:
Price Type:
Tif (Time-in-Force):
Destination:
First letter displays full Account Name
Close –之前交易日的收市价格
Trd/Sz 1 –未知数
Trd/Sz 2 –未知数
Trd/Sz 3 –未知数
OpnChg –股票最新的交易价格与当天开市价的价格差距
% OpnChg –股票最新的交易价格与当天开市价的价格差距百分比
Opg Bid –未知愿买价,但是当前市场还没执行此价格.
Opg Ask –未知愿卖价,但是当前市场还没执行此价格
“Quick Fill” - Order Entry Keystrokes - by Category:
Side:
Quantity:
Symbol:
Price:
B –BUY
C –BUY CVR
E –SSHRT EX (Sell Short Exempt)
M –BUY- (Buy on down-tick)
C– CHX
E– EDGA
K– TRAC
M– AMEX
N– NY/AM
P– PIPE
R– RDOX
S– SRDOT
T– TRAC
V– VFILL
W– ARCA=
X– NYSE+
Y– NYSE
=– ARCA=
[– [MULTI]
Linking Windows链接窗口
LINKING可以实现四个窗口的链接,这四个窗口分别是Level ILevel IIOrder Entry,Time and Sales ,Chart.交易者可以任意选择这四个或者其中的几个窗口建立链接关系.当这种关系一建立的话,系统会自动给出一个编号.这个编号是根据这种关系建立的时间先后来给出的.如果某些旧编号的窗口链接加进了新的窗口,那么这个新组合的编号也相应地变成新的编号了.窗口链接的编号通常是作为插入成分显示在标题栏里,即股票代码的右侧.
Last –Leabharlann 近订单的交易价格Chg –当前价格与前个交易日
Bid –当前市场最好的愿买价格
Ask –当前市场最好的愿卖价格
Size –订单的股数(通常是100的整数倍)
High –市场当天交易中最高的交易价格
Low –市场当天交易中最低的交易价格
Vol –股票的成交量
% Chg -最新的交易价格与之前交易日的收市价的变动百分比
设置Level 2订单窗口,请按如下步骤:View -> Setting...
在General这一栏,交易员可以设置颜色, Level 1订单窗口的设置.具体设置功能如下:
Colors
在这一栏里,交易员可以设置颜色.系统默认的设置是比较柔和的颜色.
Columns
这里,交易员可以选择显示在Level 2.订单窗口的资料.
Bid Sz –愿意以愿买价成交的股票的股数(通常是100的整数倍)
Ask Sz –愿意以愿卖价成交的股票的股数(通常是100的整数倍)
通常来说,我们以下图中的模式来设置Quote Bar
“Expanded”模式所含的资料比“Quick”模式多.比如说
特殊的订单设置:AON,DNI,DNT.
订单价格类型:STP , STP LMT, S-STP,S-STP LMT, T-STP和“无”
当交易员点击“START”时,立刻会出现同一股票的链接代码.你可以任意链接你想要的窗口.这样做就使系统明白这些窗口是要一起出现的.同时,你可以在这些窗口的标题栏上看到这个链接关系的编号.在下图的例子中,它所生成的编号就是3了.当你完成这个链接过程后,请点击Actions -> Link Windows -> Stop.
P –SELL+ (Sell on up-tick)
T –SSHRT (Sell Short)
S –SELL
H–Hundreds
M–One Thousand
K–Thousands
First letter displays nearest symbol - e.g.:
I–IBM
IN–INTC
C–CPQ
如果交易员想把模式转换成“Quick”模式,只需点击工具栏的'VIEW” ,然后再点击“QUICK”,就可以
转成如下图所示的“Quick”模式了.
如果交易员把”VIEW”里的某些选项(Title Bar, Menu Bar, Status Bar and Quote Bar)去掉的话,那么
Quick View模式就变成下图的样子了.
.在同一编号的链接窗口里,当交易员改变其中一个窗口的股票代码,其它窗口里的资料也会相应地转变成新的股票代码的资料.
当交易员想去掉链接某些窗口时,打开想去掉窗口的页面,按如下程序进行即可:ActionsLinkWindowsRemove from Group.
同样的道理,如果交易员想把同一编号的链接窗口加入其它的窗口时,按下面程序进行即可:
在Level II窗口,交易员可以选择对数据的设置,具体设置如下:
Level II
Display Level II quotes: .如果选择这项,交易员就只能看到书了,看不到ECN ,证券市场和市场中心了.这个选项我们可以不理.
Display time with seconds: .如果选择这项,数据的出现时间以HH:MM:SS形式出现.如果不选,数据出现的时间则以HH:MM的形式出现.
当交易员进入到SETTING的页面时,可以看到下面的图.我们首先从Level 1 OE (Level 1 Order Entry)讲起.
交易员可以选择Open a Time and Sales window and a Chart window upon startup和Automatically link upon opening.这样一来,当交易员开启Level 1 Order Entry的窗口时,就可以自动开启相应的T&S和
MMID–做市商身份代码.选择这项交易员可以看到NYSE, EDGX, BAB之类的符号.
Images– .选择这项,交易员可以给书比如, Arca (ARB), BATS (BAB), EdgA (EAB), EdgX (EXB),标上”书本”的图案.交易员可以给市场中心(比如,证券市场,ECN).标上”闪电”的图案.至于没有图案的则是做市商了.
Price– .选择这项,交易员可以看到当时最好的愿买价和愿卖价.
Size–股票的股数.通常是100的整数倍.
Time– MMID里最新订单的发送来的时间.
There在这里,我们建议交易员只选择Columns里最有价值的MMID, Price and Size就行了.
Level 1 bar highlighting
在Add to Group的窗口里,交易员可以看到下面的图,这里,选择数字5就行了.
Setting Up Automatic Linking Using Global Order Entry Settings:
鉴于交易员各自的情况不同.系统还提供一种自动建立链接的设置.这就是Global Order Entry Settings.有了这个设置后,每当有新的Level IOrder Entry或者Level II Order Entry窗口开启时,系统就会自动开启相应的Chart,Time and Sales.而且可以实现各个窗口之间的链接转换和退出..如下图所示,在系统的工具栏上,交易员按照以下程序进行即可:View -> Settings…