Android中利用画图类和线程画出闪烁的心形
Android特效专辑(八)——实现心型起泡飞舞的特效,让你的APP瞬间暖心讲解
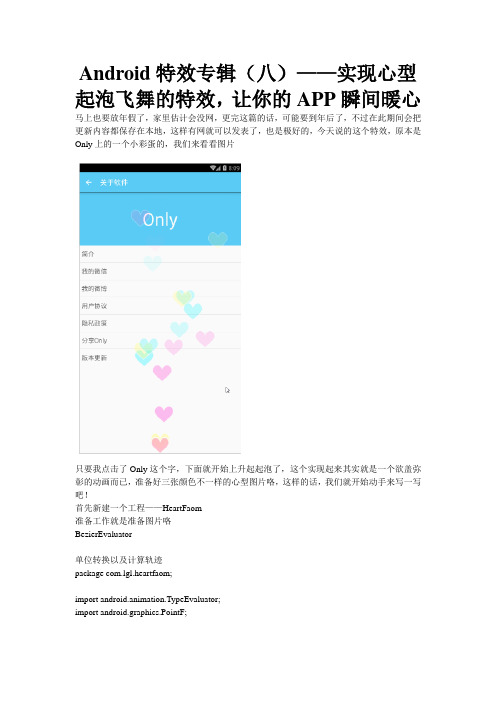
Android特效专辑(八)——实现心型起泡飞舞的特效,让你的APP瞬间暖心马上也要放年假了,家里估计会没网,更完这篇的话,可能要到年后了,不过在此期间会把更新内容都保存在本地,这样有网就可以发表了,也是极好的,今天说的这个特效,原本是Only上的一个小彩蛋的,我们来看看图片只要我点击了Only这个字,下面就开始上升起起泡了,这个实现起来其实就是一个欲盖弥彰的动画而已,准备好三张颜色不一样的心型图片咯,这样的话,我们就开始动手来写一写吧!首先新建一个工程——HeartFaom准备工作就是准备图片咯BezierEvaluator单位转换以及计算轨迹package com.lgl.heartfaom;import android.animation.TypeEvaluator;import android.graphics.PointF;public class BezierEvaluator implements TypeEvaluator<PointF> {private PointF pointF1;private PointF pointF2;public BezierEvaluator(PointF pointF1, PointF pointF2) {this.pointF1 = pointF1;this.pointF2 = pointF2;}@Overridepublic PointF evaluate(float time, PointF startValue, PointF endValue) {float timeLeft = 1.0f - time;PointF point = new PointF();// 结果point.x = timeLeft * timeLeft * timeLeft * (startValue.x) + 3* timeLeft * timeLeft * time * (pointF1.x) + 3 * timeLeft* time * time * (pointF2.x) + time * time * time * (endValue.x);point.y = timeLeft * timeLeft * timeLeft * (startValue.y) + 3* timeLeft * timeLeft * time * (pointF1.y) + 3 * timeLeft* time * time * (pointF2.y) + time * time * time * (endValue.y);return point;}}PeriscopeLayout贝塞尔曲线的计算以及气泡的实现package com.lgl.heartfaom;import java.util.Random;import android.animation.Animator;import android.animation.AnimatorListenerAdapter;import android.animation.AnimatorSet;import android.animation.ObjectAnimator;import android.animation.ValueAnimator;import android.annotation.TargetApi;import android.content.Context;import android.graphics.PointF;import android.graphics.drawable.Drawable;import android.os.Build;import android.util.AttributeSet;import android.view.View;import android.view.animation.AccelerateDecelerateInterpolator;import android.view.animation.AccelerateInterpolator;import android.view.animation.DecelerateInterpolator;import android.view.animation.Interpolator;import android.view.animation.LinearInterpolator;import android.widget.ImageView;import android.widget.RelativeLayout;public class PeriscopeLayout extends RelativeLayout {private Interpolator line = new LinearInterpolator();// 线性private Interpolator acc = new AccelerateInterpolator();// 加速private Interpolator dce = new DecelerateInterpolator();// 减速private Interpolator accdec = new AccelerateDecelerateInterpolator();// 先加速后减速private Interpolator[] interpolators;private int mHeight;private int mWidth;private LayoutParams lp;private Drawable[] drawables;private Random random = new Random();private int dHeight;private int dWidth;public PeriscopeLayout(Context context) {super(context);init();}public PeriscopeLayout(Context context, AttributeSet attrs) {super(context, attrs);init();}public PeriscopeLayout(Context context, AttributeSet attrs, int defStyleAttr) { super(context, attrs, defStyleAttr);init();}@TargetApi(Build.VERSION_CODES.LOLLIPOP)public PeriscopeLayout(Context context, AttributeSet attrs,int defStyleAttr, int defStyleRes) {super(context, attrs, defStyleAttr, defStyleRes);init();}private void init() {// 初始化显示的图片drawables = new Drawable[3];Drawable red = getResources().getDrawable(R.drawable.pl_red);Drawable yellow = getResources().getDrawable(R.drawable.pl_yellow);Drawable blue = getResources().getDrawable(R.drawable.pl_blue);drawables[0] = red;drawables[1] = yellow;drawables[2] = blue;// 获取图的宽高用于后面的计算// 注意我这里3张图片的大小都是一样的,所以我只取了一个dHeight = red.getIntrinsicHeight();dWidth = red.getIntrinsicWidth();// 底部并且水平居中lp = new LayoutParams(dWidth, dHeight);lp.addRule(CENTER_HORIZONTAL, TRUE);// 这里的TRUE 要注意不是true lp.addRule(ALIGN_PARENT_BOTTOM, TRUE);// 初始化插补器interpolators = new Interpolator[4];interpolators[0] = line;interpolators[1] = acc;interpolators[2] = dce;interpolators[3] = accdec;}@Overrideprotected void onMeasure(int widthMeasureSpec, int heightMeasureSpec) { super.onMeasure(widthMeasureSpec, heightMeasureSpec);mWidth = getMeasuredWidth();mHeight = getMeasuredHeight();}public void addHeart() {ImageView imageView = new ImageView(getContext());// 随机选一个imageView.setImageDrawable(drawables[random.nextInt(3)]);imageView.setLayoutParams(lp);addView(imageView);Animator set = getAnimator(imageView);set.addListener(new AnimEndListener(imageView));set.start();}private Animator getAnimator(View target) {AnimatorSet set = getEnterAnimtor(target);ValueAnimator bezierValueAnimator = getBezierValueAnimator(target);AnimatorSet finalSet = new AnimatorSet();finalSet.playSequentially(set);finalSet.playSequentially(set, bezierValueAnimator);finalSet.setInterpolator(interpolators[random.nextInt(4)]);finalSet.setTarget(target);return finalSet;}private AnimatorSet getEnterAnimtor(final View target) {ObjectAnimator alpha = ObjectAnimator.ofFloat(target, View.ALPHA, 0.2f, 1f);ObjectAnimator scaleX = ObjectAnimator.ofFloat(target, View.SCALE_X,0.2f, 1f);ObjectAnimator scaleY = ObjectAnimator.ofFloat(target, View.SCALE_Y,0.2f, 1f);AnimatorSet enter = new AnimatorSet();enter.setDuration(500);enter.setInterpolator(new LinearInterpolator());enter.playTogether(alpha, scaleX, scaleY);enter.setTarget(target);return enter;}private ValueAnimator getBezierValueAnimator(View target) {// 初始化一个贝塞尔计算器- - 传入BezierEvaluator evaluator = new BezierEvaluator(getPointF(2),getPointF(1));// 这里最好画个图理解一下传入了起点和终点ValueAnimator animator = ValueAnimator.ofObject(evaluator, new PointF((mWidth - dWidth) / 2, mHeight - dHeight),new PointF(random.nextInt(getWidth()), 0));animator.addUpdateListener(new BezierListenr(target));animator.setTarget(target);animator.setDuration(3000);return animator;}/*** 获取中间的两个点** @param scale*/private PointF getPointF(int scale) {PointF pointF = new PointF();pointF.x = random.nextInt((mWidth - 100));// 减去100 是为了控制x轴活动范围,看效果随意~~// 再Y轴上为了确保第二个点在第一个点之上,我把Y分成了上下两半这样动画效果好一些也可以用其他方法pointF.y = random.nextInt((mHeight - 100)) / scale;return tF;}private class BezierListenr implements ValueAnimator.AnimatorUpdateListener { private View target;public BezierListenr(View target) {this.target = target;}@Overridepublic void onAnimationUpdate(ValueAnimator animation) {// 这里获取到贝塞尔曲线计算出来的的x y值赋值给view 这样就能让爱心随着曲线走啦PointF pointF = (PointF) animation.getAnimatedValue();target.setX(pointF.x);target.setY(pointF.y);// 这里顺便做一个alpha动画target.setAlpha(1 - animation.getAnimatedFraction());}}private class AnimEndListener extends AnimatorListenerAdapter {private View target;public AnimEndListener(View target) {this.target = target;}@Overridepublic void onAnimationEnd(Animator animation) {super.onAnimationEnd(animation);// 因为不停的add 导致子view数量只增不减,所以在view动画结束后remove 掉removeView((target));}}}activity_main.xml布局的实现<RelativeLayout xmlns:android="/apk/res/android"xmlns:tools="/tools"android:layout_width="match_parent"android:layout_height="match_parent"android:background="#000" ><Buttonandroid:id="@+id/btn_start"android:layout_width="wrap_content"android:layout_height="wrap_content"android:layout_centerInParent="true"android:text="飞舞吧!" /><com.lgl.heartfaom.PeriscopeLayoutandroid:id="@+id/periscope"android:layout_width="match_parent"android:layout_height="match_parent" ></com.lgl.heartfaom.PeriscopeLayout></RelativeLayout>MainActivity接着就是怎么去使用它了package com.lgl.heartfaom;import android.app.Activity;import android.os.Bundle;import android.view.View;import android.view.View.OnClickListener;import android.widget.Button;public class MainActivity extends Activity {private Button btn_start;// 心型气泡private PeriscopeLayout periscopeLayout;@Overrideprotected void onCreate(Bundle savedInstanceState) {super.onCreate(savedInstanceState);setContentView(yout.activity_main);// 初始化periscopeLayout = (PeriscopeLayout) findViewById(R.id.periscope);btn_start = (Button) findViewById(R.id.btn_start);btn_start.setOnClickListener(new OnClickListener() {@Overridepublic void onClick(View v) {// 调用添加泡泡的方法periscopeLayout.addHeart();}});}}好,我们接下来就可以运行一下试试实际上的效果了觉得不错的点个赞哦!。
Flutter:如何使用CustomPaint绘制心形

Flutter:如何使用CustomPaint绘制心形“作为程序员其实也有浪漫的一幕,今天我们一起借助CustomPaint和CustomPainter绘制心形,本文将带您了解在 Flutter 中使用CustomPaint和CustomPainter绘制心形的端到端示例。
闲话少说(比如谈论 Flutter 的历史或它有多华丽),让我们深入研究代码并制作一些东西。
”例子预览我们将创建 4 个心形。
第一个没有边界,但其他的有。
img步骤1.通过扩展CustomPainter类来实现一个画笔:class MyPainter extends CustomPainter { // The color of the heart final Color bodyColor; // The col or of the border of the heart final Color borderColor; // The thickness of the border final double bor derWith; MyPainter(this.bodyColor, this.borderColor, this.borderWith); @override void paint(Canva s canvas, Size size) { // The body of the heart final Paint body = Paint(); body ..color = body Color ..style = PaintingStyle.fill ..strokeWidth = 0; // The border of the heart final Paint borde r = Paint(); border ..color = borderColor ..style = PaintingStyle.stroke ..strokeCap = Stroke Cap.round ..strokeWidth = borderWith; final double width = size.width; final double height = siz e.height; final Path path = Path(); path.moveTo(0.5 * width, height * 0.4); path.cubicTo(0.2 * widt h, height * 0.1, -0.25 * width, height * 0.6, 0.5 * width, height); path.moveTo(0.5 * width, height * 0.4); path.cu bicTo(0.8 * width, height * 0.1, 1.25 * width, height * 0.6, 0.5 * width, height); canvas.drawPath (path, body); canvas.drawPath(path, border); }2.使用 CustomPaint 小部件和我们之前创建的画家绘制心形:// Non-border heart CustomPaint( size: const Size(280, 260), painter: MyPainter(Colors.pi nk, Colors.transparent, 0), ),// Hearts with borders CustomPaint( size: const Size(20 0, 120), painter: MyPainter(Colors.purple, Colors.black, 10), ), CustomPaint( size: const Size(200, 240), painter: MyPainter(Colors.red, Colors.redAccent, 5), ), CustomPaint( size: const Size(50, 100), painter: MyPainter(Colors.amber, Colors.indigo , 10), ),最终代码这是main.dart中的完整代码,它生成了上面屏幕截图中显示的很酷的心形:// main.dartimport 'package:flutter/material.dart';void main() { runApp(const MyApp());}class MyApp e xtends StatelessWidget { const MyApp({Key? key}) : super(key: key); @override Widget build(Buil dContext context) { return MaterialApp( // Hide the debug banner debugShowCheckedModeB anner: false, title: 'breeze', theme: ThemeData( primarySwatch: Colors.indigo, ), home : const HomeScreen(), ); }}// Implementing our heart painterclass MyPainter extends CustomPainter { // The color of the heart final Color bodyColor; // The color of the border of the heart final Color borderColor; // The thickness of the border final double borderWith; MyPainter(this.bodyColor, this. borderColor, this.borderWith); @override void paint(Canvas canvas, Size size) { // The body of th e heart final Paint body = Paint(); body ..color = bodyColor ..style = PaintingStyle.fill ..str okeWidth = 0; // The border of the heart final Paint border = Paint(); border ..color = borderC olor ..style = PaintingStyle.stroke ..strokeCap = StrokeCap.round ..strokeWidth = borderWith; final double width = size.width; final double height = size.height; final Path path = Path(); path.m oveTo(0.5 * width, height * 0.4); path.cubicTo(0.2 * width, height * 0.1, -0.25 * width, height * 0.6, 0.5 * width, height); path.moveTo(0.5 * width, height * 0.4); path.cu bicTo(0.8 * width, height * 0.1, 1.25 * width, height * 0.6, 0.5 * width, height); canvas.drawPath (path, body); canvas.drawPath(path, border); } @override bool shouldRepaint(CustomPainter oldD elegate) { return true; }}class HomeScreen extends StatefulWidget { const HomeScreen({Key? ke y}) : super(key: key); @override State<HomeScreen> createState() => _HomeScreenState();}class _ HomeScreenState extends State<HomeScreen> { @override Widget build(BuildContext context) { return Scaffold( appBar: AppBar( title: const Text(''), ), body: Center( child: Column( mainAxisAlignment: MainAxisAlignment.spaceAround, mainAxisSize: Mai nAxisSize.min, children: [ // Non-border heart CustomPaint( size: const Size(280, 260), painter: MyPainter(Colors.pi nk, Colors.transparent, 0), ), // Hearts with borders CustomPaint( size: const Si ze(200, 120), painter: MyPainter(Colors.purple, Colors.black, 10), ), CustomPaint( size: const Size(200, 240), painter: MyPainter(Colors.red, Colors.redAccent, 5), ), CustomPaint( size: const Size(50, 100), painter: MyPainter(Colors.amber, Colors.i ndigo, 10), ), ], )), ); }}参考您可以在官方文档中找到有关 CustomPaint 小部件和 CustomPainter 类的更多详细信息:自定义绘制小部件CustomPainter 类后记您已经学会了如何在不使用任何第三方软件包的情况下从头开始绘制自定义心形。
跳动的爱心代码

跳动的爱心代码<h3>回答1:</h3><br/>Python爱心代码源码是利用Python 语言实现一段可爱的爱心图案代码。
爱心图案是一种流行的爱情符号,其形状象征了爱情中的感情和温暖,具有浪漫而有趣的味道。
下面是Python爱心代码源码: ``` python import turtle def love(x, y): turtle.seth(0) for i inrange(0,135): turtle.forward(1) turtle.right(0.5) turtle.seth(225) for i in range(0,135):turtle.forward(1) turtle.right(0.5) turtle.seth(0) turtle.penup() turtle.goto(x, y) turtle.stamp() turtle.pendown() turtle.setup(width=800, height=600) turtle.speed(10) turtle.color('red', 'pink')turtle.penup() turtle.goto(0, -180) turtle.pendown() turtle.begin_fill() turtle.seth(-30)turtle.forward(220) love(0, 0) turtle.seth(150) turtle.forward(220) turtle.end_fill()turtle.hideturtle() turtle.done() ``` 此代码用到了Python的turtle库,通过语言控制海龟前进的方向和转动的角度,实现了爱心图案的绘制过程。
在程序执行时,还可以展示绘制的过程,从而增强了交互体验。
这个Python程序的颜色和大小都可以自由调整,可以根据不同的喜欢和需求,来调整爱心的形态。
Android绘制图形(转)学习

Android绘制图形(转)学习以前的⽂章⾥边画⼀般都是⼀些矩形,今天就看看怎么在android⼿机屏幕上绘制⼀些⼏何图形,如三⾓形、多边形、椭圆、圆形、正⽅形等等。
并且设置空⼼、实⼼。
下⾯我们先来看看在android中可以绘制出那些⼏何图形[color=#008000] ⽅法说明drawRect 绘制矩形drawCircle 绘制圆形drawOval 绘制椭圆drawPath 绘制任意多边形drawLine 绘制直线drawPoin 绘制点[/color]我们先来看看效果图吧:[align=center][/align][align=left] 下⾯我们就来看看代码是怎么做的:[/align][align=left][b]Java代码:[/b][/align][code]<?xml version="1.0" encoding="utf-8"?><LinearLayout xmlns:android="/apk/res/android"android:orientation="vertical"android:layout_width="fill_parent"android:layout_height="fill_parent"><TextViewandroid:layout_width="fill_parent"android:layout_height="wrap_content"android:text="@string/hello"android:textColor="#00FF00"/><xiaohang.zhimeng.GameViewandroid:layout_width="wrap_content"android:layout_height="wrap_content"/></LinearLayout>[/code][b]Java代码:[/b][code]package eoe.demo;import android.app.Activity;import android.os.Bundle;public class Activity01 extends Activity {@Overrideprotected void onCreate(Bundle savedInstanceState) {super.onCreate(savedInstanceState);setContentView(yout.main);}}[/code]GameView[b]Java代码:[/b][code]package eoe.demo;import android.content.Context;import android.graphics.Canvas;import android.graphics.Color;import android.graphics.Paint;import android.graphics.Path;import android.graphics.Rect;import android.graphics.RectF;import android.util.AttributeSet;import android.view.View;public class GameView extends View implements Runnable {// 声明Paint对象private Paint mPaint = null;private GameView2 mGameView2 = null;public GameView(Context context, AttributeSet attr){super(context,attr);System.out.println(1);// 构建画笔对象mPaint = new Paint();mGameView2 = new GameView2(context);// 开启线程new Thread(this).start();}@Overrideprotected void onDraw(Canvas canvas) {super.onDraw(canvas);// 设置画布为⿊⾊背景canvas.drawColor(Color.BLACK);// 取消锯齿mPaint.setAntiAlias(true);// 设置画笔风格为空⼼mPaint.setStyle(Paint.Style.STROKE);{// 定义矩形对象Rect rect1 = new Rect();// 设置矩形⼤⼩rect1.left = 5;rect1.top = 5;rect1.bottom = 25;rect1.right = 45;mPaint.setColor(Color.BLUE);// 绘制矩形canvas.drawRect(rect1, mPaint);mPaint.setColor(Color.RED);// 绘制矩形canvas.drawRect(50, 5, 90, 25, mPaint);mPaint.setColor(Color.YELLOW);// 绘制圆形// 40 70 分别是圆⼼的X 和 Y坐标 30为半径 mPaint为画笔对象canvas.drawCircle(40, 70, 30, mPaint);// 定义椭圆RectF rectf1 = new RectF();rectf1.left = 80;rectf1.top = 30;rectf1.right = 120;rectf1.bottom = 70;mPaint.setColor(Color.LTGRAY);// 绘制椭圆canvas.drawOval(rectf1, mPaint);// 绘制多边形Path path1 = new Path();/*** 这个多变形我也没试验它到底是怎么画应该就是从起点找点⼀个点⼀个点的连线*/path1.moveTo(150 + 5, 80 - 50); // 此点为多边形的起点path1.lineTo(150 + 45, 80 - 50);path1.lineTo(150 + 30, 120 - 50);path1.lineTo(150 + 20, 120 - 50);// 使这些点构成封闭的多边形path1.close();mPaint.setColor(Color.GRAY);// 绘制这个多边形canvas.drawPath(path1, mPaint);mPaint.setColor(Color.RED);// 设置画笔空⼼边框的宽度mPaint.setStrokeWidth(3);// 绘制直线// 这个绘制直线的⽅法前2个参数是前点坐标后 2个参数是终点坐标我们可看出两个点的Y坐标都⼀样的canvas.drawLine(5, 110, 315, 110, mPaint);}// 绘制实⼼⼏何体// 将画笔设置为实⼼mPaint.setStyle(Paint.Style.FILL);{// 定义矩形Rect rect1 = new Rect();rect1.left = 5;rect1.top = 130 + 5;rect1.bottom = 130 + 25;rect1.right = 45;mPaint.setColor(Color.BLUE);// 绘制矩形canvas.drawRect(rect1, mPaint);mPaint.setColor(Color.RED);// 绘制矩形canvas.drawRect(50, 130 + 5, 90, 130 + 25, mPaint);mPaint.setColor(Color.YELLOW);// 绘制圆形这⾥参数就不说明了上边已经说了canvas.drawCircle(40, 130 + 70, 30, mPaint);// 定义椭圆对象RectF rectf1 = new RectF();// 设置椭圆⼤⼩rectf1.left = 80;rectf1.top = 130+30;rectf1.right = 120;rectf1.bottom = 130 + 70;mPaint.setColor(Color.LTGRAY);// 绘制椭圆canvas.drawOval(rectf1, mPaint);// 绘制多边形Path path1 = new Path();// 设置多边形的点path1.moveTo(150+5, 130+80-50);path1.lineTo(150+45, 130+80-50);path1.lineTo(150+30, 130+120-50);path1.lineTo(150+20, 130+120-50);// 使这些点构成封闭的多边形path1.close();mPaint.setColor(Color.GRAY);// 绘制这个多边形canvas.drawPath(path1, mPaint);mPaint.setColor(Color.RED);mPaint.setStrokeWidth(3);// 绘制直线canvas.drawLine(5, 130 + 110, 315, 130 + 110, mPaint);}// 通过ShapDrawable来绘制⼏何图形mGameView2.DrawShape(canvas);}@Overridepublic void run() {while (!Thread.currentThread().isInterrupted()) {try {Thread.sleep(100);} catch (InterruptedException e) {Thread.currentThread().interrupt();}// 使⽤postInvalidate可以直接在线程中更新界⾯postInvalidate();}}}[/code]在android中还可以通过ShapDrawable来绘制图像,ShapDrawable可以设置画笔的形状。
android开发教程画图避免屏幕闪烁
android画图避免屏幕闪烁在处理一些复杂的界面时,往往要用view,SurfaceV iew来自己处理画图。
比如用SurfaceView 来贴两张图,并控制他们左右平移,基本代码如下:Java代码1Canvasc=null;2try{3c=mSurfaceHolder.lockCanvas(null);4if(c!=null){5 c.setDrawFilter(mFilter);6 c.drawRect(0,0,c.getWidth(),c.getHeight(),mBGPaint);//画背景7 c.drawBitmap(bm1,0,0,null);89 c.drawBitmap(bm2,bm1.getWidth(),0,null);//第二张图画在第一张旁边10}11}finally{12if(c!=null){13mSurfaceHolder.unlockCanvasAndPost(c);14}15}控制它左右平移时,会发现屏幕非常闪烁,眼睛看着会非常累。
研究以后发现,这是因为两张图是依次一张一张贴到屏幕上的,如果刷新频率高的话,会使屏幕非常的闪烁。
解决的办法其实非常简单,想起windows下开发解决画图闪烁的办法,先把要画的图先画好放在一张大的内存位图上,然后一下贴到屏幕。
Android其实也是一样的,上面的问题解决方法如下:Java代码16finalBitmapmemBm=Bitmap.createBitmap(screenWidth,screenHeight,Bitmap.Config.RG B_565);1718finalCanvasc=newCanvas(memBm);1920 c.setDrawFilter(mFilter);21 c.drawRect(0,0,c.getWidth(),c.getHeight(),mBGPaint);//画背景22 c.drawBitmap(bm1,0,0,null);2324 c.drawBitmap(bm2,bm1.getWidth(),0,null);//第二张图画在第一张旁边2526Canvasrender=null;27try{28render=mSurfaceHolder.lockCanvas();29if(render!=null){30render.drawBitmap(memBm,0,0,null);31}32}finally{33if(render!=null)34mSurfaceHolder.unlockCanvasAndPost(render);35}3637memBm.recycle();//记得回收内存位图这样处理后,view刷新将变得平滑,眼睛看着舒服多了。
心型绘制操作方法

心型绘制操作方法
心型可以用简单的几何形状和曲线来绘制。
下面是一种绘制心型的简单方法:
1. 准备一张纸和一支铅笔。
2. 在纸上选一个适当的位置,用铅笔画一个倒置的等边三角形。
这会是心型的底部。
3. 从三角形底部的中心点开始,向上画一条弧线。
这会是心型的左侧。
4. 从三角形底部的中心点开始,向上画另一条弧线,与第三步的弧线相交。
这会是心型的右侧。
5. 检查心型的对称性和比例,做适当的调整。
6. 在绘制出的轮廓上,用铅笔加粗描绘,使心型更加明显。
7. 可以根据个人喜好进行装饰,如填充颜色、加上字母等。
根据个人绘画经验和技巧,也可以通过其他方法来绘制心型,如使用绘图软件、模板等。
c语言跳动爱心代码

c语言跳动爱心代码C语言作为一种广泛应用于计算机编程的语言,不仅可以实现各种功能,还可以用来表达情感。
今天,我想和大家分享一个特别的C语言代码——跳动爱心代码。
首先,我们需要了解一下C语言的基本语法和数据类型。
C语言是一种结构化的编程语言,它使用变量来存储和操作数据。
在C语言中,我们可以使用基本数据类型,如整型、浮点型和字符型,来定义变量。
此外,C语言还提供了一些控制结构,如条件语句和循环语句,来控制程序的执行流程。
接下来,让我们来编写跳动爱心代码。
首先,我们需要使用C语言的图形库来绘制爱心图案。
在C语言中,我们可以使用图形库函数来绘制各种图形。
这里,我们使用了一个简单的图形库函数来绘制一个爱心图案。
```c#include <stdio.h>#include <graphics.h>int main(){int gd = DETECT, gm;initgraph(&gd, &gm, "");int x = getmaxx() / 2;int y = getmaxy() / 2;for (int i = 0; i <= 300; i++){setcolor(i % 15 + 1);circle(x - i / 2, y - i / 2, i);circle(x + i / 2, y - i / 2, i);delay(10);cleardevice();}closegraph();return 0;}```在这段代码中,我们首先使用`initgraph`函数来初始化图形库。
然后,我们使用`getmaxx`和`getmaxy`函数来获取屏幕的宽度和高度,以便将爱心图案绘制在屏幕的中心位置。
接下来,我们使用一个循环来绘制跳动的爱心图案。
在每次循环中,我们使用`setcolor`函数来设置绘制图形的颜色,然后使用`circle`函数来绘制两个圆形,形成一个爱心图案。
带颜色动态的爱心c语言代码

带颜色动态的爱心c语言代码很高兴能够回答这个问题,关于带颜色动态的爱心c语言代码,我想分享一下我的想法。
首先,我们需要了解一下c语言的基础知识,包括变量、循环、条件语句等等。
然后,我们可以使用c语言的图形库来实现带颜色动态的爱心代码。
具体实现方法如下:1. 首先,我们需要定义一个窗口,用来显示我们的爱心代码。
可以使用c语言的图形库,例如graphics.h。
2. 然后,我们需要定义一个循环,用来不断更新爱心的位置和颜色。
可以使用while循环或者for循环。
3. 在循环中,我们需要定义一个变量,用来控制爱心的位置和大小。
可以使用变量i来控制。
4. 接下来,我们需要使用c语言的图形库来绘制爱心。
可以使用圆形和线段来绘制。
5. 最后,我们需要使用c语言的图形库来设置爱心的颜色。
可以使用setcolor函数来设置颜色。
下面是一个简单的示例代码:#include <graphics.h>int main(){initwindow(640, 480, "Love Heart");int i;for (i = 0; i < 100; i++){setcolor(i % 15 + 1);circle(320, 240, i);line(320 - i, 240 - i, 320 - i, 240 + i);line(320 + i, 240 - i, 320 + i, 240 + i);delay(50);cleardevice();}getch();closegraph();return 0;}这段代码可以实现一个带颜色动态的爱心,每隔50毫秒更新一次颜色和位置。
在循环中,我们使用了setcolor函数来设置颜色,使用circle和line函数来绘制爱心。
总之,c语言是一门非常强大的编程语言,可以用来实现各种各样的功能,包括图形界面。
带颜色动态的爱心c语言代码只是其中的一个小例子,希望这个例子可以帮助大家更好地理解c语言的基础知识。
- 1、下载文档前请自行甄别文档内容的完整性,平台不提供额外的编辑、内容补充、找答案等附加服务。
- 2、"仅部分预览"的文档,不可在线预览部分如存在完整性等问题,可反馈申请退款(可完整预览的文档不适用该条件!)。
- 3、如文档侵犯您的权益,请联系客服反馈,我们会尽快为您处理(人工客服工作时间:9:00-18:30)。
Android中利用画图类和线程画出闪烁的心形,送给亲爱的他(她)本文讲解主要涉及的知识点:1.线程控制2.画图类3.心形函数大家先看图片:因为前一段时间在写画图类,刚好有一个线程控制画图闪烁的,我就想说我能不能做一个心形闪烁的,出来的效果就如图,先贴再讲解代码:里面设置两个类,一个是我们的activity类,这个类用来显示示图,然后建一个继承SurfaceView的类,我们在这里面画图。
先贴两个累的代码:主类名:GameMainActivity,画图类类名:Love.1 package com.cz.game.demo;23 import android.app.Activity;4 import android.os.Bundle;56 public classGameMainActivity extends Activity {7 /** Called when the activity is first created. */89 private Love love;10 @Override11 public void onCreate(Bundle savedInstanceState) {12 super.onCreate(savedInstanceState);13 this.love = new Love(this);14 setContentView(love);15 }16 }画图类:1 /**2 *3 */4 package com.cz.game.demo;56 import android.content.Context;7 import android.graphics.Canvas;8 import android.graphics.Color;9 import android.graphics.Paint;10 import android.graphics.RectF;11 import android.graphics.Typeface;12 import android.view.SurfaceHolder;13 import android.view.SurfaceView;1415 /**16 * @author CZ17 *18 */19 public class Love extends SurfaceView implements SurfaceHolder.Callback,20 Runnable {2122 booleanmbloop = false;23 SurfaceHoldermSurfaceHolder = null;24 private Canvas canvas;25 intmiCount = 0;26 int y = 50;28 /**29 * @param context30 */31 public Love(Context context) {32 super(context);33 mSurfaceHolder = this.getHolder();34 mSurfaceHolder.addCallback(this);35 this.setFocusable(true);36 this.setKeepScreenOn(true);37 mbloop = true;38 }3940 /*41 * (non-Javadoc)42 *43 * @see44 *android.view.SurfaceHolder.Callback#surfaceChanged(android.view.SurfaceH older45 * ,int, int, int)46 */47 @Override48 public void surfaceChanged(SurfaceHolder holder, int format, int width,49 int height) {50 // TODO Auto-generated method stub5152 }5354 /*55 * (non-Javadoc)56 *57 * @seeandroid.view.SurfaceHolder.Callback#surfaceCreated(android.view.SurfaceH older59 * )60 */61 @Override62 public void surfaceCreated(SurfaceHolder holder) {63 // TODO Auto-generated method stub64 new Thread(this).start();65 }6667 /*68 * (non-Javadoc)69 *70 *@seeandroid.view.SurfaceHolder.Callback#surfaceDestroyed(android.view.71 * SurfaceHolder)72 */73 @Override74 public void surfaceDestroyed(SurfaceHolder holder) {75 // TODO Auto-generated method stub76 mbloop = false;77 }7879 /*80 * (non-Javadoc)81 *82 * @see ng.Runnable#run()83 */84 @Override85 public void run() {86 // TODO Auto-generated method stub87 while (mbloop) {88 try {89 Thread.sleep(200);90 } catch (Exception e) {91 // TODO: handle exception92 }93 synchronized (mSurfaceHolder) {94 Draw();95 }96 }97 }9899 /**100 *101 * Year:2011 Date:2011-7-27 Time:下午06:52:04 Author:CZ TODO 102 */103 private void Draw() {104 // TODO Auto-generated method stub105 canvas = mSurfaceHolder.lockCanvas();106 try {107 if (mSurfaceHolder == null || canvas == null) {108 return;109 }110 if (miCount< 100) {111 miCount++;112 } else {113 miCount = 0;114 }115 Paint paint = new Paint();116 paint.setAntiAlias(true);117 paint.setColor(Color.BLACK);118 canvas.drawRect(0, 0, 320, 480, paint);119 switch (miCount % 6) {120 case 0:121 paint.setColor(Color.BLUE);122 break;123 case 1:124 paint.setColor(Color.GREEN);125 break;126 case 2:127 paint.setColor(Color.RED);128 break;129 case 3:130 paint.setColor(Color.YELLOW);131 break;132 case 4:133 paint.setColor(Color.argb(255, 255, 181, 216));134 break;135 case 5:136 paint.setColor(Color.argb(255, 0, 255, 255));137 break;138 default:139 paint.setColor(Color.WHITE);140 break;141 }142 inti, j;143 double x, y, r;144145 for (i = 0; i<= 90; i++) {146 for (j = 0; j <= 90; j++) {147 r = Math.PI / 45 * i * (1 - Math.sin(Math.PI / 45 * j)) 148 * 20;149 x = r * Math.cos(Math.PI / 45 * j)150 * Math.sin(Math.PI / 45 * i) + 320 / 2;151 y = -r * Math.sin(Math.PI / 45 * j) + 400 / 4;152 canvas.drawPoint((float) x, (float) y, paint);153 }154 }155156 paint.setTextSize(32);157 paint.setTypeface(Typeface.create(Typeface.SERIF, Typeface.ITALIC)); 158159 RectFrect = new RectF(60, 400, 260, 405);160 canvas.drawRoundRect(rect, (float) 1.0, (float) 1.0, paint);161 canvas.drawText("Loving You", 75, 400, paint);162 mSurfaceHolder.unlockCanvasAndPost(canvas);163 } catch (Exception e) {164 }165166 }167168 }169关于这个程序要讲解的几点:1. 画图的时候你可以继承View,也可以继承SurfaceView,这两者的区别在于:surfaceView是在一个新起的单独线程中可以重新绘制画面而View必须在UI的主线程中更新画面。
SurfaceView可以控制表面的格式,比如大小,显示在屏幕中的位置,最关键是的提供了SurfaceHolder类,使用getHolder方法获取,还有涉及的surfaceCreated(SurfaceHolder holder),surfaceDestroyed(SurfaceHolder holder),surfaceChanged(SurfaceHolder holder, int format, int width, int height)方法,而在SurfaceHolder.Callback 接口回调中可以通过重写来改变这些方法2.程序其实很简单,既然生命了Runnable接口,就有相对应的Run方法,在surfaceCreate()的时候开启线程,线程每隔200ms就刷新一次,这样我们看到的效果就是闪烁的,每200毫秒画一次图,根据经过的间隔时间来设置画笔的颜色,然后通过循环描点,画出心形,然后设置字体大小,画字和字下面的横线。