Logitech
罗技logitech品牌介绍
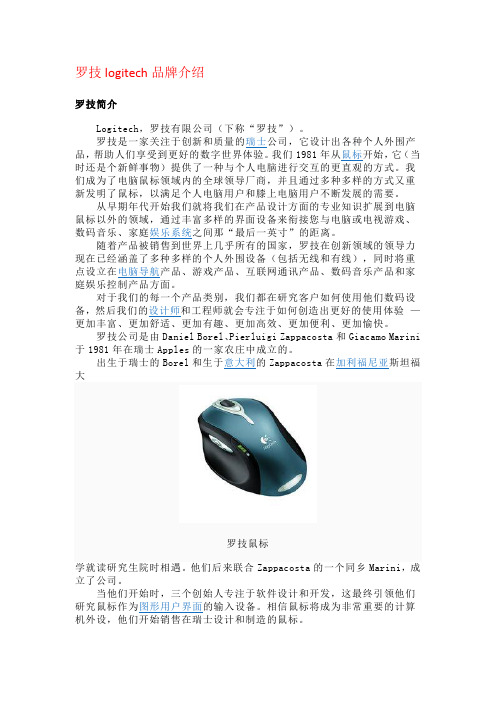
罗技logitech品牌介绍罗技简介Logitech,罗技有限公司(下称“罗技”)。
罗技是一家关注于创新和质量的瑞士公司,它设计出各种个人外围产品,帮助人们享受到更好的数字世界体验。
我们1981年从鼠标开始,它(当时还是个新鲜事物)提供了一种与个人电脑进行交互的更直观的方式。
我们成为了电脑鼠标领域内的全球领导厂商,并且通过多种多样的方式又重新发明了鼠标,以满足个人电脑用户和膝上电脑用户不断发展的需要。
从早期年代开始我们就将我们在产品设计方面的专业知识扩展到电脑鼠标以外的领域,通过丰富多样的界面设备来衔接您与电脑或电视游戏、数码音乐、家庭娱乐系统之间那“最后一英寸”的距离。
随着产品被销售到世界上几乎所有的国家,罗技在创新领域的领导力现在已经涵盖了多种多样的个人外围设备(包括无线和有线),同时将重点设立在电脑导航产品、游戏产品、互联网通讯产品、数码音乐产品和家庭娱乐控制产品方面。
对于我们的每一个产品类别,我们都在研究客户如何使用他们数码设备,然后我们的设计师和工程师就会专注于如何创造出更好的使用体验—更加丰富、更加舒适、更加有趣、更加高效、更加便利、更加愉快。
罗技公司是由Daniel Borel、Pierluigi Zappacosta和Giacamo Marini 于1981年在瑞士Apples的一家农庄中成立的。
出生于瑞士的Borel和生于意大利的Zappacosta在加利福尼亚斯坦福大罗技鼠标学就读研究生院时相遇。
他们后来联合Zappacosta的一个同乡Marini,成立了公司。
当他们开始时,三个创始人专注于软件设计和开发,这最终引领他们研究鼠标作为图形用户界面的输入设备。
相信鼠标将成为非常重要的计算机外设,他们开始销售在瑞士设计和制造的鼠标。
此后不久,他们开始为主要的计算机制造商制造他们自己的鼠标,最终为扩大到整个市场。
数年后,罗技扩大了其生产线、销售地区市场(进入100多个国家)及其运营中心。
五款顶级游戏鼠标品牌推荐
五款顶级游戏鼠标品牌推荐在如今的电子竞技世界中,鼠标无疑是游戏玩家最重要的利器之一。
一款优质的游戏鼠标能够帮助玩家实现精准操作,提升游戏体验。
然而,市面上各种品牌和型号的鼠标琳琅满目,让人眼花缭乱。
在这篇文章中,我将向大家推荐五款顶级游戏鼠标品牌,帮助您在选择游戏鼠标时做出明智的决策。
1. 罗技(Logitech)罗技作为全球顶尖的电子设备制造商之一,在游戏鼠标领域有着极高的声誉。
罗技的游戏鼠标以其高精度的感应器和人体工程学设计而闻名。
无论您是FPS游戏玩家还是MOBA游戏玩家,罗技都有适合各类游戏的专业型号可供选择。
G系列和MX系列是罗技最受欢迎的游戏鼠标系列,因其可靠性和性能而备受赞誉。
2. 罗技G系列游戏鼠标罗技G系列游戏鼠标是罗技专门为游戏玩家打造的产品系列。
它们采用了最先进的技术和创新设计,具有高度可调节的 DPI(每英寸点数)、可定制的按钮和顺滑的滚轮。
罗技G系列游戏鼠标适用于各类游戏环境,并提供了轻松切换和保存配置文件的便利性。
3. Razer(雷蛇)Razer是全球最受欢迎的游戏周边设备制造商之一。
雷蛇的游戏鼠标以其出色的质量和先进的技术而闻名。
雷蛇的产品特点包括高精度的光学传感器、人体工程学设计和可定制的按钮配置。
雷蛇的DeathAdder系列和Naga系列是其最受欢迎的游戏鼠标系列,广受专业游戏玩家的喜爱。
4. SteelSeries(斯蒂尔赛)SteelSeries是游戏设备制造商中的佼佼者,其游戏鼠标以其优质的材料和卓越的性能而闻名。
SteelSeries的游戏鼠标具有出色的耐用性、高灵敏度的感应器、以及舒适的人体工程学设计。
SteelSeries Rival系列和Sensei系列是此品牌的代表作品,均备受好评。
5. Corsair(海盗船)Corsair是一家专注于高性能游戏设备生产的公司,其游戏鼠标以其坚固耐用和卓越性能而备受好评。
Corsair的游戏鼠标采用先进的光学或激光传感器,具有可调节的DPI设置、可编程按钮和舒适的外形设计。
罗技MX Master 2S使用说明书

Step OneDownload Logitech Options to use all the possibilities this mouse has to offer. Todownload and learn more about the possibilities go to /options.Step TwoTurn your mouse on.Step ThreeThis mouse allows you to use it with up to three different computers. Just use the Easy-Switch™ button to change the channel. Select the channel you want and go to the next step.Step FourTo connect your mouse to your computer press the Easy-Switch™ button for 3 seconds.When it blinks fast it means it's in discoverable mode.Step FiveChoose if you want to pair with Bluetooth or with the provided Unifying receiver.Product OverviewMX MASTER 2S AT A GLANCE1 – Speed-adaptive scroll wheel 6 – Darkfield high precision sensor2 – Manual shift button 7 – Easy-Switch & connect button3 – Gesture button 8 – Battery status LED4 – Micro USB port 9 – Thumb wheel5 – On/Off button 10 – Back/forward buttonsFeatures:Speed adaptive scroll-wheelIf SmartShift™ is enabled, the speed-adaptive scroll wheel shifts between two scrolling modes automatically, in response to your touch.∙Click-to-click (ratchet) mode — ideal for precise navigation of items and lists.∙Hyper-fast (freespin) mode — near-frictionless spinning, letting you fly through long documents and web pages.Enable SmartShiftSelect Enable from the SmartShift pull-down menu on the Point and scroll tab.Turn off SmartShift by selecting Disable from the SmartShift pull-down menu.When SmartShift is disabled, spinning or braking the scroll wheel has no effect on the current scrolling mode.Switch modes manuallyWhether SmartShift is enabled or disabled, you can manually switch between modes by pressing the mode shift button.By default, mode shift is assigned to the button on top of the mouse. (Check current button assignments on the Mouse tab.)Set a fixed scroll wheel modeIf you prefer to use just one mode, you can fix the scroll wheel to either click-to-click (ratchet) or hyper-fast (freespin) mode.On the Point and scroll tab, select Ratchet or Freespin from the Fixed scroll wheel mode pull-down menu.IMPORTANT!You can fix the scroll wheel mode only if SmartShift is disabled and mode shift is not assigned to any MX Master button.To activate fixed scroll wheel mode:∙Select Disable from the SmartShift pull-down menu.∙On the Mouse tab, click the highlighted mode shift button and select an action other than mode shift.For more help, see the MX Master 2S FAQ pageThumb wheelScroll side to side effortlessly with a stroke of your thumb.To scroll horizontally:∙Spin the thumb wheel up (to scroll right) or down (to scroll left)Install Logitech Options software to extend thumb wheel capabilities:∙Invert scrolling direction∙Reproduce touch-based gestures∙Adjust scrolling speed and resolution∙Navigate tabbed content∙Switch apps∙Swipe between full-screen apps (Mac only)∙Switch between full-screen apps (Windows 8 only)∙Zoom in and out∙Adjust volume∙Control screen brightness∙Display notifications (Mac only)Gesture buttonGESTURES STREAMLINE NAVIGATION AND DESKTOP MANAGEMENTInstall Logitech Options software to enable gestures for managing media, panning, zoom, and rotation, plus custom tasks.Assign up to five different actions to the Gesture button. Or map gestures to other MX Master buttons, including the middle button or manual shift button.To perform a gesture:Hold down the Gesture button while moving the mouse left, right, up, or down.The figure below shows the gestures for managing windows in Windows 8 and in Mac OS X.Back/Forward buttonsConveniently located at your thumb, the back and forward buttons enhance navigation and simplify tasks.To move back and forward:Press the back or forward button to navigate web or document pages, depending on the location of the mouse pointer.NOTE: On the Mac, enabling of the back/forward buttons requires installation of Logitech Options software.Install Logitech Options software to unlock new capabilities for the back/forward buttonsIn addition to enabling the buttons for use with Macs, Logitech Options software lets you map other useful functions to the buttons, including OS navigation, zoom, dictionary lookup, and more.Battery1 – Charging cableRECHARGE MX MASTER 2SConnect one end of the provided charging cable to the Micro-USB port on the mouse and the other end to a USB power source.A minimum of 3 minutes charging gives you enough power for a full day of use. Depending on how you use the mouse, a full charge can last up to 70 days*.* Based on eight hours of daily use. Battery life may vary depending on user and operating conditions.CHECK BATTERY STATUSThree LED lights on the side of the mouse indicate battery status.Install Logitech Options software to receive battery status notifications, including low-charge warnings.。
logitech options使用方法

logitech options使用方法Logitech Options使用方法Logitech Options是罗技推出的一款强大的软件,用于个性化和优化使用Logitech设备的体验。
通过Logitech Options,用户可以轻松自定义鼠标、键盘和触摸板的功能,以及调整各种设备设置。
下面将详细介绍Logitech Options的使用方法,帮助用户充分发挥设备的潜力。
一、下载和安装Logitech Options1. 在Logitech官网上搜索并找到与您的设备兼容的最新版本的Logitech Options软件。
2. 点击下载按钮,保存安装程序到您的计算机。
3. 打开安装程序,按照提示进行安装。
二、连接设备1. 将您的鼠标、键盘或触摸板与计算机连接,可以通过无线或有线方式连接。
2. 如果是无线设备,请确保设备已经配对成功,并且电池有足够的电量。
三、打开Logitech Options1. 在计算机上找到并打开Logitech Options软件。
2. 如果是第一次打开软件,它会自动检测已连接的设备并显示在软件的界面上。
四、个性化设备功能1. 选择您想个性化的设备,点击设备的图标或名称。
2. 在设备的设置界面上,您可以看到各种可自定义的选项,如按钮功能、滚轮行为、手势等。
3. 点击相应的选项,选择您想要的功能或行为。
您可以重新映射按钮,调整滚轮速度,设置手势等。
4. 在设置界面的左侧,您还可以选择不同的应用程序或场景,以便为每个应用程序或场景设置不同的设备功能。
5. 完成个性化设备功能的设置后,点击保存,您的设备将立即应用新的设置。
五、其他功能和设置1. 在Logitech Options的主界面上,您还可以找到其他一些有用的功能和设置。
2. 在“高级设置”中,您可以调整鼠标或触摸板的指针速度、滚动速度等。
3. 在“电池信息”中,您可以查看无线设备的电池状态和剩余电量。
4. 在“帮助”中,您可以找到有关Logitech Options的使用指南和常见问题解答。
Logitech MX Anywhere 2S 使用指南说明书

Downloadpossibilities go toStep TwoTurn your mouse on.Thischannel. Select the channel you want and go to the next step.Step FourTo connect your mouse to your computer press the Easy-Switch™ button for 3 seconds. When it blinks fast it means it's in discoverable mode.Step FiveChoose if you want to pair with1 – Scroll wheel 5 – On/O button2 – Middle button 6 – Dark eld high precision sensor3 – Battery status LED7 – Connect and Easy-Switch button4 – Micro USB port8 – Back/forward buttonsFeatures:Hyperfast scrollingPress down on the wheel to switch between two scrolling modes: hyperfast and click-to-click.In hyperfast mode you’ll y through documents and web pages with a single spin. Click-to-click scrolling ratchets the wheel, giving you the precision you need for navigating lists, slides, and images.Logitech OptionsInstall Logitech Options to optimize the scrolling experience.Enable smooth scrollingSwitch scrolling directionAdjust scrolling speed (Mac only)Horizontal scrollingScroll wide documents and web pages by tilting the wheel right or left.Use Logitech Options software to:Adjust scrolling speedInvert horizontal scrolling directionAssign another action to the tilt wheelBack/forward buttonConveniently located back and forward buttons enhance navigation and simplify tasks.Use Logitech Options software to activate the back/forward buttons (on a Mac) and assign other actions to the buttons.NOTE: On a Windows computer, this feature is available right out of the box.GesturesInstallation of Logitech Options transforms the middle button into a gesture button you can use to trigger gestures that simplify desktop and application management, media control, document viewing, and personalization of common tasks.Perform a gesture:Hold down the middle button while moving the mouse left, right, up, or down.The gure below shows gesture sets available for managing windows in Windows (7, 8, or later) and Mac OS X (10.8 or later).TIP: Use Logitech Options to view available gesture sets and assign gestures to the middle button or to other mouse controls.BatterySupport Check battery level:。
Logitech游戏设备指南说明书

Logitech®游戏软件活动...需要了解更多信息?新建配置文件快速入门分配命令至 G 键/按钮配置文件教程录制多按键宏疑难解答软件升级Logitech 支持网站Array本帮助中心提供游戏设备和音频设备的相关信息。
请注意:您的 Logitech 设备可能并不具备本帮助中心中的某些功能。
请参考设备附带的文档。
© 2013 Logitech。
保留所有权利。
罗技、罗技标志、Logitech 和其他罗技商标均归罗技所有,并或已注册。
所有其他商标均是其各自所有者的财产。
欢迎恭喜选用全新的 Logitech®游戏设备。
Logitech 设计和制造的个人界面产品使您可在数字世界中高效率地工作、娱乐、交流。
这些产品在人与计算机之间架起了一座桥梁,以直观的链接让您的数字世界成为自然感官的延伸。
所有设备都具备许许多多省时、直观、可定制的功能 - 您很快就会感叹以前没有这些设备时是怎样过来的。
Logitech 游戏设备究竟有何独到之处?首先,键盘和游戏手柄具备一系列可编程 G 键,可用以针对每个游戏创建一组有用的自定义命令,创建这些命令时甚至无需退出游戏(还可以向鼠标按钮分配可自定义的命令)。
部分设备模块配有媒体按钮,只需触摸按钮即可控制音乐与电影。
配合许多设备模块使用,让您可以密切关注邮件、游戏状态、媒体以及众多其他信息。
Logitech 游戏软件可为您的设备提供强大功能和智能操作,从而实现某些高级游戏功能,包括配置文件、多按键命令,以及 LCD 显示屏配置。
要发挥设备和 Logitech 游戏软件的最大潜力,请使用此帮助中心... 帮助中心可提供根据自身需要进行设备自定义的详细信息。
帮助中心还会说明如何为每个游戏设置配置文件,如何录制宏以及如何将宏分配给 G 键/按钮,以此充分挖掘您的游戏潜能。
Logitech 游戏设备搭配 Logitech 游戏软件... PC 游戏的终极控制终端。
Logitech

Getting started with Logitech® HD Webcam C310Logitech HD Webcam C310ContentsEnglish 3繁體中文12简体中文 21한국어 302English 31243Thank you for buying a Logitech webcam!Use this guide to set up and begin using your Logitech webcamIf you have questions before you start, or if you just want to learn more about your Logitech web-cam, please visit /supportGetting started withSetting up your webcam 1Place your webcam4 EnglishLogitech HD Webcam C310• A computer with speakers (or a headset) and a microphone; your Logitech HD Webcam c310 has a built-in microphone • A broadband Internet connection (e g , DSL, T1, or cable)Getting started with video callingYour Logitech HD Webcam c310 provides HD 720p video calling.To take advantage of video calling both you and the person you call must installSkype™, or use a different video-calling application such as Yahoo!® Messenger,Windows Live® Messenger or GmailLearn more: As well as a webcam and video calling application, both callers need:English 5Getting started withUsing your webcam with Windows 8 Understanding the Camera app1. Preview window Click or tap to capturephotos or videos (depending on whetherVideo Mode is selected)2. Change webcams (when you have morethan one) The face of your Logitechwebcam illuminates when selected3. Adjust your camera settings4. Activate or deactivate the Timer featureWhen activated, there is a three secondcountdown to capturing a photo or video 5. Turn Video Mode on (to record videos) oroff (to take photos)6. Click or tap on the arrows to scrollthrough the photos and videos you havecapturedVideos are denoted by a timer and playbutton in the bottom right-hand corner: Use the Camera app, available from the Windows 8 Start screen, to operate and control your webcam6 EnglishEnglish 7LogitechHD Webcam C310The Logitech software optimizes the settings for your environment automatically To adjust any of your settings choose Camera options This is available from the Camera app (see the previous page) and from within Metro apps that support webcamsAdjusting your Camera settings1. Choose your required resolution for photo capture, orvideo capture when in Video Mode 2. Choose the microphone you want to use to recordsound in your videos, if you have more than one available 3. Access More Options , to benefit from enhancedfeatures such as digital Zoom and MoveIf the More Options pane doesn’t show the Logitech logo and offer enhanced options, it is likely that the Logitech software didn’t install correctly when you first connected your camera To reinstall it, go to the Win-dows Store and look for Logitech Camera Controller 4. Zoom in or out to include/exclude your surroundings 5. Having zoomed in, drag the white box to pan (adjustthe focus area of your webcam) 6. Use Follow my face so you’re always in the picture 7. Enjoy clear conversations without annoying backgroundnoise Depending on the features available with your camera, youcan access further advanced settings by scrollingTip: The Camera app lets you use your webcam’s most popular features quickly and easily If you want to take advantage of the enhanced features your webcam offers, such as motion detection, use the Logitech Webcam Software available from /downloadsGetting started withSharing your photos and videosYou can share your photos and videos via e-mail, Twitter, Facebook®, YouTube®, or Microsoft Sky-Drive® Follow these steps:1. In the Camera app, scroll to the photo or video you want to share2. Select Share in the Charms bar (or press- H):3. Choose the media through which you want to share the photo or video8 EnglishEnglish 9Logitech HD Webcam C310Understanding the Logitech Webcam Software1. Capture pictures and videos2. View captured images and share viae-mail, Facebook, or YouTube3. Capture videos triggered by detectedmotion4. Control your webcam while on a videocall5. Change webcams (when you havemore than one)6. Open Logitech Webcam Softwaresettings7.Open help dashboardUsing your webcam with Windows 7 and Windows VistaThe Logitech Webcam Software provides everything you need to use and control your webcam . Launch the software from the Windows Start® menu, or by right-clicking on the camera icon in the Windows taskbar .10 EnglishGetting started withCapturing video and snapping picturesQuick Capture allows you to take photos and re-cord videos easilyYou have quick access to webcam controls and settings:1. Preview window2. Capture mode:photo/video 3. Capture button 4. Webcam controls5. Photo thumbnails6. Video thumbnails7. Click a thumbnailto enter the galleryThe gallery: viewing and sharingClicking on an image thumbnail in the webcam gallery (1) opens the video or photo in the review window (2) You can then:• Attach the video or picture file to an e-mail (3)• Edit the photo or splice together video (4)• Upload the picture or video to Facebook (5)• Upload the video to Twitter or YouTube (6) You can also drag and drop a gallery image onto one of the function tiles (items 3-6) to launch anediting application or to attach or uploadEnglish 11Using motion detection• Set up your webcam to record video when it detects movement• Adjust captured video duration and detection sensitivity• Captured video is automatically saved to your computer• View content in the Gallery or upload it using the One-touch Upload windowFine tuning your webcam during a video call1. Launch the webcam controller when on a video call2. Use pan and tilt to find the best angle3. Zoom in or out to include/exclude your surroundings4. Use Follow my face so you’re always in the picture5.Enjoy clear conversations without annoying background noise6. Correct for poor lighting environments usingRightLight7.Access advanced webcam settings12 繁體中文1243感謝您購買羅技的網路攝影機!使用本指南可安裝並開始使用您的羅技網路攝影機。
logitech 链接方法

logitech 链接方法【实用版2篇】目录(篇1)1.罗技鼠标的链接方法2.罗技键盘的链接方法3.罗技摄像头的链接方法4.罗技音箱的链接方法5.总结正文(篇1)罗技是一家知名的电脑外设制造商,它的产品包括鼠标、键盘、摄像头和音箱等。
这些设备与电脑的链接方式略有不同,下面我们来分别介绍一下它们的链接方法。
首先,我们来看看罗技鼠标的链接方法。
一般来说,罗技鼠标通过 USB 或蓝牙与电脑连接。
USB 连接需要将鼠标的 USB 接口插入电脑的 USB接口,然后安装驱动程序即可。
而蓝牙连接则需要在电脑上打开蓝牙设置,然后将鼠标与电脑进行配对。
接下来,我们看看罗技键盘的链接方法。
罗技键盘也是通过 USB 或蓝牙与电脑连接。
USB 连接的方法与鼠标类似,只需要将键盘的 USB 接口插入电脑的 USB 接口,然后安装驱动程序即可。
而蓝牙连接则需要在电脑上打开蓝牙设置,然后将键盘与电脑进行配对。
然后,我们来看看罗技摄像头的链接方法。
罗技摄像头一般也是通过USB 与电脑连接。
只需将摄像头的 USB 接口插入电脑的 USB 接口,然后安装驱动程序即可。
最后,我们来看看罗技音箱的链接方法。
罗技音箱可以通过蓝牙或AUX 线与电脑连接。
蓝牙连接的方法与前面提到的设备类似,需要在电脑上打开蓝牙设置,然后将音箱与电脑进行配对。
而 AUX 线连接则需要将音箱的 AUX 接口与电脑的 AUX 接口连接。
总的来说,罗技的各种电脑外设的链接方法都比较简单,只需要根据设备的接口类型和电脑的接口类型进行匹配,然后安装驱动程序即可。
目录(篇2)1.罗技鼠标的简介2.罗技鼠标的链接方法3.常见问题与解决方案正文(篇2)罗技鼠标的简介:罗技(Logitech)是一家专注于电脑外设的公司,其生产的鼠标因其高质量和可靠性而广受好评。
罗技鼠标不仅适用于家庭和办公环境,还适用于游戏等高性能领域。
为了帮助用户更好地使用罗技鼠标,本文将介绍罗技鼠标的链接方法以及一些常见问题的解决方案。
- 1、下载文档前请自行甄别文档内容的完整性,平台不提供额外的编辑、内容补充、找答案等附加服务。
- 2、"仅部分预览"的文档,不可在线预览部分如存在完整性等问题,可反馈申请退款(可完整预览的文档不适用该条件!)。
- 3、如文档侵犯您的权益,请联系客服反馈,我们会尽快为您处理(人工客服工作时间:9:00-18:30)。
2007-01-25
Collected by Handsome Yin
3
相關工位的大概介紹—鎖螺螄
鎖螺螄結構按照建議方式設計
2007-01-25
Collected by Handsome Yin
4
相關工位的大概介紹—鎖螺螄
2007-01-25
Collected by Handsome Yin
7
相關工位的大概介紹—點膠
產品上面務必設計存放膠水的槽.防止 因為點膠後產品黏合在一起
2007-01-25
Collected by Handsome Yin
8
2007-01-25
Collected by Handsome Yin
9
2007-01-25
Collected by Handsome Yin
Logitech 機構設計準則建議
整 理: 尹 俊 2007-01-25
1
2007-01-25
ected by Handsome Yin
提綱
相關工位的大概介紹 相關工位的注意點
2007-01-25
Collected by Handsome Yin
2
相關工位的大概介紹
鎖螺絲,卡勾組裝,點膠,點油,印刷,熱融, 超音波融接,噴漆,雷雕,電鍍(水鍍/蒸鍍 ),燙 金(突起面/平滑面), IMD
5
相關工位的大概介紹—產品設計時注意
Top/Key X/Y方向定位問題
2007-01-25
Collected by Handsome Yin
6
相關工位的大概介紹—卡鉤組裝
避免卡鉤太多的設計—給組裝與 Rework造成一定的麻煩,
2007-01-25
Collected by Handsome Yin
14
10
2007-01-25
Collected by Handsome Yin
11
2007-01-25
Collected by Handsome Yin
12
2007-01-25
Collected by Handsome Yin
13
2007-01-25
Collected by Handsome Yin