SWAT2009 SSURGO Tool
Autodesk Stitcher Unlimited 2009用户指南说明书

Introduction _______________________________________________________________ 2 About Autodesk® Stitcher™ Unlimited 2009 _________________________________________ 2 Goal of this tutorial ___________________________________________________________ 2 1.Loading Images _________________________________________________________ 3The Autodesk Stitcher Unlimited 2009 interface ____________________________________ 3 Loading your shots ____________________________________________________________ 4 2.Stitching _______________________________________________________________ 6Auto-Stitching ________________________________________________________________ 6 Manual-Stitching _____________________________________________________________ 73.Alignment ____________________________________________________________ 124.Equalization ___________________________________________________________ 145.Render _______________________________________________________________ 15Render area and rendering options ______________________________________________ 15Load a Spherical panorama and convert to QTVR® _________________________________ 20IntroductionAbout Autodesk® Stitcher™ Unlimited 2009Autodesk Stitcher Unlimited 2009 is the way to build high-quality panoramas for the Web, film, print, and 3D.With advanced features, Autodesk Stitcher Unlimited 2009 gives photographers and artists the power to deliver the most impressive panoramas in the formats they need. Autodesk Stitcher creates wide-angle, high-resolution 360° × 180° panoramic images in seconds from horizontally and vertically overlapping photos. You can create new image sets from the panorama using a virtual camera with zoom, pan, and roll motion. Results can be rendered as a cube, plane, cylinder, sphere projection, and as a QuickTime® movie (Cylindrical QTVR and Cubic QTVR), and in VRML format for creating high-impact Web pages, definition mattes, environment maps, and 3D models.Goal of this tutorialThis 5-step tutorial will guide you through the creation of a full spherical panorama image in 360° and a QTVR interactive file. This complete project will take you step by step through the main workflow and features of Autodesk Stitcher Unlimited 2009.This tutorial was prepared and illustrated using Autodesk Stitcher Unlimited 2009.1. Loading ImagesThe Autodesk Stitcher Unlimited 2009 interfaceLoading your shotsThe first step in the creation of a Stitcher project is to load the image files that you will use to create the panorama.To load the pictures:1.Select File > Load Images from the main menu or click the Load Images icon in the toolbar.The Load Images browser opens.2.Select all the files you will use for your panorama.3.Click Open.When the images are loaded, Stitcher tries to read the EXIF data and proposes theappropriate camera lens type. The following dialog lets you choose between keeping thesettings and adjusting them manually.The current example use images with EXIF data so Stitcher correctly detects all theparameters. Click Yes to keep the settings Stitcher has read.NOTE If for any reason you need to change the parameters you can right-click anywhereinside the Stitcher interface and open the Properties dialog.Your images will be loaded into the Thumbnail View, as demonstrated in the screen shot below.Open the loaded.rzs file to see the image files already loaded for this project.2.StitchingAuto-StitchingAutodesk Stitcher Unlimited 2009 has a fully automated stitching engine. Run the Stitch Shots function by either:•clicking the icon in the toolbar, or•press ENTER (make sure no images are selected),or•Stitch > Stitch ShotsThe Stitching Window is a 3D environment in which you can navigate around using the navigation controls (see “Navigating in Stitcher” in the Stitcher User Guide for more information on navigation). NOTE The display can appears smoother in the Stitching window if your graphic card allows real timelinear blending; the GPU options can be set from the preferences. The icon is a status indicator to specify that the GPU blending is activated.Manual-StitchingIn this example almost all the pictures are automatically stitched, but one is missing. For situations like this, you can use the Manual Stitch tool to complete the panorama.To manually stitch the missing image, you need to find a stitched image which overlaps it. You will use the overlapping features in the shots to match the images one to each other.1.Select the unstitched image2.Add to the selection by holding down the Shift key and clicking an already stitched imagewhich has features that overlap the unstitched image (in our example use the venitian08.jpg)3.Do one of the following:•Click Manual Stitch in the Toolbar, or•Select Stitch > Manual Stitch, or•Right-click and choose Manual Stitch from the contextual menuWhen stitching images manually, you need to find at least two common points in both images. The points should not be on the same line, but be distributed in the image for greater precision.The manual stitch workflow is:1.Click and place a marker on a particular detail in the first image2.Click to add the same marker inside the second image, then repeat step 1 and 2 to create 3points inside each image as shown in the screen shots.positioned correctly inside the panorama.NOTE Manually stitched images have a yellow highlight to distinguish them from auto-stitched images.Load the Stitcher project file, stitched.rzs, to see this step completed.3.AlignmentBefore rendering the panorama, you can change the viewpoint to determine what you see in the final panorama. Stitcher automatically aligns the panorama.You can align the panorama by clicking the Auto-Align icon or by selecting Tool > Automatically Align Panorama, or pressing “A”.NOTE the status indicator is displayed when the panorama is aligned.4.EqualizationWhen you click the Equalization icon, the Equalization tool launches in all of the images. This step is significant and makes it possible to correct certain differences in exposures, especially in the levels of blue in the sky.NOTE The Equalization process can be reverted at any time by selecting Render > Unequalize. The equalization factor can be defined in the rendering preferences.5.RenderRender area and rendering optionsIf you need to render only a part of the panorama, do the following steps:1.Select Render > Render Area > Set Render Area tool.2.Right-click in the panorama, and choose Spherical View from the contextual menuNOTE the contextual menu in the fully-stitched panorama lets you choose the projection you want to use for rendering.3.Now draw a rectangular area in order to define and adjust the borders of the final image.4.To quit the Render Area tool, press the Space key or Render > Render Area > Set RenderArea.5.Click Render Panorama to set the render parameters.6.The last step before launching the rendering process is to define the parameters for theimage.Stitcher gives you the option of the following rendering types:•Cubical or cylindrical QuickTime® VR (QuickTime Player installation is required)•Images with a spherical, a cylindrical, or a cubical projection•Snapshot image•3D formats such as VRML or Pure Player® projectionWhen rendering a panorama as an image, you can choose between the following file formats:•Jpg•TIF•PSD Photoshop®•…Each file format has specific options which can be adjusted in the related tab.Before rendering, you must define:•The path and filename where you want to save the image file•The size in pixels (for this tutorial you will set the width to 2048, the height value will update automatically).NOTE The size of the panorama will have an impact on the rendering time. The optimal size is calculated as a function of the original image size that you have loaded in Stitcher, in order to maximize quality.•The image format.Now verify that the Type is set to Spherical and that the Use Defined Viewport option ischecked. The Use Defined Viewport option is active when a render area is set.7.Click Render.Spherical panorama 360° with render area.Load the Stitcher project file, render_area.rzs, to see this step completed.You can also see the result with the file Venitian_area.jpg.Load a Spherical panorama and convert to QTVR®This part of the tutorial guides you through loading a full 360° panorama in Stitcher, using the authoring control tool to set the viewing parameters of your movie and then converting the panorama to a QTVR® file.1.Select File > Load PanoramaThe browser dialog opens.2.Select the image file you want to load and click Open.In our example load Venitian_Spherical.jpg.NOTE If you are working with a cubical panorama, select one of the 6 face files.e Tools > Authoring Controls to activate the interactive controller.The General Information expands to display the Authoring Controls options.e the navigation control inside the stitching window to author (in real time) the view youwant your QTVR file to have. Adjust the zoom out and lock it by clicking Max FOV. Do the same with the min FOV. You can real-time preview the zoom control constraint and adjust them at any time.NOTE The zoom out constraint is a good way to define the maximum zoom view and thereby stop viewers from setting a huge field of view (sometimes an inelegant display for your movie). The zoom in constraint prevents viewers from magnifying the view past the point where you feel the image quality of your movie is compromised (too pixilated, and also an inelegant display for your movie).Use the Tilt constraint and the Pan constraint the same way.In our example, the bottom part of the panorama is a black area, so we want to prevent viewers from tilting to that position. We have therefore locked the Min TILT value.5.To quit the Authoring Controls tool, close the edit dialog, then select Tools > AuthoringControls, or click the white cross at the top right corner of the General Information.NOTE Do not change the point of view after setting the Authoring Control otherwise your Authoring Control values will not make sense anymore without the initial points of reference.6.Open the Render Parameters dialog by clicking , or select Render > Render.7.Set the render parameters path, filename, size and QTVR options as you see them in thenext screen shot.unch the Convert process.Congratulations! You have successfully completed the full Stitcher workflow from stitching a panorama, and to creating a QTVR movie.View the result with the file Venitian.mov.。
Swatcup简单使用说明
Swatcup简单使用说明(以SUFI方法为例)1.数据准备:已经进行过至少一次模拟的swat输出文件,一般放于simxx目录下(xx是数字)swatcup需要的是其中的txtinout文件夹。
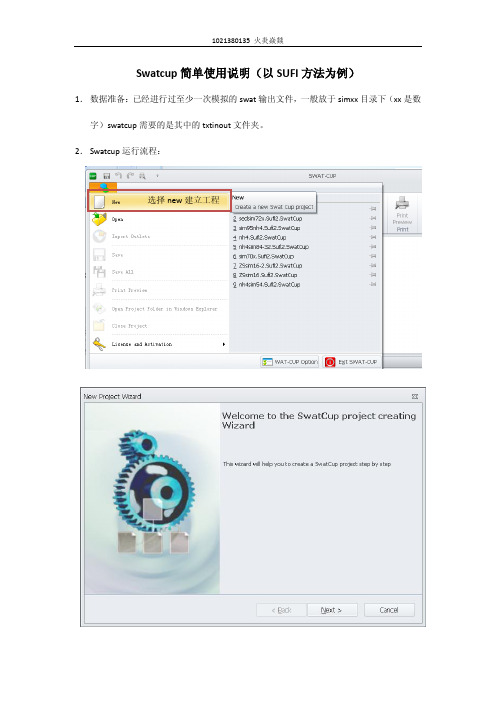
2.Swatcup运行流程:选择new建立工程选择txtinout文件夹只有选择正确才能使用选择校准时的模拟方法,具体见SWATCUP说明书Finish 之后工程就开始自动建立,工程建立完成后是一个“模子”,具体的东西还要我们自己来修改。
命名以及选择输出文件夹,这里就随便了这里是设置校准参数的地方,我们需要做的是更改参数并为每个参数设定取值范围,需要注意的是,参数的修改方法有v__, a__, r__三种,分别是赋值,加值,乘以某值(百分比浮动)。
具体可见说明书。
每个参数后面的两个数字别是在下一次模拟中该参数取值的下界和上界,可以根据需要随便赋值,前提是不能超过理论上的最大范围参数个数以及模拟次数,参数 个数要和下面的实际个数一样开始模拟数及模拟次数,注意和par_inf对应File.cio是一些swatcup运行的基础参数,非专业人士请勿乱动哈(反正我是不会)。
我们需要更改的有NBYR,IYR,IDAL(年中的天数,有时会出问题,在365和366之间改改试试)以及NYSKIP(缓冲年)这里是swatcup接受修改的参数的上下界,参考用,一般禁止修改。
在par_inf中的参数的范围需要注意不要越界。
本图中,1是指变量个数,如果要同时校准多个出口,这里可以更改数字,但此处写几下面就要写几组观测数据,格式一样。
Flow_out_29是命名用的,29是模拟的出口所在subbasin。
84是观测值个数,需要和你的模拟年对应好,一年12个月哦,365或366天,一定要算准,不然出错。
观测数据的使用,这里仅说一下rch的(其他的没用过)。
格式是:序号(空格)FLOW_OUT_月(日)_年(空格)观测值。
建议在excel中做,很方便可以使用CONCATENATE函数。
《暴力摩托2009》秘籍
暴力摩托2009中文版> 《暴力摩托2009》秘籍
《暴力摩托2009》秘籍
2012-10-19 18:02 | 查看:4983
●游戏秘技:
在游戏比赛过程中先正确键入XYZZY 如果输入正确,此时你的名称(玩家名称)会变为黄色,这表示已启用了秘技的输入功能,然后再根据你的需要键入下列相应的秘技代码:
K’THUNK!作用:得到木棒
THWACK! 作用:得到铁鞭
SPOON! 作用:得到加速功能
YES,OCCIFER 作用:杀掉警-察
BRIBE 作用:贿赂警察,减小交警上路执勤次数
PLUGH 作用:禁用秘技(玩家名称变回白色)
(注:以上秘技的输入大小写均可)
●其他秘技:
1、比赛进行期间,按小键盘8 + Num Lock + Back Space(退格键)键后可使你的赛车进入自动前进状态,再也不需要长按“前进”键了。
(请注意:要取消该秘技,须删除系统的页面文件。
)
2、把Data 下的Cars 文件夹随意改名后,以后在任何赛道中除了摩托车以外其他任何车辆将不会再出现。
3、比赛进行期间,按V 键可查看游戏版本;按F10 为切换/显示/隐藏摩托车的仪表面板;小键盘的+ - 键为改变游戏背景的贴图颜色。
无损龙狙模板
无损龙狙模板介绍无损龙狙模板是一种用于游戏《绝地求生》中的狙击枪模板。
它的设计目的是为了提供更加精准和稳定的射击体验,使玩家能够更好地击中目标。
在本文中,我们将深入探讨无损龙狙模板的特点、优势以及如何正确使用它。
特点和优势1. 精准度高无损龙狙模板采用了先进的技术和算法,能够大幅提高狙击枪的精准度。
它通过减少后坐力和弹道偏移,使玩家能够更容易地命中目标。
2. 稳定性好无损龙狙模板还具有出色的稳定性。
它能够减少枪械的抖动和晃动,使玩家能够更好地掌控狙击枪的射击。
3. 可调节性强无损龙狙模板还具有可调节的功能。
玩家可以根据自己的喜好和需求调整模板的灵敏度和其他参数,以获得最佳的射击体验。
4. 兼容性广无损龙狙模板适用于多种狙击枪,包括AWM、Kar98k等。
它可以与这些狙击枪完美配合,提供最佳的射击效果。
如何使用无损龙狙模板1. 下载和安装首先,玩家需要从官方网站或其他可靠来源下载无损龙狙模板的安装文件。
然后,按照安装程序的指示进行安装。
2. 调整设置安装完成后,玩家需要打开游戏设置界面,找到狙击枪设置选项。
在这里,玩家可以找到无损龙狙模板的设置选项,并进行调整。
玩家可以根据自己的喜好和需求,调整模板的灵敏度、后坐力补偿等参数。
3. 练习和适应使用无损龙狙模板需要一定的练习和适应。
玩家应该在训练场或其他安全的环境下进行练习,熟悉模板的使用方法和特点。
通过不断的练习,玩家可以逐渐掌握无损龙狙模板的技巧和技巧。
4. 实战应用当玩家对无损龙狙模板熟悉并掌握了使用技巧后,就可以在实战中应用它了。
在游戏中,玩家可以通过使用无损龙狙模板来提高狙击枪的射击精准度和稳定性,从而更好地击败敌人。
注意事项1. 合法性在使用无损龙狙模板之前,玩家需要确保其合法性。
某些游戏可能禁止使用模板,如果发现使用非法模板,可能会受到封号等惩罚。
2. 合理使用玩家在使用无损龙狙模板时,应该合理使用,不要依赖模板完全取胜。
狙击枪的使用还需要玩家的技巧和经验,模板只是辅助工具。
ArenaMatch Utility 小前景 补声扬声器 AMU105 AMU108 AMU206

规范信息
本产品符合所有适用的欧盟指令要求。您可以从网站 /compliance 找到完整的符合性声明。
此符号表示不得将此产品作为生活垃圾丢弃,应将其送到合适的 回收站点进行回收。正确处理和回收有助于保护自然资源、人类 健康和环境。想要获得更多关于此产品的处理和回收的信息,请 联系当地市政当局、垃圾处理服务部门或您购买此产品的商店。
中国危险物质限用表
有毒或有害物质或元素名称及成分
有毒或有害物质和元素
零件名称
铅
汞
(Pb) (Hg)
镉 ()
六价铬 (CR(VI))
多溴化 联苯 (PBB)
印刷电路板 X
O
O
O
O
金属零件
X
O
O
O
O
塑料零件
O
O
O
O
O
扬声器
X
O
O
O
O
线缆
X
O
O
O
O
此表格依据 SJ/T 11364 的要求制定。
O:表示此零件中所有均质材料所包含的此类有毒或有害物质均低于 GB/T 26572 中的限定要求。
6. 只能使用制造商指定的附件/配件。
7.
只能使用制造商指定或随本设备一起销售的推车、支架、
三角架、托架或工作台。如果使用推车,则在移动推车/设
备时应格外小心,以免因倾倒而造成伤害。
警告/小心:
包含可能导致窒息危险的小部件。不适合 3 岁以下的儿童使用。
本产品含有磁性材料。有关这是否会影响到您的植入式医疗器 械,请咨询您的医生。
包装清单................................................................................................................................................................................................... 5 可选配件................................................................................................................................................................................................... 5 检查和维护....................................................................................................................................................................................................... 6 保持防风雨性........................................................................................................................................................................................... 6 推荐使用的工具.............................................................................................................................................................................................. 6 产品尺寸........................................................................................................................................................................................................... 7 ArenaMatch Utility AMU105........................................................................................................................................................... 7 ArenaMatch Utility AMU108........................................................................................................................................................... 8 ArenaMatch Utility AMU206.......................................................................................................................................................... 9 ArenaMatch Utility AMU208........................................................................................................................................................ 10
魔兽DOTO命令
注:若要挑战boss可直接输入命令-ayox或者-ayny
Boss奥妮克希亚(-ayox)
资料列表:
等级:255
种族:古树
生命值:480,000
攻击力:425~527点英雄攻击
护甲:274点英雄护甲
第三阶段:
火焰气息:对面向方向喷射大量火焰,造成1750点火焰伤害。
飞翼打击:对面前的敌人击退525码,并造成1500~2500点物理伤害。
龙尾扫击:对身后大范围的敌人击退650码,并造成1250~2000点物理伤害。
顺劈斩:对目标及其周围敌人造成攻击伤害。
-rb 系统会随机BAN掉8个英雄。
-cc 此模式下小兵会变得猥琐。不过会相对占用一定的系统资源。同时小兵可以通过获取经验值升级。此模式与AK/SS模式不兼容。
-ra 此模式与AK/SS模式不兼容,和团队BUFF不兼容,在此模式下,每个英雄拥有初始2个技能,每次升级或者更换英雄都会重新获得新的技能,获得技能的个数与技能等级与英雄的等级有关。
-cn 在该模式下AI英雄的技能不会IM化。
-sl 该模式下每个英雄所有技能,包括小技能,大招和黄点中的某一个将会丢失,不能再学习,施法及起到相应的作用。
-fe 在该模式下野怪和ROSHAN死亡后有很低概率掉落普通物品,经过120秒会在随机野怪中自动产生一个精英野怪。击杀会获得额外的大量经验和大量金钱。精英野怪会提高100%的掉落概率。
-swap 1/2/3/4/5 交换英雄命令 向你想交换的英雄序号玩家提交交换请求。如果他也向你提交请求,交换成功。交换命令可以多次使用,但是只能在开局后90秒前使用。
游戏中使用的相关命令
[讲解]ss工具的使用方法
![[讲解]ss工具的使用方法](https://img.taocdn.com/s3/m/ceabeac03086bceb19e8b8f67c1cfad6195fe9d4.png)
一、后台配置使用说明:第一次配置目前主程序已部署在省公司BOSS堡垒机211.2。
第一次执行,需要先配置环境变量,一次配置后不再需要进行配置。
步骤如下:1、登录211.2堡垒主机后,执行以下语句:sh/tmp/shenjibin/edit_profile.sh请复制左框内容2、按照如上图提示,复制并执行指令: . /home/你的用户名/.profile配置成功,以后就可以开始使用数据库分析器了。
二、数据库用户使用分析器的方法:对SQLPLUS用户使用习惯无影响方法一:在任意目录输入“ss”,会提示输入用户名,密码,sid,key(AMS 单号)。
当没有数据修改单号时,可不输入或输入任意字符,不影响使用。
说明:该系统部署到4A后,与目前4A系统自动往BOSS库输送用户名和密码的原理一样,通过4A自动往BOSS数据库输送用户名和密码,则用户无需再输入用户名和密码,只需输入key(AMS单号)即可。
方法二:通过字符串的方式进行连接,类似SQLPLUS,如下:ss username/password@sfs DM_FS_20101208_XXXX -n,即可登录。
如登录时显示-选择-y,提交语句时会显示“未经审核”的提示,要继续,直接输入yes或回车即可。
✧若不想该系统老是显示该提示,刚在登录时,在登录串后面输入命令最后加上-n参数,(意思为不提醒分析结果),样例:ss user/password@sid ams 单号–n✧对于自动提数脚本,使用该工具不影响提数结果,只需在配置数据库登录串时,选择ss user/password@sid ams单号–n的方式即可正常提数,与使用SQLPLUS工具无任何差别✧在操作过程中,需要改变不同的操作单单号,不需要退出系统,只需要在ss下,输入$key,会提示要输入的KEY,输入KEY后即可转换审批单号✧退出输入 quit或exit即可✧如平日操作没有AMS审批单号,可不输入KEY,或输入自己的名字拼音即可进行操作。
CSO-NST修改方法
CSOLdjb各种问题以及第三方修改补丁的总结CSOLdjb问题1. 改枪参数参数文件位置:“X:\CSONST\cstrike\addons\amxmodx\configs\nst_wpn.ini”,nst_wpn.ini里面就是所有枪支参数文件了,修改它需要使用“UltraEdit”,UE这软件自己去度娘一下,现在我来说明下里面各种E文的解释吧。
[type]武器模式类型(1-8)【1-普通模式,2-普通-普通双模式,3-右键武器近身攻击模式,4-普通-榴弹模式,5-更改武器换弹模式,6-右键直接发射榴弹模式, 7-武器延迟模式,8-连射模式(M16A4,N94)。
[name]武器自定义名称。
[model]模型名称。
[wpn_change]武器原型及弹道(1-30)【1-*p228原型弹道,3-鸟狙scout原型弹道,4-手雷原型,5-自动散弹枪xm1014原型弹道,7-冲锋枪tmp(俗称渍水)原型弹道,8-警用单倍镜aug 原型弹道,10-双枪elite原型弹道,11-*fiveseven原型弹道,12-冲锋枪ump45(警匪B-3-3)原型弹道,13-警用连狙sg550弹道原型,14-匪用galil(B-4-1)原型弹道,15-警用famas(B-4-1)原型弹道,16-警用usp原型弹道,17-匪用glock18原型弹道,18-狙击awp 原型弹道,19-冲锋枪mp5原型弹道,20-机关枪M249原型弹道,21-半自动散弹枪M3原型弹道,22-m4a1,23-匪用mac10(B-3-1)原型弹道,24-匪用连狙g3sg1原型弹道,26-银鹰deagle 原型弹道,27-匪用单倍镜sg552原型弹道,28-匪用ak47原型弹道,29-刀原型,30-冲锋枪p90(B-3-4)原型弹道】。
[damage]伤害,数值为原型武器的倍数,就是说当数值为1时,武器与原型武器威力相当;数值为1.5时,武器威力为原型武器的1.5倍。
- 1、下载文档前请自行甄别文档内容的完整性,平台不提供额外的编辑、内容补充、找答案等附加服务。
- 2、"仅部分预览"的文档,不可在线预览部分如存在完整性等问题,可反馈申请退款(可完整预览的文档不适用该条件!)。
- 3、如文档侵犯您的权益,请联系客服反馈,我们会尽快为您处理(人工客服工作时间:9:00-18:30)。
SOL_AWC
SOL_K SOL_CBN CLAY SILT SAND ROCK SOL_ALB USLE_K SOL_EC
Not required Available water capacity of sol layer (mm H20/mm soil)
Saturated hydraulic conductivity (mm/hr) Organic carbon content (percent of soil weight) Clay content (percent of soil weight) Silt content (percent of soil weight) Sand content (percent of soil weight) Rock fragment content (percent of soil weight) Moist soil albedo USLE soil erodibility K factor (0.013 metric ton m2 hr/m3 metric ton cm) Electrical conductivity (dS/m)
SSURGO – Soil Survey Geographic Database
Distributed by the Natural Resources Conservation Service (NRCS) Mapping scales generally range from 1:12,000 to 1:63,360 Most detailed level of soil mapping Structured on county basis Designed for use by landowners, townships, and county natural resource planning and management Consists of spatial and tabular data files Available at
Map unit - identifies the map units included in the referenced legend Component - lists the map unit components identified in the referenced map unit, and selected properties of each component Legend - identifies the soil survey area Horizon - lists the horizons Horizon fragments - lists the mineral and organic fragments that generally occur in the referenced horizon
SSURGO Table
Legend – Legend Mapunit – Comp – Comp – – Comp Chorizon – Chorizon
Soil Identifying Name (concatenated key) Soil interpretation record Percent of Soil component Number of soil layers, not more than 10 Soil hydrologic group Fraction of porosity for which anions are excluded Potential or maximum crack volume of soil profile expressed as fraction of total volume Texture of soil layer – not required by ArcSWAT Depth from soil surface to bottom of layer (mm) Maximum rooting depth of sol profile (mm) Moist bulk density (g/cm3)
Peschel, J.M., P.K. Haan, and R.E. Lacey 2006. Influences of Soil Data Set Resolution on Hydrologic Modeling, Journal of the American Water Resources Association 42(5): 1371-1389 Diluzio, M., Arnold, J.G., Srinivasan, R. 2004. Integration of SSURGO maps and soil parameters within a geographic information system and nonpoint source pollution model. Journal of Soil and Water Conservation. 59(4):123-133. Have flaws and do not present a complete conversion utility
The U.S. General Soil Map or STATSGO2 (2006)
Revised STATSGO Distributed by the Natural Resources Conservation Service (NRCS) Available at /survey/geography/statsgo
ArcMap Tool for Pre-processing SSURGO Soil Database for ArcSWAT
Aleksey Sheshukov Prasad Daggupati Ming-Chieh Lee Kyle Douglas-Mankin
Biological and Agricultural Engineering Kansas State University
Presented at the 5th SWAT International Conference in Boulder, CO - 5-7 Aug, 2009
Outline
STATSGO vs SSURGO SSURGO in SWAT Conversion Methodology
Description
Mapping Unit Identifier Record Counter
Calculated
SSURGO Variable
Areasymb ** Areasymb Musym *** Comppct_r ** Hydgrp* *** *** Taxpartsz Hzdepb_r* ** Db3bar_r*
Unique key identifiers
chkey cokey mukey lkey
SWAT and SSURGO Variables
SWAT Variable
MUID SEQN SNAM S5ID CMPPCT NLAYERS HYDGRP ANION_EXCL SOL_CRK TEXTURE SOL_Z SOL_ZMX SOL_BD
Tabular Datasets Spatial Datasets Linkage
Case Study Conversion Tool for ArcSWAT
GIS Desktop Extension
Objectives
To develop/adopt methodology for processing SSURGO soils To design a procedure/tool that converts SSURGO soil datasets into an ArcSWAT compatible format To validate the conversion results To make the tool user-friendly by creating an extension to ArcMap GIS
References:
/ssurgo/ Developed as an extension to Arcview 3.x Works with Arcview SWAT Does tabular datafiles conversion and clips spatial dataset to watershed boundary Not adjusted for ArcMap Not adjusted for ArcSWAT
Name StMUID StMUID+Name StMUID+Seqn S5ID
Available Conversion Tools
No Conversion Utilities for ArcSWAT SSURGO SWAT 2.0 Extension by J. M. Peschel
Soil Databases
STATSGO (1994) – State Soil Geographic Database
The map data are collected in 1- by 2-degree topographic quadrangle units and merged into a seamless national dataset with mapping scale about 1:250,000 Distributed in state/territory and national extents Designed for state level, river basin applications