WorkbenchUserGuide
DejaVuX详细操作手册

déjàvuDéjà Vu X(工作组版)上手指南徐彬(simon_xb@sohu。
com)译(在déjàvu Professional环境下)目录Déjà Vu X(工作组版)的组成 (3)项目 (3)翻译记忆 (4)术语库 (5)SGML/XML过滤器 (5)Déjà Vu工作组版使用教程 (6)创建项目 (6)翻译文件 (14)导出完成的翻译 (22)倍增生产力 (23)预翻译 (26)字数统计和统计数字 (30)Déjà Vu X Workgroup 构成项目Déjà Vu X(工作组版),工作时面对的是项目文件.Déjà Vu 工作组项目是一个具有特殊结构的电脑文件,Déjà Vu 工作组版能够识别、显示、管理该文件,帮助你完成翻译工作.项目包含下列内容:-翻译工作中的所有文本,包括源语文本和翻译文本,二者使用表格的样式呈现。
-左栏显示源语文本, 右栏显示目标语言. 每次只显示一个目标栏.-每个源语句子占一行. 源语文本根据一定的规则被切分为表格单元。
用户可以设定相应的规则.-原始文档的格式和其他信息. 这些不可译信息或者隐藏于句子(表格行)之间,或者是隐藏在控制码中。
项目所使用的源语文件,可以是不同的格式,只要Déjà Vu支持即可(软件所支持的格式请参见用户手册). 这些文件可以是位于电脑的某个文件夹内,或是局域网的其他位置。
表格的行可以以不同的方式显示:-一次一个文件-或是所有的文件一起显示。
两种方式下行都可以以字母顺序排列显示,或是按文档原来的顺序显示(即句子在原文中出现的顺序显示)。
你将进行翻译的工作文件称作Déjà Vu 项目 .dvprj)。
你可以在Déjà Vu 工作组主界面中创建并打开这些文件。
ansysworkbench总结

Workbench 总结1.CAD建模几个重要的概念与功能(1)PART 多体部件体from new part和布尔操纵体的区别,Part内部无接触,可定义不同材料(2)Active和Freeze冻结体(3)Slice功能与Freeze的配合使用(4)抑制体的使用suppress(5)面印记Imprint Face的功能(6)概念建模:产生面体(7)要在CAD or DM中使用Use CAD or DM to:–Simplify the geometry–Merge small edges–Merge the faces in order to reduce the number of faces–Avoid narrow faces–Keep volume gaps only where important–Decompose the geometry–Remove unnecessary geometries–Add geometries–Repair the geometry2.网格划分技巧:•Strategies to Improve Mesh Quality策略–CAD Cleanup清理–Virtual Topology拓扑–Pinch Controls微量控制–Sensible Mesh Sizing and Inflation Settings网格大小控制和膨胀设置–General Recommendations 一般建议–•Mesh Quality Metrics in ANSYS Meshing网格质量检查–Skewness 偏斜–Aspect Ratio纵横比–Worst Element最差单元•Mesh metrics available in ANSYSMeshing include:–Element Quality–Aspect Ratio–Jacob Ration–Warping Factor–Parallel Deviation–Maximum Corner Angle–Skewness1网格质量检查Two methods for determining skewness:1.Based on the Equilateral Volume deviation:•Skewness =•Applies only to triangles and tetrahedron•Default method for tris and tets偏斜=(正四面体-- 实际四面体)/ 正四面体2.Based on the deviation from a Normalized Angle deviation:•Skewness =Where θe is the equiangular face/cell (60 for tets and tris, and 90 for quads and hexas)•Applies to all cell and face shapes 单元和面•Used for prisms and pyramids 棱柱和棱锥–skewness–For Hexa, Tri and Quad: it should be less than 0.8–For tetrahedra: it should be less than 0.9Aspect Ratio纵横比(1)A spect for generic triangles and quads is a function of the ratio of longest side to the shortest side of the reconstructed quadrangles (see User Guide for details)(2)E qual to 1 (ideal) for an equilateral triangle or a square•For Aspect Ratio:–It should be less than 40, but this depends onthe flow characteristics–More than 50 may be tolerated at the inflation layers Worst Element最差单元•For Aspect Ratio:–It should be less than 40, but this depends onthe flow characteristics–More than 50 may be tolerated at the inflation layers •For Cell Size Change:It should be between 1 and 2.2策略•Model中的Virtual Topology 的功能:合并。
ANSYS Workbench 14.0超级学习手册(第1章)

ANSYS Workbench 14.0超级学习手册(第1章)ansysworkbench14.0超级学习手册(第1章)第1章ansysworkbench14.0概述本章从总体上对ansysworkbench14.0自带软件包含结构力学模块、流体力学模块等展开详述,同时对ansysworkbench14.0最新资源整合的其他模块展开直观了解,其中包含低频电磁场分析模块ansoftmaxwell、多领域机电系统设计与仿真分析模块ansoftsimplorer、烦躁分析模块ncode及复合材料建模与后处理模块acp等。
同时,本章还以solidworks软件为基准,了解workbench14.0与常用的cad软件展开内置的步骤及方法。
学习目标:(1)介绍ansysworkbench软件各模块的功能;(2)掌握ansysworkbench软件与solidworks软件的集成设置;(3)掌控ansysworkbench平台的常规设置,包含单位设置、外观颜色设置等。
1.1ansys软件简介ansys提供广泛的工程仿真解决方案,这些方案可以对设计过程要求的任何场进行工程虚拟仿真。
全球的诸多组织都相信ansys为它们的工程仿真软件投资带来最好的价值。
ansys软件就是融结构、流体、电场、磁场、声场分析于一体的大型通用型有限元分析软件。
由世界上最小的有限元分析软件公司之一、美国ansys公司研发,它能够与多数cad软件USB,同时实现数据的共享资源和互换。
软件主要包括3个部分:前处理模块,分析计算模块和后处理模块。
(1)前处置模块提供更多了一个强悍的实体建模及网格分割工具,用户可以便利地结构有限元模型。
(2)分析计算模块包括结构分析(线性分析、非线性分析和高度非线性分析)、流体动力学分析、电磁场分析、声场分析、压电分析以及多物理场的耦合分析,可模拟多种物理介质的相互作用,具有灵敏度分析及优化分析能力。
(3)后处理模块可以将计算结果以彩色等值线表明、梯度表明、矢量表明、粒子流迹表明、立体切片表明、透明化及半透明表明(可以看见结构内部)等图形方式表明出,也可以将计算结果以图表、曲线形式表明或输入。
WorkBench教程
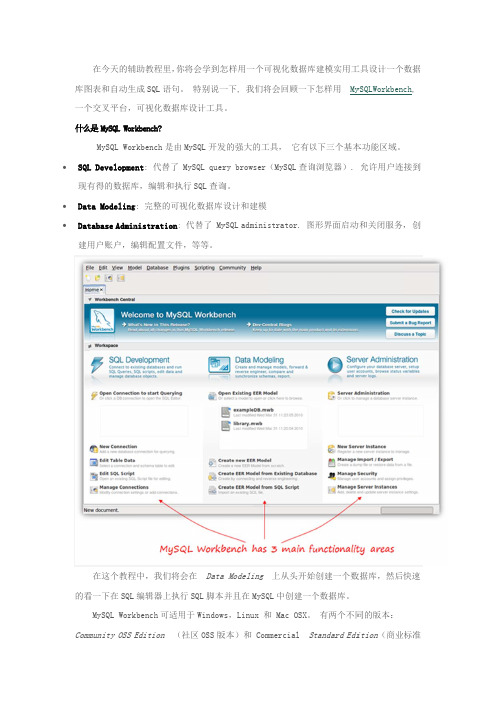
库图一个什么∙ SQL 现有∙Dat∙Dat建用的看Comm 在今天的辅图表和自动生个交叉平台,是 MySQL Wor MySQL Wor L Developme 有得的数据库ta Modeling tabase Admin 用户账户,编在这个教程看一下在SQL MySQL Work munity OSS E 辅助教程里,你生成SQL 语句可视化数据rkbench?rkbench 是由ent : 代替了 库,编辑和执g : 完整的可nistration :编辑配置文件程中,我们将编辑器上执kbench 可适用Edition (你将会学到怎。
特别说一据库设计工具由MySQL 开发MySQL quer 执行SQL 查询视化数据库设: 代替了 My 件,等等。
将会在 Data 执行SQL 脚本用于Window (社区OSS 版怎样用一个可一下, 我们将。
发的强大的工ry browser 询。
设计和建模ySQL adminis a Modeling 并且在MySQ s,Linux 和版本)和 Com 可视化数据库将会回顾一下工具, 它有以(MySQL 查询strator. 图上从头开始QL 中创建一个和 Mac OSX。
mmercial S 库建模实用工下怎样用 My 以下三个基本询浏览器). 图形界面启动始创建一个数个数据库。
有两个不同Standard Edi 工具设计一个ySQLWorkben 本功能区域。
允许用户连动和关闭服务数据库,然后同的版本:ition (商业个数据ch , 连接到, 创快速业标准版本文章本发开始作为对于当设一个本)。
社区版章里用到的。
备注: 这个发行时写的(2创建数据库为了学会怎为案例。
假如于我们这个小设计我们的图个老师可以教版本是开源和商业版本增个辅助教程是2010.4)。
怎样使用 MyS 如一组老师想小的项目,我图表时, 我们教很多学科和GPL 授权的加了一些其他是基于Commun SQL Workbenc 想给几门学科我们应该存储需要知道以的,正如你所他的功能,像nity OSS Ed ch, 我们将会提供在线课程以下信息:下几组数据之所期望的。
ANSYS workbench 入门介绍

镜像、移动、删除、缩放、 缝合、简化、转换、旋转、 切除材料、表面印记
20
参数化建模
21
参数管理器
22
ME
23
24
分析步骤
25
预处理:几何体特性
定义材料属性
26
预处理:几何体接触关系
定义接触关系
接触关系: 绑定、无分离、无 摩擦、有摩擦、粗 接触等
点焊定义(Spot weld) 提供了在分离点上连接 壳体组件的方法: 目前,只有 DesignModeler和 Unigraphics支持点焊。
Design Modeler
10
草绘建模
导入模型
11
二维草绘命令
草 绘
草图修改
尺寸标注
栅格设置
施加约束 关系
12
导入导出模型
导入
CAD模型两种途径导出CAD模型
13
三维模型的状态
14
高级几何体操作(常用)
1、抽壳
15
2、倒圆角
16
3、倒角
17
4、布尔操作
18
5、阵列特征
19
6、体操作
5
二、Workbench界面
预定义模板
6
选择合适的单位制
用户自定义单位系统
7
Engineering Data
材料列表
具体材料 属性图表
材料属性
8
9
DM
? Design Modeler (DM) 是ANSYS Workbench 的一 个组分。
? 类似于CAD的建模器, 可以建模,亦可对导入 的模型进行修改、简化 等操作
3
有限元基本概念
概念
把一个原来是连续的物体划分为有限个单元,这些单元通过有限个节 点相互连接,承受与实际载荷等效的节点载荷,并根据力的平衡条件 进行分析,然后根据变形协调条件把这些单元重新组合成能够整体进 行综合求解。 有限元法的基本思想—离散化。
第2讲Workbench建模

适用于复杂的几何体 1. 创建二维草图(Sketch) 2. 扫掠/拉伸/旋转/缩放/合并/剪切等
Geometry CAD建模
直接建模
方法:Create->Primitives 例:创建球体,选择Sphere,在Tree Outline中会出现Sphere1,
在Details View中用户需输入相关参数,然后在Sphere1上单击右 键菜单选择Generate
Mesh 划分网格
创建——草图构建
5. 设置域属性 在Tree Outline的最下方,列出了所有的域, 选中域Solid,在Detail View中设置为 “Fluid”
Mesh启动
1. 刷新CAD数据 回到Workbench,在项目的Mesh模块上单 击右键菜单选择“Refresh”,待刷新完毕 双击Mesh模块启动
第2讲Workbench建模
User Interface 用户界面
如何启动任务
——任务类型 ——几何建模 ——划分网格 ——计算设置 ——计算 ——后处理 ——任务名(可修改)
模块的状态
User Interface 用户界面
关于模块状态的说明
Unfulfilled ( ):上游模块没有数据。 Refresh Required ( ):上游数据有变化,本级任务需要刷新数据 。例如Geometry改变,Meshing模块需要刷新数据。 Attention Required ( ):上游模块的数据已经传入本级模块,但 是本级模块的设置还未完成。例如网格(Meshing模块)已经划分完 毕,Setup模块需要等待用户设置。 Update Required ( ):设置发生改变,需要重新计算。例如更新 了Geometry模块中的参数,几何体发生改变,则Meshing模块需重新 生成网格。 Up To Date ( ):设置或计算已经完成。 Interrupted ( ):计算过程被用户中止。例如设定迭代步数1000步 ,计算到500步时被用户 中止。 Input Changes Pending ( ):设置有改动,但已有计算结果,有 待于更新。例如前一次计算已有结果,但是修改了部分设置,可以重 新计算。
Shure WWB Wireless Workbench Quick Start Guide

WWBWireless Workbench Quick Start GuideThe quick setup guide for Shure Wireless Workbench software.Version: 5.0 (2023-F)Table of ContentsWWB Wireless Workbench Quick Start Guide3 Overview3 Step 1: Download Wireless Workbench 3 Step 2: Connect Shure devices to your network 3 Automatic IP addressing 4 Manual IP addressing 4 Step 3: Configure the firewall 4 Mac 5Windows 5 Step 4: Open Wireless Workbench 5 Step 5: Verify your network connection 6 Network troubleshooting 6 Step 6: Coordinate frequencies7 Step 7: Set transmitter frequencies using IR sync7 Step 8: Monitor and control your system8 Step 9: Learn more 8••••••••••WWBWireless Workbench Quick Start GuideOverviewWireless Workbench (WWB) is free device management, coordination, and monitoring software that helps RF coordinators, touring, broadcast, theater and house of worship audio professionals manage everything from pre-show planning to frequency coordination, live channel monitoring, and post-performance analysis.Note: This is a quick setup guide for Wireless Workbench. For the full instruction manual, see the Wireless Workbench help page .By bringing together networkable and non-networkable Shure and third-party devices combined with RF data, this software al-lows you to quickly manage and coordinate your wireless devices so you can focus on mixing. Workbench facilitates quick and easy configuration, operation, and monitoring of your wireless devices, and is compatible with the following Shure networked systems:QLX-D Digital Wireless System ULX-D Digital Wireless System Axient Wireless Management Network PSM 1000 Personal Monitoring System UHF-R Wireless System Axient Digital Wireless System SLX-D Digital Wireless System ResourcesFor detailed help with Wireless Workbench, visit the Wireless Workbench Help page . To find the same help content within Wireless Workbench, press F1 or go to Help > Wireless Workbench help system .Other online resources:Workbench release notesWorkbench video tutorialsAnswers to frequently asked questionsStep 1: Download Wireless WorkbenchTo download Wireless Workbench, visit the Wireless Workbench page . Launch the installer and follow the steps to complete the installation.Note: You must be logged in to your computer as an administrator to install Wireless Workbench.®®®®®®®1.2.3.1.2.3.4.Step 2: Connect Shure devices to your networkWireless Workbench communicates with connected devices through an Ethernet network. Each device on the network must have a unique and valid IP address assigned to communicate with other devices on the network. IP addresses can be as-signed automatically by a computer, switch, or router that employs DHCP addressing.Automatic IP addressingTo take advantage of DHCP addressing, Shure devices have an automatic IP mode for quick and easy setup. If specific IP ad-dresses need to be assigned, the IP mode can be set to manual.Connect your computer and devices using CAT5 or better Ethernet cable. For multiple device systems, adding a routeror switch as shown in the diagram is recommended. Avoid using cross-over cables for any connections.Turn on your computer and all devices connected to the network.For each device, enter the network menu and set the IP address mode to Automatic to enable automatic IP addressing.Manual IP addressingAs an alternative to automatic IP addressing, a manual addressing option is available if you want to assign specific IP address-es to your devices.Connect your computer and devices using CAT5 or better Ethernet cable. For multiple device systems, adding a routeror switch as shown in the diagram is recommended. Avoid using cross-over cables for any connections.Turn on your computer and all devices connected to the network.For each device, enter the network menu and set the IP address mode to Manual.Assign unique IP addresses to each device. Assign the identical subnet mask to all devices.Step 3: Configure the firewallIf you have a firewall protecting your computer, you'll need to grant access to Wireless Workbench. Log in to your computer as an administrator to gain full access to your firewall settings or contact your IT administrator for help.For third-party firewall software, refer to the manufacturer's instructions for granting access to each instance of an application (there may be more than one instance).Note: If you receive an alert pop-up that blocks Wireless Workbench, check the boxes to allow access for all networks (Domain Networks, Private Networks, and Public Networks).1.2.3.◦◦1.2.◦◦1.2.MacFrom System Preferences , access firewall settings.If the firewall is on, open the Firewall Options to view the applications that request network access.For each of the following applications, select Automatically allow built-in software to receive incoming connections andAutomatically allow downloaded signed software to receive incoming connections :snetDameonWireless Workbench.appWindowsOpen the Windows Firewall on your computer.Place a check next to each instance of an application--there may be more than one instance--for the following applica-tions to allow access to Domain Networks, Private Networks, and Public Networks:snetDameonwireless workbenchRefer to the Microsoft Support website if you need more help with firewall configuration.Step 4: Open Wireless WorkbenchIn the welcome screen, set up a network connection and choose to create or open a show.Choose a network: Select the network that closely matches the numbering order and format of the IP address yourdevice is connected to. The first few numbers of the address shown in Wireless Workbench will match the first fewnumbers of the device's IP address.Tip: If you're not sure which IP address to choose, go to the network menu on the device to see what IP address it is using. Model-specific instructions for accessing the network menu are available in the hardware user guides, found on the user guide home page .Open an existing show or create a new show. If you create a new show, you are prompted to enter show informationand add devices to your show. Click Closewhen you are finished adding devices.1.2.3.• 1.2.• 1.Step 5: Verify your network connection Once you have selected a network, confirm the connection by looking for the network icon () on the display or front panel ofeach device.Devices connected to the network will automatically appear in the Inventory tab. To verify that your devices are connected:View the device ID, channel name, and other parameters.Click a device icon to flash the front panel of the device for remote identification.Verify that the devices online indicator is green. The number of devices listed should match the number of devices con-nected to the network.Network troubleshootingTry the following solutions for common problems. If the issue you're having doesn't appear here, see the Network Trou-bleshooting topic of the full Wireless Workbench help system .If the network icon doesn't appear on a device's screen:Check all cables and connections.Click the network status indicator and verify that the IP address of the network in your preferences correspondswith the IP addresses of your networked devices.If one of your devices doesn't appear in the Inventory tab:Check IP address to verify that device is on the same network as the computer network. Select Reports >Firmware and Network Summary for a report of the IP addresses of your computer and any discovered devices.2.•1.2.3.4.5.6.Open a terminal and try to ping the IP address of the device (to do this, type "ping" and enter the device's IP ad-dress).If the Device online indicator is gray, click the network status indicator and verify that the IP address of the network in your preferences corresponds with the IP addresses of your networked devices.Step 6: Coordinate frequenciesIn the Frequency coordination tab, you can organize, manage, and calculate frequencies for your system. As part of the coordi-nation, you can analyze the frequencies to make sure they are compatible with all the devices in your system and then deploy them to your devices.Perform a scan. In the scanning sidebar, select devices to scan with and start the scan.Add frequencies to the coordination. In the Add frequencies tab, choose to select frequencies from the inventory.Choose All frequencies from Inventory and click OK to bring frequencies into the coordination workspace.Select Analyze to check the compatibility of the current frequencies.Select Calculate to find compatible frequencies for all unlocked entries.Select Assign and Deploy to preview the assignments of channels and frequencies.Deploy the frequencies to your devices.Step 7: Set transmitter frequencies using IR syncPerforming an IR sync automatically tunes the portable device to the same frequency that was deployed to the networked de-vice. When the IR sync is complete, a wireless audio channel is formed between the two devices.Align the IR sync windows of the portable device and networked device, and then press sync or access the sync menu. Refer to the hardware user guides for details about IR sync for your model of transmitter and receiver.1.2.3.4.5.Step 8: Monitor and control your systemIn the Monitor tab, you can add channel strips and Mini-Timelines to monitor your devices. The properties panel displays RF and audio meters and allow you to adjust parameters in real-time.Add channel strips and a Mini-Timeline by dragging and dropping channels from the right pane. You can also use theStrip and Timeline checkboxes.Right-click a channel strip to see configuration options.Double-click a channel strip to see and change detailed device parameters.Click Auto to update the way your channel strip is arranged. Snap it to the frame or move it freely about the screen.Select the gear icon in the lower-right corner of the screen to customize channel strips.Step 9: Learn moreFor more information and support for Wireless Workbench, see the following resources: Shure Audio Institute - Trainings, educational materials, and other instructional content Wireless Workbench video tutorials on YouTubeWireless Workbench release notesAnswers to frequently asked questions。
WindRiverWorkbench
Wind River Workbench是一个基于Eclipse的开发套件,可以很方便的创建项目,完成host-target的通信,运行,调试,监视VxWorks的应用。
创建项目和开发源代码Workbench包含了多个被定义好的项目类别,并对这些项目以及用户自定义的项目提供完全的支持。
Workbench Editor提供了代码模板,参数提示,代码完成建议,以及快速加入断点等功能帮助用户开发代码。
Workbench提供了工具以供查找普通代码以及特定的表达,必要时还可以对这些代码进行替换。
解析源文件Workbench使用静态解析源代码的方法,高亮多种语言句法,定制导航。
另外,静态分析对某些特征如,浏览和调用树中对于的数据。
在一个项目中设置静态分析和解析代码选项后,可以在团队中共享这些设置。
调试应用调试会使你不断的在target上加载应用,Workbench则允许你再配置相关信息后,点击按钮来加载项目。
当你链接调试器,可以在Debug视图监视和控制加载的项目进程。
整合EclipseWorkbench基于eclipse,因此可以将编辑,解析,调试三个插件工具整合在一起。
另外,还可以将Workbench安装在一个已存在的eclipse上。
启动Workbenchwindows下,选择Start > All Programs > Wind River >Workbench 3.x >Wind River Workbench 3.xSolaris or Linux下,在安装目录下,使用% ./startWorkbench.sh 命令风河运行时分析工具运行时分析工具是一系列实时调试工具,包括:内存分析器,统计器,数据监视器,代码覆盖分析,函数跟踪命令行开发工具wind river提供了命令行开发工具,以便配置和构建VxWorks操作系统,开发内核应用,实时应用等。
这些工具包括makefile系统,vxprj配置和构建工具,编译器和其他功能。
- 1、下载文档前请自行甄别文档内容的完整性,平台不提供额外的编辑、内容补充、找答案等附加服务。
- 2、"仅部分预览"的文档,不可在线预览部分如存在完整性等问题,可反馈申请退款(可完整预览的文档不适用该条件!)。
- 3、如文档侵犯您的权益,请联系客服反馈,我们会尽快为您处理(人工客服工作时间:9:00-18:30)。
What is the Endeca Information Access Platform?.......................................................................................9 Exploring data with Guided Navigation applications..............................................................................9 Understanding records, dimensions, and propertie...........................................10 The makeup of an Endeca implementation.........................................................................................11
What is Endeca Workbench?......................................................................................................................12 Roles in Endeca Workbench...............................................................................................................12 Working with others.............................................................................................................................12
Appendix A: Stop Words..........................................................................47
Suggested Stop Words...............................................................................................................................47
About merchandising...........................................................................................................................17 Sample dynamic business rule............................................................................................................18 Typical merchandising uses.................................................................................................................20 About zones, styles, and rule groups...................................................................................................27 About approval workflow and dynamic business rules........................................................................28 Working with business rules................................................................................................................36 Managing keyword redirects.......................................................................................................................38 Managing automatic phrases......................................................................................................................40 Managing thesaurus entries.......................................................................................................................40 Managing stop words..................................................................................................................................42 Viewing Endeca Workbench resources that are locked..............................................................................43 Ordering dimensions and dimension values...............................................................................................44 Viewing reports...........................................................................................................................................46
Chapter 2: Using Endeca Workbench.....................................................15
Logging in to Endeca Workbench...............................................................................................................15 Logging out of Endeca Workbench.............................................................................................................16 Managing dynamic business rules..............................................................................................................17
iii
Copyright and disclaimer
Product specifications are subject to change without notice and do not represent a commitment on the part of Endeca Technologies, Inc. The software described in this document is furnished under a license agreement.The software may not be reverse engineered, decompiled, or otherwise manipulated for purposes of obtaining the source code. The software may be used or copied only in accordance with the terms of the license agreement. It is against the law to copy the software on any medium except as specifically allowed in the license agreement. No part of this document may be reproduced or transmitted in any form or by any means, electronic or mechanical, including photocopying and recording, for any purpose without the express written permission of Endeca Technologies, Inc. Copyright © 2003-2009 Endeca Technologies, Inc. All rights reserved. Printed in USA. Portions of this document and the software are subject to third-party rights, including: Corda PopChart® and Corda Builder™ Copyright © 1996-2005 Corda Technologies, Inc. Outside In® Search Export Copyright © 1991, 2007 Oracle. Rosette® Globalization Platform Copyright © 2003-2005 Basis Technology Corp. All rights reserved. Teragram Language Identification Software Copyright © 1997-2005 Teragram Corporation. All rights reserved.