JIRA+SQLServer配置指南
SQLServer镜像配置操作
SQLServer 数据库镜像配置文档1.设置SQLServer服务启动账户a)在“主服务器”及“从服务器”2个服务器上,都创建一模一样(包括登录名及密码都一样)的Windows登录账户。
例如:在主服务器上创建登录名aa 密码123456的账户,那么在从服务器上也相应创建登录名aa 密码123456的账户。
b)为上面创建的Windows账户分配权限。
至少分配为管理员权限,也可全部分配所有权限。
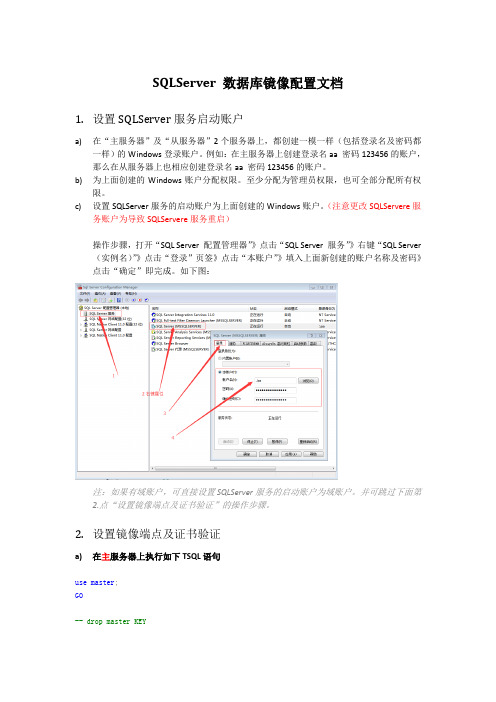
c)设置SQLServer服务的启动账户为上面创建的Windows账户。
(注意更改SQLServere服务账户为导致SQLServere服务重启)操作步骤,打开“SQL Server 配置管理器”》点击“SQL Server 服务”》右键“SQL Server (实例名)”》点击“登录”页签》点击“本账户”》填入上面新创建的账户名称及密码》点击“确定”即完成。
如下图:注:如果有域账户,可直接设置SQLServer服务的启动账户为域账户。
并可跳过下面第2.点“设置镜像端点及证书验证”的操作步骤。
2.设置镜像端点及证书验证a)在主服务器上执行如下TSQL语句use master;GO-- drop master KEYCREATE MASTER KEY ENCRYPTION BY PASSWORD='123456';GO-- DROP CERTIFICATE host_1_certCREATE CERTIFICATE host_1_cert WITH SUBJECT='镜像出站证书 Principal Server Certificate', START_DATE='2017/01/01',EXPIRY_DATE='2025/01/01';GO-- DROP ENDPOINT 镜像出站CREATE ENDPOINT镜像出站STATE=STARTEDAS TCP (LISTENER_PORT= 5022,LISTENER_IP=ALL)FOR DATABASE_MIRRORING(AUTHENTICATION=CERTIFICATE host_1_cert,ENCRYPTION= REQUIRED ALGORITHM AES,ROLE=ALL);GOBACKUP CERTIFICATE host_1_cert TO FILE='D:\Certs\host_1_cert.cer'GOb)在从服务器上执行如下TSQL语句USE masterGO-- drop master KEYCREATE MASTER KEY ENCRYPTION BY PASSWORD='123456';GO-- DROP CERTIFICATE host_2_certCREATE CERTIFICATE host_2_cert WITH SUBJECT='镜像入站证书 Mirror Server Certificate', START_DATE='2017/01/01',EXPIRY_DATE='2025/01/01';GO-- DROP ENDPOINT 镜像入站CREATE ENDPOINT镜像入站STATE=STARTEDAS TCP (LISTENER_PORT= 5022,LISTENER_IP=ALL)FOR DATABASE_MIRRORING(AUTHENTICATION=CERTIFICATE host_2_cert,ENCRYPTION= REQUIRED ALGORITHM AES,ROLE=ALL);GOBACKUP CERTIFICATE host_2_certTO FILE='D:\Certs\host_2_cert.cer';GOc)交换证书将主服务器D:\Certs\host_1_cert.cer的证书复制到从服务器的D:\Certs\目录下。
SQL Server数据库配置说明

SQL Server数据库配置说明
1、点“开始”,然后“所有程序”,再按照下图所示,点击“SQL Server Management Studio Express”
2、身份验证改为SQL Server,如下图红圈所示,然后点“连接”
2、画红圈的地方点右键,打开“属性”
3、打开服务器属性,点“安全性”,然后如红圈所示把“Windows身份验证模式(W)”改为“SQL Server和Windows身份验证模式(S)”,最后点确定
4、回到此位置如下图
5、点击“安全性”左边小方框内+号
6、点击“登录名”左边小方框内+号
7、双击sa,点一下“强制实施密码策略”左边的方框内小勾,密码(P):改为:sa 然后确认密码(C):改为sa,如下图所示
8、暂时不点确认键,鼠标回到左上角,点击:“状态”,然后点:“启用”,最后点:“确认”
9、
10、
11、
12、
13、
将上图所有红色箭头所示部分改成如图所示设置
15、重新启动电脑,数据库配置成功。
SQLServer教程
SQLServer教程SQLServer 是由Microsoft开发的关系型数据库管理系统,它是一种可靠且高效的数据管理工具。
本教程将帮助您更好地了解SQLServer,并提供使用它的基本知识和技巧。
安装SQLServer-------------------------第一步是安装SQLServer。
您可以在Microsoft官方网站上下载SQLServer的安装程序。
按照安装向导的指示完成安装过程。
一旦安装完成,您将能够开始使用SQLServer。
连接SQLServer-------------------------您可以使用SQLServer Management Studio(SSMS)连接到SQLServer。
打开SSMS,然后在连接窗口中输入正确的服务器名称、身份验证方式和凭据。
一旦连接成功,您将能够访问和管理SQLServer中的数据库。
创建数据库-------------------------在SQLServer中,您可以使用T-SQL语句来创建数据库。
例如,使用以下语句可以创建一个名为"mydatabase"的数据库:```CREATE DATABASE mydatabase;```执行此语句后,您将在SQLServer中看到一个新的数据库。
创建表-------------------------要在数据库中存储数据,您需要创建表。
使用T-SQL语句可以轻松创建表。
例如,使用以下语句可以创建一个名为"employees"的表:```CREATE TABLE employees (id INT PRIMARY KEY,name VARCHAR(50),age INT,salary DECIMAL(10,2));```这将创建一个包含id、name、age和salary列的表。
插入数据-------------------------插入数据是通过使用INSERT INTO语句完成的。
最新jira配置流程说明

j i r a配置流程说明Jira平台配置说明Jira安装完成以后地址栏中输入:http://192.168.0.30:8070/secure/Dashboard.jspa 进行平台配置。
可以对项目中的一些参数进行设置:包括“问题类型”(Issue Types)、“问题状态”(Statuses)“问题等级”(Priorities)等,点击上方的导航菜单进入“管理”界面。
一、基本设置1、设置“问题类型”点击左侧的导航菜单中:Issue Settings—> Issue Types,如下图:在类型列表的下方Add New Issue Type可以添加自己想要的类型,选择对应的图片,点击增加。
还可以对已存在的类型进行编辑和删除。
点击上面的Issue Types Schema 可以定义自己的问题类型的模板,比如在选择问题时只想要“缺陷”和“完善”这两种类型。
如下图:然后再在此模板中增加想要的问题类型,之后直接在项目中使用该类型模板就可以了。
2、设置“问题状态”点击左侧的导航菜单中:Issue Settings—> Statuses,如下图:在状态列表的下方Add New Status中可以添加自己想要的状态。
其中Mode列表示的是:已经被工作流使用Workflows列表示的是:哪个工作流中在使用操作列表示的是:可以对状态进行编辑。
3、设置“问题等级”点击左侧的导航菜单中:Issue Settings—> Priorities,如下图:在状态列表的下方Add New Priority中可以添加自己想要的等级。
输入名称,选择图片,选择等级颜色,点击保存,如下图。
其中:Color列表示的是:根据等级选择的颜色,时用户添加问题等级时自定义的。
Order列表示的是:在创建问题时,报告人选择问题等级的下拉菜单中的顺序。
操作列表示的是:可以选择问题等级的默认值,同时可以对等级进行编辑。
二、用户和组管理如果想让某些人共同拥有操作某些步骤的权限,就要将这些拥有共同权限的人分成一组。
jira数据库配置

Connecting JIRA to SQL Server 2008Skip to end of metadata Page restrictions apply Attachments:2 Added by Andrew Lui [Atlassian Technical Writer], last edited by Rosie Jameson [Atlassian Technical Writer] on Mar 03, 2011 (view change) show commentGo to start of metadataFull Size These instructions will help you connect JIRA to a Microsoft SQL Server 2008 database. On this page: 1. Before you begin: 1.1 Export your existing JIRA data 1.2 Shut down JIRA 2. Configure SQL Server 3. Copy the SQL Server driver to your application server 4. Use the JIRA Configuration Tool 5. Configure the database connection manually 5.1 Configure your application server to connect to SQL Server 5.2 Configure the JIRA Entity Engine 5.3 Next steps Installation notes1. Before you begin:1.1 Export your existing JIRA dataIf you are already using JIRA, create an export of your data as an XML backup. You will then be able to transfer data from your old database to your new database, as described in Switching databases.1.2 Shut down JIRA2. Configure SQL Server1. Create a database for JIRA to store issues in (e.g. jiradb). Note that the collation type must be case insensitive, e.g.: 'SQL_Latin1_General_CP437_CI_AI' is case insensitive. If it is using your server default, check the collation type of your server. Remember the name of this database, as it will be used again when configuring JIRA in steps 4 or 5 of this article. SQL Server uses Unicode encoding to store characters. This is sufficient to prevent any possible encoding problems. 2. Create a database user which JIRA will connect as (e.g. ( See SQL Startup Errors for details.) 3. Create an empty 'schema' in the database (e.g. jiraschema) for the JIRA tables. Please note that a 'schema' in SQL Server 2008 is a distinct namespace used to contain objects, and is different from a traditional database schema. You are not required to create any of JIRA's tables, fields or relationships (JIRA will create these objects in your empty schema when it starts for the first time). You can read more on SQL Server 2008 schemas in the relevant Microsoft documentation. 4. Ensure that the user has permission to connect to the database and create and populate tables in the newly-created schema. 5. Ensure that TCP/IP is enabled on SQL Server and listening on the correct port (the port is 1433 for the default instance of SQL Server). Read the Microsoft documentation for information on how to enable a network protocol (TCP/IP) and how to configure SQL server to listen on a specific port. 6. Ensure that SQL Server is operating in the appropriate authentication mode. By default, SQL Server operates in 'Windows Authentication Mode'. However, if your user is not associated with a trusted SQL connection, i.e. 'Microsoft SQL Server, Error: 18452' is received during JIRA startup, you will need to change the authentication mode to 'Mixed Authentication Mode'. Read the Microsoft documentation on authentication modes and changing the authentication mode to 'Mixed Authentication Mode' 7. Turn off the SET NOCOUNT option. (The JIRA on MS SQL Server document provides details on the errors that occur if SET NOCOUNT is set.) To turn off SET NOCOUNT: Open SQL Server Management Studio and navigate to Tools -> Options -> Query Execution -> SQL Server -> Advanced. The following screenshot displays the configuration panel for this setting in MSSQL Server 2008.jirauser ). Note that jirauser should not be the database owner, but should be in the db_owner role.Ensure that the SET NOCOUNT option is not selected:3. Copy the SQL Server driver to your application serverSkip this step if you are using JIRA Standalone, as JIRA Standalone includes the driver. 1. Download the SQL Server JDBC driver (v1.2.3) from JTDS. Note Microsoft have their own JDBC driver but we have not tested JIRA with it. Previous versions of the MS JDBC driver have been known to cause issues: ( JRA-5760, JRA-6872 ), workflow problems (JRA-8443) and Chinese character problems (JRA-5054). 2. Add the SQL Server JDBC driver jar (jtds-1.2.3.jar) to the lib/ directory.4. Use the JIRA Configuration ToolYou can either use the configuration tool (this section) or configure the corresponding XML file manually (see Section 5) The JIRA Configuration Tool is a GUI tool only available if you are using JIRA Standalone distribution. If you are running a WAR-EAR distribution of JIRA, or have a text-only connection to the JIRA server, you will need to configure the files manually. The JIRA Configuration Tool requires that Java be installed and configured on youroperating system. We recommend using a Java platform supported by JIRA — refer to JIRA Requirements for details. For Windows: Run config.bat in the bin subdirectory of the JIRA Installation Directory. For other supported operating systems: Run config.sh in the bin subdirectory of the JIRA Installation Directory.The Configuration Tool will display your current configuration settings if any are already set. 1. Click the 'Database' tab. 2. From the 'Database type' drop-down choose 'SQL Server'.3. Fill in the connection details for your SQL Server database: Hostname — The name or IP address of the machine that SQL Server is installed on. Port — The TCP/IP port that SQL Server is listening on. You can leave this blank to use the default port. Database — The database that you will be connecting to. (the database name set from step 2 of this article) Username — The user to connect to SQL Server as. Password — The password to use to authenticate with SQL Server. Schema — The schema that you want the DB tables created under.4. After typing in your settings, use the 'Test Connection' button to test the connection settings. The tool will attempt to connect to the database, and give a message with the results. 5. Click 'Save' to save your settings when you are done. 6. Restart JIRA in order for your new settings to take effect.Congratulations — you have finished!5. Configure the database connection manuallySkip this step if you used the JIRA Configuration Tool (see above).5.1 Configure your application server to connect to SQL Server1. Edit the server configuration file and customise the username , password ,driverClassName and url parameters for the Datasource, as shown in the codesample below. ? If you are using JIRA Standalone, the server configuration file that you need to edit isconf/server.xml . conf/Catalina/localhost/jira.xml .If you are using JIRA WAR/EAR, edit the appropriate file on your application server, e.g. for Tomcat, edit<Server port="8005" shutdown="SHUTDOWN"> <Service name="Catalina"> <Connector port="8080" maxHttpHeaderSize="8192" maxThreads="150" minSpareThreads="25" maxSpareThreads="75" enableLookups="false" redirectPort="8443" acceptCount="100" connectionTimeout="20000" disableUploadTimeout="true" /> <Engine name="Catalina" defaultHost="localhost"> <Host name="localhost" appBase="webapps" unpackWARs="true" autoDeploy="true"> <Context path="" docBase="${catalina.home}/atlassian-jira" reloadable="false"> <Resource name="jdbc/JiraDS" auth="Container" type="javax.sql.DataSource" username="[enter db username]" password="[enter db password]" driverClassName="net.sourceforge.jtds.jdbc.Driver" url="jdbc:jtds:sqlserver://localhost:1433/jiradb" maxActive="20" [ if maxActive is not set it uses the default number of the connections (8), which may be too little and can cause performance issues ] [ delete the minEvictableIdleTimeMillis and timeBetweenEvictionRunsMillis params here ] /><Resource name="UserTransaction" auth="Container" type="erTransaction" factory="erTransactionFactory" jotm.timeout="60"/> <Manager className="org.apache.catalina.session.PersistentManager" saveOnRestart="false"/> </Context> </Host> </Engine> </Service> </Server>If you have a named instance, your string may look like url="jdbc:jtds:sqlserver://localhost:1433/jiradb;instance=instance_name" If you can't find this section at all, you've probably got the wrong file — search for mentions of 'jira' in the files under conf/ . If you are using JIRA Standalone, you will also need to edit deleteconf/server.xml , andthe minEvictableIdleTimeMillis and timeBetweenEvictionRunsMillis a ttributes. These attributes are only needed for HSQL, and will degrade performance if they are not removed.5.2 Configure the JIRA Entity Engine1. #* Edit the JIRA Entity Engine configuration file and change the attribute to mssql. If you are using JIRA Standalone, the JIRA Entity Engine configuration file that you need to edit isfield-type-nameatlassian-jira/WEB-INF/classes/entityengine.xml . If you are using JIRA WAR/EAR, the JIRA Entity Engine configuration file that you need to edit is edit-webapp/WEB-INF/classes/entityengine.xml . If you forget to do to make this change and start JIRA, it may create database tables incorrectly. See this page if this happens to you. 2. Change schema-name="PUBLIC" to the name of the schema associated with the database (i.e. the schema you created in step 1.3 above), e.g.schema-name="jira" . Note that the schema must exist in the database before youperform this step. ?<!-- DATASOURCE - You will need to update this tag for your installation.--> <datasource name="defaultDS" field-type-name="mssql" schema-name="jira" helper-class="org.ofbiz.core.entity.GenericHelperDAO" check-on-start="true" use-foreign-keys="false" ...If you are using JIRA WAR/EAR, your application server may require other changes toentityengine.xml (e.g. to customise the jndi-jdbc tag). 5.3 Next stepsYou should now have an application server configured to connect to a database, and JIRA configured to use the correct database type. The next step is to start it up! If you are using JIRA Standalone, start it up and watch the logs for any errors. If you are using JIRA WAR/EAR, rebuild and redeploy the webapp in your application server. Once you have the JIRA server running, you can try accessing the JIRA application in your browser.。
JIRA问题跟踪系统安装与配置手册

JIRA问题跟踪系统安装与配置手册目录1 环境介绍 (1)2 JIRA安装配置与SQL SERVER连接 (1)2.1步骤一:配置JDK (1)2.2步骤二:安装SQL S ERVER 2000 (3)2.3步骤三:创建JIRADB数据库 (3)2.4步骤四:安装JIRA (3)2.5步骤五:修改ENTITYENGINE.XML文件 (3)2.6步骤六:修改SERVER.XML文件 (4)2.7步骤七:配置JTDS驱动文件 (4)2.8步骤八:启动JIRA (5)2.9步骤九:S TOP JIRA (5)2.10步骤十:重启JIRA (5)2.11步骤十一:配置JIRA (5)3 JIRA配置经验总结 (6)1 环境介绍问题跟踪服务器的具体环境以及所需软件如下:(1)操作系统:Windows server 2003(XP也可以)(2)数据库:MS SQL Server 2000、sp4补丁(3)问题跟踪系统:JIRA.Enterprise.Edition.V3.13.4(4)JDK:JDK 1.62 JIRA安装配置与SQL Server连接JIRA是一款问题跟踪系统软件,原系统使用的是软件自带数据库(HSQL),随着数据日益积累,数据量的变大以及安全性考虑,现将数据库从HSQL中移植出来而后转移到MSSQL上,现将JIRA的安装配置以及与SQL Server的连接的具体操作方法介绍如下:2.1 步骤1:配置JDK安装JDK1.6(本文所使用的软件jdk-6u10-rc2-bin-b32-windows-i586-p-12_sep_2008.rar),配置java运行环境。
JAVA环境变量配置步骤:1、首先安装JDK1.6,jdk-6u10-rc2-bin-b32-windows-i586-p-12_sep_2008.rar。
有了这个安装程序,你就可以开发和运行跟JAVA有关的程序。
按照JDK的提示来安装,安装完之后设置环境变量。
JIRA配置管理指南

JIRA配置管理指南JIRA(JIRA Software)是Atlassian开发的一款项目管理和问题跟踪软件。
它为团队提供了一个集中管理项目、任务、缺陷和需求的平台。
在开始使用JIRA之前,首先需要进行一些配置管理,以确保系统能够满足团队的需求和项目的目标。
本文将向您介绍JIRA的配置管理指南,以帮助您正确地配置和管理JIRA系统。
1.创建项目:在JIRA中,项目是您组织和管理任务、缺陷和需求的主要单元。
首先,您需要创建一个项目。
在创建项目时,您需要考虑项目的名称、描述和类型。
选择适当的项目类型对于后续配置和使用非常重要。
2.配置工作流:工作流定义了在项目中的任务、缺陷和需求如何转换和流转。
在配置工作流时,您可以定义状态、转换和相关的属性。
确保您的工作流能够正确地反映项目业务流程,并且满足团队的需求。
3.自定义字段:JIRA允许您自定义字段,以满足特定项目和团队的需求。
在配置自定义字段时,您可以定义字段的类型、名称、描述和选项。
确保您的自定义字段能够提供足够的信息,以便于团队成员正确地理解和填写字段。
4.配置权限:权限是JIRA中的关键概念之一、通过配置权限,您可以控制用户对项目和功能的访问权限。
在配置权限时,您需要考虑角色和用户组,以及用户能够执行的操作。
确保只授权给需要访问和操作的用户相应的权限。
5.创建工作日历:工作日历定义了项目中的工作时间和非工作时间。
在创建工作日历时,您需要定义工作日和非工作日,以及每天的工作时间段。
确保工作日历能够正确地反映项目的实际工作情况,以便于团队准确地计划和管理任务。
6.配置通知:JIRA可以通过电子邮件或站内信通知用户有关项目的变化和更新。
在配置通知时,您需要定义通知的触发事件和收件人。
确保通知设置合理,以便于团队成员及时了解项目的最新进展。
7.配置报告:JIRA提供了各种报告,以帮助团队分析项目的进展和问题。
在配置报告时,您需要选择适当的报表类型,并定义报表的参数和过滤器。
sqlserver中文参考手册

SQL Server中文参考手册一、介绍SQL Server是微软公司开发的一款关系型数据库管理系统,常用于企业级应用程序的开发和数据管理。
它具有强大的数据处理和管理能力,能够支撑大型的数据量和复杂的业务逻辑。
本文将针对SQL Server的中文参考手册进行详细介绍,帮助读者理解和使用SQL Server的各项功能。
二、安装与配置1. 下载与安装在微软全球信息站上可以找到SQL Server的安装程序,根据自己的需求选择相应的版本进行下载。
安装过程中,可以根据向导逐步进行配置,包括选择安装目录、设置数据库引擎配置、配置实例等。
2. 服务设置安装完成后,需要对SQL Server的各项服务进行设置,包括SQL Server数据库引擎服务、SQL Server代理服务等。
可以通过“SQL Server配置管理器”进行相关设置。
三、数据库设计与管理1. 数据库设计SQL Server支持基于数据库模型进行设计,包括创建表、定义字段、设置键与索引等。
可以使用SQL Server Management Studio (SSMS)进行数据库设计。
2. 数据库管理SQL Server提供了丰富的数据库管理功能,包括备份与还原、数据库迁移、容灾与恢复等。
通过SSMS可以轻松进行数据库的管理操作。
四、数据查询与处理1. SQL语法SQL Server支持标准的SQL语法,包括SELECT、INSERT、UPDATE、DELETE等操作。
还支持存储过程、触发器、函数等高级特性。
2. 查询优化SQL Server提供了查询优化器,可以对查询语句进行优化,提高查询效率。
通过执行计划或查询分析工具,可以对查询进行性能分析。
五、安全与权限管理1. 登入与用户SQL Server允许创建多个登入账号,并且可以为不同的数据库设置不同的用户权限。
通过SQL Server安全性功能可以进行相关设置。
2. 数据加密SQL Server支持数据加密功能,可以对敏感数据进行加密保护。
- 1、下载文档前请自行甄别文档内容的完整性,平台不提供额外的编辑、内容补充、找答案等附加服务。
- 2、"仅部分预览"的文档,不可在线预览部分如存在完整性等问题,可反馈申请退款(可完整预览的文档不适用该条件!)。
- 3、如文档侵犯您的权益,请联系客服反馈,我们会尽快为您处理(人工客服工作时间:9:00-18:30)。
1. 开始之前的准备工作
1.1 导出现有JIRA的数据
如果以已经使用了JIRA, 请通过备份XML数据功能来导出JIRA的数据。
这样你就可以把JIRA数据从一个数据库迁移到另一个数据库, 详细方法请参见切换数据库。
1.2 停止JIRA
2. 配置SQL Server
1。
启用SQL Server网络连接
确保您的SQL Server实例允许TCP / IP连接,默认端口列表。
请注意,默认情况下禁用网络连接,在一些版本的SQL Server(如SQL Server 2005 Express版本)。
因此,您必须启用它,如下所述:
要启用TCP / IP为SQL Server,
. 打开“SQL Server配置管理器“。
. 展开“SQL Server 2005的网络配置在控制台窗格中。
. 点击“<实例名>的协议“ 。
. 详细资料窗格中将会显示(见下面的截图)。
右键单击' TCP / IP协议“,然后单击”启用“。
. 点击“SQL Server 2005服务“在控制台窗格中。
. 详细信息窗格中会显示。
右键单击“SQL服务器(<实例名>)“,然后点击”重新启动“停止并重新启动SQL Server服务。
截图:启用TCP / IP为SQL Server 2005
2。
SQL Server的配置与适当的身份验证模式
确保SQL Server是在适当的身份验证模式经营。
默认情况下,SQL Server的工作在“Windows 身份验证模式“。
但是,如果用户不信任的SQL连接相关,即“微软SQL Server,错误:18452“是JIRA的启动期间收到,您将需要更改身份验证模式”混合身份验证模式“。
阅读的身份验证模式更改身份验证模式的说明,微软的文档。
3。
禁用“SET NOCOUNT”选项,在SQL Server
要禁用“SET NOCOUNT”选项在SQL Server,
. 打开“SQL Server Management Studio中”
. 浏览到“工具“ - >”选项“ - >”查询执行“ - >”SQL服务器“ - >”高级“。
SQL Server的高级设置,将显示。
. 确保“SET NOCOUNT“选项未选中,按下面的截图,
截图:禁用“SET NOCOUNT为SQL Server
要设置你的JIRA的SQL Server 2005数据库
①创建一个新的数据库
1. 打开“SQL Server Management Studio中”。
2. 连接到SQL Server,要整合的JIRA与。
默认情况下这将是“本地主机“。
3. 导航到“<服务器名称>“ - > “数据库“的左侧菜单中的“SQL Server Management Studio的“ 。
4. 右键单击“数据库“,根据您的SQL Server服务器的名称,并选择“新建数据库... ...“从下拉菜
单中出现的选项。
5. 将显示“新建数据库“窗口。
在左侧菜单中选择“常规“选项。
6. 将显示“常规“页(见下面的截图)。
在“数据库名称“字段输入jiradb。
7. 在左边的菜单选择“选项“选项。
检查整理类型,整理类型是不区分大小写,例如:
“SQL_Latin1_General_CP437_CI_AI'不区分大小写。
如果它使用的是服务器的默认,检查您的
服务器的排序规则类型。
截图:创建jiradb数据库
8. 点击“OK“按钮来创建数据库。
②创建一个新的数据库用户
1. 导航“<服务器名称>” - >“安全” - >“登录“,在左侧菜单中的”SQL Server Management Studio
中“。
2. _Right单击“登录“文件夹并选择”新建登录“。
3. “登陆-新的窗口将显示。
在左侧菜单中选择“常规“选项。
4. 进入数据库用户的详细信息窗口显示(见下面的截图),如下:
a. 输入“jirauser在“登录名“字段。
b. 选择“SQL Server身份验证“。
c. 输入“jirauser“作为密码,并输入”jirauser中的“再次确认密码“字段。
d. 如果您想强制执行密码策略,检查“强制密码策略“复选框。
但是,请注意您可能需要修改之前
输入的密码(“jirauser),以满足您的密码策略规则(如您的密码策略可能要求所有密码数字字符)。
e. 确保“强制密码过期“复选框未选中。
这将是自动的泛滥,残疾人,如果你有以前未选中“强制密
码策略“复选框。
f. 确保“用户必须更改在下次登录时的密码“复选框未选中。
这将是自动泛滥,残疾人,如果您以
前已经取消选中“强制实施密码策略“复选框。
截图:创建jirauser用户
5. 在左侧菜单中,选择“用户映射“选项。
6. jiradb用户映射字段将显示(见下面的截图)。
“jiradb“复选框打勾。
7. “数据库角色成员身份:jiradb“面板将显示在窗口底部的面板。
“的db_owner“复选框打勾。
8. 截图:创建用户映射为jirauser点击“确定“按钮保存更改。
③创建一个JIRA的数据库架构
1. 导航到“<服务器名称>” - >“数据库” - >“jiradb” - >“安全” - >“架构”,在左侧菜单中的“SQL
Server Management Studio中” 。
2. 右键单击“架构“文件夹中,选择“新模式“
3. “模式-新的”窗口将显示。
在左侧菜单中选择“常规“选项。
4. 将显示“常规“页(见下面的截图)。
填写栏位,如下:
在“架构名称“字段输入jiraschema。
∙输入jirauser在“模式的所有者“领域。
截图:创建JIRA的数据库架构
5. 在左侧菜单中选择“权限“选项。
6. “权限“页面将显示(见下面的截图)。
点击“添加...“按钮。
7. 输入“jirauser在“,”输入对象名称来选择(示例):“弹出窗口,显示领域。
点击' OK '保存您
的更新,并关闭弹出窗口。
8. 在“指定架构权限为jirauser明确许可表“上的”权限“页面,如下:
∙Alter -复选框被选中。
∙Delete -复选框被选中。
∙Insert -复选框被选中。
∙References -复选框被选中。
∙Select-复选框被选中。
∙Update -复选框被选中。
9. 点击“确定“按钮保存更改。
截图:创建JIRA的架构的权限
恭喜,您已经成立了一个SQL Server2005的JIRA数据库
3. 将SQL Server 驱动复制到应用服务器
如果你使用的是JIRA Standalone,请跳过这步, 因为JIRA Standalone 已经包含了这个驱动。
1.
虽然
间歇断线
( JRA-5054
2. 将SQL Server JDBC 驱动jar (jtds-1.2.
3.jar) 文件复制到文件
夹。
4. 使用JIRA 配置工具
JIRA 配置工具是图形化工具,只能用于JIRA Standalone。
如果你使用的是WAR-EAR 版, 或JIRA服务器只有文本模式, 你需要手动配置。
1. 点击'Database' 标签页
2. 从'Database type' 下拉列表中选择'SQL Server'。
3. 填写SQL Server数据库的连接串:
∙Hostname— SQL Server数据库服务器的名称或IP地址。
∙Port— SQL Server数据库服务器监听端口号。
留空将使用默认端口。
∙Database—数据库的名称。
∙Username—访问SQL Server数据库服务器的账号。
∙Password—访问SQL Server数据库服务器的授权密码。
∙Schema—你创建的空schema,JIRA会在这个schema下创建数据表。
4. 输入完以上信息, 点击'Test Connection' 按钮测试连接是否成功。
工具会尝试连接数据库,
并返回测试结果。
5. 点击'Save' 保存你配置的选项。
6. 重新启动JIRA服务器。
祝贺你,你已经完成了数据库配置!
5. 备份数据的导入
之后导入已经备份过的XML数据即可;。