Arcncpu便携式计算机(定制)
投标产品技术参数表
内存32MB
14
高清
电视
55寸
屏幕尺寸:55英寸智能电视:是
屏幕分辨率:超高清4K(3840x2160)
HDR显示:支持屏幕比例:16:9
背光源:LED背光方式:侧入式
3D显示:不支持亮度:1000流明以上
刷屏率:60HZ扫描方式:逐行扫描
水平视角(度)Байду номын сангаас±178°垂直视角(度):±178°
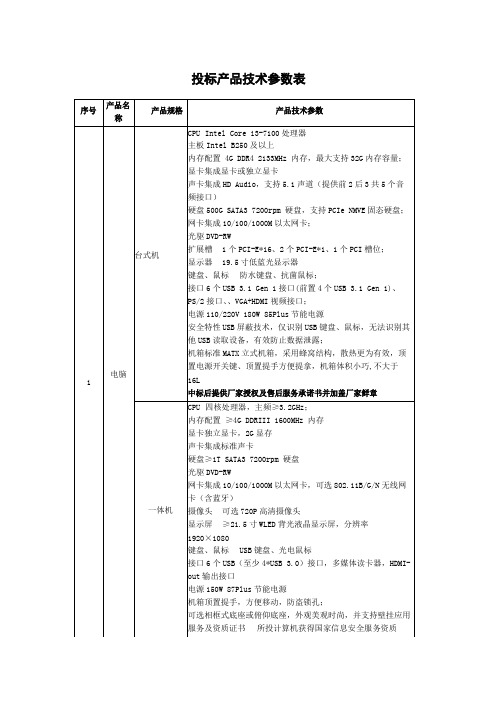
序号
产品名
称
产品规格
产品技术参数
1
电脑
台式机
CPUIntelCorei3-7100处理器
主板IntelB250及以上
内存配置4GDDR42133MHz内存,最大支持32G内存容量;
显卡集成显卡或独立显卡
声卡集成HDAudio,支持5.1声道(提供前2后3共5个音
频接口)
硬盘500GSATA37200rpm硬盘,支持PCIeNMVE固态硬盘;
键盘、鼠标USB键盘、光电鼠标
接口6个USB(至少4*USB3.0)接口,多媒体读卡器,HDMI-
out输出接口
电源150W87Plus节能电源
机箱顶置提手,方便移动,防盗锁孔;
可选相框式底座或俯仰底座,外观美观时尚,并支持壁挂应用
服务及资质证书所投计算机获得国家信息安全服务资质
(安全工程类一级)、制投厂商拥有IT环保处置服务,制造
外部纸架214㎜(8,.4″)?外径搭配76㎜(3″)纸芯
碳带轴心尺寸25.4㎜(1″)-76.2mm(3″)
碳带宽度25.4㎜~114㎜(1″~4.4″)
最大碳带长度300m通讯介面RS232,Centronics
神舟Q120C产品介绍

1.音频输入输 出接口 2.工作指示灯 3.指取设备(触 摸板 +正反 按键) 4.输入区 5.开关键 6.显示区
神舟优雅Q120C
震撼价1999
超便携电脑 配置
处理器类型 处理器型号 处理器主频(GHz ) 二级缓存(KB) 前端总线频率(MHz) 主板芯片组 标准内存容量(MB) Intel Atom Intel 凌动 N270 1.6 512 533 Intel 945GSE 512
电池容量
3芯锂离子电池(2200mAh)
适用范围
1.上网冲浪 2.小型娱乐游戏 3.看电影(除高清 1080P格式) 4.文档or图片处理(除3D 软件)
笔记本左侧
1. 10/100Mbps以 太网卡(RJ45) 2.显示器.投影仪接 口(VGA) 3.外置普通设备接 口(USB) 4. 散热口
笔记本右侧
1. 外置电源接口 2.外置普通设备 接(USB) 3. 4合1读卡器 4. 防盗锁孔 5. 散热口 6.小喇叭
NEC SX-Aurora TSUBASA 系列超级计算机规格说明书
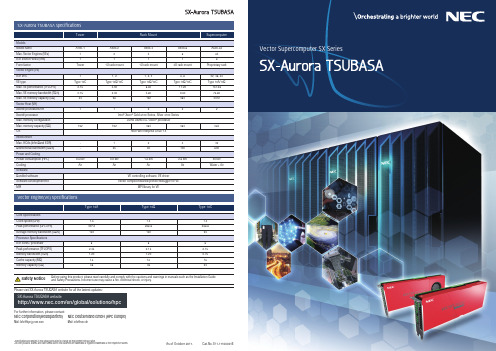
NEC Corporation(Headquarters) NEC Deutschland GmbH (HPC Europe)Vector Engine(VE) SpecificationsVector Supercomputer SX SeriesMail:***********Mail:***********•Speci cations and designs in this catalog are subject to change for improvement without notice.•All other products, brands, and trade names used in this document are trademarks or registered trademarks of their respective holders.Before using this product, please read carefully and comply with the cautions and warnings in manuals such as the Installation Guide and Safety Precautions. Incorrect use may cause a re, electrical shock, or injury.Please visit SX-Aurora TSUBASA website for all the lastest updates:For further information, please contact:SX-Aurora TSUBASA website/en/global/solutions/hpcSafety NoticeCat.No. E11-17100001EAs of October 2017.The new SX architecture contains the Vector Engine (VE) and Vector Host(VH). The VE executes complete applications while the VH mainlyprovides OS functions for connected VEs. The VE consists of one vectorprocessor with eight vector cores, using “high bandwidth memory”modules (HBM2) for utmost memory bandwidth. The world’s rstimplementation of one CPU LSI with six HBM2 memory modules using a“chip-on-wafer-on-substrate” technology (CoWoS) leads to theworld-record memory bandwidth of 1.2 TB/s.It is connected to the VH, a standard x86/Linux node, through PCIe. This newS X a r c h i t e c t u r e,w h i c hexecutes an entire applicationon the VE and the OS on theV H,c o m b i n e s h i g h e s tsustained performance, forwhich vector processors arefamous, in a well-knownx86/Linux environment.•Vector processor + x86/Linux architectureSupporting a GNU environment, the SX-Aurora TSUBASA offersFortran/C/C++ compilers with advanced automatic vectorization andparallelization for industry leading sustained performance and MPI librariesoptimized for system con gurations of the SX-Aurora TSUBASA.A supercomputer is a tool to increase the productivity of researchers anddevelopers. For users to achieve the optimal vector-processor performance,the SX-Aurora TSUBASA offers the following major software features:Inherited ease of use as a research and development tool•Compiler with automatic vectorization and parallelizationScienti c computing libraries optimized for SX-Aurora TSUBASA areavailable. These libraries include the industry standard BLAS, FFT, LAPACK,and ScaLAPACK.•Rich scientific computing libraryThe vector core on the VE processor is the most powerful single core in HPCas of today, thus keeping the design philosophy from the previous SX series.It will achieve industry leading calculation performance per core (307GFLOPS)*1 and memory bandwidth per core (150 GB/s)*1.With eight cores the vector processor will execute applications withextremely high sustained performance. It features 2.45 TF peak performanceand the world’s highest memory bandwidth per processor, 1.2 TB/s. Differentfrom standard processors a vector architecture is known to achieve asigni cant fraction of the peak performance on real applications.The vector processor employs 16nmF i n F E T p r o c e s s t e c h n o l o g y f o rextremely high performance and lowpower consumption.•Extremely high capability core and processor with extremely high memory bandwidth•State of the art technology forhigh sustained performanceVE cards with one vector-processor and high memory bandwidth HBM areused in a wide range of models. The product portfolio features a tower modelthat can be used on a user’s desk to a supercomputer model for alarge-scale supercomputer center. The product can be exibly con gured tomeet the most demanding computational needs.From entry model to supercomputer modelBroad supercomputer-applicable targetsBio, Healthcare, Drug discovery,Gene analysisAI, IoT, Image analysis, New energy Big data analytics, Finance,Next-generation distributionStructural analysis, Fluid analysis,New material developmentResearch and development,Large scale supercomputer centerClimate change, Weather forecast, Disaster preventionand mitigation, Resource explorationThe SX-Aurora TSUBASA offers up to 157 TF performance per rack and amemory bandwidth of up to 76 TB/s with 30 kW of power consumption,realizing 1/10 of the oor space and 1/5 of the power consumptioncompared to the predecessor SX-ACE.*2 This is a result of our innovationusing cutting edge LSI and packaging technologies such as the CoWoSimplementation, allowing for a thin wafer integration.10x space e ciency and 5x power e ciencySX-AuroraTSUBASA A500-64160TFLOPS10 racks•170KW157TFLOPS1 rack•30KW1/10 footprint1/5 PowerconsumptionNew SX architectureVHVector HostVEVector Engine*1: as of October, 2017 (according to NEC’s research), *2: Comparison in theoretical peak performanceVector EngineSX-Aurora TSUBASA series。
航天科工自主可控硬件产品手册
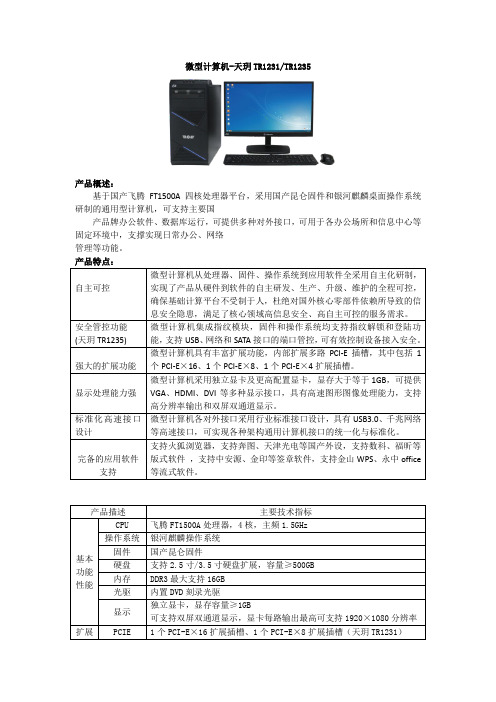
微型计算机-天玥TR1231/TR1235产品概述:基于国产飞腾FT1500A四核处理器平台,采用国产昆仑固件和银河麒麟桌面操作系统研制的通用型计算机,可支持主要国产品牌办公软件、数据库运行,可提供多种对外接口,可用于各办公场所和信息中心等固定环境中,支撑实现日常办公、网络管理等功能。
产品特点:微型计算机-天玥TR117*产品概述:基于国产龙芯3A3000四核处理器平台,采用国产昆仑固件和中标麒麟桌面操作系统研制的通用型计算机,可支持主要国产品牌办公软件、数据库运行,可提供多种对外接口,可用于各办公场所和信息中心等固定环境中,支撑实现日常办公、网络管理等功能。
微型计算机(一体式)-天玥TR3231产品概述天玥TR3231微型计算机(一体式)是以国产飞腾FT1500A处理器为核心,采用符合UEFI2.3标准的国产昆仑桌面版固件和麒麟桌面操作系统的通用型计算机。
台式计算机(一体式)主要由主板、内存、硬盘、独立显卡、光驱、风扇模组、电源模块、机箱组成,可支持主要国产品牌数据库(达梦、金仓、南通、神通等)连接工具的运行,支持可信硬件模块扩展,可提供多种对外接口,适用于我军各级固定指挥所、通信站台、网络控制室、值班室试验基地、办公场所和信息中心(节点)等固定环境中,支撑实现指挥作业、通信业务、安全控制、网络管理、值班交换等功能。
Mini 主机-天玥TR5171产品概述:天玥 TR5171 型 Mini 主机是专门针对“两个终端”问题研制的一款小型国产化终端产品,基于龙芯 3A3000 处理器,搭载中标麒麟操作系统,同时内置 KVM 功能,用最小的体积解决“两个终端”切换问题。
产品支持主流国产品牌办公软件,主要用于各办公场所,降低终端占地面积。
产品特点:Mini 主机-天玥TR5231产品概述:天玥 TR5231 型 Mini 主机是专门针对“两个终端”问题研制的一款小型国产化终端产品,基于飞腾处理器,搭载银河麒麟操作系统,同时内置 KVM 功能,用最小的体积解决“两个终端”切换问题。
CPU排行榜十大最佳迷你台式机处理器推荐

CPU排行榜十大最佳迷你台式机处理器推荐对于许多迷你台式机用户来说,选择一款性能出色的处理器是至关重要的。
一个高效的处理器不仅可以提供流畅的计算体验,还能保证应对多任务处理和复杂计算的能力。
在这篇文章中,我们将为您介绍当前市场上排名前十的最佳迷你台式机处理器,以协助您在购买时做出明智的选择。
1. 英特尔 Core i9-9900K:这款处理器是英特尔第九代酷睿系列的旗舰型号。
它拥有8个物理核心和16个线程,主频高达5.0 GHz。
这使得它成为了当前最强大的迷你台式机处理器之一。
2. 英特尔 Core i7-9700K:这款处理器与英特尔 Core i9-9900K 类似,拥有8个物理核心和8个线程,主频高达4.9 GHz。
虽然它在多任务处理能力上稍逊于前者,但在性价比方面更具吸引力。
3. AMD Ryzen 9 3900X:这款处理器是AMD最新一代锐龙系列的旗舰型号。
它拥有12个物理核心和24个线程,主频高达4.6 GHz。
它不仅在多任务处理方面表现出色,还具有出色的能效比和高度可靠性。
4. AMD Ryzen 7 3700X:这款处理器是AMD Ryzen系列中性价比最高的模型之一。
它拥有8个物理核心和16个线程,主频可达4.4 GHz。
性能稳定可靠,适合进行中等负载任务处理。
5. 英特尔 Core i5-9600K:这款处理器是英特尔第九代酷睿系列中的主打型号。
它拥有6个物理核心和6个线程,主频为4.6 GHz。
虽然相比前述处理器性能稍低,但在轻负载任务中表现出色。
6. AMD Ryzen 5 3600:这款处理器是AMD锐龙系列中的高性价比选择。
它拥有6个物理核心和12个线程,主频为4.2 GHz。
适用于中等负载的日常使用。
7. 英特尔 Core i3-9100F:这款处理器是英特尔第九代酷睿系列中的入门级型号。
它拥有4个物理核心和4个线程,主频为4.2 GHz。
适用于轻负载的办公任务和娱乐应用。
莫克A V2201系列极小型x86嵌入式计算机产品说明书
P/N: 1802022010015 *1802022010015*V2201 SeriesQuick Installation GuideVersion 3.3, April 2023Technical Support Contact Information/support2023 Moxa Inc. All rights reserved.OverviewThe Moxa V2201 Series ultra-compact x86 embedded computer is based on the Intel® Atom™ E3800 Series processor, features the most reliable I/O design to maximize connectivity, and supports dual wireless modules, making it suitable for a diverse range of communication applications. The computer’s thermal design ensures reliable system operation in temperatures ranging from -40 to 85°C, and wireless operation in temperatures ranging from -40 to 70°C with a special purpose Moxa wireless module installed. The V2201 Series supports Proactive Monitoring function for device I/O status monitoring and alerts, system temperature monitoring and alerts, and system power management. Closely monitoring the system status makes it easier to recover from errors and provides the most reliable platform for your applications.Package ChecklistBefore installing the V2201, verify that the package contains the following items:•V2201 embedded computer•Terminal block to power jack converter•Wall mounting kit•Quick installation guide (printed)•Warranty cardNOTE Notify your sales representative if any of the above items are missing or damaged.V2201 Panel LayoutThe following figures show the panel layouts of the V2201-W models. In the “non -W” models, the five antenna connectors will not be installed during production.Front PanelRight PanelLeft PanelLED IndicatorsThe following table describes the LED indicators located on the front panel of the V2201.LED Name Status Function Power Green Power is on and computer is functioning normally.Off Power is offUser Defined Red Event has occurred Off No alert mSATA Yellow Blinking: Data is being transmittedOff Not connected / No data transmissionSD Card Yellow Blinking: Data is being transmittedOff Not connected / No data transmissionWireless 1 Green Steady On: Link is OnBlinking: Data is being transmittedOff Not connectedWireless 2 Green Steady On: Link is OnBlinking: Data is being transmittedOff Not connectedLAN 1 Yellow Steady On: 1000 Mbps Ethernet linkBlinking: Data is being transmittedGreen Steady On: 100 Mbps Ethernet linkBlinking: Data is being transmittedLED Name Status FunctionOff 10 Mbps Ethernet link or LAN is not connectedLAN 2 Yellow Steady On: 1000 Mbps Ethernet linkBlinking: Data is being transmittedGreen Steady On: 100 Mbps Ethernet linkBlinking: Data is being transmittedOff10 Mbps Ethernet link or LAN is not connectedTx 1 Green Blinking: Data is being transmittedOff Not connectedTx 2 Green Blinking: Data is being transmittedOff Not connectedRx 1 Yellow Blinking: Data is being transmittedOff Not connectedRx 2 Yellow Blinking: Data is being transmittedOff Not connectedNOTE The Mini PCIe card’s LED behavior depends on the moduleInstalling the Wireless ModulesThe V2201 has two Mini PCIe sockets on the rear panel. One socket only supports USB signals using the MC9090, MC7354, or MC7354 Mini PCIe cards. The other socket supports standard USB and PCIe signals.STEP1: Loosen the four screws located at the middle of the rear panel and open the cover.STEP 2: Insert the wireless module card at an angle.STEP 3: Push the wireless module card down and fasten it with the two screws included with the product.The V2201 has the following two Mini PCIe sockets.Socket 1: USB signal, for 3G/LTE Mini PCIe card (Sierra Wireless MC9090, MC7304, or MC7354). NOTE: The cellular card heat sink is installed in socket 1. Socket 2: Standard USB + PCIe signals, for Wi-Fi Mini PCIe card (SparkLAN WPEA-252NI).STEP 4: Connect the corresponding wireless module cards to connectors of the Mini PCIe sockets.The following five connectors are available:No. 1 & No. 3:For the Wi-Fi Mini PCIe card No. 2 & No. 4:For the 3G/LTE Mini PCIe card No. 5:For the GPS moduleSTEP 5: Replace the rear cover.You can also purchase and install external antennas from Moxa. Contact a Moxa sales representative for information.After installing the wireless modules and wireless external antennas, the computer should appear as follows:Installing the V2201DIN-rail MountingThe DK-DC50131 die-cast metal kit (shipped only with V2201-E4-W-T-LX; to be purchased separately for all other models), enables easy and robust installation of the V2201. Use the six M4*6L FMS screwsincluded to attach the DIN-rail mounting kit to the side panel of theV2201.Installation:STEP 1:Insert the upper lip of the DIN rail intothe DIN-rail mounting kit.STEP 2:Press the V2201 towards the DIN railuntil it snaps into place.Removal:STEP 1:Pull down the latch on themounting kit with a screwdriver.STEP 2 & 3:Use the screwdriver to pry theV2201 slightly forward away fromthe DIN rail, and then lift theV2201 upwards to remove it fromthe DIN rail.STEP 4:Press the recessed button on the spring-loaded bracket to lock it into position untilthe next time you need to install theV2201 on to a DIN rail.Wall or Cabinet MountingThe V2201 computers (with the exclusion of the V2201-E4-W-T-LX model) come with two metal brackets for attaching to a wall or the inside of a cabinet. Four screws (Phillips truss headed, M3*6L, and nickel plated with Nylok®) are included in the kit.Step 1:Use two screws for eachbracket and attach the bracketto the rear of the V2201.Step 2:Use two screws on each side toattach the V2201 to a wall orcabinet.The product package does notinclude the four screws requiredfor attaching the wall-mountingkit to the wall or cabinet; theyneed to be purchasedseparately. We recommendusing standard M3*5L screws.Connector DescriptionPower ConnectorConnect the 9 to 36 VDC LPS or Class 2 power line to the V2201’s terminal block. If the power is supplied properly, the Power LED will light up. The OS is ready when the Ready LED glows a solid green.Grounding the V2201Grounding and wire routing help limit the effects of noise due to electromagnetic interference (EMI). Run the ground connection from the grounding screw (M4) to the grounding surface prior to connecting the power.SG:The Shielded Ground (sometimes calledProtected Ground) contact is the right most oneon the 3-pin power terminal block connector when viewed from the angle shown here.Connect the SG wire to an appropriate grounded metal surface.HDMI OutputsThe V2201 comes with a type A HDMI female connector on the front panel to connect an HDMI monitor.The screw hole above the HDMI connector is used to attach a custom lock to the HDMI connector; a custom lock is needed since the shape of different HDMI connectors are not the same. Please contact a Moxa sales representative for details. Before Attaching the LockAfter Attaching the LockEthernet PortsThe 10/100/1000 Mbps Ethernet ports use RJ45 connectors.Pin 10/100 Mbps 1000 Mbps1 ETx+ TRD(0)+2 ETx- TRD(0)-3 ERx+ TRD(1)+4 – TRD(2)+5 – TRD(2)-6 ERx- TRD(1)-7 – TRD(3)+8 – TRD(3)-Serial PortsThe serial ports use DB9 connectors. Each port can be configured by software for RS-232, RS-422, or RS-485. The pin assignments for the ports are shown in the following table:Pin RS-232 RS-422 RS-485(4-wire)RS-485(2-wire)1 DCD TxDA(-) TxDA(-) –2 RxD TxDB(+) TxDB(+) –3 TxD RxDB(+) RxDB(+) DataB(+)4 DTR RxDA(-) RxDA(-) DataA(-)5 GND GND GND GND6 DSR – – –7 RTS – – –8 CTS – – –SD SlotThe V2201 has an SD slot for storage expansion. The SD slot allows users to plug in an SD 3.0 standard SD card. To install an SD card, gently remove the outer cover from the left, and then insert the SD card into the slot.Mini SIM SlotThe V2201 has a Mini SIM slot for 3G/LTE wireless Internet connections. To install a Mini SIM card, gently remove the outer cover from the left, and insert the card into the slot.USB HostsThe V2201 has 1 USB 3.0 and 2 USB 2.0 Type-A connectors. 2 USB 2.0 ports are located on the front panel, and 1 USB 3.0 port is on the right panel. The port supports keyboard and mouse and can also be used to connect a Flash drive for storing additional data.Audio InterfaceThe audio output of the V2201 is combined with the HDMI connector.DI/DOThe V2201 comes with four digital inputs and four digital outputs on a 2 x 5 terminal block.Reset ButtonPress the “Reset Button” on the left side panel of the V2201 to reboot the system automatically. Real-time ClockThe V2201’s real-time clock is powered by a lithium battery. Westrongly recommend that you do not replace the lithium battery without help from a qualified Moxa support engineer. If you need to change the battery, contact the Moxa RMA service team.Powering on the V2201To power on the V2201, connect the “terminal block to power jack converter” to the V2201’s DC terminal block (located on the sidepanel), and then connect the 9 to 36 VDC power adapter. The computer is automatically switched on once the power adapter is plugged in. If it does not, press the Power Button to turn on the computer. Note that the Shielded Ground wire should be connected to the top pin of the terminal block. It takes about 30 seconds for the system to boot up. Once the system is ready, the Power LED will light up.Connecting the V2201 to a PCPower on the V2201 computer after connecting a monitor, keyboard, and mouse, and verifying that the power source is ready. Once the operating system boots up, the first step is to configure the Ethernet interface. The factory default settings for the V2201’s LANs are shown below (W7E uses DHCP):Default IP AddressNetmaskLAN 1 192.168.3.127 255.255.255.0 LAN 2 192.168.4.127255.255.255.0- 11 - Configuring the Ethernet Interface Linux OSIf you use the console cable to configure network settings for the first time, use the following commands to edit the interfaces file:#ifdown –a //Disable LAN1~LAN2 interface first, before you reconfigure the LAN settings. LAN1 = eth0, LAN2 = eth1// #vi /etc/network/interfaces //check the LAN interface first//After the boot setting of the LAN interface has been modified, use the following commands to immediately activate the LAN settings: #sync; ifup –a W7E OSSTEP 1: Go to Start → Control Panel → Network and Internet → Viewnetwork status and tasks → Change adapter setting.STEP 2: In the Local Area Connection Properties screen, click InternetProtocol (TCP/IP) and then select Properties. Select InternetProtocol Version 4, and then click Properties.STEP 3: Click OK after inputting the proper IP address and netmask.NOTERefer to the V2201 user’s manuals for additional configuration information.。
满血规格!盘点4款主流价位的8核16线程处理器轻薄本

满血规格!盘点4款主流价位的8核16线程处理器轻薄本作者:来源:《电脑报》2020年第34期近几年,笔记本的处理器性能可谓节节攀高。
而今年移动端最大的看点就是高规格的处理器开始在主流价位普及,以往性能不错的4核处理器在今年成了入门级别,如果用户需要强悍的性能,则可以考虑规格更高的6核/8核处理器。
特别是轻薄本,在高规格处理器的加持下,如今的轻薄本性能已经媲美甚至超过了游戏本。
本期牛叔点评4款5000元价位搭载8核16线程处理器的“满血”机型,对高性能轻薄本有需求的用户,可以重点关注它们。
14英寸FHD IPS /锐龙7 4800U/16GB/512GB/1.43kg/5499元看点:机型质感不错,配置齐全+高色域屏,电池容量较大联想旗下有多款机型搭载了8核16线程的锐龙7 4800U,而这里牛叔点评的是其中各项最为均衡的一款——YOGA 14S。
YOGA 14S是一款14英寸大小、重量约1.4kg的轻薄本,该机的配置比较齐全,有16GB LPDDR4X 4266MHz内存、512GB PCIe SSD以及100%sRGB色域全高清IPS屏,配合8核16线程处理器,轻松搞定各种日常办公学习应用。
目前该机的参考价格为5499元。
YOGA 14S不仅有高规格的硬件配置,它的性能释放也比较强,在野兽模式下,该机的Cinebench R15测试成绩为1682cb——比一般8核8线程U处理器1000cb出头的成绩强得多,实测单考处理器可以稳定在26.5W上(爆发性能可达38W),高负载下C面有热感但不明显。
而用户在轻度使用时,可以切换为节能或者智能模式,以达到性能、风扇噪声和表面温度之间的平衡。
该机60Wh容量的电池可以支撑15小时左右的本地播放时间,续航较好。
另外值得一提的是,YOGA 14S支持扩展第二块M.2固态硬盘,不过需要注意,其规格为M.2 2242。
槽点方面,该机左侧无USB大口,鼠标绕线略有不便。
Aljfcs便携式计算机配置需求

另配30R6344型电脑包
联想Thinkpad
联想ThinkpadT400-2767CR2
1台
(T400-2767CR2)酷睿2双核P8700(2.53GHz),1066MHz前端总线,3M二级缓存/2GB内存DDR3 1066MHz/250GB硬盘5400RPM/Rambo/14.1”WXGA+(1440×900)LED/ATI Mobility Radeon HD 3470,256MB独立显存,双显卡可切换/Intel 5300AGN无线/6芯电池/Express+PCMCIA/Modem/指纹识别器/1394/摄像头/蓝牙/2G迅盘/XP Professional/三年部件和人工(电池一年),三年有限上门
生活需要游戏,但不能游戏人生;生活需要歌舞,但不需醉生梦死;生活需要艺术,但不能投机取巧;生活需要勇气,但不能鲁莽蛮干;生活需要重复,但不能重蹈覆辙。
-----无名
附件3
便携式计算机配置需求
本次共采购5台便携式计算机,具体配置需求见下表:
品牌
型号
数量
基本描述
联想Thinkpad
2774HG1
3台
(X301-2774HG1)酷睿2双核超低电压CPU SU9400(1.4GHz),800MHz前端总线,3M二级缓存/4GB内存DDR3/128GSSD/Rambo/13.3" WXGA;GMA 4500MHD/Intel 5300AGN无线/3芯电池/指纹识别器/摄像头/蓝牙/WINXP-Pro/三年部件和人工(电池一年),三年上门
联想Thinkpad
ThinkPad063RT3)酷睿2双核P9600(2.66GHz),1066MHz前端总线,6M二级缓存/15.4”WSXGA+(1680×1050)/ATI V5700GL 512MB独立显存,双显卡可切换/2GB内存DDR3 1066MHz/320GB硬盘7200RPM/Rambo/Vista Ultimate 32/蓝牙/千兆网卡/Intel 5100AGN无线/Express+7合1读卡器/指纹识别器/摄像头/6芯电池/三年部件和人工(电池一年),三年注册上门
- 1、下载文档前请自行甄别文档内容的完整性,平台不提供额外的编辑、内容补充、找答案等附加服务。
- 2、"仅部分预览"的文档,不可在线预览部分如存在完整性等问题,可反馈申请退款(可完整预览的文档不适用该条件!)。
- 3、如文档侵犯您的权益,请联系客服反馈,我们会尽快为您处理(人工客服工作时间:9:00-18:30)。
七夕,古今诗人惯咏星月与悲情。
吾生虽晚,世态炎凉却已看透矣。
情也成空,且作“挥手袖底风”罢。
是夜,窗外风雨如晦,吾独坐陋室,听一曲《尘缘》,合成诗韵一首,觉放诸古今,亦独有风韵也。
乃书于纸上。
毕而卧。
凄然入梦。
乙酉年七月初七。
-----啸之记。
二、托卡诺(TUCANO)14.1寸双肩笔记本电脑包(BMIP)
尺寸:外寸31x39x16cm ,内寸27x35.7x4.5cm
材质:800D双色面料+150D特多龙尼龙化纤里料+加密PE棉保护层参考重量: 0.9kg
三、托卡诺(TUCANO )13.3寸笔记本内胆包
材料: 内袋是高弹性潜水面料
内袋尺寸: 32.5*22.5*2.5cm
四、备注:
1,以上产品必须是原厂正品行货,可以得到厂家正规售后维修。
2,必须出具正规发票
3,供应商提供至少一年上门服务维修。