EyeWin挂牌使用说明
WisWin数字标牌管理系统用户手册V

数字标牌联网信息发布系统用户手册2012年9月成都瑞博智能信息系统有限公司目录1.安装与部署21.1系统运行环境31.2系统安装31.3系统配置31.4系统授权与运行41.5系统升级41.6系统卸载42.使用入门42.1如何登录系统42.2如何添加终端设备52.3如何添加素材62.4如何添加节目72.5如何将节目下发给终端103.高级功能113.1如何启用终端113.2如何设置终端的输出模式113.3如何设置终端的网络参数123.4如何设置终端的工作时间段123.5如何用U盘更新终端数据143.6如何升级终端163.7如何预先下载素材资源173.8如何添加和使用网页数据183.9如何编辑金融数据模板203.10如何添加流播素材213.11如何添加和使用场景223.12如何设置节目的播放时段243.13如何管理终端上播放节目253.14如何管理用户及权限264.辅助功能284.1如何管理终端分组284.2如何管理素材目录291. 安装与部署1.1 系统运行环境➢软件要求操作系统:Windows XP、Windows 2003、Windows 7系统框架:.net Framework 2.0Web应用服务器:Apache 2.2数据库服务器:MySQL 5.2FTP文件服务器:ServerNTP对时服务器:NTP Service➢硬件要求CPU:2.0G及以上硬盘容量:80G及以上内存容量:512M及以上网络带宽:10M及以上显示分辨率:1024 x 768及以上1.2 系统安装安装前,建议临时关闭360安全卫士等实时监控软件,避免安装过程中的频繁提示给您造成不便。
为便于系统安装,安装文件中已包含以下所需软件:. net Framework 2.0、Apache 2.2、MySQL 5.2、Server、NTP Service双击安装文件,根据安装向导提示,即可完成整个安装。
安装期间,系统将根据当前系统的运行环境自动安装上述内容。
护眼卫士使用说明书
用户手册关于眼卫为避免因使用不当而造成的眼卫损坏,在首次使用眼卫前请认真阅读用户手册非常感谢您购买我公司的眼卫产品,南京智松电子科技有限公司自成立以来一直致力于青少年视力保护产品的研发工作。
在使用本产品前,请务必仔细阅读说明书并按照正确的方式使用,愿您的孩子在眼卫的帮助下茁壮成长,远离近视!眼卫从使用者离课本、桌面的距离、头部的倾斜角度来综合判定使用者看书学习时的坐姿,并通过检测环境光线的明暗,提醒使用者营造适合学习的环境。
同时眼卫通过学习时间提醒功能,防止青少年因学习时间过长而导致的视力疲劳。
眼卫通过全面监控和适时提醒,督促每一个使用者保持正确坐姿,营造科学的学习环境,从而有效避免使用者因看书距离不当、坐姿不当、光线太暗等因素而导致的视力下降。
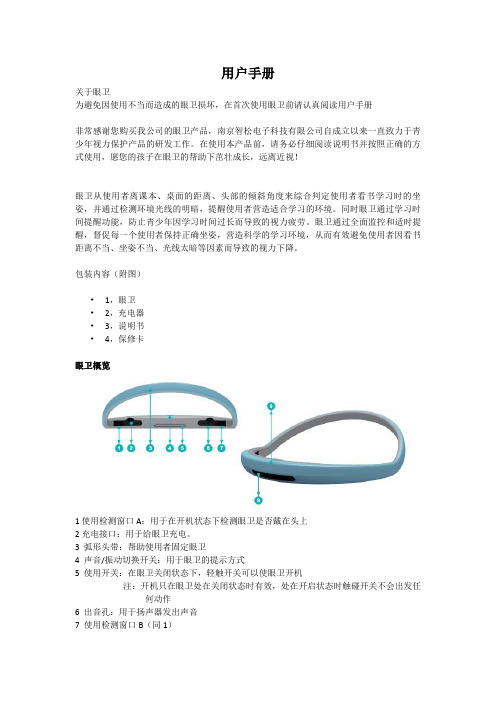
包装内容(附图)•1,眼卫•2,充电器•3,说明书•4,保修卡眼卫概览1使用检测窗口A:用于在开机状态下检测眼卫是否戴在头上2充电接口:用于给眼卫充电。
3 弧形头带:帮助使用者固定眼卫4 声音/振动切换开关:用于眼卫的提示方式5 使用开关:在眼卫关闭状态下,轻触开关可以使眼卫开机注:开机只在眼卫处在关闭状态时有效,处在开启状态时触碰开关不会出发任何动作6 出音孔:用于扬声器发出声音7 使用检测窗口B(同1)8 距离和光线感测窗口:用于检测使用者头部与观测物的距离①,“用于检测学习环境的光线是否充足②,9 状态指示灯:在充电状态下红灯亮,在充满后绿灯亮,工作状态(声音模式下),蓝灯间隔闪烁低电状态:蓝灯频繁闪烁10 伸缩杆:用于调节眼卫的大小以适应不同的使用者。
使用入门开关机产品正确配戴在头上自动进入工作状态,并且有“护眼卫士”的声音提示,从头上取下一段时间,眼卫会自动关机,并发出“谢谢使用”的关机提示;振动状态下,开机会有振动,在关机时也有振动提示。
提醒场景:检测环境光强:当环境光线比较弱不适合学习时,会有“光线太暗了”的语音提示,在振动状态下会振动提示。
EYEwin20系统简易使用手册剖析

保存配置 增加节点机记录 删除节点机记录
网络状态刷新 外挂模块调用方式配置
单击“网络配置”,单击 按钮,自动生成第一个节点机列表(为空),序号为 1。在该行中“节点名”一列填写一台计算机在网络中的名称,名称可以不是计算 机的名称。如起名为“jk5”,表示 5#监控机。“A 网地址”列中填写该计算机第 一块网卡的 IP 地址,如“172.20.22.223”;“B 网地址”列中填写该计算机第 二块网卡的 IP 地址,如“172.21.22.223”。如该计算机并非通过双网连接而仅 有一块网卡,则用户可在“A 网地址”或“B 网地址”中填写“-1”,表示无该 网 IP。“主控机”列是一个选择项,默认为否。该项含义为该节点计算机在运行 中是否可成为服务器(具体含义为是否运行EYEwin.exe 程序)。单击该栏,出现如 图所示下拉列表框,有“是”和“否”可供选择。 如该机将作为服务器使用(不分主备,系统运行时主控程序自动选优判别),则用 户需单击“是”;如该机将作为客户机使用,则用户保持默认“否”选项不变。 “前置机”列仍然是一个选择项,默认为否。该项含义为该节点计算机在运行中是 否启动前置程序(具体含义为是否运行 PremNet.exe 程序)。单击该栏,同样出 现下拉列表框,有“是”和“否”可供选择。如该机需要启动前置程序,则用户需 单击“是”,如该机不需启动前置程序,则用户保持默认“否”选项不变。一旦选 择“否”,即使以后再手工启动前置程序,服务器依然会认为其非法,不与之连接 通信。一般情况下,成为服务器的节点计算机都应启动前置程序。
注意:字符串中的逗号应为英文字符的逗号。
遥控:选择遥信点对应的遥控点。单击遥控区域,弹出遥控点列表对话框 ,遥控在 遥信子系统中定义,不需要在遥控子系统中再定义,定义好的遥控点可以在遥控子 系统中显示出来 在遥控点列表对话框中,选择遥控点所在的站,该站的 遥控点显示在下面的列表中(列表中的遥控点为没有与 任何遥信点相对应的遥控点,以保证遥控点与遥信点一 一对应) 单击报警声属性区域,弹出对话框,选择监控系统目录 中的Media 文件夹,在Media 文件夹中选择声音文件
MYEYE监控平台使用说明书

MYEYE监控平台使⽤说明书平台快速使⽤说明书⼀.服务端安装:双击服务器安装程序,进⼊安装页⾯点击下⼀布选择安装路径,默认“C:\Program Files\myeye”点击下⼀步,进⼊“选择安装服务器”:说明:我们整套平台软件,分:主控服务器、流媒体服务器、存储服务器、设备状态服务器、主动注册服务等5个服务,您可以在⼀个PC上安装全部服务,也可以将主控服务于其他⼏个服务分开,架设分布式服务器点击下⼀步,您可以根据需要选择安装什么样的版本:点击下⼀步,确定安装路径:点击下⼀步,安装软件:安装完后:默认会提⽰初始配置界⾯:说明:通⽤配置服务器地址:默认选择第⼀块⽹卡的第⼀个地址,如果您有多⽹卡或者多地址,必须选择⼀个您当前需要使⽤的外⽹映射地址:默认为空,如果您的客户需要通过外⽹来访问服务器,则这个地址栏必须输⼊您服务器PC对应的路由器的地址,这样⽅便客户端访问服务器端⼝:默认9000,您也可以更改,注意,这个端⼝是客户端登录的Web服务端⼝:默认8080,⽤于web⽹页登陆web管理序列号:这个必须是我公司提供的,没有正确的序列号,您的PC只能运⾏我们的服务器30天设备管理服务侦听端⼝:这些侦听信息之所以可以让您配置,是怕您的pc上有其他的程序占⽤了我们默认的端⼝,默认端⼝9010流媒体服务侦听端⼝:默认端⼝9020媒体端⼝:默认10000-30000存储服务参数侦听端⼝:默认9030媒体端⼝:30001-50000数据传输协议:⽤于适⽤各种⽹络环境⽂件打包长度:指客户端查询时候,多少时间作为⼀个录像⽂件,默认60分钟磁盘列表:磁盘路径:指定存储的路径普通⽂件空间:指定定时录像存储空间,单位M报警⽂件空间:指定报警⽂件存储空间,单位M单⽂件⼤⼩:指定⽂件系统中,⽂件的单位⼤⼩,单位M建议配置:单个磁盘总空间<1T,sector⼤⼩设为20M1T<=单个磁盘总空间<5T,sector⼤⼩设为40M单个磁盘总空间>=5T,sector⼤⼩设为50M这个值越⼤,您的磁盘空间利⽤率会相应的降低,所以最⼤空间不能超过10T关于存储服务⾥的参数配置(参数介质),在管理系统⾥⽆法进⾏修改,只能在配置⽂件⾥进⾏修改,具体操作为:点击开始->所有程序->myeye->config主动注册服务侦听端⼝:9040初始配置完后,会提⽰是否初始化数据库,说明:如果您是第⼀次安装,则必须初始化数据库,否则程序⽆法启动,如果您原先安装过版本,同时⼜不想清除原先的数据库信息,则您可以不初始化数据库。
慧眼车牌识别使用说明2.0
慧眼车牌识别一体机说明书V2.0 2016-01-23目录✧一、车牌识别概述 (3)✧二、车牌识别安装前注意事项 (4)2.1 电脑配置要求 (4)2.2 网络配置要求 (4)2.3 现场安装位置及道路要求 (6)2.2.1车道长度测算 (6)2.3.2路面宽度限制 (6)2.3.3摄像机安装拍摄角度要求 (7)2.3.4现场环境勘察 (7)✧三、车牌识别安装与调试 (8)3.1标准车牌识别安装示意图 (8)3.2车牌识别摄像机安装角度示意图 (9)3.3车牌识别布线示意图 (10)3.4车牌识别接线示意图 (11)3.5车牌识别一体机识别效果测试与识别位置调整 (12)3.5.1识别一体机IP地址修改 (12)3.5.2 添加识别一体机 (12)3.5.3 调试识别一体机 (12)✧四、车牌识别软件设置 (16)4.1 IE浏览器设置及插件安装 (16)4.2 慧眼识别软件各项参数设置 (19)4.2.1 车场、LPR、岗亭、员工、角色管理及收费标准 (19)4.2.1.1 车场管理 (19)4.2.1.2 LPR 管理 (20)4.2.1.3 岗亭管理 (21)4.2.1.4 员工管理 (22)4.2.1.5 角色管理 (23)4.2.1.6 收费标准 (23)4.2.2 通道组管理 (25)4.2.2.1 单通道功能 (25)4.2.2.2 通道绑定 (25)4.2.3优惠商家 (26)4.2.4 多岗亭联网设置 (26)✧五、车牌识别软件使用 (27)5.1 发行管理(贵宾车辆、月租车辆、储值车辆、月临车辆的管理) (27)5.1.1 贵宾车的发行、修改与删除 (27)5.1.1.1贵宾车的发行 (27)5.1.1.2贵宾车的修改(延期) (28)5.1.1.3贵宾车的删除(退卡) (28)5.1.2 月租车的发行、修改与删除 (29)5.1.3 储值车的发行、修改与删除 (29)5.1.4 月临车的发行、修改与删除 (29)5.2 车位绑定 (29)5.3 临时车辆的收费 (30)✧六、其他特殊功能 (32)6.1 广告信息发布 (33)6.2 通行时段、车辆控制 (33)6.3 特殊车牌异常处理 (33)✧七、常见问题及排除方法 (34)一、车牌识别概述车牌号码识别简称车牌识别,也称作车牌号识别或车辆牌照识别。
EyeVac+ 用户手册说明书

USER MANUALIMPORTANT SAFETY INSTRUCTIONSThis electrical appliance must always be used according to the following safety instructions. Save these instructions as this manual contains important safety and operating information. When using an electrical appliance, basic precaution should always be followed, including the following:READ ALL INSTRUCTIONS CAREFULLY BEFORE USING THIS APPLIANCE:To reduce the risk of fire, electric shock or injury:1. Always depress the Vacuum Power Button on the bottom of the unit to the OFF position, and the Trash Bin Power Button on the top of the unit to the OFF position before unplugging the EyeVac+.2. Always unplug the appliance before cleaning or servicing it. Do not unplug by pulling the cord; to unplug, grasp the plug, not the cord.3. Do not let the EyeVac + be used as a toy. Close attention is necessary when used near children. Do not use in AUTO Mode or leave appliance plugged in near children, infants or small animals.4. Do not pull or carry the appliance by the cord. Do not run the appliance over the cord, close a door on the cord, or pull the cord around sharp edges or corners. Keep the cord away from heated surfaces.5. Do not use the appliance if the cord or plug is damaged.6. Do not handle the plug or appliance with wet hands.7. Do not use appliance on wet surfaces.8. Do not expose to rain.9. Do not use appliance to dispose of water or damp materials such as mud, tile grout, plaster filler, or caulking. Do not use to pick up any liquid or wet objects.10. Do not use appliance to vacuum up flammable or combustible liquids, such as gasoline. Do not use in areas where these liquids may be present.11. Do not use this appliance to vacuum up burning or smoking materials, such as cigarettes, matches or hot ashes.12. Keep hair, loose clothing, and all parts of the body, especially fingers, away from openings and moving parts.13. Do not put any objects into appliance openings or use with any openings blocked or plugged.14. Do not use this appliance to pick up hard or sharp objects or other large surface litter. Pick these up by hand before vacuuming.15. Do not operate without the Lid and Filters properly in place.16. Use the appliance only as described in this Use and Care Guide.17. Turn appliance OFF (both power buttons) before removing or replacing the Canister or Filter.18. Unplug appliance before cleaning or maintenance.19. If the appliance is not working as it should, call for instructions where to send for repair. Do not attempt to repair, as it will invalidate your warranty.20. When cleaning the outside of the appliance, wipe with a damp cloth to reduce the static electricity on the outer surface.WARNING! To reduce the risk of electric shock, do not use on wet surfaces. Do not expose to rain. Store indoors.1. Canister Lid2. Pre-Motor Filter3. Vacuum Canister4. Serial Number (located on back of unit)5. Sensor- Trash Bin6. Inlet7. Sensor - Vacuum8. Vacuum Manual Activation Button9. Vacuum Power Button10. Vacuum Auto Mode 11. Vacuum Manual Mode12. Vacuum Canister Full Indicator13. Exhaust Filter Housing14. Exhaust Filter(not shown, located on back of unit)15. Trash Bin Lid16. Trash Bin Lid Power ButtonDESCRIPTION OF EYEVAC + SAVE THESE INSTRUCTIONS FOR HOUSEHOLD USE ONLYBEFORE USING FOR THE FIRST TIME1. Remove EyeVac + from packaging and set upright on any non-carpeted flooring.2. Install EyeVac + Trash Bag3. Plug unit into any standard 120V(US) AC electrical outlet.NOTE: EYEVAC + CANNOT BE USED WITH A CONVERTER OR ADAPTER4. Depress the Vacuum Power Button to the MAN position for manual operation or to the AUTO position for automated use. The Power Indicator Light will illuminate when the Power Button is in either of these positions. Switch the Trash Bin Lid Power Button to the On position. Your EyeVac + is now ready for use.Replace Trash BagsOpening the Lid TopOPERATING VACUUM FEATURENOTE: EYEVAC + cannot operate when the Power Button is in the OFF position.USER MAINTENANCE INSTRUCTIONS1. To empty the EyeVac+ Canister, press the Vacuum Power Button to the OFF position, press the Trash Bin Lid Power Button to the OFF position, and unplug the unit.2. Pull the Canister outward from the bottom of the Bin Cavity. Grasp the Canister Grip firmly and lift it out and away from the EyeVac + Main Unit.3. Holding the Canister firmly with one hand, grasp the Canister Lid Handle with the other hand and pull the Lid straight up and out to remove.4. Turn the Canister upside down over a trash can. Make sure you empty all dirt and debris from inside and below the Bin. To ensure that all the dirt spills out, tap the side of the Canister gently against the edge of the trash can. Re-attach the Canister Lid to the top of the Canister.5. Clean Sensors, Dirt Inlet area, Canister, Canister Lid and Canister Cavity with a damp rag or towel. Do not use soap or alcohol to clean sensors.6. After all parts are fully dried, insert the assembled Canister with Lid fitted snugly into position and Pre-Motor Filter locked into place. The 2 grooves in the bottom of the Bin fit easily over the rod in the front of the unit. Grasp the Canister grip and lock the Canister back into position7. Always use the Trash Bin with EyeVac + or other 45 Litre or Trash Bags..NOTE: Make sure all parts are completely dry before reassembly.HEALTH TIP: If you suffer from allergies or asthma, take the Canister outdoors to empty. As you empty the dirt into the trash can, gently tap the Canister against the side of the can to remove loose debris.CLEANING THE PRE-MOTOR FILTERTo maintain optimal performance, the Pre-Motor Filter will need cleaning whenever the suction is not strong. The Pre-Motor Filter must be clean and free of elements, which might hinder the flow of air.1. To empty the EyeVac+ Canister, press the Vacuum Power Button to the OFF position, press the Trash Bin Lid Power Button to the OFF position, and unplug the unit.2. Pull the Canister outward from the front of the Bin Cavity. Grasp the Canister grip firmly and lift it out and away from the EyeVac + Main Unit. Locate the Pre-Motor Filter Handle.3. Remove the Pre-Motor Filter by grasping the Filter Handle and turn counter-clockwise to the unlock position. Pull Filter straight up and out of the top of the Canister. Rinse under running water to clean. If needed a mild soap and soft bristled brush can also be used.IMPORTANT! Dry thoroughly before use.4. Slide the Pre-Motor Filter back into the top of the Canister. Rotate clockwise to the “lock” position. Put the Canister back into place.5. If a new Filter is needed, replace with standard filter cartridges. Make sure that it fits snugly in the Filter Holder. Replacement Filters are available through the Customer Service Department.IMPORTANT! NEVER OPERATE THE EYEVAC + WITHOUT THE PRE-MOTOR FILTER PROPERLY IN PLACE.CLEANING THE EXHAUST FILTER HOLDER1. To clean the Exhaust Filter Holder, press the Vacuum Power Button to the OFF position, press the Trash Bin Lid Power Button to the OFF position, and unplug the unit.2. The Exhaust Filter Holder slides up and out of its housing on the side of the unit.3. Gently pull the Filter out of the Filter Holder.4. Tap Filter gently against trash container to free and eliminate excess dirt and debris.5. To clean the Filter, wash in mild soap and water; rinse and dry thoroughly before assembly6. Slide the Holder back into the unit with the Filter facing outwards.IMPORTANT! NEVER OPERATE EYEVAC + WITHOUT THE EXHAUST FILTER & FILTER HOLDER PROPERLY IN PLACE.CLEANING THE CANISTERThe Canister should be washed periodically.1. To clean the EyeVac+ Canister, press the Vacuum Power Button to the OFF position, press the Trash Bin Lid Power Button to the OFF position, and unplug the unit.2. Wash the Bin in warm water using a mild soap. Avoid harsh or abrasive cleaners or sponges. Rinse thoroughly.TO AVOID DAMAGE, DO NOT PLACE CANISTER IN THE DISHWASHER.3. Let it air dry. Make sure the Canister is completely dry before putting it back into the EyeVac +.4. Insert the assembled Canister following the instructions outlined in the USER MAINTENANCE INSTRUCTIONS.IMPORTANT! Other than cleaning the Pre-Motor Filter and replacing the Exhaust Filter Holder, as described in this Owner Manual, this EyeVac + is not user serviceable. There are no user serviceable parts inside the unit. Servicing by our Authorized Service Center is required to avoid damage to internal components.STORAGE1. To store the EyeVac+ press the Vacuum Power Button to the OFF position, press the Trash Bin Lid Power Button to the OFF position, and unplug the unit.2. Store EyeVac + indoors, in a clean, dry place.3. Never store EyeVac + while it is still plugged in. Never wrap cord tightly around the appliance, use the Cord Storage area on the back of the EyeVac + unit. Do not put any stress on the cord where it enters the unit, as it could cause the cord to break.WARNING! TO REDUCE THE RISK OF ELECTRIC SHOCK, DO NOT USE OUTDOORS OR ON WET SURFACES.TROUBLESHOOTINGCORRECT DISPOSAL OF THIS PRODUCTThis marking indicates that this product should not be disposed with other household wastes. To prevent possible harm to the environment or human health from uncontrolled waste disposal, recycle it responsibly to promote the sustainable reuse of material resources. To return your used device, please use the return and collection systems or contact the retailer where the product was purchased. They can take this product for environmentally safe recycling.This appliance is a dry pick-up, Canister type vacuum cleaner for household and indoor use. Also, it is a general-purpose vacuum cleaner, which can be used for hard floor cleaning.LIMITED WARRANTYOne-Year Limited Warranty. What is covered: JPaulJones, LPTM warrants to the first retail purchaser of this EyeVac+ that should this product or any part be proved defective in materials or workmanship from the date of proof of purchase for a period of one (1) year, then it will be subject to the terms of this one-year limited warranty. Such defects will be replaced, or credit issued at JPaulJones, LP’s option, without charge for parts or labor directly related to the defect. Limitations and Exclusions: This warranty gives you specific legal rights and you may also have other rights which vary from state to state. This warranty does not apply to any cost incurred for removal or re-installation, or to any product or part thereof which has suffered through normal wear and tear, alteration, improper installation, physical abuse, misuse, neglect or accident. Nor does it cover defects caused by shipment to JPaulJones, LP or repair or service of the product by anyone other than JPaulJones, LP. Damage resulting from an unforeseen circumstance including but not limited to fire, flood, earthquake, and other natural causes will be excluded. This Limited warranty is in lieu of all other warranties, express or implied either in fact or by operations of law, statutory or otherwise, including, but not limited to any implied warranty of merchantability or fitness for a particular use. JPaulJones, LP does not authorize any other person to assume any liability beyond the warranty herein described. In no event, whether based in contract or tort shall be liable for incidental, inconsequential, indirect, special or punitive damages of any kind from the use of this product. In no event shall be liable for damage in excess of the purchase price. EyeVac + not for commercial use.For Warranty Service, submit a Service Request at /connect/ or contact: JPaulJones, LP, 7500 Rialto Blvd., Bldg. 1, Suite 122, Austin, TX 78735 or call 512-485-3050.©2014 JPaulJones, LP Intellectual Property. All rights reserved, JPaulJones, LP, JPaulJones, LP logo and all other marks contained herein are trademarks of JPaulJones, LP Intellectual Property and/ or JPaulJones, LP affiliated companies.。
EYEwin厂站监控系统技术说明书_V2.0

国电南自Q/GDNZ.JB.T2-2004标准备案号: 154-2005 EYE win厂站监控系统技术说明书使用说明书国电南自股份有限公司GUODIAN NANJING AUTOMATION CO.,LTDEYE win 厂站监控系统技术说明书使用说明书国电南京自动化股份有限公司2008年9月* 本说明书可能会被修改,请注意最新版本资料* 2008年09月第1版第1次印刷第一部分技术说明书版本声明此版本说明书适用于EYE win2.0厂站监控系统目录版本声明1 系统概述 (1)2 主要技术特点 (2)3 系统功能 (3)3.1数据采集功能 (3)3.2数据处理 (3)3.3控制功能 (5)3.4报警处理功能 (5)3.5防误闭锁 (5)3.6设备信息管理 (5)3.7双机和双网切换 (6)3.8故障录波分析功能 (6)3.9系统的自诊断和自恢复 (6)3.10时钟同步功能 (6)3.11图形显示和打印 (6)3.12电压无功综合控制(VQC)功能 (7)3.13小电流接地选线 (7)3.14五防操作票系统 (7)3.15统计计算功能 (7)3.16安全系统 (8)3.17网络监视 (8)4 系统容量 (9)5 技术指标 (10)1 系统概述EYE win厂站监控系统是国电南自依托自身在电力自动化领域多年的成功开发经验,凭借对变电站综合自动化监控系统用户需求的充分把握,在总结和借鉴以往监控系统产品成功经验基础上推出的新一代的监控系统。
EYE win基于WindowsNT/2000/XP操作系统,硬件以HP工作站或高档PC机为主,软件设计中采用了分层设计、组件化、标准化、开放式等先进的软件开发思想,为用户提供了可靠、安全、易于操作的监控系统平台。
适用于220kV及以下各电压等级的厂站监控系统。
-1-2 主要技术特点l微内核的体系结构EYE win采用了微内核的设计思想,内核提供了最基本的实时监控系统的所需功能,并负责系统各模块的任务调度、事件的激发和等待、实时数据库的网络同步等。
鹰眼系列使用说明书

在 SD 卡中找到 Setup.exe 程序并安装(如图)
13
安装.exe 后缀文件 安装.exe 后缀文件 点 Next 进入下一步
14
点击 INSTALL 并安装 点击 NEXT 进入下一步 点击 NEXT 进入下一步
15
点击 NEXT 进入下一步 点击 NEXT 进入下一步 点击 NEXT 进入下一步
按键
自带指示灯
阅览器
用户控制 重量 尺寸
规格书
记录单位 记录帧
记录时间 记录速度 事件历史文件 回放时间文件
VGA 类型 视角 类型 视角 Ο
MPEG-4 AAC SD 卡
2 通道 1& 2 通道
Ο Ο Ο
描述
备注
10秒
通道 1:30帧,通道 2:30帧 (每通 道30帧)
连续记录90分钟,16.5 MB数据量 2GB存储器
设置两个镜头 -Tint: 控制颜色的色调 (1-100,数值大,颜色重) -Color: 控制色彩浓淡(1-100,数值大,颜色重) -Bright:亮度控制 (1-100,数值大,亮度越亮) -Contrast: 对比度(1-100,数值大,对比度越明显)
传感器灵敏度(SENSOR)
设置驾驶时的传感器灵敏度(1-5 级, 数值越小越敏感)
2、安装顺序 ①将 SD 卡插入设备
将设备正面朝上,卡面朝上插入。(不要插反)
SD 卡插入方法
SD 卡插入后
②装上带黏贴片的支架 撕去黏贴片外的保护纸,安装在挡风玻璃前面,调整位置,直到能够收到较好的 GPS 信
号
黏贴片粘在支架面上
将支架安装在挡风玻璃前 有良好视野的地方
11
- 1、下载文档前请自行甄别文档内容的完整性,平台不提供额外的编辑、内容补充、找答案等附加服务。
- 2、"仅部分预览"的文档,不可在线预览部分如存在完整性等问题,可反馈申请退款(可完整预览的文档不适用该条件!)。
- 3、如文档侵犯您的权益,请联系客服反馈,我们会尽快为您处理(人工客服工作时间:9:00-18:30)。
EyeWin挂牌使用说明
[1].EyeWin的挂牌位图存放于\\bitmap\\目录下,有4个文件:
bitmap_g.bmp(接地图标)、bitmap_e.bmp(检修图标)、
bitmap_w.bmp(工作图标)、bitmap_o.bmp(自定义牌图标),
这些图标可以编辑修改,但需要保证大小为48*48像素,否则可能显示不全。
如果\\bitmap\\目录下没有这些位图文件,系统将采用默认的图标来显示。
[2].在\\Data\\Config\\目录下会自动生成SetFlag.ini文件,该文件有三项配置,解释如下:
[Settings]
;为1时产生挂牌或拆牌事件,为0时不产生事件,默认为1
Event=1
[Tip]
;下面四项分别为四种挂牌的提示信息,可以修改以适应现场要求。
GroundingTip=该开关(刀闸)接地,禁止操作!
ExamineTip=该开关(刀闸)检修,小心操作!
WorkingTip=有人在此间隔工作,禁止操作!
OtherFlagTip=用户自定义的挂牌信息。
[FlagName]
;下面四项分别为四种挂牌的牌名称,可以修改以适应现场要求。
GroundingName=接地牌
ExamineName=检修牌
WorkingName=工作牌
OtherFlagName=自定义牌
zhancg
2005.04.18。