EPSON 3250K打印机速查手册
Epson532打印机使用说明书

第一章简介80K6控制器是用于驱动EPSON M-T500系列热敏机芯的。
同时带有并行接口和串行接口,自动切纸,具备黑标检测,纸将尽检测功能,用户如有特殊要求,可以专门解决。
用户使用时特别注意事项:1:电源要求:A:建议用户采用控制器生产商提供的开关电源。
B:如果用户使用自己的开关电源应满足下列要求:(1):输出一组电压+24V±2.4V:平均电流不得小于2A,峰值电流不得小于15A峰值电流持续时间不得小于0。
8MS,频率最大为560PPS。
C:开关电源使用时,不得连续操作,每次关闭电源后,应至少间隔1分钟以上才能重新打开电源,否则有可能导致损坏打印机和控制器。
D:电源输出插头类型及输出电压与地线的排列顺序应严格与控制器的电源输入插座类型及电压排列顺序保持一致,否则将导致损坏热敏打印头和控制器。
控制器电源输入插座类型及电压与地线的排列顺序见下图:地 +24V +24V 地2:使用供应商或确认的符合要求的热敏纸,否则可能会影响打印质量及打印头寿命,甚至会损坏热敏打印头。
注意:打印纸卷密度及内径最小直径应符合误差要求,否则可能出现走纸不畅不直等现象影响打印机正常工作。
3:不得在打印机带电状态下拔接口电缆或电源电缆。
4:任何时候不得用硬物(如镊子,刀片等)取切刀口内或头片上的纸屑或其他附作物,以免对头片或刀片造成永久性损伤。
5:在打印完成后,若打开切刀不要马上用手触摸打印头片或马达外壳,以免被金属外壳高温烫伤。
6:经过一段时间后,打印头和胶棍上会粘有纸屑或其他附作物,应定期清洁。
清洁步骤为:(1):打印机断电,将切刀与打印头分离到最大位置。
(2):将机头抬杆前推到最大位置。
(3):用气囊吹去机头内及胶棍上的纸屑或其他附作物。
(4):用微湿酒精棉球轻擦陶瓷基片上的一整条打印头发热元件。
注意擦洗时酒精不得滴淌,不得用镊子等硬物夹持棉球,以免不慎碰伤头片。
(5):清洗好头片后,请等头片上的酒精完全干燥之后,再将机头抬杆放下。
Epson 打印机用户手册说明书
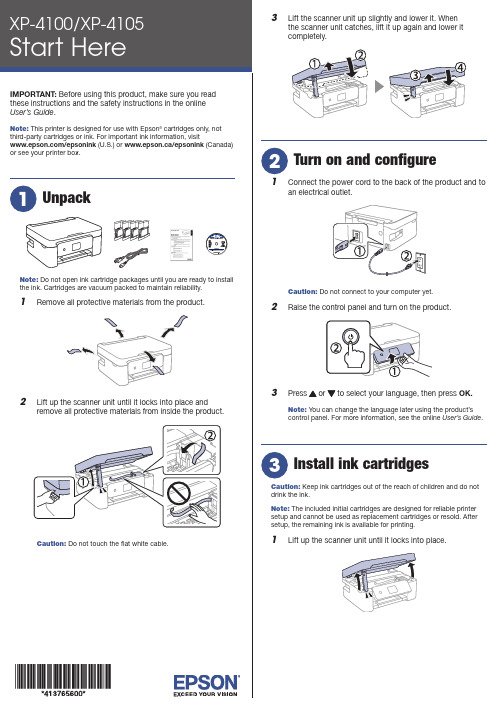
Do not open ink cartridge packages until you are ready to installthe ink. Cartridges are vacuum packed to maintain reliability.emove all protective materials from the product.3 L ift the scanner unit up slightly and lower it. Whenthe scanner unit catches, lift it up again and lower itcompletely.1 C onnect the power cord to the back of the product and toan electrical outlet.Caution: Do not connect to your computer yet.2 R aise the control panel and turn on the product.3 OK.Note: You can change the language later using the product’scontrol panel. For more information, see the online User’s Guide.Caution: Keep ink cartridges out of the reach of children and do notdrink the ink.Note: The included initial cartridges are designed for reliable printersetup and cannot be used as replacement cartridges or resold. Aftersetup, the remaining ink is available for printing.1 L ift up the scanner unit until it locks into place.9 F ollow the on-screen instructions to adjust the printquality of your product.Note:• Y ou need to load paper before you can adjust the print quality.See “Load paper” below for details.• S elect Adjust Later if you want to adjust the print quality later. For more information, see the online User’s Guide.See the online User’s Guide for information about loading capacity, available paper types and sizes, and loading envelopes.1 M ake sure the product is not charging. Then flip thefeeder guard forward, raise the paper support, and tilt itbackwards slightly.2 3 L4 S tightly.5 P6 F ollow the instructions on the LCD screen to select yourpaper settings.• Print from wherever you are, next to your printer or remotely, with Epson Connect™ and Google Cloud Print™. Learn more at /connect (U.S.) or www.epson.ca/connect (Canada).• Use voice-activated assistants to print a variety of creative and everyday items from your Epson product. Simply add your product to an Epson Connect account, then link the account to a voice-activated assistant. See /voice (U.S.) orwww.epson.ca/voice (Canada) for more information.* M ay require the Epson Print Enabler or Mopria Print Service app from Google Play™.Any problems?Network setup was unsuccessful.• M ake sure you select the right network name (SSID).• Restart your router (turn it off and then on), then try toconnect to it again.• T he printer can only connect to a network that supports 2.4 GHz connections. If your router offers both 2.4 GHz and 5 GHz connections, make sure the 2.4 GHz connection is enabled.• I f you see a firewall alert message, click Unblock or Allow to let setup continue.• I f your network has security enabled, make sure you enter your network password (WEP key or WPA passphrase) correctly. Be sure to enter your password in the correct case.AB1# for There are lines or incorrect colors in my printouts.Run a nozzle check to see if there are any gaps in the printout. Then clean the print head, if necessary. See the online User’s Guide for more information.The product’s screen is dark.Make sure your product is turned on, and press any button to wake it from sleep mode.Setup is unable to find my printer after connecting it with a USB cable.Make sure the printer is turned on and that it is securelyconnected as shown:Note:• I f you are using a Mac or your computer does not have a CD/DVD drive, an Internet connection is required to obtain the product software.• T o print from a Chromebook™, go to /support/gcp (U.S.) orwww.epson.ca/support/gcp (Canada) for instructions.Firmware Update Notice: Epson periodically provides firmware updates to address issues of security, performance, minor bug fixes and ensure your printer functions as designed. Your printer was designed to work only with genuine Epson ink cartridges, therefore some updates may affect the functionality of third-party ink.1 M ake sure the product is NOT CONNECTED to yourcomputer.W indows ®: If you see a Found New Hardware screen, click Cancel and disconnect the USB cable.2 I nsert the product CD (Windows only) or download andrun your product’s software package. For the latestsoftware, visit:XP-4100/support/xp4100 (U.S.) www.epson.ca/support/xp4100 (Canada)XP-4105/support/xp4105 (U.S.) www.epson.ca/support/xp4105 (Canada)3 F ollow the instructions on the computer screen to run thesetup program.4 W hen you see the Select Your Connection screen, selectone of the following and follow the on-screen instructions:• Wireless connectionIn most cases, the software installer automatically attempts to set up your wireless connection. If setup is unsuccessful, you may need to enter your network name (SSID) and password.• Direct USB connectionM ake sure you have a USB cable (not included).Mobile and voice-activated printing• Print directly from your iOS device. Simply connect your printer and device to the same network and tap the action icon to select the print option.• Print directly from your Android™ (v4.4 or later) devices*. Simply connect your printer and device to the same networkand tap the menu icon to select the print option.XP-4100/XP-4105 replacement ink cartridges。
爱普生EPSON针式打印机恢复出厂设置及清EEPROM及其它面板操作速查指引手册

清EEPROM 及其它面板操作速查针打LQ-300k+换行/换页+进纸 /退纸 + 暂停+电源LX-300+换行/换页+进纸 /退纸 + 暂停+电源LQ - 580K :换行/换页+进退纸 +暂停+电源 .LQ-630K :清 EEPROM :换行/换页+进退纸 + 暂停+电源 .设置:进纸 /退纸 + 暂停 + 电源键盘锁定:换行/换页 + 暂停 + 5 秒以上,响二声。
解锁:进纸 /退纸 + 换行/换页+ on.LQ-670K高速+切纸+电源LQ-680K :换行/换页+进纸 /退纸 + 暂停+电源LQ-1600K3 /K3 +, 2600KLQ-1600K4/K4+LQ-2600K字体 + 切纸 + 电源DLQ-1000K :Line Feed + Form Feed + Micro Adjust J + 电源DLQ-3000K :清 EEPROM :Selec Type + Paper Select + Pause +电源DLQ-3500K :LF/FF + Load/Eject + Pause + 电源喷墨COLOR切换 + 字体 + 进/退纸 + 暂停+电源COLOR II 切换+暂停+进纸 +彩清洗+电源COLOR 300 进纸+清洗+电源,再按清洗 10 秒COLOR 400/440/460 进纸灯闪几秒后,按1、进/退纸清 EEPROM2、清洗 10秒,清废墨计数器COLOR 500进纸 + 黑头清洗 + 彩头清洗 + on ,再按进纸键 3 秒COLOR 600/640/66O/670进纸 +清洗 +电源缺纸灯闪 5 秒后,再按1、进/退纸清EEPRO及timer IC2、清洗 10 秒,清废墨计数器COLOR 800 / 850 初始化:进纸+黑头清洗+彩头清洗+ON ,松手再按彩头清洗秒10 COLOR 1520K切换+进/退纸+换行/换页+微调f +电源COLOR 3000暂停+换行/换页+微调J +电源SP870/1270进/退纸 + 清洗 + on 然后按1、/ 退纸清 EEPRO及 timer IC2、清洗 10 秒,清废墨计数器SP 950:Paper + Roll paper + on 1. Paper (EEPROM)SP 2100/2200Paper + Roll paper + on 1. Paper (EEPROM)MJ -510进/退纸 + 清洗 + on 松手后再按进 /退纸 10秒至进纸灯和缺墨灯闪MJ-850切换 + 暂停 + 电源, 再按进 /退纸至省墨灯与暂停灯闪烁再按切换MJ-1000切换 + 省墨/压缩 + 进/退纸 + 暂停 + 电源MJ-1500K/K +切换+微调J+暂停+换行/换页+ ON激光机EPL-5600 :Item+1+Continue+On Line+ 开机EPL-5700 :按切换键 +操作继续键 +联机键 +开机EPL-5700L :操作同 E PL-1 220 (参见 1220 图示) EPL-5800 :按切换键 +操作继续键 +联机键 +开机EPL-5800L :驱动+属性T可选设定值Alt + Ctrl + Shift + W + 鼠标左键EPL-5900&EPL-6100按住 Start/Stop + Job Cancel + Information + 电源,直到联机和错误指示灯同时亮 . EPL-5900L&EPL-6100L :1、计算机中选择打印机“属性”中的“可选设定值”项;2、时按住键盘的ALT+CTRL+SHIFT+ “W”键,然后用鼠标点击屏幕中“可选设定值”项的任意空白区域,参考 EPL-1220 图示;3、屏幕出现是否进行 EEPROM初始化的对话框,选择“ YES “,操作完成。
EPSON 操作手册
!"# $%&'(
!"#$%&'()
!"
1
2
=========
!"#$%&'()
!"#
NR
ñaJmáÅíìêÉ=`~êÇ ñaJmáÅíìêÉ=`~êÇ=qóéÉ=j ñaJmáÅíìêÉ=`~êÇ=qóéÉ=jH ñaJmáÅíìêÉ=`~êÇ=qóéÉ=e pa=jÉãçêó=`~êÇ pae`=jÉãçêó=`~êÇ jìäíájÉÇá~`~êÇ jj`éäìë jj`ãçÄáäÉG
`çãé~Åícä~ëÜ
jáÅêçÇêáîÉ
jj`ãáÅêçG
G
!"
ãáåápaG ãáåápae`G
!"#$%&'
ãáÅêçpa ãáÅêçpae`G
G
!"#$%#"&'()
!"#
!"#$%"&'
jÉãçêó=píáÅâ jÉãçêó=píáÅâ=mêç j~ÖáÅd~íÉ=jÉãçêó=píáÅâ jÉãçêó=píáÅâ=aìçG jÉãçêó=píáÅâ=mêç=aìçG jÉãçêó=píáÅâ=mêçJed=aìçG j~ÖáÅd~íÉ=jÉãçêó=píáÅâ=aìçG jÉãçêó=píáÅâ=jáÅêçG
! ==== ==== ==== ==== ==== ! ==== ==== ==== ==== ! ==== ==== ! KKKKKKKKKKKKKKKKKKKKKK OV !"# KKKKKKKKKKKKKKKKKK PN ! KKKKKKKKKKKKKKKKKKKKKK ! KKKKKKKKKKKKKKKK L `aLasa KKKKKKKKKKKKK !"#$% KKKKKKKKKKKKKK ON OP OR OT !" KKKKKKKKKKKKKKKKKKKK !" KKKKKKKKKKKKKKKKKKKK `aLasa KKKKKKKKKKKKK !" KKKKKKKKKKKKKKKKKKKK ! KKKKKKKKKKKKKKKKKKKKKK V NM NP NR NT ==== ==== ==== ==== ==== ==== ==== ==== ==== ==== ==== ==== !" KKKKKKKKK `aLasa !"# KKKKKKKKKKKKKKKKKK !"#$% KKKKKKKKKKKKKK !"#$%&'( KKKKKKKK !"#$% KKKKKKKKKKKKKK ! !" KKKKKKKKKKKKKKKKKKKK !" KKKKKKKKKKKKKKKKKKKK !"# KKKKKKKKKKKKKKKKKK !"# KKKKKKKKKKKKKKKKKK !"#$% KKKKKKKKKKKK !"#$% KKKKKKKKKKKKKK ! ! !"# KKKKKKKKKKKKKKKKKK PP PS PV QO QQ QS QU RM RN RO RP RR !" KKKKKKKKKKKKKK ==== L !" KKKKKKKKKKKKKKKKKKKK ==== KKKKKKKKKKKKKKKKK ====máÅí_êáÇÖÉ !"#$% KKKKKKKKKKKKKK ==== ! ! KKKKKKKKKKKKKKKKKKKKKK ==== ==== ! KKKKKKKKKKKKKKKKKKKKKK ==== KKKKKKKKKKKKKKKKKKKKKKKKKK ==== !" KKKKKKKKKKKKKKKKKKKK !"# KKKKKKKKKKKKKKKKKK ==== ==== !"# KKKKKKKKKKKKKKKKKK ! KKKKKKKKKKKKKKKKKKKKKK ==== ! KKKKKKKKKKKKKKKKKKKKKK ==== RS RU SM SO SQ SS SV TR TS TS TT TT
3250中文操作说明书

0.01 mΩ 100 : 1
to 99.999 kΩ
10V max
-4-
PDF 文件使用 "pdfFactory Pro" 试用版本创建
作者:董志勤 Mobile:13312955052 QQ:625603178
2.4 测量准确
当确实遵守下列条件和状态能有效确保测量准确: (1) 热机时间:≧30 分 (2) 做完正确开路和短路归零校正.
¡ 扫描测试
: 配合扫描测试治具可做 20 点之变压器扫描测试.
1.3 附带检查
当贵客户在收到这仪器后, 请检查下列项目: (1). 此制品外表是否有任何损害或刮伤. (2). 表 1-2 为本机之附件. 如果您发现任何损坏或附件遗失, 请通知本公司、分公司或代理商以求立即之服务.
表 1 - 2 标准附件
作者:董志勤 Mobile:13312955052 QQ:625603178
图 2 – 1 L.C.Z. 转换
测试频率
2.6 校正功能
¡ 开路归零: 去除由于测试治具引起开路杂散阻抗的量测误差.
¡ 短路归零: 去除由于测试治具引起短路残余阻抗的量测误差.
¡ 载入校正: 当因外接治具或机器误差, 造成量测和实际值有误差时, 可设定实际值于测试条件内, 将量 测值和实际值做载入校正. 加载后系统即以加载值为标准.
作者:董志勤 Mobile:13312955052 QQ:625603178
2.2测试讯号
¡ 频率: 20Hz~300KHz 准确度:±0.01%
¡ 讯号标准: 电压
范围 10mVrms to 2 Vrms
设定准确度 ±10%+1mVrms
¡ 输出阻抗 : Turn
Epson 打印机用户手册.pdf_1701924064.594625说明书
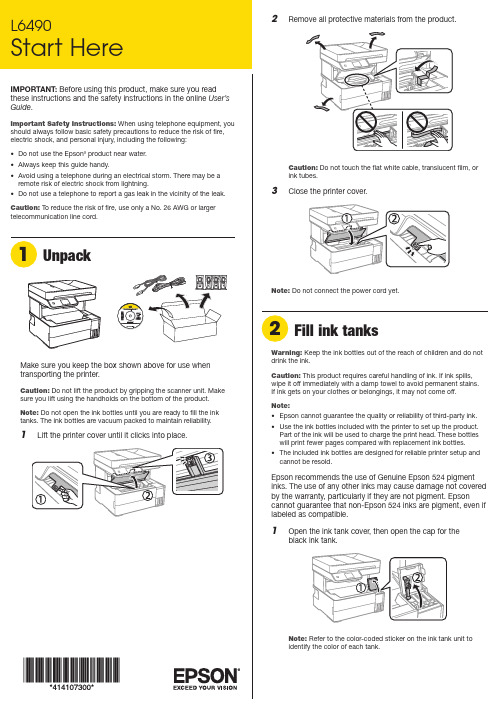
Make sure you keep the box shown above for use when8 Close the ink tank cover.9 C onnect the power cord to the back of the product and toan electrical outlet.Caution: Do not connect to your computer yet.10 P ress thepower button to turn on the product.Note: If an error message appears, turn off the product and check that no protective material has been left inside the product.11 Select your language, country, date, and time settings.Note: You can change these settings later using the product’s control panel. For more information, see the online User’s Guide .Follow steps 12 and 13 to continue ink charging.12 W hen the message to see the Start Here sheet appearson the LCD screen, press and hold the help button for5 seconds.13 W hen the ink confirmation message appears on the LCDscreen, select Done to start charging the ink. Ink charging takes approximately 11 minutes. A message appears when ink charging is complete.Caution: Do not unplug or turn off the product, lift the printer cover, or load paper while the product is charging or you’ll wasteink.Note: After some ink is used for charging, the rest is available forprinting.14 F ollow the on-screen instructions to adjust the printquality.Note: You need to load paper before you can adjust the printquality. See “Load paper” for details.Note:• I f you are using a Mac or your computer does not have a CD/DVD drive, an Internet connection is required to obtain the product software.• T o print from a Chromebook™, go to/support/chromebookprint for instructions.1 M ake sure the product is NOT CONNECTED to yourcomputer.Windows ®: If you see a Found New Hardware screen, click Cancel and disconnect the USB cable.2 I nsert the product CD (Windows only) or download andrun your product’s software package. For the latestsoftware, visit /support/L6490. 3 F ollow the instructions on the computer screen to run the setup program.4 W hen you see the Select Your Connection screen, selectone of the following:• Wireless connectionIn most cases, the software installer automaticallyattempts to set up your wireless connection. If setup is unsuccessful, you may need to enter your network name (SSID) and password.• Direct USB connectionMake sure you have the USB cable ready.• Wired network connectionMake sure you have an Ethernet cable (not included).Mobile printingConnect wirelessly from your smartphone, tablet, or computer.Print documents and photos from across the room or around the world:• P rint directly from your Android™ (v4.4 or later) device*.Simply connect your printer and device to the same network and tap the menu icon to select the print option.• Turn your mobile device into an intuitive, easy-to-useprinting and scanning control center with Epson Smart Panel ®. Download the app from your mobile device’s app store.• Print from wherever you are, next to your printer or remotely, with Epson Connect™. Learn more at /connect* M ay require the Epson Print Enabler or Mopria Print Service app fromGoogle Play™.See the online User’s Guide for information about loading capacity, available paper types and sizes, loading envelopes, and using the rear paper feed slot or ADF .1 M ake sure the product is done charging the ink. Open the2 S3 Insert paper with the printable side down and slide theNote: Make sure the paper is loaded against the front of the cassette.5 S elect the paper settings on the product’s control panel.C onnect the fax line1 C onnect a phone cord to a telephone wall jack and to theLINE port on your product. See the online User’s Guidefor more information.2 S elect Proceed on the LCD screen to set up the fax, orselect Set Up Laterto set it up later.EPSON and Epson Smart Panel are registered trademarks, and EPSON Exceed Your Vision is a registered logomark of Seiko Epson Corporation.Designed for Excellence is a trademark of Epson America, Inc.Windows is a registered trademark of Microsoft Corporation in the United States and/or other countries.Mac is a trademark of Apple Inc., registered in the U.S. and other countries.Android, Chromebook, and Google Play are trademarks of Google LLC.General Notice: Other product names used herein are for identification purposes only and may be trademarks of their respective owners. Epson disclaims any and all rights in those marks.This information is subject to change without notice. © 2020 Epson America, Inc., 12/20CPD-60316Technical supportVisit /support/L6490 to download drivers, view manuals, get FAQs, or contact Epson.You can also speak to a service technician by calling one of these numbers:Argentina(54 11) 5167-0300 Guatemala * 1-800-835-03580800-288-37766Mexico 01-800-087-1080Bolivia * 800-100-116 Mexico City (52 55) 1323-2052Chile (56 2) 2484-3400Nicaragua * 00-1-800-226-0368Colombia 018000-915235Panama * 00-800-052-1376Bogota (57 1) 592-2200Paraguay 009-800-521-0019Costa Rica 800-377-6627Peru 0800-10-126DominicanLima (51 1) 418-0210Republic * 1-888-760-0068Uruguay 00040-5210067Ecuador * 1-800-000-044Venezuela (58 212) 240-1111El Salvador * 800-6570 * C ontact your local phone company to call this toll-free number from a mobilephone.If your country does not appear on the list, contact your nearest Epson sales office. Toll or long distance charges may apply.Need paper and ink?Ensure brilliant results with Epson specialty and plain papers, engineered specifically for Epson printers. You can purchase them from an Epson authorized reseller. To find the nearest one, visit or contact Epson as described in “Any questions?” on this sheet.L6490 replacement inks。
爱普生EPSONESCPOS指令集说明

爱普生【EPSON】ESC/POS指令集说明英文模式下的命令功能代码回车CRESC !设置打印方式选择或取消用户自定义字符集ESC %定义用户自定义字符集ESC &设置位映射方式ESC *初始化打印机ESC @LED ON/OFF ESC ~返回行首ESC <选择行间距为1/6ESC 2英寸设置行进为最小间距ESC 3蜂鸣器ON/OFF ESC BEL设置单页长度ESC C选择打印页ESC c0选择行间距ESC c1选择纸结束信号输出ESC c3选择打印纸及检测器(终止打印)ESC c4禁止ESC c5/使能面板开关禁止/使能ESC c6ON-LINE开关打印及N ESC d行进纸设置TAB位置ESC D打印病退回N ESC e行设单页等待时间ESC f选择或取消单页退纸区ESC F全切割ESC i以最小间距进行打印和进纸ESC J以最小间距进行打印和退纸ESC K选择或取消倒过来的字符ESC l局部切割ESC m印章ESC o产生指定脉冲ESC p释放纸ESC q选择打印颜色ESC r1 / 22选择国际字符子集ESC R ESC SP设置右边界选择字符码表ESC t选择或取消单向打印ESC U ESC V发送打印机状态设置或取消两页并行打印ESC z FF打印送出单页TABHT水平换行LFTAB流水RS中文模式下的命令代码功能设置中文字符下划线模式开关– n FS选择中文字体FS ! n选择中文字符模式FS &取消中文模式FS .----------------------------------------------------------------------------------------EPSON打印控制指令集打印命令功能格式:ASCII:以标准ASCII字符序列表示十进制:以十进制数字序列表示十六进制:以十六进制数字序列表示说明:该命令功能和使用说明。
爱普生LQK打印机使用说明
爱普生LQK打印机使用说明您可以通过控制面板上的按键对打印机进行简单操作,如换行、换页、进纸和退纸以及选择打印速度等。
控制面板指示灯可显示打印机的状态。
控制面板按键和指示灯1. 打印速度指示灯*指示当前的打印速度设置。
高质量(常规速度)高速超高速当打印机为默认设置模式时,指示灯保持亮。
2.切纸/存折指示灯当连续纸处于切纸位置时,此指示灯闪烁。
当打印机处于存折模式时,此指示灯亮。
3.切纸/存折/速度按键当微调和打印速度有效时,打印速度被选定。
将连续打印纸进到切纸位置。
从切纸位置反向将连续纸进到页顶位置。
当要打印存折时,按下此按键。
4.换行/换页按键*如果没有单页纸装入,不操作。
如果装入单页纸,当快速按下此按键时,一行一行进纸,当连续按此按键时,弹出单页纸。
如果没有装入连续纸,装入连续纸。
如果已装入连续纸,当快速按下此按键时,一行一行进纸,或当连续按下此按键时,插入一个分页符。
5.进纸/退纸按键*如果装入了一张单页纸,退出此张单页纸。
备用位置装入连续纸。
将连续纸返回到备用位置。
如果没有单页纸装入,此时没有操作(导致缺纸错误)。
6.暂停按键暂时停止打印,再次按下此按键时继续打印。
持续按住此按键3秒钟,打开微调模式*和打印速度。
要关闭此模式,再次按下此按键。
7.缺纸指示灯当未在所选的纸张来源中装入打印纸或未正确装入打印纸时,此灯亮。
打印纸尚未完全退出,此指示灯闪烁。
8.暂停指示灯打印机暂停时,此指示灯亮。
打印机处于微调模式和打印速度可用时,此灯闪烁。
因打印头过热而停止打印时,此灯闪烁。
9.缩小指示灯当选择缩小模式时,此指示灯亮。
当未处于缩小模式时,此指示灯灭。
* 微调模式:按住暂停按键3秒钟后,打印机进入微调模式。
在此模式下,可以按下换行/换页和进纸/退纸按键调整页顶位置或切纸位置。
参见调整页顶位置。
** 当您同时按下进纸/退纸和暂停按键时,打印机进入缩小模式。
关于打印机的默认设置更改默认设置默认设置控制打印机的许多功能。
- 1、下载文档前请自行甄别文档内容的完整性,平台不提供额外的编辑、内容补充、找答案等附加服务。
- 2、"仅部分预览"的文档,不可在线预览部分如存在完整性等问题,可反馈申请退款(可完整预览的文档不适用该条件!)。
- 3、如文档侵犯您的权益,请联系客服反馈,我们会尽快为您处理(人工客服工作时间:9:00-18:30)。
默认设置 (3/4)
打印的说明列出了您可以更改的设置 描述如何更改它们 并显示控制板指示 灯如何帮助您进行这些设置 使用这些 说明从控制板中更改打印机默认设置
注意 说明页中的箭头指示打印机的当前设 置
5. 当完成这些设置时 关闭打印机并退出 默认设置模式
注意 任何时候关闭打印机都可以退出默认设 置 您进行的所有设置仍将有效直到您 再次更改它们
选项 长度为英尺 3,3.5,4,5.5, 6,7,8,8.5,11,70/6,12,14,1 7 关开 关开 关开 双向 单向 自动 ESC/P2 IBM PPDS
0, 0/ 有斜线的 0 字符
关开 自动 并行 USB 选件 10 秒 30 秒 关开 自动 关 关开 关开
EPSON DLQ-3250K 速查手册
错误指示灯 (1/1)
纸张厚度设置
如果您对打印质量不太满意 特别是在使用 像多联表格纸这样的特殊纸张时 可以手动 调节纸厚调节杆到适当的位置 纸厚调节杆所设置的数字越大 滚筒与打印 头之间的距离就越宽 如果打印输出显得暗 淡或字符好像被遗漏或丢失 那么此设置的 值可能太高 相反 如果此设置的值太低 打印输出可能会显得有污点 此时还有可能 是进纸不正确或色带损坏 下表提供了针对您正在使用的纸张类型不 同 选择相应的纸厚调节杆位置的指导信 息
出现未知的打印机错误
关闭打印机并等待几分钟 然后重新打开打印机 如果仍然出现此错误 请与爱普生授权维修中心联系
打印头过热 等待几分钟 打印头冷却后打印机将自动恢复打印
n = 开 , o = 关 , f = 闪烁 ••• = 一系列短蜂鸣声 三声
••••• = 一系列短蜂鸣声 五声
注意 当你按下控制板上的按键而相应的功能不可用时 打印机将发出一声蜂鸣声
纸张装入不正确
取出并重新正确装入打印纸 然后按下暂停按键 请参见 连续纸 特殊纸 的纸张装入说明
导纸器装入单页纸 或
打印机中出现夹纸
要清除夹纸 请参见用户指南中的 清除夹纸
纸张没有完全退出
按下进纸 / 退纸按键以退出整张纸张
控制板上的纸张来源选择不正确
选择适当的纸张来源然后按下暂停键
打印机盖打开
关闭打印机盖然后按下暂停键
默认设置 (2/4)
EPSON DLQ-3250K 速查手册
分组模式
当从 Windows 应用程序中使用打印机随机携 带的 CD 光盘中的打印机驱动程序进行打印 时 请确认选择了自动 当从其他操作系统 例如 DOS 的应用程序中进行打印如果遇到任 何通信故障 请关闭这一模式
自动 CR 回车
这一设置仅在 IBM PPDS 仿真模式中可用 当 自动回车打开时 打印机每接收到一个换行
手动进纸等待时间
这一设置允许您设定打印纸插入导纸器到打 印纸进纸之间的等待时间 如果进纸之前要 适当调整它的位置 您需要增加等待时间
蜂鸣器 报警器
当出现错误时打印机将发出嘟嘟声 请参见 出错指示灯 可获得打印机出错的详细信
息 如果出现错误时不想打印机发出嘟嘟 声 则关闭这一设置
更改默认设置
注意 ❏ 要打印语言选择和默认设置模式说明
自动 I/F 接口 等待时间
当打印机处于自动接口模式并且在设置指定 的时间内没有从当前指定的接口中接收到数 据时 它将确定哪个接口正在接收数据并切 换到此接口 您可以指定自动等待时间为 10 秒或 30 秒
并行 /I/F 双向模式
当这一功能打开时 使用并行接口双向传输 模式 如果不需要双向传输模式 则关闭这 一功能
自动切纸
当自动切纸打开并且您正在使用拖纸器在连 续纸上打印时 打印机自动将打印纸的页缝 进到切纸位置 在这一位置您可以很方便地 撕下打印好的页面 当打印机再次接收数据 时 打印机自动将尚未使用的打印纸移回页 顶位置并开始打印 这样两个打印任务之间 就不会浪费纸张了
当自动切纸关闭并且您正在拖纸器中使用连 续纸时 您需要通过按下切纸 / 特殊纸按键 来手动移动页缝到切纸位置 详细信息请参 见 使用切纸功能
设置 字符表
斜体表国际字符集 ** 字体 手动进纸等待时间 蜂鸣器
选项
标准模式 italic, PC437, PC850, PC860, PC863, PC865, PC861, BRASCII, Abicomp, Roman8, ISO Latin 1, PC858, ISO 8859-15
所有其他模式 Italic, PC437, PC850, PC437 Greek, PC853, PC855, PC852, PC857, PC864, PC866, PC869, MAZOWIA, Code MJK, ISO 8859-7, ISO Latin 1T, Bulgaria, PC 774, Estonia, ISO 8859-2, PC 866 LAT., PC 866UKR, PC APTEC, PC708, PC720, PCAR 864, PC860, PC865, PC861, PC863, BRASCII, Abicomp, Roman8, ISO Latin 1, PC858, ISO8859-15, PC 771
LF 代码或 ESC J 代码伴随着一个回车 CR 代码 因而打印机将移动打印位置到 下一行的开始位置 当关闭这一设置时 必 须发送一个回车代码才能将打印位置移动到 下一行的开始位置
A.G.M. (IBM)
在 IBM PPDS 仿真模式中打开交互图形模式使 用 ESC3 ESC A ESC J ESC K ESC L ESC Y ESC Z 和 ESC* 命令 与 ESC/P2 模式下的 图形命令一样 仅在 IBM PPDS 仿真模式中 A.G.M 功能可用
带斜线 0
选择带斜线 (/0) 的 0 字符 这一功能打开 或无斜线 0 的 0 字符 这一功能关 闭 这一斜线使您可以方便地区分大写字 母 O 和零
高速草图
当高速草图打开时 打印机的打印速度可以 达到 550cps 每秒字符数 每英寸 10 个 字符 当高速草图关闭时 打印机的打印 速度可以达到 495cps 每英寸 10 个字 符
按键和灯
EPSON DLQ-3250K 速查手册
1
字体按键
选择可用字体
字体指示灯
表明选中的字体
2
复位
当同时按下字体和字间距按键时打印 机清除缓冲区并恢复到默认设置
3
字间距按键
选择一种字间距设置
字间距指示灯
表明选中的字间距
4
切纸 / 专用纸键
❏ 正向送入连续纸到切纸位置
❏ 从切纸位置到页顶位置反向送入 打印纸
自动换行
当自动换行打开时 打印机每接收到一个回 车 CR 代码都带有一个换行 LF 代码
打印方向
您可以选择自动打印方向 双向打印 Bi-D 或单向打印 Uni-D 打印通常是
双向打印 但是 单向打印使打印垂直向精 确对齐
软件
当选择 ESC/P2 时 打印机在 EPSON ESC/P2 模式下运行 当选择 IBM PPDS 时 打印机仿 真 IBM 打印机
9
缺纸指示灯
❏ 当纸张来源中没有打印纸或纸张 装入不正确时灯亮
❏ 当纸张没有完全退出或出现夹纸 时灯闪烁
EPSON DLQ-3250K 速查手册
10 暂停按键
❏ 暂时停止打印 当再次按下时继 续打印
❏ 当按下键三秒钟 打印机进入微 调整模式 当再次按下时 退出 微调整模式
暂停按键
❏ 当打印机暂停时灯亮
0.5 秒 1 秒 1.5 秒 2 秒
关开
* 这些设置只在 IBM PPDS 仿真模式中可用
** 根据所购买国家 / 地区的不同 设置的可用选项也有所 不同
默认设置 (1/4)
EPSON DLQ-3250K 速查手册
用于拖纸器的页长
用此设置可以设定拖纸器中装入的连续纸的 页长 用英寸表示
跳过页缝
只有当纸张来源选择连续纸时 这一功能可 用 当您打开这一功能时 打印机在前一页 的最后一个可打印行和后一页的第一个可打 印行之间提供一个 1 英寸 25.4 毫米 的 页边距 由于大多数的应用程序页边距设置 会覆盖控制板中的页边距设置 所以您应该 只在应用程序中无法设置顶部和底部页边距 时使用这一设置
n 缺纸 n 暂停
f 缺纸 n 暂停
蜂鸣声类 型 •••
•••
•••
•••
o 缺纸
•••
n 暂停
•••
f 缺纸 f 暂停 ff 切纸 / 特殊 纸 f f f 字体 f f f 字间距
o 缺纸 f 暂停
•••••
问题 解决
选中的纸张来源中没有装入打印纸
在选中的纸张来源中装入打印纸 缺纸灯和暂停灯熄灭并且打印机将继续打印
I/F 接口 模式
打印机除了内置并行接口和 USB 接口外 还 提供了一个选件接口插槽 您可以选择自动
AUTO 并行 USB 或接口模式选项 当选 择自动时 打印机自动选择接收数据的接 口 并使用此接口直到打印任务结束 自动 设置允许您在多台计算机中共享此打印机而 无须更改接口模式
如果仅有一台计算机与打印机连接 根据计 算机使用的接口不同可以选择并行 USB 或 选项
Italic U.S.A., Italic France, Italic Germany, Italic U.K., Italic Denmark 1, Italic Sweden, Italic Italy, Italic Spain 1
OCR-B, Orator, Orator-S, Script C, Roman T, Sans Serif H
需要三张 A4 纸或信纸尺寸的单页纸 或 者三页至少要 279 毫米长 11 英寸 210 毫米宽 8.3 英寸 的连续纸 请 参见 连续纸 和 使用导纸器装入单 页纸 可获得装入连续纸和单页纸的说 明