8.交换机VLAN、 TRUNK 、VTP 配置
交换机vlan基本配置

交换机上配置静态VLAN1、创建VLAN(1)在全局模式下创建VLAN:switch>enable 进入特权模式switch#configure terminal 进入全局模式switch(config)#vlan vlan-ID创建VLAN号switch(config)#name vlan-name配置VLAN名称switch(config)#mtu mtu-size改变MTU大小(可选命令)switch(config)#end 退出switch(config)#show vlan {name vlan-name|ID vlan-id}验证查看vlanswitch(config)#copy running-config startup-config 保存配置(2)在VLAN数据库中创建VLAN(VLAN数据库模式目前已经过时IOS版本不在支持,推荐使用全局模式配置定义VLAN)switch#vlan datebase 进入VLAN配置状态switch(vlan)#vlan vlan-id name vlan-name创建VLAN号及VLAN名称switch(vlan)#vlan vlan-id mtu mtu-size 修改MTU大小switch(vlan)#exit 更新VLAN数据并退出switch(config)#show vlan {name vlan-name|ID vlan-id}验证查看vlanswitch(config)#copy running-config startup config 保存配置(3)在VLAN中添加、删除端口switch#configure terminal 进入配置状态switch(config)# interface interface-id 进入要分配的端口switch(config)#switchport mode access 定义二层端口switch(config)#switchport access vlan vlan-id把端口划分给某个VLANswitch(config)#end 退出switch#show running-config interface interface-ID验证端口号的VLAN号switch#show interfaces interface-id switchport 验证端口的管理模式和VLAN情况switch#copy running-config startup-config 保存配置使用default interface interface-id命令可以还原接口的默认配置状态(4)验证VLAN的配置switch#show vlan brief 查看VLAN信息的命令switch#show vlan vlan-id查看指定的某一个VLAN信息(5)删除VLAN用no vlan vlan-id命令Switch#configure terminalSwitch(config)#no vlan vlan-id++++++++++++++++++++++++++++++++++++++++++++++++++++++++++++++++++++ 2、Turnk的模式和协商接口的配置模式1、switchport mode access将接口设定为永久的非中继模式,并协商将链路转换为非中继链路,即使邻接端口是中继端口,此接口也会成为非中继接口2、switchport mode dynamic desirable 使得接口主动尝试将链路转换为中继链路。
交换机上vtp的配置

任务3 在catalyst2950 交换机上配置vtp一、实验目的:掌握vtp的配置,深入了解vtp的工作原理,并掌握调试和检查方法。
二、背景描述:企业有采购部和销售部两个部门,采购部需要实时了解销售部的销售情况,以便做出合理的采购方案。
为了保持通信通畅,采购部与销售部在相同的vlan下。
三、实验拓扑结构:VTP网络拓扑图四、实验步骤:1.交换机Host name和Trunk配置Switch1>e nableSwitch1#config tSwitch1(co nfig)#host name SwitchA // SwitchA(co nfig)#i nterface faO/1SwitchA(c on fig-if)#switchport mode trunk // SwitchA(co nfig-if)#exitSwitch2>e nable更改switch1 为switchA 设置fa0/1为trunk模式更改switch2 为switchBSwitch2#config tSwitch2(co nfig)#host name SwitchB // SwitchB(config)#interface fa0/1SwitchB(config-if)#switchport mode trunk // SwitchB(config-if)#exitSwitchB(config)#interface fa0/2SwitchB(config-if)#switchport mode trunk // SwitchB(config-if)#exit 设置fa0/1 为trunk 模式设置fa0/2 为trunk 模式Switch3#config tSwitch3(config)#hostname SwitchCSwitchC(config)#interface fa0/1// 更改switch3 为switchCSwitchC(config-if)#switchport mode trunk SwitchC(config-if)#exit // 设置fa0/2 为trunk 模式Switch3>enable 2. 配置交换机的VTPSwitchA(config)#vtp domain Cisco // Change VTP domain from NULL to Cisco SwitchA(config)#vtp mode server // Device mode already VTP SERVER. 设置SwitchA 的域名为Cisco 设置vtp 为serverSwitchB(config)#vtp domain Cisco // 设置SwitchB 的域名为CiscoDomain name already ser to CiscoSwitchB(config)#vtp mode transparent // 设置vtp 为transparentSwitchC(config)#vtp domain Cisco // Change VTP domain from NULL to Cisco SwitchC(config)#vtp mode client // 设置SwitchC 的域名为Cisco 设置vtp 为client3. 验证VTPSwitchA# show vtp statusSwitchAt3haw vtp VTP VeraianCcnfiguration RevisionMaximum VLANs supported locally : 2S6:S :Server:Cisco:Di^abl&di Disabled:Disabled:0xA9 OxCB 0x52 0x12 0x94 0x71 0x£9 OxSCLocal updates ID is 0.0.0.0 ■:nc valid interface found)SwitchAtSwitchB# show vtp statusSwitchB^en^ble SuitchBtshow vtp VTF VersionCcnfiguraticn ReviHicnMaxinum VLANm supported locally Number cf exiating VLANm VTF Operaring - Mode VTF Domain Nans VTF Pruning Mede VTP V2 MadeVTP Tcaps Generation MD5 digestConfiguration last modified by SwitchB#|SwitchC# show vtp statusSwitch-C^shcw vtp srstus VTF VersionCcnfiguraticfi P.evisicnMaximuni VLAMs supperted locally Humber of existing '/LANs VTF Dperi^inj Mede VTF Domain Name VTF Pruning Me de VTP V2 Mede VTF Traps Generaticn MD5 digestConfiguraticn last modified by 0 SwirchC#| :0 :2S5 z S :Client:Cisco :Disabled :Disabled :Disabled:0xA9 0X C8 0K 52 0X 12 0X 94 0X 71 0x^9+ 0.0*0 at 0-0-00 00:00:00Ccnfiguraticn lasr modified by0.0.0.0ar 0-0-0000:00:00tTumbez of existing ^TANs VTP Opecoting Mede VTP Oqjnain VTP Pruning Mode VTP V2 Mede VTP Traps {Jeneration MDS digest:2SS :5Transparent :Cisco Disabled Dinabled Disabled0xA9 QxCB 0xS2 0x1: 094 0x71 QxZS QxSC4•配置交换机的vlan,并验证vtp各模式的特点(1) SwitchA交换机vlan的配置SwitchA# vlan database SwitchA(vlan)#vlan 2 // SwitchA(vlan)#vlan 3 //SwitchA(vlan)#exit(2) SwitchB 交换机 vlan 的配置 SwitchB# vlan databaseSwitchB(vlan)#vlan 4 // SwitchB(vlan)#vlan 5 //SwitchB(vlan)#exit6.在交换机 SwitchC 上 show vlan ,结果是 SwitchC 加入了 vlan2 , vlan3,如下图所示:5.配置交换机的 vtp 口令 (1) SwitchA 交换机 vtp 口令配置: SwitchA# config tSwitchA(config)#vtp password cisco SwitchA(config)#exit (2) SwitchB 交换机 vtp 口令配置: SwitchB# config t SwitchB(config)#vtp password cisco SwitchB(config)#exit (3) SwitchC 交换机 vtp 口令配置: SwitchC# config t SwitchC(config)#vtp password cisco SwitchC(config)#exit // 设置 vtp 密码为 cisco// 设置 vtp 密码为 cisco// 设置 vtp 密码为 cisco新建 vlan2 新建 vlan3新建 vlan4 新建 vlan5r VTP Client ?Physical Config ) CLIIOS Command Line Interfacen w 亠LT-riiZIM X JL-I H IT 丄■-Na.zDiz百七口P 口:rf■1d-ef eu.lt activeFaO/JL, Fa0/3p Fa0-/4r FaO/SFsOZ€, FaO/7.FaO/3FaO/10r Fa0/ll…. FaO/12,FaO/13FaO/14, FaO/l£p FaO/lfi,FaQ/17FaO/lB, FaO/13. FaO/20,F*O/22, Faa/23,. F*O/24FaO/2X z1^LAN0002active3VUUST0003ac t iiu p e1002 f dd.±—-daf aigrt/u-Tiaup1003c-a k*n-£ 丄ng— defaixl 匚A et/unaup10-0-4 f d.d.ina 七—da f at口JLt a iTt/11 Fl a up1005t me t - <le f au.1 匸aet/unsupT^pa SAID MTU Paxrenx; SfexnyTJo Brl-dgeNo Stp B■若旦Gtcd 冒Tran al Trans^ 1ono七10QQG1l&QQ—— -一一O02enet 100Q口21500= = =- = 00□■anst 10QQQ31B0Q- - -- - 00二1QQ2ra<ii laioaz15QQ- - -一一Q0■=Copy | PasteL. -J在SwitchA上新建vlan 6,发现SwitchC上的vlan与SwitchA实现同步更新: SwitchA# vla n database SwitchA(vlan)#vlan 6 // 新建vlan6SwitchA(co nfig)#exitSwitchC的show vlan结果如下图:。
VLAN、TRUNK、VTP的配置

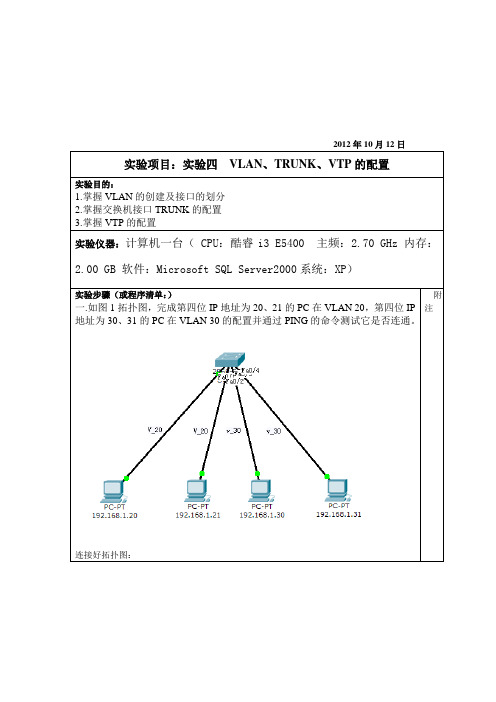
一.如图1拓扑图,完成第四位IP地址为20、21的PC在VLAN 20,第四位IP地址为30、31的PC在VLAN 30的配置并通过PING的命令测试它是否连通。
连接好拓扑图:
配置VLAN:
将f0/1 f0/2接入V_20,f0/3 f0/4接入V_30:
检验:
PC0能ping通PC1,不能ping通PC2 PC3
PC2能ping通PC3,不能ping通PC0 PC1:
二.拓扑图,配置让两个交换机之间相同的VLAN能连通。
图2
配置好拓扑图:
配置SWITCH1:
f/1 f0/2接入v_20,f0/3,f0/4接入v_30:
配置switch2:
然后将两个交换机相连的口设置成trunk口。
检测:
PC4 ping PC8能通:
2012年10月12日
实验项目:实验四VLAN、TRUNK、VTP的配置
实验目的:
1.掌握VLAN的创建及接口的划分
2.掌握交换机接口TRUNK的配置
3.掌握VTP的配置
实验仪器:计算机一台(CPU:酷睿i3 E5400主频:2.70 GHz内存:2.00 GB软件:Microsoft SQL Server2000系统:XP)
PC4 ping PC9不能:
PC6 ping PC9能通:
(3)如图3、4拓扑图,分别测试下列两种不情况下VTP配置并优化。
.
Vtp使用条件:交换机直连、同域(domain),同密(Password),拥有中继端口(trunk)。
连接好拓扑图:
配置交换机:
附注
实验结果分析:
教师批阅:
VLAN 的原理的配置,VTP 协议的配置

VLAN 的原理的配置,VTP 协议的配置一、VLAN 的定义和作用(VLAN Basics)什么是 VLAN:一个 VLAN 就是一个广播域(Broadcast Domain),或一个逻辑的独立网段。
两个 VLAN 之间在没有路由的情况下不能相互通讯VLAN 的一些优点1、安全性(Security)。
不同的 VLAN 间不能相互访问,所以增加安全性。
2、将网络分段(Segmentation):VLAN 可将一个交换变成多个不同的 VLAN,控制访问。
3、灵活性(Flexibility):VLAN 可以跨越多个交换,简化网络管理。
VLAN 让您能够将用户划分到同一个广播域中,而不管他们的物理位置如何,通过创建 VLAN,可控制广播的传播,从而提高了交换型网络的性能,要在 VLAN 之间通信,必须使用能够使用第 3 层设备二、VLAN 成员关系(VLAN Memberships)静态 VLAN(Static VLANs):管理员手工将端口划分给某个具体的 VLAN,与设备的物理位置没什么关系而且,每个VLAN 中的主机必须拥有正确的 IP 地址信息。
动态 VLAN(Dynamic VLANs)动态 VLAN:使用管理软件,基于 MAC 地址,动态地将端口分配到某个 VLAN,甚至应用程序来动态创建 VLAN,Cisco 设备管理员可以使用 VLAN 管理策略服务器(VLANManagement Policy Server,VMPS)的服务来建立个 MAC 地址数据库,来根据这个动态创建 VLAN,VMPS 数据库把 MAC 地址映射 VLAN 上。
三、帧标记 (Frame Tagging)Frame tagging:帧的鉴别方法,当帧到达每个 switch,首先先检查 VLAN ID,然后决定如何对帧进行处理、当帧到达和 VLAN ID 所匹配的 access link 的时候,switch 移去 VLAN标识符。
思科CISCOVLAN、TRUNK和VTP功能与原理简介

思科CISCOVLAN、TRUNK和VTP功能与原理简介本⽂讲述了思科CISCO VLAN、TRUNK 和 VTP 功能与原理。
分享给⼤家供⼤家参考,具体如下:VLAN、TRUNK 和 VTP 简介VLAN如图,虚拟局域⽹ VLAN ( Virtual LAN ) 是交换机端⼝的逻辑组合。
VLAN ⼯作在 OSI 的第 2 层(数据链路层),⼀个 VLAN 就是⼀个⼴播域,VLAN 之间的通信是通过第 3 层的路由器来完成的。
VLAN 有以下优点:1. 控制⽹络的⼴播问题:每⼀个 VLAN 是⼀个⼴播域,⼀个 VLAN 上的⼴播不会扩散到另⼀VLAN;2. 简化⽹络管理:当 VLAN 中的⽤户位置移动时,⽹络管理员只需设置⼏条命令即可;3. 提⾼⽹络的安全性:VLAN 能控制⼴播;VLAN 之间不能直接通信。
定义交换机的端⼝在什么 VLAN 上的常⽤⽅法有:1. 基于端⼝的 VLAN :管理员把交换机某⼀端⼝指定为某⼀ VLAN 的成员;2. 基于 MAC 地址的 VLAN :交换机根据节点的 MAC 地址,决定将其放置于哪个 VLAN 中。
Trunk当⼀个 VLAN 跨过不同的交换机时,在同⼀ VLAN 上但是却是在不同的交换机上的计算机进⾏通信时需要使⽤ Trunk。
Trunk 技术使得在⼀条物理线路上可以传送多个 VLAN 的信息,交换机从属于某⼀ VLAN(例如 VLAN3)的端⼝接收到数据,在Trunk 链路上进⾏传输前,会加上⼀个标记,表明该数据是 VLAN3 的;到了对⽅交换机,交换机会把该标记去掉,只发送到属于VLAN3 的端⼝上。
有两种常见的帧标记技术:ISL 和 802.1Q。
ISL 技术在原有的帧上重新加了⼀个帧头,并重新⽣成了帧较验序列(FCS),ISL 是思科特有的技术,因此不能在 Cisco 交换机和⾮ Cisco交换机之间使⽤。
⽽ 802.1Q 技术在原有帧的源 MAC 地址字段后插⼊标记字段,同时⽤新的 FCS 字段替代了原有的 FCS 字段,该技术是国际标准,得到所有⼚家的⽀持。
交换机配置VLANTrunk

交换机配置VLANTrunk交换机配置VLAN Trunk有的思科交换机用户不知道怎么配置,且因为思科有一款模拟器软件,本文就以思科交换机的设置作为示例。
这次店铺来介绍一下思科交换机怎么设置虚拟串口配置VLAN Trunk的步骤。
交换机串口(Trunk)的作用:在以太网上通过交换机的.串口实现中继可以使用如下两种封装类型:—IEEE 802.1Q—ISL(Inter Switch Link, Cisco私有)配置步骤:交换机怎么设置-第一步:在交换机上添加VLAN交换机怎么设置-第二步:将接口添加到相应的VLAN中Switch1#config terminalSwitch1(config)#interface fastEthernet 0/1Switch1(config-if-range)#switchport access vlan 2Switch1(config)#interface fastEthernet 0/2Switch1(config-if-range)#switchport access vlan 3交换机怎么设置-第三步:配置交换机之间互联的端口为串口(Trunk)Switch1(config)#interface f0/15Switch1(config-if-range)#switchport mode trunk相关其他命令去除VLAN:Switch(config-if)#switchport trunk allowed vlan removevlan-list添加VLAN:Switch(config-if)#switchport trunk allowed vlan add vlan-list 查看端口状态:Switch#show interface f0/15switchport检查中继端口允许VLAN的列表:Switch#show interface interface-id switchport 查看VLAN信息:Switch#show vlan brief查看配置:Switch#show running-config【交换机配置VLAN Trunk】。
配置vtp

配置 VTP VTP (VLAN Trunking Protocol) 是一种消息协议, 用于在 VTP 域内同步 VLAN 信息 (VLANs 的添加、删除和重命名),而不必在每个交换上配置相同的 VLAN 信息,从而实现 VLAN 配置的一致性。
使用 VTP,可以在一个或多个交换机上建立配置修改中心,并自动完成与 网络中其他所有交换机的通信,可以有效地减少交换网络中的管理事务。
1.VTP 简介 (1)VTP 域 VTP 域(也称 VLAN 管理域),由一个或多个相互连接、使用相同 VTP 域名的交换机所组 成。
一台交换机能够被配置而且也只能被配置一个 VTP 域。
使用命令行界面或 SNMP,可 以修改全局 VLAN 的域配置。
默认状态下,交换机处于 VTP Server 模式,并且在收到由中继连接传来的 VTP 通告(VTP Advertisement)或由配置一个管理域之前,一直处于非管理域状态。
不能在 VTP 服务器上 建立或修改 VLAN,直到管理域名被指定或被学习。
如果交换机收到一个从中继连接传来的 VTP 通告,它将继承管理域名和 VTP 配置版本号, 并且不再理睬不同的管理域名或更早的配置版本号。
如果将交换机配置为 VTP 透明,可以建立可修改的 VLAN,但修改将只影响到个别的交换 机。
当修改位于 VTP Server 上的 VLAN 配置时,该修改将传播至 VTP 域中所有的交换机。
VTP 通告 被发送至所有的中继连接,包括 Inter-Switch Link (ISL)、IEEE 802.1Q、IEEE 802.10和 ATM LAN Emulation(LANE)。
(2)VTP 模式 可以将交换机配置在以下任何一种 VTP 模式操作: Server。
在 VTP Server(服务器)模式,可以为整个 VTP 域建立、修改和删除 VLAN,并指 定其他配置参数(如 VTP 版本和 VTP 修剪)。
交换机常见的配置参数

交换机常见的配置参数
交换机常见的配置参数如下:
1、端口配置参数:包括端口速率、双工模式、端口状态(开启/关闭)等。
2、VLAN配置参数:VLAN是一种将局域网(LAN)划分成多个逻辑网络的技术,配置参数包括VLAN ID、VLAN名称、端口所属VLAN等。
3、IP配置参数:包括管理IP地址、默认网关、子网掩码等。
4、用户名和密码:用于登录交换机进行配置和管理。
5、SNMP配置参数:包括SNMP版本、团体名、读/写权限等。
6、端口安全配置参数:包括允许接入的MAC地址、防止MAC地址攻击、防止ARP攻击等。
7、STP配置参数:STP是一种防止网络环路的协议,配置参数包括STP版本、桥ID、路径开销等。
8、QoS配置参数:用于在网络中为某些流量提供优先传输,配置参数包括流量分类、优先级、队列调度等。
9、系统参数:包括交换机名称、时钟同步、系统日志等。
10、端口聚合配置参数:端口聚合可以将多个物理端口捆绑成一个逻辑端口,以增加链路带宽和提高网络可靠性,配置参数包括聚合组ID、端口成员、聚合模式等。
11、协议支持:包括支持的网络协议(如TCP/IP、IPv4/IPv6等)、路由协议(如RIP、OSPF 等)、桥接协议(如STP、RSTP等)等。
12、硬件和软件版本:包括交换机硬件型号、操作系统版本、固件版本等。
1。
- 1、下载文档前请自行甄别文档内容的完整性,平台不提供额外的编辑、内容补充、找答案等附加服务。
- 2、"仅部分预览"的文档,不可在线预览部分如存在完整性等问题,可反馈申请退款(可完整预览的文档不适用该条件!)。
- 3、如文档侵犯您的权益,请联系客服反馈,我们会尽快为您处理(人工客服工作时间:9:00-18:30)。
交换机VLAN、TRUNK 、VTP 配置1.配置CISCO 二层交换机的IP 地址(catalyst 2950 为例)SW1(config)#int vlan 1 //进入管理接口interface vlan 1SW1(config-if)#ip address 11.1.1.2 255.255.255.0 //配置IP 地址SW1(config-if)#no shutdownSW1(config-if)#exitSW1(config)#ip default-gateway 11.1.1.1 //配置网关,可通过show run 查查看所配置的IP 地址:SW1#show int vlan 1Vlan1 is up, line protocol is upHardware is CPU Interface, address is 0008.20ff.6400 (bia 0008.20ff.6400)Internet address is 11.1.1.2/242.配置交换机的端口速度和双工(Speed and Duplex)SW1(config)#interface fa0/1SW1(config-if)#speed {10 | 100 | auto} //10M/100M/自适应SW1(config-if)#duplex {auto | full | half} //自适应/全双工/半双工一般情况下,交换机两端的端口速度和双工要匹配,这样通信质量才能得到保证,在相同厂家的产品(比如说Cisco 的交换机互连)中端口协商不用配置一般不会有什么问题,可以通过show interface 查看端口的速度和双工。
通常在不同厂家的产品中(比如说Cisco 和华为互连)如果通过查看发现端口速度和双工不匹配,可以通过手工配置来解决。
如图:通过show interface 查看端口的速度和双工:SW1#show interfaces fastEthernet 0/24FastEthernet0/24 is up, line protocol is up (connected)Hardware is Fast Ethernet, address is 0008.20ff.6418 (bia 0008.20ff.6418)MTU 1500 bytes, BW 100000 Kbit, DLY 100 usec,reliability 255/255, txload 1/255, rxload 1/255Encapsulation ARPA, loopback not setKeepalive set (10 sec)Full-duplex, 100Mb/s, media type is 100BaseTXinput flow-control is unsupported output flow-control is unsupportedARP type: ARPA, ARP Timeout 04:00:00Last input 00:00:03, output 00:00:00, output hang never注:CISCO 交换机端口默认值:Auto-duplex, Auto-speed, media type is 100BaseTX Cisco 设备配置端口速度(speed)和双工(duplex)命令:SW1(config)#interface fastEthernet 0/24SW1(config-if)#speed ?10 Force 10 Mbps operation ----------------------------注:强制速度为10M100 Force 100 Mbps operation---------------------------注:强制速度为100Mauto Enable AUTO speed configuration -----------------注:速度自动协议(默认值)SW1(config-if)#duplex ?auto Enable AUTO duplex configuration ----------------注:自动协商双工full Force full duplex operation ---------------------------注:强制为全双工half Force half-duplex operation --------------------------注:强制为半双工3.设置永久MAC 地址不过期SW1(config)#mac-address-table static mac_addr {vlan vlan_id} [interface int1 [int2 ... int15]] SW1(config)#mac-address-table static 1111.1111.a111 vlan 1 interface f0/1配置后show mac-address-table 可以看到静态添加的MAC 地址1111.1111.a111SW1#show mac-address-tableVlan Mac Address Type Ports---- ----------- -------- -----All 000f.72db.4ec0 STATIC CPU1 1111.1111.a111 STATIC Fa0/14.管理MAC 地址表SW1#show mac-address-tableMac Address Table-------------------------------------------Vlan Mac Address Type Ports---- ----------- -------- -----All 000f.72db.4ec0 STATIC CPU1 0000.0c3f.0b05 DYNAMIC Fa0/121 0030.94e6.391d DYNAMIC Fa0/111 00e0.b05a.5bfe DYNAMIC Fa0/101 1111.1111.a111 STATIC Fa0/15.设置交换机端口的访问模式(三种) access /dynamic / trunkSW1(config-if)#switchport mode ?access Set trunking mode to ACCESS unconditionallydynamic Set trunking mode to dynamically negotiate access or trunk modetrunk Set trunking mode to TRUNK unconditionallySW1(config)#int fastEthernet 0/1SW1(config-if)#switchport mode access //设置FA0/1 为ACCESS 模式SW1(config-if)#switchport mode trunk //设置FA0/1 为TRUNK 模式SW1(config-if)#switchport mode dynamic auto //设置FA0/1 为自动直协商模式(默认) 交换机TRUNK 端口配置:1)一般交换机与交换机相连接的端口要设置为trunk 模式2 )如果是核心交换机与非网管的交换机相连,核心交换机端口设置为access 模式如下图:配置SW1:SW1(config)#int f0/24SW1(config-if)#no shutdownSW1(config-if)#switchport mode trunk //设置FA0/24 为TRUNK 模式配置SW2:SW2(config)#int f0/24SW2(config-if)#no shutdownSW2(config-if)#switchport mode trunk //设置FA0/24 为TRUNK 模式验证TRUNK 命令:Show interface trunkShow interface f0/24 switchportSW1#sho run int f0/24interface FastEthernet0/24switchport mode trunkSW1#show int trunkPort Mode Encapsulation Status Native vlanFa0/24 on 802.1q trunking 1SW1#show int f0/24 switchportName: Fa0/24Switchport: EnabledAdministrative Mode: trunkOperational Mode: trunkAdministrative Trunking Encapsulation: dot1qOperational Trunking Encapsulation: dot1qNegotiation of Trunking: OnAccess Mode VLAN: 1 (default)Trunking Native Mode VLAN: 1 (default)Voice VLAN: noneAdministrative private-vlan host-association: noneAdministrative private-vlan mapping: noneAdministrative private-vlan trunk native VLAN: noneAdministrative private-vlan trunk encapsulation: dot1qAdministrative private-vlan trunk normal VLANs: noneAdministrative private-vlan trunk private VLANs: noneOperational private-vlan: noneTrunking VLANs Enabled: ALLPruning VLANs Enabled: 2-1001Capture Mode DisabledCapture VLANs Allowed: ALLProtected: falseAppliance trust: noneSW1#SW2:SW2#sho run int f0/24interface FastEthernet0/24switchport mode trunkendSW2#show int trunkPort Mode Encapsulation Status Native vlanFa0/24 on 802.1q trunking 16.配置VLAN1).创建VLANSW1(config)#vlan 2 //创建VLAN2SW1(config)#name VLAN2 //命名为VLAN2,默认为vlan002,命名是可选命令2).将端口加入VLANSW1(config-if)#switchport mode access //设配端口为access 模式SW1(config-if)#switchport access vlan 2 //把端口加到vlan23).检查的命令Switch#show vlan例子:创建VLAN2 命令为widom ,创建VLAN3 命令为market把端口F0/4 加入VLAN2SW1#config tSW1(config)#vlan 2SW1(config-vlan)#name wisdomSW1(config-vlan)#exitSW1(config)#vlan 3SW1(config-vlan)#name marketSW1(config-vlan)#exitSW1(config)#int fas0/4SW1(config-if)#switchport mode accessSW1(config-if)#switchport access vlan 2可以同时把多个端口加入到相应VLANSW1(config)#interface range fastEthernet 0/10 – 15 //可以同时把多个端口加入到一个VLAN 里SW1(config-if-range)#switchport mode accessSW1(config-if-range)#switchport access vlan 3 //把端口10-15 都加入到VLAN3 里SW1#show vlan //检查VLAN 信息VLAN Name Status Ports---- -------------------------------- --------- -------------------------------1 default active Fa0/1, Fa0/5, Fa0/6, Fa0/7Fa0/8, Fa0/9, Fa0/16, Fa0/17Fa0/18, Fa0/19, Fa0/20, Fa0/21Fa0/22, Fa0/23, Fa0/242 wisdom active Fa0/43 market active Fa0/10, Fa0/11, Fa0/12Fa0/13, Fa0/14, Fa0/15SW1#7.配置VTP----VTP 技术使得在大型的网络里布置多个VLAN 变得简单.VTP 的配置步骤:1、配置Trunk (交换机和交换机相连的端口要设置为TRUNK)2、配置VTP DOMAIN3、配置VTP MODE4、配置VLAN5、将端口加入VLAN6、检查Switch#show interface xx/xx switchport //查看相应该接口的trunk 状态Switch#show vtp status //查看vtp 状态Switch#show vlan //查看VLAN配置SW1:SW1#configure terminalSW1(config)#interface fastEthernet 0/24SW1(config-if)#switchport mode trunkSW1(config-if)#no shutdownSW1(config-if)#exitSW1(config)#vtp domain wisdomDomain name already set to wisdom.SW1(config)#vtp mode serverDevice mode already VTP SERVER.SW1(config)#vtp password ciscoSetting device VLAN database password to ciscoSW1(config)#vtp pruning //配置VTP 的修剪,只要在SERVER 端配置就行. Pruning switched onSW1#sho vtp statusVTP Version : 2Configuration Revision : 1Maximum VLANs supported locally : 64Number of existing VLANs : 5VTP Operating Mode : ServerVTP Domain Name : wisdomVTP Pruning Mode : EnabledVTP V2 Mode : DisabledVTP Traps Generation : DisabledMD5 digest : 0xE8 0x5A 0x7D 0xB1 0x0E 0xBC 0xEB 0x1FConfiguration last modified by 11.1.1.2 at 3-1-93 02:56:31Local updater ID is 11.1.1.2 on interface Vl1 (lowest numbered VLAN interface found) 创建VLAN2 VLAN3 VLAN4 VLAN5SW1(config)#vlan 2SW1(config-vlan)#vlan 3SW1(config-vlan)#vlan 4SW1(config-vlan)#vlan 5SW1(config-vlan)#在SW1 上创建VLAN 后查看修订版本:SW1#show vtp statusVTP Version : 2Configuration Revision : 5Maximum VLANs supported locally : 128Number of existing VLANs : 9VTP Operating Mode : ServerVTP Domain Name : wisdomVTP Pruning Mode : EnabledVTP V2 Mode : DisabledVTP Traps Generation : DisabledMD5 digest : 0x9C 0x64 0xD6 0x44 0x5E 0x54 0x9E 0xFCConfiguration last modified by 11.1.1.2 at 3-1-93 02:59:04Local updater ID is 11.1.1.2 on interface Vl1 (lowest numbered VLAN interface found) 在交换机SW1 上检查已创建的VLANSW1#sho vlanVLAN Name Status Ports---- -------------------------------- --------- -------------------------------1 default active Fa0/1, Fa0/5, Fa0/6, Fa0/7Fa0/8, Fa0/9, Fa0/16, Fa0/17Fa0/18, Fa0/19, Fa0/20, Fa0/21Fa0/22, Fa0/23, Fa0/242 VLAN0002 active3 VLAN0003 active4 VLAN0004 active5 VLAN0005 active检查trunk 端口:SW1#show interfaces fastEthernet 0/24 switchportName: Fa0/24Switchport: EnabledAdministrative Mode: trunkOperational Mode: trunkAdministrative Trunking Encapsulation: dot1qOperational Trunking Encapsulation: dot1qNegotiation of Trunking: OnAccess Mode VLAN: 1 (default)Trunking Native Mode VLAN: 1 (default)Voice VLAN: noneAdministrative private-vlan host-association: noneAdministrative private-vlan mapping: noneAdministrative private-vlan trunk native VLAN: noneAdministrative private-vlan trunk encapsulation: dot1qAdministrative private-vlan trunk normal VLANs: noneAdministrative private-vlan trunk private VLANs: noneOperational private-vlan: noneTrunking VLANs Enabled: ALLPruning VLANs Enabled: 2-1001Capture Mode DisabledCapture VLANs Allowed: ALLProtected: falseAppliance trust: none配置SW2:Switch#Switch#config tEnter configuration commands, one per line. End with CNTL/Z.SW2(config)#hostname SW2SW2(config)#int fastEthernet 0/24SW2(config-if)#switchport mode trunkSW2(config-if)#exitSW2(config)#vtp domain wisdomChanging VTP domain name from test to wisdomSW2(config)#vtp mode clientSetting device to VTP CLIENT mode.SW2(config)#vtp password ciscoSetting device VLAN database password to ciscoSW2(config)#查看F0/24 的trunk 状态:SW2#show interfaces fastEthernet 0/24 switchport Name: Fa0/24Switchport: EnabledAdministrative Mode: trunkOperational Mode: trunkAdministrative Trunking Encapsulation: dot1q Operational Trunking Encapsulation: dot1q Negotiation of Trunking: OnAccess Mode VLAN: 1 (default)Trunking Native Mode VLAN: 1 (default)Voice VLAN: noneAdministrative private-vlan host-association: none Administrative private-vlan mapping: none Administrative private-vlan trunk native VLAN: none Administrative private-vlan trunk encapsulation: dot1q Administrative private-vlan trunk normal VLANs: none Administrative private-vlan trunk private VLANs: none Operational private-vlan: noneTrunking VLANs Enabled: ALLPruning VLANs Enabled: 2-1001Capture Mode DisabledCapture VLANs Allowed: ALLProtected: falseAppliance trust: none查看VTP 状态:SW2#show vtp statusVTP Version : 2Configuration Revision : 5Maximum VLANs supported locally : 128Number of existing VLANs : 9VTP Operating Mode : ClientVTP Domain Name : wisdomVTP Pruning Mode : EnabledVTP V2 Mode : DisabledVTP Traps Generation : DisabledMD5 digest : 0x9C 0x64 0xD6 0x44 0x5E 0x54 0x9E 0xFCConfiguration last modified by 11.1.1.2 at 3-1-93 02:59:04----------此处可以看到SW2 的VLAN 信息是从SW1-11.1.1.2 同步过来的SW2#show vlanVLAN Name Status Ports---- -------------------------------- --------- -------------------------------1 default active Fa0/2, Fa0/3, Fa0/4, Fa0/5Fa0/6, Fa0/7, Fa0/8, Fa0/9Fa0/10, Fa0/11, Fa0/12, Fa0/13Fa0/14, Fa0/15, Fa0/16, Fa0/17Fa0/18, Fa0/19, Fa0/20, Fa0/21Fa0/22, Fa0/23, Fa0/242 VLAN0002 active3 VLAN0003 active4 VLAN0004 active5 VLAN0005 active实验结果:SW2 不用配置VLAN,已同步了SW1 的VLAN 信息.实验成功SW2 同步VTP SERVER 的VLAN 后,接下来的操作就是安要求把相应的端口加入到相应的VLAN。
