T4服务器Solaris操作系统安装截图
新手入门:Solaris 10系统安装图解
新手入门:Solaris 10系统安装图解我们简要介绍了Solaris 10操作系统的特性,本篇向大家介绍在VMware Workstation 5环境下如何安装Solaris 10(X86)操作系统。
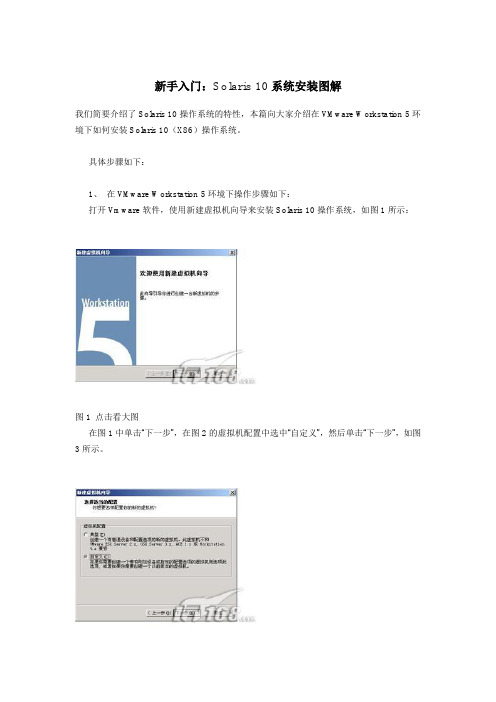
具体步骤如下:1、在VMware Workstation 5环境下操作步骤如下:打开Vmware软件,使用新建虚拟机向导来安装Solaris 10操作系统,如图1所示:图1 点击看大图在图1中单击“下一步”,在图2的虚拟机配置中选中“自定义”,然后单击“下一步”,如图3所示。
图2 点击看大图图3 点击看大图在图3虚拟机格式中选择“新的—Workstation 5 (W)”,然后单击“下一步”,如图4所示。
图4 点击看大图在图4的客户机操作系统选中“Sun Solaris(S)”,在“版本(V)”选择“Solaris 10(experimental)”,然后单击“下一步”,如图5所示,“虚拟机名称”采用默认值,“位置”修改,使用“浏览”为“E:\solaris10\”;然后单击“下一步”,进入图6中,“虚拟机内存”一般采用系统的默认值(至少要96MB,否则的话不能使用图形界面安装),笔者在这里使用“272 MB”内存,接近最大的推荐内存284MB(如果PC机的物理内存比较大,比如说1GB,建议使用最大的284MB 内存)。
图5 点击看大图图6 点击看大图在图6中,单击“下一步”,进入图7,在“网络连接”中选中“使用桥接网络”,接下来在“I/O 适配器类型”采用默认值,如图8所示;然后单击“下一步”,进入图9中,在“磁盘”选中“创建一个新的虚拟磁盘”;接下来在“虚拟机磁盘类型”也采用默认值,如图10所示。
图7 点击看大图图8 点击看大图图9 点击看大图图10 点击看大图在图10中单击“下一步”,进入图11,在这里“磁盘大小(GB)”笔者选择12.0(缺省的是4.0),也就是Solaris10的最小磁盘空间;在指定的“磁盘文件”采用采用默认的文件名,如图12所示,然后点击“完成”按钮,出现如图13的Solaris 10的虚拟机。
solaris安装教程,配合图解
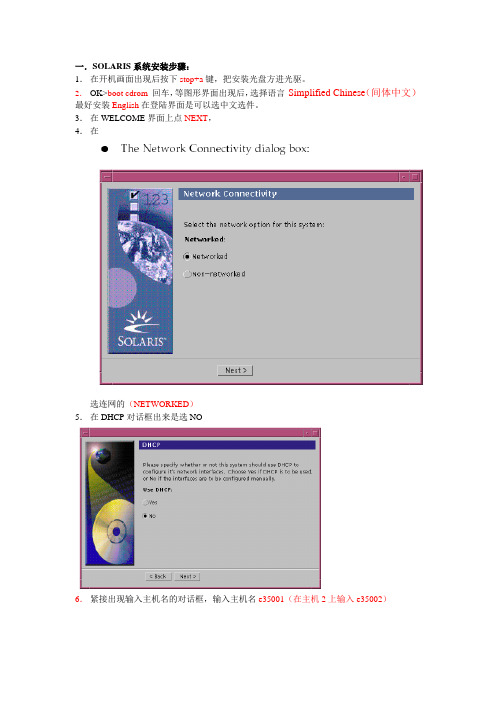
Sun solaris的安装心得:作者:黄浦下载地址:/technetwork/server-storage/solaris10/downlo ads/index.html下载后刻成盘,也可以直接买个盘(不贵)我是用X86安装的我的的配置:内存:1.5G硬盘:100G1.插入光盘并开机下图是要决定使用那一种Console 类型,基本上预设第一个就是对的。
另外两个Serial Console 你可以用箭头键来选择你需要的Console 类型。
基本上,这两个Serial Console 是用来给一些不是使用VGA 显示器来显示的headless rack-mounted 系统用,所以,这类型的系统是需要接上Serial Console 或Serial 终端机来操作。
在60 秒之内,如果你没按ENTER 键来确定选择,系统会自动Boot Solaris OS接下来出现如下信息这是正在载入便会出现六个安装选项。
你可以用箭头键来选择你需要的方法或样计时功能到达30秒。
超过30秒后,便会出现自动安装功能,这里我们选择1。
如果发现不对,你可以按下ESC 键来改变硬件的设定。
下一步会出现如下进程选中最后一个US-English再按F2继续安装按“回车”键继续安装接下来进入安装界面按“回车”进入窗口安装这里我们选择0英文这里是要设置的目录直接NEXT接下来出现下面情况,如果玩单机选择Non-networked这里我们选择Networked,然后next接下来会出现下面窗口,这里是看你是否用动态IP选择no,然后next接下来出现下面窗口,是设置主机名,我这里把主机名直接设置成我的名字的拼音,你们可以随意设置下一步是设置IP地址,设置你将要使用的IP地址,然后next接下来出现下面窗口,输入子网掩码,然后next下面窗口是让你设置IPv6,这里我们不予设置,然后next接下来出现下面,选择“Specify one”然后next接下来是设置默认网关,然后next接下来出现下面窗口,直接no,然后next这里选择地区,设置时间这里选择语言,最好选择英文,这里我选择中文设置时间设置root密码,最好设置复杂点包括字母(区分大小写),数字,下划线等上面我是全部输入的oracle ,格纹也可以根据自己的喜好设计一下这个是退出时弹出光盘,选择yes就行,然后nextLicense 直接accept ,然后next 就行自定义安装,我这里选择第二个,自定义安装悬着地址,我们选择Asia的chinat这里没有添加的,借next按照下面选择这个next后会安排你配置硬盘,可以直接保持默认(最好是保持swap区是Ram的两倍但是不要超过2G)接下来直接安装就行下面是安装进度,要安装的时间有点长,安装后会reboot也就是重启新手出入茅庐,如果有错误请大家指出。
solaris操作系统

pkgadd -d /cdrom/cdrom0/Product /SUNWTcl pkgrm SUNWTcl
pkgrm:卸载软件包
#
pkginfo:查询软件包 (pkgchk –lp /filename)
#
pkginfo –l |grep SUNWTcl
补丁维护
补丁就是一些替换现存的文件和目录的文件目录集合。补 丁纠正应用程序的错误或增加功能。 Patch编号
文件系统管理
fsck磁盘检测纠错工具
系统每次启动时都会自动运行fsck。如果发现错误,会尝试自动修复, 如果错误非常严重,需要人工修复。这时要进入系统单用户模式,然 后对错误磁盘执行:
#fsck
/dev/dsk/c0t0d0s0
newfs创建文件系统
# newfs /dev/rdsk/c0t2d0s0
rm:删除文件须为空。 mv:更改文件名;移动文件和目录; ln:将一个文件连接到另外的文件上 dd:用指定大小的块拷贝一个文件
- dd if=/dev/fd0 of=disk.img bs=1440k 备份软盘 - dd if=/dev/dsk/c1t0d0s2 of=/dev/dsk/c1t3d0s2 bs=10240k 两个硬盘 对拷
文件系统是一种通常驻留在磁盘上的某一部分的数据 结构。Solaris是一种层次化文件系统。它由一系列相 互关联的文件组成,同时可以允许用户以一种很容易 找到某个特定文件的方式来组织文件。 在一个标准的Solaris系统中.每一个用户都具有自己 的一个目录(宿主目录),在这个目录下用户可以随意 创建自己的新子目录,另外还可以再将子目录分为若 干个子目录。通过这种方式,用户可以将文件结构扩 展到任意的层次以满足自己的需要。
Solaris系统安装步骤
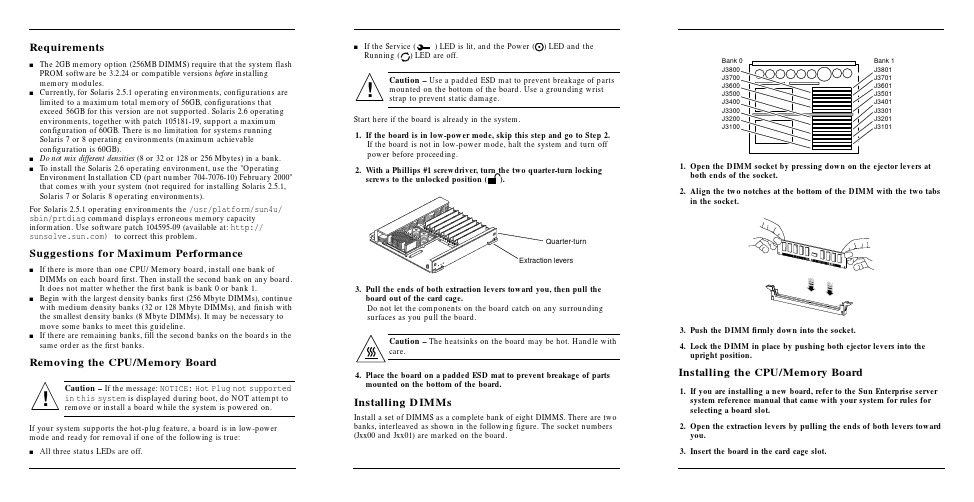
一.SOLARIS系统安装步骤:1.在开机画面出现后按下stop+a键,把安装光盘方进光驱。
2.OK>boot cdrom回车,等图形界面出现后,选择语言Simplified Chinese(间体中文)最好安装English在登陆界面是可以选中文选件。
3.在WELCOME界面上点NEXT,4.在选连网的(NETWORKED)5.在DHCP对话框出来是选NO6.紧接出现输入主机名的对话框,输入主机名e35001(在主机2上输入e35002)7.在IP地址的地方输入IP地址,10.35.55.17(在2号机器上输入10.35.55.18)8.在子网掩码对话框里输入255255.255.1289.在IPV6的IP协议框里选默认的版本即可,回车。
10.在如下的名称对话框里选NO。
11.接着选择时区,选东亚,中华人民共和国12.设置日期(默认即可)13.设置密码14.在电源管理对话框里,按NEXT ,(默认选择)15.在代理服务对话框里,根据实际的情况填写。
如果是直接连接到INTERNET 16.接着上一个确认的对话框如下,仔细检查一下,如果没有问题,点确认:17.接着会提示你放如第一张安装光盘18.选择安装方式。
自定义安装19.选择64位安装方式20.选择安装方式:完全安装(ENTIRE SOLARIS SOFTWARE GROUP PLUS OEM)21.选择DISKS,添加:22.在下面的分区框里,选择硬盘分区(MODIFY)23.输入分区打小:0 / 3000m1swap 2000m3/var 2000m4 /usr 2000m5 /opt 3000m6/oracle 4500m7150m24.然后点确认,开始安装。
24.中途会提示更换安装光盘,更换光盘,确认即可。
二.VERITAS voluemanager卷管理软件的安装。
1.把安装光盘放入光驱到安装目录用pkgadd –d . 回车即可。
通过终端安装solaris操作系统

> To make a selection, use the arrow keys to highlight the option and
press Return to mark it [X].
Primary network interface
[X] ce0
[ ] ge0
Press Return to show more choices.
Please make a choice (0 - 59), or press h or ? for help:
输入0后按回车键;
5、 因为是在终端上安装Solaris9,所以这时会出现如下提示:
What type of terminal are you using?
1、开机上电,等待显示器亮后,按Ctrl-Break键。 这时,服务器进入OK状态:
2、将Solaris9系统盘Software 1/2插入DVD/CD-ROM,并在OK提示符下输入以下命令:
OK boot cdrom
这时,服务器从光盘上开始引导系统
3、等待一会,,系统出现如下提示:
Help.
Networked
[X] Yes
[ ] No
F2_Continue F6_Help
安装程序提示系统是否连接了网络?使用上下箭头键移动,在合适的位置停止后,按空格键,
选中该选项;
在我们的安装中,需要网络功能,因此按F2键继续安装;
9、出现如下提示:
respond, press ESC; the legend at the bottom of the screen
will change to show the ESC keys to use for navigation.
Solaris操作系统的系统要求与安装指南说明书
Requirementss The2GB memory option(256MB DIMMS)require that the system flash PROM software be3.2.24or compatible versions before installingmemory modules.s Currently,for Solaris2.5.1operating environments,configurations are limited to a maximum total memory of56GB,configurations thatexceed56GB for this version are not supported.Solaris2.6operating environments,together with patch105181-19,support a maximumconfiguration of60GB.There is no limitation for systems runningSolaris7or8operating environments(maximum achievableconfiguration is60GB).s Do not mix different densities(8or32or128or256Mbytes)in a bank.s To install the Solaris2.6operating environment,use the"Operating Environment Installation CD(part number704-7076-10)February2000"that comes with your system(not required for installing Solaris2.5.1, Solaris7or Solaris8operating environments).For Solaris2.5.1operating environments the/usr/platform/sun4u/ sbin/prtdiag command displays erroneous memory capacity e software patch104595-09(available at:http:// )to correct this problem.Suggestions for Maximum Performances If there is more than one CPU/Memory board,install one bank of DIMMs on each board first.Then install the second bank on any board.It does not matter whether the first bank is bank0or bank1.s Begin with the largest density banks first(256Mbyte DIMMs),continue with medium density banks(32or128Mbyte DIMMs),and finish with the smallest density banks(8Mbyte DIMMs).It may be necessary to move some banks to meet this guideline.s If there are remaining banks,fill the second banks on the boards in the same order as the first banks.Removing the CPU/Memory BoardCaution–If the message:NOTICE:Hot Plug not supportedin this system is displayed during boot,do NOT attempt toremove or install a board while the system is powered on.If your system supports the hot-plug feature,a board is in low-power mode and ready for removal if one of the following is true:s All three status LEDs are off.s If the Service()LED is lit,and the Power ()LED and theRunning()LED are off.Caution–Use a padded ESD mat to prevent breakage of partsmounted on the bottom of the e a grounding wriststrap to prevent static damage.Start here if the board is already in the system.1.If the board is in low-power mode,skip this step and go to Step2.If the board is not in low-power mode,halt the system and turn offpower before proceeding.2.With a Phillips#1screwdriver,turn the two quarter-turn lockingscrews to the unlocked position().3.Pull the ends of both extraction levers toward you,then pull theboard out of the card cage.Do not let the components on the board catch on any surroundingsurfaces as you pull the board.Caution–The heatsinks on the board may be hot.Handle withcare.4.Place the board on a padded ESD mat to prevent breakage of partsmounted on the bottom of the board.Installing DIMMsInstall a set of DIMMS as a complete bank of eight DIMMS.There are twobanks,interleaved as shown in the following figure.The socket numbers(Jxx00and Jxx01)are marked on the board.1.Open the DIMM socket by pressing down on the ejector levers atboth ends of the socket.2.Align the two notches at the bottom of the DIMM with the two tabsin the socket.3.Push the DIMM firmlydown into the socket.4.Lock the DIMM in place by pushing both ejector levers into theupright position.Installing the CPU/Memory Board1.If youare installing a new board,refer to the Sun Enterprise serversystem reference manual that came with your system for rules forselecting a board slot.2.Open the extraction levers by pulling the ends of both levers towardyou.3.Insert the board in the card cage slot.!!Extraction leversQuarter-turnBank 1J3801J3701J3601J3501J3401J3301J3201J3101Bank 0J3800J3700J3600J3500J3400J3300J3200J3100sFor a 4-slot or 5-slot card cage,orient the board with the component side to the right.sFor a 16-slot or 8-slot card cage (diagram follows):Front slot installation,orient the board with the component side down.Rear slot installation,orient the board with the component side up.4.Push the board into the card cage,then simultaneously press both extraction levers to seat the board on the centerplane.Caution –Do not press on the board front panel to seat it—doing so will damage the connector pins.Caution –When inserting a board into slot 4or slot 10of a16-slot card cage,lift the board slightly to avoid damage to the centerplane connectors.Pushing both levers simultaneously avoids twisting the board and bending the connector pins.5.With a Phillips #1screwdriver,turn the two quarter-turn locking screws to the locked position ().Rear viewFront view!!Sun ™ Enterprise ™6x 00/5x 00/4x 00/3x 00 Systems DIMM Installation GuideCaution –The heatsinks on the board can bedamaged by incorrect handling.Do not touch the heatsinks while installing or moving the board.Hold the board only by the edges.If a heatsink is loose or broken,obtain a replacement board.Caution –The heatsinks on the board can bedamaged by improper packaging.When storing or shipping the board,ensure that the heatsinks have sufficient protection.Note –Make sure the DIMM and connector are freeof dust and debris.If necessary,gently clean them using the dry,stiff brush supplied.!!Part Number: 802-5032-15Revision A of January 2000Accessing Sun Documentation OnlineThe sm web site enables you to access Sun technicaldocumentation on the Web.You can browse the archive or search for a specific book title or subject at:Sun Welcomes Your CommentsWe are interested in improving our documentation and welcome your comments and suggestions.You can email your comments to us at:*******************Please include the part number (802-5032-14)of the document in the subject line of your email.Copyright 2000 Sun Microsystems, Inc. All rights reserved. Use is subject to license terms. Third-party software, including font technology, is copyrighted and licensed from Sun suppliers. Sun, SunMicrosystems, the Sun Logo, SunDocs, and Solaris are trademarks or registered trademarks of Sun Microsystems, Inc. in the U.S. and other countries.RESTRICTED RIGHTS : Use, duplication, ordisclosure by the U.S. Government is subject to restrictions of FAR 52.227-14(g)(2)(6/87) and FAR 52.227-19(6/87), or DFAR 252.227-7015(b)(6/95) and DFAR 227.7202-3(a).Copyright 2000 Sun Microsystems, Inc. Tous droits réservés. Distribué par des licences qui enrestreignent l’utilization. Le logiciel détenu par des tiers, et qui comprend la technologie relative aux polices de caractères, est protégé par un copyright et licencié par des fournisseurs de Sun. Sun, SunMicrosystems,le logo Sun,SunDocs,et Solaris sont des marques de fabrique ou des marques déposées de Sun Microsystems, Inc. aux Etats-Unit et dans d’autres pay.Sun Microsystems Computer Company •901San Antonio Road •Palo Alto,CA 94303-4900USA •650960-1300•Fax 650969-91316.Reboot the system now or schedule a later time to reboot when system disruption will be minimized.The system cannot use the new board until the system is rebooted.7.If the system is running,look for a system message similar to the following example.This example is for a CPU/Memory board in slot 5:NOTICE: CPU Board Hotplugged into Slot 5NOTICE: Board 5 is ready to remove。
solaris-sybase安装(图形)
一在sun服务器上安装solaris 8.01.同时按下stop + a 键,机器输出ok , 键入命令boot cdrom, 插入solaris software 1光盘,即安装。
2.主要安装步骤选择:安装语言选择:选择简体中文,再选择UTF-8.(vi /app/Sybase/.profile加入一行export LANG=C)联网:是;DHCP:否;输入主机名;IP:输入IP地址;子网部分:输入子网掩码;IPV6 :否;安全性:否;继续;命名服务:none ; 地理区域:东亚,中国;初始;亚洲;完整分配;继续;;自动布局;用户化,所创建分区如下:/ 2206 M/swap 2000 M/overlap 34730 M/var 4000 M/opt 2000 M/home 24522 M开始安装;自动重新引导;输入口令;媒体:CD ;换solaris software 2光盘进行安装;跳过;重新引导。
注意:其它没提到的步骤均按其默认值设置。
二在solaris上安装sybase1.桌面右击,选择Tool; 选择Admin Tool, 创建名为sybase的帐户,其路径设为/home/sybase.2.编辑/etc/system 文件:在set:下加入一行:set shmsys:shminfo_shmmax=nnn nnn=实际内存数(2G=2048000000),修改后存盘退出,重新启动系统生效。
3.插入sybase光盘,以sybase用户登录:在终端下输入:cd /cdrom/cdrom0; ./install –c将安装目录设为:/home/sybase ; 是否注册?n.4.设置环境变量:cat /home/sybase/SYBASE.sh >>/home/sybase/.profile注销,以sybase 用户名登录.5.配置sybase:cd ASE-12_0 ; cd bin ; ./asecfg ,选择configure a new server ; 选择配置Adaptive Server , Backup Server , Monitor Server .(1) 在Adaptive Server配置界面,配置参数如下:server name :SYBASEmaster device path :/home/sybase/master.datmaster device size (MB) :100master database size (MB) :50sybsystemprocs device path :/home/sybase/sybsystemp.datsybsystemprocs device size (MB) :200sybsystemprocs database size (MB) :100port number 6688选择ok..(2 ) 在Backup Server配置界面, 只设置port number 6689 , 其它默认。
Solaris11安装图解
内容摘要:Solaris 11 即Solaris Express Developer Edition ,SXDE是完全免费的,每个季度发布一个新的版本,适合作为应用程序开发环境。
512MB内存不足以安装Solaris ExpressDeveloper Edition GUI 安装程序。
要安装Developer 发行版,至少需要768MB内存。
解决方法: x86 系统:在GRUB 菜单中,选择"Solaris Express Serial Console ttyb" 安装选项(即第4 个选项)。
此选项提供了使用512MB内存的基于文本的安装。
该安装仅包括操作系统,而不包括开发者工具。
您可以在完成安装后添加开发者工具。
(6)缺省安装方式屏幕出现将显示第二个屏幕,如图4 。
图 4缺省安装方式在屏幕中键入1,然后按Enter 键。
(7)选择系统语言在以下面板中,为安装程序选择一种语言,然后单击"OK"(确定)。
如图 5 。
图5 选择系统语言(8)选择进行安装在以下面板中,单击“安装”或“升级”,然后单击“下一步”。
如图6 。
图 6选择进行安装单击“安装”将会执行Solaris OS 的初始安装,这会用新版本的Solaris OS 覆写现有的Solaris 文件系统。
如果您的系统未在运行Solaris OS,则必须执行初始安装。
注意:请注意以下重要注意事项■ 无法读取磁盘表。
■ 磁盘先前未曾分区。
■ 如果磁盘上存在现有Solaris 分区,且用户没有对分区进行任何修改,则安装会只覆写该Solaris分区。
其他现有分区不会被更改。
(9)确定磁盘大小和指定Solaris 11 的安装位置如图 7图 7确定磁盘大小和指定Solaris 11 的安装位置图 7的顶部部分会显示系统上可用的内部磁盘、外部磁盘和固态驱动器。
此面板还会显示每个磁盘的大小(以GB 为单位)。
要了解有关某个磁盘的详细信息,请将光标移至该磁盘图标上面。
手把手交你安装solaris10(图文并茂)
一、准备工作A.准备安装介质(CD/DVD)。
B.将系统的引导顺序改为CD/DVD优先。
C.如果Solaris要安装在有其它操作系统的硬盘上,请务必备份重要数据。
D.向SA申请网络资源备用(IP地址,网关地址,子网掩码,DNS等)。
E.在安装前阅读此文档,对安装过程有个大致的了解。
二、开始安装1.将安装介质装入,并重新启动计算机。
(先保证第一个引导为CD/DVD引导)从光盘开始引导界面。
选择的一项“Solaris”,回车继续。
选择“1”图形交互方式的安装。
选择安装提示语言,此处选择了6,即简体中文(请根据需要选择),回车继续。
欢迎页面,点击“下一步”继续。
需要联网则保持默认值,否则选择“非联网的”,点击“下一步”继续。
如果是动态分配IP地址,请选择“是”,需要设定一个IP地址则选择否,单击“下一步”继续。
给主机起一个响亮的名字,单击“下一步”继续。
设定网络地址,填写从系统管理员分配到的IP,点击“下一步”继续。
设定子网掩码(公SA那里获取),点击“下一步”继续。
如果需要IPv6则选择是,此处选择“否”,单击“下一步”继续。
指定缺省路由(LAN中一般都设置为网关),可以由系统检测,也可以指定一个。
此处选择“指定一个”,单击“下一步”继续。
输入默认路由地址,单击“下一步”继续。
保持默认选项,单击“下一步”继续。
设置名字服务方式,根据实际需要选择,此处选择了“无”,“下一步”继续。
时区的设置,此处以洲/国家/地区的方式设置,“下一步”继续。
选择洲和国家,点击“下一步”继续。
设定日期和时间,“下一步”继续。
设定root用户口令。
“下一步”继续。
前一部分设定信息的确认。
点击“确认”继续。
选择“下一步”继续。
根据需要选择,此处保持原有值,点击“下一步”继续。
选择安装介质,此处选择CD/DVD,“下一步”继续。
初始化中,等待进入下一个对话。
够选“接受”,“下一步”继续。
选择安装类型,此处选择了“自定义安装”,“下一步”继续。
Solaris10系统安装
Solaris10系统安装Solaris 10 系统安装说明:蓝色字体是配置选项。
T4安装步骤:配置管理口的时候,默认情况下 state=disabled需要更改配置将state置为enabled set state=enabled 最后执行set commitpending=true1配置管理接口Oracle(R) Integrated Lights Out ManagerVersion 3.0.16.7.c r73993Copyright (c) 2021, Oracle and/or its affiliates. All rights reserved.Warning: The system appears to be in manufacturing test mode. Contact Service immediately.Warning: password is set to factory default.-> cd /SP/network /SP/network-> show/SP/network Targets:interconnect ipv6testProperties:commitpending = (Cannot show property) dhcp_server_ip = none ipaddress = 192.168.2.106 ipdiscovery = staticipgateway = 192.168.2.250 ipnetmask = 255.255.255.0macaddress = 00:10:E0:0E:92:09managementport = /SYS/MB/SP/NETMGMT outofbandmacaddress =00:10:E0:0E:92:09 pendingipaddress = 192.168.2.106 pendingipdiscovery = staticpendingipgateway = 192.168.2.250 pendingipnetmask = 255.255.255.0pendingmanagementport = /SYS/MB/SP/NETMGMT sidebandmacaddress = 00:10:E0:0E:92:08 state = enabledCommands: cd set show-> set pendingipaddress=192.168.1.100 Set 'pendingipaddress' to'192.168.1.100'-> set pendingipgateway=192.168.1.1 Set 'pendingipgateway' to'192.168.1.1'-> set commitpending=true Set 'commitpending' to 'true'-> set pendingipdiscovery = static Set 'pendingipdiscovery' =to 'static'->set pendingipdiscovery = static Set 'pendingipdiscovery '= 'static'-> stop /SYS Are you sure you want to stop /SYS (y/n)? y stop: Target already stopped停止初始系统 -> set /HOST/bootmode script=\ 设置系统启动后进入ok 模式 Set 'script' to 'setenv auto-boot? false'-> start /SYSAre you sure you want to start /SYS (y/n)? Y start: Target already started-> start /SP/consoleAre you sure you want to start /SP/console (y/n)? ySerial console started. To stop, type #.Primary Bootstrap.2 做硬raid (在OK模式下)T4服务器做raid1系统大概需要运行15个小时{0} ok probe-scsi-all 查看系统硬盘路径 /pci@400/pci@2/pci@0/pci@f/pci@0/usb@0,2/hub@2/hub@3/storage@2Unit 0 Removable Read Only device AMI Virtual CDROM 1.00/pci@400/pci@2/pci@0/pci@4/scsi@0FCode Version 1.00.60, MPT Version 2.00, Firmware Version 9.00.00.00Target 9Unit 0 Disk HITACHI H106030SDSUN300G A2B0 585937500 Blocks, 300 GB SASDeviceName 5000cca02534e880 SASAddress 5000cca02534e881 PhyNum 0 TargetaUnit 0 Removable Read Only device TEAC DV-W28SS-V 1.0B SATA device PhyNum 6 Target bUnit 0 Disk HITACHI H106030SDSUN300G A2B0 585937500 Blocks, 300 GB SASDeviceName 5000cca02534e8d0 SASAddress 5000cca02534e8d1 PhyNum 1/pci@400/pci@1/pci@0/pci@6/SUNW,qlc@0,1QLogic QLE2562 Host Adapter FCode(SPARC): 2.03 06/30/08 Firmware version 4.03.02 Fibre Channel Link downPossible causes: No cable, incorrect connection mode or data rate SFP state: 8Gb Present/pci@400/pci@1/pci@0/pci@6/SUNW,qlc@0QLogic QLE2562 Host Adapter FCode(SPARC): 2.03 06/30/08Firmware version 4.03.02 Fibre Channel Link downPossible causes: No cable, incorrect connection mode or data rate SFP state: 8Gb Present/pci@400/pci@1/pci@0/pci@4/scsi@0FCode Version 1.00.60, MPT Version 2.00, Firmware Version 9.00.00.00{0} ok{0} ok select /pci@400/pci@2/pci@0/pci@4/scsi@0 进入系统硬盘路径{0} ok{0} ok show-children 查看系统硬盘id及其他信息FCode Version 1.00.60, MPT Version 2.00, Firmware Version 9.00.00.00Target 9Unit 0 Disk HITACHI H106030SDSUN300G A2B0 585937500 Blocks, 300 GB SASDeviceName 5000cca02534e880 SASAddress 5000cca02534e881 PhyNum 0 TargetaUnit 0 Removable Read Only device TEAC DV-W28SS-V 1.0BSATA device PhyNum 6 Target bUnit 0 Disk HITACHI H106030SDSUN300G A2B0 585937500 Blocks, 300 GB SASDeviceName 5000cca02534e8d0 SASAddress 5000cca02534e8d1 PhyNum 1 {0} ok show-volumes 查看系统硬盘是否已有raid No volumes to show{0} ok 9 b create-raid1-volume 创建系统硬盘raid1 Target 9 size is 583983104 Blocks, 298 GB Target b size is 583983104 Blocks,298 GBThe volume can be any size from 1 MB to 285148 MB What size do you want? [285148]Volume size will be 583983104 Blocks, 298 GB Enter a volume name: [0 to15 characters] Volume has been created {0} ok {0} ok3 做lable插入系统盘solaris 10 {0} ok{0} ok boot cdrom -s 进入单用户模式Boot device: /pci@400/pci@2/pci@0/pci@4/scsi@0/disk@p6 File and args: -sSunOS Release 5.10 Version Generic_147440-01 64-bitCopyright (c) 1983, 2021, Oracle and/or its affiliates. All rightsreserved. Booting to milestone \Configuring devices. WARNING:/pci@400/pci@2/pci@0/pci@4/scsi@0/iport@v0/disk@w3c746dae7c726a8a,0 (sd6):Corrupt label; wrong magic number ## format Searching for disks...WARNING:/pci@400/pci@2/pci@0/pci@4/scsi@0/iport@v0/disk@w3c746dae7c726a8a,0 (sd6): Corrupt label; wrong magic number doneWARNING:/pci@400/pci@2/pci@0/pci@4/scsi@0/iport@v0/disk@w3c746dae7c726a8a,0 (sd6):Corrupt label; wrong magic numberc1t3C746DAE7C726A8Ad0: configured with capacity of 277.99GB format> q # init 0# syncing file systems... done Program terminated {0} ok boot cdromBoot device: /pci@400/pci@2/pci@0/pci@4/scsi@0/disk@p6 File and args: SunOS Release 5.10 Version Generic_147440-01 64-bitCopyright (c) 1983, 2021, Oracle and/or its affiliates. All rights reserved. Configuring devices.Using RPC Bootparams for network configuration information.4 开始安装说明:[X] 中括号中X代表选中,[]中括号代表不选中。
- 1、下载文档前请自行甄别文档内容的完整性,平台不提供额外的编辑、内容补充、找答案等附加服务。
- 2、"仅部分预览"的文档,不可在线预览部分如存在完整性等问题,可反馈申请退款(可完整预览的文档不适用该条件!)。
- 3、如文档侵犯您的权益,请联系客服反馈,我们会尽快为您处理(人工客服工作时间:9:00-18:30)。
T4-4 安装
Configuring ILOM With the ILOM CLI and a Serial Connection
The default serial port speed is 9600 baud, 8 bits, no parity, 1 stop bit & no handshake.
Log in to the ILOM SP. User = root
Pwd = changeme
Set the working directory.
cd /SP/network
配置ILOM网络管理口的IP set pendingipaddress=
set pendingipdiscovery=static set pendingipnetmask=
set pendingipgateway=
set commitpending=true set state=enabled
Verify the changes. show /SP/network
Log out of the ILOM SP.
Exit
Configuring the SP's Clock Properties via CLI To examine the current settings:
-> show /SP/clock
To manually set the ILOM clock property values: -> set /SP/clock datetime=
-> set /SP/clock timezone=EST
Configuring the SP's Clock Properties via GUI
Root/changeme
默认用户名和密码
SECURING THE ILOM SERVICE PROCESSOR (SP) (不改)
ssh -l root <SP-ipaddr>
set /SP/users/root password=<new password>
Verifying the Firmware Versions using the CLI
-> show /HOST sysfw_version
Verifying the Firmware Versions using the GUI
Preparing for the Update
HOST POWER ON & POST
set /HOST/bootmode script="setenv auto-boot? false"
Power on the server
start /SYS
start /HOST/console
SPARC T4-4, No Keyboard
Copyright (c) 1998, 2011, Oracle and/or its affiliates. All rights reserved. OpenBoot 4.33.4, 130560 MB memory available, Serial #8.
Ethernet address 0:21:28:fa:d9:7e, Host ID: 85fad97e.
VERIFY / UPGRADE LSI SAS 2008 RAID CONTROLLERS
Using the FCODE Facility (from OBP)
{0} ok probe-scsi-all
ok show-devs
select /pci@400/pci@1/pci@0/pci@0/LSI,sas@0 {0} ok show-volumes
select /pci@700/pci@1/pci@0/pci@0/LSI,sas@0 {0} ok show-volumes
{0} ok show-children
9 a create-raid1-volume
Show-volumes
Devalias
{0} ok boot cdrom –s
Fromat
Quit
Reboot – cdrom
# eeprom auto-boot?=true
Eis-补丁
打完后,init 6 重启系统,,,看uname -a 版本号有升级。