linux weblogic创建域
Linux环境下创建weblogic服务
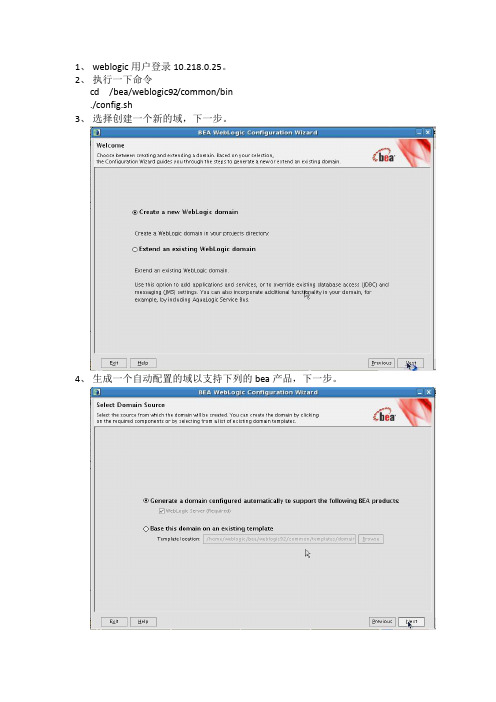
1、weblogic用户登录10.218.0.25。
2、执行一下命令cd /bea/weblogic92/common/bin./config.sh3、选择创建一个新的域,下一步。
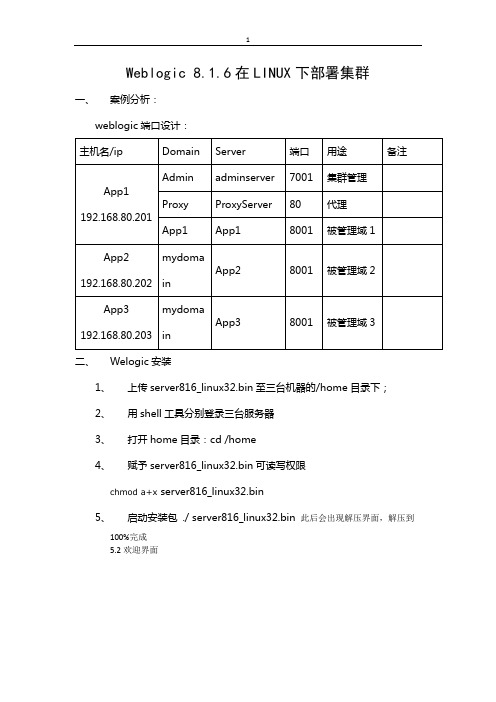
4、生成一个自动配置的域以支持下列的bea产品,下一步。
5、输入用户名和用户密码,一般都默认是weblogic,下一步。
6、根据需要选择模式,开发模式还是生产模式,并选择正确的jdk,下一步。
7、是否自定义设置,这里选是,下一步。
8、设置管理服务器的端口号为7003,下一步。
9、配置被管理的服务器,这里不需要配置,下一步。
10、配置计算机,不需要配置,下一步。
11、检查weblogic域,下一步。
12、设置域名称和路径,创建。
10.218.0.25创建完毕。
setDomianEnv.sh,以文本方式打开并修改如下几个地方并保存。
14、配置boot.properties进入/bea/user_projects/domains/base_domain_LR,创建文件boot.properties,文件内容为username=weblogicpassword=weblogic15、配置startAdmin.sh在/bea/user_projects/domains/base_domain_LR /bin下执行命令cp startWebLogic.sh startAdmin.shvi startAdmin.sh将startAdmin.sh的内容更改为START_WL_LOG /home/bea/user_projects/domains/base_domain_LR/bin/startAdmin.log /home/bea/user_projects/domains/base_domain_LR /bin/startWebLogic.sh >$START_WL_LOG保存退出16、启动执行./startAdmin.sh也可以执行./startAdmin.sh &在后台执行17、说明如果从控制台中修改了weblogic密码,重启weblogic时会报错,此时需要做以下工作,1,修改/bea/user_projects/domains/base_domain_LR中的boot.properties;2,删除/bea/user_projects/domains/base_domain_LR/servers/AdminServer/securit y中的boot.properties。
linux系统创建weblogic域以及修改端口方法

一、安装发布Weblogi域1.使用远程工具登录Linux服务器,这里使用SecureCRT软件进行截图讲解。
2、执行如下图命令一,进入weblogic发布服务所在目录。
执行如下图命令二,启动weblogic 发布服务文件。
3、进入配置向导页而,如无须更改则选择下一步即可。
4、如无须更改,直接输入下一步。
如要更改选择对应序号。
5、直接输入下一步即可。
6、下图是配置weblogic新建域的名称,这里说明下如何修改。
2)如确左更改则输入下一步。
7、下图为将该域创建的所在位置。
一般情况下默认即可。
输入下一步。
8、配置weblogic控制台登录控制台用户需密码。
这里只需要输入序号进行修改。
2)选择2输入密码。
2)输入密码回车。
9、选择域模式,这里选择开发模式。
因开发模式可自动加载程序包。
而生产模式需要部署服务包才可使用,非税系统属于自动加载程序包方式。
10. 这里需要选择weblogic运行所需jdk版本。
1)选择2输入其他java SDK。
2)输入JDK路径,回车即可。
3)输入下一步确认。
11^此处根据需要选择,一般默认直接下一步即可。
13、有如下提示则创建完成。
二、通过修改配置文件修改weblogic启动端口方法1、进入所在域的目录下2、进入config目录下3、通过vi命令修改weblogic配置文件,通过移动光标找到server [T点4、找到对应的位置按i则进入编辑:模式。
增加如下语句,8015则是这个域的端口:5、按Exc按钮后,输入:wq则保存配置.6、此时已经修改完成。
如不懂VI命令者慎用,以防误删配置信息。
增加端口语句:<listen-port>8015</listen-port><listen ・port・e nabled>truev/listG port-enabled>友情提示:范文可能无法思考和涵盖全面,供参考!最好找专业人士起草或审核后使用,感谢您的下载!。
linux下weblogic集群部署
Weblogic 8.1.6在LINUX下部署集群一、案例分析:1、上传server816_linux32.bin至三台机器的/home目录下;2、用shell工具分别登录三台服务器3、打开home目录:cd /home4、赋予server816_linux32.bin可读写权限chmod a+x server816_linux32.bin5、启动安装包 ./ server816_linux32.bin 此后会出现解压界面,解压到100%完成5.2欢迎界面直接回车即可出现lience界面,输入“1”,回车;5.3选择BEA 主目录输入“/weblogic/bea”,回车即可。
2.4 选择安装类型选择12.5选择产品的安装目录默认即可,直接回车2.6等待安装2.7等待安装JDK2.8完成安装回车后,安装过程会清除安装过程中的临时文件。
三、Linux系统及weblogic部分系统参数修改1、用FTP工具分别登录三台服务器2、打开下载etc目录下的hosts、exports及/etc/security下的limits.conf3、在hosts文件中加入192.168.80.202 app2192.168.80.201 app1192.168.80.203 app34、在exports文件中加入* 192.168.80.201(rw,sync)* 192.168.80.202(rw,sync)* 192.168.80.203(rw,sync)5、在limits.conf文件末尾中加入* soft nproc 8192* hard nproc 16384* soft nofile 8192* hard nofile 65536* soft nproc 16384 * hard nproc 32768 * soft nofile 16384 * hard nofile 655366、重启服务器 reboot四、创建域:1、/home/weblogic/bea/weblogic81/common/bin目录中的 config.sh 文件,会出现是创建还是扩展域的提示页面,选择第一个,创建一个新的域2、系统会提示选择模板注意选择Basic Weblogic Server Domain,每次的顺序可能不一样,选择数字的时候要注意3、系统会出现是否使用快速模式选项,建议选择非快速模式“2”。
Linux 环境下weblogic domain配置
Linux 环境下weblogic domain配置综合2009-03-06 12:14:09 阅读124 评论0 字号:大中小订阅>cd bea/weblogic81/common/bin>sh congfig.shDomain Mode Configuration:--------------------------Enable Development or Production Mode for this domain.->1|Development Mode --开发模式2|Production Mode --生成模式Enter index number to select OR [Exit][Previous][Next]> 1-------------------------------------------------------------------------------------------------------------------Java SDK Selection:-------------------->1|Sun SDK 1.5.0_11 @ /usr/java/jdk1.5.0_11 --默认地址下的JDK2|Other Java SDK --另外的JDKEnter index number to select OR [Exit][Previous][Next]> 1-------------------------------------------------------------------------------------------------------------------Choose Configuration Option:----------------------------*Do you want to modify any of the preconfigured settings or defaults in your template?**To keep the default or template settings, and proceed directly to name and create your domain, leave No selected.1|Yes-> 2|No --修改样板配置Enter index number to select OR [Exit][Previous][Next]> 1Configure the Administration Server:------------------------------------Enter adminstration server configurations. Each WebLogic Server domain must have one Administration Server. The Administration Serverhosts the Administration Console which is used to perform administrative tasks.| Name | Value |_|__________________|_____________________|1| *Name: | AdminServer |2| Listen address: | All Local Addresses |3| Listen port: | 7001 |4| SSL listen port: | N/A |5| SSL enabled: | false |Select Option:1 - Modify "Name"2 - Modify "Listen address"3 - Modify "Listen port"4 - Modify "SSL enabled"Enter option number to select OR [Exit][Previous][Next]>Edit Domain Information:------------------------| Name | Value |_|________|___________|1| *Name: | ebusiness |Select Option:1 - Modify "Name"2 - Discard ChangeEnter option number to select OR [Exit][Previous][Next]>Creating Domain...0% 25% 50% 75% 100%[------------|------------|------------|------------][***************************************************]**** Domain Created Successfully! ****该界面是所有配置信息的汇总确认,如果没问题,点击Create,开始创建DOMAIN域.三、启动Weblogic在启动Weblogic之前,可将服务用户名和密码写入启动脚本。
linux字符界面创建weblogic域方法

linux字符界面创建weblogic域方法〇、环境操作系统:Redhat 5.5Weblogic :英文版 8.1.6Weblogic安装目录:/weblogic一、域的建立执行下面语句进入weblogic的bin目录:1.cd /weblogic/weblogic81/common/bin/运行新建服务向导:1../config.sh出现如下图界面默认是新建服务(1.Create a new WebLogic configuration),所以:直接回车(或者输入1,回车)出现下图因为是创建新域,所以选择Basic WebLogic Server Domain(基本Weblogic 服务域)。
图中默认就是选中的这项,直接回车,如果不默认,输入该项前的序号 3 然后回车。
接下图:提示:Do you want to run the wizard in express mode?(是否进入快捷向导模式?)因为在非快捷模式下才可以自定义端口号等配置,所以要对它说No了:输入 2 ,回车接下图:上图中可以设置服务名、监听地址、监听端口等等,输入相应序号进入相应设置。
提示:Enter option number to select(输入选项序号进行选择)首先我们设置Name(服务名)输入 1 ,回车接下图:提示:Enter value for "Name" (输入服务名)输入你的服务的名称比如:testserver,回车接下图:再次到设置选择页面,可以看到Name后面的值已经变成了刚刚输入的testserver。
现在我们来设置端口,输入3,回车接下图:默认端口号是7001,如果不改的话不用管,我们在这里改为9001。
输入9001,回车接下图:此时服务名和监听端口已设置完毕,直接回车,进入下一步操作:提示:Do you want to configure Managed Servers,Clusters and Mac..(是否设置被管服务,集群...?)这是配置集群时所设置的,现在我们是建单独的域,所以选No。
weblogic创建域
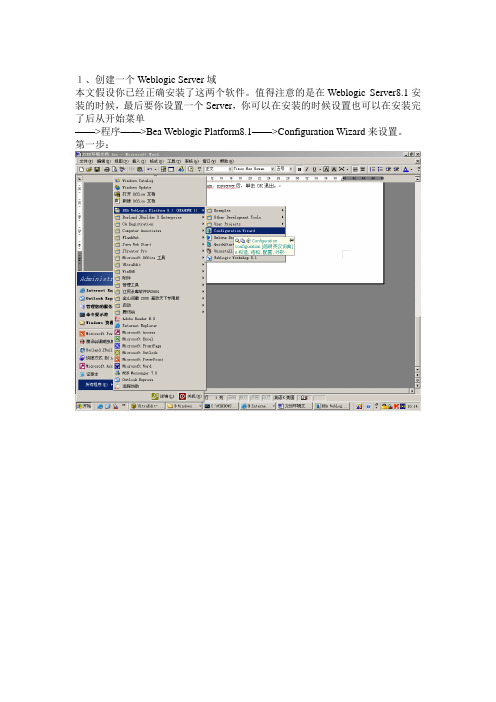
1、创建一个Weblogic Server域本文假设你已经正确安装了这两个软件。
值得注意的是在Weblogic Server8.1安装的时候,最后要你设置一个Server,你可以在安装的时候设置也可以在安装完了后从开始菜单——>程序——>Bea Weblogic Platform8.1——>Configuration Wizard来设置。
第一步:选择“Create a new Weblogic confinguration”按next 下一步选择Express选项,直接next 下一步输入用户名,密码直接next 下一步Production模式,然后选择SDK,直接next 下一步create 将创建一个weblogic的应用域done完成创建。
1、创建一个Weblogic 的应用(快速配置weblogic8.X的应用目录)我们知道在weblogic7.x之前,安装完后weblogic会自动创建默认的应用目录DefaultWebApp。
如果没有特别的需要,就可以利用这个默认的应用目录布署Web应用程序或者J2EE系统了。
而在weblogic8.x之后版本中,它不会自动创建默认的应用目录。
所以我们需要使用Configuration Wizard来创建自己的应用目录,发布应用目录有两种方法,现分别介绍。
1.weblogic8.x安装 weblogic8.x有几个版本提供使用,我们使用了英文版的weblogic8.1。
2.回顾创建weblogic服务安装成功后,依次点击”开始”->”BEA WebLogic Platform 8.1”->”Configuration Wizard”,启动”BEA WebLogic Configuration Wizard”,选择”create a new weblogic configuration”,然后”next”,在”template”选择”base weblogic server domain”,然后”next”,没有特别的需要就不修改默认选择,然后”next”,在这个界面上输入用户名、密码和创建这个服务的描述(请记住这个用户密码它是启动这个服务和进入服务控制台的帐号),然后”next”,选择jdk 的版本,然后”next”,在这个界面你可以修改创建服务的目录和名称,然后按”create”开始创建。
linux环境下平台部署(域的建立)
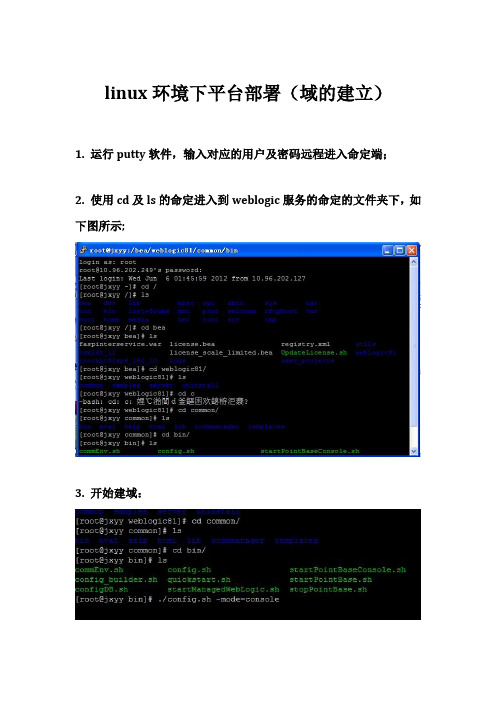
linux环境下平台部署(域的建立)1. 运行putty软件,输入对应的用户及密码远程进入命定端;2. 使用cd及ls的命定进入到weblogic服务的命定的文件夹下,如下图所示;3. 开始建域:执行./config.sh -mode=console命定,按照下面步骤进行建域操作;进入设置:<-------- BEA WebLogic Configuration Wizard -------------->Create or Extend a Configuration:---------------------------------Choose between creating and extending a configuration. Based on your selection, the Configuration Wizard guides you through the steps togenerate a new or extend an existing configuration.->1|Create a new WebLogic configuration|Start here to create a WebLogic configuration in your projects directory.2|Extend an existing WebLogic configuration|Start here to extend an existing WebLogic configuration. Use this option to add applications and services, including Database| access (JDBC) and Messaging (JMS). This option also enables you to extend functionality by enabling WebLogic Workshop.Enter index number to select OR [Exit][Next]> 1<--------------------------------BEA WebLogic Configuration Wizard ----------------------->Select a Domain Template:-------------------------Please select a template from the list or select another directory of templates.*[/home/weblogic/bea/weblogic81/common/templates/domains]1|Basic WebLogic Platform Domain 8.1.3.0| BEA Systems, Inc.| Create a basic WebLogic Platform domain, without installing sample applications. Domains created from this template will support the|WebLogic Server, WebLogic Workshop, WebLogic Integration and WebLogic Portal runtime functionality, including support for J2EE|applications, Web applications, Web Services, custom controls, business processes and portals. Use domains created from this template|for development of WebLogic Platform applications.2|Basic WebLogic Portal Domain 8.1.3.0| BEA Systems, Inc.| Create a basic WebLogic Portal domain, without installing sampleapplications. Domains created from this template will support the|WebLogic Server, WebLogic Workshop and WebLogic Portal runtime functionality, including support for J2EE applications, Web applications,|Web Services, custom controls and portals. Use domains created from this template for development of WebLogic Portal applications.3|Basic WebLogic Integration Domain 8.1.3.0| BEA Systems, Inc.| Create a basic WebLogic Integration domain, without installing sample applications. Domains created from this template will support|the WebLogic Server, WebLogic Workshop and WebLogic Integration runtime functionality, including support for J2EE applications, Web|applications, Web Services, custom controls and business processes. Use domains created from this template for development of WebLogic|Integration applications.4|Basic WebLogic Workshop Domain 8.1.3.0| BEA Systems, Inc.<---------------------- BEA WebLogic Configuration Wizard ---------------------------->Select a Domain Template:-------------------------Please select a template from the list or select another directory of templates.| Create a basic WebLogic Workshop domain, without installing sample applications. Domains created from this template will support the|WebLogic Server and WebLogic Workshop runtime functionality, including support for J2EE applications, Web applications, Web Services and |custom controls. Use domains created from this template for development of WebLogic Workshop applications.->5|Basic WebLogic Server Domain 8.1.3.0| BEA Systems, Inc.| Create a basic WebLogic Server domain without installing sample applications.6|WebLogic Server Examples Domain 8.1.3.0| BEA Systems, Inc.| Create the WebLogic Server Examples domain in a directory outside of the installed kit. The Examples domain contains a collection of|examples to show best practices for coding individual J2EE APIs.7|Avitek Medical Records Sample Domain 8.1.3.0| BEA Systems, Inc.| Create the Avitek Medical Records domain in a directory outside of the installed kit. The Avitek Medical Records is a WebLogic Server |sample application suite that concisely demonstrates all aspects of the J2EE platform.8|Select another directory locationEnter index number to select OR [Up][Exit][Previous][Next]>5<--------------------- BEA WebLogic Configuration Wizard --------------------->Select a Domain Template:-------------------------Please select a template from the list or select another directory of templates.*The selected template is the same as the one you are working on. Do you*want to reload the template ?->1|Yes2|NoEnter index number to select OR [Exit][Next]> 1<------------------------- BEA WebLogic Configuration Wizard ------------------------->Choose Configuration Option:-------------------------*Do you want to run the wizard in express mode?->1|Yes2|NoEnter index number to select OR [Exit][Previous][Next]> 1<------------------------- BEA WebLogic Configuration Wizard ------------------------->Configure Administrative Username and Password:--------------------Create a user automatically assigned to the Administrative Role. This user is the default administrator used to start development modeservers.| Name | Value |_ |_____ |___ __________ _|1| *Username: | weblogic |2| *Userpassword:| |3|*Confirmuserpassword:| |4| Description: | The default administration user |Select Option:1 - Modify "User name"2 - Modify "User password"3 - Modify "Confirm user password"4 - Modify "Description"Enter option number to select OR [Exit][Previous][Next]> 2<------------------------- BEA WebLogic Configuration Wizard ------------------------->Configure Administrative Username and Password:-------------------Create a user automatically assigned to the Administrative Role. This user is the default administrator used to start development modeservers."*User password:" = [ ]Input new *User password: OR [Exit][Reset][Accept]> 【这里输入密码】<------------------------- BEA WebLogic Configuration Wizard ------------------------->Configure Administrative Username and Password:--------------------Create a user automatically assigned to the Administrative Role. This user is the default administrator used to start development modeservers.| Name | Value |_|___________________|__________________________|1| *Username: | weblogic |2| *Userpassword: | ****** |3|*Confirmuserpassword:| |4| Description: | The default administration user |Select Option:1 - Modify "User name"2 - Modify "User password"3 - Modify "Confirm user password"4 - Modify "Description"5 - Discard ChangesEnter option number to select OR [Exit][Previous][Next]> 3<------------------------- BEA WebLogic Configuration Wizard ------------------------->Configure Administrative Username and Password:--------------------Create a user automatically assigned to the Administrative Role. This user is the default administrator used to start development modeservers."*Confirm user password:" = []Input new *Confirm user password: OR [Exit][Reset][Accept]> [确认密码] ///口令必须与上面的一样<------------------------- BEA WebLogic Configuration Wizard ------------------------->Configure Administrative Username and Password:--------------------Create a user automatically assigned to the Administrative Role. This user is the default administrator used to start development modeservers.| Name | Value |_|_____________________|______________________|1| *User name: | weblogic |2| *User password: | ******** |3| *Confirm user password: | ******** |4| Description: | The default administration user |Select Option:1 - Modify "User name"2 - Modify "User password"3 - Modify "Confirm user password"4 - Modify "Description"5 - Discard ChangesEnter option number to select OR [Exit][Previous][Next]> next<------------------------- BEA WebLogic Configuration Wizard -------------------------> Domain Mode Configuration:--------------------------Enable Development or Production Mode for this domain.->1|Development Mode2|Production ModeEnter index number to select OR [Exit][Previous][Next]> 2<------------------------- BEA WebLogic Configuration Wizard -------------------------> Java SDK Selection:-------------------->1|JRockit SDK 1.4.2_04-8130 @ /home/weblogic/bea/jrockit81sp3_142_04 2|Sun SDK 1.4.2_04 @ /home/weblogic/bea/jdk142_043|Other Java SDKEnter index number to select OR [Exit][Previous][Next]> 1<------------------------- BEA WebLogic Configuration Wizard -------------------------> Select the target domain directory for this configuration:"Target Location" = [/home/weblogic/bea/user_projects/domains]Input new Target Location OR [Exit][Previous][Next]> [直接回车]<------------------------- BEA WebLogic Configuration Wizard -------------------------> Edit Domain Information:------------------------| Name | Value |_|_______|_________|1| *Name: | mydomain |Enter value for "Name" OR [Exit][Previous][Next]> [输入名称或者直接回车] <------------------------- BEA WebLogic Configuration Wizard -------------------------> Creating Domain...0% 25% 50% 75% 100%[------------|------------|------------|------------][*******************************************]**** Domain Created Successfully! ****建域完成!4. 启动weblogic服务进入bea-->user_projects-->domains-->进入你建的域的名字的文件夹(如揭西:jxfasp)执行如下命令nohup ./startWeblogic.sh &启动服务。
Linux环境下搭建WebLogic1036集群服务十步曲培训资料

Linux环境下搭建WebLogic1036集群服务十步曲培训资料步骤一:下载WebLogic安装包访问Oracle官方网站,下载WebLogic的安装包。
确保您选择了适用于Linux系统的版本。
步骤二:安装Java Development Kit(JDK)在Linux系统上安装JDK,WebLogic需要Java环境来运行。
您可以从Oracle官方网站下载最新的JDK安装包,并按照官方文档进行安装。
步骤三:解压WebLogic安装包使用解压工具,将WebLogic安装包解压到您选择的目录中,并进入解压后的目录。
步骤四:运行配置工具运行配置工具,它位于解压后的目录中。
根据提示,选择创建新的WebLogic域,并设置集群名称、管理员用户名和密码等。
步骤五:创建WebLogic域根据配置工具的提示,创建WebLogic域。
在此过程中,您需要指定域的名称、设置域的类型(集群型)以及其他相关设置。
步骤六:创建管理服务器在创建WebLogic域的过程中,您需要指定一个管理服务器的配置。
请确保指定的服务器是启用管理的。
步骤七:创建集群在WebLogic控制台中,选择创建一个新的集群,并指定集群的名称、可扩展性等级和其他相关配置。
步骤八:创建集群中的服务器选择集群,然后在控制台中创建一些服务器。
这些服务器将成为您集群中的节点,并用于部署应用程序。
步骤九:配置集群在集群配置中,您可以设置集群的故障恢复行为、负载均衡策略等。
根据您的需求,进行相应的配置。
步骤十:部署应用程序最后,将您的应用程序部署到WebLogic集群中的服务器上。
您可以使用WebLogic控制台或命令行工具来完成此操作。
以上是在Linux环境下搭建WebLogic1036集群服务的十个步骤。
当然,在实际搭建过程中,还可能会遇到各种挑战和问题。
因此,建议您参考WebLogic官方文档和社区论坛,以获取更详细的指导和支持。
继续写相关内容:步骤一:下载WebLogic安装包在Linux环境下搭建WebLogic集群之前,首先需要从Oracle官方网站下载WebLogic的安装包。
- 1、下载文档前请自行甄别文档内容的完整性,平台不提供额外的编辑、内容补充、找答案等附加服务。
- 2、"仅部分预览"的文档,不可在线预览部分如存在完整性等问题,可反馈申请退款(可完整预览的文档不适用该条件!)。
- 3、如文档侵犯您的权益,请联系客服反馈,我们会尽快为您处理(人工客服工作时间:9:00-18:30)。
Weblogic linux 下创建域步骤
1.cd /bea/wlserver_10.3/common/bin 进入目录
2.执行./config.sh进入配置界面。
选择1
3.
选择1
这一步直接继续
这一步是设置用户名密码和确认密码
这是选择模式我们选择2 (产品模式)
选择JDK版本我们选择第一个选择1
我们选择1 (YES)
这里选择1 (不配置安全存储)
这里指需要修改端口号就行 3
继续
继续
继续
继续
v
这里输入你要改的名字我这里随便写了一个1作为域名了
这里确认名字选择1
然后完成
修改
setDomainEnv.sh
在底端处JA V A_OPTIONS="${JA V A_OPTIONS}" export JA V A_OPTIONS
后面加上这两句话
WLS_USER=weblogic
WLS_PW=weblogic
在startWeblogic.sh 中间添加这些参数
SA VE_JA V A_OPTIONS="${JA VA_OPTIONS}"
SA VE_CLA S SPATH="${CLASSPATH}" 找到这个所在的位置在下面添参数
WLS_USER="weblogic" 域用户民
export WLS_USER
WLS_PW="weblogic_note" 域密码
export WLS_PW
MEM_ARGS="-Xms2048m -Xmx2048m -XX:MaxPermSize=1024m"
export MEM_ARGS
在setDomainEnv.sh最前面添加此参数
JA V A_OPTIONS="${JA V A_OPTIONS} -Djava.security.egd=file:/dev/./urandom" export JA V A_OPTIONS
WLS_USER=weblogic 域用户名
WLS_PW=weblogic_note 域密码。