ASTM D256-97塑料冲击试验方法(中文版)
ASTM美国材料标准中文版

ASTM美国材料标准中文版ASTM A488/A488-2007 钢铸件焊接工艺和人员资格评定的标准实施规程( Standard Practice for Steel Castings, Welding, Qualifications of Procedures and Personnel )ASTMA 802/A 802M-1995(R2006重新审批) 视觉检测铸钢表面验收标准规程 (STANDARPDR ACTICEFOR STEEL CASTINGS, SURFACE ACCEPTANCE STANDARDS, VISUAL EXAM)INATIONASTM B108-2006 铝合金永久型铸件标准规范( STANDARD SPECIFICATION FOR ALUMINUM-ALLOY PERMANENT MOLD CAST)INGSASTM B179-2006 铸造用铝合金原锭及熔融锭在各铸造过程的标准技术规范( STANDARD SPECIFICATION FOR ALUMINUM ALLOYS IN INGOT AND MOLTEN FORMS FOR CASTINGS FROM ALL CASTING PROCESS)ESASTM B26/B26M-2005铝合金砂铸件标准规范( STANDARD SPECIFICATION FOR ALUMINUM-ALLOY SAND CASTING)SASTM D256-2006 测定塑料抗悬臂梁摆锤冲击性的标准试验方法( STANDARD TEST METHODS FOR DETERMINING THE IZOD PENDULUM IMPACT RESISTANCE OF PL)ASTICSASTM D2794-1993(R2004) 有机涂层抗快速形变(冲击)作用的标准试验方法( STANDARD TEST METHOFDO RR ESISTANCOE FO RGANI C OATINGTSO T HEE FFECTSO FR APIDD EFORMATIO(INM PACT) )ASTM D3359-2008 胶带试验用测定粘合性的标准试验方法( STANDARD TEST METHODS FOR MEASURING ADHESION BY TAPE T)ESTASTM D3363-2005 铅笔试验法测定涂膜硬度的标准试验方法( STANDARD TEST METHOD FOR FILM HARDNESS BY PENCIL TE)STASTMD 4060-2007 用泰伯尔磨蚀机测定有机涂层耐磨性的标准试验方法 ( STANDARTDE STM ETHODFOR ABRASION RESISTANCE OF ORGANIC COATINGS BY THE TABER A)BRASERASTM D4674-2002A暴露在室内办公室环境下的塑料颜色稳定性加速试验的标准实施规范(STANDARTDE STM ETHOFDO RA CCELERATETDE STINGF ORC OLORS TABILITY OF PLASTICSE XPOSED TO INDOOR OFFICE ENVIRONME)NTSASTM D4752-2003 用溶剂擦试法测定硅酸乙酯( 无机)富锌底漆耐甲乙酮的标准试验方法(STANDARD TEST METHOD FOR MEASURING MEK RESISTANCE OF ETHYL SILICATE (INORGANIC) ZINC-RICH PRIMERS BY SOLVENT R)UBASTMD 4828-1994E1(R2003) 有机覆层实际可洗性的标准试验方法( STANDARTDE STM ETHODFSO R PRACTICAL WASHABILITY OF ORGANIC COAT)INGSASTMD 638-2003 塑料拉伸性能标准测试方法 (STANDARTDE STM ETHOFDO RT ENSILEP ROPERTIESOF PLASTICS)ASTM E1316-2007 无损检测标准术语( STANDARD TERMINOLOGY FOR NONDESTRUCTIVE EXAMINATION)SASTM E1444-2005 磁粉检测标准规程( STANDARD PRACTICE FOR MAGNETIC PARTICLE TE)STING ASTM E155-2005 铝、镁铸件检验用标准参考射线底片( STANDARD REFERENCE RADIOGRAPHS FOR INSPECTION OF ALUMINUM AND MAGNESIUM CAS)TINGSASTME 165-2002 液体渗透剂检查标准测试方法( STANDARTDE STM ETHOFDO RL IQUID PENETRANT EXAMINATIO)NASTM E165-2002 液体渗透检查的标准试验方法王倩译( STANDARD TEST METHOD FOR LIQUID PENETRANT EXAMINAT)IONASTME 192-2004 航天设备蜡模钢铸件的参考放射线照相( STANDARRDE FERENCREA DIOGRAPHOSF INVESTMENT STEEL CASTINGS FOR AEROSPACE APPLIC)ATIONSASTM E242-2001(2005年重新批准) 在某些参数变化时射线图像外观用标准参考射线底片(STANDARD REFERENCE RADIOGRAPHS FOR APPEARANCES OF RADIOGRAPHIC IMAGES AS CER PARAMETERS ARE CHAN)GEDASTM E385-2007 使用14 兆电子伏特的中子活化和直接计数技术测定含氧量的试验方法(STANDARD TEST METHOD FOR OXYGEN CONTENT USING A 14-MEV NEUTRON ACTIVATION AND DIRECT-COUNTING TECHNIQ)UEASTM E426-1998(2007重新审批) 无缝及焊接管产品、沃斯田不锈钢及类似合金的电磁(涡电流)检测操作规程( Standard Practice for Electromagnetic (Eddy-Current) Examination of Seamless and Welded Tubular Products, Austenitic Stainless Steel and Similar Alloys )ASTM E446-98(2004 年重新批准) 用于厚度在2in(51mm)以下钢铸件的标准参考射线底片(STANDARD REFERENCE RADIOGRAPHS FOR STEEL CASTINGS UP TO 2 IN. (51 MM) IN THICKNESS (ALSO SEE ASTM E 446 ADJUNCT SET, ASTM E 446 ADJUNCT V1, ASTM E 446 ADJUNCT V2. AND ASTM E 446 ADJUNCT V3))ASTME 466-2007 金属材料上进行的恒定振幅轴向疲劳试验 (STANDARPDR ACTICEF ORC ONDUCTING FORCE CONTROLLED CONSTANT AMPLITUDE AXIAL FATIGUE TESTS OF METALLICMA)TERIALSASTM F2357-2004 使用NORMA工N具"RCA"磨擦器测定薄膜开关上墨水和涂层抗磨性的标准试验方法( STANDARTDE STM ETHOFDO RD ETERMININTGH EA BRASIONR ESISTANCOE FI NKS ANDC OATINGS ON MEMBRANE SWITCHES USING THE NORMAN TOOL "RCA" A)BRADERASTM G154-2006 非金属材料暴露用荧光灯紫外暴露装置的操作规范标准( STANDARD PRACTICEFOR OPERATING FLUORESCENT LIGHT APPARATUS FOR UVEXPOSURE OF NONMETALLI)C MATERIA ISO,ASME,ASTM,DIN, JIS 国外管道法兰用密封垫片标准汇编ASTM F36-1995 测定垫片材料压缩率及回弹率的标准试验方法ASTM F37-1995 垫片材料密封性的标准试验方法ASTM F38-1995 垫片材料的蠕变松弛的标准试验方法ASTM F112-1995 包覆垫片密封性能的标准试验方法ASTM F146-1995A 垫片材料耐液体标准试验方法ASTM F363-1989(1994年重新确认)垫片腐蚀试验的标准方法ASTM F336-1992 用于腐蚀工况的非金属包覆垫片的设计与结构用标准方法ASTM F586-1979(1989年重新确认)测定垫片汇漏(泄漏率与应力y和系数m的关系)的标准试验方法ASTM A6/A6M-2004 a版结构用轧制钢板、型钢、板桩和棒钢通用要求ASTM A27/A27M-2005版一般用途碳钢铸件标准技术条件ASTM A29/A29M-2005版热锻碳素钢和合金钢棒材一般要求标准规范ASTM A36/A36M-2005版碳结构钢标准规范ASTM A36/A36M-2004碳结构钢标准规范ASTM A48/A48M-2003版灰铸铁铸件标准技术条件ASTM A53/A53M-2005版无镀层及热浸镀锌焊接与无缝公称钢管标准技术条件ASTM A105/A105M-2005版管道部件用碳钢锻件ASTM A106-2006版高温用无缝碳钢公称管规范ASTM A108-2003版冷精整的碳钢和合金钢棒材标准技术条件ASTM A123/A123M-2002版钢铁产品镀锌品层(热浸镀)标准规范ASTM A126-2004版阀门、法兰和管道附件用灰铁铸件ASTM A143-2003版热浸镀锌结构钢制品防脆化的标准实施规程和催化探测方法ASTM A153/A153M-2005版钢铁构件镀锌层(热浸镀)标准规范ASTM A179/A179M-1990(a R2001)版热交换器和冷凝器用无缝冷拉低碳钢管标准规范ASTM A192-2002版高压设备用无缝碳钢锅炉管标准规范ASTM A193/A193M-2006版高温用合金钢和不锈钢螺栓材料ASTM A194/A194M-2006版高温或高压或高温高压螺栓用碳钢及合金钢螺母标准规范ASTM A209/A209M-2003版锅炉和过热器用无缝碳钼合金钢管标准规范ASTM A210/A210M-2002版无缝中碳钢锅炉管和过热器管标准规范ASTMA 213/A213Mb-2004版无缝铁素体和奥氏体合金钢锅炉管、过热器管和换热器管标准规范ASTM A216/A216M-2004版高温用可熔焊碳钢铸件标准规范ASTM A234/A234M-2004版中、高温用锻制碳钢和合金钢管道配件ASTM A240/A240M-2005版压力容器用耐热铬及铬-镍不锈钢钢板、薄板和钢带标准技术条件ASTM A250/A250M-2004版锅炉和过热器用电阻焊铁素体碳合金钢管子标准技术条件ASTM A252-98(R2002)版焊接钢和无缝钢管桩的标准规范ASTM A262-2002a版探测奥氏体不锈钢晶间腐蚀敏感度的标准实施规范ASTM A269/A269-2004版通用无缝和焊接奥氏体不锈钢管标准规范ASTM A276-2006版不锈钢棒材和型材标准规范ASTM A283/A283M-2003版中、低抗拉强度碳素钢板标准技术条件ASTM A285/A285M-2003版压力容器用中、低抗拉强度碳素钢标准技术条件ASTM A307/A307M-2004版抗拉强度6000PSI 碳钢螺栓和螺柱标准技术条件ASTM A312/A312M-2005版无缝和焊接的以及重度冷加工奥氏体不锈钢公称管标准技术条件ASTM A320/A320M-2005版低温用合金钢栓接材料标准规范ASTM A333/A333M-2004版低温设备用无缝和焊接钢管的规范标准ASTM A334/A334M-2004版低温设备用无缝和焊接碳素和合金钢管的标准规范ASTM A335-2003版高温设备用无缝铁素体合金钢管标准规范ASTM A336/A336M-2005版高温承压件合金钢锻件标准技术条件ASTM A350/A350M-2004a版需切口韧性试验的管道部件用碳钢和低合金钢锻件标准规范ASTM A351/A351M-2006版承压件用奥氏体铸钢件标准规范ASTM A352/A352M-2006版低温承压用铁素体和马氏体铸钢件标准规范ASTM A356/A356M-2005版汽轮机用厚壁碳钢、低合金钢和不锈钢铸件标准技术条件ASTM A370-2005版钢制品力学性能试验方法和定义标准ASTM A387/A387M-2003版压力容器用铬钼合金钢板的标准规范ASTM A403/A403M-2004版锻制奥氏体不锈钢管配件的标准规范ASTM A450/A450M-2004版碳素钢管、铁素体合金钢管及奥氏体合金钢管一般要求的标准规范ASTM A479/A479M-2005版锅炉和其他压力容器用不锈钢棒材和型材标准技术条件ASTM A484/A484M-2005版不锈钢棒材、钢坯及锻件通用要求标准技术条件ASTM A500-2003a版圆形与异型冷成型焊接与无缝碳素钢结构管标准规范ASTM A515-2003版中温及高温压力容器用碳素钢板的标准规范ASTM A516-2004a版中温及低温压力容器用碳素钢板的标准规范ASTM A519-2003版机械工程用碳素钢和铝合金钢无缝钢管ASTM A530-2003版特种碳素钢和合金钢管一般要求的标准规范ASTM A577/A577M-90(R200)1 版钢板超声斜射波检验ASTM A589/A589M-2006版打水井用碳素钢无缝钢管和焊接钢管ASTM A609/A609M-199(1 82002)版碳钢、低合金钢和马氏体不锈钢铸件超声波检验ASTM A615/A615M-2004a版混凝土配筋用异形钢筋和无节钢胚棒标准规范ASTM A703/A703M-2004版标准技术条件—承压件钢铸件通用要求ASTM A751-2001版钢制品化学分析方法,实验操作和术语ASTM A781/A781M-2004a版铸件、钢和合金的标准规范及通用工业的一般性要求ASTM A788/A788M-2004a版标准技术条件—钢锻件通用要求ASTM A965/A965M-2002版高温承压件用奥氏体钢锻件标准规范ASTM B16/B16M-2005版螺纹切削机用易车削黄铜棒、条和型材标准规范ASTM B62/B62M-2002版青铜或高铜黄铜铸件标准规范ASTM B209-2004版铝和铝合金薄板和中厚板标准规范ASTM B462-2004版高温耐腐蚀用锻制或轧制的UNS NO603、0 UNS NO602、2 UNS NO620、0 UNS NO8020、UNS NO802、4 UNS NO802、6 UNS NO836、7 UNS NO1027、6 UNS N10665、UNS N10675和UNS R20033合金管法兰、锻制管件、阀门和零件标准规范ASTM B564-2004版镍合金锻件标准规范ASTM E6-2003版关于力学性能试验方法的标准术语ASTM E10-2001版金属材料布氏硬度的标准试验方法ASTM E18-2003版金属材料洛氏硬度和洛氏表面硬度的标准测试方法ASTM E29-2002版使用有效数字确定试验数据与规范符合性作法ASTM E8M-2004版金属材料拉伸试验的标准测试方法ASTM E94-2004版放射性检查的标准指南ASTM E125-1963(R2003)版铁铸件的磁粉检验用标准参考照片ASTM E164-2003版焊件的超声接触检验的标准操作规程ASTM E208-1995a(R2000)版用导向落锤试验测定铁素体钢无塑性转变温度的标准试验方法ASTM E213-2004版金属管超声检验方法ASTM E273-2001版焊接公称管和管子制品超声波检验用标准实用规程ASTM E709-2001版磁粉试验的推荐试验方法ASTM F36-1999(R2003)版测定垫片材料压缩率及回弹率的标准试验方法ASTM F37-2000版垫片材料密封性的标准试验方法ASTM F38-2000版垫片材料的蠕变松弛的标准试验方法ASTM F112-2000版包复垫片密封性能的标准试验方法ASTM F146-2004版垫片材料耐液体标准试验方法ASTM F1311-1990(R2001)版大口径组装式碳钢法兰标准规范ASTM G1-2003版腐蚀试样的制备、清洁处理和评定用标准实施规范ASTM G36-73(R1981) 参考资料标准实用规程:在沸的氯化镁溶液中进行的应力腐蚀裂纹试验ASTM G46-1976(R1986) 参考资料标准实用规程:麻点腐蚀的检验和评定ASTMG 48-2003 版使用三氯化铁溶液做不锈钢及其合金的耐麻点腐蚀和抗裂口腐蚀性试验的标准方法ASTM标准中译本丛书(一) 碳钢、铸铁、不锈钢及合金钢材料标准规范(含18个标准)1.ASTM A105/A105M-2002 版管道部件用碳钢锻件2.ASTM A126-1995(R2001)版阀门、法兰和管道附件用灰铁铸件3.ASTM A181/A181M-2001 版通用管路用碳钢锻件标准规范4.ASTM A193/A193M-2001 版高温用合金钢和不锈钢螺栓材料5.ASTM A194/A194M-2001a版高温、高压或高温高压螺栓用碳钢及合金钢螺母标准规范6.ASTM A216/A216M-2001a版高温用可熔焊碳钢铸件标准规范7.ASTM A217/A217M-2002 版高温承压件用马氏体不锈钢和合金钢铸件标准规范8.ASTM A276-2002a 版不锈钢棒材和型材9.ASTM A278/A278M-2001 版高温不超过650°F(350℃)的承压部件用灰铸铁件10.ASTM A320/A320M-2002 版低温用合金钢栓接材料11.ASTM A350/A350M-2002 版要求冲击韧性试验的管件用碳钢及低合金钢锻件标准规范12.ASTM A351/A351M-2000 版承压件用奥氏体、奥氏体- 铁素体(双相)钢铸件规范13.ASTM A352/A352M-1993(R1998)版低温承压件用铁素体和马氏体钢铸件标准规范14.ASTM A395/A395M-1999 版高温用铁素体球墨铸铁承压铸件15.ASTM A439-1983(R1999) 版奥氏体球墨铸铁件16.ASTM A536-1984(R1999) 版球墨铸铁件17.ASTM A694/A694M-2000 版高温输送用管法兰、管件、阀门及零件用碳钢和合金钢锻件标准规范18.ASTM A965/A965M-2002 版高温高压部件用奥氏体钢锻件ASTM标准中译本丛书(二) 法兰、管件、阀门及部件(含9 个标准)1.ASTM A182/A182M-2002版高温用锻制或轧制合金钢法兰、锻制管件、阀门和部件2.ASTM A961-2002 版管道用钢制法兰、锻制管件、阀门和零件的通用要求标准规范3.ASTMB 462-2002 版高温耐腐蚀用锻制或轧制的UNSN O6030、UNSN O6022、UNSN O6200、UNS NO8020、UNS NO802、4 UNS NO802、6 UNS NO836、7 UNS NO1027、6 UNS N10665、UNS N10675和UNS R20033合金管法兰、锻制管件、阀门和零件标准规范4.ASTM F885-1984(R2002)版公称管径为NPS 1/4~2的青铜截止阀外形尺寸标准规范5.ASTM F992-1986(R2001) 版阀门铭牌标准规范6.ASTM F993-1986(R2001) 版阀门锁紧装置标准规范7.ASTM F1030-1986(R1998) 版阀门操作装置的选择准则8.ASTM F1098-1987(R1998) 版公称管径有NPS2~24 的蝶阀外形尺寸标准规范9.ASTM F1565-2000 版蒸汽用减压阀规范。
塑料抗冲击试验方法

塑料抗冲击试验方法抗冲强度(冲击强度)是材料突然受到冲击而断裂时,每单位横截面上材料可吸收的能量的量度。
它反映材料抗冲击作用的能力,是一个衡量材料韧性的指标。
冲击强度小,材料较脆。
一、目的要求1.掌握XCJ-50型冲击试验机的使用。
2.测定聚丙烯、聚氯乙烯型材的冲击强度。
二、实验原理国内对塑料冲击强度的测定一般采用简支梁式摆锤冲击实验机进行。
试样可分为无缺口和有缺口两种。
有缺口的抗冲击测定是模拟材料在恶劣环境下受冲击的情况。
冲击实验时,摆锤从垂直位置挂于机架扬臂上,把扬臂提升一扬角α,摆锤就获得了一定的位能。
释放摆锤,让其自由落下,将放于支架上的样条冲断,向反向回升时,推动指针,从刻度盘读数读出冲断试样所消耗的功A,就可计算出冲击强度:(公斤•厘米/厘米2)b、d分别为试样宽及厚,对有缺口试样,d为除去缺口部分所余的厚度。
从刻度盘上读出的数值,是冲击试样所消耗的功,这里面也包括了样品的"飞出功",以关系式表示为:W为摆锤重,L为摆锤摆长,α、β分别为摆锤冲击前后的扬角;A为冲击试样所耗功;Aα、Aβ分别为摆锤在α、β角度内克服空气阻力所消耗的功;为“飞出功”,一般认为后三项可以忽略不计,因而可以简写成:对于一固定仪器,α、W、L均为已知,因而可据β大小,绘制出读数盘,直接读出冲击试样所耗功。
实际上,飞出功部分因试样情况不同,试验仪器情况不同而有较大差别,有时甚至占读数A的50%。
脆性材料,飞出功往往很大,厚样品的飞出功亦比薄样大。
因而测试情况不同时,数值往往难以定量比较,只适宜同一材料,同一测定条件下的比较。
试样断裂所吸收的能量部分,表面上似乎是面积现象,实际上它涉及到参加吸收冲击能的体积有多大,是一种体积现象。
若某种材料在某一负荷下(屈服强度)产生链段运动,因而使参与承受外力的链段数增加,即参加吸收冲击能的体积增加,则它的冲击强度就大。
冲击试验作业指导书

冲击试验作业指导书一、引言冲击试验是一种重要的实验方法,用于评估材料、产品或结构在受到冲击载荷时的性能和耐久性。
本指导书旨在提供冲击试验的详细步骤和操作要求,以确保试验的准确性和可重复性。
二、试验目的本次冲击试验的目的是评估某产品的抗冲击性能,以确定其是否满足相关标准和要求。
试验将通过施加冲击载荷并记录产品的响应来进行。
三、试验设备1. 冲击试验机:型号XYZ,额定载荷范围0-1000N,冲击速度范围0-5m/s。
2. 试验夹具:根据产品的特点设计制作,确保产品的稳定固定和受力均匀。
四、试验步骤1. 准备工作a. 确认试验设备的工作状态和性能,如电源、传感器等。
b. 根据产品的特点和试验要求,设计并制作适当的试验夹具。
c. 检查试验夹具的固定和调整,确保试验过程中产品的稳定性和受力均匀性。
2. 样品准备a. 根据产品的要求,选择适当数量的样品进行试验。
b. 检查样品的完整性和质量,排除任何可能影响试验结果的缺陷或损伤。
3. 试验参数设定a. 根据产品的特点和试验要求,设置冲击试验机的载荷和速度参数。
b. 确定试验的冲击方向和位置,以确保冲击载荷施加在产品的关键部位。
4. 试验操作a. 将样品固定在试验夹具上,并确保夹具的稳定性和受力均匀性。
b. 将试验夹具放置在冲击试验机的工作台上,并调整试验位置和方向。
c. 启动冲击试验机,按照设定的参数进行试验。
d. 在试验过程中,记录产品的响应和试验数据,如位移、应力、变形等。
e. 根据试验要求,进行多次试验以获取可靠的试验结果。
5. 数据处理与分析a. 将试验数据导入计算机软件进行处理和分析。
b. 统计和比较试验结果,评估产品的抗冲击性能。
c. 根据评估结果,判断产品是否符合相关标准和要求。
六、安全注意事项1. 在试验过程中,操作人员应佩戴个人防护装备,如安全眼镜、手套等。
2. 严禁将手指或其他身体部位放置在试验夹具和冲击试验机的移动部件附近。
3. 在试验过程中,严禁随意调整试验设备的参数或进行其他操作。
ASTM.塑料标准.D2657

Designation:D2657–03An American National Standard Standard Practice forHeat Fusion Joining of Polyolefin Pipe and Fittings1This standard is issued under thefixed designation D2657;the number immediately following the designation indicates the year oforiginal adoption or,in the case of revision,the year of last revision.A number in parentheses indicates the year of last reapproval.Asuperscript epsilon(e)indicates an editorial change since the last revision or reapproval.This standard has been approved for use by agencies of the Department of Defense.1.Scope1.1This practice describes general procedures for making joints with polyolefin pipe andfittings by means of heat fusion joining techniques in either a shop orfield environment.These procedures are general ones.Specific instructions for heat fusion joining are obtained from product manufacturers.1.2The techniques covered are applicable only to joining polyolefin pipe andfittings of related polymer chemistry,for example,polyethylenes to polyethylenes,polypropylenes to polypropylenes,or polybutylenes to polybutylenes.Material, density,andflow rate shall be taken into consideration in order to develop uniform melt viscosities and formation of a good fusion bond when joining the same material to itself or to other materials of related polymer chemistry.1.3Parts that are within the dimensional tolerances given in present ASTM specifications are required to produce sound joints between polyolefin pipe andfittings when using the joining techniques described in this practice.1.4The values stated in inch-pound units are to be regarded as the standard.The values given in parentheses are for information only.1.5The text of this practice references notes,footnotes,and appendixes which provide explanatory material.These notes and footnotes(excluding those in tables andfigures)shall not be considered as requirements of the practice.1.6This standard does not purport to address all of the safety concerns,if any,associated with its use.It is the responsibility of the user of this standard to establish appro-priate safety and health practices and determine the applica-bility of regulatory limitations prior to use.See specific safety precautions in3.1.1,5.2,8.2.3.1,Note8and Note9,and A1.1.2.Referenced Documents2.1ASTM Standards:F905Practice for Qualification of Polyethylene Saddle Fusion Joints2F1056Specification for Socket Fusion Tools for Use inSocket Fusion Joining Polyethylene Pipe or Tubing and Fittings22.2PPI Documents3TR-33Generic Butt Fusion Joining for Polyethlene Gas Pipe3.Summary of Practice3.1Heat-fusion joining uses a combination of heat and force resulting in two melted surfacesflowing together to produce a joint.Fusion bonding occurs when the joint cools below the melt temperature of the material.There is a temperature range within which any particular material is satisfactorily joined. The specific temperature used requires consideration of the properties of the specific material,and the joining environment. With Techniques II or III(3.3.2or3.3.3),there is also an appropriate force to be applied which depends upon the material,the fusion equipment being used,and fusion tempera-ture.3.1.1Electrically powered heat fusion tools and equipment are usually not explosion proof.When performing heat fusion in a potentially combustible atmosphere such as in an excava-tion where gas is present,all electrically powered tools and equipment that will be used in the combustible atmosphere shall be disconnected from the electrical power source and operated manually to prevent explosion andfire.For the heating tool,this requires bringing the heating tool up to or slightly above temperature in a safe area,then disconnecting it from electrical power immediately before use.This procedure is limited to smaller sizes where heating is accomplished before the heating tool drops below acceptable temperature.3.2Adequate joint strength for testing is attained when all of the joint material cools to ambient temperature.The joint shall not be disturbed or moved until it has cooled.N OTE1—Polybutylene undergoes a crystalline transformation for sev-eral days after cooling below its melt temperature.Although this phenom-enon has an effect on the ultimate physical properties of the material,its effect on testing of joints has not been found to be significant.If there is any question of its effect,a comparison should be made between joints that have been conditioned for different periods of time in order to establish the conditioning-time relationship.1This practice is under the jurisdiction of ASTM Committee F17on Plastic Piping Systems and is the direct responsibility of Subcommittee F17.20on Joining.Current edition approved Aug.10,2003.Published November2003.Originallyapproved st previous edition approved in1997as D2657–97.2Annual Book of ASTM Standards,V ol08.04.3Plastic Pipe Insititue Inc.,1825Connecticut Ave.,NW Suite680Washington, DC20009.1Copyright©ASTM International,100Barr Harbor Drive,PO Box C700,West Conshohocken,PA19428-2959,United States.3.3Three fusion techniques are covered in this practice as follows:3.3.1Procedure1,Socket Fusion—The socket-fusion tech-nique involves simultaneously heating the outside surface of a pipe end and the inside of afitting socket,which is sized to be smaller than the smallest outside diameter of the pipe.After the proper melt has been generated at each face to be mated,the two components are joined by inserting one component into the other.See Fig.1.The fusion bond is formed at the interface resulting from the interferencefit.The melts from the two componentsflow together and fuse as the joint cools.Optional alignment devices are used to hold the pipe and socketfitting in Logitudinal alignment during the joining process;especially with pipe sizes3in.IPS(89mm)and larger.3.3.2Procedure2,Butt Fusion—The butt-fusion technique in its simplest form consists of heating the squared ends of two pipes,a pipe and afitting,or twofittings,by holding them against a heated plate,removing the plate when the proper melt is obtained,promptly bringing the ends together,and allowing the joint to cool while maintaining the appropriate applied force.See Fig.2.An alignment jig shall be used to obtain and maintain suitable alignment of the ends during the fusion operation.3.3.3Procedure3,Saddle Fusion—The saddle-fusion tech-nique involves melting the concave surface of the base of a saddlefitting,while simultaneously melting a matching pattern on the surface of the pipe,bringing the two melted surfaces together and allowing the joint to cool while maintaining the appropriate applied force.See Fig.3.4.Significance and Use4.1The procedures described in Sections7,8,and9,when implemented using suitable equipment and procedures in either a shop orfield environment,produce strong pressure-tight joints equal to the strength of the piping material.Some materials are more adaptable to one technique than another. Melt characteristics,average molecular weight and molecular weight distribution are influential factors in establishing suit-able fusion parameters;therefore,consider the manufacturer’s instructions in the use or development of a specific fusion procedure.5.Operator Experience5.1Skill and knowledge on the part of the operator are required to obtain a good quality joint.This skill and knowl-edge is obtained by making joints in accordance with proven procedures under the guidance of skilled operators.Evaluate operator proficiency by testing sample joints.5.2The party responsible for the joining of polyolefin pipe andfittings shall ensure that detailed procedures developed in conjunction with applicable codes and regulations and the manufacturers of the pipe,fittings,and joining equipment involved,including the safety precautions to be followed,are issued before actual joining operations begin.6.Apparatus:General Recommendations6.1Heating Tool—The tool may be heated by gas or electricity.Gas-fired heaters for2in.IPS and smaller socket and butt fusion joints only,shall have heat sinks of sufficient capacity to prevent excessive draw down of the tool tempera-ture,and are used only in above-freezing conditions.Electric heating plates maintain consistent fusion temperatures when provided with an adequate power source.Electric heating plates for general fusion use shall be controlled thermostati-cally and most are adjustable for a set point temperature ranging from300to575°F(150to300°C).Some tools may have afixed set point for a particular application.6.2Heating Tool Faces—Heating tools may be made from materials such as aluminum,stainless steel,copper,or copper alloys.Copper or copper-alloy heating faces are notsuitable, FIG.1SocketFusionunless chromium-plated or clad with another suitable metal,because some polyolefins react with copper.Plastic materials may stick to hot metal heating surfaces.This sticking may be minimized by applying a non-stick coating to the heating surfaces or by fitting a high-temperature,non-stick fabric over the heating surfaces.The heating plate surfaces,coated or uncoated,shall be kept clean and free of contaminants such as dirt,grease and plastic build-up,which may cause excessive sticking and create unsatisfactory joints.Most of these con-taminants are removed from the hot tool surfaces using a clean,dry,oil-free lint-free cloth.Do not use synthetic fabrics which may char and stick to the fusion surface.Some pigments,such as carbon black,may stain a heating surface and probably cannot be removed;such stains will not contaminate the joint interface.6.2.1After a period of time in service,non-stick coatings or fabrics will deteriorate and become less effective.Deteriorated fabrics should be replaced,and worn,scratched,orgougedFIG.2Typical Butt FusionOperationFIG.3SaddleFusionnon-stick coatings should be re-coated when they lose effec-tiveness.Heat fusion quality may be adversely affected by deteriorated non-stick surfaces.Spray-on chemicals,such as non-stick lubricants or oils shall not be applied to heating iron surfaces as they will contaminate the joint.6.3Temperature Indicator—Heating tools shall be equipped with a thermometer or other built-in temperature indicating device.This device indicates the internal temperature of the heating iron which is usually higher than temperature of the fusion e a pyrometer periodically to verify the temperature of the tool surfaces within the pipe orfitting contact area.Select multiple checkpoints to ensure uniform surface temperature.N OTE2—A significant temperature variation,that is,cold spots,on the fusion surfaces may indicate a faulty heating iron which may need to be serviced before it can be used.7.Procedure1—Socket Fusion7.1Apparatus—Socket fusion tools manufactured in accor-dance with Specification F1056are used for joining polyeth-ylene pipe,tubing,andfittings.7.1.1Heating Tool—In order to obtain a proper melt,it is necessary for a uniform temperature to be maintained across the heating surface.Therefore,gas-fired tools are generally restricted to use with pipe sizes of2in.IPS(63mm)or less.7.1.2Heating Tool Faces—Consisting of two parts,a male end for the interior socket surface and a female end for the exterior pipe surface.Both parts shall be made to such tolerances as to cause an interferencefit.7.1.3Alignment Jig—The alignment jig is an optional tool which consists of two sets of devices holding the components in alignment to each other.One set of holding devices isfixed, and the other allows longitudinal movement for making the joint.7.1.4Rounding Clamps,(cold ring)to maintain roundness of the pipe and control the depth of pipe insertion into the socket during the joining operation.7.1.5Depth Gage,for proper positioning of the rounding clamp.7.1.6Chamfering Tool,to bevel the end of the pipe.N OTE3—The depth gage and chamfering tool may be combined into a single tool.7.1.7Tubing Cutter,to obtain a square end cut on the pipe.7.1.8Fitting Puller,an optional tool to assist in the removal of thefitting from the heating tool and to hold thefitting during assembly.7.2Procedure:7.2.1Attach the proper size heater faces to the heating tool, and heat the tool to the fusion temperature for the material.7.2.2Cut the pipe end squarely,and clean the pipe end and fitting,both inside and outside,by wiping with a clean,dry, oil-free,lint-free cloth.7.2.3Chamfer the outside edge of the pipe end slightly and fix the rounding clamp about the pipe as determined from the depth gage.N OTE4—Chamfering may not be required by some procedures or some fusion tools.Pipe sizes1in.(25.4mm)and smaller are not usually chamfered,regardless of tooling design.N OTE5—Some recommend using a50to60-grit emery or garnet cloth to roughen the outside of the pipe and inside of thefitting as a means of minimizing any possible skin interface when making the fusion.Sandpa-per is not recommended for this purpose,as it might disintegrate and contaminate the joint interface.If roughening is performed,first clean the surfaces before roughening.Clean dust and particles from the roughened surfaces afterwards by wiping with a clean,dry,oil-free,lint-free cloth.7.2.4Bring the preheated tool faces into contact with the outside surface of the end of the pipe and the inside surface of the socket.7.2.5Heat the pipe end and thefitting socket for the time required to obtain a proper melt.Proper melt is a function of material,time,tool temperature,and the size of the parts.Pipe andfittings of larger diameters require more time to reach the proper melt consistency than those of smaller diameters. Underheated or overheated materials will not form a good bond.7.2.6At the end of the heating time,simultaneously remove the pipe andfitting straight out from the tool,using a snap action.Immediately insert the pipe straight into the socket of thefitting so the rounding clamp isflush against the end of the fitting socket.Hold or block the joint in place until the melts of the mating surfaces have solidified.The exact cooling time depends on the size of the pipe and the material being fused.7.2.7Remove the rounding clamp,and inspect the melt pattern at the end of the socket for a complete impression of the rounding clamp in the melt surface.There shall no gaps,voids, or unbonded areas.Clean the heating tool of any residual material using a wood stick or a clean,dry,oil-free,lint-free, non-synthetic cloth.Take care not to damage the heating surfaces.Plastic left on the tool tends to char when reheated, causing a loss of heater efficiency and joint contamination. 7.2.8Allow for extremes in weather when makingfield joints.Heating times,operation of alignment jig,dimensional changes,and the like,are affected by extreme conditions. 7.3Testing—Evaluate sample joints in order to verify the skill and knowledge of the fusion operator.Cut joints into straps,(see Fig.4)and visually examine and test for bond continuity and strength.Bending,peeling,and elongation tests are useful for this purpose.8.Procedure2—Butt Fusion8.1Apparatus:8.1.1Heating Tool—The heating tool shall have sufficient area to adequately cover the ends of the size of pipe to be joined.8.1.2Alignment Jig—The alignment jig is three basic parts: (1)a stationary clampingfixture and a movable clamping fixture for holding each of the two parts to be fused in alignment;(2)a facer for simultaneously preparing the ends of the parts to be joined(Note6);and(3)appropriate adapters for different pipe sizes.Alignment jigs are manually or hydrauli-cally powered.N OTE6—A facer is a rotating cutting device used to square-off the pipe orfitting ends to obtain properly mating fusion surfaces.8.2Procedure:8.2.1Bring the heater plate surfaces to propertemperature.8.2.1.1For butt fusion in accordance wiht PPI TR-33,the heating tool surfaces are set for a temperature from 400to 450°F (204to 232°C).8.2.2Clean the inside and outside of the components (pipe or pipe and fitting)to be joined.Remove all foreign matter from the surface of the component where it will be clamped in the alignment jig.8.2.3Align each component with its alignment jig clamp,and close the clamp.Check component to component align-ment,adjust as needed,and face off the ends.8.2.3.1Take care when placing pipe or fittings in the alignment jig.Pipes shall be aligned before the alignment clamp is closed;however,do not force the pipe into alignment by pushing it against the side of an open alignment jig clamp.8.2.4Bring the piping components together and check for high-low alignment,and out-of-roundness.Adjust as required.Re-face after adjustment.The ends of the piping components shall be square to each other around their full circumference.8.2.5Place the heater plate between the component ends,and move the component ends against the heater plate with sufficient force to ensure complete circumferential contact against the heater plate.Hold the components against the heater plate briefly,using limited force to ensure that proper contact with the plate has been made.Release the force,but hold the components against the heater plate until an appro-priately sized bead of molten plastic develops circumferentiallyaround each component end as a result of the thermal expan-sion of the material.Do not push the components into the heater plate as the melting progresses.8.2.5.1For butt fusion in accordance with PPI TR-33,the melt bead size for 2in.IPS pipe is about 1⁄16(1.6mm)and is about 1⁄8to 3⁄16in.(3.2to 4.8mm)for 8in.IPS.8.2.6Move the melted component ends away from the heater plate,and remove the heater plate.Quickly inspect the melted surfaces per 8.2.1.If the melt is accpetable,immedi-ately bring the melted ends together with enough force to roll both component melt beads over to the pipe surface around the entire circumference of the joint.When the bead touches the pipe surface,stop moving the component ends together,but do not release the force.Hold the force on the joint until the joint has cooled.8.2.6.1Do not use excessive or insufficient force.If the components are brought together with too much force,all molten material may be pushed out of the joint and cold material brought into contact forming a “cold”joint.If too little force is used,only the melt in the beads may be fused together and,as the molten material in the joint cools and contracts,voids or non-fused areas may be formed.If the softened material sticks to the heater plate,discontinue the joining procedure.Clean the heater plate,re-square the component ends,and repeat the process from the beginning (8.2.2).8.2.6.2Inspect the component ends quickly when the heat-ing tool is removed.The melt should be flat.A concave melt surface indicates unacceptable pressure during heating.If a concave melt surface is observed,do not continue.Allow the component ends to cool,and start over from 8.2.1.8.2.6.3For butt fusion in accordance with PPI TR-33,an interfacial pressure of 60to 90psi (0.41to 0.62MPa)is used to determine the force required to roll both fusion beads over to the pipe surface.For any pipe size and wall thickness,the actual fusion joining force is determined by multiplying the interfacial pressure by the area of the pipe end.To determine a fusion pressure gauge setting for hydraulic butt fusion ma-chines,the force is divided by the area of the hydraulic cylinders that move the fusion machine carriage.The hydraulic fusion machine gauge pressure setting may need to be in-creased to overcome internal machine friction drag or to provide additional force to move pipes attached to the butt fusion machine.8.2.7Allow the assembly to stand at least until cool before removing the clamps or other aligning device (Note 7).Do not subject the joint to high stress until it has cooled to less than approximately 130°F.Do not apply internal pressure until the joint and surrounding material have reached ambient air temperature.N OTE 7—The joint is usually cool enough to remove from the align-ment jig if a bare hand can be held against the beads without discomfort (less than approximately 130°F).Further cooling is recommended prior to ditching the pipe.8.2.8Visually inspect the joint against recommended ap-pearance guidelines.The beads should be uniformly shaped and sized all around the joint.8.3Testing —Evaluate sample joints to verify the skill and knowledge of the fusion operator.In some cases,butt-fusionFIG.4Bent Strap TestSpecimenjoints can be nondestructively examined using ultrasonic equipment to detect voids or other discontinuities.Visually,the width of butt fusion beads should be2to2-1/2times the bead height above the pipe,and the beads should be rounded and uniformly sized all around the pipe circumference.The v-groove between the beads should not be deeper than half the bead height above the pipe surface.When butt fusing to moldedfittings,thefitting-side bead may display shape irregu-larities such as minor indentations,deflections and non-uniform bead rollover from molded part cooling and knit lines. In such cases,visual evaluation is based mainly on the size and shape of the pipe-side bead.For destructive tests,cut joints into straps(see Fig.4),visually examine,and test for bond continuity and strength.Tests that have been found useful for this purpose include inside face bend,outside face bend,tensile elongation,torque,and impact.Quantifiable data may be obtained by the use of laboratory procedures and comparing data against that from control samples.9.Procedure3—Saddle Fusion9.1Apparatus:9.1.1Heating Tool Faces—The faces are matched sets,by pipe size,of concave and convex blocks which bolt or clamp onto aflat or round core heater.9.1.2Alignment Jigs—Various types of alignment jigs are available.Alignment jigs provide a means to mount the alignment jig on the pipe,hold thefitting and align it to the pipe,and move thefitting towards and away from the pipe. Alignment jigs are used for saddle fusions for optimum results and are required for certain materials.N OTE8—Some materials may be saddle fused using a hand-stab procedure.Consult the manufacturer for a hand-stab procedure.9.2Procedure:9.2.1Bring heater plate and faces to proper temperature.9.2.2Clean the mating surfaces of the pipe and the concave surface of thefitting base and roughen the mating surfaces. Emery or garnet cloth of50to60grit is used to remove the tough outer surface skin.It is essential to remove the surface skin completely without altering the contours of the mating surfaces and to keep the surface clean.Remove dust and particles from the surface after roughing with a clean,dry, oil-free,lint-free cloth.9.2.3Install the alignment jig on the pipe.For smaller pipe sizes,install a bolster plate under the pipe to provide additional support.9.2.4Install thefitting in the alignment jig.Press thefitting against the pipe to align thefitting base to the pipe,then secure thefitting in the alignment jig.9.2.5Place the heater on the pipe and press thefitting against the heater to obtain a melt on both the pipe and the fitting.N OTE9—When saddlefittings are fused to pipes that are under pressure,it is important that the surface melt be obtained quickly without too much heat penetration.Otherwise,the pipe may rupture from internal pressure.Consult the manufacturer for specific recommendations for fusing saddlefittings to pipe under pressure.9.2.6When a proper melt is achieved,remove the heater, quickly examine the pipe andfitting to ensure proper melt patterns,and immediately place thefitting on the pipe.Hold in place while exerting suitable force for the specified cooling time.N OTE10—If a suitable melt pattern has not been achieved,do not reheat;however,continue with the fusion and apply thefitting to the pipe. When the joint has cooled,remove the alignment jig,cut off the top of the fitting to prevent use,and start over at another location.9.3Visually inspect the joint against recommended visual inspection guidelines.9.4Testing—Evaluate sample joints to verify the skill and knowledge of the fusion operator.Cut joints into straps(see Fig.4),visually examine,and test for bond continuity and strength.See Practice F905for methods for evaluating the quality of fusion joints.10.Keywords10.1butt fusion;fitting;heat fusion;joining;pipe;polybu-tylene;polyethylene;polyolefin;polypropylene;saddle fusion; socket fusionANNEX(Mandatory Information)A1.COLD WEATHER PROCEDURESA1.1Cold Weather Handling—Pipe should be inspected for damage.Polyolefin pipes have reduced impact resistance in sub-freezing conditions.Avoid dropping pipe in sub-freezing conditions.When handling coiled pipe at temperatures below 40°F,it is helpful to uncoil the pipe prior to installation and let it straighten out.Gradually uncoil the pipe and cover it with dirt at intervals to keep it from recoiling.Always use caution when cutting the straps on coils of pipe because the outside end of a coil may spring out when the strapping is removed.A1.2Preparation for Socket,Saddle,and Butt Fusion Joining:A1.2.1Wind and Precipitation—The heating tool should be shielded in an insulated container to prevent excessiveheatloss.Shield the pipe fusion area and fusion tools from wind, snow,and rain by using a canopy or similar device.A1.2.2Pipe and Fitting Surface Preparation—The pipe and fitting surfaces to be“joined”or held in clamps should be dry and clean and free of ice,frost,snow,dirt,and other contami-nation.Regular procedures for preparation of surfaces to be joined,such as facing for butt fusion and roughening for saddle fusion should be emphasized.After preparation,the surfaces should be protected from contamination until joined.Contami-nation of the area to be fused will likely cause incomplete fusion.Frost and ice on the surfaces of the pipe to be clamped in either a cold ring or alignment jigs may cause slippage during fusion.Inspect coiled pipe to see if it hasflattened during storage which could cause incomplete melt pattern or poor fusion.It may be necessary to remove several inches at the pipe ends to eliminate such distortion.Pipe may have a slight toe-in or reduced diameter for several inches at the end of the pipe.The toe-in may need to be removed before butt fusing to a freshly cut pipe end,or to afitting.A1.2.3Heating—Work quickly once pipe andfitting have been separated from the heating tool,so that melt heat loss is minimized,but still take time(no more than3s)to inspect both melt patterns.Keep the heater dry at all times.Check the temperature of the heating tool regularly with a pyrometer. Keep the heating tool in an insulated container between fusions.Do not increase heating tool temperature above the specified temperature setting.Gas-fired heating tools are used only in above freezing conditions.A1.3Socket Fusion:A1.3.1Pipe Outside Diameter—Pipe outside diameter con-tracts when cold.This results in loose or slipping cold rings. For best results,clamp one cold ring in its normal position adjacent to the depth gage.Place shim material(that is,piece of paper or rag,etc.)around the inside diameter of a second rounding ring and clamp this cold ring directly behind thefirst cold ring to prevent slippage.Thefirst cold ring allows the pipe adjacent to the heated pipe to expand to its normal diameter during the heating cycle.A1.3.2Fitting Condition—If possible,store socketfittings at a warm temperature,such as in a truck cab,prior to use.This will make it easier to place thefitting on the heating tool becausefittings contract when cold.A1.3.3Heating—At colder temperatures the pipe andfitting contract,thus the pipe slips more easily into the heating tool.At very cold outdoor temperatures(particularly with2,3,and4in.IPS pipe),the pipe may barely contact the heating surface. Longer heating cycles are used so that the pipefirst expands (from tool heat)to properly contact the heating tool,then develops complete melt.The length of cycle necessary to obtain a complete melt pattern will depend not only on the outdoor(pipe)temperature but wind conditions and operator variation.Avoid cycles in excess of that required to achieve a good melt pattern.To determine the proper cycle time for any particular condition,make a melt pattern on a scrap piece of pipe,using the heating cycle as instructed by the pipe manu-facturer.If the pattern is incomplete(be sure rounding rings are being used),try a3-s longer cycle on a fresh(cold)end of pipe. If the melt pattern is still not completely around the pipe end, add an additional3s and repeat the pleteness of melt pattern is the key.Keep the heater dry at all times. Check the temperature of the heating tool regularly and keep the heating tool in an insulated container between fusions.A1.4Butt Fusion:A1.4.1Joining—It will take longer to develop the initial melt bead completely around the pipe ends.Do not increase pressure during heating.When proper melt bead has been obtained,the pipe and heater shall be separated in a rapid, snap-like motion.The melted surfaces shall then be joined immediately in one smooth motion so as to minimize cooling of the melted pipe ends.A1.5Saddle Fusion:A1.5.1Surface Preparations—Regular procedures for roughening the surfaces to be fused on the pipe and thefitting should be emphasized.After the surfaces have been prepared, particular care should be taken to protect against contamina-tion.A1.5.2Heating Time—Make a trial melt pattern on a scrap piece of pipe.A clean,dry piece of wood is used to push the heating tool against the pipe.If the melt pattern is incomplete, add3s to the cycle time and make another trial melt pattern on another section of cold pipe.If the pattern is still incomplete, continue3-s additions on a fresh section of cold pipe until a complete melt pattern is e this heating cycle for fusions during prevailing conditions.Regardless of the weather or the type of tools used,the important point to remember is that complete and even melt must occur on thefitting and the pipe in order to produce a good fusion joint.This requires pipe preparation to make it clean,straight,round,and well supported.ASTM International takes no position respecting the validity of any patent rights asserted in connection with any item mentioned in this ers of this standard are expressly advised that determination of the validity of any such patent rights,and the risk of infringement of such rights,are entirely their own responsibility.This standard is subject to revision at any time by the responsible technical committee and must be reviewed everyfive years and if not revised,either reapproved or withdrawn.Your comments are invited either for revision of this standard or for additional standards and should be addressed to ASTM International Headquarters.Your comments will receive careful consideration at a meeting of the responsible technical committee,which you may attend.If you feel that your comments have not received a fair hearing you should make your views known to the ASTM Committee on Standards,at the address shown below.This standard is copyrighted by ASTM International,100Barr Harbor Drive,PO Box C700,West Conshohocken,PA19428-2959, United States.Individual reprints(single or multiple copies)of this standard may be obtained by contacting ASTM at the above address or at610-832-9585(phone),610-832-9555(fax),or service@(e-mail);or through the ASTM website().。
塑料的冲击强度与硬度的检测方法以及影响因素
塑料的冲击强度与硬度的检测方法以及影响因素1、冲击性能冲击试验是用来评价材料在高速载荷状态下的韧性或对断裂的抵抗能力的试验。
塑料材料的冲击强度在工程应用上是一项重要的性能指标,它反映不同材料抵抗高速冲击而致破坏的能力。
冲击试验可分为摆锤式(包括简支梁和悬臂梁式)、落球(落锤)式和高速拉伸冲击试验等。
不同材料、不同用途制品可选择不同的试验方法。
摆锤式冲击试验包括简支梁型和悬臂梁型。
这两种方法都是将试样放在冲击机上规定位置,然后使摆锤自由落下,使试样受到冲击弯曲力而断裂,试样断裂时单位面积或单位宽度所消耗的冲击功即冲击强度。
简支梁冲击试验是摆锤打击简支梁试验的中央;悬臂梁则是用摆锤打击有缺口的悬臂梁的自由端。
影响因素:(1)试样制备每种制样过程都要符合相关标准,不同制样方法不具有可比性。
(2)试样尺寸规格要一致。
不同加工方式加工的试样,其测值不具可比性。
(3)试验环境冲击强度值均随温度的降低而降低。
湿度对某些塑料冲击强度有影响。
(4)操作过程如冲击速度,冲击摆锤刀口与试样打击面吻合。
简支梁冲击试验中,如果试样与支架没有贴紧,则容易产生多次冲击使测试结果不准确。
(5)数据处理数据处理与试验结果的精确度有着密切关系。
2、硬度试验测定硬度的方法主要有三种类型:(1)测定材料耐顶针压入能力的试验,如邵氏硬度(肖式硬度)、球压痕硬度试验等;(2)测定材料对尖头或其它材料的耐划痕硬度试验,如莫氏硬度(Mobs)等;(3)测定材料回弹性的硬度试验,如洛氏硬度,邵氏反弹硬度试验等。
邵氏A型适用于软质塑料及橡胶;邵氏C型和邵氏D型适用于较硬或硬质塑料和硫化橡胶。
球压痕硬度实验适用于柔软的弹性体到较硬的塑料。
洛氏硬度实验主要用于刚硬的工程塑料的硬度评价。
【邵氏硬度】:将规定形状的压针,在标准的弹簧压力下和规定的时间内,把压针压入试样的深度转换为硬度值,表示该试样材料的邵氏硬度等级。
影响因素:(1)试样厚度:试样过薄,将使测定的硬度值偏大。
标准试件的冲击韧性测试方法
冲击强度impact strength(1)冲击强度用于评价材料的抗冲击能力或判断材料的脆性和韧性程度,因此冲击强度也称冲击韧性。
(2)冲击强度是试样在冲击破坏过程中所吸收的能量与原始横截面积之比。
(3)冲击强度根据试验设备不同可分为简支梁冲击强度、悬臂梁冲击强度.(4) 冲击强度的测量标准主要有ISO国际标准(GB参照ISO)及美国材料ATSM 标准,GB为1943-2007为最新标准,ATSM 标准为D-256标准,具体区分如下:GB: 是试件在一次冲击实验时,单位横截面积(m2)上所消耗的冲击功(J),其单位为MJ/m2。
ATSM:它反映了材料抵抗裂纹扩展和抗脆断的能力,单位宽度所消耗的功,单位为J/m。
(5)设备区分:悬臂梁冲击方向中间有撞针,简支梁冲击方向垂直面有凹块,正面形状为一凹形摆锤。
(6)缺口区分:缺口一般分为四种,有V型口和U型口两种,每种根据简短圆弧半径又分为两种。
(7)样条区分:GB:一般为80*10mm 样条以及63.5*10mm 样条缺口为2mm,也有63.8*12.7mm样条ATSM:一般为63.5*12.7mm 缺口剩余宽度为10.16mm (国内有用80*10样条)(8)测试公式:GB: a=W / (h*d) 单位KJ/m ATSM: a= W /d 单位:J/ma:冲击强度W :冲击损失能量h:缺口剩余宽度d:样条厚度因此,GB与ATSM之间不可以等同测量,但从测量公式可总结经验公式:GB 数值*10.16或8(错误样条)=ATSM数值,也可以由实际测量来总结比值。
冲击韧性实验大纲1.用摆锤冲击试验机,冲击简支梁受载条件下的低碳钢和铸铁试样,确定一次冲击负载作用下折断时的冲击韧性αku2.通过分析计算,观察断口,比较上述两种材料抵抗冲击载荷的能力冲击韧性实验指导书衡量材料抗冲击能力的指标用冲击韧度来表示。
冲击韧度是通过冲击实验来测定的。
这种实验在一次冲击载荷作用下显示试件缺口处的力学特性(韧性或脆性)。
热塑性塑料管材和管件耐冲击性能的测试
热塑性塑料管材和管件耐冲击性能的测试方法(落锤法). 本标准适于用落锤冲击法测定热塑性塑料管材和管件的耐冲击性能。
1 原理和定义 1.1 原理在规定的冲击条件下,选择落锤质量(也可以选择一定冲击高度而变换落锤质量),提升机下降,通过电磁铁吸附锤体,牵引上升,到达预选高度后,释放落锤冲击试样。
在落锤第一次回弹时,捕捉装置将落锤捉住,测出热塑性塑料管材和管件冲击破坏所需的能量。
1.2 试样经冲击作用后管壁上出现用肉眼在自然光线下可见的裂纹、龟裂和破碎的现象称为破坏。
2 试验设备 2.1 落锤式冲击试验机 2.1.1 锤体自由下落冲击管材和管件试样,锤体下落能量损失小于5%。
2.1.2 落锤质量精度为±0.1%。
2.1.3 落锤冲头顶点位于试样轴线上方,与轴线偏差小于2mm。
2.1.4 冲击高度(锤头顶点到试样上方):误差不大于1%。
2.1.5 采用的高度增量为25、50、150mm。
2.2 落锤 2.2.1 冲头:落锤(冲头+锤体)上的冲头形状如下图所示。
用半径为10mm 的冲头时,指定用落锤A。
用半径为30mm 冲头时,指定用落锤B。
用半径为5mm 冲头时,指定用落锤C。
注:落锤推荐用耐刮痕钢制造,以减轻冲头的损伤。
严重伤痕的冲头会影响试验结果。
2.2.2 落锤质量为2、3、4、5、6、7、8、10、15kg。
2.3 落管2.3.1 落管右调高度为2000mm(条件允许情况下,落管长度可为4000mm)。
组装时,应保证纵方向垂直。
2.3.2 安装后应保证落锤能自由落下。
2.3.3 落管选用无剩磁材料。
注:只要能获得同样结果,落锤可不用落管或其它方式导向。
采用落管的目的在于消除落锤;回弹时对操作者可能带来的伤害,另外又能导引落锤中心准确地冲击试样顶端。
2.4 试验夹具,采用V 型托板和平行托板两种夹具。
V 型托板一般与落锤A和落锤 C 联合使用,平行托板常与落锤B 或检验管件时使用。
中文版塑料测试方法
拉伸强度和拉伸模量ASTM D 638, ISO R527, DIN 53455, DIN53457了解材料对负载的响应程度是了解材料性能的基础。
通过测试在一定应力下材料的变形程度(应变),设计者可以预测材料在其工作环境下的应用(如图1)。
图1 拉伸应力-应变曲线A:弹性形变的极限值B:屈服点C:最大强度O-A:屈服区域,发生弹性形变超过A点:塑性变形图2:ASTM D 6,拉伸试样的尺寸模量:应力/应变 Mpa屈服应力:开始发生塑性变形的应力 Mpa断裂应力发生断裂时的应力 Mpa断裂伸长率材料发生断裂时的应变%弹性极限开始发生弹性形变的终点弹性模量发生在塑性变形时的模量 Mpa测试速度:A速度:1mm/mm 拉伸模量B速度:5mm/mm 填充材料的拉伸应力/应变C速度:50mm/mm 为填充材料的拉伸应力/应变弯曲强度和弯曲模量ASTM D 790, ISO 178, DIN 53452弯曲强度是用来测量材料抵制挠曲变形的能力或者是测试材料的刚性。
与拉伸负载不同的是,在测试弯曲时,所有的应力加载在一个方向上。
用压头压在试样的中部使其形成一个3点的负载,在标准测试仪上,恒定的压缩速度为2mm/mm.通过计算机收集的数据,测绘出试样的压缩负荷-变形曲线,来计算压缩模量。
在曲线的线性区域至少取5个点的负载和变形。
弯曲模量(应力与应变的比值)是表征材料弯曲性能的重要指标。
压缩模量是指在应力-应变的曲线的线性范围内,压缩应力与压缩应变之比。
压缩应力与压缩应变的单位都是Mpa。
图3:弯曲测试示意图耐磨性能测试GE测试方法与ASTM D 1044, ISO 3537, DIN 52347测试方法相似图4:Taber 磨损实验用Taber 磨损机磨损测试试样,通过计算试样的磨损量来表征材料的耐磨性能。
测试试样放置在一个以恒定转速60rpm的旋转转盘上(如图4所示),把一定重量的砂轮压在测试试样上(转盘是通过人工磨出来的,可以获得不同重量的转盘)。
用冲击法测定塑料及弹性塑料的脆化温度的试验方法
用冲击法测定塑料及弹性材料的脆化温度的试验方法1 范围1.1 该试验方法是测定塑料和弹性材料在一定的冲击强度下出现脆性破坏时的温度。
还有两种常规检查和验收工艺。
注1---在测试橡胶的脆性温度时,用试验方法D2137。
1.2 SI是标准单位。
1.3 因为使用水银温度计存在潜在的安全和环境风险,建议使用其他仪器来测量温度(如热电偶温度计和电阻温度计)。
1.4该标准并不旨在讨论所有的安全问题,如有,仅与其使用相关。
该标准的使用者责任制定相关适用的安全和健康规范,并在使用前确定规范的适用性。
2 参考标准3 术语3.1 总则---如无特殊说明,该标准中所使用的塑料的定义与D883中的定义相同。
3.2 脆化温度---样品50%可能损坏的统计温度。
4 试验方法概述4.1 用转矩扳手将样品固定到样品架上,测定其脆化温度。
样品架浸入到装有传热介质的容器中进行冷却。
在规定的线速下撞击样品,然后进行测量。
样品50%的部分损坏时的温度为脆化温度。
5 意义和使用6 仪器6.1 A类:6.1.1 样品夹钳和冲锤数量---样品夹钳作为悬梁用于固定样品。
每个样品都必须牢牢的固定在样品钳上。
冲锤刀刃应该从大于6.4毫米处以2000±200毫米/秒的线速撞击样品。
为了在某些仪器上保持此速度,有必要减少每次测试的样品的数量。
冲击刀刃中线与钳子在撞击时的距离为7.87±0.25毫米。
冲击刀刃的半径为1.6±0.1毫米。
冲击臂与夹钳在冲击时的距离为6.35±0.25毫米。
图1描述了这些尺寸要求。
图2描述了钳子的尺寸。
使用夹紧螺钉,10-32国家标准细牙螺纹。
6.2 B类:6.2.1 样品夹钳和冲锤数量---样品夹钳作为悬梁用于固定样品。
每个样品都必须牢牢的固定在样品钳上。
冲锤刀刃在冲击前和冲击后5.0毫米范围内试验速度为2000±200毫米/秒。
为了在某些仪器上保持此速度,有必要减少每次测试的样品的数量。
astm d256-2006塑料和绝缘材料抗冲击性能测试
Designation:D256–06Standard Test Methods forDetermining the Izod Pendulum Impact Resistance of Plastics1This standard is issued under thefixed designation D256;the number immediately following the designation indicates the year of original adoption or,in the case of revision,the year of last revision.A number in parentheses indicates the year of last reapproval.A superscript epsilon(e)indicates an editorial change since the last revision or reapproval.1.Scope*1.1These test methods cover the determination of the resistance of plastics to“standardized”(see Note1)pendulum-type hammers,mounted in“standardized”machines,in break-ing standard specimens with one pendulum swing(see Note2). The standard tests for these test methods require specimens made with a milled notch(see Note3).In Test Methods A,C, and D,the notch produces a stress concentration that increases the probability of a brittle,rather than a ductile,fracture.In Test Method E,the impact resistance is obtained by reversing the notched specimen180°in the clamping vise.The results of all test methods are reported in terms of energy absorbed per unit of specimen width or per unit of cross-sectional area under the notch.(See Note4.)N OTE1—The machines with their pendulum-type hammers have been “standardized”in that they must comply with certain requirements, including afixed height of hammer fall that results in a substantiallyfixed velocity of the hammer at the moment of impact.However,hammers of different initial energies(produced by varying their effective weights)are recommended for use with specimens of different impact resistance. Moreover,manufacturers of the equipment are permitted to use different lengths and constructions of pendulums with possible differences in pendulum rigidities resulting.(See Section5.)Be aware that other differences in machine design may exist.The specimens are“standard-ized”in that they are required to have onefixed length,onefixed depth, and one particular design of milled notch.The width of the specimens is permitted to vary between limits.N OTE2—Results generated using pendulums that utilize a load cell to record the impact force and thus impact energy,may not be equivalent to results that are generated using manually or digitally encoded testers that measure the energy remaining in the pendulum after impact.N OTE3—The notch in the Izod specimen serves to concentrate the stress,minimize plastic deformation,and direct the fracture to the part of the specimen behind the notch.Scatter in energy-to-break is thus reduced. However,because of differences in the elastic and viscoelastic properties of plastics,response to a given notch varies among materials.A measure of a plastic’s“notch sensitivity”may be obtained with Test Method D by comparing the energies to break specimens having different radii at the base of the notch.N OTE4—Caution must be exercised in interpreting the results of these standard test methods.The following testing parameters may affect test results significantly:Method of fabrication,including but not limited to processingtechnology,molding conditions,mold design,and thermaltreatments;Method of notching;Speed of notching tool;Design of notching apparatus;Quality of the notch;Time between notching and test;Test specimen thickness,Test specimen width under notch,andEnvironmental conditioning.1.2The values stated in SI units are to be regarded as standard.The values given in brackets are for information only.1.3This standard does not purport to address all of the safety concerns,if any,associated with its use.It is the responsibility of the user of this standard to establish appro-priate safety and health practices and determine the applica-bility of regulatory limitations prior to use.N OTE5—These test methods resemble ISO180:1993in regard to title only.The contents are significantly different.2.Referenced Documents2.1ASTM Standards:2D618Practice for Conditioning Plastics for TestingD883Terminology Relating to PlasticsD3641Practice for Injection Molding Test Specimens of Thermoplastic Molding and Extrusion MaterialsD4066Classification System for Nylon Injection and Ex-trusion Materials(PA)D5947Test Methods for Physical Dimensions of Solid Plastics SpecimensE691Practice for Conducting an Interlaboratory Study to Determine the Precision of a Test Method2.2ISO Standard:ISO180:1993Plastics—Determination of Izod Impact1These test methods are under the jurisdiction of ASTM Committee D20on Plastics and are the direct responsibility of Subcommittee D20.10on Mechanical Properties.Current edition approved March15,2006.Published March2006.Originally approved st previous edition approved in2005as D256-05a.2For referenced ASTM standards,visit the ASTM website,,or contact ASTM Customer Service at service@.For Annual Book of ASTM Standards volume information,refer to the standard’s Document Summary page on the ASTM website.*A Summary of Changes section appears at the end of this standard. Copyright©ASTM International,100Barr Harbor Drive,PO Box C700,West Conshohocken,PA19428-2959,United States.Strength of Rigid Materials33.Terminology3.1Definitions—For definitions related to plastics see Terminology D883.3.2Definitions of Terms Specific to This Standard:3.2.1cantilever—a projecting beam clamped at only one end.3.2.2notch sensitivity—a measure of the variation of impact energy as a function of notch radius.4.Types of Tests4.1Four similar methods are presented in these test meth-ods.(See Note6.)All test methods use the same testing machine and specimen dimensions.There is no known means for correlating the results from the different test methods.N OTE6—Test Method B for Charpy has been removed and is being revised under a new standard.4.1.1In Test Method A,the specimen is held as a vertical cantilever beam and is broken by a single swing of the pendulum.The line of initial contact is at afixed distance from the specimen clamp and from the centerline of the notch and onthe same face as the notch.4.1.2Test Method C is similar to Test Method A,except for the addition of a procedure for determining the energy ex-pended in tossing a portion of the specimen.The value reported is called the“estimated net Izod impact resistance.”Test Method C is preferred over Test Method A for materials that have an Izod impact resistance of less than27J/m[0.5 ft·lbf/in.]under notch.(See Appendix X4for optional units.) The differences between Test Methods A and C become unimportant for materials that have an Izod impact resistance higher than this value.4.1.3Test Method D provides a measure of the notch sensitivity of a material.The stress-concentration at the notch increases with decreasing notch radius.4.1.3.1For a given system,greater stress concentration results in higher localized rates-of-strain.Since the effect of strain-rate on energy-to-break varies among materials,a mea-sure of this effect may be obtained by testing specimens with different notch radii.In the Izod-type test it has been demon-strated that the function,energy-to-break versus notch radius, is reasonably linear from a radius of0.03to2.5mm[0.001to 0.100in.],provided that all specimens have the same type of break.(See5.8and22.1.)4.1.3.2For the purpose of this test,the slope,b(see22.1), of the line between radii of0.25and1.0mm[0.010and0.040 in.]is used,unless tests with the1.0-mm radius give“non-break”results.In that case,0.25and0.50-mm[0.010and 0.020-in.]radii may be used.The effect of notch radius on the impact energy to break a specimen under the conditions of this test is measured by the value b.Materials with low values of b, whether high or low energy-to-break with the standard notch, are relatively insensitive to differences in notch radius;while the energy-to-break materials with high values of b is highly dependent on notch radius.The parameter b cannot be used in design calculations but may serve as a guide to the designer and in selection of materials.4.2Test Method E is similar to Test Method A,except that the specimen is reversed in the vise of the machine180°to the usual striking position,such that the striker of the apparatus impacts the specimen on the face opposite the notch.(See Fig. 1,Fig.2.)Test Method E is used to give an indication of the unnotched impact resistance of plastics;however,results ob-tained by the reversed notch method may not always agree with those obtained on a completely unnotched specimen.(See 28.1.)4,55.Significance and Use5.1Before proceeding with these test methods,reference should be made to the specification of the material being tested. Any test specimen preparation,conditioning,dimensions,and testing parameters covered in the materials specification shall take precedence over those mentioned in these test methods.If there is no material specification,then the default conditions apply.5.2The pendulum impact test indicates the energy to break standard test specimens of specified size under stipulated parameters of specimen mounting,notching,and pendulum velocity-at-impact.5.3The energy lost by the pendulum during the breakage of the specimen is the sum of the following:5.3.1Energy to initiate fracture of the specimen;5.3.2Energy to propagate the fracture across the specimen;3Available from American National Standards Institute(ANSI),25W.43rd St., 4th Floor,New York,NY10036.4Supporting data giving results of the interlaboratory tests are available from ASTM Headquarters.Request RR:D20-1021.5Supporting data giving results of the interlaboratory tests are available from ASTM Headquarters.Request RR:D20-1026.FIG.1Relationship of Vise,Specimen,and Striking Edge to Each Other for Izod Test Methods A andC5.3.3Energy to throw the free end (or ends)of the broken specimen (“toss correction”);5.3.4Energy to bend the specimen;5.3.5Energy to produce vibration in the pendulum arm;5.3.6Energy to produce vibration or horizontal movement of the machine frame or base;5.3.7Energy to overcome friction in the pendulum bearing and in the indicating mechanism,and to overcome windage (pendulum air drag);5.3.8Energy to indent or deform plastically the specimen at the line of impact;and5.3.9Energy to overcome the friction caused by the rubbing of the striker (or other part of the pendulum)over the face of the bent specimen.5.4For relatively brittle materials,for which fracture propa-gation energy is small in comparison with the fracture initiation energy,the indicated impact energy absorbed is,for all practical purposes,the sum of factors 5.3.1and 5.3.3.The toss correction (see 5.3.3)may represent a very large fraction of the total energy absorbed when testing relatively dense and brittle materials.Test Method C shall be used for materials that have an Izod impact resistance of less than 27J/m [0.5ft·lbf/in.].(See Appendix X4for optional units.)The toss correction obtained in Test Method C is only an approximation of the toss error,since the rotational and rectilinear velocities may not be the same during the re-toss of the specimen as for the original toss,and because stored stresses in the specimen may have been released as kinetic energy during the specimen fracture.5.5For tough,ductile,fiber filled,or cloth-laminated mate-rials,the fracture propagation energy (see 5.3.2)may be large compared to the fracture initiation energy (see 5.3.1).When testing these materials,factors (see 5.3.2,5.3.5,and 5.3.9)can become quite significant,even when the specimen is accurately machined and positioned and the machine is in good conditionwith adequate capacity.(See Note 7.)Bending (see 5.3.4)and indentation losses (see 5.3.8)may be appreciable when testing soft materials.N OTE 7—Although the frame and base of the machine should be sufficiently rigid and massive to handle the energies of tough specimens without motion or excessive vibration,the design must ensure that the center of percussion be at the center of strike.Locating the striker precisely at the center of percussion reduces vibration of the pendulum arm when used with brittle specimens.However,some losses due to pendulum arm vibration,the amount varying with the design of the pendulum,will occur with tough specimens,even when the striker is properly positioned.5.6In a well-designed machine of sufficient rigidity and mass,the losses due to factors 5.3.6and 5.3.7should be very small.Vibrational losses (see 5.3.6)can be quite large when wide specimens of tough materials are tested in machines of insufficient mass,not securely fastened to a heavy base.5.7With some materials,a critical width of specimen may be found below which specimens will appear ductile,as evidenced by considerable drawing or necking down in the region behind the notch and by a relatively high-energy absorption,and above which they will appear brittle as evidenced by little or no drawing down or necking and by a relatively low-energy absorption.Since these methods permit a variation in the width of the specimens,and since the width dictates,for many materials,whether a brittle,low-energy break or a ductile,high energy break will occur,it is necessary that the width be stated in the specification covering that material and that the width be reported along with the impact resistance.In view of the preceding,one should not make comparisons between data from specimens having widths that differ by more than a few mils.5.8The type of failure for each specimen shall be recorded as one of the four categories listed as follows:C =Complete Break —A break where the specimen separates into two or more pieces.H =Hinge Break —An incomplete break,such that one part of the specimen cannot support itself above the horizontal when the other part is held vertically (less than 90°included angle).P =Partial Break —An incomplete break that does not meet the definition for a hinge break but has frac-tured at least 90%of the distance between the vertex of the notch and the opposite side.NB =Non-Break —An incomplete break where the frac-ture extends less than 90%of the distance be-tween the vertex of the notch and the opposite side.For tough materials,the pendulum may not have the energy necessary to complete the breaking of the extreme fibers and toss the broken piece or pieces.Results obtained from “non-break”specimens shall be considered a departure from stan-dard and shall not be reported as a standard result.Impact resistance cannot be directly compared for any two materials that experience different types of failure as defined in the test method by this code.Averages reported must likewise be derived from specimens contained within a single failure category.This letter code shall suffix the reported impact identifying the types of failure associated with the reported value.If more than one type of failure is observed for a sample material,then the report will indicate the averageimpactFIG.2Relationship of Vise,Specimen,and Striking Edge to EachOther for Test MethodEresistance for each type of failure,followed by the percent of the specimens failing in that manner and suffixed by the letter code.5.9The value of the impact methods lies mainly in the areas of quality control and materials specification.If two groups of specimens of supposedly the same material show significantly different energy absorptions,types of breaks,critical widths,or critical temperatures,it may be assumed that they were made of different materials or were exposed to different processing or conditioning environments.The fact that a material shows twice the energy absorption of another under these conditions of test does not indicate that this same relationship will exist under another set of test conditions.The order of toughness may even be reversed under different testing conditions.N OTE8—A documented discrepancy exists between manual and digital impact testers,primarily with thermoset materials,including phenolics, having an impact value of less than54J/m[1ft-lb/in.].Comparing data on the same material,tested on both manual and digital impact testers, may show the data from the digital tester to be significantly lower than data from a manual tester.In such cases a correlation study may be necessary to properly define the true relationship between the instruments.TEST METHOD A—CANTILEVER BEAM TEST6.Apparatus6.1The machine shall consist of a massive base on which is mounted a vise for holding the specimen and to which is connected,through a rigid frame and bearings,a pendulum-type hammer.(See 6.2.)The machine must also have a pendulum holding and releasing mechanism and a mechanism for indicating the breaking energy of the specimen.6.2A jig for positioning the specimen in the vise and graphs or tables to aid in the calculation of the correction for friction and windage also should be included.One type of machine is shown in Fig.3.One design of specimen-positioning jig is illustrated in Fig.4.Detailed requirements are given in subsequent paragraphs.General test methods for checking and calibrating the machine are given in Appendix X2.Additional instructions for adjusting a particular machine should be supplied by the manufacturer.6.3The pendulum shall consist of a single or multi-membered arm with a bearing on one end and a head, containing the striker,on the other.The arm must be suffi-ciently rigid to maintain the proper clearances and geometric relationships between the machine parts and the specimen and to minimize vibrational energy losses that are always included in the measured impact resistance.Both simple and compound pendulum designs may comply with this test method.6.4The striker of the pendulum shall be hardened steel andshall be a cylindrical surface having a radius of curvature of 0.8060.20mm[0.03160.008in.]with its axis horizontal and perpendicular to the plane of swing of the pendulum.The line of contact of the striker shall be located at the center of percussion of the pendulum within62.54mm[60.100in.] (See Note9.)Those portions of the pendulum adjacent to the cylindrical striking edge shall be recessed or inclined at a suitable angle so that there will be no chance for other than this cylindrical surface coming in contact with the specimen during the break.N OTE9—The distance from the axis of support to the center of percussion may be determined experimentally from the period of small amplitude oscillations of the pendulum by means of the following equation:L5~g/4p2!p2where:L=distance from the axis of support to the center of percussion,m or[ft],FIG.3Cantilever Beam(Izod-Type)ImpactMachine FIG.4Jig for Positioning Specimen forClampingg=local gravitational acceleration(known to an accuracy of one part in one thousand),m/s2or[ft/s2],p= 3.1416(4p2=39.48),andp=period,s,of a single complete swing(to and fro)determined by averaging at least20consecutive and uninterrupted swings.Theangle of swing shall be less than5°each side of center.6.5The position of the pendulum holding and releasing mechanism shall be such that the vertical height of fall of the striker shall be61062mm[24.060.1in.].This will produce a velocity of the striker at the moment of impact of approxi-mately3.5m[11.4ft]/s.(See Note10.)The mechanism shall be so constructed and operated that it will release the pendulum without imparting acceleration or vibration to it.N OTE10—V5~2gh!0.5where:V=velocity of the striker at the moment of impact(m/s),g=local gravitational acceleration(m/s2),andh=vertical height of fall of the striker(m).This assumes no windage or friction.6.6The effective length of the pendulum shall be between 0.33and0.40m[12.8and16.0in.]so that the required elevation of the striker may be obtained by raising the pendulum to an angle between60and30°above the horizontal.6.7The machine shall be provided with a basic pendulum capable of delivering an energy of2.760.14J[2.0060.10 ft·lbf].This pendulum shall be used with all specimens that extract less than85%of this energy.Heavier pendulums shall be provided for specimens that require more energy to break. These may be separate interchangeable pendulums or one basic pendulum to which extra pairs of equal calibrated weights may be rigidly attached to opposite sides of the pendulum.It is imperative that the extra weights shall not significantly change the position of the center of percussion or the free-hanging rest point of the pendulum(that would consequently take the machine outside of the allowable calibration tolerances).A range of pendulums having energies from2.7to21.7J[2to16 ft·lbf]has been found to be sufficient for use with most plastic specimens and may be used with most machines.A series of pendulums such that each has twice the energy of the next will be found convenient.Each pendulum shall have an energy within60.5%of its nominal capacity.6.8A vise shall be provided for clamping the specimen rigidly in position so that the long axis of the specimen is vertical and at right angles to the top plane of the vise.(See Fig.1.)This top plane shall bisect the angle of the notch with a tolerance of0.12mm[0.005in.].Correct positioning of the specimen is generally done with a jig furnished with the machine.The top edges of thefixed and moveable jaws shall have a radius of0.2560.12mm[0.01060.005in.].For specimens whose thickness approaches the lower limiting value of3.00mm[0.118in.],means shall be provided to prevent the lower half of the specimen from moving during the clamping or testing operations(see Fig.4and Note11.)N OTE11—Some plastics are sensitive to clamping pressure;therefore, cooperating laboratories should agree upon some means of standardizing the clamping force.One method is using a torque wrench on the screw of the specimen vise.If the faces of the vise or specimen are notflat and parallel,a greater sensitivity to clamping pressure may be evident.See the calibration procedure in Appendix X2for adjustment and correction instructions for faulty instruments.6.9When the pendulum is free hanging,the striking surface shall come within0.2%of scale of touching the front face of a standard specimen.During an actual swing this element shall make initial contact with the specimen on a line22.0060.05 mm[0.8760.002in.]above the top surface of the vise. 6.10Means shall be provided for determining the energy expended by the pendulum in breaking the specimen.This is accomplished using either a pointer and dial mechanism or an electronic system consisting of a digital indicator and sensor (typically an encoder or resolver).In either case,the indicated breaking energy is determined by detecting the height of rise of the pendulum beyond the point of impact in terms of energy removed from that specific pendulum.Since the indicated energy must be corrected for pendulum-bearing friction, pointer friction,pointer inertia,and pendulum windage,in-structions for making these corrections are included in10.3and Annex A1and Annex A2.If the electronic display does not automatically correct for windage and friction,it shall be incumbent for the operator to determine the energy loss manually.(See Note12.)N OTE12—Many digital indicating systems automatically correct for windage and friction.The equipment manufacturer may be consulted for details concerning how this is performed,or if it is necessary to determine the means for manually calculating the energy loss due to windage and friction.6.11The vise,pendulum,and frame shall be sufficiently rigid to maintain correct alignment of the hammer and speci-men,both at the moment of impact and during the propagation of the fracture,and to minimize energy losses due to vibration. The base shall be sufficiently massive that the impact will not cause it to move.The machine shall be so designed,con-structed,and maintained that energy losses due to pendulum air drag(windage),friction in the pendulum bearings,and friction and inertia in the indicating mechanism are held to a minimum.6.12A check of the calibration of an impact machine is difficult to make under dynamic conditions.The basic param-eters are normally checked under static conditions;if the machine passes the static tests,then it is assumed to be accurate.The calibration procedure in Appendix X2should be used to establish the accuracy of the equipment.However,for some machine designs it might be necessary to change the recommended method of obtaining the required calibration measurements.Other methods of performing the required checks may be substituted,provided that they can be shown to result in an equivalent accuracy.Appendix X1also describes a dynamic test for checking certain features of the machine and specimen.6.13Micrometers—Apparatus for measurement of the width of the specimen shall comply with the requirements of Test Methods D5947.Apparatus for the measurement of the depth of plastic material remaining in the specimen under the notch shall comply with requirements of Test Methods D5947, provided however that the one anvil or presser foot shall be a tapered blade conforming to the dimensions given in Fig.5.The opposing anvil or presser foot shall be flat and conforming to Test Methods D 5947.7.Test Specimens7.1The test specimens shall conform to the dimensions and geometry of Fig.6,except as modified in accordance with 7.2,7.3,7.4,and 7.5.To ensure the correct contour and conditions of the specified notch,all specimens shall be notched as directed in Section 8.7.1.1Studies have shown that,for some materials,the location of the notch on the specimen and the length of the impacted end may have a slight effect on the measured impact resistance.Therefore,unless otherwise specified,care must be taken to ensure that the specimen conforms to the dimensions shown in Fig.6and that it is positioned as shown in Fig.1or Fig.2.7.2Molded specimens shall have a width between 3.0and 12.7mm [0.118and 0.500in.].Use the specimen widthasN OTE 1—These views not to scale.N OTE 2—Micrometer to be satin-chrome finished with friction thimble.N OTE 3—Special anvil for micrometer caliper 0to 25.4mm range (50.8mm frame)[0to 1in.range (2-in.frame)].N OTE 4—Anvil to be oriented with respect to frame as shown.N OTE 5—Anvil and spindle to have hardened surfaces.N OTE 6—Range:0to 25.4mm [0to 1in.in thousandths of an inch].N OTE 7—Adjustment must be at zero when spindle and anvil are in contact.FIG.5Early (ca.1970)Version of a Notch-DepthMicrometerspecified in the material specification or as agreed upon between the supplier and the customer.All specimens having one dimension less than 12.7mm [0.500in.]shall have the notch cut on the shorter side.Otherwise,all compression-molded specimens shall be notched on the side parallel to the direction of application of molding pressure.(See Fig.6.)N OTE 13—While subsection 7.5requires perpendicular pairs of plane parallel surfaces,the common practice has been to accept the non-parallel drafted surfaces formed when directly injection molding specimens for Izod ers must be aware that employing a trapezoidal section rather than a rectangular section may lead to data shifts and scatter.Unequal stress,created by clamping in the fracture region and dynamic twisting,caused by uneven striking of the specimen are prone to occur when the faces of the specimen are not parallel.Interlaboratory compari-sons must clearly spell out the specimen preparation conditions.7.2.1Extreme care must be used in handling specimens less than 6.35mm [0.250in.]wide.Such specimens must be accurately positioned and supported to prevent twist or lateral buckling during the test.Some materials,furthermore,are very sensitive to clamping pressure (see Note 11).7.2.2A critical investigation of the mechanics of impact testing has shown that tests made upon specimens under 6.35mm [0.250in.]wide absorb more energy due to crushing,bending,and twisting than do wider specimens.Therefore,specimens 6.35mm [0.250in.]or over in width are recom-mended.The responsibility for determining the minimumspecimen width shall be the investigator’s,with due reference to the specification for that material.7.2.3Material specification should be consulted for pre-ferred molding conditions.The type of mold and molding machine used and the flow behavior in the mold cavity will influence the impact resistance obtained.A specimen taken from one end of a molded plaque may give different results than a specimen taken from the other end.Cooperating laboratories should therefore agree on standard molds con-forming to the material specification.Practice D 3641can be used as a guide for general molding tolerances,but refer to the material specification for specific molding conditions.7.2.4The impact resistance of a plastic material may be different if the notch is perpendicular to,rather than parallel to,the direction of molding.The same is true for specimens cut with or across the grain of an anisotropic sheet or plate.7.3For sheet materials,the specimens shall be cut from the sheet in both the lengthwise and crosswise directions unless otherwise specified.The width of the specimen shall be the thickness of the sheet if the sheet thickness is between 3.0and 12.7mm [0.118and 0.500in.].Sheet material thicker than 12.7mm shall be machined down to 12.7mm.Specimens with a 12.7-mm square cross section may be tested either edgewise or flatwise as cut from the sheet.When specimens are tested flatwise,the notch shall be made on the machined surface ifthemmin.A 10.1660.050.40060.002B 31.861.0 1.2560.04C 63.562.0 2.5060.08D 0.25R 60.050.010R 60.002E12.7060.200.50060.008FIG.6Dimensions of Izod-Type TestSpecimen。
- 1、下载文档前请自行甄别文档内容的完整性,平台不提供额外的编辑、内容补充、找答案等附加服务。
- 2、"仅部分预览"的文档,不可在线预览部分如存在完整性等问题,可反馈申请退款(可完整预览的文档不适用该条件!)。
- 3、如文档侵犯您的权益,请联系客服反馈,我们会尽快为您处理(人工客服工作时间:9:00-18:30)。
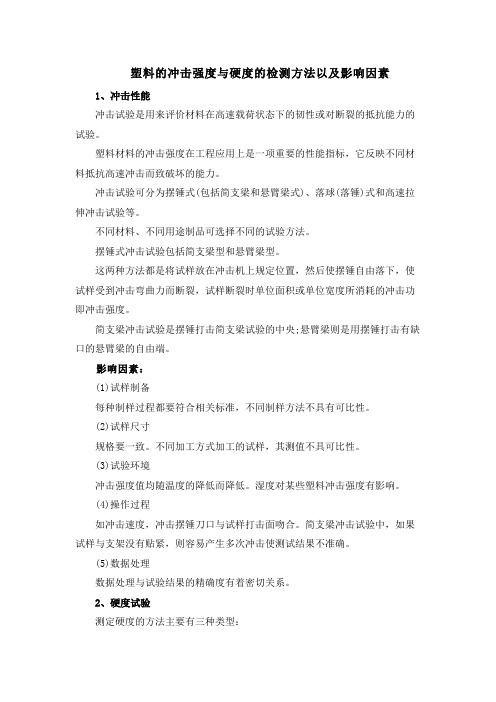
图 2 悬臂梁试验方法 E 的台钳、试样、冲击边的相互关系 于 IZOD 冲击强度小于 27J/m(0.5 英尺·磅/英寸)的材料(见附录×5)。用试验方法 C 所获得的抛掷修正只是对抛掷误差的一个大致估计,这是由于在再抛掷试样过程中,转 速与线速不可能与原来的抛掷相同以及试样中贮存的应力在试样断裂过程中会作为动 能释放出来的原因。
3 术语
3.1 定义:与塑料有关的定义见术语 D883。 3.2 本标准的特定术语的定义 3.2.1 悬臂:一条仅固定一端的突出梁。 3.2.2 V 型口敏感性: 一种评定 V 型缺口半径的作用影响而造成冲击能量差别的 测量方法。
4 试验种类
4.1 本试验方法中共有 4 个相似方法(见注 5)。所有方法使用相同的试验和样品 尺寸。从不同试验方法得到结果不具有相关性。
ASTM D256-1997
塑料的悬臂梁冲击性能检测的标准试验方法
本标准以固定编号 D256 出版,紧接在编号后的数字表示本方法当次被采用的年份,或在修订情况下表示最近 一次修订的年份。括号内的数字表示最近一次批准的年份。右上角希腊字母表示从最近一次修订或批准后的编辑改 变。
1 适用范围
1.1 本测试方法适用于塑料耐挠曲冲击破损性的测定,用安装在“标准化”仪器中 的“标准化”(注 1)摆锤作一次摆动,使标准试样断裂,试样所吸收的能量来表示。本 测试方法的标准试验要求试样有一道铣成的缺口(注 2)。在试验方法 A、C 和 D 中, 缺口处的强度集中从而导致脆性而非韧性断裂。在试验方法 E 中,通过将有缺口的试样 180°反向固定在台钳中,可得冲击强度。所有试验结果按每单位试样宽度或切口处的 面积所吸收的能量报出。
1
所有安全问题。使用者有必要制定适当的安全和健康条例,并在使用前确定规章制度的
适用范围。 注 4:本试验方法仅在标题上相似于 ISO180:1993,内容显著不同。
2 参考文献
2.1 ASTM 标准 D618 测试用塑料和电绝缘材料的状态调节技术 D883 塑料有关的术语 D3641 模塑和挤出的热塑性塑料的注塑成型试验样品的标准制样方法 D4000 特定塑料的材料的分类系统 D4066 尼龙注射和挤出材料的规格 D4812 塑料的引人注意的悬臂梁冲击强度的试验方法 E691 为测定试验方法精密度而进行的实验室间研究技术 2.2 ISO 标准 ISO180:1993 塑料—悬臂梁冲击强度的测定
擦产生的阻力)所耗的能量; 5.3.8 在冲击线处使试样被压入或产生塑性形变消耗的能量; 5.3.9 克服冲击端(或摆的其它部分)擦过弯曲试样表面所引起的摩擦阻力消耗的
能量。 5.4 对于相对较脆的材料,由于其裂纹扩展能量与引发断裂的能量相比很小,因此,
在实际应用中,所指示的吸收冲击能量就是 5.3.1 和 5.3.3 的总和。在试验相对较密和较 脆的材料时,抛掷修正(见 5.3.3)可相当于吸收总能量的大部分。试验方法 C 已应用
正计算的图或表。如图 3 所示为一种类型的仪器。如图 4 所示为试样定位夹具的一种设 计图样。详细要求在下述段落中给出,检验和校正仪的通用方法在附录 X1 中给出,另 外还应由制造厂家提供一份调节特定仪器的附加操作说明。
6.3 摆应由单元件或多元件摆臂和摆头组成,摆臂一端连有一轴承,另一端为一冲 击端组成的摆头。摆臂也须足够坚固,以维持仪器部件和试样间正确的间隙和几何关系,
5 意义和用途
5.1 在用本试验方法处理样品前,应制定被测试材料的规格说明作为参考。材料规
格说明所包括的试验样品制备、状态调节、大小规格和试验参数应在该部分试验方法提
供,如果没有材料规格说明,那么可利用缺省条件来做。 5.2 附加能量摆锤冲击试验表征的是在试样安装、开口(应力集中)和摆锤冲击速
度的规定条件下规定尺寸的标准试样的断裂能量。 5.3 在试样断裂过程中,摆锤损失的能量是下列所需能量的总和: 5.3.1 引发试样断裂的能量; 5.3.2 使裂纹在试样上扩展的能量; 5.3.3 抛掷断裂试样的自由端(一块或几块)所耗的能量(即“抛掷修正”); 5.3.4 弯曲试样的能量; 5.3.5 摆臂产生振动所耗的能量; 5.3.6 机框或底座产生振动或水平移动所耗的能量; 5.3.7 克服摆轴承和附加能量指示机构产生的摩擦阻力以及克服风阻(摆与空气摩
注 2:IZOD 试样上的缺口有助于集中应力,减小塑料形变,使断裂对准缺口后的 部分试样,这样就减少了断裂能量的分散。但是,由于塑料的弹性和粘弹性之间的差别, 材料间应有不同的给定缺口。塑料“缺口灵敏度”衡量可用试验方法 D,即通过比较具 有相同缺口的试样的断裂能量来获得,除了缺口底部半径不同外,其它都相同。
另一边间的裂纹至少有 90%。 NB 非断裂——是一种不完全断裂,在凹痕尖角至另一边间的裂纹扩展没有达到
90%。(只是弯了,可能有应力发白现象产生) 对于坚韧的材料来说,摆锤未必有足够的能量来使最厉害的纤维完全断裂和抛掷 断裂样块(一块或几块)。由不断裂试样所得的结果应认为是对标准的偏离,且不应作 为标准结果予以记录。对任何两种经历不同破损种类(见方法中代码的定义)的材料, 其冲击值不能直接用来对比。同样,报出的平均值也须由只包括单个破损种类的试样 而得来的。此字母代码将标在报出的冲击值后面,以用来鉴明与报出值有关的破损种 类。假如对于一种样品,观察到的破损种类不只一种的话,那么报告中就应标明每种 破损种类的平均冲击值,然后再在后面标上以此种方式破损的试样百分数,并附上字 母代码。 5.9 这些冲击试验方法得出的值主要用于质量控制和材料规格方面。假如假定相 同的材料的两组试样显示出明显不同的能量吸收、断裂类型、临界宽度或临界温度的 话,则可假定它们是由不同材料制成的或是暴露在不同的加工或状态调节环境中的。 在这些试验条件一种材料显示出两倍于另一种材料的能量吸收的事实并不能表明在另 一套试验条件下也存在同样的关系,在不同的试验条件下,韧度的顺序甚至会反过来。
5.5 对于坚韧、柔软、纤维填充或棉布层压材料,裂纹扩展能量(见 5.3.2)比引发断 裂能量(见 5.3.1)要大。在试验这些材料时,该因素(见 5.3.2,5.3.5 和 5.3.9)就变得相当 显著了,甚至在试样是准确机加工和定位及仪器状况良好,有足够的能量时也是如此(注 6)。弯曲能量(见 5.3.4)和压痕损失能量(见 5.3.8)在试验软材料会变得相当显著。
注 1:此摆锤式冲击试验仪已经“标准化”,即它们须符合某些要求,包括要有一个 固定的摆锤下落高度,使得摆锤冲击时的冲击速度固定不变。但是,对具有不同冲击强 度的试样使用具有不同初始能量的摆锤(初始能量的不同可通过改变摆锤的有效重量来 产生)。另外,也允许仪器制造厂家使用不同的摆长和摆结构可能会产生摆锤刚性的不 同(见第 5 节)以及其它一些仪器设计上的差别。试样的“标准化”是指试样要求具有 定长、定厚和一个特殊设计的铣成缺口,而试样宽度允许在一定范围内变动。
注 6:仪器框架和底座应是足够坚固和结实的,以使其能测试坚韧试样而不会产生 移动和过量振动,但设计必须保证冲击的中心在摆锤中心。当使用脆性试样时,保证冲 击端精确定位在冲击中心处会减少摆臂的振动。但是,对于较坚韧的试样,即使在冲击
4
端是正确定位时,也会产生由于摆臂振动及作摆臂设计的部分修正而引起的一些损失。 5.6 在一台有足够坚固性和足够重的精心设计的仪器上,由于 5.3.6、5.3.7 引起的
注 5:简支梁试验方法 B 已被移走,并用新标准重新出版。 4.1.1 在试验方法 A 中,试样是以垂直悬臂梁形式夹持的,摆锤作一次摆动冲击使 试样断裂,初始冲击线与试样夹具,缺口中心线等距且位于有缺口的一面上。 4.1.2 试验方法 C 与 A 类似,但增加了对抛掷部分试样所有消耗的能量的测定程 序,此读出值可称作“估计净 IZOD 冲击强度”。试验方法 C 对于缺口 IZOD 冲击强度 小于 27J/m(0.5 英尺·磅力/英寸)的材料比试验方法 A 要好,而对于 IZOD 冲击强度 高于此值的材料来讲,试验方法 A 和 C 之间的差别就不很重要了。 4.1.3 试验方法 D 提供了材料缺口灵敏度的测量,缺口处的应力集中随半径的递减 而增加。 4.1.3.1 对于一个给定的系统,较大的应力集中会导致较高的局部应变速率,由于 应变速率对断裂能量的影响会随材料而改变,因此可通过测量具有不同缺口半径的试样
注 3:在整理这些标准试验方法的结果时须小心,下述试验参数会对试验结果有明 显的影响:
加工方法,包括但不只限于加工工艺,模制条件,模具设计和热处理; 开缺口方法; 缺口工具的速度; 缺口仪器的设计; 缺口的质量; 开缺口和试验间的时间; 试样厚度、缺口后的试样厚度及状态调节环境。 1.2 以 SI 单位制表示的值作为标准值,而括号内的值仅供参考。 1.3 本方法可能包含危险的物质操作和设备,这个标准没有提供与它的使用有关的
5.8 按以下四个代码的种类中的一个,记录每个试样的破损类型: C 完全断裂——试样分成两段或多段的断裂。 H 铰链断裂——是一种不完全断裂,试样的一部分不能使自身支撑在水平上的位
置,而另一部分仍保持垂直(二部分间夹角小于 90°)。(破裂试 样的两段只是由很薄的表皮连接在一起,而且这种铰链没有任何 残留刚性。) P 部分断裂——也是一种不完全断裂,但不符合绞链断裂定义,但在凹痕尖角至
2
来获得对此影响的量度。在 IZOD 型试验中,已经证明了只要所有试样都具有相同的断 裂类型(见 1.8 和 22.1),则断裂能量对缺口半径的函数关系,在半径为 0.03~2.5mm (0.001~0.100in)间会呈现相当好的线性。
4.1.3.2 对于此试验来讲,除非 1.0mm 半径试验给出“不断”的结果,否则都可使 用半径在 0.25~1.0mm(0.010~0.04.0in)间的直线的斜率 b(见 22.1),在那种不断的情 况下,要使用 0.25~0.50mm(0.010~0.020in)半径。在此试验条件下,缺口半径对试样 冲击断裂能量的影响可用斜率 b 来衡量,对于具有低 b 值的材料来说,不论其标准缺口 下断裂能量是高还是低,对缺口半径的差别都相当不敏感;而对于具有高 b 值的材料来 说,其断裂能量则高度依赖于缺口半径。斜率 b 不能用于设计计算中,但可以供设计者