爱多油烟机说明书
烟机操作规程
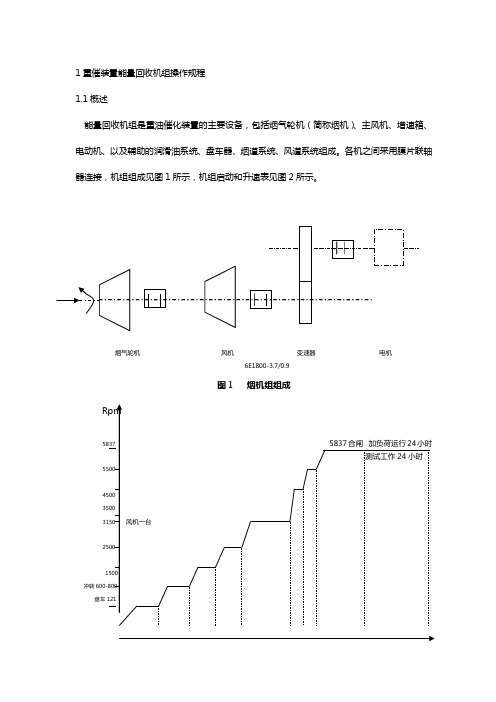
1重催装臵能量回收机组操作规程1.1概述能量回收机组是重油催化装臵的主要设备,包括烟气轮机(简称烟机)、主风机、增速箱、电动机、以及辅助的润滑油系统、盘车器、烟道系统、风道系统组成。
各机之间采用膜片联轴器连接,机组组成见图1所示,机组启动和升速表见图2所示。
烟气轮机风机变速器电机6E1800-3.7/0.9冲转盘车20分 30分 30分 30分 1小时 0.5 0.5 24小时 72小时时间(小时)图2 机组启动和升降表烟机将再生烟气中的热能和压力能膨胀作功,转变为机械能。
烟机输出的功率用来驱动主风机,从而达到能量回收的目的。
主风机负责供给再生器、外取热器烧焦需要的氧气,保证催化剂流化的动力空气,并维持再生器压力,它能否正常运转直接关系到整个装臵的正常生产,因此,必须坚持以下原则:----------- 在任何情况下,必须确保设备的安全,必与反应岗位紧密配合,克服一切困难,保证热平衡所需要的氧气,保证再生器流化需要的风量和压力;----------- 机组的仪表自控系统必须灵敏、准确,自保系统确实可靠;----------- 对机组的微小变化都要及时发现,找清原因,及时处理。
在再生器压力波动时,严防主风机飞动,更不允许催化剂倒流入机体内。
1.2 机组性能参数2机组性能参数2.1主风机型号: D800-330工艺编号: M-101轴功率: 2880KW最大流量: 800Nm3/min设计流量: 720 Nm3/min最小流量:进口温度(年平均): 30℃进口压力:0.098MPa(A)排出压力: 0.32 MPa(A)工作转速: 6899r/min第一临界转速: 3513 r/min第二临界转速:8512 r/min出口温度:170℃生产厂家:沈阳鼓风机(集团)有限公司2.2电动机型号: YKS710-4额定功率: 3200KW电压: 10000V频率: 50Hz工作转速: 1486 r/min额定电流: 221.2A满载效率:满载功率因数: 0.87临界转速:绝缘等级: F级转向:从烟机端顺时针生产厂家:佳木斯电机股份有限公司2.3变速箱型号: GYR-660-3200/4.64传动比: 6899/1486传动型式:渐开线齿形传动功率: 3200KW高速轴临界转速:低速轴临界转速:工作转速:生产厂家:沈阳鼓风机(集团)有限公司2.4烟气轮机型号: YL-3000型烟气轮机进气温度: 680℃进气压力P1: 0.23 MPa(A)排气温度: 563℃排气压力P2: 0.108 MPa(A)进口流量: 700 Nm3/min一级临界转速转向:从烟机端看逆时针效率: 81%工作转速: 6899 r/min输出功率: 2150KW生产厂家:兰州石化机械厂2.5电动盘车器型号: DRC-16-900-R-D1/7F-PS-P-PK 盘车转速: 46 r/min电机型号: Y2-90L-4功率: 1.5KW电压: 380V转速: 1390 r/min工作力矩最大力矩生产厂家:江苏大中电机股份有限公司2.6主要辅助设备2.6.1高温平板闸阀型号: DN800设计温度: 700℃公称压力: 0.4 MPa(A)气源压力: 0.4 MPa(A)控制方式:风关风动全开(全关)时间:2.6.2 高温电液蝶阀型号:公称直径: DN800油源方式介质压力: 0.35 MPa(A)介质温度: 720℃2.6.3 风机入口蝶阀型号: LSHN-63控制方式:风关气源压力: 0.49 MPa(A)开∕关时间最大输出力矩最大开度灵敏度准确度介质温度:常温介质压力: 0.096 MPa(A)2.6.4 机组润滑油系统a) 油泵型号: HSA660-51流量: 570L/min 44 m3/h输出压力: 1.0 MPa轴功率: 18.5KW电机型号: Y2-180-M-4功率: 18.5KW转速: 1470电压: 380Vb) 冷油器型号: 721.253TV545冷却油量: 44.22m3/h冷却面积: 59.72m2耗水量: 41 m3/h设计入口水温:32℃设计出口水温:≰40℃c) 滤油器型号: 112.227TV424过滤油量: 96 m3/h过滤面积:过滤精度: 10umd) 油箱规格: 731.269TV506e) 高位油箱(2000L)规格: 741.171TG257f)N46防锈汽轮机油质量指标运动粘度(40℃):41.4mm2/s–50.6 mm2/s闪点(开口):≮180℃酸值:≯0.3mgKOH/g凝点:≯-7℃机械杂质:无水份:无破乳化时间(54℃):≯15min氧化后酸值达2.0mgKOH∕g时间:≮1500h3开机前的准备工作3.1润滑油系统3.1.1主油箱内装入合格的N46防锈汽轮机油,并使其处于正常油位。
爱多油烟机说明书

爱多油烟机说明书
摘要:
1.爱多油烟机的特点和功能
2.安装和使用方法
3.清洁和维护
4.安全注意事项
5.保修和联系方式
正文:
爱多油烟机是一款高品质的家电产品,它具有以下特点和功能:
1.高效抽吸:爱多油烟机采用高性能马达,能快速、准确地抽吸油烟,确保厨房空气清新。
2.低噪音:在抽吸油烟的同时,爱多油烟机还能保持低噪音,让您在烹饪时享受宁静的环境。
3.多功能照明:爱多油烟机配备LED 照明系统,提供充足的光线,方便您在烹饪时操作。
安装和使用方法:
1.在安装前,请确保油烟机与燃气灶之间有足够的距离,以确保安全和空气流通。
2.根据说明书中的图示,正确连接油烟机的进风口、出风口和排烟管道。
3.接通电源,打开燃气灶,然后开启油烟机。
4.使用时,请确保油烟机的进风口和出风口畅通,以确保高效抽吸。
清洁和维护:
1.定期清洁油烟机的进风口、出风口和过滤网,以确保油烟机的抽吸效果。
2.使用中性清洁剂和柔软的布擦拭油烟机的表面,避免使用腐蚀性清洁剂。
3.如有需要,可以联系售后服务人员进行专业清洁和维护。
安全注意事项:
1.使用前,请仔细阅读说明书,了解油烟机的使用方法和安全注意事项。
2.不要在油烟机进风口和出风口上覆盖物品,以免影响抽吸效果。
3.如果发现油烟机异常运行,请立即切断电源,并联系售后服务人员。
保修和联系方式:
1.爱多油烟机享有一年免费保修服务,请妥善保存购买发票和保修卡。
烟机说明书
1、概述.....................................................................(3)2、设计参数.................................................................(3)3、主要结构和系统...........................................................(4)4、安装说明.................................................................(7)5、烟气轮机的安装...........................................................(13)6、控制要求.................................................................(14)7、启动.....................................................................(14)8、运行.....................................................................(15)9、停机.....................................................................(16)A11、概述克拉玛依石化公司催化从50万吨/年处理量改造成80万吨/年,由于主风量从50000Nm3/h扩容改造至75000Nm3/h,而原有烟机(入口流量为975Nm3/min)未作相应改造,已不能满足全部烟气能量回收的要求,大量能量被浪费,而且原有烟机由于受材料使用温度的限制,只能在660℃以下温度运行,故本次烟机系统改造更新一台与80万吨/年催化装置相配套的烟气轮机,烟气轮机型号为YL-4000D(轮盘直径为Ф820mm),更新后的烟机利用原有基础并保证机组整体标高不变。
抽油烟机说明书
抽油烟机说明书抽油烟机说明书产品介绍抽油烟机是一种家用厨房电器,用于吸收和排除烹饪过程中产生的油烟、烟雾和异味。
它通过强力的排风系统将油烟和污染物排出室外,确保厨房空气清新,保护用户的健康。
安装要求在安装抽油烟机之前,请确保以下条件已满足:- 安全距离:抽油烟机上方至炉灶底部的最低距离应为700mm。
- 确保厨房通风良好,以便排放油烟和异味。
- 电源:确保有符合电源要求的插座。
- 合适的排气管道:抽油烟机需要与排气管道相连,确保油烟能够顺利排出室外。
- 所需工具:安装所需的工具包括螺丝刀、电钻、水平尺等。
安装步骤按照以下步骤安装抽油烟机:1. 准备工作- 找到合适的安装位置,确保距离炉灶合适。
- 确保有必要的安装工具和材料。
2. 安装固定架- 使用水平尺测量抽油烟机上方距离,标记出安装位置。
- 钻孔并安装固定架,确保稳固牢固。
3. 连接排气管道- 将合适的排气管道与抽油烟机连接。
确保连接牢固,无泄漏。
4. 安装抽油烟机- 将抽油烟机安装到固定架上。
确保安装平稳,能够支撑好重量。
5. 完成安装- 确保抽油烟机已正确安装,牢固稳定。
- 接通电源,测试抽油烟机的功能是否正常。
使用方法开机和关机- 开机:按下电源按钮,抽油烟机开始工作。
- 关机:再次按下电源按钮,抽油烟机停止工作。
选择风速- 抽油烟机通常设置有多个风速档位,用户可以根据需要选择适当的风速。
- 适当的风速可以更好地吸收油烟和异味。
定期清洁- 为保证抽油烟机的正常运行和长寿命,建议定期对它进行清洁。
- 清洁前,请先断电并等待抽油烟机完全冷却。
- 使用清洁剂和软布擦拭抽油烟机的外壳和内部零件。
- 清洁过程中,不要将水或清洁剂直接喷洒到电机部分。
注意事项- 在使用抽油烟机前,请确保电源已经接通,同时确保油烟机的插头和电源插座配对无误。
- 不要将易燃物体放置在抽油烟机附近,以免发生火灾。
- 在清洁抽油烟机时,请务必断电,并等待它完全冷却后再进行清洁工作。
爱多乐A1使用说明书

目录目录..................................................................................................................................................... 1外观描述产品简介..........................................................................................................................2 桌面.................................................................................................................................................3 锁屏界面......................................................................................................................................... 4预装程序.......................................................................................................................................... 5状态和通知区.................................................................................................................................. 6电源键的用法.................................................................................................................................. 7设备充电及注意事项......................................................................................................................电池的日常保养............................................................................................................................. 8用USB数据线连接电脑拷贝资料................................................................................................ 9相机..................................................................................................................................................拍摄图片.....................................................................................................................................录制视频.....................................................................................................................................全景拍摄..................................................................................................................................... 10查看平板文件内容........................................................................................................................复制拷贝文件.............................................................................................................................删除文件..................................................................................................................................... 11音乐................................................................................................................................................播放音乐.....................................................................................................................................将歌曲添加到新的播放列表.....................................................................................................删除播放列表.............................................................................................................................12 超清播放器...................................................................................................................................13 拨打电话.......................................................................................................................................14 软件安装与卸载...........................................................................................................................连接无线WIFI 下载安装程序 .................................................................................................本机安装程序.............................................................................................................................卸载程序..................................................................................................................................... 15浏览器............................................................................................................................................输入法设置................................................................................................................................. 16外接U盘使用............................................................................................................................... 17TF卡的使用................................................................................................................................... 18有线上网连接……………………………………….....................................................................19 无线WIFI 网络连接设置 ...........................................................................................................20 设置菜单功能介绍....................................................................................................................... 21常见问题........................................................................................................................................ 附录.建议可选配件及型号................................................................................................................致谢·非常感谢您选择了AD LOVE爱多乐产品。
油烟机的使用方法

油烟机的使用方法
油烟机作为厨房中重要的厨房电器,能够有效地吸收和排除厨房中产生的油烟
和异味,保持厨房空气清新。
正确的使用油烟机不仅可以延长其使用寿命,还能更好地发挥其功能。
下面将介绍油烟机的使用方法,希望能为您带来帮助。
1. 安装位置,油烟机的安装位置应选择在灶台正上方,距离灶台表面不宜过高
或过低,一般为60-75厘米。
这样可以更好地吸收油烟和异味。
2. 使用开关,使用油烟机时,首先应打开油烟机的主电源开关,然后再打开油
烟机的风机开关。
在使用完毕后,应先关闭风机开关,再关闭主电源开关。
3. 调节风速,大多数油烟机都具有多档风速调节功能,根据不同的烹饪情况可
以选择不同的风速。
一般来说,烹饪时可选择高风速,而炒菜、煎炸等产生大量油烟时可选择中高速或高速,煮汤、煮粥等清淡菜肴可选择低速。
4. 定时功能,一些高档的油烟机还具有定时功能,可以根据需要设定吸烟时间,使用起来更加方便。
5. 定期清洁,油烟机在长时间使用后,油烟会附着在油烟机的风叶和过滤网上,影响吸烟效果,因此需要定期清洁。
一般建议每1-2个月清洁一次,清洁时可以拆
下过滤网,用清水或中性洗涤剂清洗,然后晾干后安装回原位。
6. 更换滤网,一些油烟机的过滤网是可拆卸式的,使用一段时间后需要更换新
的过滤网,以保证油烟机的吸烟效果。
7. 注意安全,在清洁和更换滤网时,应先关闭油烟机的电源开关,以免发生意外。
总之,正确的使用和保养油烟机对于保持厨房空气清新和延长油烟机的使用寿
命非常重要。
希望以上介绍的油烟机使用方法能够帮助您更好地使用和保养油烟机。
油烟机说明书模板

油烟机说明书模板一、产品概述感谢您选择我们的油烟机产品。
本说明书旨在向用户介绍如何正确使用和维护油烟机,以确保产品的正常运行和提供更好的使用体验。
二、产品特点1.xxx(列举产品特点,如噪音小、抽风效果好等)2.xxx3.xxx三、安装准备在安装油烟机之前,请务必阅读以下内容:1.确认安装地点是否满足油烟机的尺寸和安装要求;2.确保安装地点附近有适配的电源和排风管道;3.清洁安装地点,避免安装时遗留杂物;4.准备好所需的安装工具。
四、安装步骤1.使用合适的工具在安装地点的墙面上标出安装孔的位置;2.使用电钻钻孔,并将塑料膨胀管插入孔中;3.将支架固定在安装孔上;4.将油烟机底座置于支架上,并用螺丝固定;5.将排风管道连接至油烟机和墙口。
五、使用须知1.在使用油烟机之前,请确保插头已正确插入电源插座;2.打开油烟机的电源开关;3.使用前请先确保手部干燥,避免触碰油烟机内部;4.请定期清洁油烟机,以确保其正常运行;5.使用中若出现异常情况,请立即关闭电源,并联系售后服务。
六、维护保养1.定期清洁油烟机的外壳和过滤网,以保持其外观整洁;2.按照说明书的要求更换油烟机的过滤网和炭包;3.避免使用腐蚀性或破坏性的清洁剂清洁油烟机;4.定期检查排风管道是否畅通,如有堵塞应及时清理。
七、常见问题与解答Q:油烟机启动后不能正常工作怎么办?A:首先请检查电源是否接好,若电源无问题,则可能是油烟机内部设备故障,建议联系售后服务。
(根据实际产品情况列举其他常见问题和解答)八、售后服务如您在使用过程中遇到任何问题,请随时联系我们的售后服务部门,我们将竭诚为您提供解决方案。
九、免责声明本说明书仅供参考,我们对因操作不当、非法操作或对产品进行非授权维修等造成的任何损失不承担责任。
最后,再次感谢您购买我们的油烟机产品。
希望本说明书能为您提供到具体的操作指引和维护方法,享受洁净的厨房环境。
如有其他疑问,请随时与我们联系。
Electrolux 电器范 hood 用户手册说明书
2 3WE’RE THINKING OF YOUT hank you for purchasing an Electrolux appliance.You’ve chosen a product that brings with it decadesof professional experience and innovation. Ingeniousand stylish, it has been designed with you in mind.So whenever you use it, you can be safe in theknowledge that you’ll get great results every time.Welcome to Electrolux.BEFORE USING YOUR APPLIANCEB efore you use the rangehood, we recommend that youread through the whole user manual which providesthe description of the rangehood and its functions. Toavoid the risks that are always present when you use anelectrical appliance, it is important that the rangehood isinstalled correctly and that you read the safety instructions carefully to avoid misuse and hazards.F or future reference, please store this booklet in asafe place.CONDITIONS OF USEThis appliance is intended to be used in household andsimilar applications such as:•S taff kitchen areas in shops, offices andother working environments•Farm houses•B y clients in hotels, motels and other residential type environments•Bed and breakfast type environmentsBEFORE YOU CALLPlease ensure you read the instruction manual fully before you call for service, or a full service fee could be applicable. RECORD MODEL AND SERIAL NUMBER HERE:Model:Serial No: CONTENTS3 Safety information4 Product description5 Dimensions6 Rangehood installation10 Using the rangehood11 Maintenance and cleaning12 Troubleshooting13Customer Care CenterLEGENDWARNING!This symbol indicates information concerning yourpersonal safety.CAUTION!This symbol indicates information on how to avoiddamaging the rangehood.IMPORTANT!This symbol indicates tips and information about use ofthe rangehood.ENVIRONMENT!This symbol indicates tips and information abouteconomical and ecological use of the rangehood.SAFETY INFORMATIONThis manual explains the proper use of your new Electroluxcanopy rangehood. Please read this manual carefullybefore using the product. This manual should be kept in asafe place for handy reference.This canopy rangehood is a domestic appliance which hasbeen manufactured and tested to comply with InternationalStandard IEC 60335.2.31.Read the following carefully to avoid damage or injury.This symbol indicates never to do thisThis symbol indicates always do thisWARNING!Follow these instructions carefully to avoid an electricshock orElectrical connectionCheck that the mains voltage matches with the voltage onthe data plate inside the canopy rangehood. Check thatthe installation complies with standards of local building,gas and electrical authorities. Before connecting to themains supply ensure that the mains voltage correspondsto the voltage on the rating plate inside the cooker hood.If the supply cord is damaged, it must be replaced bythe manufacturer or its service agent or similarly qualifiedperson in order to avoid a hazard.Safety warnings – For the installerWhen installing the cooker hood, make sure you adhereto the minimum and maximum distances from the cookerhood base to the hob surface (as per table on page 6).Exhaust installation: The following rules must bestrictly followed to obtain optimal air extraction.•Keep exhaust short and straight•Do not reduce the size or restrict exhaust•Keep bends in the exhaust to a minimum.•W hen using always install duct with helixpulled taut to minimise pressure loss.•F ailure to observe these basic instructions willdrastically reduce the performance and increase thenoise levels of the cooker hood.Exhaust air must not be discharged into a wall cavity,unless the cavity is designed for that purpose. The exhaustfrom the cooker hood must not be discharged into anyheating flue, which may carry combustion products fromother sourcesNOTE: Some installations may require the telescopicexhaust cover to be cut to length. Cut with sharp tinsnips or a fine-tooth hack saw blade, taking care not todistort or dent the exhaust cover.Fig. 24 5PRODUCT DESCRIPTION DIMENSIONS1 Ceiling mount bracket2 Telescopic flue cover set 34 Wall bracket5 Main body and fan housing assemblyGrease filtersadditional items required for installation•i x i F ngs required to attach rangehood body and anti tiltpoints.•i x i F ngs required to attach ceiling mounting bracket andhood bracket to the wall.•a c r o e p a t t c u D ble ties.Technical SpecificationPower supply: 220-240 Volts 50Hz. Connects to 7.5A power point.Lights: LED 1 x 8.5 watt, 12 Volt LEDFig. 3NOTE:1) T he fan housing transition duct is 180mm in diameter.2)Flue transition duct 180mm to 150mm is for external ventingand Recirculation mode.Fig. 56 7RANGEHOOD INSTALLATION WARNING!Refer to “Safety information” chapter.BEFORE INSTALLATIONBefore the installation of the appliance, record the information below from the rating plate. The rating plate is on the bottom of the appliance casing.Model PNC Serial number1. 2. Using a spirit level mark a vertical centre line on the wallwhere the hood is to be positioned, and a horizontal line at the hood base position (refer diagram below).NOTE: The height of the underside of the hood body must be a minimum of 600mm* to a maximum height of 800mm.* If the instructions of the hob specify a greater distance than the minimum above, then that shall be the minimum height for installation.Mark the location for flue cover wall mounting bracketsand cooker hood mounting points and anti-tilt fixing points above the hood base using the hood base as the reference point (Fig. 6).RANGEHOOD INSTALLATION (CONT)3. I nstall flue cover wall mounting brackets with suitablefixings. Install suitable screws for cooker hood mounting points (to support a total weight of 30kg) to the wall as marked (Fig. 6).Depending on the preferred installation/ducting mode,follow step 5a or 5b below.5a. Recirculating mode (Fig. 9).150mmFig 108 9RANGEHOOD INSTALLATION (CONT)RANGEHOOD INSTALLATION (CONT)6.Electrical connectioninstallation of telescopiccoversSeparate the inner and outer flue covers. Carefullyreassemble the upper and lower flue covers sections by sliding the inner into the outer flue cover. Carefully lower the assembled upper and lower flue covers onto the top of the rangehood body. and insert the flue cover into the rangehood body approximately 5mm. Fix upper flue cover to the wall mounting bracket with screws supplied. Ensure that the upper section is extended.NOTE: Carefully remove the plastic protective coating, if present, from the flue covers. Pay particular attention when removing protective plastic coating from decals.IMPORTANT!Care must be taken to ensure the screws are not cross threaded when attaching the upper flue cover. If installed in recirculating mode, insert the carbon filterTo complete the rangehood installation, insert the threefilters to the underside of the hood body. Place back edge of filter into position and push up front edge so that the filter clips into place.10 11MAINTENANCE AND CLEANINGCAUTION!• B efore maintenance or cleaning is carried out,the canopy rangehood should be disconnectedfrom the main power supply. Ensure that therangehood is switched off at the wall socket andthe plug removed.• E xternal surfaces are susceptible to scratchesand abrasions, so please follow the cleaninginstructions to ensure the best possible result is achieved without damage. • T hese instructions must be followed to avoid ariskStainless Steel SurfaceClean stainless steel surfaces using non-abrasive cleaning products that are specifically for use on stainless steel. To ensure best results also use an even pressure and follow the grain of the stainless steel. Use of a soft cloth reduces the risk of scratching. If the cloth is wet ensure that a dry soft cloth is used to wipe down the surface again reducing the risk of any surface rust appearing. Control panel surfaceThe control panel can be cleaned using warm soapywater. Ensure the cloth is well wrung before cleaning. Use a dry soft cloth to remove any excess moisture left after cleaning.Removing the metal grease ltersPush the grease filter towards the left side of the unit and then pull it down.Hand washingThe mesh filters can be cleaned by hand in warm soapy water. Soak in warm water and some washing up liquid. For stubborn grease stains use a soft nylon brush to help remove these stains. After cleaning ensure that the filters are completely dry before refitting.USING THE RANGEHOOD Standby modeWhen connecting the hood to the power supply for the first time or after power is returned after power outage, all symbols on the control panel will light up from left to right and a “beep” will sound once. Following this, the control panel goes to standby mode and the hood will be ready for use. Turning on hoodWhen the hood is in standby mode, user can either press the or button to turn on the fan or light individually. The default factory level is 2, following that, the hoodremembers the last used setting and will start at that level when the user presses the fan or light button. Pressing directly on the slider strip will also allow the user to jump straight into the level pressed.Fan – select speed to suit cooking conditions. – motor on/off 1 – light frying/boiling2 – frying/wok cooking/heavy boiling3 – grilling, intensive frying and wok cooking – stir fryingNOTE: Touch the symbol to turn the fan boost ON, the fan boost starts running at the highest fan speed for 1 minute before reducing to speed 3 automatically. Light – select light level – Light on/off 1 – low-light level 2 – mid-light level 3– high-light levelUsing the TimerAt the end of cooking, if the timer is switched on, therangehood will continue to run for an additional 5 minutes, depending on the selected fan speed. This should ensure the removal of any odours that remain after cooking.FilterThis is the indicator/switch to show when the filter needs to be cleaned. Once the filters are cleaned the “Filter” alert can be deactivated with a single touch.Control LockPress and hold 3 seconds the . button will lock the control panel at any time. The same action will unlock the control panel.When control is locked, pressing any other button will make . button blink and a beep will sound. • W hen the hood is working (light on and fan on) andis touched then hood will stop fan but keep lighting on while lock menu. • W hen the hood is working (lights off and fan on) andthe is touched then hood will stop fan and keep lighting off while lock menu. • W hen is activated when hood is working it will juststatus of lighting. • W hen is touched while hood stops then it will justlock the menuDishwasherPlace grease filters in the dishwasher. Select the mostpowerful washing program and highest temperature, atleast 65°C. Repeat the process. Refit the grease filterswhen they are dry. When washing the metal grease filterin the dishwasher a slight discolouration of the filter canoccur, this does not have any impact on it’s performance.Changing the lamps Lamps are long life LED lamps and should not require service. If there is an issue with lamps please contactService. Service contact details shown on page 13. Charcoal lter • T he charcoal should only be used if you want touse the hood in the recirculation function. • T his cannot be cleaned or re-used and as ageneral rule, the activated charcoal filter should be changed once every four months.• A lways specify the hood model code number andserial number when ordering replacement filters. This information is shown on the registration plate located on the inside of this unit. • R eplacement charcoal can be ordered from yourlocal Spare parts centre, contact details are shown on page 13.12 13TROUBLESHOOTINGIf you have completed all of the above checks and are still experiencing difficulty, please contact your local Electrolux Service Centre.NOTE: This product is fitted with a safety cutout device.•I f the cooker hood is installed too close to the cooktop, flambe cooking, operating the cooktop withoutcooking utensils and blocked filters may activatethe safety cutout device. If the hood stops duringoperation, correct the faults and allow time for thesafety cutout device to reset, the cooker hood will thenfunction correctly.•D o not operate cooktop without pots/pans•D o notunder cooktop。
- 1、下载文档前请自行甄别文档内容的完整性,平台不提供额外的编辑、内容补充、找答案等附加服务。
- 2、"仅部分预览"的文档,不可在线预览部分如存在完整性等问题,可反馈申请退款(可完整预览的文档不适用该条件!)。
- 3、如文档侵犯您的权益,请联系客服反馈,我们会尽快为您处理(人工客服工作时间:9:00-18:30)。
爱多油烟机说明书
以爱多油烟机说明书为标题,我们来详细介绍一下这款油烟机的使用方法和注意事项。
一、产品概述
爱多油烟机是一款家用油烟处理设备,旨在帮助用户有效减少厨房油烟的排放,保持室内空气清新。
它采用先进的油烟处理技术,具有高效净化、低噪音、易清洗等特点,是现代家庭厨房的理想之选。
二、产品外观和结构
1. 外观设计:爱多油烟机外观简约大方,采用高品质不锈钢材质,具有耐腐蚀、易清洗的特点。
外观颜色可根据用户需求选择,目前提供银色和黑色两种款式。
2. 结构组成:爱多油烟机由机身、油烟过滤系统、风机系统和控制面板等部分组成。
其中,机身为整体结构,油烟过滤系统和风机系统位于机身内部,控制面板位于机身侧面,方便用户进行操作。
三、使用方法
1. 安装:在使用爱多油烟机之前,首先需要将其正确安装在厨房墙壁上。
安装过程中,请确保油烟机与炉灶的距离符合安全要求,以免发生意外。
2. 通电:将爱多油烟机插头插入电源插座,确保供电正常。
在使用过程中,请注意不要将插头和电源线接触水或油脂,以免发生短路
或火灾。
3. 开关控制:爱多油烟机配备了智能控制面板,用户可通过面板上的按键来控制油烟机的开关、风速等功能。
按下开关键,油烟机开始工作;根据需要选择不同的风速档位,以适应不同的烹饪需求。
4. 净化过程:当油烟机开始工作后,油烟将通过油烟过滤系统被有效吸收和净化,确保不会外溢。
油烟处理完毕后,净化后的空气将通过排气管道排出,保持厨房空气清新。
5. 清洗维护:为了保证爱多油烟机的正常运行和使用寿命,我们建议用户定期进行清洗维护工作。
具体方法可参考产品附带的清洗手册,注意事项如下:
- 在进行清洗前,请确保油烟机已断电,以免发生触电事故。
- 使用中性洗涤剂和温水清洗机身表面,可搭配软布或海绵进行擦拭。
- 油烟过滤器可拆卸,建议每3个月进行清洗,可用清水冲洗并晾干后再安装回机身。
- 若油烟机长时间不使用,建议拔掉电源插头,并定期检查机身和排气管道是否有积尘或异物,如有需要及时清理。
四、注意事项
1. 请勿在使用过程中将易燃物品放置在油烟机周围,以防发生火灾。
2. 使用过程中,请勿将手指或其他物体伸入油烟机内部,以免发生意外伤害。
3. 请勿将油烟机用于除油烟以外的用途,以免损坏设备或引发安全隐患。
4. 当油烟机出现异常情况时(如异味、噪音过大等),请立即停止使用并联系售后服务。
5. 请勿更改油烟机的任何结构或参数,以免影响正常使用和安全性能。
6. 请定期检查电源线和插头是否损坏,如有问题请及时更换。
以上就是对爱多油烟机的详细介绍和使用说明。
希望通过本说明书能够帮助用户更好地使用和维护这款油烟机,为您的厨房环境提供安全、健康的保障。
如有更多疑问或需要进一步了解,请联系我们的售后服务。