新2800维修手册
VLT 2800 变频器操作说明书
DS-K2800 系列门禁控制主机用户手册说明书

DS-K2800系列门禁控制主机用户手册UD05671N关于本手册本手册描述的产品仅供中国大陆地区销售和使用。
本手册作为指导使用。
手册中所提供照片、图形、图表和插图等,仅用于解释和说明目的,与具体产品可能存在差异,请以实物为准。
因产品版本升级或其他需要,本公司可能对本手册进行更新,如您需要最新版手册,请联系我们。
我们建议您在专业人员的指导下使用本手册。
责任声明●在法律允许的最大范围内,本手册所描述的产品(含其硬件、软件、固件等)均“按照现状”提供,可能存在瑕疵、错误或故障,本公司不提供任何形式的明示或默示保证,包括但不限于适销性、质量满意度、适合特定目的、不侵犯第三方权利等保证;亦不对使用本手册或使用本公司产品导致的任何特殊、附带、偶然或间接的损害进行赔偿,包括但不限于商业利润损失、数据或文档丢失产生的损失。
●若您将产品接入互联网需自担风险,包括但不限于产品可能遭受网络攻击、黑客攻击、病毒感染等,本公司不对因此造成的产品工作异常、信息泄露等问题承担责任,但本公司将及时为您提供产品相关技术支持。
●使用本产品时,请您严格遵循适用的法律。
若本产品被用于侵犯第三方权利或其他不当用途,本公司概不承担任何责任。
●如本手册内容与适用的法律相冲突,则以法律规定为准。
前言符号约定在本文中可能出现下列标志,它们所代表的含义如下。
符号说明表示有中度或低度潜在危险,如果不能避免,可能导致人员轻微或中等伤害。
表示有潜在风险,如果忽视这些文本,可能导致设备损坏、数据丢失、设备性能降低或不可预知的结果。
表示是正文的附加信息,是对正文的强调和补充。
危险类文字,表示有高度潜在风险,如果不加避免,有可能造成人员伤亡的重大危险。
目录第1章产品主要功能 (1)第2章主板外观 (2)2.1正面外观说明 (2)2.1.1 单门禁控制主机正面外观 (2)2.1.2 双门禁控制主机正面外观 (3)2.1.3 四门禁控制主机正面外观 (4)2.2灯号及开关示意图及说明 (4)2.2.1 门禁控制主机灯号及开关示意图 (4)2.2.2 门禁控制主机组件说明 (5)第3章连接端子说明 (6)3.1连接端子及端子说明 (6)3.1.1 单门禁控制主机连接端子及端子说明 (6)3.1.2 双门禁控制主机连接端子及端子说明 (8)3.1.3 四门禁控制主机连接端子及端子说明 (10)3.2韦根读卡器接法 (13)3.3电锁安装示意图 (14)3.3.1 阴极锁安装示意图 (14)3.3.2 磁力锁/阳极锁安装示意图 (14)3.4外接报警设备示意图 (15)3.5开门按钮接线图 (15)3.6门禁侦测连接示意图 (16)3.7电源供应器安装示意图 (16)第4章设定 (17)4.1硬件初始化设定 (17)4.2报警继电器输出NO/NC状态示意图 (17)第5章激活及配置 (19)5.1通过SADP软件激活 (19)5.2通过客户端软件激活 (20)第6章门禁客户端操作 (23)6.1功能模块 (23)6.2用户登录 (26)6.3门禁系统配置 (27)6.4门禁管理 (28)6.4.1 设备管理 (29)6.4.2 人员配置 (55)6.4.3 计划模板 (68)6.4.4 门禁权限 (76)6.4.5 高级配置 (79)6.5门禁事件配置 (100)6.5.1 门禁事件 (100)6.5.2 门禁报警输入 (101)6.5.3 事件卡号联动 (101)6.6门禁跨设备联动 (103)6.6.1 添加门禁跨设备联动 (103)6.6.2 修改/删除门禁跨设备联动 (106)6.7门禁事件查询 (106)6.8状态监控 (108)6.8.1 门状态 (108)6.8.2 查看刷卡记录 (111)6.8.3 查看报警信息 (112)6.9布防控制 (113)第1章产品主要功能●32位高速处理器,性能强劲、速度快。
M280维修手册

M280设备维修手册一、M280设备产品规格及硬件电路1、规格2、布线图3、线路说明3.1电源转换和系统方框图3.1.1电源转换:系统主要由电池供电,电池正常工作电压3.7~4.2V,其余系统电源均由此电压转换而来A.VCCX是由电池电压通过MOS管V1转换而来;B.VCCX2是开机后通过V2和V11转换而来C.VCC_RTC是由VCCX通过N8转换而来,并且是一直存在的电源;D.VCC3.3V和VCC1.8V是开机后,由VCCX通过N4转换而来,是系统电源;E.背光电源是由VCCX转换成VAVDD后,再通过升压电路而来F.HDMI和USB 5V均是由通过升压芯片N5转换而来G. CPU 需VCC2.5VA由SYSTERM 3.3V转换而来。
H.DDR/CPU Core 需VCCK 1.25V 由VCCx转换而来I.DDRII&Codec 需1.8V由VCCx转换而来下图为M280电源转换图CoreGPIO,NAND,LCDDDRII&CodecBacklight3G MODULE 3.1.2主芯片方块图:3.2特色功能简述3.2.1电视跟我走和多屏互动通过WiFi将M280与XT710连接到同一个局域网中。
1.M280通过WiFi模块(N32)接收XT710传输过来的电视信号,再通过SDIO总线将此信号传送给主芯片(U26)。
主芯片(U26)经过编解码后,通过RGB总线和TCON将此电视信号再传输到屏幕上,从而实现在M280上显示XT710传过来的电视图像。
2.M280的视频信号通过主芯片(U26)编码后,透过SDIO总线传输给WiFi模块(N32),然后在通过天线将其传送给XT710,这样就实现了XT710显示M280的视频图像。
3.2.2万能遥控器如下图为M280的IR小板原理图,其中有1个发射二极管(VD3)和1个接收二极管(VD4)。
VD3用于发射红外信号,可以遥控电视,空调,DVD,功放等家用电器;VD4为接收红外信号的接受二极管,可以学习电视,DVD,功放等家用电器的遥控器,从而去遥控电视,DVD及功放。
GX-2800 用户手册说明书

GX-2800 Display6.8”In CarDisplayAudioHold:Press:Overview Of The UnitHold:Press: Home Screen DescriptionsTuner Radio Return To Previous Item Bluetooth Audio AV InSetting MenuBluetooth Phone Phone Mirroring Audio SettingFront USB Functions of the Buttons on the Head Unit2 ENRadio Operation3 EN1. Displays the information of the current station2. Switches the FM/AM band3. Recalls the memorized station .(When tap and hold to stores the current receiving station in memory .)4. Tunes in a station with good reception automatically .5. Displays the Radio Setup screen13254Radio SetupEverytime We Touch.mp3CascadeEnding Dream02:30 002/021USB Media OperationUSB Album Art WallpaperYou can set the Album Art to the background image.Tap access System Setting menu turn [ON] or [OFF] to enable / disable this function.4 EN1.2. Tap repeatedly to Repeat playback mode 3. Tap repeatedly to Random playback mode 4. Displays the information of the current file 5. Play/Pause6. Displays playback contents list7. Searches the previous /next content . Tap and hold to fast forward or fastbackwardArtwork (Shown if the track contains artwork)1325467132546Video Playback1. Play/Pause2. Searches the previous next content Tap and hold to fast forward or fastbackward3. Reset to the factory settings4. Adjust image quality in video screen (Brightness/Contrast/Color/Tint)5. Searches file6. [NORMAL]/[16:9]/[4:3] : Select a screen mode/. Selecting A T rack In A List (Searches File )1.Select whether you search by audio files / video files2. Tap to moves to the upper hierarchy.3. Tap the desired folder.when you tap a folder its contents are displayed.4. Tap desired item from the content list, will play starts automatically5 ENBT Audio Operation Description1.2. Tap repeatedly to Repeat playback mode 3. Tap repeatedly to Random playback mode 4. Displays the information of the current file 5. Play/Pause6. Displays playback contents list7. Searches the previous /next content . Tap and hold to fast forward or fast backwardArtwork (Shown if the track contains artwork)1325467Connect/Delete the Bluetooth Device1. Tap in the bluetooth setup menu.2. Touch the device name you want to connect/delete.6 ENUSB Album Art WallpaperYou can set the Album Art to the background image. Tap access System Setting menu turn [ON] or [OFF] to enable/disable this function.Making A Call2. Tap / to switches the speaking voice output betweensmartphone and speaker 1.Tap entering a phone number with number keys• :To delete the last entry Incoming Calls; Outgoing Calls; Missed Calls) • :Call using call records ( • :Phonebook• :Voice Assistant Phonebook1. Tap will start downloading the Phonebook.2. Select the person you want to call from the list.3. Select the phone number from the list.TIPSTap the letter A~Z to Direct and fast find the phone numberto dial.7 EN133****508600:05 TalkingBenjaminHold12:05AM1. When you receive a call while talking on another call, you can answer theCall Waitingnewly received call by taping . The current call is on hold. 2. Each time you tap , the caller will change.3. When you tap , the current call will end and switch to the call in hold.133****5086Incoming call...12:05AMVoice ControlTap access the voice recognition function of the phone connected to thisTap access the System Setting menu to turn On/Off the Voice Control function.You can use voice recognition function by press and hold on the front panel.This function must be operated in a state before connection Bluetooth VOICE9 ENSmart phone connectivity gives phone users an incredibly intuitive way to make calls, use maps, listen to music and access message with just a word or a touch.If the smart phone connection to the Car AV System is not successful, please unplug and insert USB cable and try patible Android devices:You can use Android Mirroring with devices of Android Version 7.0 or later.Install a APPTIPSMirrorAPPNo installed apps work with this USB accessory. Learn more about this accessory at https:///store/apps/details?id= .soundmax.mirrorappThis device supports USB Mirroring through AndroidSmartphoe. When you use the USB Mirroring first time, you must install the “MirrorAPP” and authorization.Method 1:Please go to Google play and search “Gigaboyz” or “MirrorAPP” to download and install “MirrorAPP” APP .Method 2:Please scan QR code to download and install “MirrorAPP”APP .AuthorizationPlease follow the pop up authorization prompt on your phone and complete theauthorizationTIPSIf you want to have the authorization message on your phone, you can unplug & insert USB cable to try again.Getting StartTap to start.10 ENTurn the Rear Speakers to Virtual Subwoofer. Enjoy the powerful Bass without install any real subwoofer.Time Alignment Tap to adjust the delay time of the selected speaker LevelCross Over 13 Band Equalizer Tap to switch Subwoofer low pass filter transfer function Tap to switch Front/Rearhigh pass filter functionVirtual SubwooferTap to to adjust the sound level of the selected speaker.Tap access into Audio Settings to adjust the various settings.Fader . Balance Tap to adjust the volume balance around the touched area Tap to select perfect listening position FaderBalanceListening Position Bass BoostTap to Set the amount ofbass boost,and set the amount of boost of low and hightones11 EN12 ENTap access Settings Menu to select the item to be adjusted.TIPS Some of the setting you may interest to know.Default VolumeThis function will allow change the Default Volume Level than the default level 20, turn power off and restart the unit, the volume will keep the default level 20.. When the volume is over/less Steering LearningYou can set the desired function in the Steering Remote Controller. Select the function you want the Steering Remote to learning Press and hold the same function button on the Steering Wheel Remote until “Learn Ok” is displayed.Parking Guide AdjustIf you select [ON] for [Parking Assist Guide], tap on access into to adjust the parking guidelines.Adjust the parking guidelines by selecting the mark.Adjusting the position of the selected mark.C DAB Rear AV In/Camera InIf set the [Rear AV IN]/[Camera IN] as DVR, then activate the DVR function.Parking Assist GuideYou can display parking guidelines to enable easier parking when you shift the gear to the reverse (R) position.13 ENOptional 14 ENOutput Frequency Band : 20-20000Hz Maximum Power : 50Wx 4Continuous Power Output (RMS): 22Wx 4Preout Level V ()10k ΩPreout Impedance : 1.3k ΩSpeaker Impedance ΩUSB interface section Bluetooth section Audio section GeneralSupport Formats Playable Audio Files MP3/WMA/AAC-LC/Linear PCM (WAVE) /FLAC/Vorbis Bit rate:16-320 Kbps,VBR ID3 Tag Version 1.0/1.1/2.2/2.3/2.4 (for MP3)Acceptable Video Files MPEG 1 (.mpg,mpeg), 720x480 (30fps) MPEG 2 (.mpg,mpeg), 720x480 30fps) MPEG 4 (.mp4,avi), 1280x720 (30fps) H.264/MPEG 4 AVC (mp4,mkv,avi,flv,f4v.ts) MKV (.mkv)Support File / Folder Formats levelsDirectory nesting up to a maximum of 6 Number of tracks/titles: maximum 999Number of albums/folders:maximum 99TFT Monitor sectionScreen Size Display ResolutionContrast Ratio :500USB Standard:USB 2.0 Full Speed File System :FAT 16/32Maximum Current :DC 5V 1.5A D/A Converter :24Bit : Bluetooth Ver 4.1Communication SystemOutput: Bluetooth Standard Power Class 2: Approx. 10meters Maximum Communication RangeFrequency Band: 2.4 GHz : HFP/SPP/A2DP/AVRCP /PBAP Compatible PorfilesBluetooth: SBC (Sub Band Codec)Supported Codecs Radio section Frequency FM range : 87.5-108.0MHz Frequency AM(MW) range : 522-1620 KHz Usable sensitivity : 13.2 uV ()FM : 44.7 uV (AM)(MW)Operating Voltage: 14.4V (10.5-16 V) OperationalTemperature Range: -20°C -+70°C Maximum Current Consumption :15A :800x480 dots :6.8 inches Video sectionColor System ofExternal Video Input: NTSC/PAL External Video Input(RCA/3.5m Jack): 1 Vp-p /75ΩNOTE WMA and AAC of which is covered with DRM cannot be played.Although the audio files are complied with the standards listed above, the play may be impossible depending on the types or conditions of media ordevice.15 EN。
(参考资料)VLT2800基本参数设置
VLT2800本地开环速度控制:端子连线及相关参数设置:1.端子连线首先将端子12和27短接。
2.参数设置P002 设置成为本机操作(LOCAL)P013 设置成为本机控制与开环(LOC CTRL/OPEN LOOP)P100 设置成为开环速度调节(SPEED OPEN LOOP)P102 设置成为相应的电机功率(参照电机名牌)P103 设置成为相应的电机电压(参照电机名牌)P104 设置成为相应的电机频率(参照电机名牌)P105 设置成为相应的电机电流(参照电机名牌)P106 设置成为相应的电机转速(参照电机名牌)P003 设置成为当前所需要的给定值(电机就会按此给定值运行)P207 设置成为当前所需要的上升时间(从0HZ到额定电机频率的加速过程)P208 设置成为当前所需要的下降时间(从电机的额定频率到0HZ的减速过程)3.启动变频器,电机将按照P003中的给定值运行。
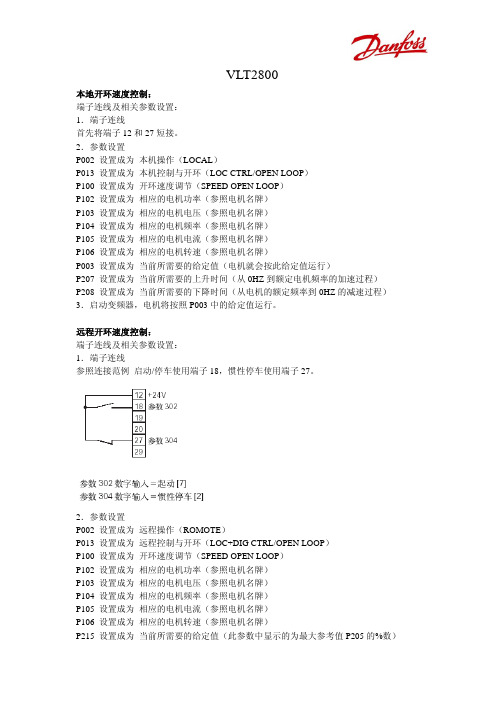
远程开环速度控制:端子连线及相关参数设置:1.端子连线参照连接范例启动/停车使用端子18,惯性停车使用端子27。
2.参数设置P002 设置成为远程操作(ROMOTE)P013 设置成为远程控制与开环(LOC+DIG CTRL/OPEN LOOP)P100 设置成为开环速度调节(SPEED OPEN LOOP)P102 设置成为相应的电机功率(参照电机名牌)P103 设置成为相应的电机电压(参照电机名牌)P104 设置成为相应的电机频率(参照电机名牌)P105 设置成为相应的电机电流(参照电机名牌)P106 设置成为相应的电机转速(参照电机名牌)P215 设置成为当前所需要的给定值(此参数中显示的为最大参考值P205的%数)P207 设置成为当前所需要的上升时间(从0HZ到额定电机频率的加速过程)P208 设置成为当前所需要的下降时间(从电机的额定频率到0HZ的减速过程)P302 设置成为启动(START)(参照本手册中关于数字输入列表中的选项)P304 设置成为惯性停车反逻辑(MOTORCOAST INVERSE)(参照本手册中关于数字输入列表中的选项)3.首先在LCP操作面板上按下启动键(START),然后通过闭合18号端子来启动变频器。
LGM(KE)-2800使用说明及操作维护手册
每行滤袋的上方要安装一根喷吹管,安装时要以滤袋为基准用随机附送的喷吹管定位模对喷吹 管定位,使喷吹管喷孔与滤袋中心互相对准。每根喷吹管通过一个靠近除尘器室框架的钢接头和外 部的气包相连,喷吹管的另一端固定在夹紧支架上,喷吹管面朝下的喷吹孔应该在喷吹管固定后和 滤袋、文丘里同轴。
要注意:滤袋和袋笼不应在室外保存。安装清理完毕后,各个分室和灰斗的检修门应该关闭不 再打开。滤袋装好后,不可以再在滤袋附近进行焊接、切割或打磨等作业。
2) 准备进入除尘器前,先打开上盖和灰斗人孔门,用大约两个小时时间散热并用强制 通风方式清除逗留的烟气。应注意:打开人孔门的时候不要站在近处,因为会有热 烟气冲出来。还要注意金属表面会很烫,应戴好手套;
3) 只在非进入不可的情况下才能打开灰斗检修门,更换滤袋则没有必要进入灰斗。开 启灰斗检修门前,须判断门的另一面是否有积灰。方法是: a. 如果感觉灰斗检修门没有箱体那样烫,那么就可能有积灰; b. 抽掉几条滤袋,吊个重物和灯下去用肉眼观察。
B.预启动检查清单 在袋式除尘器安装完毕开始运行前,应对以下内容进行仔细检查。以后在运行维护过程中进行 检查时,也可以以此清单为依据。
1. 滤袋 ⑴ 安装
a.滤袋的安装; b.袋笼的安装; c.在灰斗中检查滤袋长度和排列情况。 ⑵ 滤袋的萤光粉检漏 ⑶ 滤袋的预喷涂 a.预喷涂材料规格; b.预喷涂进行的步骤。 2. 管道 ⑴ 进去检查 a.导流板; b.联接和密封。 ⑵ 启动后的检查 a.飞灰的积聚。 3. 旁通阀 ⑴ 行程开关的机械装配; ⑵ 旁通阀的安装和密封; ⑶ 阀的远程操作; ⑷ 气缸磁控行程开关的远程指示; ⑸ 相应的失效方式和警告信号。 4. 输灰系统 ⑴ 要对卸灰阀作检查; ⑵ 运转检查。 5. 压缩空气系统 ⑴ 脉冲用气 a.压缩空气管路; b.设置调压阀;
施乐S2011、S2320、S2520维修手册
DocuCentre S2520/S2320 DocuCentre S2011DocuCentre S2520/S2320/S2011维修手册 Ver.1.0发行:2014年11月编辑/发行:Fuji Xerox Co., Ltd. Solution Service & Operational Management CS Dept.MMCBldg,3-6-1, Minato-mirai, Nishi-ku, Yokohama-shi, Kanagawa, JAPAN 220-0012 [XEROX] 是注册商标。
∙本维修手册用于下列产品:富士施乐(有限公司)•DocuCentre S2520/S2320/S2011 ∙关于维修手册的机密性∙本维修手册仅限于富士施乐认可的产品维护保养人员使用,严禁未经许可而复印、转载、供他人阅读或提供给他人。
∙因修订等原因而不再需要时,请务必烧毁或用碎纸机进行处理。
∙使用时请注意,应将手册保管好,避免遗失、破损。
∙关于因设计变更等原因而修订维修手册本维修手册的记载内容中出现相关设计变更时,有时会发行必要的相关技术信息,作为维修手册下次修订时反映变更内容以前的补充信息。
注意 技术信息等内容中的“备用零件号码的变更”及调整项目的“设定规定值”的变更等重要项目应在每次变更时记录在本维修手册内。
0 Introduction0.1 关于本手册 (3)0.2 手册的使用方法 (3)0.3 术语、符号的说明 (4)0.1 关于本手册本手册作为标准维修手册适用于DocuCentre S2520 / S2320 / S2011。
· 维修手册意见表若您对本维修手册有任何意见、或您发现有错误、需要订正的地方,请您填写维修手册意见表,寄送至以下部门。
Japan:Solution Service & Operational Management CS Dept.APO/GCO:OSG PSD CS&SD SSOMG via OpCo Technical Service Department 0.2 手册的使用方法本手册记载了本产品维护时的标准作业。
Midmark 280 680系列椅子维修手册说明书
2 in. (5.1 cm)
Back Cushion Dimension:
18 in. W x 13.5 in. H (45.7 x 34.3 cm)
2 in. (5.1 cm)
20 in. W x 16.5 in. H (51 x 42 cm)
680
Cleaning
• Clean upholstery with diluted bleach solution. Ratio: 10:1 (water:bleach) • Clean the chair as necessary, wiping the painted metal and plastic surfaces with a clean,
iii
Rev 10/8/12
Back
Go To Table Of Contents
Next
General Information
Specifications
Specification Weight Capacity:
680 400 lbs (181 kg)
281 400 lbs (181 kg)
Chair Height (*):
Drawer Size:
n/a
8.5 x 15.25 x 4.5 in. (22 x 39 x 12 cm)
Seat Cushion Dimension:
18 in. W x 19.5 in. D (45.7 x 49.5 cm)
20 in. W x 16.5 in. D (51 x 42 cm)
Seat Cushion Thickness:
Section E
GENERAL INFORMATION
Symbols .................................... iii Ordering Parts ......................... iii Serial Number Location .......... iii Specifications ........................... iv Warranty Information ............... v
- 1、下载文档前请自行甄别文档内容的完整性,平台不提供额外的编辑、内容补充、找答案等附加服务。
- 2、"仅部分预览"的文档,不可在线预览部分如存在完整性等问题,可反馈申请退款(可完整预览的文档不适用该条件!)。
- 3、如文档侵犯您的权益,请联系客服反馈,我们会尽快为您处理(人工客服工作时间:9:00-18:30)。
第七章 HT-2800 维修手册
一、调试方法
1、键盘操作:
(1)恢复出厂设置:按住“累加”键开机。
(2)老化状态:按住“复位”键开机。
(3)查看参数:同时按“累加”键和“批量”键。
2、对管调试:
按出参数,用一张专用测试纸过钞。
调节主板上的VR6,将1路参数调至68~6A左右(微调顺时针调高,反时针调低)。
调节主板上的VR4,将2路参数调至68~6A左右(微调顺时针调高,反时针调低)。
调节主板上的VR5,将F路参数调至68~6A左右(微调顺时针调高,反时针调低)。
调节主板上的VR3,将0.路参数调至68~6A左右(微调顺时针调高,反时针调低)。
3、荧光调试:
盖好上盖,按出参数,用荧光测试纸(正面向上)过钞。
调节主板上的VR1,将3路参数调至3E~40左右(微调顺时针调大,反时针调小)。
4、磁性调试:
(1)调节磁头距离:
调节各磁头的的调节螺丝,使各磁头与轮间距离约为2~3张纸币的厚度。
(2)4路调试:
调节右侧板上的磁感板VR1,将U2第○3脚电压调至0.45-0.7V左右。
(微调顺时针调高,反时针调低)
(3)5路调试:
调节右侧板中的磁感板VR2,将U2第○5脚电压调至0.45-0.7V左右。
(微调顺时针调高,反时针调次数低)
(4)7路调试:
调节左侧板中的磁头板VR1,将U2第○3脚电压调至1.4V左右。
(微调顺时针调高,反时针调低)
二、开机故障及维修方法:
三、点钞过程中的故障及维修方法:
四、点钞过程中误报及维修方法:
五、检修方框图
方框图一 判断进钞传感器好坏
1
2、接收管判断:
先拔掉P9插线,用万用表2M 或20M 电阻档测量接收管阻值
方框图二 进钞传感器工作电路检修
方框图三 判断计数传感器好坏
1、发射管判断:
先拔掉P4插线(如右图),用万用表二极管档测量发射管:
P4
先拔掉P4插线,用万用表2M或20M电阻档测量接收管阻值
方框图四通电检修E21故障1、发射管工作电路
方框图五接钞传感器工作电路检修
方框图六转速传感器工作电路检修
1
P11
2、接收管工作电路
方框图七 小电机电路检修
小电机
P17
吸尘器
HT-2800维修手册方框图八大电机电路检修
7-11。