MAXIMO 应用程序开发
maximo开发指南

maximo开发指南Maximo是一种功能强大的企业资产管理(EAM)软件,广泛应用于各个行业,包括工业制造、公共事业、交通运输等。
作为一款灵活的软件解决方案,Maximo开发者往往需要具备一定的技术知识和经验来定制和扩展该软件。
本篇文章将为您提供一份Maximo开发指南,帮助您入门和掌握Maximo开发技巧。
1. Maximo开发环境的搭建在进行Maximo开发之前,首先需要搭建一个适合的开发环境。
您可以选择在本地搭建一个Maximo开发环境,或者使用IBM提供的Maximo测试环境。
在搭建开发环境时,需要注意配置数据库、应用服务器等组件,以确保Maximo的正常运行。
2. Maximo开发基础知识在进入具体的Maximo开发之前,掌握一些基础知识是非常重要的。
首先,了解Maximo的核心功能和模块,如资产管理、工单管理、库存管理等。
其次,学习Maximo的数据库结构和表关系,以及常用的Maximo对象和属性。
3. Maximo应用定制Maximo提供了灵活的应用定制功能,允许开发者根据实际需求对系统进行定制和扩展。
通过Maximo应用定制,您可以添加新的字段、页面、应用程序、工作流程等,以满足特定的业务需求。
同时,您还可以进行界面定制和报表设计,提供更好的用户体验和数据展示。
4. Maximo集成开发Maximo作为一个企业级管理软件,通常需要与其他系统进行集成。
比如,将Maximo与ERP系统集成,实现采购、财务等数据的共享和交互。
开发者可以利用Maximo提供的集成工具和接口,如MIF (Maximo Integration Framework)、MEA(Maximo Enterprise Adapter)等,进行系统集成开发。
5. Maximo扩展与插件开发除了应用定制和集成开发,Maximo还支持扩展和插件开发。
通过扩展和插件开发,您可以在Maximo中新增自定义功能和业务逻辑。
例如,开发一个新的工作流插件,实现自动分配工单和通知等功能。
Maxio71应用二次开发指南

Maxio7.1应用二次开发指南1、文档描述本文档是根据我个人的经验和网上收索的资料整理出来,哈哈~~2、命名规则2.1 基本准则(1)总体说来,按照Maximo的包结构,存放相应的类,将psid改为power即可。
(2)公司开发的类,统一放在power包中。
(3)应用程序业务逻辑类,请放在power.app包中。
(4)应用程序的页面操作类,请放在power.webclient.beans.包中。
(5)工作流过程名,一般为应用程序的名字。
(6)主表与子表之间的联系名,请直接使用子表的名称。
2.2 类名的命名规则以下的规则,按优先级,从高到低排列,如果有冲突,请按优先级高的方式命名。
(1)关于类名的命名规则,请多多熟悉Maximo本身源码类名的命名规则。
(2)扩展原有的类,请不要使用相同的名字,最好加上“CU”关键字。
(3)直接从Mbo或StatefulMbo继承的类,最好使用表名作为类名。
(4)直接从MboSet继承的类,最好使用表名加上“Set”作为类名。
(5)远程接口的名称,最好都加上Remote。
(6)字段的类名,最好以Fld开头。
3、开发说明3.1 搭建开发环境········3.2 配置Eclipse集成开发环境········4 第一个应用程序4.1 业务描述做一个单表的增、删、改、查业务,以下业务为开封电厂实际程序。
4.2 应用设计应用程序名:CUTASK(点检任务)应用程序模块名:CUTASK应用程序表:CUROUTES_TASK (主对象)应用程序关联表:4.3 数据表设计主列:CUROUTES_TASKID4.4 开发步骤4.4.1 第一步建立数据表(1)启动Maximo,转到配置,数据库配置。
(2)点击新建对象。
(3)输入相关信息,如下图:注意这里对象即是表名CUROUTES_TASK、服务输入CUSTAPP、级别选择SITE,如果不是工作流表,请不要选中主对象,存储分区,是你的分区表空间。
maximo开发指南
maximo开发指南Maximo 开发指南在当今的企业管理领域,Maximo 作为一款强大的资产管理软件,发挥着至关重要的作用。
它能够帮助企业实现对资产的全生命周期管理,提高运营效率,降低成本,并提升决策的科学性。
然而,要充分发挥 Maximo 的潜力,进行有效的开发是必不可少的。
接下来,让我们一起深入探讨 Maximo 开发的方方面面。
一、Maximo 开发的前期准备在开始 Maximo 开发之前,我们需要对企业的业务需求进行深入的了解和分析。
这包括明确企业的资产类型、管理流程、业务规则以及所需的报表和功能等。
只有清楚地了解这些需求,才能为后续的开发工作提供明确的方向。
同时,还需要搭建合适的开发环境。
这包括安装 Maximo 软件、相关的数据库(如 DB2 或 Oracle)、应用服务器(如 WebSphere 或Tomcat)等。
此外,配置好开发工具,如 Eclipse 或 IBM Rational Application Developer 等,也是非常重要的。
二、Maximo 数据模型的理解Maximo 基于一个复杂而强大的数据模型来存储和管理资产相关的信息。
理解这个数据模型是开发的关键。
其中,核心的表包括 ASSET(资产表)、LOCATION(位置表)、WORKORDER(工单表)等。
每个表都有其特定的字段和关系,需要我们仔细研究和掌握。
例如,在资产表中,包含了资产的基本信息,如资产编号、名称、描述、类别等。
而工单表则记录了资产的维护、维修等工作订单的详细信息。
三、Maximo 应用程序的开发Maximo 提供了多种方式来进行应用程序的开发。
1、基于 Maximo 自带的工具和框架进行开发Maximo 自身提供了一些工具,如 Maximo Integration Framework (MIF)、Maximo Scripting 等,可以用于开发自定义的业务逻辑和流程。
通过 MIF,可以实现与外部系统的数据集成,确保数据的流通和共享。
maximo开发指南

maximo开发指南导言Maximo是一款功能强大的企业级维修、保养和操作管理系统。
它提供了一系列丰富的功能,使得用户能够高效地管理资产、设备和工作流程。
本文将介绍Maximo开发的基本概念和一些建议,以帮助初学者更好地理解和使用Maximo开发。
一、Maximo开发简介Maximo开发是指使用Maximo应用编程接口(API)进行系统的自定义和扩展。
Maximo开发的目的是满足企业特定需求,例如添加新字段、修改工作流程、创建定制报表等。
Maximo开发可以通过应用程序和脚本编程语言,如Java、JavaScript和Python等进行实现。
在Maximo开发之前,确保对Maximo的基本概念和核心功能有一定的了解是非常重要的。
二、Maximo开发环境搭建在进行Maximo开发之前,需要先搭建开发环境。
首先,您需要安装Maximo开发工具包,并配置相应的开发环境变量。
其次,您需要一个可用的Maximo实例,可以是实际生产环境的一个副本,也可以是一个独立的开发环境。
最后,您需要一个集成开发环境(IDE),例如Eclipse或IBM Rational Developer等,用于编写和调试您的Maximo开发代码。
三、Maximo开发常用技术1. MBO(Maximo Business Objects)开发:MBO是Maximo中的一种数据对象,它定义了实体类之间的关系和属性。
通过使用MBO,您可以对Maximo数据进行增、删、改、查等操作。
在Maximo开发中,MBO开发是非常常见和基础的技术。
2. Scripting:Maximo提供了多种脚本语言,如Automation Scripts、Java脚本、JavaScript脚本等。
脚本可以在Maximo的各个环节中执行自定义逻辑,例如字段验证、计算、触发其他操作等。
Scripting是Maximo开发中常用的灵活性技术,可以满足个性化的需求。
3. 应用程序扩展:Maximo提供了一套可定制的应用程序模板,例如应用程序导航、菜单和工具栏等。
1、maximo环境搭建与eclips集成问题资料
对本文档原作者宋庆辉,表示非常的感谢。
maximo的开发环境配置和maximo的程序调试一直是maximo开发人员的一个头疼的问题,在这里我简单描述一下如何在eclipse里面配置开发环境并进行调试。
1.maximo项目实际上是由多个web项目和整个j2ee项目组成的大的开发项目。
所以在开发环境的部署上也要主要建立两个项目,一个是总体的java项目,一个是web项目。
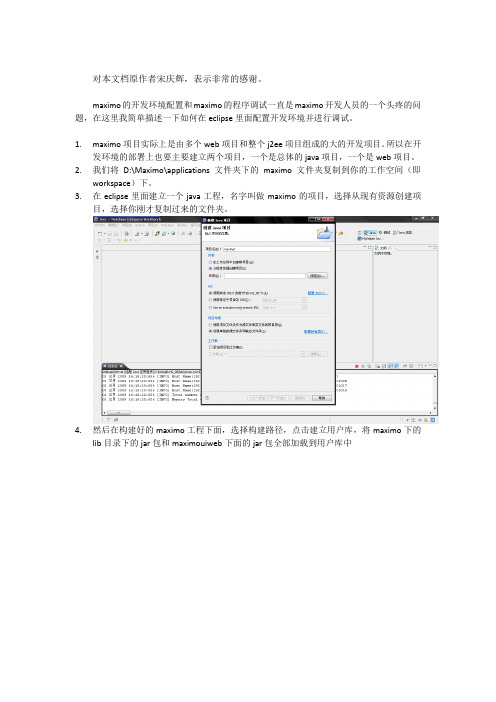
2.我们将D:\Maximo\applications文件夹下的maximo文件夹复制到你的工作空间(即workspace)下。
3.在eclipse里面建立一个java工程,名字叫做maximo的项目,选择从现有资源创建项目,选择你刚才复制过来的文件夹。
4.然后在构建好的maximo工程下面,选择构建路径,点击建立用户库,将maximo下的lib目录下的jar包和maximouiweb下面的jar包全部加载到用户库中补充:还要加载businessobjects文件夹下的class,不用加载maximouiweb的class如图:5.同理建立web应用maximouiweb,将该项目的根目录建立在刚才复制的maximo文件夹下的maximouiweb目录下。
然后加载刚才创建的用户库,然后加载maximo项目的类文件夹。
如图:补充:我照上面的图做没有成功,我是通过创建新文件夹然后连接了原先c盘maximo下的businessobjects下的class和maximouiweb下的classes的才好的. !!!!!!!!!!!!!!!!!!!!!!!!!!!!!!!!!!!!!!!!!!!!!!!!!!!!!!!!!!!!!!!!!!!!!注:最重要一点必须要将eclipse的首选项里的java/Compiler/building中的output folder 下的Scrub output folders when cleaning projects的勾去掉才能做以后的配置:如图!!!!!!!!!!!!!!!!!!!!!!!!!!!!!!!!!!!!!!!!!!!!!!!!!!!!!!!!!!!!!!!!!!!!6.然后设置输出文件夹为maximouiweb/webmodule/WEB-INF/classes7.然后配置weblogic9的服务器,打开首选项备注-Dport=7004的7004是weblogic的端口号,按照自己的端口号做改动-Xms256m -Xmx512m -XX:CompileThreshold=8000 -XX:PermSize=32m -XX:MaxPermSize=128m -Xverify:none -da8.单击确定,然后启动weblogic,发布刚才的maximo文件夹。
maximo 接口 开发

Eclipse :Version: 3.4.2 支持web service 工程IBM Tivoli Asset Management for IT 7.2.2.0Maximo部分,开放webservice接口:转到系统配置→平台配置→webservice库(webservice lib)如果列表中没有你想要的webservice,那就新建一个:从对象结构创建工单。
选择你要发布的webservice名称,如:大部分可根根据对象的名称来选择MXASSET:是针对asset 的增删改查同步的操作MXSR:是针对服务申请的改查同步的操作MXPERSON:是针对person的增删改查同步的操作等我们项目中的要求是,接受第三方系统的一个请求,里边包含资产的信息,maximo进行同步,然后记录下本次的维护记录。
资产信息的更新,新建,删除操作当然选择MXASSET维护记录,此次放到SR里边,选择MXSR点击,创建完成后选择操作部署webservice,然后确定就好。
会弹出一个xml的对话框,确定,至此maximo端,webservice创建完毕。
系统属性设置mxe.int.webappurl 的值为:http://51.96.2.72/meaweb查看http://51.96.2.72/meaweb/wsdl/MXASSET.wsdl正常显示表示创建成功。
设置属性mxw.int.globaldir,可是设置服务器端路径,生成wsdl文件。
关于使用webservice 创建交互,请参见web_Service_Interactions.pdf。
Eclipse部分:单纯的使用maximo发布的webservice,只需要建立一个java project。
这里需要开发一个中间转化的工具,接收第三方发来的数据,进行必要的格式和值得处理,然后调用maximo接口,将数据存入maximo中。
所以这个工程既是maximo的客户端,又是第三方系统的服务端。
MAXIMO系统开发和实施方法

MAXIMO系统开发和实施方法MAXIMO系统开发和实施方法 (1)简介 (2)I. 项目启动阶段 (2)II. 设计和开发阶段 (2)III. 系统实施/投产阶段 (3)阶段1:项目启动 (4)1.0 项目定位 (4)2.0 技术环境/架构计划 (4)3.0 软件安装和调试 (4)4.0 实施项目组定位和培训 (5)5.0 需求分析/用户点评估 (5)阶段2:设计和开发 (5)6.0 详细说明开发 (5)7.0 应用设计和开发 (6)8.0 系统测试 (6)阶段3:系统实施/投产 (6)9.0 用户和系统培训 (6)10.0 数据转换/数据导入和系统投产 (7)11.0 实施评估和计划 (7)简介MRO Software公司采用一种“闭环”的系统开发和实施方法,以确保及时、高效的、统一的、成功的实施结果。
这种方法基于每个用户的需求是独特的和重要的这个概念。
通过与我们的用户/合作伙伴的协商,MRO SOFTWARE将实施计划进行剪裁,将MAXIMO进行客户化以达到每个用户/合作伙伴的特定的要求。
无论我们的客户/合作伙伴的实施目标和预算情况如何,MRO SOFTWARE 的实施方法都是灵活的和可衡量的,它提供了最合适的解决方案。
MRO SOFTWARE系统实施方法由三个独特的实施阶段组成:项目启动,设计和开发,以及系统实施和投产。
下面是对组成每个阶段的主要任务或活动的描述。
I. 项目启动阶段实施启动阶段通过定义或进一步精炼项目的工作范围和业务目标,建立技术环境,以及维项目组成员提供产品培训,奠定了一个成功项目的基础。
项目启动阶段的主要任务或活动包括:∙适用性评估/成本估算(Fit Assessment/Cost Estimates)∙项目组织机构(Project Organization)∙技术环境/架构计划(Technical Environment/Infrastructure Planning)∙软件安装和调试(Software Installation and Tuning)∙实施队伍的产品定位和培训(Implementation Team Product Orientation and Training)∙需求分析/各用户点评估(Requirement Analysis/Site Assessment)∙实施计划开发(Implementation Plan Development)II. 设计和开发阶段设计和开发阶段包括了所有与开发和/或剪裁MAXIMO,使其达到每个用户/合作伙伴的特定需求相关的任务。
maximo二次开发_开发环境的搭建

1.安装weblogic服务器点击下一步:协议容,同意,然后点击下一步,设置Weblogic bea 的主目录为D:\bea,然后下一步:2.maximo数据库的配置首先开始创建数据库,开始—>程序—>Oracle - OraDb10g_home1—>配置和移植工具—> Database Configuration Assistant点击下一步,创建数据库然后输入数据库访问密码。
然后一直下一步,最后点击完成,开始创建数据库,进入确认页面,点击确认。
点击退出,创建数据库完成。
然后用pl-sql访问数据库,用户名system 密码是刚才创建数据库时设置的。
登录后创建表空间,和用户,执行以下脚本。
Create tablespace MAXIMO_DATA datafile 'D:\ORACLE\PRODUCT\10.2.0\ORADATA\MAXIMO\MAXIMO_DATA.DBF' size 1200M autoextend然后导入maximo.dpm文件。
(根据发给的dmp文件和命令导入maximo库)修改数据库连接在{D:\ibm\SMP}\maximo\applications\maximo\properties目录下有两个文件maximo.properties_orig 和maximo.properties,分别为明文和密文数据库配置文件。
Maxmio的数据库连接文件必须使用密文。
可采用以下方式来生成密文属性文件(建议在操作之前备份maximo.properties_orig 和maximo.properties文件)。
1、删除maximo.properties文件。
2、另存maximo.properties_orig文件,名为maximo.properties,并修改其中的数据库连接信息。
3、执行{D:\ibm\SMP}\maximo\tools\maximo目录下encryptproperties.bat文件,如果没有错误发生,那么{D:\ibm\SMP}\maximo\applications\maximo\properties\maximo.properties文件将被生成为密文。
- 1、下载文档前请自行甄别文档内容的完整性,平台不提供额外的编辑、内容补充、找答案等附加服务。
- 2、"仅部分预览"的文档,不可在线预览部分如存在完整性等问题,可反馈申请退款(可完整预览的文档不适用该条件!)。
- 3、如文档侵犯您的权益,请联系客服反馈,我们会尽快为您处理(人工客服工作时间:9:00-18:30)。
Custom Application with Application DesignerCreate the Table Domain1.Create a table domain to the Asset table. This will be used to lookup the values inthe asset application. Call the Table Domain CUSASSET.2.Set the where clause assetnum=:assetnum and set the Organization = EAGLENAand the site = BEDFORD. This will restrict the domain to the specific site and organization.3.Click OK.4.Now that the domain is created we need to create the table that will store ourknowledge base data. So go the Database Configuration Application and create a new object titled KNOWAPP, set the application to the Organization level. Add the following columns, note maximo adds the key and long description fields.5.Create an index on the primary key KNOWAPPID.6.Create the following relationships KNOWASSET which will be used to lookupadditional columns in the Asset table and DRILLDOWN which enables us to use the drilldown for Assets and Locations.7.Save the object.8.Stop your Maximo server (Service), NOTE: It must be stopped before runningconfigdb.9.After configuring the database login to Maximo and open the ApplicationDesigner.10.Create a New Power Application associated to the Workorder Module referencingthe Application name KNOWAPP (this is the name you want to call theapplication. The description field of the application, the Main Object is the table name that you created earlier, and the Module Name is WO, i.e. where you want the application to be access from.. There are three types of applications that you can create: a power application such as Workorders, a simple power application such as the Chart of Accounts, and a self service application such as ServiceRequest or Desktop Requisitions.11.Save your application, note you Tab names will change to List and Main. Theapplication designer will display with an application shell, i.e., the presentation layer.12.The presentation layer is an XML schema to view the XML tags go to the selectaction and select the [Toggle Show All Controls] action. This will display the XML tags that are used display any of the screens in Maximo and cannot bechanged.13.Keeping with the standard naming conventions name the second tab KnowledgeBase to reflect the application by clicking on the white space next to the Main title and select the Control Properties icon. Change the properties of the tab to:14.Your screen should now appear as below:15.Now we need to design our screen by placing the a number of sections on theknowledge base tab. You want to add one more section than is required just in case you need to add a section at the bottom of the screen. Maximo will not allow to add a section at the bottom of the page but you can add in sections between other sections. Our design will need five sections. So open the controls palette and select the section control. Draw the control unto the white space under the tab title and release your mouse.16.Repeat the process five times. Your screen should now appear as below.17.Select the top section and open the control properties and change the labelproperty to ‘Section 1’. Your screen should now appear as below.18.Change the remaining label to read section 2- 5. Your screen should appear asbelow.19.Now that we have our sections defined we will need to add in section rows whichwill enable us to further add section columns that will in turn enable us to add section columns, then sections within those columns. So in section 1 add a section row.20.Add a new section in the section row you just created.21.Repeat the process for section 2 using the same controls.22.In section three add a section row, section column, and place a new section ineach column.23.In section four accomplish the same process except add in two section columns.24.Section 5 is a dummy section and will be deleted so make no entries here.25.Save.26.Now we are ready to add our controls and relate those to our database columns.Here is the list of database columns and respective controls that we will use.27.Control PropertiesError in the screen below. Deals with a relationship see if you can solve.28.The next steps is to add in security options, actions, place icons, and modify thesearch page.Result: a drop down list of actions that can be applied to an application.Click on Add/Modify Signature OptionsResult: the Add/Modify Signature Options dialog will open.Result: a data entry screen will display.Click on New Row.Result: a data entry screen will open.Click on New RowRemember to authorize the choices though the Security Groups.1.Changing default field size.In order to change the default size of fields you need to modify this file. Back up before you make any changes.Open the file and locate the field type that you want to change the display size of and follow the following example.//For ALN, LOWER, UPPER field typesfieldtypegroup = new Hashtable();fieldtypegroup.put(new Integer("2"), new Integer("2"));fieldtypegroup.put(new Integer("30"), new Integer("10"));fieldtypegroup.put(new Integer("31"), new Integer("40"));fieldsizegroups.put(new Integer(FIELD_TYPE_ALN).toString(), fieldtypegroup);fieldsizegroups.put(new Integer(FIELD_TYPE_LOWER).toString(), fieldtypegroup);fieldsizegroups.put(new Integer(FIELD_TYPE_UPPER).toString(), fieldtypegroup);∙If the database field size is 1 or 2, then the screen size is 2.∙If the database field size is 3 through 30, then the screen size is 10.∙If the database field size is greater than 30, then the screen size is 40. This will apply to all field types ALN, UPPER and LOWER.Other field types are listed individually where these are grouped together.2.Creating a hyperlink to another application.Linking to another application can be done at least three different ways:1. hyperlink2. Pushbutton3. Or, add as a Go To property to a field in the Textbox properties dialog. The Go To field is not long enough to just add another look so you go to the xml and add the applink to the applicable field (see below).<tablecol id="po_tablebody_1" dataattribute="ponum" menutype="normal" applink="po,receipts" /> Note: this was done on viewdr.xml. On the PO number field on the History tab. Adding the hyperlink caused the Receving application to be launched for that PO.3.Adding a default value to an xml page rather than at the database level (note: used toset a default value in the Select Owner dialog box.Create a default value id tag within the table/dialog of where the field is located..Tag:<defaultvalue id="owner_labor_owner_labordiv1_1_1_tbllabor_default_1" dataattribute="department"value="IT" defaulttype="query" />Table:Note: this was done to default a value in the Department field in the Select Owner dialog.4. Commenting out a section on the xml.This is an example of commenting out an entire section with only two sections on the page. If there is only one section, then the method is to comment out the row which is not needed for a single section. To comment it out do not change existing line details add<!—or --> where applicable. Note: when commenting out a section there can not be any comments within that section, so if a row has been commented out prior to the section then you have to remove it before the section can be commented out.Result:Before changeAfter change:Note that the remaining section now spans the entire page and the fields are centered.5.adding an ALN DOMAIN.In app designer highlight the field that the domain is attached (in db config), click on the properties icon, and enter ‘Valuelist’ in the LOOKUP field.The domain field should have the name of the ALN Domain created. The example below includes a default value of ACTIVE.6.Adding a standard lookup to a new field with a condition. In app designer weindicate that the lookup is person we have to create a Table Domain. Here wedisplay the person lookup for person’s in the ACTIVE status. This lookup wasadded to look up a Supervisor if the Personid in the Supervisor field waswrong.DomainApplication DesignerDatabase Configuration29.。