HP StorageWorks EVA的最佳实例
HP StorageWorks EVA4x00 6x00 8x00 M5314 驱动器套式安装指南说
HP StorageWorksEVA4x00/6x00/8x00M5314 drive enclosure installation instructionsThis document contains instructions for addingan M5314drive enclosure to an existingEVA4x00/6x00/8x00storage system cabinet.These instructions are not for adding a drive enclosure to an expansion cabinet.20072007*5697-6937*Adding a drive enclosure to anEVA8x00/6x00This section contains the procedure for adding an M5314drive enclosure to an EVA8x00or EVA6x00while the storage system is operating.The M5314A or M5314B is used with the EVA8000and EVA6000.The M5314C drive enclosure is used with the EVA8100 andEVA6100.HP highly recommends that you perform this upgrade procedureduring off-peakhours.A fully loaded drive enclosure with all components installedweighs more than29.5kg(65lb.)and requires a minimumof two people to move.To safely and easily install the driveenclosure,remove the drives,power supplies,blowers,EMU,and I/O modules.This reduces the drive enclosure weight toapproximately11.0kg(24lb.).Even though a single person canlift this weight,the drive enclosure is difficult to install because ofthe physical size.Therefore,HP recommends that a minimum oftwo people install an empty drive enclosure in a rack.Before you begin this hardware upgrade,you must verify that the Enterprise Virtual Array is functioning e HP Command View EVA to verify that each drive enclosure and disk drive has a good operational status.If a drive enclosure or disk drive does not have a good operational status,correct the problem.1.If it is necessary to add an ID expansion cable to the cabinetaddress bus to accommodate the new drive enclosure,install the cable as follows:a.Remove the top terminator from the cabinet address bus.b.Connect the new ID expansion cable to the address bus.c.Install the top terminator at the end of the new expansioncable.bel each new FC cable with the labels contained in the driveenclosure kit.Each drive enclosure has two FC copper e the labeling scheme described in Table1.Table1FC cable labelsDriveenclosure FC cable labelsDriveenclosure FC cable labels 18and14820and2629and15921and27310and161022and28411and171123and29512and181224and30613and191325and313.If FC cable loop spools are used,carefully turn the captive fastener1/4turn and slide the cable loop off of the rail.Carefully,let the spool hang.4.Remove the nearby velcro cable ties.5.Cut the plastic ties on the drive enclosure power cables.6.Install the drive enclosure snap-in rail kit(part number302465-001).7.Install the drive enclosure into the rack.8.Insert and seat all disk drives and other components into the driveenclosure,but do not connect the cables.9.Connect the AC power to the drive enclosure and do the following:a.Wait for all FC disk drives to spinup.Thefirst drive in the drive enclosure might have the orangeDrive Failure icon lit.This is expected behavior.b.Check the EMU alphanumeric display for errors.See Figure1.Resolve any errors.CXO7373A1.Alphanumeric display2.Function select3.Display group selectFigure1EMU alphanumeric display and controlsc.Verify that the EMU displays00,indicating that the driveenclosure is not connected to the enclosure address bus.d.Verify that the fan LEDs are on and steady.See Figure2.Figure2Enclosure operational status indicationse.On both I/O modules,verify that the Power status indicatoris on and steady.Verify that both port status indicators areoff.See Figure3.f.Resolve any problems before proceeding to the next step.1.Upper port2.Power3.Lower portFigure3I/O module status indicators10.Check the operational status of the FC loops.a.On the controller,verify that the A-side and B-side device portindicators are on and steady.b.Resolve any problems before proceeding to the next step.11.Remove the GBICs from the required ports on the A and B loopswitches.ing a copper FC cable,connect I/O module A to the appropriateA-side loop switch.The A-side of the rack is the right side of the rack,when viewed from the rear.See Figure4and refer to Table2 and Table3to determine which cables and port connections to use.•On an EVA8x00,the location of the drive enclosure in the rack determines the loop switch it connects to.Drive enclosuresmounted in the lower half of the rack(enclosures1through6)connect to loops1A and1B.Drive enclosures mounted in theupper half of the rack(enclosures8through13)connect toloops2A and2B.•An EVA6x00includes a single set of loop switches and all drive enclosures are connected to loops1A and1B.a.Plug the FC cable into the correct port on the A-side loopswitch.b.Route the copper cable through the appropriate cablemanagement arm and radial clip.Do not route the coppercables throughflumes that containfiber optic cables.Instead,route the copper cables through vacantflumes.When you are adding the copper cables to the rack,handlethefiber optic cables with care.If you are not careful,youcan damage thefiber optic cables.c.Coil the excess copper cable and secure the cable behindthe rail with cable ties.d.Plug the cable into I/O module A of the drive enclosure.1.Loop2A 3.Loop1B2.Loop1A 4.Loop2BFigure4Loop locations in the Enterprise rack Table2FC cable connections for I/O module A,loop1ADrive enclosureI/OmoduleFC cable FC loopswitchFC loopswitchport1A81A122A91A103A101A84A111A65A121A46A131A2Table3FC cable connections for I/O module A,loop2ADrive enclosureI/OmoduleFC cable FC loopswitchFC loopswitchport8A202A1 9A212A3 10A222A5 11A232A7 12A242A9 13A252A1113.Verify that the FC connection is operating correctly.a.Verify that the green SFP Status LED on the FC loop switch ison and steady and the Port bypassed LED is off.See Figure5.b.Verify that the corresponding port status indicator on I/Omodule A is on and steady.c.Verify that the corresponding A device port on the controlleris on and steady.The orange Drive Failure icon on thefirst drive in the driveenclosure is turned off.d.Verify thatthe upgraded configuration is working properly, using HP Command View EVA.•Verify that the added drive enclosure has a good status.•Verify that each disk drive in the added drive enclosure has a good status.e.Resolve any problems before proceeding to the next step.FrontBezelCXO7884A1.SFP status 4.Over temp2.Port bypassed 5.Power3.POST fault 6.Loop operationalFigure5FC loop switch status indicatorsing a copper FC cable,connect I/O module B to the appropriateB-side loop switch.The B-side of the rack is the left side of the rack when viewed from the rear.See Table4and Table5to determine which cables and port connections to use.Make sure you are connecting the drive enclosure tocorresponding loop switches.If you used loop switch1A for portA,then you must use loop switch1B.If you used loop switch2A, then you must use loop switch2B.If you fail to connect the driveenclosure to corresponding loop switches,you can make thedata in the other drive enclosures inaccessible.a.Plug the FC cable into the correct port on the B-side loopswitch.b.Route the copper cable through the appropriate cablemanagement arm and radial clip.Do not route the coppercables throughflumes that containfiber optic cables.Instead,route the copper cables through vacantflumes.When you are adding the copper cables to the rack,handlethefiber optic cables with care.If you are not careful,youcan damage thefiber optic cables.c.Coil the excess copper cable and secure the cable behindthe rail with cable ties.d.Plug the cable into I/O module B of the drive enclosure.Table 4FC cable connections for I/O module B,loop 1B Drive enclosure I/O moduleFC cableFC loop switch FC loop switch port 1B 141B 22B 151B 43B 161B 64B 171B 85B 181B 106B 191B12Table 5FC cable connections for I/O module B,loop 2B Drive enclosure I/O moduleFC CcableFC loop switch FC loop switch port 8B 262B 119B 272B 910B 282B 711B 292B 512B 302B 313B 312B115.Verify that the FC connection is operating correctly.a.Verify that the green SFP Status LED on the FC loopswitch ison and steady and the Port bypassed LED is off.b.Verify that the corresponding port status indicator on I/Omodule B is on and steady.c.Verify that the corresponding B device port on the controller is on and steady.d.Resolve any problems before proceeding to the next step.16.Connect the newly added drive enclosure to the enclosure addressbus.See Figure 6for the enclosure numbering.•CAB address ports 8and 14share a common address.When adding a drive enclosure to loop 2on an EVA8x00,make sure drive enclosures are connected to either port 8or port 14.You can use one or the other but not ing both of these ports on the same loop makes it dif ficult to analyze disk problems because the disks in the drive enclosure connected to ports 8and 14appear to have the same addresses.•When adding a drive enclosure to an EVA6x00,do not use address port 7for the enclosure.Address port 7does not receive a hard AL-PA range.a.Verify that the EMU displays a unique enclosure number.b.Verify that the EMUs on the other drive enclosures continue todisplay valid enclosure numbers.c.Wait 15minutes.d.Verify that HP Command View EVA displays the recentlyadded drive enclosure under the Rack element in theNavigation pane.It should no longer be in the Unmappable Hardware folder.e.Verify that the upgraded con figuration is working properly,using HP Command View EVA.•Verify that the added drive enclosure has a good status.•Verify that each disk drive in the added drive enclosurehas good status.0046a-2Figure 6Enclosure numbering17.Repeat the above steps to add each drive e nylon ties to secure the copper FC cables.19.In HP Command View EVA,con figure the additional storagecapacity.See the HP StorageWorks 4x00/6x00/8x00Enterprise Virtual Array user guide and the EVA Best Practices white paper for information on using the new disk capacity.Adding a drive enclosure to an EVA4x00This section contains the procedure for adding an M5314drive enclosure to an EVA4x00while the storage system is operating.The M5314A or M5314B is used with the EVA4000.The M5314C drive enclosure is used with the EVA4100.HP highly recommends that you perform this upgrade procedure during off-peak hours.A fully loaded drive enclosure with all components installedweighs more than29.5kg(65lb.)and requires a minimumof two people to move.To safely and easily install the driveenclosure,remove the drives,power supplies,blowers,EMU,and I/O modules.This reduces the drive enclosure weight toapproximately11.0kg(24lb.).Even though a single person canlift this weight,the drive enclosure is difficult to install because ofthe physical size.Therefore,HP recommends that a minimum oftwo people install an empty drive enclosure in a rack.Before you begin this hardware upgrade,you must verify that the Enterprise Virtual Array is functioning e HP Command View EVA to verify that each drive enclosure and disk drive has a good operational status.If a drive enclosure or disk drive does not have a good operational status,correct the problem.bel each new FC cable with the labels contained in the driveenclosure kit.Each drive enclosure has two FC copper cables. 2.If FC cable loop spools are used,carefully turn the captive fastener1/4turn and slide the cable loop off of the rail.Carefully,let the spool hang.3.Remove the nearby velcro cable ties.4.Cut the plastic ties on the drive enclosure power cables.5.Install the snap-in rail kit(part number302465-001).6.Install the drive enclosure into the rack.7.Insert and seat all drives and other components into the driveenclosure,but do not connect the cables.8.Connect the AC power to the drive enclosure and do the following.a.Wait for all FC disk drives to spinup.Thefirst drive in the drive enclosure might have the orangeDrive Failure icon lit.This is expected behavior.b.Check the EMU alphanumeric display for errors.See Figure1.Resolve any errors.c.Verify that the EMU displays00,indicating that the driveenclosure is not connected to the enclosure address bus.d.Verify that the fan LEDs are on and steady.See Figure2.e.On both I/O modules,verify that the Power status indicatoris on and steady.Verify that both port status indicators areoff.See Figure3.f.Resolve any problems before proceeding to the next step.9.Check the operational status of the FC loops.a.On the controller,verify that the A-side and B-side device portindicators are on and steady.b.Resolve any problems before proceeding to the nextstep.As long as one I/O loop(1A or1B)is operational,storagesystem operation will not be interrupted.Make sure youdisconnect only one loop at a time.Make sure a loop isoperational before disconnecting the other loop.10.Connect the new drive enclosure to I/O loop1A:a.Disconnect the FC cable from device port DP1A on the upperstorage system controller.b.Connect this cable to the lower port on I/O module A of thenew drive enclosure.c.Connect a FC cable from the upper port on I/O module A ofthe new drive enclosure to device port DP1A on the upperstorage system controller.11.Verify that loop1A is operating correctly.a.Verify that the upper and lower port LEDs on I/O module Aare on and steady.b.Verify that device port DP1A on the controller is on andsteady.The orange Drive Failure icon on thefirst drive in the driveenclosure is turned off.c.Verify that the upgraded configuration is working properly,using HP Command View EVA.•Verify that the added drive enclosure has a good status.•Verify that each disk drive in the added drive enclosure has a good status.d.Resolve any problems before proceeding to the next step.12.Connect the new drive enclosure to I/O loop1B:a.Disconnect the FC cable from device port DP1B on the lowerstorage system controller.b.Connect this cable to the lower port on I/O module B of thenew drive enclosure.c.Connect a FC cable from the upper port on I/O module Bof the new drive enclosure to device port DP1B on the lowerstorage system controller.13.Verify that loop1B is operating correctly.a.Verify that the upper and lower port LEDs on I/O module Bare on and steady.b.Verify that device port DP1B on the controller is on and steady.c.Resolve any problems before proceeding to the next step.14.Connect the newly added drive enclosure to the enclosure addressbus.See Figure6for the enclosure numbering.a.Verify that the EMU displays a unique enclosure number.b.Verify that the EMUs on the other drive enclosures continue todisplay valid enclosure numbers.c.Wait15minutes.d.Verify that HP Command View EVA displays the recentlyadded drive enclosure under the Rack element in theNavigation pane.It should no longer be in the UnmappableHardware folder.e.Verify that the upgraded configuration is working properly,using HP Command View EVA.•Verify that the added drive enclosure has a good status.•Verify that each disk drive in the added drive enclosure has good status.15.Repeat the preceding steps to add additional drive enclosures.16.In HP Command View EVA,configure the additional storagecapacity.See the HP StorageWorks4x00/6x00/8x00Enterprise Virtual Array user guide and the EVA Best Practices white paper for information on using the new disk capacity.。
EVA 安装指南

和EVA的第一次亲密接触EVA系列磁盘阵列,在HP的存储架构中,大致处在VA 与XP之间。
EVA 可以使用在HPUX环境下也已经有好一段时间了,苦于华南区一直没有这样的单,所以没有机会亲身体会一下。
这次福州移动终于order了一台EVA5000 (2C2D) 。
八月十八,晴,我和陈英杰(Jacky ) 怀着愉快的心情出发了。
外观 (2)准备工作 (2)EVA硬件安装 (2)EVA配置 (3)起始页面 (4)点击 Storage management appliance 的icon (5)点击 Devices的icon (5)点击HSV element manager (6)Navigation Pane (6)Content Pane (6)点Content Pane的Options,设storage system access和License (7)确认EVA的VCS版本 (8)初始化阵列 (9)初始化阵列续一 (9)添加Host (10)增加Host续一 (11)添加Virtual Disk (12)Present VD to Host (13)在主机上S ECURE P ATH的安装配置 (13)安装 (13)配置 (13)spmgr display (14)打开|关闭Secure Path的Load Balancing (15)更改Secure Path下的设备文件名 (15)Load Balancing (16)配置与优化 (17)Disk Group (17)RAID Level (17)SCSI Queue Depth & IO timeout (18)脚本与自动化操作 (18)外观EVA是单独的一个41U的机柜,颜色的基调是黑色。
’2C’ 是指两个控制器,上有LCD和按钮,’2D’ 是指有两个盘柜(Fiber Channel Drive Enclosure),每个盘柜最多可以安装14块硬盘。
HPStorageWorks磁碟阵列解决方案
HPStorageWorks磁碟阵列解决方案儲存伺服器解決方案67HP StorageWorks磁碟陣列解決方案HP儲存資源最佳化解決方案提升儲存的效能、效率與永續性各企業大量利用IT以改善其自身的經營績效,IT能力的良窳已經是企業策略性的競爭優勢。
在多年來各式應用程式及IT設備的引入,企業內累積了大量的資料,儲存在各式各樣的儲存設備上,以提供各個關鍵性應用程式所使用。
資料的儲存、存取、保護及歸檔不但是企業內IT部門重要的工作,其運作的效率及效能,更直接影響企業每日的正常運作。
以下將整理出3種企業內使用儲存設備最常運見的使用情境及HP 相對應的解決方案,以提供確實可行的架構及產品,來解決每一情境的問題與挑戰。
這些解決方案包括:HP儲存整合解決方案(Storage Consolidation Solution)HP儲存/網路整合解決方案(Storage/Network Consolidation Solution)HP儲存虛擬化解決方案(Storage Virtualization Solution)6869儲存伺服器解決方案效益:1. HP 完整SAN 儲存裝置,提供符合各種不同需求的性能價格比2. HP 有共種不同領域及不同應用程式的技術顧問,可針對整合架構作專業規劃3. 整合不是一蹴可及,HP 有完整的Roadmap 可引導客戶階段性的完成整合專案典型組態包含如下組件:1. HP StorageWorks EVA 、XP 磁碟陣列或LeftHand 產品2. SAN Director 或HP ProCure 交換器3. HP 儲存整合專業服務及專案管理二、NAS (Network Attach Storage )問題與挑戰:1. 檔案分散,整合不易2. 檔案容量成長快速,磁碟空間不敷使用3. 不同的NAS ,操作及管理均不相同4. 企業內同時擁有多套NAS 時,系統管理者需面對複雜的檔案版本控管、檔案更新、檔案重複及同步、檔案安全設定、使用者帳戶管理、備份、…等多個複雜議題5. 針對應用程式的效能調校HP NAS 解決方案,包括簡單易用的X1000系列,基於標準x86架構及Microsoft Storage Server 的ProLiantStorage Server 及叢集式高效能的EFS Clustered Gateway 。
EVA系列存储讲解

EVA的顺序为: • 开机柜总电源 • 开光纤交换机电源 • 开EVA 机柜电源( 此时硬盘柜自动加电) • 启动SMA • 等待10 分钟待光纤交换机和硬盘柜状态正常后开控制卡电源 • 等待3 分钟待控制卡状态稳定后开主机电源, 启动进入操作系统 • 起集群服务及应用
HP StorageWorks Enterprise Virtual Array
EVA 产品介绍及结构
EVA的优点
EVA是HP StorageWorks Disk Array产品,具有以下优点 : 虚拟化特性: 提供最优架构,提高性能,优化磁盘的使用率,
便于动态的存储扩展 可管理性: 可管理大型SAN配置, 缩短管理时间,降低成本 几乎即时的快速克隆: 可立即使用克隆复制, 大大节省时间几
EVA系统日志有四类: --Management Event Log --Controller Event Log --Controller Termination Event Log --NT Event Log 前三个log我们可以通过EVA的command view来获得,NT event
日志事件的实例
点击more detail查看该事件的详细描述
收集EVA系统日志
选择get log file 或get parse file
问答与实机操作
EVA的配置主要有如下步骤: 1. 准备相关信息 a. 列出需要使用eva 存储的主机名 、 ip 等信息. b. 列出所有需连接eva 的主机的Fibre Channel adapters (FCAs). c. 查出FCA卡的WWN号. 2. 升级相关软件, 如command view等( 此项为可选项) . 3. 初始化EVA存储. 4. 升级firmware( 为可选项 ) 5. 创建disk group. 6. 创建主机列表. 7. 创建virtual disks. 8. 创建 snapshots and snapclones.( 需购买相关的license)
HP StorageWorks EVA软件兼容性参考说明书

Y
Y
HP StorageWorks Replication Solutions Manager 1.0 and later
Y
Y
HP StorageWorks Command View
EVA 3.3 and later2
Y
Y
Y
Y
Y
Y
Y
Y
Y
Y
HP StorageWorks Secure Path (required for multipath configurations)
Storage Management Appliance
G1, G2, G3
HP ProLiant Storage Server
HP ProLiant DL380 G4 Storage Server (base model) HP Proliant DL380 G4 Storage Server (SAN model) HP ProLiant DL585 Storage Server HP Proliant DL585 Dual Core Storage Server Note: In most configurations, the HP ProLiant DL380 SAN model is preferred.
Y
Y
Y
SSSU Build 7 for 3.2
HP Command View EVA 4.0
EVAPerf 1.0 SMI-S EVA 4.0
N
Y
N
SSSU 4.0.18
EVA3000/EVA5000 VCS 3.0141 VCS 3.0202
Y
Y
Y
Y
Y
Y
EVA4400
HP StorageWorks 4400企业虚拟阵列(EVA4400)性能白皮书简介 (2)性能参数 (2)端到端性能参数 (3)高速缓存性能参数 (3)EVA4400性能参数总结 (3)EVA4400和EVA4100的差别 (3)测试环境说明 (4)评估标准 (4)测量结果 (5)结论 (8)更多信息 (8)简介HP StorageWorks企业虚拟阵列(EVA)系列产品为大中型企业客户提供了具备领先性能、大容量和高可用性的存储解决方案,可显著降低IT成本及复杂性。
EVA提供了存储虚拟化功能,可实现虚拟存储池、简化管理、自动性能负载平衡、动态容量管理等特性。
HP StorageWorks 4400企业虚拟阵列(EVA4400)继承了所有这些先进特性。
由于工程设计方面的改进,EVA4400在实际环境中的性能大大超过了EVA4100。
由于持续读写性能得到大幅提升,EVA4400显著提高了各种应用的I/O处理能力,包括数据仓储、流媒体、高性能技术计算以及备份和恢复等。
在随机读写性能方面,EVA4400的整体性能可随磁盘数量的增加而增长。
客户可以根据实际业务情况,预先选择最佳的配置。
随机读写性能的提高也改进了各种应用的吞吐量并缩短了响应时间,其中包括文件系统、面向交易的数据库以及电子邮件等。
本文对以下两方面进行了概括:•高速缓存和端到端性能参数的重要性和区别•EVA4400性能概述性能参数HP StorageWorks的研发工作以两项重要原则为指导:•开发出的产品必须能为客户创造价值,符合其质量要求。
(这条原则始终为惠普公司在尖端技术部署的决策提供指导。
)•通过可靠的测试程序建立信任,在正常的工程设计限制内,客户可以在自己的公司内使用这些程序进行反复的测试。
(许多客户将惠普视为“可信任的顾问”,并依赖惠普技术来运营他们的企业。
他们可以在自己的站点,通过测试程序反复进行验证,确认惠普的产品是否符合要求。
HP StorageWorks Continuous Access EVA实现指南说明书
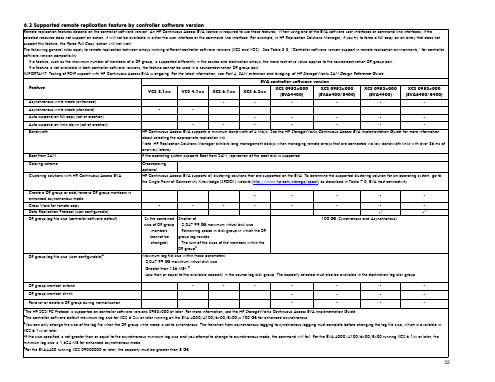
Asynchronous write mode (enhanced)
•
•
•
•
•
•
Asynchronous write mode (standard)
•
•
Auto suspend on full copy (set at creation)
•
•
•
•
•
Auto suspend on links down (set at creation)
DR group log file size (user configurable)3
•
•
•
•
•
•
•
•
•
•
2x the combined size of DR group
members (cannot be changed)
Smaller of: – 2,047.99 GB maximum virtual disk size – Remaining space in disk group in which the DR group log resides – The sum of the sizes of the members within the DR group2
•
•
•
•1
•1
100 GB (Synchronous and Asynchronous)
Maximum log file size within these parameters: – 2,047.99 GB maximum virtual disk size – Greater than 136 MB4, 5 – Less than or equal to the available capacity in the source log disk group. The capacity selected must also be available in the destination log disk group.
HPStorageWorksEVA企业虚拟化存储讲解

选择disk group中的硬盘数目和protection level:
输入alarm level,建议为default值(95%),设好该值后,在分配空间时,不要使用超 过可用空间的95%,否则会alarm,该选项主要是在用户数据量大空间不够时提醒用户做扩 容等;
2. 3、如何浏览和更改组的属性
2.4.2、添加主机
添加主机的过程如下:
点击Add host:
输入主机名(该名称为用户自己定义的,不一定与实际主机名相同)IP地址为可选项, 可以不输,建议输入,便于识别该主机;
Save changes — 保存对该页所做的改动。 Add disks —添加新的物理盘到该group中. Locate — 定位组中的某个disk的位置,locate off取消locate动作. Delete — 删除组,会删除组内的数据. 不能删除Default Disk Group. 更改disk group name, disk failure protection level, occupancy alarm level, and comments by entering new values and clicking Save changes.
EVA特性对比
HP Enterprise Virtual Array 4400
EVA存储配置过程
EVA系统的开机和关机顺序
EVA 作为企业的核心数据存储系统,如何 正确的开机和关机对数据安全有着很大的 影响。
在日常维护中,请务必按照正确顺序进行 开关机。
EVA系统的开机顺序
• 停集群服务和节点 • shutdown 服务器; • 通过sma关闭eva的控制卡; • 关闭eva控制卡后的开关; • 关闭SMA; • 关闭SAN SWITCH; • 关闭EVA机柜电源;
- 1、下载文档前请自行甄别文档内容的完整性,平台不提供额外的编辑、内容补充、找答案等附加服务。
- 2、"仅部分预览"的文档,不可在线预览部分如存在完整性等问题,可反馈申请退款(可完整预览的文档不适用该条件!)。
- 3、如文档侵犯您的权益,请联系客服反馈,我们会尽快为您处理(人工客服工作时间:9:00-18:30)。
HP StorageWorks EVA
的最佳實例
HP 諮詢中心技術經理張明福文
關於EVA 的規劃,基本上根據三個因素:Cost, Performance, Availability。
客戶常關心的問題包
括:「是否要把全部的硬碟都放在同一disk group或二個(以上) group ? 它們之間的Performance,
Availability差異如何?使用不同的VRAID level和硬碟故障保護程度 (disk failure protection
level),將佔用多少空間,還是多少可用空間 ? 我使用Oracle資料庫,disk group 和data files,
redo logs, archive files等檔案,如何規劃才兼具最佳的可用性 (availability) 和性能
(performance)」…等等。
一般說來,考慮某一因素可能就無法顧及其他因素,使用者必須分析自己作業環境的需求和什麼是您
最重要的因素,HP工程師會瞭解您的環境和需求而為您作最佳規劃,以下以這三個因素分別舉列其最
佳實例供您參考,如果您需要更進一步的資料,可參考HP EVA5000和Storage array systems white
papers 的網址:
/storage/arraywhitepapers.html
Cost Considerations
.在一disk group使用相同容量的硬碟
.只使用一個 disk group (減少保留空間數量 (reserved space) )
.儘可能使用更多的硬碟
.使用較低性能、較大容量的硬碟
不混合不同容量硬碟在同一disk group:在一個disk group裡,EVA保留二倍(Vriad1) 最大硬碟
的空間來rebuild data處理一顆或二顆故障硬碟。
例如:一個disk group有16顆36GB 硬碟,它必須保
留 (36GB * 2(failure protection level)* 2) 的空間。
假如您的disk group換成是
15顆36GB和1顆
72GB硬碟組成,disk group就需要更大的保留空間 (72GB * 2 * 2) 來作硬碟故障時資料的重建,相
對地可使用的空間就減少。
只使用一個 disk group:愈多disk groups就需要愈多個保留空間 (reserved space)。
多個disk
groups將使空間分散在不同的disk group,可能形成個別的disk group都沒有大空間來產生一個
Vdisk/LUN。
Availability Considerations
VRIAD5的最佳實例
.至少有八個硬碟櫃 (disk enclosure)
.所有硬碟以垂直方式分置在不同的硬碟櫃
.在一disk group使用八的倍數的硬碟數量
.當產生disk group,EVA選擇不同硬碟櫃的硬碟成為它的成員
在一disk group裡,EVA把硬碟sub group成不同的 redundancy set 以支援多個硬碟故障而不造成資
料的損失,以避免硬碟櫃的故障而造成資料的損失。
任一redundancy set不能有二個(或以上) 的成
員在同一硬碟櫃上。
所以VRIAD5至少要有八個硬碟櫃,所有硬碟須以垂直方式插入不同的硬碟櫃,
硬碟的數量是八的倍數。
VRIAD1的最佳實例
.所有硬碟以垂直方式分置硬碟櫃
.當產生disk group,EVA選擇不同硬碟櫃的硬碟成為它的成員
假如EVA只有二或四個硬碟櫃,VRIAD5硬碟將無法避免硬碟櫃的故障而造成資料的損失,VRIAD1是最
佳的保護和選擇,成對mirror硬碟被分在不同的硬碟櫃以避免硬碟櫃的故障而造成資料的損失。
硬碟更換的最佳實例
.硬碟更換時,等待 sparing 的完成
.更換故障硬碟,所用相同容量的硬碟於相同的槽位 (Slot)
.插入新硬碟需等待 60 秒後,再插入第二顆硬碟
.對於Oracle資料庫,考慮把data files和log files放在不同的disk group
單個disk group具有很好的性能和延展性,最大地使用全部的硬碟卻是低可用性(availability),
假若disk group發生問題,資料就會流失。
雖然使用二個 (以上) disk group需較高的費用和可能
會降低性能但卻大大提高可用性,避免一個disk group發生問題而資料庫的資料不能還原 (recover)。
以下是二個資料庫把資料根據容量和性能的平衡,放在不同的disk group,任一disk group發生
問題,兩個資料庫都可以還原。
Disk Group 1 : Database 1, DB 1 log files, DB2 log files
Disk Group 2 : Database 2, DB 2 log files, DB1 log files
Performance Considerations
.儘可能使用更多的硬碟
.只使用一個 disk group
.15K RPM硬碟比相同容量10K硬碟具有較佳性能,相同的預算可以購買較多10K RPM 硬碟,增加
硬碟的數量而全面提高性能
.混合不同轉速的硬碟:不同轉速的硬碟放在同一disk group比放在不同的disk group性能較佳
.LUN balancing:同一時間一個LUN只被一個controller讀寫,平均I/O負載在不同的controller上
愈多的硬碟、性能愈好。
15K RPM的硬碟比10K RPM硬碟的性能快30% ~ 40%但15K硬碟可能比10K硬碟貴30%
~ 40% 以上,以下是對照表,使用者可從價錢和性能之間作最佳的選擇:
(cost, availability
or performance ?)。