CIA Review I-Edition 13
Native Instruments MASCHINE MK3 用户手册说明书

The information in this document is subject to change without notice and does not represent a commitment on the part of Native Instruments GmbH. The software described by this docu-ment is subject to a License Agreement and may not be copied to other media. No part of this publication may be copied, reproduced or otherwise transmitted or recorded, for any purpose, without prior written permission by Native Instruments GmbH, hereinafter referred to as Native Instruments.“Native Instruments”, “NI” and associated logos are (registered) trademarks of Native Instru-ments GmbH.ASIO, VST, HALion and Cubase are registered trademarks of Steinberg Media Technologies GmbH.All other product and company names are trademarks™ or registered® trademarks of their re-spective holders. Use of them does not imply any affiliation with or endorsement by them.Document authored by: David Gover and Nico Sidi.Software version: 2.8 (02/2019)Hardware version: MASCHINE MK3Special thanks to the Beta Test Team, who were invaluable not just in tracking down bugs, but in making this a better product.NATIVE INSTRUMENTS GmbH Schlesische Str. 29-30D-10997 Berlin Germanywww.native-instruments.de NATIVE INSTRUMENTS North America, Inc. 6725 Sunset Boulevard5th FloorLos Angeles, CA 90028USANATIVE INSTRUMENTS K.K.YO Building 3FJingumae 6-7-15, Shibuya-ku, Tokyo 150-0001Japanwww.native-instruments.co.jp NATIVE INSTRUMENTS UK Limited 18 Phipp StreetLondon EC2A 4NUUKNATIVE INSTRUMENTS FRANCE SARL 113 Rue Saint-Maur75011 ParisFrance SHENZHEN NATIVE INSTRUMENTS COMPANY Limited 5F, Shenzhen Zimao Center111 Taizi Road, Nanshan District, Shenzhen, GuangdongChina© NATIVE INSTRUMENTS GmbH, 2019. All rights reserved.Table of Contents1Welcome to MASCHINE (25)1.1MASCHINE Documentation (26)1.2Document Conventions (27)1.3New Features in MASCHINE 2.8 (29)1.4New Features in MASCHINE 2.7.10 (31)1.5New Features in MASCHINE 2.7.8 (31)1.6New Features in MASCHINE 2.7.7 (32)1.7New Features in MASCHINE 2.7.4 (33)1.8New Features in MASCHINE 2.7.3 (36)2Quick Reference (38)2.1Using Your Controller (38)2.1.1Controller Modes and Mode Pinning (38)2.1.2Controlling the Software Views from Your Controller (40)2.2MASCHINE Project Overview (43)2.2.1Sound Content (44)2.2.2Arrangement (45)2.3MASCHINE Hardware Overview (48)2.3.1MASCHINE Hardware Overview (48)2.3.1.1Control Section (50)2.3.1.2Edit Section (53)2.3.1.3Performance Section (54)2.3.1.4Group Section (56)2.3.1.5Transport Section (56)2.3.1.6Pad Section (58)2.3.1.7Rear Panel (63)2.4MASCHINE Software Overview (65)2.4.1Header (66)2.4.2Browser (68)2.4.3Arranger (70)2.4.4Control Area (73)2.4.5Pattern Editor (74)3Basic Concepts (76)3.1Important Names and Concepts (76)3.2Adjusting the MASCHINE User Interface (79)3.2.1Adjusting the Size of the Interface (79)3.2.2Switching between Ideas View and Song View (80)3.2.3Showing/Hiding the Browser (81)3.2.4Showing/Hiding the Control Lane (81)3.3Common Operations (82)3.3.1Using the 4-Directional Push Encoder (82)3.3.2Pinning a Mode on the Controller (83)3.3.3Adjusting Volume, Swing, and Tempo (84)3.3.4Undo/Redo (87)3.3.5List Overlay for Selectors (89)3.3.6Zoom and Scroll Overlays (90)3.3.7Focusing on a Group or a Sound (91)3.3.8Switching Between the Master, Group, and Sound Level (96)3.3.9Navigating Channel Properties, Plug-ins, and Parameter Pages in the Control Area.973.3.9.1Extended Navigate Mode on Your Controller (102)3.3.10Navigating the Software Using the Controller (105)3.3.11Using Two or More Hardware Controllers (106)3.3.12Touch Auto-Write Option (108)3.4Native Kontrol Standard (110)3.5Stand-Alone and Plug-in Mode (111)3.5.1Differences between Stand-Alone and Plug-in Mode (112)3.5.2Switching Instances (113)3.5.3Controlling Various Instances with Different Controllers (114)3.6Host Integration (114)3.6.1Setting up Host Integration (115)3.6.1.1Setting up Ableton Live (macOS) (115)3.6.1.2Setting up Ableton Live (Windows) (116)3.6.1.3Setting up Apple Logic Pro X (116)3.6.2Integration with Ableton Live (117)3.6.3Integration with Apple Logic Pro X (119)3.7Preferences (120)3.7.1Preferences – General Page (121)3.7.2Preferences – Audio Page (126)3.7.3Preferences – MIDI Page (130)3.7.4Preferences – Default Page (133)3.7.5Preferences – Library Page (137)3.7.6Preferences – Plug-ins Page (145)3.7.7Preferences – Hardware Page (150)3.7.8Preferences – Colors Page (154)3.8Integrating MASCHINE into a MIDI Setup (156)3.8.1Connecting External MIDI Equipment (156)3.8.2Sync to External MIDI Clock (157)3.8.3Send MIDI Clock (158)3.9Syncing MASCHINE using Ableton Link (159)3.9.1Connecting to a Network (159)3.9.2Joining and Leaving a Link Session (159)3.10Using a Pedal with the MASCHINE Controller (160)3.11File Management on the MASCHINE Controller (161)4Browser (163)4.1Browser Basics (163)4.1.1The MASCHINE Library (163)4.1.2Browsing the Library vs. Browsing Your Hard Disks (164)4.2Searching and Loading Files from the Library (165)4.2.1Overview of the Library Pane (165)4.2.2Selecting or Loading a Product and Selecting a Bank from the Browser (170)4.2.2.1[MK3] Browsing by Product Category Using the Controller (174)4.2.2.2[MK3] Browsing by Product Vendor Using the Controller (174)4.2.3Selecting a Product Category, a Product, a Bank, and a Sub-Bank (175)4.2.3.1Selecting a Product Category, a Product, a Bank, and a Sub-Bank on theController (179)4.2.4Selecting a File Type (180)4.2.5Choosing Between Factory and User Content (181)4.2.6Selecting Type and Character Tags (182)4.2.7List and Tag Overlays in the Browser (186)4.2.8Performing a Text Search (188)4.2.9Loading a File from the Result List (188)4.3Additional Browsing Tools (193)4.3.1Loading the Selected Files Automatically (193)4.3.2Auditioning Instrument Presets (195)4.3.3Auditioning Samples (196)4.3.4Loading Groups with Patterns (197)4.3.5Loading Groups with Routing (198)4.3.6Displaying File Information (198)4.4Using Favorites in the Browser (199)4.5Editing the Files’ Tags and Properties (203)4.5.1Attribute Editor Basics (203)4.5.2The Bank Page (205)4.5.3The Types and Characters Pages (205)4.5.4The Properties Page (208)4.6Loading and Importing Files from Your File System (209)4.6.1Overview of the FILES Pane (209)4.6.2Using Favorites (211)4.6.3Using the Location Bar (212)4.6.4Navigating to Recent Locations (213)4.6.5Using the Result List (214)4.6.6Importing Files to the MASCHINE Library (217)4.7Locating Missing Samples (219)4.8Using Quick Browse (221)5Managing Sounds, Groups, and Your Project (225)5.1Overview of the Sounds, Groups, and Master (225)5.1.1The Sound, Group, and Master Channels (226)5.1.2Similarities and Differences in Handling Sounds and Groups (227)5.1.3Selecting Multiple Sounds or Groups (228)5.2Managing Sounds (233)5.2.1Loading Sounds (235)5.2.2Pre-listening to Sounds (236)5.2.3Renaming Sound Slots (237)5.2.4Changing the Sound’s Color (237)5.2.5Saving Sounds (239)5.2.6Copying and Pasting Sounds (241)5.2.7Moving Sounds (244)5.2.8Resetting Sound Slots (245)5.3Managing Groups (247)5.3.1Creating Groups (248)5.3.2Loading Groups (249)5.3.3Renaming Groups (251)5.3.4Changing the Group’s Color (251)5.3.5Saving Groups (253)5.3.6Copying and Pasting Groups (255)5.3.7Reordering Groups (258)5.3.8Deleting Groups (259)5.4Exporting MASCHINE Objects and Audio (260)5.4.1Saving a Group with its Samples (261)5.4.2Saving a Project with its Samples (262)5.4.3Exporting Audio (264)5.5Importing Third-Party File Formats (270)5.5.1Loading REX Files into Sound Slots (270)5.5.2Importing MPC Programs to Groups (271)6Playing on the Controller (275)6.1Adjusting the Pads (275)6.1.1The Pad View in the Software (275)6.1.2Choosing a Pad Input Mode (277)6.1.3Adjusting the Base Key (280)6.1.4Using Choke Groups (282)6.1.5Using Link Groups (284)6.2Adjusting the Key, Choke, and Link Parameters for Multiple Sounds (286)6.3Playing Tools (287)6.3.1Mute and Solo (288)6.3.2Choke All Notes (292)6.3.3Groove (293)6.3.4Level, Tempo, Tune, and Groove Shortcuts on Your Controller (295)6.3.5Tap Tempo (299)6.4Performance Features (300)6.4.1Overview of the Perform Features (300)6.4.2Selecting a Scale and Creating Chords (303)6.4.3Scale and Chord Parameters (303)6.4.4Creating Arpeggios and Repeated Notes (316)6.4.5Swing on Note Repeat / Arp Output (321)6.5Using Lock Snapshots (322)6.5.1Creating a Lock Snapshot (322)6.5.2Using Extended Lock (323)6.5.3Updating a Lock Snapshot (323)6.5.4Recalling a Lock Snapshot (324)6.5.5Morphing Between Lock Snapshots (324)6.5.6Deleting a Lock Snapshot (325)6.5.7Triggering Lock Snapshots via MIDI (326)6.6Using the Smart Strip (327)6.6.1Pitch Mode (328)6.6.2Modulation Mode (328)6.6.3Perform Mode (328)6.6.4Notes Mode (329)7Working with Plug-ins (330)7.1Plug-in Overview (330)7.1.1Plug-in Basics (330)7.1.2First Plug-in Slot of Sounds: Choosing the Sound’s Role (334)7.1.3Loading, Removing, and Replacing a Plug-in (335)7.1.3.1Browser Plug-in Slot Selection (341)7.1.4Adjusting the Plug-in Parameters (344)7.1.5Bypassing Plug-in Slots (344)7.1.6Using Side-Chain (346)7.1.7Moving Plug-ins (346)7.1.8Alternative: the Plug-in Strip (348)7.1.9Saving and Recalling Plug-in Presets (348)7.1.9.1Saving Plug-in Presets (349)7.1.9.2Recalling Plug-in Presets (350)7.1.9.3Removing a Default Plug-in Preset (351)7.2The Sampler Plug-in (352)7.2.1Page 1: Voice Settings / Engine (354)7.2.2Page 2: Pitch / Envelope (356)7.2.3Page 3: FX / Filter (359)7.2.4Page 4: Modulation (361)7.2.5Page 5: LFO (363)7.2.6Page 6: Velocity / Modwheel (365)7.3Using Native Instruments and External Plug-ins (367)7.3.1Opening/Closing Plug-in Windows (367)7.3.2Using the VST/AU Plug-in Parameters (370)7.3.3Setting Up Your Own Parameter Pages (371)7.3.4Using VST/AU Plug-in Presets (376)7.3.5Multiple-Output Plug-ins and Multitimbral Plug-ins (378)8Using the Audio Plug-in (380)8.1Loading a Loop into the Audio Plug-in (384)8.2Editing Audio in the Audio Plug-in (385)8.3Using Loop Mode (386)8.4Using Gate Mode (388)9Using the Drumsynths (390)9.1Drumsynths – General Handling (391)9.1.1Engines: Many Different Drums per Drumsynth (391)9.1.2Common Parameter Organization (391)9.1.3Shared Parameters (394)9.1.4Various Velocity Responses (394)9.1.5Pitch Range, Tuning, and MIDI Notes (394)9.2The Kicks (395)9.2.1Kick – Sub (397)9.2.2Kick – Tronic (399)9.2.3Kick – Dusty (402)9.2.4Kick – Grit (403)9.2.5Kick – Rasper (406)9.2.6Kick – Snappy (407)9.2.7Kick – Bold (409)9.2.8Kick – Maple (411)9.2.9Kick – Push (412)9.3The Snares (414)9.3.1Snare – Volt (416)9.3.2Snare – Bit (418)9.3.3Snare – Pow (420)9.3.4Snare – Sharp (421)9.3.5Snare – Airy (423)9.3.6Snare – Vintage (425)9.3.7Snare – Chrome (427)9.3.8Snare – Iron (429)9.3.9Snare – Clap (431)9.3.10Snare – Breaker (433)9.4The Hi-hats (435)9.4.1Hi-hat – Silver (436)9.4.2Hi-hat – Circuit (438)9.4.3Hi-hat – Memory (440)9.4.4Hi-hat – Hybrid (442)9.4.5Creating a Pattern with Closed and Open Hi-hats (444)9.5The Toms (445)9.5.1Tom – Tronic (447)9.5.2Tom – Fractal (449)9.5.3Tom – Floor (453)9.5.4Tom – High (455)9.6The Percussions (456)9.6.1Percussion – Fractal (458)9.6.2Percussion – Kettle (461)9.6.3Percussion – Shaker (463)9.7The Cymbals (467)9.7.1Cymbal – Crash (469)9.7.2Cymbal – Ride (471)10Using the Bass Synth (474)10.1Bass Synth – General Handling (475)10.1.1Parameter Organization (475)10.1.2Bass Synth Parameters (477)11Working with Patterns (479)11.1Pattern Basics (479)11.1.1Pattern Editor Overview (480)11.1.2Navigating the Event Area (486)11.1.3Following the Playback Position in the Pattern (488)11.1.4Jumping to Another Playback Position in the Pattern (489)11.1.5Group View and Keyboard View (491)11.1.6Adjusting the Arrange Grid and the Pattern Length (493)11.1.7Adjusting the Step Grid and the Nudge Grid (497)11.2Recording Patterns in Real Time (501)11.2.1Recording Your Patterns Live (501)11.2.2The Record Prepare Mode (504)11.2.3Using the Metronome (505)11.2.4Recording with Count-in (506)11.2.5Quantizing while Recording (508)11.3Recording Patterns with the Step Sequencer (508)11.3.1Step Mode Basics (508)11.3.2Editing Events in Step Mode (511)11.3.3Recording Modulation in Step Mode (513)11.4Editing Events (514)11.4.1Editing Events with the Mouse: an Overview (514)11.4.2Creating Events/Notes (517)11.4.3Selecting Events/Notes (518)11.4.4Editing Selected Events/Notes (526)11.4.5Deleting Events/Notes (532)11.4.6Cut, Copy, and Paste Events/Notes (535)11.4.7Quantizing Events/Notes (538)11.4.8Quantization While Playing (540)11.4.9Doubling a Pattern (541)11.4.10Adding Variation to Patterns (541)11.5Recording and Editing Modulation (546)11.5.1Which Parameters Are Modulatable? (547)11.5.2Recording Modulation (548)11.5.3Creating and Editing Modulation in the Control Lane (550)11.6Creating MIDI Tracks from Scratch in MASCHINE (555)11.7Managing Patterns (557)11.7.1The Pattern Manager and Pattern Mode (558)11.7.2Selecting Patterns and Pattern Banks (560)11.7.3Creating Patterns (563)11.7.4Deleting Patterns (565)11.7.5Creating and Deleting Pattern Banks (566)11.7.6Naming Patterns (568)11.7.7Changing the Pattern’s Color (570)11.7.8Duplicating, Copying, and Pasting Patterns (571)11.7.9Moving Patterns (574)11.7.10Adjusting Pattern Length in Fine Increments (575)11.8Importing/Exporting Audio and MIDI to/from Patterns (576)11.8.1Exporting Audio from Patterns (576)11.8.2Exporting MIDI from Patterns (577)11.8.3Importing MIDI to Patterns (580)12Audio Routing, Remote Control, and Macro Controls (589)12.1Audio Routing in MASCHINE (590)12.1.1Sending External Audio to Sounds (591)12.1.2Configuring the Main Output of Sounds and Groups (596)12.1.3Setting Up Auxiliary Outputs for Sounds and Groups (601)12.1.4Configuring the Master and Cue Outputs of MASCHINE (605)12.1.5Mono Audio Inputs (610)12.1.5.1Configuring External Inputs for Sounds in Mix View (611)12.2Using MIDI Control and Host Automation (614)12.2.1Triggering Sounds via MIDI Notes (615)12.2.2Triggering Scenes via MIDI (622)12.2.3Controlling Parameters via MIDI and Host Automation (623)12.2.4Selecting VST/AU Plug-in Presets via MIDI Program Change (631)12.2.5Sending MIDI from Sounds (632)12.3Creating Custom Sets of Parameters with the Macro Controls (636)12.3.1Macro Control Overview (637)12.3.2Assigning Macro Controls Using the Software (638)12.3.3Assigning Macro Controls Using the Controller (644)13Controlling Your Mix (646)13.1Mix View Basics (646)13.1.1Switching between Arrange View and Mix View (646)13.1.2Mix View Elements (647)13.2The Mixer (649)13.2.1Displaying Groups vs. Displaying Sounds (650)13.2.2Adjusting the Mixer Layout (652)13.2.3Selecting Channel Strips (653)13.2.4Managing Your Channels in the Mixer (654)13.2.5Adjusting Settings in the Channel Strips (656)13.2.6Using the Cue Bus (660)13.3The Plug-in Chain (662)13.4The Plug-in Strip (663)13.4.1The Plug-in Header (665)13.4.2Panels for Drumsynths and Internal Effects (667)13.4.3Panel for the Sampler (668)13.4.4Custom Panels for Native Instruments Plug-ins (671)13.4.5Undocking a Plug-in Panel (Native Instruments and External Plug-ins Only) (675)13.5Controlling Your Mix from the Controller (677)13.5.1Navigating Your Channels in Mix Mode (678)13.5.2Adjusting the Level and Pan in Mix Mode (679)13.5.3Mute and Solo in Mix Mode (680)13.5.4Plug-in Icons in Mix Mode (680)14Using Effects (681)14.1Applying Effects to a Sound, a Group or the Master (681)14.1.1Adding an Effect (681)14.1.2Other Operations on Effects (690)14.1.3Using the Side-Chain Input (692)14.2Applying Effects to External Audio (695)14.2.1Step 1: Configure MASCHINE Audio Inputs (695)14.2.2Step 2: Set up a Sound to Receive the External Input (698)14.2.3Step 3: Load an Effect to Process an Input (700)14.3Creating a Send Effect (701)14.3.1Step 1: Set Up a Sound or Group as Send Effect (702)14.3.2Step 2: Route Audio to the Send Effect (706)14.3.3 A Few Notes on Send Effects (708)14.4Creating Multi-Effects (709)15Effect Reference (712)15.1Dynamics (713)15.1.1Compressor (713)15.1.2Gate (717)15.1.3Transient Master (721)15.1.4Limiter (723)15.1.5Maximizer (727)15.2Filtering Effects (730)15.2.1EQ (730)15.2.2Filter (733)15.2.3Cabinet (737)15.3Modulation Effects (738)15.3.1Chorus (738)15.3.2Flanger (740)15.3.3FM (742)15.3.4Freq Shifter (743)15.3.5Phaser (745)15.4Spatial and Reverb Effects (747)15.4.1Ice (747)15.4.2Metaverb (749)15.4.3Reflex (750)15.4.4Reverb (Legacy) (752)15.4.5Reverb (754)15.4.5.1Reverb Room (754)15.4.5.2Reverb Hall (757)15.4.5.3Plate Reverb (760)15.5Delays (762)15.5.1Beat Delay (762)15.5.2Grain Delay (765)15.5.3Grain Stretch (767)15.5.4Resochord (769)15.6Distortion Effects (771)15.6.1Distortion (771)15.6.2Lofi (774)15.6.3Saturator (775)15.7Perform FX (779)15.7.1Filter (780)15.7.2Flanger (782)15.7.3Burst Echo (785)15.7.4Reso Echo (787)15.7.5Ring (790)15.7.6Stutter (792)15.7.7Tremolo (795)15.7.8Scratcher (798)16Working with the Arranger (801)16.1Arranger Basics (801)16.1.1Navigating Song View (804)16.1.2Following the Playback Position in Your Project (806)16.1.3Performing with Scenes and Sections using the Pads (807)16.2Using Ideas View (811)16.2.1Scene Overview (811)16.2.2Creating Scenes (813)16.2.3Assigning and Removing Patterns (813)16.2.4Selecting Scenes (817)16.2.5Deleting Scenes (818)16.2.6Creating and Deleting Scene Banks (820)16.2.7Clearing Scenes (820)16.2.8Duplicating Scenes (821)16.2.9Reordering Scenes (822)16.2.10Making Scenes Unique (824)16.2.11Appending Scenes to Arrangement (825)16.2.12Naming Scenes (826)16.2.13Changing the Color of a Scene (827)16.3Using Song View (828)16.3.1Section Management Overview (828)16.3.2Creating Sections (833)16.3.3Assigning a Scene to a Section (834)16.3.4Selecting Sections and Section Banks (835)16.3.5Reorganizing Sections (839)16.3.6Adjusting the Length of a Section (840)16.3.6.1Adjusting the Length of a Section Using the Software (841)16.3.6.2Adjusting the Length of a Section Using the Controller (843)16.3.7Clearing a Pattern in Song View (843)16.3.8Duplicating Sections (844)16.3.8.1Making Sections Unique (845)16.3.9Removing Sections (846)16.3.10Renaming Scenes (848)16.3.11Clearing Sections (849)16.3.12Creating and Deleting Section Banks (850)16.3.13Working with Patterns in Song view (850)16.3.13.1Creating a Pattern in Song View (850)16.3.13.2Selecting a Pattern in Song View (850)16.3.13.3Clearing a Pattern in Song View (851)16.3.13.4Renaming a Pattern in Song View (851)16.3.13.5Coloring a Pattern in Song View (851)16.3.13.6Removing a Pattern in Song View (852)16.3.13.7Duplicating a Pattern in Song View (852)16.3.14Enabling Auto Length (852)16.3.15Looping (853)16.3.15.1Setting the Loop Range in the Software (854)16.4Playing with Sections (855)16.4.1Jumping to another Playback Position in Your Project (855)16.5Triggering Sections or Scenes via MIDI (856)16.6The Arrange Grid (858)16.7Quick Grid (860)17Sampling and Sample Mapping (862)17.1Opening the Sample Editor (862)17.2Recording Audio (863)17.2.1Opening the Record Page (863)17.2.2Selecting the Source and the Recording Mode (865)17.2.3Arming, Starting, and Stopping the Recording (868)17.2.5Using the Footswitch for Recording Audio (871)17.2.6Checking Your Recordings (872)17.2.7Location and Name of Your Recorded Samples (876)17.3Editing a Sample (876)17.3.1Using the Edit Page (877)17.3.2Audio Editing Functions (882)17.4Slicing a Sample (890)17.4.1Opening the Slice Page (891)17.4.2Adjusting the Slicing Settings (893)17.4.3Live Slicing (898)17.4.3.1Live Slicing Using the Controller (898)17.4.3.2Delete All Slices (899)17.4.4Manually Adjusting Your Slices (899)17.4.5Applying the Slicing (906)17.5Mapping Samples to Zones (912)17.5.1Opening the Zone Page (912)17.5.2Zone Page Overview (913)17.5.3Selecting and Managing Zones in the Zone List (915)17.5.4Selecting and Editing Zones in the Map View (920)17.5.5Editing Zones in the Sample View (924)17.5.6Adjusting the Zone Settings (927)17.5.7Adding Samples to the Sample Map (934)18Appendix: Tips for Playing Live (937)18.1Preparations (937)18.1.1Focus on the Hardware (937)18.1.2Customize the Pads of the Hardware (937)18.1.3Check Your CPU Power Before Playing (937)18.1.4Name and Color Your Groups, Patterns, Sounds and Scenes (938)18.1.5Consider Using a Limiter on Your Master (938)18.1.6Hook Up Your Other Gear and Sync It with MIDI Clock (938)18.1.7Improvise (938)18.2Basic Techniques (938)18.2.1Use Mute and Solo (938)18.2.2Use Scene Mode and Tweak the Loop Range (939)18.2.3Create Variations of Your Drum Patterns in the Step Sequencer (939)18.2.4Use Note Repeat (939)18.2.5Set Up Your Own Multi-effect Groups and Automate Them (939)18.3Special Tricks (940)18.3.1Changing Pattern Length for Variation (940)18.3.2Using Loops to Cycle Through Samples (940)18.3.3Using Loops to Cycle Through Samples (940)18.3.4Load Long Audio Files and Play with the Start Point (940)19Troubleshooting (941)19.1Knowledge Base (941)19.2Technical Support (941)19.3Registration Support (942)19.4User Forum (942)20Glossary (943)Index (951)1Welcome to MASCHINEThank you for buying MASCHINE!MASCHINE is a groove production studio that implements the familiar working style of classi-cal groove boxes along with the advantages of a computer based system. MASCHINE is ideal for making music live, as well as in the studio. It’s the hands-on aspect of a dedicated instru-ment, the MASCHINE hardware controller, united with the advanced editing features of the MASCHINE software.Creating beats is often not very intuitive with a computer, but using the MASCHINE hardware controller to do it makes it easy and fun. You can tap in freely with the pads or use Note Re-peat to jam along. Alternatively, build your beats using the step sequencer just as in classic drum machines.Patterns can be intuitively combined and rearranged on the fly to form larger ideas. You can try out several different versions of a song without ever having to stop the music.Since you can integrate it into any sequencer that supports VST, AU, or AAX plug-ins, you can reap the benefits in almost any software setup, or use it as a stand-alone application. You can sample your own material, slice loops and rearrange them easily.However, MASCHINE is a lot more than an ordinary groovebox or sampler: it comes with an inspiring 7-gigabyte library, and a sophisticated, yet easy to use tag-based Browser to give you instant access to the sounds you are looking for.What’s more, MASCHINE provides lots of options for manipulating your sounds via internal ef-fects and other sound-shaping possibilities. You can also control external MIDI hardware and 3rd-party software with the MASCHINE hardware controller, while customizing the functions of the pads, knobs and buttons according to your needs utilizing the included Controller Editor application. We hope you enjoy this fantastic instrument as much as we do. Now let’s get go-ing!—The MASCHINE team at Native Instruments.MASCHINE Documentation1.1MASCHINE DocumentationNative Instruments provide many information sources regarding MASCHINE. The main docu-ments should be read in the following sequence:1.MASCHINE Getting Started: This document provides a practical approach to MASCHINE viaa set of tutorials covering easy and more advanced tasks in order to help you familiarizeyourself with MASCHINE.2.MASCHINE Manual (this document): The MASCHINE Manual provides you with a compre-hensive description of all MASCHINE software and hardware features.Additional documentation sources provide you with details on more specific topics:▪Controller Editor Manual: Besides using your MASCHINE hardware controller together withits dedicated MASCHINE software, you can also use it as a powerful and highly versatileMIDI controller to pilot any other MIDI-capable application or device. This is made possibleby the Controller Editor software, an application that allows you to precisely define all MIDIassignments for your MASCHINE controller. The Controller Editor was installed during theMASCHINE installation procedure. For more information on this, please refer to the Con-troller Editor Manual available as a PDF file via the Help menu of Controller Editor.▪Online Support Videos: You can find a number of support videos on The Official Native In-struments Support Channel under the following URL: https:///NIsupport-EN. We recommend that you follow along with these instructions while the respective ap-plication is running on your computer.Other Online Resources:If you are experiencing problems related to your Native Instruments product that the supplied documentation does not cover, there are several ways of getting help:▪Knowledge Base▪User Forum▪Technical Support▪Registration SupportYou will find more information on these subjects in the chapter Troubleshooting.1.2Document ConventionsThis section introduces you to the signage and text highlighting used in this manual. This man-ual uses particular formatting to point out special facts and to warn you of potential issues. The icons introducing these notes let you see what kind of information is to be expected:This document uses particular formatting to point out special facts and to warn you of poten-tial issues. The icons introducing the following notes let you see what kind of information can be expected:Furthermore, the following formatting is used:▪Text appearing in (drop-down) menus (such as Open…, Save as… etc.) in the software and paths to locations on your hard disk or other storage devices is printed in italics.▪Text appearing elsewhere (labels of buttons, controls, text next to checkboxes etc.) in the software is printed in blue. Whenever you see this formatting applied, you will find the same text appearing somewhere on the screen.▪Text appearing on the displays of the controller is printed in light grey. Whenever you see this formatting applied, you will find the same text on a controller display.▪Text appearing on labels of the hardware controller is printed in orange. Whenever you see this formatting applied, you will find the same text on the controller.▪Important names and concepts are printed in bold.▪References to keys on your computer’s keyboard you’ll find put in square brackets (e.g.,“Press [Shift] + [Enter]”).►Single instructions are introduced by this play button type arrow.→Results of actions are introduced by this smaller arrow.Naming ConventionThroughout the documentation we will refer to MASCHINE controller (or just controller) as the hardware controller and MASCHINE software as the software installed on your computer.The term “effect” will sometimes be abbreviated as “FX” when referring to elements in the MA-SCHINE software and hardware. These terms have the same meaning.Button Combinations and Shortcuts on Your ControllerMost instructions will use the “+” sign to indicate buttons (or buttons and pads) that must be pressed simultaneously, starting with the button indicated first. E.g., an instruction such as:“Press SHIFT + PLAY”means:1.Press and hold SHIFT.2.While holding SHIFT, press PLAY and release it.3.Release SHIFT.Unlabeled Buttons on the ControllerThe buttons and knobs above and below the displays on your MASCHINE controller do not have labels.。
SICK GMS800系列I O模块补充操作说明说明书

S U P P L E M E N T A R Y O P E R A T I N G I N S T R U C T I O N SConnectionsFunctionsTechnical DataDocument InformationDescribed ProductProduct name:I/O ModuleBasic device:GMS800 Series gas analyzersDocument IDTitle:Supplementary Operating InstructionsI/O ModulePart No.:8015917Version: 2.0Release:2012-12ManufacturerSICK AGErwin-Sick-Str. 1·79183 Waldkirch·GermanyPhone:+49 7641 469-0Fax:+49 7641 469-1149E-mail:***************TrademarksProduct names used in this document may be trademarks and are only used for identification purposes.Original documentsThe English edition 8015917 of this document is an original docu-ment of the manufacturer.SICK AG assumes no liability for the correctness of an unauthor-ized translation.Please contact the manufacturer in case of doubt.Legal informationSubject to change without notice©SICK AG. All rights reserved.GlossaryWarning SymbolsWarning Levels / Signal WordsCAUTIONHazard or unsafe practice which could result in personal injury or property damage.NOTICEHazard which could result in property damage. Information SymbolsAC Alternating CurrentCAN Field bus (Control Area Network) with high datasecurity; especially suitable for safety-relevantapplications.CANopen Communication protocol for the CAN bus. Stan-dardized as European standard EN 50325-4.()CSA Canadian Standards Association (www.csa.ca) DC Direct CurrentEthernet Cable-based network technology for data net-works. Basis for network protocols (e.g. TCP/IP). PC Personal Computer.SOPAS SICK Open Portal for Applications and Systems:Family of computer programs to set parameters,capture and calculate data.SOPAS ET SOPAS Engineering Tool: PC application programto configure modular system components.Hazard (general)Important technical information for this productImportant information on electric or electronic func-tionsNice to knowSupplementary informationLink to information at another place2I/O Module·Supplementary Operating Instructions·8015917V2.0·©SICK AGContents1Important Information . . . . . . . . . . . . . . . . . . . . . . . . . . . . . . . . . . . . . . . . . . . . . . . 51.1Main safety information. . . . . . . . . . . . . . . . . . . . . . . . . . . . . . . . . . . . . . . . . . . . . . . . . . . . . . . 61.2Important operating information . . . . . . . . . . . . . . . . . . . . . . . . . . . . . . . . . . . . . . . . . . . . . . . 61.3Additional documentation/information . . . . . . . . . . . . . . . . . . . . . . . . . . . . . . . . . . . . . . . . . 62Product Description. . . . . . . . . . . . . . . . . . . . . . . . . . . . . . . . . . . . . . . . . . . . . . . . . . . 72.1Function. . . . . . . . . . . . . . . . . . . . . . . . . . . . . . . . . . . . . . . . . . . . . . . . . . . . . . . . . . . . . . . . . . . . . 82.2Versions. . . . . . . . . . . . . . . . . . . . . . . . . . . . . . . . . . . . . . . . . . . . . . . . . . . . . . . . . . . . . . . . . . . . . 83Installation . . . . . . . . . . . . . . . . . . . . . . . . . . . . . . . . . . . . . . . . . . . . . . . . . . . . . . . . . . . . . . 93.1Signal connection layout . . . . . . . . . . . . . . . . . . . . . . . . . . . . . . . . . . . . . . . . . . . . . . . . . . . . .103.2Suitable signal cables. . . . . . . . . . . . . . . . . . . . . . . . . . . . . . . . . . . . . . . . . . . . . . . . . . . . . . . .103.3Signal connections description . . . . . . . . . . . . . . . . . . . . . . . . . . . . . . . . . . . . . . . . . . . . . . .113.3.1Analog inputs (plug connector X7) . . . . . . . . . . . . . . . . . . . . . . . . . . . . . . . . . . . . . . . . . .113.3.2Analog outputs (plug connector X7). . . . . . . . . . . . . . . . . . . . . . . . . . . . . . . . . . . . . . . . .123.3.3Digital inputs (plug connector X3). . . . . . . . . . . . . . . . . . . . . . . . . . . . . . . . . . . . . . . . . . .133.3.4Digital outputs (plug connectors X4, X5). . . . . . . . . . . . . . . . . . . . . . . . . . . . . . . . . . . . .144Configuration . . . . . . . . . . . . . . . . . . . . . . . . . . . . . . . . . . . . . . . . . . . . . . . . . . . . . . . . . .174.1Setting options. . . . . . . . . . . . . . . . . . . . . . . . . . . . . . . . . . . . . . . . . . . . . . . . . . . . . . . . . . . . . .184.2Automation with formulas . . . . . . . . . . . . . . . . . . . . . . . . . . . . . . . . . . . . . . . . . . . . . . . . . . . .185Technical Data . . . . . . . . . . . . . . . . . . . . . . . . . . . . . . . . . . . . . . . . . . . . . . . . . . . . . . . .195.1Dimensions . . . . . . . . . . . . . . . . . . . . . . . . . . . . . . . . . . . . . . . . . . . . . . . . . . . . . . . . . . . . . . . .205.2Electronic data . . . . . . . . . . . . . . . . . . . . . . . . . . . . . . . . . . . . . . . . . . . . . . . . . . . . . . . . . . .215.3Signal connections – overview . . . . . . . . . . . . . . . . . . . . . . . . . . . . . . . . . . . . . . . . . . . . . . .225.4Signal connections – list . . . . . . . . . . . . . . . . . . . . . . . . . . . . . . . . . . . . . . . . . . . . . . . . . . . . .23I/O Module·Supplementary Operating Instructions·8015917V2.0·©SICK AG3Contents4I/O Module·Supplementary Operating Instructions·8015917V2.0·©SICK AGImportant InformationI/O Module ·Supplementary Operating Instructions ·8015917V2.0·©SICK AG 5S u b j e c t t o c h a n g e w i t h o u t n o t i c eI/O Module1Important InformationProduct description Main information Additional information6I/O Module ·Supplementary Operating Instructions ·8015917V2.0·©SICK AGImportant InformationS u b j e c t t o c h a n g e w i t h o u t n o t i c e1.1Main safety information1.2Important operating informationIf an »Alarm« message is displayed▸Check the current measured values. Consider the situation.▸Perform the measures planned at your site for the particular situation.▸When necessary: Switch the alarm message off (»acknowledge«).In hazardous situations:▸Switch off the emergency switch or mains disconnector switch of the host system.1.3Additional documentation/informationThis document supplements the Operating Instructions for GMS800 gas analyzers. It extends the “GMS800“ Operating Instructions with technical information on the I/O Mod-ule.▸Observe the Operating Instructions delivered with the “GMS800”.NOTICE: Sensitive electronics▸Before signal connections are established (also with plug connections): Disconnect the I/O Module and all connected devices from the mains (switch off).Otherwise electronic components could be damaged.The “GMS800” Operating Instructions also specify all further documents belonging to the individual device.NOTICE:▸Pay primary attention to any individual information provided.Product DescriptionI/O Module ·Supplementary Operating Instructions ·8015917V2.0·©SICK AG 7S u b j e c t t o c h a n g e w i t h o u t n o t i c eI/O Module2Product DescriptionFunction Versions8I/O Module ·Supplementary Operating Instructions ·8015917V2.0·©SICK AGProduct DescriptionS u b j e c t t o c h a n g e w i t h o u t n o t i c e2.1FunctionThe I/O Module is an electronic module for GMS800 Series series gas analyzers. It pro-vides the GMS800 signal connections (electronic inputs and outputs).Connection with the other device components is performed with a CAN bus.The logical function of the signal connections can be configured individually (→p.18, §4.2).2.2Versions●Open module for integration in enclosure (→Fig.1)●Closed module with top hat rail adapter (→p.20, §5.1)Fig.1Open I/O ModuleInstallationI/O Module ·Supplementary Operating Instructions ·8015917V2.0·©SICK AG 9S u b j e c t t o c h a n g e w i t h o u t n o t i c eI/O Module3InstallationConnections Electric functionsSettings10I/O Module ·Supplementary Operating Instructions ·8015917V2.0·©SICK AGInstallationS u b j e c t t o c h a n g e w i t h o u t n o t i c e3.1Signal connection layoutDesign●The signal connections have 12-pole plug connectors.●The plug connector counterparts delivered have screw terminals.●Each plug connector housing delivered accommodates two plug connector counter-parts.Mechanical coding (if required)▸Block a recess in the plug connection with a plastic insert.▸Remove the corresponding burr on the counterpart (→Fig.2).Fig.2I/O Module plug connector3.2Suitable signal cables▸Use shielded cables for all of the signal connections with a low high-frequency imped-ance of the shield.▸Only connect the earth on one cable end with GND/enclosure. Whenever possible, ensure a short connection with broad contact.▸Observe the shielding concept of the host system (if existing).NOTICE:▸Install the plug connector counterparts in the delivered metallic plug con-nector housings after connection of the signal cables.▸Secure the plug connection with the screws of the plug connectors so that the plug connector housing is pressed against the enclosure (EMC sealing tape).Otherwise the specified electromagnetic compatibility (EMC) will probably not be attained.Position of signal connections →Supplementary Operating Instructions forEnclosureDesignCodingNOTICE:▸Use suitable cables only. Install all cables properly.Otherwise the specified electromagnetic compatibility (EMC) will probably not be attained and functional problems might occur.InstallationS u b j e c t t o c h a n g e w i t h o u t n o t i c e3.3Signal connections description3.3.1Analog inputs (plug connector X7)Fig.3Plug connector X7 (analog inputs)FunctionAnalog input (AI1, AI2) must only be connected when the GMS800 considers these inputs;this requires an appropriate configuration of the analog inputs. The appropriate informa-tion is delivered separately when the analog inputs are configured at the factory or system manufacturer.▸Check whether the information on the analog inputs has been delivered.▸When required, connect the specified signals to the analog inputs.Application examples–Display an external measured value on GMS800–Mathematical link of an external measured value to internal measured values, e.g. for cross-sensitivity compensation or physical conversion Electric function●The input signal is an analog current signal (0…20mA).●The signal current must originate from an external current source.●Load (internal resistance) of an analog input: 10ΩIdentification in Formula editor Identification for I/O assignmentAI1N3M07AI01 (AI02)AI2N3M07AI02 (AI02)●Configuration options →p.18, §4.1●Electronic data →p.21, §5.2●Suitable signal cables →p.10, §3.2InstallationS u b j e c t t o c h a n g e w i t h o u t n o t i c e3.3.2Analog outputs (plug connector X7)Fig.4Plug connector X7 (analog outputs)FunctionEach analog output (AO1…AO4) can be assigned to one of the available sources (→p.18,§4.1). The current value of the source is output as a potential-free current signal.When the current measured value of an Analyzer module is selected as source, the measured value can be output in two different measuring ranges when allowed by the Ana-lyzer module configuration.Electric functionThe analog outputs are potential-free and deliver a load-independent current signal.▸Maintain the allowable load (standard: 500Ω).▸For device versions for potentially explosive atmospheres and fitted with Zener barri-ers: Observe the separate specification for the allowable load (Data Sheet).Identification in Formula editorIdentification for I/O assignmentAO1N3M05AO01 (AO02)AO3N3M05AO02 (AO02)AO4N3M06AO01 (AO02)AO5N3M06AO02 (AO02)New measured values are created approximately every 0.5…20seconds (depending on the type and number of Analyzer modules).●Configuration options →p.18, §4.1●Electronic data →p.21, §5.2●Suitable signal cables →p.10, §3.2InstallationS u b j e c t t o c h a n g e w i t h o u t n o t i c e3.3.3Digital inputs (plug connector X3)Fig.5Plug connector X3 (digital inputs)FunctionEach digital input (control input) can be assigned to one of the available logical functions (→p.18, §4.1).Electric function●The digital inputs (DI1…DI8) are potential-free optical coupler inputs with common ref-erence potential (DIC).●The signal voltage must originate from an external voltage source (14…42V DC).●The digital inputs can be run with either positive or negative voltage (reference potential optionally “-” or “+”).●With inverted switching logic, the logical function of the control input is activated when no current flows through the control input.Identification in Formula editorIdentification for I/O assignmentDI1N3M01DI01 (DI04)DI2N3M01DI02 (DI04)DI3N3M01DI03 (DI04)DI4N3M01DI04 (DI04)DI5N3M02DI01 (DI04)DI6N3M02DI02 (DI04)DI7N3M02DI03 (DI04)DI8N3M02DI04 (DI04)NOTICE:▸Keep voltages above 50 V DC away from the signal connections.Higher voltages could severely damage components. In addition, the safe sep-aration of functional voltages would no longer be guaranteed.●Configuration options →p.18, §4.1●Electronic data →p.21, §5.2●Suitable signal cables →p.10, §3.2InstallationS u b j e c t t o c h a n g e w i t h o u t n o t i c e3.3.4Digital outputs (plug connectors X4, X5)Fig.6Plug connectors X4 and X5 (digital outputs)Identification in Formula editorIdentification for I/O assignmentDO1N3M03DO01 (DO04)DO2N3M03DO02 (DO04)DO3N3M03DO03 (DO04)DO4N3M03DO04 (DO04)DO5N3M04DO01 (DO04)DO6N3M04DO02 (DO04)DO7N3M04DO03 (DO04)DO8N3M04DO04 (DO04)NOTICE:▸Keep voltages above 50 V DC away from the signal connections.▸Observe the maximum contact load (→p.21, §5.2).▸Only connect inductive loads (e.g. relays, solenoid valves) using discharging diodes.Unallowed loads could severely damage components and the safe separation of functional voltages would no longer be guaranteed.●Configuration options →p.18, §4.1●Electronic data →p.21, §5.2●Suitable signal cables→p.10, §3.2InstallationS u b j e c t t o c h a n g e w i t h o u t n o t i c eFunctionThe digital outputs are potential-free relay switching contacts (switching outputs). Each dig-ital output (DO1 ... DO8) can be assigned to one of the available logical functions (→p.18,§4.1).Switching logica)Normal (open-circuit principle): When the assigned switching function is activated logi-cally, the switching output is also activated electronically (relay is energized).b)Inverted (closed-circuit principle): The switching output is activated electronically as long as the logical switching function is not activated. The switching output is deacti-vated electronically in logically activated state (relay deactivated).Check this variant carefully when the switching output is used for a warning message (→p.15 ”Safety criteria”). Safety criteriaCAUTION:Risks for connected devices/systems▸Before using the switching outputs, clarify the safety-relevant consequences for the following operational malfunctions:–Power failure (for example, local power failure or accidental switching-off or defective fuse)–Defect in the I/O Module (for example, electronic defect of a switching out-put)–Interruption of the electrical connection ▸Observe the switching method:–Switching outputs with normal switching logic signal the switching function as not activated after a power failure–Switching outputs with inverted switching logic signal the associated switching function as triggered immediately after a power failure.▸Carefully review the consequences. Make sure that no dangerous situation can arise when a failure or defect occurs.InstallationS u b j e c t t o c h a n g e w i t h o u t n o t i c eConfigurationS u b j e c t t o c h a n g e w i t h o u t n o t i c eI/O Module4ConfigurationOptions ProgrammingConfigurationS u b j e c t t o c h a n g e w i t h o u t n o t i c e4.1Setting optionsEach signal connection can be individually configured with the functions of the control unit (→Table 1). A defined standard configuration or the ordered configuration are set at the fac-tory. If the GMS800 is part of a measuring system, the signal connections are programmed to match the system.4.2Automation with formulasThe “SOPAS ET” application program can be used to program logical and mathematical function links (“formulas”). This allows digital output actions controlled by logic and time to automate external processes.Table 1I/O configuration optionsFunctional group Variables (examples)Analog inputs●Electronic zero point (0/2/4mA)●Unit of the signal fed●Physical start and end values of the signal span Analog outputs●Electronic zero point (0/2/4mA)●Source of the value output●Physical start and end values of the signal span Digital outputs ●Source that controls the switching state ●Normal or inverted activation logic Digital inputs●Name (designation)●Normal or inverted activation logicInstructions for programming formulas →Technical Information “Basic Control Unit (BCU) with SOPAS ET”Technical DataS u b j e c t t o c h a n g e w i t h o u t n o t i c eI/O Module5Technical DataElectronic dataList (overview) of the signal connectionsTechnical DataS u b j e c t t o c h a n g e w i t h o u t n o t i c e5.1DimensionsTechnical DataI/O Module ·Supplementary Operating Instructions ·8015917V2.0·©SICK AG 21S u b j e c t t o c h a n g e w i t h o u t n o t i c e5.2Electronic dataAnalog outputs Number:4Reference potential:Potential-free (electrically isolated)Signal range:0…24mA Residual ripple:0.02 mAResolution/precision: 0.1% (20μA)Precision:0.25% of measuring range end value Maximum load:500ΩMaximum output voltage:15V Start or error state:Adjustable Analog inputs Number:2Reference potential:GNDInput signal:0…20mA Highest allowable input signal:30 mA Overload protection:±1000 mA Input load50ΩTransducer precision:0.5%Digital inputs (control inputs)Type of construction:Optical coupler Number:8Switching range:18…42V Highest allowable voltage:±50V DCTable 2Maximum load per relay switching contact [1][1]All voltages relative to GND/enclosure Application area AC voltage [2] [2]Effective valueDC voltage Current [2]Standard:max. 30 V AC max. 48 V DC Max. 500 mA CSA [3][3]Possible voltage/current combinations in CSA Standard range or within the framework of a CSA certificationEither:max. 30 V AC max. 48 V DC Max. 50 mA Or:max. 15 V AC max. 24 V DC Max. 200 mA Or:max. 12 V ACmax. 18 V DCMax. 500 mADigital outputs (switching outputs)Number of relays:8Contact type:1-pole changeover switch, 3 connections Contact load:→Table 2Highest allowable voltage:±50V DCNOTICE:Only use discharging diodes to connect inductive loads (e.g. relays, solenoid valves) to the switching outputs.▸For inductive loads: Check whether the discharging diodes are fitted.▸If not: Install external discharging diodes.22I/O Module ·Supplementary Operating Instructions ·8015917V2.0·©SICK AGTechnical DataS u b j e c t t o c h a n g e w i t h o u t n o t i c e5.3Signal connections – overviewTechnical DataI/O Module ·Supplementary Operating Instructions ·8015917V2.0·©SICK AG 23S u b j e c t t o c h a n g e w i t h o u t n o t i c e5.4Signal connections – listTerminal Pin Function Name NotesX31GroundGND 23Control input commonDIC 45Control input 0DI1N3M01DI01 (DI04)6Control input 1DI2N3M01DI02 (DI04)7Control input 2DI3N3M01DI03 (DI04)8Control input 3DI4N3M01DI04 (DI04)9Control input 4DI5N3M02DI01 (DI04)10Control input 5DI6N3M02DI02 (DI04)11Control input 6DI7N3M02DI03 (DI04)12Control input 7DI8N3M02DI04 (DI04)X41Relay contact 1 – normally open DO1N3M03DO01 (DO04)2Relay contact 1 – common3Relay contact 1 – normally closed 4Relay contact 2 – normally open DO2N3M03DO02 (DO04)5Relay contact 2 – common6Relay contact 2 – normally closed 7Relay contact 3 – normally open DO3N3M03DO03 (DO04)8Relay contact 3 – common9Relay contact 3 – normally closed 10Relay contact 4 – normally open DO4N3M03DO04 (DO04)11Relay contact 4 – common12Relay contact 4 – normally closed X51Relay contact 5 – normally open DO5N3M04DO01 (DO04)2Relay contact 5 – common3Relay contact 5 – normally closed 4Relay contact 6 – normally open DO6N3M04DO02 (DO04)5Relay contact 6 – common6Relay contact 6 – normally closed 7Relay contact 7 – normally open DO7N3M04DO03 (DO04)8Relay contact 7 – common9Relay contact 7 – normally closed 10Relay contact 8 – normally open DO8N3M04DO04 (DO04)11Relay contact 8 – common12Relay contact 8 – normally closed X71GroundGND23(+) Analog input 1 (0…20mA)AI1N3M07AI01 (AI02)4(+) Analog input 2 (0…20mA)AI2N3M07AI02 (AI02)5(–) Analog output 1AO1N3M05AO01 (AO02)6(+) Analog output 1 (0/2/4…20mA)7(–) Analog output 2AO2N3M05AO02 (AO02)8(+) Analog output 2 (0/2/4…20mA)9(–) Analog output 3AO3N3M06AO01 (AO02)10(+) Analog output 3 (0/2/4…20mA)11(–) Analog output 4AO4N3M06AO02 (AO02)12(+) Analog output 4 (0/2/4…20mA)24I/O Module ·Supplementary Operating Instructions ·8015917V2.0·©SICK AGTechnical DataS u b j e c t t o c h a n g e w i t h o u t n o t i c e···Empty page ···IndexI/O Module ·Supplementary Operating Instructions ·8015917V2.0·©SICK AG 25A Additional documentation (information) . . . . . . . . . . 6Analog inputs . . . . . . . . . . . . . . . . . . . . . . . . . . . . . . 11Analog outputs . . . . . . . . . . . . . . . . . . . . . . . . . . . . . 12CClosed-circuit principle . . . . . . . . . . . . . . . . . . . . . . . 15Configuration (setting options) . . . . . . . . . . . . . . . . 18Connection terminals . . . .see »Terminal assignment«Control inputs. . . . . . . . . . . . . . . . . see »Digital inputs«DDigital inputs . . . . . . . . . . . . . . . . . . . . . . . . . . . . . . . 13Digital outputs . . . . . . . . . . . . . . . . . . . . . . . . . . . . . . 14-Control logic . . . . . . . . . . . . . . . . . . . . . . . . . . . . . . 15-Open/closed-circuit principle . . . . . . . . . . . . . . . . 15-Safety criteria . . . . . . . . . . . . . . . . . . . . . . . . . . . . 15-Switching functions . . . . . . . . . . . . . . . . . . . . . . . . 15Dimensions . . . . . . . . . . . . . . . . . . . . . . . . . . . . . . . . 20E EMC . . . . . . . . . . . . . . . . . . . . . . . . . . . . . . . . . . . . . . 10FFunction of the module . . . . . . . . . . . . . . . . . . . . . . . 8G Glossary . . . . . . . . . . . . . . . . . . . . . . . . . . . . . . . . . . . . 2IInformation symbols . . . . . . . . . . . . . . . . . . . . . . . . . . 2Installation . . . . . . . . . . . . . . . . . . . . . . . . . . . . . . . . . 9MMeasured value outputs. . . . . . .see »Analog outputs«Module versions . . . . . . . . . . . . . . . . . . . . . . . . . . . . . 8O Open-circuit principle . . . . . . . . . . . . . . . . . . . . . . . . 15PPin assignment . . . . . . see »Terminal assignment« 10Plug connector-Mechanical coding . . . . . . . . . . . . . . . . . . . . . . . . 10-Version . . . . . . . . . . . . . . . . . . . . . . . . . . . . . . . . . . 10-X3 . . . . . . . . . . . . . . . . . . . . . . . . . . . . . . . . . . . . . . 13-X4 . . . . . . . . . . . . . . . . . . . . . . . . . . . . . . . . . . . . . . 14-X5 . . . . . . . . . . . . . . . . . . . . . . . . . . . . . . . . . . . . . . 14-X7 . . . . . . . . . . . . . . . . . . . . . . . . . . . . . . . . . . 11-12Plug connector housing . . . . . . . . . . . . . . . . . . . . . . 10Product description . . . . . . . . . . . . . . . . . . . . . . . . . . 7Programming (information) . . . . . . . . . . . . . . . . . . . 18R Relay contacts . . . . . . . . . . . . . .siehe “Digital outputs”SSafety information . . . . . . . . . . . . . . . . . . . . . . . .6, 15Setting options . . . . . . . . . . . . . . . . . . . . . . . . . . . . . 18Shield (signal cable) . . . . . . . . . . . . . . . . . . . . . . . . . 10Shielding (signal cable) . . . . . . . . . . . . . . . . . . . . . . 10Signal cable . . . . . . . . . . . . . . . . . . . . . . . . . . . . . . . . 10Signal connections-Analog inputs . . . . . . . . . . . . . . . . . . . . . . . . . . . . . 11-Analog outputs . . . . . . . . . . . . . . . . . . . . . . . . . . . 12-Description . . . . . . . . . . . . . . . . . . . . . . . . . . . . . . . 11-Digital inputs . . . . . . . . . . . . . . . . . . . . . . . . . . . . . 13-Digital outputs . . . . . . . . . . . . . . . . . . . . . . . . . . . . 14-List (Table) . . . . . . . . . . . . . . . . . . . . . . . . . . . . . . . 23-Overview (graph) . . . . . . . . . . . . . . . . . . . . . . . . . . 22-Programming (information) . . . . . . . . . . . . . . . . . 18-Safety criteria . . . . . . . . . . . . . . . . . . . . . . . . . . . . 15-Setting options . . . . . . . . . . . . . . . . . . . . . . . . . . . 18-Suitable signal cable . . . . . . . . . . . . . . . . . . . . . . . 10-Technical data . . . . . . . . . . . . . . . . . . . . . . . . . . . . 21-Version . . . . . . . . . . . . . . . . . . . . . . . . . . . . . . . . . . 10Signal words . . . . . . . . . . . . . . . . . . . . . . . . . . . . . . . . 2Specifications . . . . . . . . . . . . . . . . . . . . . . . . . . . . . . 19Switching outputs . . . . . . . . . . .siehe “Digital outputs”Symbols (explanation) . . . . . . . . . . . . . . . . . . . . . . . . 2TTechnical Data . . . . . . . . . . . . . . . . . . . . . . . . . .19, 21-Dimensions . . . . . . . . . . . . . . . . . . . . . . . . . . . . . . 20-Electronic data . . . . . . . . . . . . . . . . . . . . . . . . . . . 21Terminal assignment-Analog inputs (X7) . . . . . . . . . . . . . . . . . . . . . . . . . 11-Analog outputs (X7) . . . . . . . . . . . . . . . . . . . . . . . . 12-Digital inputs (X3) . . . . . . . . . . . . . . . . . . . . . . . . . 13-Digital outputs (X4, X5) . . . . . . . . . . . . . . . . . . . . . 14W Warning symbols, warning levels . . . . . . . . . . . . . . . 2XX3 . . . . . . . . . . . . . . . . . . . . . . . . . . . . . . . . . . . . . . . . 13X4 . . . . . . . . . . . . . . . . . . . . . . . . . . . . . . . . . . . . . . . . 14X5 . . . . . . . . . . . . . . . . . . . . . . . . . . . . . . . . . . . . . . . . 14X7 . . . . . . . . . . . . . . . . . . . . . . . . . . . . . . . . . . . . 11-12SICK AG |Waldkirch |Germany |8015917/V 2.0/2012-12 |S u b j e c t t o c h a n g e w i t h o u t n o t i c eSICK worldwideYou will find our local subsidiary or agency at:Your local sales and service partner。
ASME 2013 Section VIII, Divisions 1, 2 and 3; 4.18 勘误

sketch (a)Note: 2011a was[Fig. UHX-11.1(a)]sketchshould be "+"For Information Only3.2.8 Prefabricated or Preformed Pressure Parts Furnished Without a Code Stamp …3.2.8.5The Code recognizes that a Certificate of Authorization Holder may fabricate parts in accordance with 3.2.8.4, and that are marked in accordance with 3.2.8.4(h). In lieu of the requirement in 3.2.8.4(d), the Certificate of Authorization Holder may subcontract to an individual or organization not holding an ASME Certificate of Authorization standard pressure parts that are fabricated to a standard other than an ASME product standard provided all the following conditions are met:(a) The activities to be performed by the subcontractor are included within the Certificate Holder’s Quality Control System.(b) The Certificate Holder’s Quality Control System provides for the following activities associated with subcontracting of welding operations, and these provisions shall be acceptable to the Manufacturer’s Authorized Inspection Agency.(1) The welding processes permitted by this Division that are permitted to be subcontracted.(2) Welding operations(3) Authorized Inspection activities(4) Placement of the Certificate of Authorization Holders marking in accordance withd .(c) The Certificate Holder’s Quality Control System provides for the requirements of UG‐92 7.2.2 to be met at the subcontractor’s facility.(d) The Certificate Holder shall be responsible for reviewing and accepting the Quality Control Programs of the subcontractor.(e) The Certificate Holder shall ensure that the subcontractor uses written procedures and welding operations that have been qualified as required by this Division.(f) The Certificate Holder shall ensure that the subcontractor uses personnel that have been qualified as required by this Division.(g) The Certificate Holder and the subcontractor shall describe in their Quality Control Systems the operational control of procedure and personnel qualifications of the subcontracted welding operations.(h) The Certificate Holder shall be responsible for controlling the quality and ensuring that all materials and parts that are welded by subcontractors and submitted to the Inspector for acceptance, conform to all applicable requirements of this Division.(i) The Certificate Holder shall describe in their Quality Control Systems the operational control for maintaining traceability of materials received from the subcontractor.(j) The Certificate Holder shall receive approval for subcontracting from the Authorized Inspection Agency prior to commencing of activities.should be lower case "t"Errata Pressure2011 Edition 2013 edition。
402 1 电动门用户手册说明书
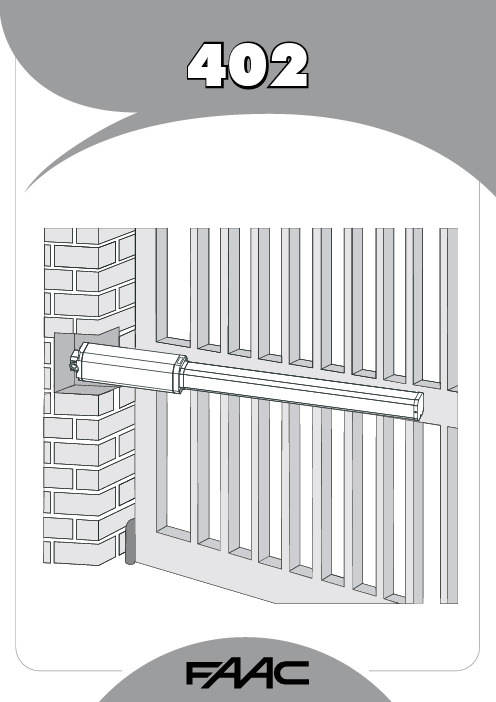
1FAAC S.p.A.Via Benini, 140069 Zola Predosa (BO) - ITALIATel.: 051/61724 - Fax: 051/758518www.faac.it732143 Rev.A.EC DECLARATION OF CONFORMITY FOR MACHINES ....................................................................................p. 2 WARNINGS FOR THE INSTALLER .......................................................................................................................p. 2 1.DESCRIPTION AND TECHNICAL SPECIFICATIONS ....................................................................................p. 31.1.DIMENSIONS ................................................................................................................................p. 32.ELECTRIC DEVICES (standard system) ....................................................................................................p. 33.INSTALLING THE AUTOMATED SYSTEM ......................................................................................................p. 43.1.PRELIMINARY CHECKS ................................................................................................................p. 43.2.INSTALLATION DIMENSIONS ........................................................................................................p. 43.2.1.GENERAL RULES FOR DETERMINING THE INSTALLATION DIMENSIONS ............................p. 43.3.INSTALLATION OF THE OPERATORS .............................................................................................p. 44.START-UP ....................................................................................................................................................p. 64.1.ADJUSTING THE ANTI-CRUSHING SYSTEM ..................................................................................p. 65.FINAL OPERATIONS ...................................................................................................................................p. 76.AUTOMATED SYSTEM TEST .........................................................................................................................p. 77.MANUAL OPERATION ...............................................................................................................................p. 78.RESTORING NORMAL OPERATION MODE ................................................................................................p. 79.MAINTENANCE ..........................................................................................................................................p. 710.REPAIRS .....................................................................................................................................................p. 711.TROUBLE SHOOTING .................................................................................................................................p. 821)ATTENTION! To ensure the safety of people, it is important that you readall the following instructions. Incorrect installation or incorrect use of the product could cause serious harm to people.2)Carefully read the instructions before beginning to install the product.3)Do not leave packing materials (plastic, polystyrene, etc.) within reachof children as such materials are potential sources of danger.4)Store these instructions for future reference.5)This product was designed and built strictly for the use indicated in thisdocumentation. Any other use, not expressly indicated here, could compromise the good condition/operation of the product and/or be a source of danger.6)FAAC declines all liability caused by improper use or use other than thatfor which the automated system was intended.7)Do not install the equipment in an explosive atmosphere: the presenceof inflammable gas or fumes is a serious danger to safety.8)The mechanical parts must conform to the provisions of Standards EN12604 and EN 12605.For non-EU countries, to obtain an adequate level of safety, the Standards mentioned above must be observed, in addition to national legal regulations.9)FAAC is not responsible for failure to observe Good Technique in theconstruction of the closing elements to be motorised, or for any deformation that may occur during use.10)The installation must conform to Standards EN 12453 and EN 12445.For non-EU countries, to obtain an adequate level of safety, the Standards mentioned above must be observed, in addition to national legal regulations.11)Before attempting any job on the system, cut out electrical power .12)The mains power supply of the automated system must be fitted with anall-pole switch with contact opening distance of 3mm or greater. Use of a 6A thermal breaker with all-pole circuit break is recommended.13)Make sure that a differential switch with threshold of 0.03 A is fittedupstream of the system.14)Make sure that the earthing system is perfectly constructed, andconnect metal parts of the means of the closure to it.15)The safety devices (EN 12978 standard) protect any danger areasagainst mechanical movement Risks , such as crushing, dragging,and shearing.16)Use of at least one indicator-light (e.g. FAACLIGHT ) is recommendedfor every system, as well as a warning sign adequately secured to the frame structure, in addition to the devices mentioned at point “15”.17)FAAC declines all liability as concerns safety and efficient operationof the automated system, if system components not produced by FAAC are used.18)For maintenance, strictly use original parts by FAAC.19)Do not in any way modify the components of the automated system.20)The installer shall supply all information concerning manual operationof the system in case of an emergency, and shall hand over to the user the warnings handbook supplied with the product.21)Do not allow children or adults to stay near the product while it isoperating.22)Keep remote controls or other pulse generators away from children,to prevent the automated system from being activated involuntarily.23)Transit through the leaves is allowed only when the gate is fully open.24)The user must not attempt any kind of repair or direct action whateverand contact qualified personnel only.25)Maintenance: check at least every 6 months the efficiency of thesystem, particularly the efficiency of the safety devices (including,where foreseen, the operator thrust force) and of the release devices.26)Anything not expressly specified in these instructions is not permitted.WARNINGS FOR THE INSTALLERGENERAL SAFETY OBLIGATIONSEC DECLARATION OF CONFORMITY FOR MACHINES(DIRECTIVE 98/37/EC)Manufacturer:FAAC S.p.A.Address:Via Benini, 1 - 40069 Zola Predosa BOLOGNA - ITALY Declares that:402 mod. operator,•is built to be integrated into a machine or to be assembled with other machinery to create a machine under the provisions of Directive 98/37/EC;•conforms to the essential safety requirements of the following EEC directives:73/23/EEC and subsequent amendment 93/68/EEC.89/336/EEC and subsequent amendment 92/31/EEC and 93/68/EECand also declares that it is prohibited to put into service the machinery until the machine in which it will be integrated or of which it will become a component has been identified and declared as conforming to the conditions of Directive 98/37/EC.Bologna, 01 January 2005The Managing DirectorA. Bassi3These instructions apply to the following models:402 CBC - 402 SBSThe FAAC 402 automated system for swing leaf gates consists of an enbloc composed of an electric pump and a hydraulic piston which transmits drive to the leaf.The model with a hydraulic locking does not require installation of electric locks, as it guarantees mechanical locking of the leaf when the motor is not operating.The model without a hydraulic locking, requires the installation of electric locks to ensure the leaf is mechanically locked.The 402 automated systems were designed and built to automate swing leaf gates. Do not use for any other purpose.Tab. 1: Technical specifications of “402 Operator”MODEL402 CBC402 SBSPower supply voltage 230 Vac(+6%-10%) 50 (6o) Hz Rod extension speed 1.3 cm/s 1 cm/s Pump flow rate1 l/min 0.75 l/min Traction and thrust force 0-500 daN0-690 daNOperating ambient temperature -40°C - +55°CAbsorbed power 220 W Absorbed current 1 A Motor rotation speed 1400 rpm Motor winding temperature 120°C Weight 6.5 kg Type of oil FAAC HP OILProtection class IP 55Single leaf max length 1,80 m3,00 mUse frequency55 (cycles/hour)4To ensure a correctly operating automated system, the structure of the existing gate or gate to be built must satisfy the following requirements:•Max length of leaves according to the dimensions of Table 1 on page 3.• A strong and rigid leaf structure.•Smooth, uniform leaves movement, without any irregular friction during the entire travel;•Existing hinges in good condition.•Travel limit mechanical stops must be provided.We advise you to carry out the metalwork jobs before installing the automated system.The condition of the structure directly influences the reliability and safety of the automated system.Table A : Recommended dimensions for standard operatorsc = The effective rod stroke is shorter than the maximum stroke, inorder to prevent the rod from reaching its stop point internally, during the opening and closing stages.(*) Rod effective stroke (**) maximum dimension1)Fasten the rear attachment on the pilaster, following the indications in Table A . Modify, if necessary, the length of the supplied attachment.Attention : To avoid compromising good operator functionality, we recommend you to respect the indicated dimensions.• For iron pilasters, accurately weld the rear attachment (ref.ባ, Fig. 6) directly on the pilaster.• For masonry pilasters, select one of the following solutions:A)appropriately lay a walling-in plate and then accurately weld the rear attachment.B)secure, with screws and expansion plugs, the rear attachment plate (ref. a, Fig.6) to the pilaster and then accurately weld the rear attachment to theplate as shown in Fig. 6.If the dimensions indicated in table A or B cannot be executed,the following must be considered in order to determine different measurements:-to obtain 90° opening of the leaf: a + b = c.-to obtain over 90° opening of the leaf: a + b < c.-lower a and b dimensions will result in higher speeds . We advise you to observe the current legal regulations;-limit the difference of the a and b dimensions to within 40 mm :higher differences will considerably vary speed during the opening and closing motion;-for reasons of operator dimensions, the minimum Z dimension is 50 mm (Fig. 4);-if the pilaster dimensions or the position of the hinge (dimension d ) do not make it possible to contain dimension a to the required size, a niche must be made in the pilaster as shown in Opening angle 90°110°a (mm)120100b (mm)120100c(*)(mm)240240d(**)(mm)705056-Lastly, remove the key and restore the power supply to the system.For any repairs, contact FAAC’s authorised Repair Centres.78The following table will help you identify and solve some particular conditions.CONDITIONGate not moving.Gate moving slowly.Gate moving jogwise.The operator is losing oil from the breather screw.The leaves stop at slow-down.Gate speed not constant.A B CD E FSUGGESTION-Check if mains power is supplied.-Make sure that the operator is not unlocked. (chapter 8.).-Check the adjustment of the anti-crushing system (paragraph 4.1).-Check oil level inside the tank. (chapter 9 - Fig. 16).-Check the connection and operation of the thrust capacitor.-Check the efficiency of the electronic control unit.-Check the adjustment of the anti-crushing system (paragraph 4.1).-Make sure that you have removed the breather screw (chapter 5).-Run some complete gate opening and closing cycles, in order to release any air inside the piston.-An initial, minimum oil leak is normal. A larger leak may occur if the operator is not fitted in a perfectly horizontal plane. If the oil leak does not stop soon, weadvise you to visit an authorised repair centre.-Check the adjustment of the anti-crushing system (paragraph 4.1).-Incorrect installation dimensions (paragraph 3.2).Notes919M A I N T E N A N C E R E G I S T E R.o N e t a D b o j f o n o i t p i r c s e D se r u t a n g i S 1_______________________________________________________________________________________________________________________________________na i c i n h c e T re m o t s u C 2_______________________________________________________________________________________________________________________________________na i c i n h c e T re m o t s u C 3_______________________________________________________________________________________________________________________________________na i c i n h c e T re m o t s u C 4_______________________________________________________________________________________________________________________________________na i c i n h c e T re m o t s u C 5_______________________________________________________________________________________________________________________________________na i c i n h c e T re m o t s u C 6_______________________________________________________________________________________________________________________________________na i c i n h c e T re m o t s u C 7_______________________________________________________________________________________________________________________________________na i c i n h c e T re m o t s u C 8_______________________________________________________________________________________________________________________________________na i c i n h c e T re m o t s u C 9_______________________________________________________________________________________________________________________________________na i c i n h c e T re m o t s u C 01_______________________________________________________________________________________________________________________________________na i c i n h c e T re m o t s u C I n s t a l l a t i o n t e c h n i c i a n ________________________________________________C u s t o m e r ___________________________________________________________________T y p e of s y s t e m ________________________________________________________S e r i a l n u m b e r _________________________________________________________I n s t a l l a t i o n d a t e ______________________A c t i v a t i o n ________________________S y s t e m c o n f ig u r a t i o nT R A P L E D O M RE B M U N L A I R E S e r o t a u t t A 402C A A F 1e c i v e d y t e f a S 2e c i v e d y t ef a S 1s l l e c o t o h p f o r i a P 2s l l e c o t o h p f o r i a P 1e c i v e d l o r t n o C 2e c i v e d l o r t n o C lo r t n o c o i d a R pm a l g n i h s a l F ec i v ed re h t O ec i v ed re h t O I n d i c a t i o n of r e s i d u a l r i s k s a n d o f f o r e s e e a b l e i m p r o p e r u s e_________________________________________________________________________________________________________________________________________________________________________________________________________________________________________________________________________________________________________________________________________________________________________________________________________________________________________________________________________________________________________________________________________________________________________________________________________________________________________________________________________________________________________________________________________________________________________________________________________________________________________________________________________________________________________________________________________________________________Read the instructions carefully before using the product and store them for future useIf correctly installed and used, the 402 automated system ensures a high degree of safety.Some simple rules on behaviour can prevent accidental trouble:-Do not pass between the leaves when they are moving. Waitfor the leaves to open fully before passing through them.-Do not, on any account stay in between the leaves.-Do not stand near the automated system, and do not allowchildren, persons or things to do so, especially when it is operating.-Keep remote controls or other pulse generators away fromchildren, to prevent the automated system from being activated involuntarily.-Do not allow children to play with the automated system.-Do not willingly obstruct leaves movement.-Prevent any branches or shrubs from interfering with leavesmovement.-Keep indicator-lights efficient and easy to see.-Do not attempt to activate the leaves by hand unless you havereleased them.-In the event of malfunctions, release the leaves to allow accessand wait for qualified technical personnel to do the necessary work.-When you have set manual operation mode, cut power to thesystem before restoring normal operation.-Do not in any way modify the components of the automatedsystem.-Do not attempt any kind of repair of direct action whateverand contact qualified personnel only.-At least every six months: arrange a check by qualifiedpersonnel of the automated system, safety devices and earth connection.These instructions apply to the following models:402 CBC - 402 SBS.The FAAC 402 automated system for swing leaf gates consists of a hydraulic enbloc composed of an electric pump and a hydraulic piston which transmits drive to the leaf.The models with a hydraulic locking do not require installation of an electric lock, as they guarantee mechanical locking of the leaf when the motor is not operating.The other models, without a hydraulic locking always require one or more electric locks to ensure the leaf is mechanically locked.Leaves of up to 3 mt can be automated depending on the selected model.The functioning of the operators is controlled by an electronic control unit, housed in an enclosure with adequate degree of protection against atmosphere agents.The leaves are normally closed.When the electronic control unit receives an opening command from the radio control or any other pulse generator, it activates the hydraulic appliance which rotates the leaves until they reach the opening position to allow access.If automatic mode was set, the leaves close automatically after selected pause time has elapsed.If the semi-automatic mode was set, a second pulse must be sent to close the leaf again.A stop pulse (if supplied) always stops movement.For details on the behaviour of the automated system in different function logics, consult the installer.Automated systems include safety devices (photocells) that prevent the leaves from moving when there is an obstacle in the area they protect.The 402 automated system is supplied standard with a hydraulic anti-crush protection safety device (BY-PASS) which limits the torque transmitted to the leaves.The warning-light indicates the current leaf movement.If the gate has to be moved manually due to a power cut or fault of the automated system, use the release device as follows:-Insert the triangular key on the release screw located in the lower part of the flange (Fig.1).-Turn the release key anti-clockwise for about two turns.-Open or close the leaf manually.To prevent an involuntary pulse from activating the operator during the manoeuvre, cut power to the system before re-locking the operator.-To re-lock the operator, turn the key clockwise until it stops (Fig.1).-Release the operator from the front and rear attachments.732143 - Rev. A。
NORMA 4000 5000 Power Analyzer 用户说明手册说明书

Since some countries or states do not allow limitation of the term of an implied warranty, or exclusion or limitation of incidental or consequential damages, the limitations and exclusions of this warranty may not apply to every buyer. If any provision of this Warranty is held invalid or unenforceable by a court or other decision-maker of competent jurisdiction, such holding will not affect the validity or enforceability of any other provision.
BEGRENZTE GEWÄHRLEISTUNG UND HAFTUNGSBESCHRÄNKUNG
Fluke gewährleistet, daß jedes Fluke-Produkt unter normalem Gebrauch und Service frei von Material- und Fertigungsdefekten ist. Die Garantiedauer beträgt 2 Jahre ab Versanddatum. Die Garantiedauer für Teile, Produktreparaturen und Service beträgt 90 Tage. Diese Garantie wird ausschließlich dem Erster
UTM设备安装指南说明书

Installation GuideFamiliarize yourself with the connectors and controls on the back of the unit.Complete the Basic SetupFollow these steps to quickly setup the UTM appliance.Connect the UnitFor initial setup, connect the WAN Ethernet port to an active WAN connection such as a broadband modern, connect a DHCP enabled PC to a LAN port, and turn on the unit.Verify the following:• Power LED : It takes about a minute to boot. The power LED should turn solidgreen. If it does not, see the Troubleshooting section of the Reference Manual . • Test LED : When you first turn on the unit, the amber test LED will be lit forapproximately 2 minutes.• WAN Status LED : The status LED on the connected WAN port should be lit. Ifnot, make sure the Ethernet cable is securely attached to the modem and the WAN port, and that the modem is powered on.• LAN Status LED : A LAN status LED should be lit. If not, ensure that the Ethernetcable from the computer to the unit is securely attached at both ends, and that the computer is turned on.Log in to the Unit1. Use a browser to connect tohttps://192.168.1.1.7. Kensington lock 8. Console port 9. Factory reset button10. Power connector7109https://192.168.1.12. When prompted, enter admin for the UserName and password for the Password. Click Login.You are now connected. After 5 minutes of inactivity (the default login time-out), you are automatically logged out.Note: When the unit scans secure HTTPS traffic, import its root CA certificate into client browsers. Click the link at the bottom of the login screen to download it.Use the Setup Wizard for Basic ConfigurationThe Setup Wizard will guide you through the basic network and scanning setup. Note: If you choose to bypass the Setup Wizard, be sure to configure an alerts email address and change the admin password.1. Start the Setup Wizard.Select Wizards > SetupWizard to start the wizard.For guidance on how to fill in the wizard screens, refer to the online help or the Reference Manual via a link in theSupport > Documentation page.2. Use the Setup Wizard to configure these basic network and scanning settings:• LAN and WAN network settings.• System time (NTP server) and time zone.• Scanning of network protocols and services.• Default scan actions when the unit detects threats.• Scan exceptions like the maximum file size.• Specify the notification server and notices to be used in email notifications.•Scan engine and signature updates.ProSecure™ Unified Threat Management (UTM) ApplianceFollow these instructions to configure your ProSecure Unified Threat Management appliance to use a single WAN interface, and enable the default threat management scanning. Then, consult the Reference Manual for instructions on configuring other options such as multiple WAN settings, VPN, firewall, and custom scanning. You can access the Reference Manual from the product management interface, via the Resource CD and from the NETGEAR support site: . Estimated time: 30 minutes.Verify the Package Contents• ProSecure™ UTM appliance. • Installation Guide.• Resource CD.• Rubber feet (4) with adhesive backing.• Rack mount brackets (some models).• Power cord.Familiarize Yourself with the UnitFamiliarize yourself with the ports and status lights on the front of the unit.1.Green power LED2.Amber test LEDB port (for future use)4.Gigabit LAN portsN port 4 DMZ identifier6.Gigabit WAN ports, dualWAN model shown12536November 2010This symbol was placed in accordance with the European Union Directive 2002/96 on the Waste Electrical and Electronic Equipment (the WEEE Directive). If disposed of within the European Union, this product should be treated and recycled in accordance with the laws of your jurisdiction implementing the WEEE Directive.©2010 by NETGEAR, Inc. All rights reserved. NETGEAR and the NETGEAR logo are registered trademarks of NETGEAR, Inc. in the United States and/or other countries. Other brand and product names are trademarks or registered trademarks of their respective holders. Information is subject to change without notice.3. Click Apply to save your changes.The unit will reboot. Your computer will lose its connection to the unit if its IP address is now on a different subnet. If so, restart the computer to refresh its network settings.LicensesYour unit is bundled with three 30-day trial licenses.• Web scanning • Email scanning• Support and maintenanceActivating the licenses starts their term of use. Activate the licenses only when you are ready to start using this unit. If your unit has never been registered before you can use the 30 day trial period for all 3 types of licenses to perform initial testing and configuration.Note: Be sure the unit has Internet access before registering the licenses.• Activate the trial licenses by selecting Support > Registration and click the “Trial ” button. Once you activate the trial licenses, you can then update the unit with the latest UTM build and signature & engines during the 30-day trialperiod.• If you purchase a license subscription bundled with your unit, a license will be assigned to your unit’s serial number. When you register your unit, the license key will automatically be downloaded to your unit. Select Support > Registration , fill out the registration page, and click “Register ” to activate the services. Note: the 30-day trial licenses will be revoked once you activate the purchased service license keys. The purchased service license keys offer one year or three years of service.For additional information on licenses see the reference manual.Register and Activate the LicensesNote: Be sure the unit has Internet access before registering the licenses.1. Log in to the unit.2. Select Support > Registrationto display the Registration tab.3. Enter the customer information. If using the trial licenses, click Trial . If youhave purchased licenses, click Register . The unit will activate the licenses. After registration is complete the unit will display the license keys and their expiration dates.Online Documentation and SupportSelect Support > Documentation to view the reference manual. Select Support > Knowledge Base to view the support page, which includes this document and the reference manual. Going to/support and selecting your product modelnumber takes you to the same page.Consult the reference manual for instructions on how to use the online supportremote diagnostics.Technical SupportThank you for selecting NETGEAR products.After installing your device, locate the serial number on the label of your product and use it to register your product at /register . Registration is required before you can use the telephone support service. Registration via our website is strongly recommended.Go to for product updates and Web support . For additional information about setting up, configuring, and using your Product Name Only, see the User Manual .For complete DoC please visit the NETGEAR EU Declarations of Conformity website at: /app/answers/detail/a_id/11621/。
Footnote-Endnote Citation Form

Footnote/Endnote Citation Form:A Short Guide by Steve VolkFootnotes only serve one purpose, to allow the reader to access with ease and confidence the source that you have used. Any citation form that does well this is appropriate, but most disciplines insist on their own particular way of citing information, and you must follow those preferences. There is nothing magical about these forms -- they all do the same thing -- but you should get used to the fact that different disciplines require different citation forms. The citation form most often used for History is taken from the University of Chicago Manual of Style. This is continually updated (and it is now in its 15th edition). Shortened as "Chicago style," this can be found in a handy form in Diana Hacker, A Pocket Style Manual, 4th ed. (Boston: Bedford/St. Martin's Press, 2003), 183-208. Some of the examples of correct style that I use below are taken from that publication. PLEASE NOTE: While I largely follow "Chicago style," I have also made some modifications that I think work well. If you are asked to use strict "Chicago Manual style," you should refer to the Manual of Style itself, not my guide.All citations for my papers should be in the form of footnotes (where the note literally appears at the foot of the page) or endnotes (located at the end of the paper if you prefer to do that or you can't get your software to turn out footnotes at the bottom of the page). There are no differences between footnotes and endnotes in terms of style formatting, only where they appear. Bibliographies require a different format, and I will inform you if I also want a bibliography. In the case of either footnotes or endnotes, the only indication that goes in the text itself is the footnote number, the small supra-number after the text you wish to reference. For my papers, there is only one time when it is proper to use parenthetical citations (e.g.: Smith, 23) in your text, and that is if you are writing a review of one or two books and the only references you have are to those books. In that case, you would use the full citation for the book in afootnote/endnote format the first time it appears and thereafter just put the page number of the quote or reference to that text in parentheses.Proper Citation Form for Footnotes and Endnotes when citing Textual Material (see below for citations from the Internet).Material First Citation Second and subsequent citations in same paperBook Michael H. Fisher, Indirect Rule in India : Residents and theResidency System, 1764-1858 (New Deli, India: Oxford UniversityPress, 1991), 100-101.Heather Hogan, Forging Revolution: Metalworkers, Managers, andthe State in St. Petersburg, 1890-1914 (Bloomington: IndianaUniversity Press, 1993), 33.Fisher, 23.Hogan, 109.Translated book Elena Poniatowska, Massacre in Mexico, trans. Helen Lane (NewYork: Viking Press, 1975), 146.Poniatowska, 150-51.Book, two or three authors Leonard V. Smith, Stéphane Audoin-Rouzeau, Annette Becker,France and the Great War, 1914-1918 (New York: CambridgeUniversity Press, 2003), 23.Smith, Audoin-Rouzeau, andBecker, 44.Book, four or more authors Lynn Hunt, et al., The Making of the West: Peoples and Cultures(Boston: Bedford, 2001), 300.Hunt, 303.Edited book Gary Kornblith, ed., The Industrial Revolution in America (Boston:Houghton Mifflin), 1998.Carol Lasser and Marlene Merrill, eds., Soul Mates: the OberlinCorrespondence of Lucy Stone and Antoinette Brown, 1846-1850(Oberlin: Oberlin College Press), 1983.[NOTE: Almost always, unless you are referring to the volume as awhole, you will be citing from a specific chapter -- including theIntroduction -- in your citation, in which case you will need to usethe form below.]Kornblith, ed., The IndustrialRevolution.Lasser and Merrill, eds., SoulMates.Chapter from an edited book Ellen Stroud, "Troubled Waters in Ecotopia: Environmental Racismin Portland, Oregon," in Louis S. Warren, ed., AmericanEnvironmental History (Malden, MA: Blackwell, 2003), 300-301.Pablo Mitchell, "Accomplished Ladies and Coyotes: Marriage, Power,and Straying from the Flock in Territorial New Mexico, 1880-1920,"in Martha Hodes, ed., Sex, Love, Race : Crossing Boundaries inNorth American History (New York: New York University Press,1999), 332-33.Stroud, 313.Mitchell, 340.Book Edition (other than 1st)Marcia L. Colish, The Mirror of Language: A Study in the MedievalTheory of Knowledge, Rev. ed. (Lincoln, NE: University of NebraskaPress, 1983), 120-121.Colish, 130.Volume in a Multivolume Work James McPherson, Ordeal by Fire, vol. 2, The Civil War (New York:McGraw-Hill, 1993), 205.McPherson, 206.Journal Article Steven Volk, "Mineowners, Moneylenders, and the State in Mid-Nineteenth Century Chile: Transitions and Conflicts," HispanicAmerican Historical Review 73 (February 1993): 67-98.Volk, 33-4.[Note: "73" is the volume number. It is not necessary to add theissue number since the date tells you that, but if you want to addthe issue number, you would write: 73:1. ]Magazine Article[NOTE: A journal isa scholarly publication; a magazine is a from the popular press (e.g. Time, Life, etc.)William A. Henry, III, "Journalism Under Fire," Time, December 12,1983, 76.Henry, 78-9.Newspapers Steven Volk and Helen Shapiro, "25,000 American SteelworkersCan Kiss the Booms Boodby," Los Angeles Times, May 6, 1979, PartV.Ximena Marre, "Ex agente procesado por ejecucion de Horman," ElMercurio [Santiago, Chile], December 11, 2003.[NOTE: Include city/country of newspaper if it is not well known]Volk and Shapiro, "25,000American Steelworkers."Marre, "Ex agente."Citing a primary source that you read in a secondary source Josiah Strong, as quoted in Michael Hunt, "American Ideology:Visions of National Greatness and Racism," in Thomas G. Patersonand Stephen G. Rabe, eds., Imperial Surge: The United StatesAbroad: The 1890s - Early 1900s (Lexington, MA: D.C. Heath,1992), 16.Strong, as quoted in Hunt,"American Ideology," 17.Classroom lecture Ellen Wurtzel, October 17, 2009.Maeda, October 17, 2003.Formal Lecture (not part of a class)Truly Boring, "The Proper Use of Footnotes in a College Paper,"American Society of Footnoters 43rd Annual Meeting (Boston, MA),February 12, 1803.Boring, "Proper Use."Government documents U.S. Department of State, Foreign Relations of the United States,1954. Vol. IV: American Republics (Washington, DC: GPO, 1986),879.U.S. Congress, Senate, Committee on Foreign Relations, The War inChechnya: Russia's Conduct, The Humanitarian Crisis, and UnitedStates Policy: Hearing on S. Hrg. 106-500,106th Cong., 2nd sess.,March 1, 2000 (Washington, DC: GPO, 2000), 23.U.S. Congress, House, Permanent Select Committee onIntelligence, Subcommittee on Terrorism and Homeland Security,Counterterrorism Intelligence Capabilities and Performance Prior to9-11: A Report to the Speaker of the House of Representatives andthe Minority Leader (Washington, D.C. : Subcommittee onTerrorism and Homeland Security, House Permanent SelectCommittee on Intelligence, 2002), 33.FRUS, 1954. Vol IV, 567-68.The War in Chechnya, 25.Counterterrorism IntelligenceCapabilities, 56.PersonalCommunicationSteven Volk, e-mail to author, October 15, 2003.Volk email, Oct. 15, 2003.On-line or Electronic SourcesCitation of electronic sources is continually changing, and fluctuate considerably. The most important information to convey (and it is not always available) is: Author, Title of the Cite, Sponsor of the Site, and the Site's URL. When no author is named, treat the sponsor as the author. I also recommend that you include at the end of the citation the date on which you accessed the site. The Internet is not "stable."The site you visited yesterday may be slightly changed by the author tomorrow and reloaded at the same URL with the new information init. By providing the date, you can tell the reader why the site she is looking at may not be the same one that the paper writer viewed two months ago.Other types of citation: see "A Brief Citation Guide:" (/~africa/citation.html).Material First Citation Second and subsequent citationsNormal Site National Security Archive, State Department Release on Chile Shows Suspicions of CIAInvolvement in Charles Horman "Missing" Case,/~nsarchiv/news/19991008/ (Dec. 12, 2009)./~nsarchiv/news/19991Normal Site Steven S. Camarota, Immigration From Mexico:Assessing the Impact on the United States, Center for Immigration Studies,/articles/2001/mexico/toc.html (Nov. 7, 2008)./articles/2001/mexico/tocPrimary Documents on Eva Duarte de Perón, History of Peronism, Modern History Sourcebook,/halsall/mod/1951evaperon.html (March 22, 2002). [Original Eva Peron, History of Peronism,Line Source: Eva Duarte de Perón, Historia del Perónismo (Buenos Aires: Presidencia de laNación, 1951)]/articles/2001/mexico/tocPrimary Documents on Line Armainio Savioli, L'Unita Interview with Fidel Castro: The Nature of Cuban Socialism,Castro Internet Archive/history/cuba/archive/castro/1961/02/01.htm (January 30,2003). [Original Source: L'Unita (Rome), No. 32 (1 February 1961)].Savioli, "L'Unita Interview,"/history/cuba/archi1961/02/01.htm.JSTOR Article All articles in JSTOR are scanned copies of the originals viewable as .pdf files. Anyarticle which is an exact copy of the original can be cited as if you read a hard copy ofthe journal with the addition that, after the citation, you provide the url of thedatabase service in parentheses. For example, Alan Knight, "Popular Culture and the Revolutionary State in Mexico, 1910-1940," Hispanic American Historical Review 74:3(1994), 400 (/). NOTE: Only include the url of the databaseservice, not of the articles itself, which is usually excessively long.Knight, 404.Newspaper Articles On Line "A Clever Burgler Caught," New York Times, Oct. 10, 1898 (Proquest). NOTE: If youused a database service, write the name of the database in parentheses.Jennifer Loven, "Bush Promotes Pal to Head HUD," Chicago Sun Times, Dec. 13, 2003(/output/news/cst-nws-hud13.html). NOTE: If you read thenewspaper on line directly, include the url.Here's how the same article would be referenced depending on where you read it online:Ian Black, "Iraq splits EU summit as Blair backs US," Guardian [UK], Dec. 13, 2003(Lexis-Nexis Academic).Ian Black, "Iraq splits EU summit as Blair backs US," Guardian [UK], Dec. 13, 2003(/eu/story/0,7369,1106337,00.html).New York Times, Oct. 10, 1898.Chicago Sun Times, Dec. 13, 2003.Guardian, Dec. 13, 2003.Guardian, Dec. 13, 2003.Videocast/PodcastLecture Posted onLineSteven Volk, "Lecture 20: Colonial Dialogues," /7489842.Volk, "Lecture 20."Podcast On the Media, "Dirty Documents," December 18, 2009:/transcripts/2009/12/18/05."Dirty Documents."On-line film clip Andre de la Varre, "Havana, Cuba 1930s," /watch?v=fEMYLkpYxX8 (Dec. 20, 2009). [To the extent that the source provides aphotographer, videographer, director, etc, you should include that in the "author"position. Always include, at the end of the citation, the date on which you accessedthe site. You can also specify the location in the clip that you are citing using anhour:minute:second format, e.g., 34:35, after the date.]"Havana, Cuba 1930s."Citation Style for Images Used in PapersCitations for images should include (where possible) the following information:· author (artist, photographer, cartoonist, etc.);· title, if it has one;· where the image is located in appropriate cases (e.g. museum location); · the date the image was made (if you know or can find out);· the medium used;· where or how you got the image.Material First Citation Second and subsequent citationsImage seen on-line Eanger Irving Couse, "The Captive" (1891), Phoenix Art Museum, oil oncanvas (/couse.html).If the image simply appears on a web-site with no other identifying marks,simply give the url. Eg.: Bob Dylan photograph,/."The Captive."Dylanphotograph.Image from book or other printed Unknown, "Silver Cross advertisement" (1998), location unknown,advertisement [from Gillian Rose, Visual Methodologies (London: SagePublications, 2001), p. 80]."Silver Crossadvertisement."source If you have simply xeroxed a photograph from a text source:Don Bishop, "Untitled," Tikkun 18:4 (July/August 2003), cover.Bishop,"Untitled."News photograph from scanned source Reuters, "Kiss and Make Up?," (Sept. 30, 2003), New York Times newsphotograph, page 1 [scanned from New York Times, Sept. 30, 2003]."Kiss and MakeUp?"。
Proficy-Machine-Edition软件的操作说明

爲总i如软件Prof icy Machine Edition软件的使用说明3.1 浏览(Navigator)工具窗口.3.2属性检查工具窗口Inspector (属性窗口)列出已选择的对象或组件的属性和当前位置.3.3在线帮助窗口Companion (在线帮助)为你的工作提供有用的提示和信息。
3.4反馈信息工具窗口Feedback Zone Window (反馈信息窗口)是一个用于显示Machine Edition产品生成的几种类型输出信息的停放窗口。
3.5数据监视工具窗口Data Watch Tool (据监视工具)是一个调试工具,让你监视变量的数值。
当在线操作一个对象时他是一个很有用的工具。
据监视工具至少有两个标签:1、Static Tab (静态标签)包含你自己添加到据监视工具中的全部变量。
2、Auto Tab (自动标签)包含当前在变量表中选择的或与当前选择的梯形逻辑图中的指令相关变量,最多可以有50行。
3、Watch List Tab (监视表标签)包含当前选择的监视表中的全部变量。
监视表让你创建和保存要监视的变量淸单。
你可以定义一个或多个监视表,但是,数据监视工具在一个时刻只能监视一个监视表。
4、数据监视工具中变量的基准地址(也简称为地址)显示在Address栏中,一个地址最多具有8个字符(例如%AQ99999)。
5、数据监视工具中变量的数值显示在Value栏中。
如果要在数据监视工具中添加变量之前改变数值的显示格式,可以使用数据监视属性对话框或右键点击变量。
6、数据监视属性对话框7、若要配置数据监视工具的外部特性,右键点击它并选择DataWatch Properties・3.6工具箱窗口Toolchest (工具箱)是功能强大的设计蓝图仓库,你可以把它添加到项目中去。
例如梯形逻辑指令、CFBS (用户功能块)、SFC (程序功能图)指令、和查看脚本关键字。
6.4.1 了解PACsystem RX3i系统的硬件模块表模块类型说明・运行・,f ・・.UBT .•沁幼杠・・K ・e’.F y k〜■ «i u^f ru> •«> —■ iu i i JASTJ —••- ••♦w ・《bM».- tb>Mv nu a lu aU>« v 2w •9*4? tiu •約tKt llxJ< JVU1>T IKnJaiiX (>v* • MI J JJ图4.4完整的PME 编辑窗4・3项目的硬件配置新建立的项目的硬件配置一般已包含一部分内容,如一个底 板、一个交流电源及一个CPU 等,对于PACSystems RX3i 系 统来说,其底板与模块的连接关系一般如图所示,由于各模块 安装的槽位有一定要求,因此在进行硬件配置时需按实际情况 对应配置。
- 1、下载文档前请自行甄别文档内容的完整性,平台不提供额外的编辑、内容补充、找答案等附加服务。
- 2、"仅部分预览"的文档,不可在线预览部分如存在完整性等问题,可反馈申请退款(可完整预览的文档不适用该条件!)。
- 3、如文档侵犯您的权益,请联系客服反馈,我们会尽快为您处理(人工客服工作时间:9:00-18:30)。
CIA Review (THIRTEENTH EDITION)
Part Ⅰ
Internal Audit Role in Governance, Risk, &Control
STUDY UNIT ONE
STANDARDS AND PROFICIENCY
(26 pages of outline)
1.1 International Professional Practices Framework (PPF) (22)
1.2 Attribute Standards (25)
1.3 Performance Standards (28)
1.4 Glossary (33)
1.5 Proficiency (36)
1.6 Due Professional Care (43)
1.7 Continuing Professional Development (CPD) (45)
1.8 Study Unit 1 Summary (46)
The mandatory auditing pronouncements of The Institute of Internal Auditors (The IIA)-the International Standards for the Professional Practice of Internal Auditing (Standards)-are this study unit as a convenient reference for the examination candidate. However, they will be repeated pronouncements of The IIA and other outline material.
The environments and organizations in which internal audit activities are performed throughout the world or even within one country are highly diverse. Moreover, these activities may be insourced or outsourced. This diversity of laws, customs, and cultures affects the practice of internal auditing each environment and organization. Nevertheless, Individuals and entities providing internal auditing services must still comply with the Standards. Thus, the Standards and other pronouncements of The IIA have no geographic limits. Accordingly, the Standards are presented as broad principles because they may be applied in very different circumstances.
According to The IIA, the Standards are part of the International Professional Practices Framework (PPF). They are intended to
a.State basic principles for the practice of internal auditing
b.Provide a framework for performing and promoting value-added internal audit activities
c.Establish the basis for evaluating internal auditing performance
d.Improve organizational processes and operations
The Standards consist of Attribute Standards (currently 1000-1340), Performance Standards (currently 2000-2600), and Implementation Standards (integrated with the other Standards). Attribute Standards concern the traits of entities and parties providing internal auditing services. Performance and performance Standards apply regardless of the service performed. Thus,they furnish guidance for assurance, consulting, and other internal auditing services.
Each group of implementation standards applies only to a major category of engagements. They apply the other standards in a more specific context. To date, final Implementation Standards have been issued for assurance services (e.g., 1110.A1)and consulting services (e.g., 1000.C1).
a.An internal auditor who provides an assurance service determines the nature and scope
of the engagement and objectively assesses (evaluates) the evidence gathered. The evidence and its evaluation form the basis for expressing an opinion or stating a conclusion about the subject matter of the engagement, such as a process or system. The three parties to an assurance service are the process owner (the party directly involver with the process or system), the internal auditor (the assessor), and the user of the assessment.
b.An internal auditor who provides a consulting service ordinarily does so at the client’s
request. The nature and scope of this advisory service are agreed upon with the client.
The tow parties to a consulting service are the internal auditor (the advisor) and the client (the advisee).
The final subunits address the proficiency of internal auditors individually and collectively.
Core Concepts
⏹Attribute Standards describe the characteristics of entities and individuals that provide
internal auditing services.
⏹Performance Standards provide criteria for guiding and evaluating all internal audit activities.
⏹Implementation Standards apply the other standards in the context of specific categories of
engagements, e.g., assurance and consulting.
⏹Internal auditing is an independent, objective assurance and consulting activity designed to
add value and improve an organization’s operations. It helps an organization accomplish its objectives by bringing a systematic, disciplined approach to evaluate and improve the effectiveness of risk management, control, and governance processes.。