神行者L50升级说明书110713
LX750_LX760说明书
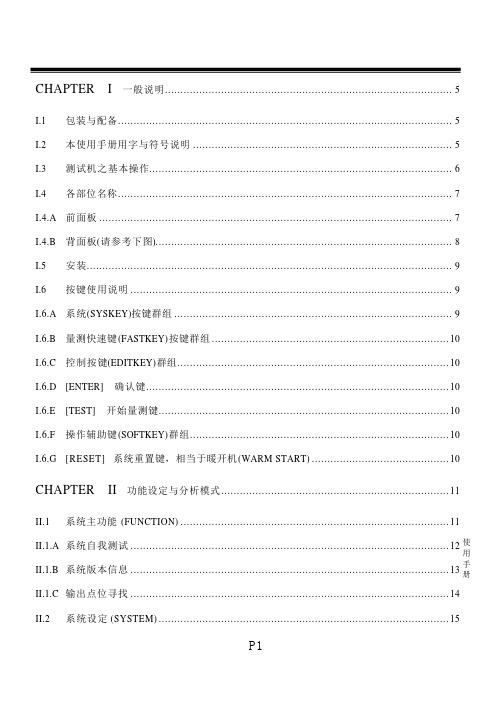
II.2.A.C LCD 亮度 ......................................................................................................... 16 II.2.A.D II.2.A.E II.2.A.F II.2.A.G LCD 反显 ...................................................................................................... 16 电源频率 ...................................................................................................... 16 开机自我测试................................................................................................ 17 系统语言 ...................................................................................................... 17
CHAPTER
II.1
II
功能设定与分析模式 ......................................................................... 11
系统主功能 (FUNCTION) ...................................................................................... 11
神行者 GPS 说明书

GPS摩托车跟踪定位器使用说明书1安装说明1.1接口说明RES :复位键DATA说明GPS:GPS天线接口GSM:GSM天线接口另一端说明SIM卡插口●PHONE:耳机插口 ●MIC :监听MIC ●LED1:电源指示灯 ● LED2:状态指示灯1.2 安装图紧急按键油量表1.3安装前检测:1、检查配件主机、10Pin连接线、油路控制器、GSM天线、GPS天线、紧急报警报钮、说明书、监听麦克风(选配)。
2、SIM卡购买SIM手机卡(只支持GSM网络),如果开通GPRS功能,可以实现网上查车,如果开通来电显示功能,能进行电话远程监听。
设备没有SIM卡,不能正常工作。
1.4安装调试步骤:1) 检测电源按接线图安装完成后,通电,LED1(红灯)指示电源,如果不亮,表示设备供电不正常或损坏。
2) LED2(绿灯)状态指示检查◆绿灯不亮表示设备工作不正常。
◆亮1秒灭1秒表示GSM注册成功,约三十秒左右。
◆亮0.1秒灭2.9秒表示GPS定位,约四十五秒左右。
◆如果绿灯快闪(亮0.1秒,灭0.1秒) 超过三分钟后,可能SIM卡未插好,或设备损坏。
◆常亮表示GSM注册网络成功,并且GPS定位。
3) 拨打电话在绿灯常亮后,拨打设备的SIM号码,如果能通,即工作正常,可以进行短信操作或网络设置。
1.5安装注意事项●GPS天线是防水的,安装位置上面不能有金属屏蔽,否则会影响到收星定位效果,GSM天线尽量展开,GSM信号会更好。
●主机不防水,工作温度-40~60℃,注意固定位置。
●油路控制器分为12V和24V,安装时,注意与汽车供电电压是否一致。
2短信操作说明短信命令格式为:A******,功能序号,参数其中A表示命令开始,******为设备操作密码,初始化密码为000000,参数视具体的功能序号而定。
将短信发送到设备中的手机卡上,设备会自动回复应相的短信。
短信全部采用半角,如果密码错误、格式错误,设备将不会回复短信。
RoadRanger RTLO-15610B-T2 商品说明书

More time on the road®Illustrated Parts ListRTLO-15610B-T2November 2012ContentsHow To Use The Illustrated Parts List (3)AUXILIARY DRIVE GEAR (4)CASE (AUX) (5)CASE (FRONT) (8)COUNTERSHAFT & BRGS(AUX) (11)COUNTERSHAFT ASSY (12)FILTER REGULATOR (14)HOSES & CONNECTIONS (15)INPUT SHAFT & DRIVE GEAR (17)INTEGRAL OIL PUMP (18)ISOLATORS (20)KITS & ASSEMBLIES (21)LEVERS/HOUSINGS (24)MAINSHAFT & SYNCHRO(AUX) (26)MAINSHAFT ASSY (28)MISCELLANEOUS (30)OIL COOLER (31)RANGE CYLINDER (33)REVERSE IDLER (35)ROADRANGER VALVE (38)SHIFT BAR HOUSING (STD) (39)SPLITTER CYLINDER (42)TOP 2 VALVE (44)2How To Use The Illustrated Parts ListThe information contained in this document is subject to frequent updates. Therefore, for the latest information available, please visit the interactive Electronic Parts Catalog at /epc.Model Designation or Nomenclature•For information regarding Model Designation and Nomenclature, visit .Kits and Assemblies (K/A's)•Kits and Assemblies contain groups of individual or assembled parts developed for optimal replacement or repair of a service problem.•Kits and Assemblies are shown with applicable parts groupings in the parts listings.Identifying Kits and AssembliesA- Part numbers beginning with the letter 'A' are pre-assembled Production AssembliesK- Part numbers beginning with the letter 'K' are kits that are not assembledS- Part numbers beginning with the letter 'S' are pre-assembled Service Assemblies•Note: Some Production Assemblies do not begin with a letter prefix (Midrange only).Illustrations•Illustrations show parts in assembly groups.•Item numbers on illustrations correspond with parts listings on pages adjacent to the illustration.•Notes are included on illustrations where additional information is needed.Parts ListingParts listings are defined by parts groupings and are broken down by service assemblies. Parts listings identify a part for servicing with the following categories•Item Number - corresponding with numbers on illlustrations for part identification.•Current Part - indentifies part as it is available for service.•Description - specifies part name or description.•Replaced Part - quantity quantity required for assembly.•Quantity - defines unique characteristics or requirements.•Notes - indicates Kits or Assemblies that contain a particular part.•Kits/Assy's Where Used34Group: AUXILIARY DRIVE GEARAUXILIARY DRIVE GEARItemCurrent PartDescription Replaced Part Qty. NotesKits/Assys WhereNeeded1 16763 SNAP RING 2K-2756,K-2765,K-2773 2 21320 SNAP RING RETAINER 1 K-2640 3 16628 SNAP RING1K-275645566507-BOXBEARING 5566504,5566507 1K-2765,K-27735 16138 BEARING RETAINER 1 6X-8-645CAPSCREWX 8 612 63/8"-16X1"7 17453 -O- RING2K-2640,K-2765,K-2773 8 21599 WASHER2 9 K-2640REPL KIT-DRIVE GEAR4301397 ,430152012134567110481-12/92 Aux DG8895Group: CASE (AUX)CASE (AUX)ItemCurrent PartDescription Replaced Part Qty. NotesKits/Assys WhereNeeded 1 X-8L-611 CAPSCREW5 3/8"-16X3-1/4" 2S-2119REAR BRG COVER ASSY20048 ,22045,4302009 ,4302031 ,S - 1558 S - 1560 1 EXTENDED3 15532 GASKET1K-1603,K-2262,K-2295,S-2119 4 20224 PLUG-MAGNETIC 2S-2119,S-2781 5 13679 -O- RING1 USE W/OEM SUPPLIEDADJUSTABLE SPEEDOMETER10402A-3-99See Service Manual for Proper Shimming Procedure 20225 "O" ring w/ OEM supplied non-adjustable speedometer sensor or Eaton part #20224 Plug *SENSOR5 20225 -O-RING 2 USE W/20224 PLUG OR OEMSUPPLIED NON-ADJUSTABLESPEEDOMETER SENSOR NOT TOBE USED WITH 4301954 SEAL5 4301954 SENSORSEAL 2 O-RINGNOTREQUIRED S-21196 20226 PLUG-MECHANICAL 2237 1 S-2119,S-27817 14142 -O-RING 1 S-2119,S-27818 7992 BUSHING 1 S-21199 X-8L-602 CAPSCREW 8 3/8"-16X1-1/2" - BEGINNINGW/SERIAL NUMBERS 51130829,70765646 & ALL SERIAL NUMBERSSTARTING WITH AN ALPHACHARACTER9 X-8L-604 CAPSCREW 8 3/8"-16X1-1/4" - PRIOR TO SERIALNUMBERS 51130829, 70765646 &PRIOR TO SERIAL NUMBERSSTARTING WITH AN ALPHACHARACTER10 20815 LIFTINGEYE 17105 211 4300925 REAR BEARING COVER 4300185 2 PRIOR TO SERIAL NUMBERS51130829, 70765646 & PRIOR TOSERIAL NUMBERS STARTINGWITH AN ALPHA CHARACTER12 4300186 GASKET 2 PRIOR TO SERIAL NUMBERS51130829, 70765646 & PRIOR TOSERIAL NUMBERS STARTINGWITH AN ALPHA CHARACTERK-1603,K-229513 K-2430 SHIMKIT 21452 1 K-2765,K-2773,S-278114 X-8L-602 CAPSCREW 17 3/8"-16X1-1/2"14 X-8L-614 CAPSCREW 2 3/8"-16X2"15 S-2986 REAR HOUSING CASEASSY 4300181 ,4300863 1 PRIOR TO SERIAL NUMBERS51130829, 70765646 & PRIOR TOSERIAL NUMBERS STARTINGWITH AN ALPHA CHARACTER15 S-3124 REAR HOUSING CASEASSY 4303592 1BEGINNING W/SERIAL NUMBERS51130829, 70765646 & ALL SERIALNUMBERS STARTING WITH ANALPHA CHARACTER16 14335 GASKET 1 K-1603,K-2295,S-278117 X-8-611 CAPSCREW 1 3/8"-16X3-1/4"18 17106 GASKET 1 K-2262,K-2295,S-2119619 19709 COLLAR 1 K-1603,K-2262,K-2295,S-211920 K-2262 OIL SEAL W/SLINGER 19109 20807 20808 1 "FOR MECHANICAL COVER" K-2765,K-277321 K-3651 OIL SEAL TOOL KIT 122 4302320 COVER 21346 2 BEGINNING W/SERIAL NUMBERS51130829, 70765646 & ALL SERIALNUMBERS STARTING WITH ANALPHA CHARACTERS-278123 4305978 GASKET 4302246 1 BEGINNING W/SERIAL NUMBERS51130829, 70765646 & ALL SERIALNUMBERS STARTING WITH ANALPHA CHARACTER K-1603,K-2295,S-278178Group: CASE (FRONT)CASE (FRONT)ItemCurrent Part Description Replaced Part Qty. NotesKits/Assys WhereNeeded 1 S-2062CASE ASSY 4301790 1 FOR USE W/INTEGRAL PUMP2 4304023 PLUG43037471 1-1/16" MAGNETIC, O-RINGINCLUDED2 X-12-2007 PIPE PLUG X12 2006 13 4304023 PLUG43037471 1-1/16" MAGNETIC, O-RINGINCLUDED3 X-12-1207 PIPE PLUG X12 1202 ,X12 1206 13/4" MAGNETIC4 4305310 GASKET 4302810 1 K-2295 5 4302809 PTO COVER 16596 ,4300571 16X-8-725CAPSCREWX 8 72487/16"-14X7/8"7 4306584 CLUTCH HOUSINGGASKET 4304815,4305668 1K-22958A-3713CLUTCH HOUSING ASSYA - 3700 1 #1 PUSH-PULL IRON10300B-8-0014Note: Some part requirements are specific to #1 or #2 Aluminum or Iron Clutch Housings and Push or Pull type Clutch.* Bushing quantity requirements: #1 Housing – Upper bore use 4 #12815 / Lower bore use 2 #8677.#2 Housing – Upper bore use 2 #12815 and 1 #8677 / Lower bore use 2 #8677.8 A-3723 CLUTCH HOUSING ASSY A - 3721 ,A - 3722 1 #2 PUSH-PULL IRON8 A-5992 CLUTCH HOUSING ASSY 4301103 1 #1 PULL ALUM.(SPECIAL-LIGHTERWEIGHT)9 239614 SCREW X-8L-509 4 5/16-18X.81 QUANTITYDEPENDENT ON DESIGN10 14506 HAND HOLE COVER 1 #2 PUSH10 14507 HAND HOLE COVER 1 #2 PULL10 4305230 HAND HOLE COVER 11453 1 #1 PULL10 4305231 HAND HOLE COVER 1565 1 #1 PUSH11 4306583 STUD 5966 612 X-10-1005 WASHER X 3 1000 ,X10 1000,X10 10046 1.23 X 6.6013 X-1-1012 HEXNUT X-1-1005 6 .625-1814 20550 FRONT BRG COVER 1 2" PULL15 X-8L-604 CAPSCREW 6 3/8"-16X1-1/4"16 20549 FRONT BRG COVER 1 2" PUSH17 14311 GASKET 1 K-229518 12815 BUSHING 4 FOR #1 HOUSING UPPER A-3713,A-3723,A-599218 12815 BUSHING 2 FOR #2 HOUSING UPPER A-3713,A-3723,A-599218 8677 BUSHING 1 FOR #2 HOUSING UPPER A-3713,A-372319 8677 BUSHING 2 FOR #1 AND #2 HOUSING LOWER A-3713,A-372320 X-8C-830 HEX HEADSCREW/WASHER ASSY X-8C-826 4.500-13 X 1.490, USE 2 PCS FORIRON HOUSING, USE 4 PCS FORALUMINUM HOUSING20 X-8C-831 HEX HEADSCREW/WASHER ASSY X-8C-822 2.500-13 X 3.460, FOR IRONHOUSING22 X-8-686 CAPSCREW 6 3/8"-16X3/4"23 14575 PTOCOVER 4302254 124 4305309 GASKET 1684 1 K-229527 14373 MAGNET 3 S-206228 18128 PIN 229 X-1-1012 HEXNUT 2 .625-1830 X-10-1005 WASHER X 3 1000 ,X10 1000,X10 10042 1.23 X 6.6031 14554 STUD 1632 ,6579 2 5/8" X 2-3/16"936 23104 PLUG 1712 237 X-8-1005 CAPSCREW 2 5/8"-11X1-1/4"38 20814 SPACER 239 X-12-802 PIPE PLUG X12 800 1 1/2"10Group: COUNTERSHAFT & BRGS(AUX)COUNTERSHAFT & BRGS(AUX)ItemCurrent Part Description Replaced Part Qty. NotesKits/Assys WhereNeeded1 4302074-BOXBEARING 21343,4302074 4K-2765,K-27732 A-6387 WELDEDCOUNTERSHAFT ASSY 2 C/S 4301398 - D/G 4301399 S/G43026963 4300184 SPACER2110441-4/92 Aux CS 13/18 spdGroup: COUNTERSHAFT ASSYCOUNTERSHAFT ASSYItemCurrent PartDescription Replaced Part Qty. NotesKits/Assys WhereNeeded1 14317 SNAP RING 2K-2756,K-2765,K-27732 14366 BEARING2 K-2765,K-2773 3K-2932CNTRSHFT W/REV & LO4301395 ,4303966,4303967 25 62511 ROLL PIN4 ROLL PINS NO LONGERREQUIRED A-63406 4303968 KEY 2 9 4303961 2ND GEAR-CNTRSHFT 4303960 2 10 15953 PTO GEAR - LOWER 1 1020840PTO GEAR - UPPER15952111 21586 DRIVE GEAR-CNTRSHFT 22271 2 12 19198SNAP RING213 4304599 BEARING 4302677 ,4304598 2 K-2765,K-2773 14 4304605 RETAINER 19548 215 X-7-1005 CAPSCREW 2 5/8"-18X1-3/4" 16 4303964 SPACER210343-11/92 CS-LO InertiaGroup: FILTER REGULATORFILTER REGULATORItemCurrent Part Description Replaced Part Qty. NotesKits/Assys WhereNeeded 1 K-2170 FILTER REG KIT A - 5454 12 K-1698 -O- RING/ELEMENT KIT1 FOR FILTER REGULATOR 3 X-8C-412CAPSCREWX 8S 41221/4"-20X2-1/4"10130-1-92 AFR2221NSS - Not Sold Separately 3NSS2 -O- Ring/Element KitGroup: HOSES & CONNECTIONSHOSES & CONNECTIONSItemCurrent PartDescription Replaced Part Qty. NotesKits/Assys WhereNeeded 1 X-8-434 CAPSCREW 2 1/4"-20X2"10116A-5/93 Super10 HC11210Item CurrentPart Description ReplacedPartQty.Notes Kits/Assys WhereNeeded2 22818 NO LONGER AVAILABLE 13 22817 RETAINERPLATE 14 K-3121 AIR VALVE CONV KIT 23545 15 84002 CONNECTORASSY 82502 1 1/8"TUBE-1/8"NPTF5 84004 CONNECTORASSY 82504 1 5/32"TUBE-1/8"NPTF5 84006 CONNECTORASSY 1 "PUSH-TO-CONNECT" 5/32"TUBE-1/8"NPTFK-3121,K-31986 22870 TEE 17 7935 BREATHER 1 K-31988 4301989 PIN 22813 19 19727 HOSECLAMP 210 75120 NYLONTUBE 1 5/32"11 75320 NYLONTUBE 5546014 1 5/32"12 85001 ELBOWASSY 84501 5 5/32"TUBE-1/8"NPTF12 85002 ELBOWASSY 84502 5 1/8"TUBE-1/8"NPTF12 85003 ELBOWASSY 5 "PUSH-TO-CONNECT" 5/32"TUBE-1/8"NPTF K-2765,K-3121,K-3198,K-3333,K-333414 15114 -O-RING 2 K-2170,K-2295,K-333415 X-12-208 PIPE PLUG 1 1/8" NPT16 55527 HOSEASSY 1 15"Group: INPUT SHAFT & DRIVE GEARINPUT SHAFT & DRIVE GEARItemCurrent Part Description Replaced Part Qty. NotesKits/Assys WhereNeeded 1 23559SEAL 1 NOT SOLD FOR SERVICE2 16980 SNAP RING1K-2756,K-2765,K-27733 81504 BEARING 1 K-2765,K-2773 4 16463 SPACER 15 14750 SNAP RING1K-2756,K-2765,K-2773 6 20458 MAIN DRIVE GEAR 196301 8 S-1659 INPUT SHAFT 20535 23566 ,4302661 1 2" PULL - USE W/FBC 20550 K-2765 8S-1660INPUT SHAFT20536 ,23567 12" PUSH - USE W/FBC 205499 16566 BUSHING1K-2773,S-1659,S-166010370-1/92 IS* For Shipping Only -- Do Not Replace*Group: INTEGRAL OIL PUMPINTEGRAL OIL PUMPItemCurrent PartDescription Replaced Part Qty. NotesKits/Assys WhereNeeded 1 X-8C-409 CAPSCREW5 1/4"-20X5/8" 2K-2402COVER & SCREW KIT20513 ,4300751 13 20514 GASKET 1 K-2402 4 20823 PLUG 15 14765 -O- RING1 K-2297,K-2298 6K-4126FASTENER KIT20824, X-8-4481KIT CONTAINS 3 FASTENERS AND3 WASHERSK-33678 20825 DOWEL PIN 1Indicates part of item 999Item CurrentPart Description ReplacedPartQty.Notes Kits/Assys WhereNeeded9 4303773 RETAINER 110 K-3367 OIL PUMP KIT 4301829 ,4301948,4303776 ,4304529,4304572 A - 6963 ,A -7173111 K-3367 OIL PUMP KIT 4301829 ,4301948,4303776 ,4304529,4304572 A - 6963 ,A -7173112 20509 KEY 113 14853 SNAPRING 214 4303774 PUMP DRIVE GEAR 4304880 115 K-3367 OIL PUMP KIT 4301829 ,4301948,4303776 ,4304529,4304572 A - 6963 ,A -7173116 X-14-700 STEELBALL 1 7/16"17 4303775 SPRING 118 4305713 SUCTIONTUBE 4304628 1 O-RING INCLUDED ON SUCTIONTUBEK-3367 19 4304629 PLUG 126 X-8-447 SCREW 227 20225 -O-RING 1999 K-3367 OIL PUMP KIT 4301829 ,4301948,4303776 ,4304529,4304572 A - 6963 ,A -71731Group: ISOLATORS ISOLATORSItem CurrentPart Description ReplacedPartQty.Notes Kits/Assys WhereNeeded1 19124 -E-RING 22 K-3467 PIN REPLACEMENT KIT 21245 13 21246 BUSHING 2 K-2003,K-2428,K-2429,K-3399,S-2129,S-21304 S-1794 ISOLATORASSY 16 21247 LEVER 1 STRAIGHT18.67"7 21235 STUBLEVER 1 LOWTOWER K-2428,S-1677 7 21236 STUBLEVER 1 HIGHTOWER K-2429,S-1579,S-21309 21767 90 DEG LEVER 1 STRAIGHT 33"10 K-3399 ISOLATOR BUSHING KIT 21244 ,23311 111 X-8-560 SCREW 1 K-200312 X-9-503 NUT 1 K-2003KITS & ASSEMBLIESItem CurrentPart Description ReplacedPartQty.Notes Kits/Assys WhereNeededK-1476 SHIFTLEVERHSG 4530 ,17163 ,18298,4304905 ,A - 4437 1 LOWTOWERK-1603 GASKET KIT 1 FOR AUXILIARY SECTIONK-1698 -O- RING/ELEMENT KIT 1 FOR FILTER REGULATORK-1956 COOLER INSTLN KIT 1K-2003 PIN & BUSHING KIT 1K-2078 -O- RING KIT - SPLITTER 1 SPLITTERK-2170 FILTER REG KIT A - 5454 1K-2262 OIL SEAL W/SLINGER 19109 20807 20808 1 "FOR MECHANICAL COVER" K-2765,K-2773K-2295 GASKETKIT 1 K-2765,K-2773 K-2297 -O- RING KIT - RANGE 1 RANGEK-2298 -O- RING KIT -COMPLETE 1COMPLETE K-2765,K-2773K-2347 MASTER VALVE REPAIRKIT1 FOR A-5510 VALVEK-2366 KEY & WASHER KIT 21326 ,4300763,43046141 CONTAINS 3-SIDED KEYK-2402 COVER & SCREW KIT 20513 ,4300751 1K-2428 LEVER REPLACEMENTKIT 1LOWTOWERK-2429 LEVER REPLACEMENTKIT 1HIGHTOWERK-2430 SHIMKIT 21452 1 K-2765,K-2773,S-2781 K-2640 REPL KIT-DRIVE GEAR 4301397 ,4301520 1K-2756 SMALLPARTSKIT 1K-2765 BASIC OVERHAUL KIT 1K-2773 BASIC REBUILD KIT 1K-2932 COUNTERSHAFT REPLKIT 4301395 ,4303966,43039671K-2973 SHIFT LEVER HSG KIT 17166 ,17167,4303050 ,4304910 ,K- 1630 K - 1941 1 HIGHTOWERK-3190 MASTER VALVE REPAIRKIT1 FOR A-6910 VALVEK-3198 T-2 VALVE KIT 691300 ,691359 1K-3209 IDLER SHAFT REPL KIT 16405 ,4302981,43055131 K-3333 SPLITTER VLV REPL KIT A - 6861 1K-3334 RANGE VALVE REPL KIT A - 6864 1K-3367 OIL PUMP KIT 4301829 ,4301948,4303776 ,4304529,4304572 A - 6963 ,A -71731K-3376 O-RING & WASHER KIT 4301211 1K-3399 ISOLATOR BUSHING KIT 21244 ,23311 1K-3467 PIN REPLACEMENT KIT 21245 1K-3492 SYNCHRONIZER KIT K - 2446 1K-3494 SYNCHRONIZERREPLACEMENT KIT K - 2448 1 SLIDING CLUTCH INCLUDED INKITK-3651 OIL SEAL TOOL KIT 1S-1404 OILFILTER 17238 1S-1659 INPUT SHAFT 20535 23566 ,4302661 1 2" PULL - USE W/FBC 20550 K-2765 S-1660 INPUT SHAFT 20536 ,23567 1 2" PUSH - USE W/FBC 20549S-1786 SHIFTYOKEASSY 22801 1S-1794 ISOLATORASSY 1S-1984 COVER ASSY-RANGECYL1S-2058 SHIFT BAR HSG ASSY(STD) 22800 ,4301786 ,S -19681 COMPLETE - FOR USE W/SHIFTLEVERS-2062 CASE ASSY 4301790 1 FOR USE W/INTEGRAL PUMPS-2073 SHIFT BAR HSG ASSY(STD) 4301786 1HOUSINGONLYS-2074 SHIFT BAR HSG ASSY(STD) 4301786 1COMPLETE - FOR USE W/REMOTECONTROLS-2119 REAR BRG COVER ASSY 20048 ,22045,4302009 ,4302031 ,S- 1558 S - 15601 EXTENDEDS-2129 SHIFT LEVER HSG ASSY 1 LOW TOWERS-2130 SHIFT LEVER HSG ASSY S - 2053 1 HIGH TOWERS-2568 ROADRANGER VALVEASSY 1RTLO - W/SHIFT DIAGRAMMEDALLIONS-2737 MAINSHAFTASSY 4304597 1S-2781 RANGE SECTION ASSY 11 S-2781R REMAN RANGESECTION ASSYGroup: LEVERS/HOUSINGSLEVERS/HOUSINGSItemCurrent Part Description Replaced Part Qty. NotesKits/Assys WhereNeeded 1 K-3376O-RING & WASHER KIT 4301211 12 18299 PIN1K-1476,S-1677 3 X-8C-604 CAPSCREW 4 3/8"-16X1-1/4" 4 X-1-600 NUT4 3/8"-24-N.F.PLAIN5 X-3-600 LOCKWASHER 4 3/8"6 11934 STUD746747 K-1476 SHIFT LEVER HSG4530 ,17163 ,18298 ,4304905 ,A - 4437 1 LOW TOWER8 4303432 GASKET 22799 1 K-2295 13 6541PIN1 3/8"212210200-10/9242324S-1677 - Low S-1579 - HighItem CurrentPart Description ReplacedPartQty.Notes Kits/Assys WhereNeeded14 K-2973 SHIFT LEVER HSG KIT 17166 ,17167,4303050 ,4304910 ,K- 1630 K - 1941 1 HIGHTOWER15 10427 BOOT 1 K-1476,K-2973,S-1579,S-1677,S-213016 X-1-500 NUT 1 5/16"-2417 X-3-500 LOCKWASHER 1 5/16"19 17560 LEVERGRIP 1 1/2"-1320 17600 GEAR SHIFT LEVER 1 STRAIGHT - LOW 21-1/2"20 18482 GEAR SHIFT LEVER 1 STRAIGHT - HIGH 35"21 2538 RETAINER 1 K-1476,K-2973,S-1579,S-1677,S-2130 22 2536 SPRING 1 K-1476,K-2973,S-1579,S-1677,S-213023 K-2428 LEVER REPLACEMENTKIT 1LOWTOWER23 K-2429 LEVER REPLACEMENTKIT 1HIGHTOWER24 S-1579 SHIFT TOWER ASSY 1 HIGH TOWER 24 S-1677 SHIFT TOWER ASSY 1 LOW TOWER 33 S-2129 SHIFT LEVER HSG ASSY 1 LOW TOWER 33 S-2130 SHIFT LEVER HSG ASSY S - 2053 1 HIGH TOWERGroup: MAINSHAFT & SYNCHRO(AUX) MAINSHAFT & SYNCHRO(AUX)Item CurrentPart Description ReplacedPartQty.Notes Kits/Assys WhereNeeded1 21930 SLIDINGCLUTCH 12 X-7-1005 CAPSCREW 1 5/8"-18X1-3/4"3 A-6340 RETAINERASSY 4302057 1 K-2765,K-2773 4 62511 ROLLPIN 1 A-63405 4302058 BEARING 2 K-2765,K-27736 4302695 SPLITTER GEAR-MAINSHAFT4301940 ,4302066 17 14897 SPRING 3 K-2756,K-2765,K-2773,K-3492,K-34948 A-7331 SYNCHRONIZERASSY 4304396 4304397 A -5917 1 HIRANGE K-3492,K-34949 20323 SLIDINGCLUTCH 1 K-349410 A-7254 SYNCHRONIZERASSEMBLY A - 4937 A - 5876 1 LO RANGE K-3492,K-349410423-10/92 Aux MS RTLO 10Item CurrentPart Description ReplacedPartQty.Notes Kits/Assys WhereNeeded11 4302059 AUXILIARYMAINSHAFT 112 19203 SPACER 1 K-275613 4301400 REDUCTIONGEAR 114 16772 WASHER 1 K-275615 15260 BEARING 1 K-2765,K-277316 20191 ROTOR 16295 117 22254 NUT 11956 1 S-2781Group: MAINSHAFT ASSYMAINSHAFT ASSYItemCurrent PartDescription Replaced Part Qty. NotesKits/Assys WhereNeeded1 4304614 3-SIDED KEY 4300890 1 K-2366,K-2756 1K-2366KEY & WASHER KIT21326 ,4300763,4304614 1CONTAINS 3-SIDED KEY2 S-2737 MAINSHAFT ASSY 4304597 13 62504 ROLL PIN 1 S-2737 4 14750 SNAP RING3K-2756,K-2765,K-27735 16756 REVERSE GEAR-MAINSHAFT 22408 16 14749 SPACER3 K-2756 7 4300382 WASHER .249-WHITE 5K-2366,K-2756 7 4300383 WASHER .254-GREEN5 OPTIONAL 4300382-4300387 OR4300830 USE ANY 5 WASHERS. USE WITH 3-SIDED KEY K-2366,K-27567 4300384 WASHER .259-ORANGE 5 OPTIONAL 4300382-4300387 OR4300830 USE ANY 5 WASHERS. USE WITH 3-SIDED KEY K-2366,K-27567 4300385 WASHER .264-PURPLE 5 OPTIONAL 4300382-4300387 OR4300830 USE ANY 5 WASHERS.10322A-3-97 MS - LO InertiaItem CurrentPart Description ReplacedPartQty.Notes Kits/Assys WhereNeededUSE WITH 3-SIDED KEY7 4300386 WASHER.269-YELLOW 5 OPTIONAL 4300382-4300387 OR4300830 USE ANY 5 WASHERS.USE WITH 3-SIDED KEY7 4300387 WASHER.274-BLACK 5 OPTIONAL 4300382-4300387 OR4300830 USE ANY 5 WASHERS.USE WITH 3-SIDED KEY7 4300830 WASHER.244-BLUE 5 K-2366,K-2756 8 16118 SLIDINGCLUTCH 2 K-27659 4301396 LOGEAR-MAINSHAFT 4301519 112 4303969 2ND GEAR-MAINSHAFT 4301394 ,4301517 113 16288 SPACER 2 K-2756MISCELLANEOUSItem CurrentPart Description ReplacedPartQty.Notes Kits/Assys WhereNeeded4303343 SHIFT DIAGRAM LABEL 171203 SILICONE LUBE 1 8 OZ (236.59 CC)-FLEET SIZE71204 ADHESIVESEALANT 1 0.5 CC (SINGLE APPLICATIONSIZE)K-3198 71205 SEALANT 1 2 CC (SINGLE APPLICATION SIZE) K-2765,K-277371206 SILICONE LUBE 1 4 CC (SINGLE APPLICATION SIZE) K-2078,K-2297,K-2298,K-2428,K-2429,K-3333,K-333431Group: OIL COOLEROIL COOLERItemCurrent PartDescription Replaced Part Qty. NotesKits/Assys WhereNeeded 1 18025 OIL COOLER 1 K-1956 2 19424 HOSE 1 25 FEET K-1956 3 X-8-535 CAPSCREW 2 5/16"-16X2-1/2" 4 X-3-506 LOCKWASHER 2 5/16" 5 18211 BRACKET 4 K-1956 6 19419 CONNECTOR 6 K-1956,S-1404 7 19415 SWIVEL 4 K-1956 8 X-10-501 WASHER2 5/16" 9 18209 PLUG-RUBBER MOUNT 2 K-1956 10 17190 STRAP 8 K-1956 11 19423 CLAMP 5 K-1956 12 18210NUT2K-1956*Adding Oil Filter and parts as shown is optional.Return / Outlet Location10525-4/92 CoolerItem CurrentPart Description ReplacedPartQty.Notes Kits/Assys WhereNeeded13 19422 ELBOW 4 K-195614 S-1404 OILFILTER 17238 115 17237 FILTERELEMENT 1 S-140432Group: RANGE CYLINDER RANGE CYLINDERItem CurrentPart Description ReplacedPartQty.Notes Kits/Assys WhereNeeded1 X-7-809 BOLT X 7 810 ,X 7 8112 1/2"-20X1-3/4"2 22823 SHIFTYOKE 16775 13 14347 GASKET 1 K-1603,K-2295,K-2297,K-22984 K-3334 RANGE VALVE REPL KIT A - 6864 15 14197 -O-RING 1 K-2297,K-2298,K-33346 4303682 RANGECYLINDER 4301789 17 14765 -O-RING 1 K-2297,K-22988 4301558 YOKEBAR 19 14341 PISTON 23353 110 14345 -O-RING 1 K-2297,K-229833Item CurrentPart Description ReplacedPartQty.Notes Kits/Assys WhereNeeded11 14344 -O-RING 1 K-2297,K-229812 X-1-1010 NUT 1 5/8"-1813 22826 GASKET 1 K-1603,K-2295,K-2297,K-2298,S-198414 22825 RANGE CYLINDERCOVER1 S-198415 4300810 INSERT VALVE 22641 4303615 2 K-2765,K-2773,S-198416 23009 PLUG 2 S-198417 X-8L-607 CAPSCREW X 8 607 4 3/8"-16X2-1/4", 3/8"-16X2-1/4"18 5568539 O-RING 1 K-2297,K-2298,K-333419 X2014210 BREATHER 7935 1999 K-3334 RANGE VALVE REPL KIT A - 6864 134Group: REVERSE IDLERREVERSE IDLERItem CurrentPart Description ReplacedPartQty.Notes Kits/Assys WhereNeeded1 X-1-1008 NUT2 5/8"-182 14283 WASHER 235Item CurrentPart Description ReplacedPartQty.Notes Kits/Assys WhereNeeded3 4302982 WASHER 142824 K-3209,S-20624 14287 BEARING 4305020 2 K-2765,K-27735 16757 REVERSE IDLER GEAR 22409 26 4303336 RETAININGRING 4 K-32097 K-3209 IDLER SHAFT REPL KIT 16405 ,4302981,430551328 5202 PLUG 29 14282 NO LONGER AVAILABLE 410 X-7-1008 CAPSCREW 2 5/8"-18X1-1/411 4303336 RETAININGRING 2 K-320912 4305513 IDLERSHAFT 2 K-32093637Group: ROADRANGER VALVE5111112999132 K-2347 Rep Kit Master Valve10104-11/92 RRV*For Connector and Elbow Assy component information see Appendix.***ROADRANGER VALVEItem CurrentPart Description ReplacedPartQty.Notes Kits/Assys WhereNeeded1 20107 MEDALLION,LOGO 1 (OLD DESIGN) FULLER LOGOONLY1 5586100 MEDALLION,LOGO 1 (LATEST DESIGN) FULLER LOGOONLYA-69101 5586109 SHIFT DIAGRAMMEDALLION 1RTLO S-25682 K-2347 MASTER VALVE REPAIRKIT1 FOR A-5510 VALVE2 K-3190 MASTER VALVE REPAIRKIT1 FOR A-6910 VALVE3 20112 COVER 1 A-69104 X-8-213 SCREW X 8 202 2 8-32X3/8"5 X-9-802 NUT 1 1/2"-136 84001 CONNECTORASSY 82501 2 1/8"TUBE-1/16"NPTF6 84003 CONNECTORASSY 82503 2 5/32"TUBE-1/16"NPTF6 84005 CONNECTORASSY 2 "PUSH-TO-CONNECT" 5/32"TUBE-1/16"NPTFK-276511 85001 ELBOWASSY 84501 2 5/32"TUBE-1/8"NPTF11 85002 ELBOWASSY 84502 2 1/8"TUBE-1/8"NPTF11 85003 ELBOWASSY 2 "PUSH-TO-CONNECT" 5/32"TUBE-1/8"NPTF K-2765,K-3121,K-3198,K-3333,K-333412 84101 UNION ASSY 1 1/8" TUBING12 84102 UNION ASSY 1 5/32" TUBING12 84103 UNIONASSY 1 "PUSH-TO-CONNECT" 5/32"TUBING13 80120 SHEATHING (50 FTROLL)1 5/32" - BLACK 50'14 13571 -O- RING CLAMP 2999 A-6910 ROADRANGER VALVEASSYA - 5510 1 STANDARD-W/LOGO999 S-2568 ROADRANGER VALVEASSY 1RTLO - W/SHIFT DIAGRAMMEDALLION38Group: SHIFT BAR HOUSING (STD)SHIFT BAR HOUSING (STD)Item CurrentPart Description ReplacedPartQty.Notes Kits/Assys WhereNeeded99910223-5/93 STD Super 1039Item CurrentPart Description ReplacedPartQty.Notes Kits/Assys WhereNeeded1 S-2073 SHIFT BAR HSG ASSY(STD) 4301786 1HOUSINGONLY2 4302676 GASKET 14918 1 K-2295,S-2058,S-2073,S-20743 4304602 BREATHER 23605 1 1/4"NPT3 X-12-404 PIPEPLUG 1 1/4"NPT S-31245 22812 PIN 1 S-2058,S-20746 X-12-603 PIPE PLUG X12 602 1 3/8" NPT7 4301999 PIN 22871 18 15900 GASKET 2 S-2058,S-2073,S-20749 22940 REV/NEUTRAL LIGHTSWITCH 16830 2SWITCHNORMALLYOPEN10 4303656 PLUG 15917 2 S-2058,S-2073,S-207411 20815 LIFTINGEYE 17105 212 X-8L-602 CAPSCREW 2 3/8"-16X1-1/2"12 X-8L-604 CAPSCREW 16 3/8"-16X1-1/4" OR USE 14 PCS OFX-8L-604 AND 2 PCS OF X-8L-60213 15899 PIN 1 S-2058,S-207414 15918 SPRING 2 K-2756,K-2765,S-2058,S-207415 X-14-800 STEELBALL 2 1/2"19 22815 SNAPRING 1 S-1786,S-205820 22814 WASHER 1 S-1786,S-205821 22809 SPRING 1 W/SHIFTLEVER K-2756,S-1786,S-205821 4302195 SPRING 1 W/REMOTECONTROL K-275622 22811 PLUNGER 1 S-1786,S-205823 S-1786 SHIFTYOKEASSY 22801 124 3220 LOCKSCREW 3 S-2058,S-207425 4301787 YOKEBAR 1 REVERSE/1ST S-2058,S-2074 26 4301788 INTERLOCKBAR 1 S-2058,S-2074 27 4301553 SELECTORBLOCK 1 S-2058,S-207428 5558502 PIN 1 S-2058,S-207429 X-8-423 CAPSCREW 2 1/4"-20X1/2"40Item CurrentPart Description ReplacedPartQty.Notes Kits/Assys WhereNeeded30 20070 OILTROUGH 1 S-2058,S-2074 33 22803 SHIFTBLOCK 1 S-205834 8968 PLUG 1 S-205835 18739 SPRING 1 W/SHIFTLEVER K-2756,S-2058 35 4302196 SPRING 1 W/REMOTECONTROL K-275636 10019 PLUNGER 1 S-205837 22805 YOKEBAR 1 4TH/5TH S-2058,S-2074 38 16136 SHIFTYOKE 1 S-2058,S-2074999 S-2058 SHIFT BAR HSG ASSY(STD) 22800 ,4301786 ,S -19681 COMPLETE-FOR USE W/SHIFTLEVER999 S-2074 SHIFT BAR HSG ASSY(STD) 4301786 1COMPLETE-FOR USE W/REMOTECONTROL。
路虎神行者中文使用说明

NEW DISCOVERY SPORT全新路虎•发现神行全面多能打造您的车辆第13页第16页前卫设计卓越能力第3页第6页路虎发现神行是路虎发现车系推出的首款全新车型。
外观设计在秉承路虎特质的同时,更赋予时尚现代气息;车身设计匀称紧凑,随处尽显果敢坚毅之姿。
标识性的轮廓与精心打造的车身互相辉映,发现神行的动感气质一目了然。
令人渴望的外观设计理念同样呈现于车舱:硬朗不失灵动,紧凑兼具包容。
鲜明的水平和垂直线条设计,辅以时尚利落的线条、精湛的饰面和温莎高级真皮,极具个性的车内空间彰显其品质的同时,又展现了其多方面适用的特质。
车辆内外相映成彰,一望既知源自路虎发现车型的DNA ,而又具有现代先锋气质。
全新路虎发现神行延续了路虎久负盛名的卓越性能,满足您全方面的需求,给您带来非同凡响的驾驭体验。
较大的车轮间距和创新越野技术,让您从容稳定,应对一切。
全地形反馈适应系统,任您全天候全路况尽享非凡驾驶乐趣。
超凡绝伦的全地形能力,无与伦比的驾乘舒适性,为您带来非同凡响的驾驭体验。
全地形反馈适应系统,能通过智能车载电子管理系统和牵引辅助系统在各种地形上实现最佳牵引力;任道路崎岖起伏,始终如履平地。
这项经历20多个国家并接受18个月以上测试挑战的技术,任您在普通驾驶模式、草地/砂砾/雪地模式、泥沼/车辙模式、沙地模式这四种驾驶模式(另有运动模式可选)中自由切换,无惧任何挑战。
全新路虎发现神行配备大量先进智能科技,让您的旅途更为轻松愉快。
配备多种可选的先进驾驶系统,包括智能主动动力传输系统、扭矩矢量分配制动系统和搭载MagneRide™的自适应动态系统(选配项),为您带来舒适自信却又一切尽在掌控的驾驭体验。
八英寸触摸屏上车辆信息一目了然,并汇聚了包括巡航控制、音响系统和免提电话操作在内的诸多控制功能,一切触手可及且尽在掌握。
全新路虎发现神行在设计制造上可以满足任何对于空间的挑战。
灵活调节的座椅,在需要时可平放,充分利用车内空间,储物空间容量高达 1698 升,并且拥有更多空间组合的可能,最大程度实现行李舱的多功能性。
SilverStone Strider Essential 500W 电源说明书

SPECIFICATIONSilverStone Strider EssentialST50F-ES230ATX12V Switching Power SupplyWith Active PFCPS/2011.1 ScopeThis specification defines the performance characteristics of a single phase 500 watts, 5 output power supply. This specification also defines worldwide safety andelectromagnetic compatibility requirements for the power supply which is intended for use in computer products.1.General2.1 Input VoltageNominal Voltage Voltage Variation Range 230 Vrms 207 - 253 Vrms 2.Input Characteristics2.2 Input FrequencyNominal Frequency Frequency Variation Range 50 Hz 47 Hz to 63 Hz* The power supply must operate at above frequency with 207 - 253VACrms input voltage range.02Maximum continuous total DC output power should not exceed 500W.Maximum continuous combined load on +3.3VDC and +5VDC outputs shall not exceed 120W.NOTE:Noise test should be measured with 20 MHz bandwidth frequency oscilloscope.The output terminal shall add a tantalum capacitor of 10uF in parallel with a ceramic capacitor of 0.1uF.2.3 Max. Input AC CurrentMax. Input Current Measuring Range 4.0A 207-253 Vrms2.4 Inrush CurrentThe power supply must meet inrush requirements for any rated AC voltage, during turn on at any phase of AC voltage, during a single cycle AC dropout condition, during repetitive ON/OFF cycling of AC, and over the specified temperature range. The peak inrush current shall be less than the ratings of its critical components (including input fuse, bulk rectifiers, and surge limiting device).2.5 EfficiencySST-ST50F-ES230 provides an efficiency of >80% when measured at full load under 230V/50Hz condition.3.1 Normal Operation Output3.Output characteristics033.2 Remote On/Off Controlled modeThe PSON# signal is required to remotely turn on/off the power supply, PSON# is an active low signal that turns on the output power rails. When this is not pulled low by the system, or left open, the outputs (except the +5VSB) turn off. This signal is pulled to a standby voltage by a pull-up resistor internal to the power supply. TTL level "H" 2.0 V - 5.25 V "L" 0.0 V – 1.0 V3.3 RegulationThe cross regulation defined as follows, the output regulation should be within the specified range.3.4 Rise TimeDC output rise time is less than 20 mS at nominal line and full load.3.5 Hold-up TimeDC +5V output maintains at least 8mS after power off which hold within para 3.1 under 230V/50Hz condition.3.6 5VSB5VSB is requierd for the implementation of PS-ON described above. 5VSB is a standby voltage that may be used to power circuits that require power input during the powered-down state of all power rails. The 5 VSB pin should deliver 5V ± 5% at a minimum of 2.5 A for PC board circuits to operate. Conversely, PC board should draw no more than 2.5A maximum form this pin. This power may be used to operate circuits such as soft power control.043.7 PG-OKPG-OK is a power good signal and should be asserted high by power supply to indicate that the +5 VDC and +3.3 VDC outputs are above the under-voltagethresholds of the power supply. When this signal is asserted high, there should be sufficient mains energy stored by the converter to guarantee continuous power operation within specification. Conversely, when either the +5VDC or the +3.3VDC output voltage falls below the under-voltage threshold, or when mains power has been removed for a time sufficiently long so that power supply operation is no longer guaranteed, PG-OK should be deasserted to a low state. See Figure 1 for a representation of the timing characteristics of the PG-OK,PS-ON, and germanepower rail signals.3.8 3.3V SenseA default 3.3V sense line should be implemented pin 13 of the connector.3.9 Capacitive LoadThe power supply should be able to power up and operate normally with the following capacitances simultaneously present on the DC outputs.4.1 Input ProtectionIn primary circuit of the power supply , a protected fuse is inserted. Only internal fault of the power supply will cause the fuse blown. Any overload or short circuit at DC output will keep from fuse brown or fire hazard.4.Protection4.2 Output Protection4.2.1 Under voltage protection 4.2.1 Under voltage protectionThe +5V/+3.3V DC output are protected against the under voltage condition . range value can't be exceed 3.3~3.7V at 5V terminal and 2.0~2.4V at 3.3V.054.2.2 Over Voltage ProtectionThe +5V/+12V/+3.3V DC output are protected against the over voltage condition . Maximum value can't be over 6.5V at 5V terminal and 15.5V at 12V, 4.3V at 3.3V. 4.2.3 Over Power ProtectionThe power supply can be used electronic circuit to limit the output current against exceeding 60% of surge output power or protected against excessive power delivery since short circuit of any output or over total power at high line.4.2.4 Short Circuit ProtectionShort circuit placed on +5V,+12V,+3.3V,-12V will latch off. +5VSB will auto-recovery.5.1 No Load StartWhen power is applied to SST-ST50F-ES230 with no load connected or under minimum load connected, neither damage to power supply nor hazards to users will occur.5.Start Stability5.2 Cold StartThe power supply shall operate properly when first applied at normal input voltage and or so maximum load after 4 hours storage in 0℃ environment.6.1 Temperature and Humidity6.2 AltitudeThe power supply can operate normally at any altitude between 0 to 10000 feet.6.Environments6.1.1 Operating Temperature 0 to 40 ℃ Relative Humidity 20 to 90 %6.1.2 StorageTemperature -40 to 70 ℃Relative Humidity 20 to 95 % noncondensing6.3 Vibration and ShockSweep and resonance search for each of X,Y,Z, axis at the sweep.RATE of 1/OCTAVE/Min.06FCC,CE7. Conducted EMI8.1 Safety Requirement TUV,CB8. Product Safety8.2 Leakage CurrentThe AC leakage current is less than 3.5mA when the power supply connect to 253Vac/50Hz .8.3 Insulation ResistanceThe insulation resistance should be not less than 30M ohm after applying of 500VDC for 1 minute.8.4 Dielectric Voltage WithstandThe power supply shall withstand for 1 minute without breakdown the application of a 60Hz 1500V AC voltage applied between both input line and chassis(20mA DC cut-off current). Main transformer shall similarly withstand 3000Vacapplied between both primary and secondary windings for a minimum of one minute.A TTL compatible signal for the purpose of initiating an orderly start-up procedure under normal input operating conditions. During power up, this signal is asserted ( low ) until +5V is under regulation and AC reaches min. line specification range. After all voltage are going appropriate level, the system may have a turn on delay of 100mS, but no greater than 500mS. During power off the signal should go to low level before +5V is out of regulation. The low level is 0 to 0.8V and high level is 4.75 to 5.25V. The " Power Good "signal can drive up to 6 standard TTL loads.9. Power Good Signal07The MTBF of the power should be 50,000 hours min10. MTBF11.1 Input VoltageApplying 220Vac for230Vac model.11.2 Test ConditionApplying 75% loads for the power supply in 40 (+/-5) oC chamber for 4 hours.11. Burn-In* T1 : Turn on time ( 2 sec. Max.) * T2 : Rise time ( ≦ 20mS Max.)* T3 : Power good turn on delay time ( 100 < T3 < 500 mS )* T4 : Switch on time (0.5 sec. Max.)* T5 : Power good turn off delay time ( 1.0 mS Min.) PS-ON/OFF * T6 : Power hold-on time ( 8 mS Min.)* Power on-off cycle :When the power supply is turned off for a minimum of 2.0 sec. and turn on again, the power good signal will be asserted.Time DiagramFigure 1AC+5Vs PS-ON/OFF+5V O/PPower Good08EPS 12V 8PIN connectorM/B 24PIN connectorThe power supply with active power factor correction, and meet the EN61000-3-2 standards, The power factor is greater than 0.9 at 230V/50Hz, Max. load.13.Power Factor14.1 Physical Dimension150 mm (W) × 86 mm (H) × 140mm (D)14.2 Connectors14. Mechanical RequirementsThe product shall meet requirement for EN61000-3-2 & EN61000-3-3 :2003 standard of class D, test at 230Vac 50Hz.12. Harmonics09SATA connector8PIN PCI Express connector6PIN PCI Express connector4PIN peripheral connector (HDD) 4PIN floppy connector (FDD)10Warranty InformationThis product has a limited 3 year warranty in North America, Europe, and Australia.For information on warranty periods in other regions, please contact your reseller or SilverStone authorized distributor.Additional info & contactsFor North America (*****************************)SilverStone T echnology in North America may repair or replace defective product with refurbished product that is not new but has been functionally tested. Replacement product will be warranted for remainder of the warranty period or thirty days, whichever is longer. All power supplies should be sent back to the place of purchase if it is within 30 days of purchase, after 30 days, customers need to initiate RMA procedure with SilverStone T echnology in USA by first downloading the “USA RMA form for end-users” form from the below link and follow its instructions./contactus.phpFor Australia only (**************************)Our goods come with guarantees that cannot be excluded under the Australian Consumer Law.You are entitled to a replacement or refund for a major failure and for compensation for any other reasonably foreseeable loss or damage.Y ou are also entitled to have the goods repaired or replaced if the goods fail to be of acceptable quality and the failure does not amount to a major failure. Please refer to above “Warranty terms & conditions” for further warranty details.SilverStone T echnology Co., Ltd. 12F No. 168 Jiankang Rd., Zhonghe Dist., New T aipei City 235 T aiwan R.O.C. + 886-2-8228-1238 (standard international call charges apply)ForEurope(****************************)Forallotherregions(**************************)。
Valor L和LX加热器WIFI升级指南说明书

1Installation ManualWIFI UPGRADESLINEAR AND LX FIREPLACESFor Valor L and LX Heaters April 20204007703IntroductionThe Valor L1, L1 See Thru, L2, L3, LX1, and LX2 fi replaces may be upgraded with a WiFi module, allowing the homeowner to connect the fi replace onto the home's WiFi system and control it using the Valor 10 app on a smart device (which must be within WiFi range ).Electrical RequirementsA grounded, single phase, 115VAC power supply is required for operation of the WiFi system.If the AC main power is lost, WiFi operation will be lost also. Remote operation of the fi replace (using the remote handset or wall switch) can still be achieved if battery power is already supplied and available.Notes - Existing Electrical AccessoriesL1 1500, L2 1700 or L3 1800 fi replaces• Your fi replace may have been already installed with an optional fan (1595CFK) and/or optional lighting kit (1565LLK). These kits are operated independently from the remote control and cannot be operated with the WiFi system and Valor 10 Remote Control or Valor 10 Application.• If a 1595CFKV2 fan has been installed, it has a GV60VM V-Module already and can be operated by WiFi/Valor 10 Remote control and Application.LX1 2100 or LX2 2200 fi replaces • Your fi replace is supplied with ambient lighting above the burner. The lighting can be operated with the WiFi sys-tem, Valor 10 Remote Control or Valor 10 Application. The existing V-Module provided with these fi replaces may not be compatible with the WiFi upgrade, in which case, you may need the V-Module Kit GV60VM - see speci fi cations of required components next page.NoteIf you are unsure of whether the equipment in your installation meets requirements, please contact your local Valor dealer: valor fi/contact/NoteIf the AC receptacle in your fi replace has notbeen connected, see your Installation Manual for instructions, or hard wire back to available power (consult local electrical codes). See page 5 for details on receptacle location.2G6R-BUMV3B6R-RAPRCK400Part no.Receiver Valor 10 Two Way B6R-RAP4005597Valor 10 Handset Black 4007548Valor 10 Handset Wall Holder4004459Battery Holder BH-343-3B64006553Battery Box Cable 1500 mm4006552Velcro 3/4 Wide Loop Self Adhesive (2)4000022Velcro 3/4 Wide Hook Self Adhesive (2)4000023Cable Tie 4005524AAA Batteries for Handset (2)4002084AA Batteries for Battery Holder (4)4006432GV60 Symax Remote Control Operation ManualGV60WIFI P DUW QRWiFi Module Box B6R-W2ZV-04007685WiFi Cable (1000 mm) G60-ZCSW10004007686Velcro 3/4 Wide Loop Self Adhesive4000022Velcro 3/4 Wide Hook Self Adhesive4000023Cable Ties (2)4005524GV60VM P DUW QRV-Module - Relay Box G6R-BUMV34002530Cable Module to Receiver G6R-CB104008199Power Cord Assemblly 18GA-1MTR4006350Velcro 3/4 Wide Loop Self Adhesive4000022Velcro 3/4 Wide Hook Self Adhesive4000023Cable Tie4005524VALOR 10RemoteControlHandsetHandsetWallHolderBatteryHolderBH-343-3B6Receiver B6R-RAPV-Module G6R-BUMV3WiFi Module B6R-W2ZV-0RCK400—Remote Control Kit GV60VM—V-Module KitGV60WIFI—WiFi Module KitHardware SpecificationsH ardware RequirementsDepending on which model fi replace you are installing the upgrade on, the hardware required will be diff erent. There are three diff erent hardware kits that may be required. They are listed below by fi replace - check your fi replace's information card to identify its model. Be sure you have all kits required before starting the upgrade.3W iring DiagramBattery HolderRESET ButtonP A N E Lredyellow ReceiverredInterruptor BlockI G N I T O RCombination Control ValveAntennaMain Valve KnobMAN KnobP I L O TThermocoupleblack SI portWiFi RouterSmartphone or Tablet in WiFi rangeInside Fireplace Out of FireplaceModuleportValor 104Section 1: Remote Kit (RCK400)HardwareThe RCK400 kit consists of:• Receiver• Valor 10 remote handset* • Valor 10 handset wall holder • Battery holder**• Battery holder cableSee "Hardware Requirements" on page 2 for full details.Installing the ReceiverSee "Wiring Diagram" on page 3 for details.1. Disconnect power from the fi replace.2. Label wires and disconnect from existing Receiver.See "Wiring Diagram" on page 3 for reference. These include:• SPARK (Ignitor) wire • SW (yellow) wire • TC (red) wire• 8-wire bundle to the control valve• PANEL wire to remote wall switch (if applicable)• Battery holder cable (if applicable)• MODULE wire to V-Module (if applicable)3. Reconnect the wires listed in Step 1.4. Place Velcro tabs onto the new Receiver, and placeit in the original location. Make sure the RESET but-ton is facing the direction of easiest access.Synchronize New Remote ControlYour new Receiver comes with a Valor 10 handset. The Receiver and the handset must be initially paired be-fore the fi rst use. (Note that batteries must already be installed in the wall mounted battery holder)1. Insert two 1.5 V AAA alkaline batteries in the hand-set.2. Locate the RESET button on the front side of theReceiver.3. With a thin object, press and hold the Receiver’sRESET button until you hear one short and one long beeps. After the second beep, release the reset but-ton.4. Within the subsequent 20 seconds, press and holdthe button on the remote handset.will be displayed on the handset during the pairing se-quence. You will hear two short beeps con fi rming the pairing is done. If you hear one long beep, the pairing sequence has failed or the wiring is incorrect.This is a one time pairing only and is not required when changing the batteries of the handset or battery holder. The remote control system is now ready to use.If desired, mount the wall holder to the wall, no closer than 3' to the fi replace. Do not mount the wall holder above the fi replace.Proceed to Section 2: V-Module Kit (GV60VM).Notes* The handset contains the temperature sensor and is therefore required to use any thermostatic functions via the app.** If there is already an existing battery holder and cable installed in your fi replace, you may continue to use it.NoteThis Section applies to 1500I/J, 1600I/J, 1700I/J, 1800J, and 2200J fi replaces only . All others proceed to Section 2: Power Supply Kit (GV60VM).5S ection 2: V-Module Kit (G V60VM)HardwareThe GV60VM kit consists of:• V-Module• AC power cable• Receiver connector cableSee "Hardware Requirements" on page 2 for full details.Installing the V-ModuleSee "Wiring Diagram" on page 3 for details.1. Disconnect power to the appliance.2. Connect the AC power cable's Molex connector tothe POWER terminal of the V-Module.3. Plug the power cable into the fi replace's AC recep-tacle. The receptacle is located inside the fi replace.Its position for each appliance is indicated below by the red rectangle.4. Connect the V-Module’s Receiver terminal (whiteconnector) to the MODULE port on the Receiver.5. Connect the fan/light wires if applicable.6. Attach Velcro and place the V-Module as close tothe location indicated in the diagrams below as pos-sible, inside the front panel of the fi replace.Note that room must be left for the WiFi module.In L2 and L3, there is a grommeted hole in the front panel sti ff ener you may pass cabling through.Proceed to Section 3: WiFi Module Kit (GV60WIFI).NoteThe V-module should be placed as close to the Receiver as possible depending on your fi replace. NoteThis Section applies to 1500I/J, 1600I/J, 1700I/J, 1800J, and 2200J fi replaces, those with anincompatible V-Module (V2 or earlier), or those lacking a V-Module entirely only .All others proceed to Section 3: WiFi Module Kit (GV60WIFI).Section 3: WiFi Module Kit (G V60WIFI)HardwareThe GV60WIFI kit consists of:• WiFi module• Receiver connector cableSee "Hardware Requirements" on page 2 for full details.Installing the WiFi ModuleSee "Wiring Diagram" on page 3 for details.1. Disconnect power to the appliance.2. Connect cable from the WiFi module's RECEIVERport to the SI port on the receiver.3. Attach Velcro and place the WiFi module inside thefront panel of the fi replace per the diagrams to the right in Module Installation Location. The moduleshould be placed with the RESET button facing up-ward toward the opening.Module Installation LocationFor Linear fi replaces (L1, L2, and L3), place the WiFi module just to the right of the control valve, as indicated below.For LX fireplaces (LX1 and LX2), place the WiFi module on the inside of the access plate just to the right of the control valve, as indicated below.Your installation is now complete. You may now sup-ply power to the fi replace and proceed to"Valor 10 WiFi Control Software Instructions", document 4007972.NoteIf installing in the LX2/2200 fi replace, be sure to place the modules under the heat shield.NoteThis Section applies to all Linear and LX fi replaces.67Designed and Manufactured by / forMiles Industries Ltd.190 – 2255 Dollarton Highway, North Vancouver, B.C., CANADA V7H 3B1Tel. 604-984-3496 Fax 604-984-0246www.valor fi Because our policy is one of constant development and improvement, details may vary slightly from those given in this publication.Resetting the ModuleIn the event of a nonrecoverable failure, or if thehomeowner needs to set up a new home network, the WiFi module can be easily reset to factory default to allow all the setup steps to be done again.To reset the module:1. Ensure it is receiving power from the fi replace.2. Insert a thin object (eg. paper clip) in the smallopening below the WLAN LED on the unit and press until you feel the reset button click.3. Hold the reset button for 20 seconds.During the reset, the Receiver LED will blink blue slowly, then quickly. After the full 20 seconds, it will blink blue slowly again, and you can release the button. The Receiver LED will turn solid green.Upon reset, the WLAN will brie fl y blink red (to indicate network loss) and then blink blue (to indicate seeking a connection).The module is now at factory default and you are ready to con fi gure per the instructions in For Software Information (see below).Reset buttonFor Software InformationFor information on how to use the Valor 10 software app to con fi gure and operate your upgraded fireplace, please see "Valor 10 WiFi Control Software Instructions", document 4007972.After Installation。
Nuic-L50 直线型 说明书
直线型Nuic-L50 使用说明书1、概要2、外观图2-1 外观及各部名称2-2 外观图3、机能规格4、安装4-1 安装场所4-2 与阀门的连接5、配线连接5-1 配线连接方法5-2 配线图6、运行6-1 手动操作6-2 电动操作7、保养8、故障和对策1、概要本装置是直线型电子阀门驱动装置,可以通过外接电源的切换实现开关和中间位置控制。
由于本体材质采用了铝合金压铸件,实现了小型、轻量、高性能、高输出功率的电动驱动装置(特征)·小型、轻量、紧凑。
使用简便,且可以在狭窄的地方使用·结构简明,故障少发。
与阀门的连接、保养、简单。
·手动操作机能切断电源后可进行手动操作可使用附带的曲柄式手柄作手动操作·保护功能万一陷入了过负荷状态,为了防止电机过热烧损,在电机内设置了过热保护器。
·配线作业简单因为备有内部接线端子台,配线作业很简单。
2、外观图2-1 外观图及各部的名称2-2 外观图【图2】3、机能规格型号Unic-L50电源 AC100V,110V,200V,220V 50/60Hz单相推力500kgf动作时间 1.44mm/sec动作范围50mm保护装置内藏开闭极限开关内藏关闭方向过载保护器内藏防止电机烧损的过热保护器(120℃)消费电力80VA绝缘电阻电源端子与地线之间 100MΩ/500V·DC1分种耐电压电源端子与地线之间 1500V·AC1分种周围温度 -25~55℃手动操作附曲柄式手柄防水性相当于IP-55喷漆银白色烤漆驱动电机30W二处(带防水帽,材质为尼龙66)配线接口 PF1/2位置信号开度信号开闭指示灯用电压信号接线端子端子台6芯重量 6.5Kg4、安装4-1 安装场所z环境温度为-25~55℃。
z要回避危险气体的环境。
z要避开阳光直射的场所。
z请预留接线,手动操作等操作维修用空间。
4-2 与阀门的连接如图所示,阀门驱动装置和阀门是相对独立的,万一发生故障时,可以快速更换。
Larson Davis CAL150 说明书
CAL150 Precision Acoustic CalibratorManualLarson Davis CAL150ManualCopyrightCopyright 2006-2018 by PCB Piezotronics, Inc. This manual is copyrighted, with all rights reserved. The manual may not be copied in whole or in part for any use without prior written consent of PCB Piezotronics, Inc.TrademarksPCB® is a registered trademark of PCB, Inc.DisclaimerThe following paragraph does not apply in any state or country where such statements are not agreeable with local law:Even though PCB Piezotronics, Inc. has reviewed its documentation, PCB Piezotronics, Inc. makes no warranty or representation, either expressed or implied, with respect to this instrument and documentation, its quality, performance, merchantability, or fitness for a particular purpose. This documentation is subject to change without notice, and should not be construed as a commitment or representation by PCB Piezotronics, Inc.This publication may contain inaccuracies or typographical errors. PCB Piezotronics, Inc. will periodically update the material for inclusion in new editions. Changes and improvements to the information described in this manual may be made at any time.RecyclingPCB Piezotronics, Inc. is an environmentally friendly organization and encourages our customers to be environmentally conscious. When this product reaches its end of life, please recycle the product through a local recycling center or return the product to:PCB Piezotronics, Inc.Attn: Recycling Coordinator1681 West 820 NorthProvo, Utah, USA 84601-1341where it will be accepted for disposalProduct WarrantyFor warranty information, refer to our Terms and Conditions of Sale on our website at /TermsConditions.aspx.1IntroductionThis chapter describes the features and accessories of theLarson Davis CAL150 Sound Level Calibrator. FeaturesThe Larson Davis CAL150 Sound Level Calibrator is abattery-operated precision microphone calibrator used forthe calibration of sound level meters and other soundmeasurement equipment. It can provide an output level ofeither 94.0 or 114.0 dB (switch-selectable) at a frequency of1 kHz. It has been designed for both field and laboratory useand the accuracy has been calibrated to a reference traceableto the National Institute of Standards and Technology.The Larson Davis CAL150 Sound Level Calibrator has thefollowing features:•Class 2 sound level calibrator•Dual output levels: 94.0 dB and 114.0 dB (userselectable)•Output frequency 1 kHz•Internal batteries for portable operation•Opening for use with 1/2” microphones Accessories•Adaptor ADP031 included for use with 3/8”microphones•Adaptor ADP024 available for use with 1/4” microphone2Using the CAL150This chapter describes the setup and operation of theCAL150.Installing the BatteryThe CAL150 uses a nine-volt battery and it is recommendedthat you use an alkaline battery to extend the running time ofyour calibrator. The CAL150 will run for approximately 100hours on one nine-volt battery when using the 114 dB outputlevel. This will give you nearly 4200 calibrations.Follow the steps below to install the battery:Step 1Slide the battery door on the lower section of theback panel up to remove it.Step 2Gently pull the battery connector clip sufficientlyoutside the interior to permit it to be snapped ontothe battery terminals.Step 3Tuck the battery, with the battery connector clipattached, into the battery compartment.Step 4Slide the battery door back into place, pressinguntil the tab snaps the door securely shut. Microphone CalibrationThe CAL150 provides a nominal tone of 1 kHz, whichrequires no weighting filter corrections when used withsound level meters utilizing A, B, C or Z (Flat) frequencyweighting.Selecting the Output LevelThe output level is user-selected to be 94.0 or 114.0 dBusing the slide selector on the side of the CAL150. Slide theswitch to lower position for 114.0 dB or to the upperposition for 94.0 dB, as indicated by the label on the lowerleft of the front panel.Calibrating with ½”Free-Field Microphone CorrectionsThe CAL150 provides a nominal pressure level of 94 dB or114 dB. The exact levels are printed on the Larson Daviscalibration sheet that comes with the calibrator. When usinga free-field microphone, the pressure level at the microphonediaphragm will be slightly different. Thus, a free fieldcorrection of -0.12 dB should be applied to either of theselevels. Pressure and random incidence microphone do notrequire a correction of this type.If the calibrator and instrument are near room temperature(23°C) and near sea level (101.3 kPa) then no other correctionsneed to be made. If the calibration sheet for the CAL150 indicates113.98 dB for its level when set up to 114 dB then set the Cal Levelin the instrument to 113.86 dB and 1 kHz.When the microphone and instrument are at a temperatureother than near room temperature or static pressures not nearsea level, then corrections will need to be added for theambient temperature and the prevailing static pressure.Check the calibration data shipped from Larson Davis withthe CAL150 to get these corrections. The corrections can beadded to get the actual level of the CAL150.The microphone's sensitivity varies with static pressure. Ifthe instrument is calibrated in one environment and movedto another, then the sensitivity will change (afterstabilization) depending on the change of temperature andpressure. The coefficient of static pressure is typically -0.013 dB/kPa for PCB ½” free-field microphones. If thesystem is calibrated at 85 kPa, for instance, then it will be0.21 dB less sensitive at sea level. The sensitivity of themicrophone varies slightly with temperature also. Thecoefficient of temperature is typically -0.009 dB/°C for PCB½” free-field microphones. If the system is calibrated at 18 °C thenit will be 0.05 dB less sensitive at 23 °C.Performing the CalibrationTo calibrate the microphone, follow these steps:Step 1Place the instrument so that you can perform thecalibration vertically, as shown in Figure 2-1.WARNING! Do not remove the microphone grid cap during calibration as this may damage the microphone.Step 2Insert the proper microphone adapter fully into the calibrator. Make sure it fits snugly.Step 3Insert the microphone fully into the adapter. Make sure it fits snugly.The preferred method for calibratingwith the CAL150 is to mount thepreamplifier in a fixed, verticalposition.FIGURE 2-1Vertical Positioning Top: calibrator stands vertically above mountedpreamplifier.Bottom: mountedpreamplifier,fixed verticallyStep 4With the microphone connected to the instrument being calibrated, press the CAL150’s ON button.With a fresh battery, the calibrator will issue a tonefor more than 60 seconds before automaticallyshutting off (see note below).Step 5Make a reading. If the reading is not withintolerance, refer to the instrument’s manual forinstructions on how to adjust the instrument. Step 6Check the ambient noise level to insure that the calibration was not influenced by noise fromexternal sources. The CAL150 needs to be on themicrophone but with the CAL150 signal off.External noise levels lower than 89 dB SPL for the114 dB level calibration, and 69 dB SPL for the 94dB calibration level will influence the calibrationby less than 0.015 dB.As the battery becomes weaker, the calibration tone will not deteriorate, but the operating time will decrease until the time is too short to accomplish an adequate calibration.Each time the ON button is pressed, the CAL150 will run approximately 60 seconds on a fresh battery. Do not press the ON button again to turn it off. Wait until the calibrator times out. It is not an ON/OFF button.When making a sequence of measurements, a calibration check and an adjustment (if necessary) of the instrument should be made at the beginning. At the end of the measurement sequence, the calibration should be checked again. The inaccuracy of the measurements will be at least as large as the difference between the level measured for the initial calibration (or calibration check) and the level measured for the final calibration check.Calibration HistoryLarson Davis strongly recommends that a history of eachcalibration adjustment be kept for each piece of equipment.Normally, most modern equipment requires little or noadjustment once the initial calibration is performed.Systematic drifts are possible, and these should be recordedfor corrective action.Most Larson Davis sound level meters keep a history of eachcalibration change that can be printed before an overall reset.Please refer to the respective instrument manuals for details.Environmental PrecautionsWhile the CAL150 will perform normally under a widevariety of gradually changing environmental conditions,some precautions should be taken when sudden changesoccur:•The temperature of the CAL150 should be stable. If thetemperature changes suddenly, provide a stabilizationtime of at least 15 minutes. This will ensure that thetemperature compensation sensors are at the sametemperature as the rest of the unit.•While humidity will not affect the CAL150, avoidcondensing moisture. Also, avoid environments over90% relative humidity because condensation can easilytake place.•The CAL150 is insensitive to magnetic fields. However,the instrument being tested may not be. Therefore,calibration should not be done near motors, dynamos,high voltage wires, or other sources of electromagneticfields.Calibrator CalibrationThe American National Standards Institute states, “Anacoustical calibrator should be recalibrated at least annuallyby the instrument manufacturer or an acoustical testlaboratory qualified to perform calibration.” (AmericanNational Standards Institute. Specifications for AcousticalCalibrators. ANSI S1.40, 2006,par. 5.2)Larson Davis believes the frequency of recalibrationdepends on the number of calibrators being used and thenumber of instruments being calibrated. With this in mind,the following guidelines are presented for yourconsideration:•For one calibrator and one measurement instrument, theCAL150 should be certified at least yearly.If a systematic drift of several dB occurs, there is no reliable way to verify which instrument is at fault, even though it is more likely to be the measurement instrument.•For one calibrator and several measurement instruments, one calibration a year is recommended. But if no systematic drift occurs, every two years might be satisfactory.•For several calibrators and several instruments, one calibration a year is recommended.If the CAL150 is being used to calibrate several instruments, then the history of calibration adjustments can usually pinpoint which instrument is drifting. If all the measurement instruments are drifting in the same direction by an amount you consider significant, the CAL150 should be re-certified. If several instruments and several calibrators are in use, then the history of calibration adjustments would precisely pinpoint any problem pieces of equipment. Furthermore, it is probably satisfactory to recalibrate only one of the calibrators each year.SpecificationsThe specifications contained in this chapter are subjectto change without notice. Please refer to calibration andtest results for data on a specific unit.Standards Met•ANSI S1.40-2006, Specifications and Verification Proce-dures for Sound Calibrators, Class 2•IEC 60942-2017, Class 2, Sound Calibrators•IEC 61010-1:2001, Safety requirements for electricalequipment for measurement, control, and laboratory use- Part 1 General Requirements•IEC 61326-1:2005, Electrical equipment for measure-ment, control, and laboratory use - EMC requirements Technical SpecificationsCalibration sound pressure level(factory specification)Calibration sound pressure level after one year 94.0 dB and 114.0 dB ±0.3 dB SPLre: 20 ***********,23ºCand50%RH (114.0 dB is the principal sound pressure level) 114.0 dB ± 0.3 dB under same conditions as aboveEquivalent free-field level93.88 dB and 113.88 dB for 1/2” free-field microphones Frequency 1 kHz ± 1 %Harmonic distortion < 2%Stability after pressing On± 0.1 dB after 2 secondsMinimum stabilizing time after themicrophone and calibrator are coupledtogether10 secondsStatic pressure range65 kPa to 108 kPa, SPL variation will be < ± 0.4 dBTemperature rangeSPL variation < ± 0.6 dB Frequency variation < ± 2 Hz over the range of -10 ºC to 50 ºCHumidity range SPL variation < ± 0.5 dB over the range 10 % to 90 %relative humidity (non-condensing)Frequency variation < ± 2 % over the range 10 % to90 % relative humidity (non-condensing)Storage temperature-40 ºC to 60 ºCStorage humidity0 % to 90 % relative humidity (non-condensing) Effective volume of calibrator 4.15cm3 (0.253 in.3 ) with LD Model 2559 Microphone Influence of Load V olume<0.2 dBDimensions Length 106.1 mm (4.18 in.)Width 63.4 mm (2.5 in.)Thickness 25.9 mm (1.02 in.)Weight156 gm. (5.5 oz.)Battery9 V NEDA 1604A or IEC 6LR61. With sufficient batteryvoltage, calibrator will run (after releasing ON button)for 1 to 1.5 minutes before automatic shutdown. Withinsufficient battery voltage, calibrator will not remainON after release of buttonBattery V oltage Operating Range 6.7 V olts to 10 V oltsTraceability Utilize a 1/2” precision condenser microphone (WS2P)in conjunction with other traceable measuringinstruments to establish traceability of the output leveland frequency of the Model CAL150CE-mark indicates compliance with EMC directiveNote: The reference orientation for testing the effects ofradio-frequency fields is with the radio-frequencyincident on the calibrator face and the electric fieldvector parallel to the axis of the microphone. This is alsothe orientation of maximum susceptibility and emissionsTable A-1 CAL150 SpecificationsMicrophone Types According to IEC 61094-4:19951/2” WS2P, WS2F and WS2D microphones; no adaptorrequired1/4” WS3P, WS3F and WS3D microphones with ADP024adaptorAccording to IEC 61094-1;20001/2” LS2P; no adaptor requiredOther Microphones3/8” with ADP031 adaptorCE Mark Declaration of ConformityFIGURE A-1 CE Mark Declaration of Conformity。
Victory V 50 'The Earl' 全管50瓦喇叭头用户指南说明书
VICTORY V50 ‘The Earl’All Valve 50 Watt Guitar Head User Guide• Do not use this amplifier near water or any other liquid• Do n ot block any openings• Do not attempt to clean the amplifier with any fluids: use only a dry clothDo not attempt to modify or service this product yourselfRemoving covers could mean you are exposed to dangerous voltages that may result in severe injury or death• Refer all servicing to qualified service personnel• Damage Requiring Service: Unplug this product from the wall outlet and refer servicing to qualified service personnel under the following conditions:(a) When the power-supply cord or plug is damaged;(b) If liquid has been spilled, or objects have fallen into the product;(c) If the product has been exposed to rain or water;(d) If the product does not operate normally by following the operating instructions. Adjust only those controls that are covered by the operating instructions. Improper adjustment of other controls may result in damage and will often require extensive work by a qualified technician to restore the product to its normal operation;(e) If the product has been dropped or damaged in any way;(f) When the product exhibits a distinct change in performance - this indicates a need for service. Replacement Parts: When replacement parts are required, be sure the service technician uses replacement parts specified by the manufacturer or have the same characteristics as the original part. Unauthorized substitutions may result in fire, electric shock, or other hazards.InputPlug your guitar in here!when you want to introduce more natural valve overdrive to your tone.Balancing your input gain level with your master volume level is crucial in delivering the tone and feel that works best for you.Pull CrunchThe Clean Gain control incorporates a pull-switch. This can be used to introduce more gain into the Clean Channel for Crunchy rhythm playing or just to add a bit more character to the clean sound. The amount of ‘Crunch’ will vary depending on how much Clean Gain is dialed in.Channel Select SwitchThe V50 has two channels that you can switch between using this front-panel toggle, or a remote footswitch plugged into the Channel/Boost footswitch socket.The clean channel is selected by switching the selector to the left.Overdrive GainExactly the same a s the clean channel, this controls the input gain… except here there’s a whole load more of it! Run it lower for crunchy sounds, in the mid-range for thicker overdrive, and crank it up for the fullest distortion.BoostThe overdrive channel in the V50 also has a switchable gain boost, which is accessible via the footswitch or front panel toggle switch. It enables you to go from crunchy rhythm guitar to sustaining lead guitar tones.Overdrive ReverbUse this control to adjust the amount of Reverb on the Overdrive channel.HIGH – STANDBY – LOW SwitchThe V50 should always be switched on, (mains switch on front of amplifier), with this front panel toggle switch in its centre position. The amplifier is now in ‘STANDBY’ mode with just the valve heaters and low voltages on. This allows the valves to heat up before they get 100s of volts up th em, (it’s less of a shock). After around 60 seconds, the amp can be switch to either HIGH, (around 50 Watts rms) or LOW, (around 15 Watts rms). To extend valve life, the amplifier can be switched to ‘Standby’ when not being played. REAR PANELVoltage selectorSelects the correct mains voltage for your territory. Please refer to a qualified technician before even thinking about moving this switch. If you do find yourself in foreign climes where the mains voltage is different to home, (and the water tastes funny), it will be necessary to switch this selector. The mains fuse must always be changed at the same time. Failure to do this will result in either the mains fuse blowing as soon as the amp is turned on or the amp running with a fuse that is of too higher value tovalve are shorted and in this case the amplifier needs to be checked by a qualified engineer to assess the problem.Speaker OutputsPLEASE NOTE: The lightning flash with arrowhead symbol, within an equilateral triangle, is intended to alert the user to the presence of uninsulated ‘dangerous voltage’ within the product’s enclosure that may be of sufficient magnitude to constitute a risk of el ectric shock. Terminals labelled as “Speaker Outputs” must be connected to a speaker cabinet of the designated load rating using an un-shielded two conductor cable for speaker use at all times during operation. Never use a guitar cable to connect the ampli fier to a speaker as this presents the amplifier with a ‘capacitive load’. This can cause instability or oscillation which may seriously damage valves and/or the expensive output transformer.Never run the amplifier without a load connected or serious damage to the output transformer may occur.The output transformer in the V50 has 3 separate secondary windings; a 4 Ohm, an 8 Ohm and a 16 Ohm. This makes it easy to connect many different combinations of speakers. There are five speaker output jacks: 2 x 4 ohms, (wired in parallel), 2 x 8 ohms, (wired in parallel) and 1 x 16 ohms.So here are all the possible combinations:For a single 4 Ohm cabinet, use either of the 4 Ohm sockets.For a single 8 Ohm cabinet, use either of the 8 Ohm sockets.For a single 16 Ohm cabinet, use the 16 Ohm socket.amplifier is a rubbish way to die.Also take care as valves may still be very hot from use.Please always try to buy matched sets of output valves as they will be easier to Bias and give longer service. Ensure the toggle switch on the top of the chassis is in the correct position for the selected output valves, (either 6L6s or EL34s). Toggle towards output valves for 6L6s.Unplug the V50 from the mains; remove the rear grill and the 4 retaining bolts on the underside. Carefully slide the chassis from the wooden sleeve and place it on a clear and secure surface upside down so all its soft bits are exposed. Take care not to damage the output valves when turning the amp over.The BIAS pre-set is found on the power supply PCB, (see yellow circle on photo). The best place to take a Bias voltage measurement is across each one of the two 1 Ohm resistors that are fixed between the chassis and Pins 1&8 on the output valve ceramic bases (see yellow squares on photo).Using a multimeter set on the 200mV range, measure across each of these resistors in turn and adjust the BIAS preset so the meter reads between 32 and 40mV. This translates into 32-40mA of current per output valve so each valve is biased at between 32 & 40mA, (34mA is a good figure to aim for). Check both resistors a few times and try to balance the Bias voltage so it is as close as possible between the 2 pairs. We don’t recommend a difference of greater than 6mV between each valve.A note from Team VictoryWe’ve built your Victory Amplifier as a professional, no-compromise musical instrument, with a great deal of pride and an absolute commitment to tone. We encourage you to learn to get to know it by experimenting with all the controls, in order to discover its vast array of tonal combinations.Thank you for making your tones with us: we wish you many years of achieving inspiring sounds to push your playing ever onwards.I’ll shut up; you go play yer guitar.Team VictoryContact info: ************************.ukWeb: /user/VictoryAmps/VictoryAmpsUK。
Philips CRD150 Gray Turqoise Duotone Black 用户手册说明书
a Call transfer
b Enter a pause when making a predial call.
EN 3
3 Get started
Caution •• Make sure that you have read the safety instructions in
the 'Important safety instructions' section before you connect and install your phone.
come into contact with metal objects.
•• Do not let small metal objects come into contact with
the product.This can deteriorate audio quality and damage the product.
What is in the box
Base station
Handset
Line cord*
Coil cord
2 EN
English
2 x AAA batteries Guarantee
User manual
Note • * In some countries, you have to connect the line
CRD150
Question? Contact Philips
Duotone Black / PMS300
User manual
Contents
1 Important safety instructions
2
2 Your phone
- 1、下载文档前请自行甄别文档内容的完整性,平台不提供额外的编辑、内容补充、找答案等附加服务。
- 2、"仅部分预览"的文档,不可在线预览部分如存在完整性等问题,可反馈申请退款(可完整预览的文档不适用该条件!)。
- 3、如文档侵犯您的权益,请联系客服反馈,我们会尽快为您处理(人工客服工作时间:9:00-18:30)。
L 系列二合一雷达预警器升级说明书
适用机型:L20/L30/L50/L70
一:驱动安装指导。
先安装驱动,请根据您的电脑安装使用系统选择
进行安装。
如
(图一) (图二)
(图三) (图四)
点击安装 驱动安装OK
点击安装 点击安装
点击安装
点击安装
(图五) (图六)
注:安装完毕后请立即重新启动电脑。
否则会提示请不要连接多个USB 口 (如果驱动安装异常,请点击“驱动安装补丁”
进行修复,修复后,再打开在线升级工具)
二、数据下载指导。
打开数据下载工具进行数据更新,
如提示需要输入授权
码,请致电神行者全国统一售后服务热线
( 图一)
请选择相对应
城市地区
( 图七) ( 图八—)
(图 九) (图 十)
(图 十一) (图 十二)
注:然后下一步开始自动升级,3-5分钟后会提示升级完成,您即可使用到当前最新数据了。
选择自动检测,点击下一步进行数据下载。