AMCap 摄像头测试软件使用说明电子教案
AMCap 摄像头测试软件使用说明

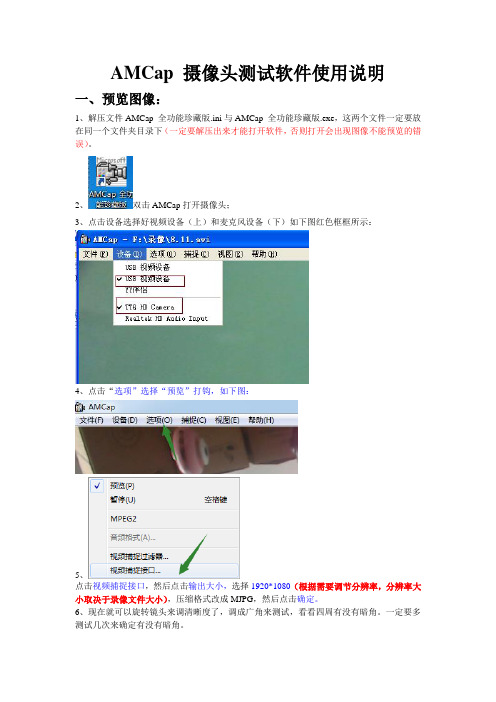
AMCap 摄像头测试软件使用说明一、预览图像:1、解压文件AMCap 全功能珍藏版.ini与AMCap 全功能珍藏版.exe,这两个文件一定要放在同一个文件夹目录下(一定要解压出来才能打开软件,否则打开会出现图像不能预览的错误)。
2、双击AMCap打开摄像头;3、点击设备选择好视频设备(上)和麦克风设备(下)如下图红色框框所示:4、点击“选项”选择“预览”打钩,如下图:5、点击视频捕捉接口,然后点击输出大小,选择1920*1080(根据需要调节分辨率,分辨率大小取决于录像文件大小),压缩格式改成MJPG,然后点击确定。
6、现在就可以旋转镜头来调清晰度了,调成广角来测试,看看四周有没有暗角。
一定要多测试几次来确定有没有暗角。
二、录像:1、点击文件设置好录像文件路径—设置好录像文件名称—弹出的录像大小直接按确定不需要去填数据:2、点击“捕捉”选项选择好红框所示的“捕捉音频”打钩,然后点击“开始捕捉”就开始录像了,需要停止录像就点击“停止捕捉”录像完成后去上一步设置的文件路径里面查找您的录像文件,需要录另一个文件请在路径名称里面改一下文件名就可以录制第二个录像:三、拍照:1、选择“捕捉”选项里面的“拍照”选项,钩选“启用”钩钩,如下图:2、然后点击文件夹设置好拍照存储路径,如下图:3、点击“快照”或者按快捷键(Ctrl+L键)就可以拍照了(拍照文件请到设置好的拍照文件路径里面寻找,照片大小可以通过上面步骤调节分辨率大小来调节,分辨率越大照片越大,分辨率越小照片越小),拍照如下图操作:注:此软件只能操作预览和简单录像拍照使用,录像格式为A VI,拍照格式BMP、JPG和PNG格式,(录像拍照的文件大小与分辨率大小有直接关系,分辨率越大文件越大,分辨率越小文件越小,设置分辨率请参照一的第5项)如果需要专业格式的录像请您自行查找别的视频软件,我们的摄像头支持所有的视频软件。
CAMMAG winCATS 数码成像系统中文操作系统说明书

薄层色谱软件>>winCATS<<数码成像系统中文操作说明书来自于瑞士的薄层色谱专家提供薄层色谱的完全解决方案 Camag中国技术支持中心TLC Visualizer系统中文操作说明书目录一.简介二.软件和硬件的安装三.软件及仪器操作一.简介符合人类工程学的全新设计,光源:增强的UV254nm, UV366nm, 白光直射以及白光透射,以保证板面光照均匀等光源系统光源频率:60KHZ光源持续时间:2,5,10,20,60分钟或连续,定时自动关闭,延长仪器使用寿命数码相机:强大的12位专业高线性数码相机(每个色彩通道有4095级)固定焦距、光圈、对焦,确保成像色彩、大小重现性,1/1.8英寸Super HAD CCD感应器动态范围:>57 dB,线性分辨率0.025%, 噪音<6.0 LSB,信号处理:20 MHz 8位快速扫描/10 MHz12位高精度扫描专业的图像增强功能:自动背景校正增强图像灵敏度,自动图像优化z自动校正亮度,使拍摄区域内亮度平衡,对不规范照明光源进行自动修正,消除以往成像中间亮,四周暗的现象z自动色彩还原,自动对成像、显示、打印的图像进行校正并保持最大程度一致性z自动板面背景扣除,体现真实自然的图像效果9采用“空白板校正”从展开和衍生化后的薄层板图像中扣除空白板的图像,消除薄层板不规则产生的影响,尤其是荧光指示剂的结构或透射模式中薄层厚度的细微差异。
9可以叠加多个图像以提高信噪比,提高检测限。
9间隔一定时间自动获取一系列图像(“场平均强度信息”)用于测定比较精确的强度z斑点放大功能,方便评估非常弱或者更小的分离组份z图像比较观测:图像对比评估,可在同一屏幕直接比较多个抽样9可以在同一屏幕上比较不同TLC/HPTLC板上的轨道,9同时显示多个(多组)样品的轨道或并排比较不同薄层板上的参比轨道。
9区分参比和样品轨道,自动将轨道信息,如位置,宽度、长度、编号等转移到“图像比较观测”中。
明美显微数码测量分析系统安装使用说明书

明美显微数码测量分析系统V1.3.10用户使用手册广州市明美光电技术有限公司公司网址:目录明美显微数码测量分析系统 (1)目录 (2)系统要求 (3)安装指引 (3)软件安装 (6)加密狗安装 (10)操作界面 (11)软件操作说明 (11)基本功能 (11)菜单说明 (15)图像捕获 (16)阴影校正设置 (19)图像测量 (22)图像处理 (27)景深扩展 (30)图像拼接 (32)系统要求要安装和使用明美显微数码测量分析系统,您需要以下或更高配置和软件:安装指引驱动安装适用型号:MC15,MC20,MC50,MC55,MC56,MCX2,MD30,MD50和MD90。
1.将驱动光盘放入您的 CD-Rom / DVD-Rom 或刻录光驱设备中。
2.连MD50至电脑USB端口(台式机推荐机箱后的端口),提示找到新硬件。
3.选择从列表或指定位置安装(高级)。
点击下一步。
(图表1)图表 14.选择不要搜索,我要自己选择安装的驱动程序,点击下一步。
(图表2)图表 25.选择图像设备,点击下一步6.点击从磁盘安装。
(图表4)图表 3 7.点击浏览。
(图表5)图表 48.选择驱动解压的目录。
.选择MD-5064.inf(32位系统选择MD-50.inf),打开。
(图表6)图表 59.点击确定(图表7)图表 610.点击下一步。
(图表8)图表 711.点击完成,完成摄像头驱动安装。
(图表9)图表 8软件安装1.首先将明美显微数码测量分析系统V1.3.10.exe文件复制在电脑中.2.双击软件图标,系统将弹出安装对话框.3.点击[下一步] (如图表13)图表 13 4.选择“我同意”,点击[下一步]。
(图表14)图表 145.点击 [下一步] (图表15)图表 15 6.点击[下一步] (图表16)图表 167.安装完之后会弹出这个VC支持库文件的安装界面,第一次安装时务必安装(图表16-2)图表 16-28.点击[完成] (图表17)图表 179.安装完成。
爱达玛克720P无线网络监控摄像头说明说明书

The Edimax IC-3116W 720p wireless network camera is a versatile monitoring device ideal for monitoring your home, shop or factory during the daytime or at night. With Edimax Plug-n-View technology, no complicated setup is required and you can easily connect the camera to the cloud and monitor remotely from a smartphone, tablet or laptop. Motion-triggered snapshots and recording to email ensure that you capture every criminal event. The IC-3116W comes with a wireless interface making installation easy for any home/store/factory monitoring applications.720p Wireless H.264 Day & Night Network CameraIC-3116WPlug-n-View for 24/7 Easy Remote Monitoring Edimax Plug-n-View technology makes it easy for you to keep your yard, garage, shop, factory or other assets wherever you go. With Plug-n-View technology, you can connect your network camera to the cloud in a few simple steps and access it remotely with a smartphone, tablet, or computer no matter where you are.Night VisionWith a light sensor, image sensor, and IR LEDs, the IC-3116W can satisfy all security and indoorsurveillance needs even in dimly lit environments. And with automatic ICR (IR Cut Filter Removal), infrared light is filtered out during the day time and allowed to pass during the night time,ensuring video color quality in comparison with other IP cameras.4 IR LEDsImage Sensor & ICRLight SensorSOFTWARE FEATURES•Easy remote monitoring via iPhone, iPad, Android, PC & Mac •High-speed H.264 & MJPEG video compression•Motion detection•Sends motion-detected snapshots to email and FTP•Pre- & post-recording upon detected motion•Viewer software to access 16 network cameras simultaneously •Manual/scheduled/cycle recording IC-3116WMotion-Triggered Snapshots & RecordingThe powerful motion detection system built into this network camera ensures that you have evidence of a criminal event. You can pre-define an area in the monitored range for motion detection; and when motion is detected in the specified area, the network camera will produce snapshots or video footage of the event immediately.High Quality VideosThe Edimax IC-3116W is built with a wide 2.2mm lens that covers a diagonal viewing angle of 69 degrees, making it suitable for capturing video footage of a wide area with a single network camera. With a megapixel CMOS sensor, this network camera is able to capture 720p (1280 x 720) videos at 24 frames per second.Functions Management InterfaceEasy remote monitoring via iPhone, iPad, Android, PC & Mac 69 degree diagonal viewing angle Supports dynamic DNS service IR filer embedded EdiView Finder (Windows/Mac) 16-channel viewer Web management interface Firmware upgradable iPhone & iPad viewer appAndroid viewer appEthernet (RJ-45) port Power jackReset/WPS button Internal antennaLED indicators: Internet, LAN/Wi-Fi LNK/ACT, Power Video Video Settings Supported ProtocolsHigh-speed H.264 & MJPEG video compression 1280 x 720 at up to 24 fps 640 x 480 at up to 30 fps 320 x 240 at up to 30 fps Resolution: HD (1280 x 720), VGA (640 x480), QVGA (320 x 240) Frame rate: 5, 10, 15, 20, 24 or 30 fps IPv4, HTTP, TCP, ICMP, RTSP, RTP, UDP, RTCP, SMTP, SNTP, FTP, DHCP, ARP, DNS, PPPoEStandards RF Output Power IR LEDsFast Ethernet IEEE 802.3/802.3u Wireless IEEE 802.11b/g/n 11b: 16dBm –18dBm 11g: 14dBm –16dBm11n: 11dBm –13dBmIR LEDs for night illumination up to 15 feetMemory Operating Conditions Power8MB flash 64MB SDRAM 0–60°C Humidity: 20–80% RH (non-condensing) Power: 12VDC x 1ADimensions Weight Certifications 65 x 110 x 27.2 mm 100g FCC,CEIC-3116WTECHNICAL SPECIFICATIONS APPLICATION DIAGRAMHARDWARE INTERFACEEthernet Port 12V DC Port WPS/ResetButton4 IR LEDsImage Sensor & ICRLight SensorLED Indicators。
AMCap 摄像头测试软件使用说明
AMCap 摄像头测试软件使用说明一、预览图像:1、解压文件AMCap 全功能珍藏版.ini与AMCap 全功能珍藏版.exe,这两个文件一定要放在同一个文件夹目录下(一定要解压出来才能打开软件,否则打开会出现图像不能预览的错误)。
2、双击AMCap打开摄像头;3、点击设备选择好视频设备(上)和麦克风设备(下)如下图红色框框所示:4、点击“选项”选择“预览”打钩,如下图:5、点击视频捕捉接口,然后点击输出大小,选择1920*1080(根据需要调节分辨率,分辨率大小取决于录像文件大小),压缩格式改成MJPG,然后点击确定。
6、现在就可以旋转镜头来调清晰度了,调成广角来测试,看看四周有没有暗角。
一定要多测试几次来确定有没有暗角。
二、录像:1、点击文件设置好录像文件路径—设置好录像文件名称—弹出的录像大小直接按确定不需要去填数据:2、点击“捕捉”选项选择好红框所示的“捕捉音频”打钩,然后点击“开始捕捉”就开始录像了,需要停止录像就点击“停止捕捉”录像完成后去上一步设置的文件路径里面查找您的录像文件,需要录另一个文件请在路径名称里面改一下文件名就可以录制第二个录像:三、拍照:1、选择“捕捉”选项里面的“拍照”选项,钩选“启用”钩钩,如下图:2、然后点击文件夹设置好拍照存储路径,如下图:3、点击“快照”或者按快捷键(Ctrl+L键)就可以拍照了(拍照文件请到设置好的拍照文件路径里面寻找,照片大小可以通过上面步骤调节分辨率大小来调节,分辨率越大照片越大,分辨率越小照片越小),拍照如下图操作:注:此软件只能操作预览和简单录像拍照使用,录像格式为A VI,拍照格式BMP、JPG和PNG格式,(录像拍照的文件大小与分辨率大小有直接关系,分辨率越大文件越大,分辨率越小文件越小,设置分辨率请参照一的第5项)如果需要专业格式的录像请您自行查找别的视频软件,我们的摄像头支持所有的视频软件。
AMCAP的基本使用方法

AMCAP的基本使用方法2.打开AMCAP:完成安装后,双击桌面上的AMCAP快捷方式图标或通过开始菜单中的AMCAP程序打开软件。
3.配置视频设备:在AMCAP的界面上方的“设备”菜单中,选择“视频设备”选项,会弹出一个对话框,列出了计算机上可用的视频设备。
选择要使用的摄像头或其他视频设备,并点击“确定”按钮。
4.调整视频参数:在AMCAP主界面的右侧是一个预览窗口和一些控制面板。
通过控制面板上的各种滑块和按钮来调整视频的亮度、对比度、饱和度、锐度等参数,以获得更好的画面效果。
5.预览视频信号:在AMCAP主界面上,点击工具栏上的“开始”按钮,就可以开始预览视频信号,视频信号会在预览窗口中显示出来。
如果调试和调整的效果不理想,可以通过控制面板上的各种滑块和按钮来实时调整参数。
6.录制视频:在调试好视频信号并满意预览效果后,可以进行视频的录制。
首先点击工具栏上的“录制”按钮,AMCAP会弹出一个对话框用于选择视频存储路径。
选择好存储路径后,点击“开始”按钮即可开始录制。
录制过程中,AMCAP的界面会有一个红色的录制指示标志,显示当前正在进行录制。
7.结束录制:要结束录制,点击工具栏上的“停止”按钮,AMCAP会停止录制,录制的视频文件会保存在之前选择的存储路径中。
8.回放录制的视频:在AMCAP的主界面上,点击工具栏上的“回放”按钮,AMCAP会弹出一个对话框用于选择要回放的视频文件。
选择好视频文件后,点击“确定”按钮,视频文件会在AMCAP的预览窗口中播放出来。
9.其他功能:总结:以上就是AMCAP的基本使用方法的详解,包括了配置视频设备、调整视频参数、预览视频信号、录制视频、回放录制的视频以及其他功能的操作。
希望这些步骤能够帮助您快速上手使用AMCAP。
摄影大师班 拍摄和拼接全景图像说明书

© tom mackieThe sweeping landscape of Aysgarth Falls provided the ideal location for shooting panoramicsthe amateur Photographer masterclass with Tom MackiePanoramasTom Mackie shows three readers how to shoot and stitch fantastic panoramic images in the Yorkshire Dales. Gemma Padley joined themLEARN FROM THE EXPERTSWhen photographing the landscape,it can be tricky fitting everything into the frame. Even using your widest focal length there are situations in which it is impossible to capture the scale of a place in a single shot. As frustrating as this can be, there is a solution: to shoot a sequence of frames and stitch them together in Photoshop to create a panoramic image. In this month’s Masterclass , Tom Mackie and three AP readers trek to theYorkshire Dales to try their hand at shooting and stitching panoramic images.Tom met the readers the night before and discussed the plan for the following day over dinner. ‘Depending on the weather, we’ll attempt a dawn panorama over the village of Askrigg and then visit Aysgarth Falls in Wensleydale, North Yorkshire, and photograph the Upper, Middle and Lower Falls,’ says Tom. ‘We’ll then drive to WestBurton Falls, a short distance away, and finally, if we have time, travel to Hardraw Force, England’s largest single drop waterfall, which is great for vertical panoramas’.The following morning, as the rain lashed down, a dawn shoot was out of the question, but the readers, huddled under umbrellas and undeterred, set out to capture some of North Yorkshire’s most majestic waterfalls. They had brought their own cameras, lenses, tripods and cable releases with them, and Tom was on hand to help them set up their tripods and cameras, and share his in-depth knowledge throughout the day. ‘While you don’t need a tripod with an expensive panoramic head to create sweeping panoramas, a good-quality tripod, preferably with a ball head and spirit level on the tripod neck, is useful,’ says Tom. ‘You may want to use an ND grad filter, but avoid using a polariser when shooting the sky as the polarisation will vary. You could use a polariser for the waterfalls [if there’s not much sky in the frame] to reduce the shutter speed and blur the water. This will also reduce the glare on the water. Try using a 2-3sec exposure and see if you can create interesting swirls and patterns using the foam on the surface of the water. Think creatively and try to previsualise your shots.’Tom advised the readers to use manual focus as they rotated the camera across the scene. One approach is to manually focus on a point in the middle distance, making sure there is enough depth of field.The readers shot horizontal and vertical panoramas (where they used the camera in portrait format) in each of the locations. ‘I’ll typically shoot five to seven frames for a 6x17cm image,’ says Tom, ‘although how many pictures you shoot is up to you.’Kim Bensonkim, 48, lives in oxfordshire and works in medical publishing. While she likes to photograph most subjects, kim especially enjoys detail shots of flowers and abstracts. kim uses a canon eoS 400D Lee MilesLee, 39, is a software developer and lives in kent. He likes landscape and streetphotography and uses a Nikon D70 with 18-70mm and 70-300mm lenses. ‘i really enjoyed theNorman RobertsonNorman, 64, is a member of Leeds Photographic Society and lives in Leeds. Now retired, his main interests are landscape and wildlife photography, as well as some sports and action photography.Tom Mackiea former contributor to aP’s Photo insight mackie, is one of the world’s leading photographers. He has spent many years as an architectural, industrial and landscape photographer Shooting panoramic images requires alittle thought to achieve striking compositions. While you could, in theory, make any scene into a panoramic, to produce an image that is engaging to look at you need to look and ‘see’ in a panoramic format as you are composing your image. Most important is that there are interesting elements to keep the eye hooked from left to right. Decide a beginning and end point for your panorama, and think about the balance of subjects between these two points. Look for elements that complement and support your main subject. You could place your subject on a third, but be careful not to include all the interesting material at one end – you want to compose your shot to retain the viewer’s attention across the whole image and ensure the eye glides seamlessly from one side to the other.‘Think about how you can use foliage andbracken to frame your shot,’ says Tom, ‘and omit anything that doesn’t enhance the main subject or that is obviously distracting to the eye. As you’re framing your shot, keep colour in mind and think about how you can balance different colours in the frame. Remember that you are composing for a 6x17cm frame and this requires a different compositional mindset. You may find it helpful to have a 6x17cm viewfinderkim BeNSoNAbove: Norman captures this dawn view over Wharfedale in the Yorkshire Dales Right: Lee converts his image of the Ribblehead Viaduct to black & white, adding impact to the sceneBelow: Rotating her camera vertically, Kimcaptures the drama of Aysgarth FallsStitching the images togetherAfter an intensive morning’s shoot, Tom and the readersheaded to a nearby pub to have a go at stitching their imagestogether. There are various programs available to so this, butPhotoshop’s Photomerge (on Photoshop CS3 or CS4) isperfectly suitable. If you have taken care at the shooting stageyou should find the images will merge seamlessly, although youmay need to make small adjustments to the edges.NormaN roBertSoN5After cropping your image, save it and click onLayers>Flatten image. Remove any imperfections usingthe Clone tool and make any other adjustments until youare happy with the final image.4Once the files have been mergedtogether you willneed to crop yourstitched image totidy up the edges.3When the filesappear in thePhotomergedialogue box, click‘OK’ and Photomergewill blend the imagestogether.2Decide which layout style you want touse – Auto is usuallyfine – and select yourfiles by clicking onthe Browse tab.1In Photoshop, select the images youwant to use for yoursequence and clickon File>Automate>Photomerge.card when looking at the scene to help youenvisage your final composition.’Setting up thetripod And cAmerABefore you start shooting, it is vital to set upthe camera and tripod carefully otherwise youwill run into difficulty at the stitching stage.First, you need to make sure your tripod islevel and that your camera is level on thetripod. A tripod with an built-in spirit levelis useful, as is a spirit level attached to thecamera’s hotshoe. Once your camera is setup and levelled, rotate the camera across thescene to make sure everything is positionedwhere you want it in the frame. When youcome to take your sequence of shots, keepthe camera level as you rotate it. ‘The tripodhead you use is important in keeping themovement smooth,’ says Tom. ‘A tripod witha pan-and-tilt head is ideal, but a ball-and-socket tripod will work fine, too.’ShootingOnce the readers had set up their camerasand tripods, they were ready to start shooting.Tom suggested they overlap each frame bya third to ensure sufficient overlap and shootmore frames than they needed. The readerstried shooting with their cameras horizontaland vertical. While horizontal panoramicscan look effective, they allow less room todevelop the composition from top to bottomand the final panoramic will be long and thin.Positioning the camera vertically on the tripodand taking a series of shots will instead giveyou a composition with more height, althoughyou will most likely need to take more framesif you use this approach.nodAl point AndpArAllAx errorWhen panning the camera to shoot a series offrames, parallax error can sometimes occur.This is due to the shifting relationship betweennear and distant elements in the scene. Oneway to avoid this is to choose scenes with noforeground detail, but if you do haveforeground detail in your shot youcan solve the problem by rotating theLee miLeScamera around its optical centre or ‘nodal point’. A detachable bracket called a nodal slide that fixes to yourtripod allows you to position the camera in relation to the tripod head so it rotates from its optical centre.expoSureOne of the biggest considerations when shooting panoramic landscapes is how to make sure your exposure is the same from frame to frame. It’s not a good idea to use autoexposure, as the darker and lighterareas of the scene will affect the exposure asyou rotate the camera. When you come to stitch the images together, the join between individual frames will be visible and you’ll need to make adjustments, which can be time consuming and fiddly. Tom suggested exposing for the waterfall to ensure the highlights aren’t lost. You can then either dial in the reading manually or work in aperture priority mode and use exposure compensation. Alternatively, you could meter for an average part of the scene and use this as your exposure for each frame. An easy way to ensure that your exposure is even is to expose for an area that is neither the darkest nor the lightest part of the scene, switch to manual mode and dial in this exposure. Once you are happy with the exposure, take a series of test shots across the scene to check that the exposure is consistent and use this for each frame. ‘Photographing in bright overcast light is ideal to give an even exposure,’ says Tom. ‘You don’t want to shoot in bright sunshine as the light will be too contrasty and wreak havoc with your metering. Dialling in your exposure manually is particularly useful if you are photographing a sweeping dawn shot where areas around the sun are much lighter and cause varianceNormaN roBertSoNAbove: Norman uses a slow shutter speed to record the motion in the water at West Burton FallsBelow: Including a figure in the scene can help to create a sense of scale inyour panoramaeverymonth we invite three tofive AP readers to join one of our experts on an assignment over the course of a day. The experts are Tom Mackie and Lee Frost (landscapes),Brett Harkness (portraits), Paul Hobson (wildlife) and Clive Nichols (gardens). This is the penultimate Masterclass this year. Clive will appear in December and the series will return in 2011.If you would like to take part, visit /masterclass for details of how to apply. Please remember to state which Masterclass you would like to attend and make sure you include your name, address, email address and daytime telephone number in your application. Each participant will be able to use his or her own camera, lenses and other equipment.Would you like to take part?‘You don’t want to shoot in bright sunshine as the light will wreak havoc with your metering’in the scene. When photographing waterfalls you want just enough water to create a swill,’ he adds. ‘If you have a huge deluge, the white areas will burn out.’Tom suggested using cloudy white balance to get an idea of how the image will look and to shoot in raw to allow maximum control over the file during the editing process. ‘One thing to bear in mind when you’re shooting panoramics is moving clouds or people moving through the scene,’ says Tom. ‘You may need to retouch your image afterwards to clone out any duplicated objects.lenS And focAl lengthTom suggested the readers use a standard or telephoto lens, and explained why these lenses are more effective for panoramic images than a wideangle lens. ‘If you use a wideangle lens you will get what’s known as a “bow-tie” effect in your final stitched image,’ says Tom. ‘This is caused by the distortion thatoccurs with wideangle lenses. If you choose your focal length carefully and avoid using the widest focal length of your lens, the bow-tie effect should be reduced. I find 50-70mm the best focal length to use.’BlAck & WhiteAlthough the readers concentrated on shooting in colour, Tom suggested they might like to try a few shots and convert their image to black & white afterwards. Scenes that would work well include those with obvious shapes and patterns. After the Masterclass Lee stayed for an extra day and photographed the Ribblehead Viaduct in the Yorkshire Dales National Park, which lends itself perfectly to a panoramic approach (see pages 22-23). The arches look especially dramatic in black & white as they cut through the rolling landscape. In this shot, industry is juxtaposed with nature and this creates an interesting tension. ApTop Tips1Make sure your tripod and camera are level before shooting. This will enable you to rotate the camera smoothly across the scene. After you have levelled your tripod, mount your camera and use a hotshoe-mounted spirit level to check that the camera is level.2Decide where your panoramic will start and finish, and pan across the scene, roughly planning your overlaps and the number of frames.3To calculate your exposure, take a reading from an average part of the scene and, switching to manual mode, dial in the exposure. Use this for each frame you shoot, but watch out for changing light.4Focus manually and start taking your shots. Move the camera to the right, making sure you overlap each frame by approximately a third. Continue this process until you have the desired number of frames.kim BeNSoNLee miLeSLee stayed in Askrigg for acouple of days after the Masterclass and was lucky enough to capture this superb sunrise。
摄像头测试方法

摄像头基本功能测试方法
1.测试项目:
检验摄像头录像效果,确保摄像头功能满足产品需求。
2.测试方法:
①距离:摄像头距离测试卡:80cm—100cm
②将待测试的摄像头装上机器,开机,连接电脑,电脑上弹出PC Camera;
③打开测试软件AMCap.exe,设置图像大小640 x 480;
设置方法:点击Options—Video Capture Pin…--输出大小,选择640 x 480,点击确定;
④合格的效果:画面线条清晰,能看清楚300线,上下左右四个角的图形中间有轻微
水波纹闪动
⑤说明:测试时眼镜的软件必须为新版软件。
即V2.1或者更高级版本。
3.清晰效果图:
模糊效果图:
摄像头像素(万)到测试卡的距离最低要求(看清楚线)测试卡大小
30 60cm 250 70x55
130 80-90cm 280 70x55
200 120cm 300 70x55
300 150cm -- 70x55。
- 1、下载文档前请自行甄别文档内容的完整性,平台不提供额外的编辑、内容补充、找答案等附加服务。
- 2、"仅部分预览"的文档,不可在线预览部分如存在完整性等问题,可反馈申请退款(可完整预览的文档不适用该条件!)。
- 3、如文档侵犯您的权益,请联系客服反馈,我们会尽快为您处理(人工客服工作时间:9:00-18:30)。
A M C a p摄像头测试软
件使用说明
AMCap 摄像头测试软件使用说明
一、预览图像:
1、解压文件AMCap 全功能珍藏版.ini与AMCap 全功能珍藏版.exe,这两个文件一定要放在同一个文件夹目录下(一定要解压出来才能打开软件,否则打开会出现图像不能预览的错误)。
2、双击AMCap打开摄像头;
3、点击设备选择好视频设备(上)和麦克风设备(下)如下图红色框框所示:
4、点击“选项”选择“预览”打钩,如下图:
5、
点击视频捕捉接口,然后点击输出大小,选择1920*1080(根据需要调节分辨率,分辨率大小取决于录像文件大小),压缩格式改成MJPG,然后点击确定。
6、现在就可以旋转镜头来调清晰度了,调成广角来测试,看看四周有没有暗角。
一定要多测试几次来确定有没有暗角。
二、录像:
1、点击文件设置好录像文件路径—设置好录像文件名称—弹出的录像大小直接按确定不需要去填数据:
2、点击“捕捉”选项选择好红框所示的“捕捉音频”打钩,然后点击“开始捕捉”就开始录像了,需要停止录像就点击“停止捕捉”录像完成后去上一步设置的文件路径里面查找您的录像文件,需要录另一个文件请在路径名称里面改一下文件名就可以录制第二个录像:
三、拍照:
1、选择“捕捉”选项里面的“拍照”选项,钩选“启用”钩钩,如下图:
2、然后点击文件夹设置好拍照存储路径,如下图:
3、点击“快照”或者按快捷键(Ctrl+L键)就可以拍照了(拍照文件请到设置好的拍照文件
路径里面寻找,照片大小可以通过上面步骤调节分辨率大小来调节,分辨率越大照片越大,分辨率越小照片越小),拍照如下图操作:
注:此软件只能操作预览和简单录像拍照使用,录像格式为AVI,拍照格式BMP、JPG和PNG格式,(录像拍照的文件大小与分辨率大小有直接关系,分辨率越大文件越大,分辨率越小文件越小,设置分辨率请参照一的第5项)如果需要专业格式的录像请您自行查找别的视频软件,我们的摄像头支持所有的视频软件。