全手工DIY制作的48V-2500W纯正弦波逆变器
从原理图到实物,手把手教你制作一个逆变器
从原理图到实物,手把手教你制作一个逆变器这次我们采用了功率较大的三极管2N3055,而电阻只用了两个,且最好电阻的功率选大一点,这样电路的输出功率也会相应地增加……在之前我们发布过一些关于逆变器的文章都只是理论讲解很少去实践,其中一个很重要的原因就是没有材料,但也很想为大家去检测一下电路的可行性,自己动手制作成功的那个心情是买多少成品都无法比拟的,我们这次制作的主题仍然是怎么简单怎么来,这个电路经过改善已经测试成功,文章也会把测试结果分享给大家。
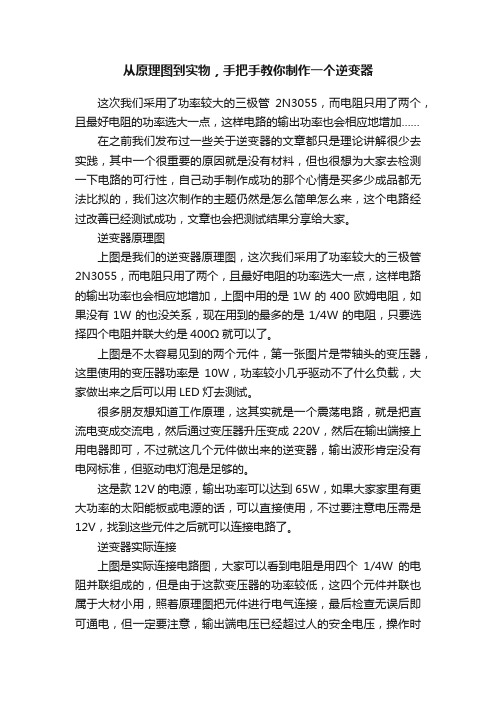
逆变器原理图上图是我们的逆变器原理图,这次我们采用了功率较大的三极管2N3055,而电阻只用了两个,且最好电阻的功率选大一点,这样电路的输出功率也会相应地增加,上图中用的是1W的400欧姆电阻,如果没有1W的也没关系,现在用到的最多的是1/4W的电阻,只要选择四个电阻并联大约是400Ω就可以了。
上图是不太容易见到的两个元件,第一张图片是带轴头的变压器,这里使用的变压器功率是10W,功率较小几乎驱动不了什么负载,大家做出来之后可以用LED灯去测试。
很多朋友想知道工作原理,这其实就是一个震荡电路,就是把直流电变成交流电,然后通过变压器升压变成220V,然后在输出端接上用电器即可,不过就这几个元件做出来的逆变器,输出波形肯定没有电网标准,但驱动电灯泡是足够的。
这是款12V的电源,输出功率可以达到65W,如果大家家里有更大功率的太阳能板或电源的话,可以直接使用,不过要注意电压需是12V,找到这些元件之后就可以连接电路了。
逆变器实际连接上图是实际连接电路图,大家可以看到电阻是用四个1/4W的电阻并联组成的,但是由于这款变压器的功率较低,这四个元件并联也属于大材小用,照着原理图把元件进行电气连接,最后检查无误后即可通电,但一定要注意,输出端电压已经超过人的安全电压,操作时要做好安全措施。
测试电路可行性在这里小编用万用表演示测试,是由于没有合适的用电器,且变压器的功率较低驱动不了大功率电器,所以用万用表代替用电器,测试输出电压。
逆变器的制作方法

逆变器的制作方法逆变器是一种将直流电转换为交流电的电气设备。
它在太阳能发电、电池储能系统、风力发电等应用中起着重要作用。
下面将介绍逆变器的制作方法,包括材料准备、电路设计和装配等步骤。
1.材料准备制作逆变器的材料通常包括以下几个方面:-整流器:用于将直流电转换为交流电。
可以使用晶体管、MOSFET器件或开关管等。
-滤波器:用于滤除交流电中的噪声和谐波,使输出电流更加稳定和纯净。
-控制器:用于监测和控制逆变器的工作状态,保证其正常运行。
-并联二用逆变器(若需要):用于扩大逆变器的功率输出。
2.电路设计逆变器电路的设计复杂度取决于功率要求和具体应用场景。
以下是一个基本的逆变器电路设计:-输入电压:根据具体需求选择适当的直流电源电压。
-整流器:选择适当的整流器器件,如MOSFET,以实现将直流电转换为交流电。
-控制器:设计一个控制器,监测逆变器的工作状态并调节其输出。
-滤波器:根据需要设计一个滤波器电路,用于滤除输出交流电中的噪声和谐波。
-输出:连接交流负载,如灯泡、电动机或电子设备等。
3.装配和调试完成了逆变器电路的设计后,就可以进行装配和调试了:-将电路中的各个组件和器件按照设计连接在一起。
-检查电路的连接是否正确,确保没有短路或接触不良的情况。
-打开输入直流电源,观察输出交流电压和频率是否符合要求。
-如果存在问题,可以通过调节控制器、更换元件或调整电路参数等方式进行调试。
需要注意的是,逆变器的制作需要一定的电子技术基础和知识,对于初学者来说可能会有一定的难度。
此外,逆变器涉及到高电压和高频电路,操作时需要格外小心,避免电击和过电流等危险。
总结:制作逆变器的方法包括材料准备、电路设计和装配调试等步骤。
需要根据具体需求选择适当的材料和器件,并理解逆变器电路的工作原理。
逆变器的制作需要一定电子技术基础和注意安全,同时可以根据实际情况进行调试和优化。
纯手工制作迷你逆变器(全图解)

纯手工制作迷你逆变器(全图解)本人是新手,不过接触电子已经很多年了,做家电维修,就是那种任何家电都修的那种家电维修,最近迷上逆变了,希望高手指教。
直接上图。
虽然不是最小的,但是也算是非常小了,什么保护都没有,如果出问题,那就是直接烧机。
EI33的变压器。
功率我也不知道说是多少好,反正最高上到了60安。
前级是最简单的3525了,什么保护都没做,直接驱动场管,两只1404。
话说这1404可真是好用,单边30安发热量也不大,如果一只上10安共200w的话连散热片也省了,基本不发热,频率30K,变压器自己做的,EI33的小变压器,初级3(0.8*7)+3。
次级也是0.8我也忘记是多少圈了,倍压空载最高750,前级滤波电容两个1000UF,有点小,可没地方装了,就为了一个(小)字,后级滤波400V47UF,也是很小啊,没办法,没空间了,整流两只8120,再加555和4只1225。
输出4.7UF,非常简单的电路。
效果我就不知道了。
没地方试,现在也只能点着灯玩。
还有我那200W的灯泡质量也非常不错啊,烧了一次,就是只断了灯丝,使劲摇啊摇给接上了,现在上到600W也不烧,雪亮雪亮的。
对了,点灯的相片没照到。
上前级D极波形图,自己感觉很自豪,看很多人都说做的波形不好尖峰高,不知道为什么我做的波形这么漂亮,我不是炫耀,比我做的好的人大把多,可能时变压器的问题吧,看不到一点尖峰,要不1404也不是那么好惹的,耐压太低了,尖峰稍高就挂了。
看波形好,我也没加吸收了。
图片上看得出来继续上图。
下面是多图欣赏。
有很多其它东西。
#p#副标题#e#这个东西被EG10001给害了,所有东西装完了,驱动板上的2110却坏了一个,那个郁闷啊,被迫无法完工,也没法试机了。
少说也有个800W以上(是纯正弦波的)前级非常不错。
ETD49的变压器,后面还少个铁铝硅。
ETD49变压器,自己做的,初级0.4*48 3+3共饶了六层,次级我也忘记是多少了。
自制超简单200w48v50HZ逆变器
自制超简单200w48v50HZ逆变器
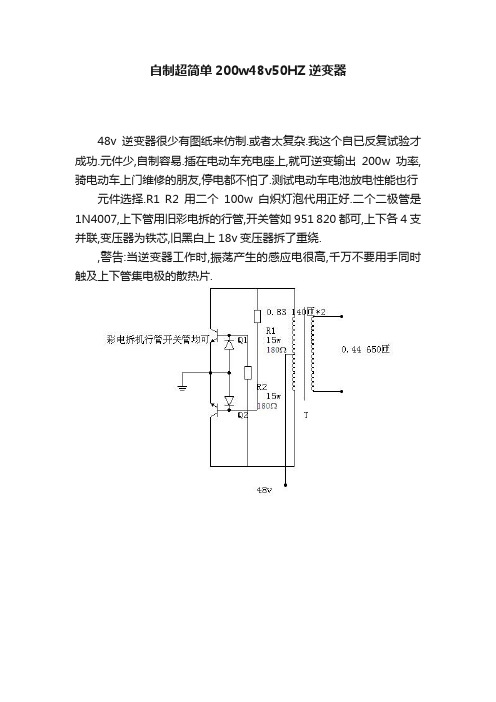
48v逆变器很少有图纸来仿制.或者太复杂.我这个自已反复试验才成功.元件少,自制容易.插在电动车充电座上,就可逆变输出200w功率,骑电动车上门维修的朋友,停电都不怕了.测试电动车电池放电性能也行元件选择.R1 R2用二个100w白炽灯泡代用正好.二个二极管是1N4007,上下管用旧彩电拆的行管,开关管如951 820都可,上下各4支并联,变压器为铁芯,旧黑白上18v变压器拆了重绕.
,警告:当逆变器工作时,振荡产生的感应电很高,千万不要用手同时触及上下管集电极的散热片.。
英普纯正正弦波逆变器(12V 24V 48V)用户手册说明书
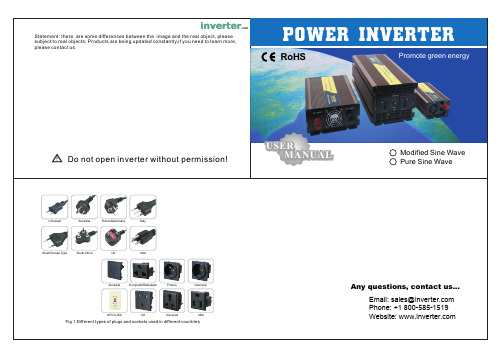
POWER INVERTERRoHSPromote green energyModified Sine Wave Pure Sine WaveUSERUSER MANUALStatement: there are some differences between the image and the real object, please subject to real objects; Products are being updated constantly,if you need to learn more,Do not open inverter without permission!Universal Australia France&Germany I talySmall Europe Type South Africa UK USAAustralia Europe&USA&Japan France Germany60006000W12000W12/24/48VPure sine wave or Modified sine waveThank you for purchasing our Power Inverter.lt is a compact and highly portable power inverter Which has an excellent track record in the field of high frequency inverter. From the 12V/24V/48V DC outlet in your vehicle or boat, or directly from a dedicated 12V/24V/48V DC battery,this inverter can efficiently and reliably power a wide variety of house hold AC products,such as TV, Computers,Air-conditioner etc. Please read this guide before installing or using the Due to our continuous work to upgrade and improve our products, we may change or revise the contents of this manual instructions or any part of it without giving any further notice.Pure sine wave or Modified sine wave600W 1200W800800W 1600W12/24/48V 12/24/48VType:TypeA,TypeB,TypeC,TypeD,TypeE,TypeF,TypeG;75W,100W,150W,200W,300W,500W,600W,800W,1000W,1200W,1500W,2000W,2500W,3000W,4000W,5000W,6000W,8000W,10000W,1205,2405,1210,2410,1215,2415,1220,2420,1230,2430,1250,2450,M:Modified sine wave inverterSY:Movable solar power system;Pure sine wave or Modified sine wave25002500W 5000W30003000W 6000W12/24/48V 12/24/48V………………………………………………………………………………………………………………………………………………………………………………………………………………………………………………………………………………………………………………………………………………………………………………………………………………………………………………………………………………………………………………………………………………………………………………………………………………………………………………………………………………………………………………………………………………………………………………………………………………………………………………………………………12-3456677-889-1011-151617-2122-24SOLUTIONShorten the wire or use widercable. Charge the battery.Make the inverter get cooler.Improve ventilation around the inverter. Place the inverter at a cool place.Feed the load according to e bigger power Check the connection and ower a s a n ormal h ousehold f an o r v ent o penings. 1-4. Do not under any circumstance, connect the inverter to AC power.1-5. The inverter housing may become uncomfortably warm, reaching 140F(60℃)under extended high power opeartion. Ensure at least 2 inches (5cm) of air space is maintained on all sides of the inverter.During operation, keep away from materials that 1-6. Do not use the inverter in the presence of flammable fumes or gases, such as in the bilge of a gasoline powered boat,or near a propane tanks. Do not use the inverter inSOLUTIONmodified sine wave real effective value to get the accurate Charge the battery or change batteryan enclosure containing automotive-type, lead-acid batteries.These batteries, unlike sealed batteries,emit explosive hy-drogenation which can be ignited by sparks from electrical tlets.T h e in verter w ill be 1-8. Do not expose the inverter to temperatures exceeding 104F(40℃).CAUTION! Do not use the inverter with the following equipment;1-9. Small battery operated products such as rechargeable falshlights,some rechargeabl shavers, and nightlights that are plugged directly into an AC receptacle to recharge.1-10. Certain battery chargers for battery packs used in hand powered tools. These chargers will have warning labels stating that dangerous voltages are present at the 1-11. Note DC voltage of battery should be similar to input DC voltage of power inverter (for example DC12V of battery should be connected with input voltage 12V of the inverter).SOLUTIONUse appliances havingpower below the inverter ′s Since the peak power of the electric appliances exceeds the peak power of the inverter, use an appliance with a peak power consistant with the inverterThe electric appliances does not work,and the red FAULT indicator of the inverter lights.The inverter come in two types; pure sine wave power type and modified sine wave type. In the pure sine wave power inverter, the 240V AC output harmonically follows a smooth sine wave and is almost identical to normal mains electricity. As a result, the pure sine wave output would be A Graphic Comparison of Modified Sine Wave and Pure Sine Wave is shown belew:Pure Sine WaveOverload protection / Over voltage protection / Short Circuit protection / Over、Sand bl a st M achine、Scanning Machine etc.Lamp or LED、SewingFreezer、 Coffemaker、For safe and optimum performance,install the inverter in a location that is:3-1-2. Cool - Operate only in ambient temperatures between 32F (0℃) and 104F ). Keep away from heating vents or other heat producing equipment.3-1-3. Safe - Do not install inverter in a compartment with batteries or flammable 3-1-4. Well ventilated - Allow at least 2 inches(5cm)clearance above and on all sides 3-1-5. Clean and free of dust and dirt- This is especially important if the inverterSOLUTIONReplace the battery or usebattery charger to charge yourSwitch off the inverter and let itget cooled for 15 minutes. Clearobjectes around the fan and theinverter. Place the inverter at acool place.Reduce loadaccording to requirements.Check the working state of thecharging system. Make sure theoutput voltage of the battery iswithin the proper voltageAC appliances do not work, and the green power indicator does not light.SOLUTIONCheck the battery, replace it ifcorrect the connection to battery,the inverter may be damaged.Replace the fuse inside inverter(outside warranty cover)Check the cables and theconnection, screw tight thewiring terminal-14-The Sketch of InverterModified sine wave800W-2000W,Pure sine wave800W-2000WOutputs connectionTips :48V a nd 2 4V i n verters a re c onnected i n s imilar w ays,b ut t h e b atteries i n s eries.AC OutletsGround Connection nutUSB DC 5VBattery Connection Red+Battery Connection Black-Battery connecting cablesFanThe inverter works in two stages. During the first stage, the DC to DC converter increases the DC input voltage from the power source (eg.A 12V battery) to 300V DC In the second stage, the high voltage DC is converted to the watts you need (AC) using advanced power MOSFET tran-sistors or IGBT technology in a full bridge configuration The result is excellent overload capability and the capacity to operate difficult reactive loads 3-3-1.Attach the ring type connector marked with redto the positive (+) DC terminal on the inverter and attach the ring connector marked with black to the negative (-) DC A reverse polarity connection (positive to negative) may damage the inverter (Fuse)Damage caused by a reverse polarity connection would probably invalidate your warrantyWARNING: Sparking may occur when connecting the unit to the battery, makesure no flammable fumes are present before making any connections.3-5-1. When a 12V/24V/48V DC outlet or battery properly connected to the inverter,turn on the ON/OFF, the green Power indicator will light, and it deliver AC power to the 3-5-2. Plug the AC appliances you wish to operated into the AC outlet (s) and switch NOTICE: When connect to the appliances,remember to turn on the inverter 3-5-3. If the audible alarm be ignored the inverter may be automatically shut down when the battery voltage drops to 9.8-10.2V / 19.6-20.4V / 39.2-40.8V. in order to 3-5-4. If the AC appliances rated power is higher than inverters rating(or the appliance draws excessive surge power),the inverter will shut down. The red FAULT indicator will light. 3-5.5. If the inverter exceeds a safe operating temperature, due to insufficient.ventilation or a high surrounding temperature , it will automatically shut down. The red FAULT indicator will light and the audio warning alarm will sound.3-3-2. Tighten the nut on each DC terminal by hand until it is snug. If the power more 3-3-3. When the inverter is not in use , unplug it from the 12V/ 24V /48V DC 3-5-6. If a defective battery charge system has caused the battery voltage to rise to a dangerously high level, the inverter will automatically shut down.3-5-7. The cooling fan is designed to operate only when the temperature goes up or CAUTION: Before using the inverter,please provide a ground connection wire. On the rear panel of the inverter is at erminal fitted with a nut for connecting to the inverter and to the earth terminal of the AC output socket. Please choose heavy duty, insulated green/yellow wire. Drive into the ground to a depth of 1-2m or more. In a vehicle,connect the inverter to the chassis of the vehicle. In a boat, connect to the boat ˋs We advise that please use deep cycle battery. If you hear the low voltage alarm, please stop the inverter immediately. When the battery is fully charged, the inverter can be used again. If you use the inverter in a car, then it would be necessary to run the engine of your car after each time you use the inverter. You can run the engine for 10 minutes or so to recharge the -13-Modified sine wave3000W-6000W,Pure sine wave3000W-6000WLight Indicators Power (Green) and Fault (Red)Ground Connection nutFanBattery Connectiong LinesUSB DC 5VON/OFF SwitchAC OutletsBattery Connection,Red+, Black-CAUTION: Although the inverter incorporates the protection function against over-voltage, there would be still the possibility of getting the unit damaged Modified sine wave150W-600W,Pure sine wave150W-600WCrocodile Clip linesUSB DC 5VON/OFFSwitchAC OutletsCigarette Lighter FanBattery Connection,Red+, Black-。
简易逆变器制作方法

简易逆变器制作方法一、引言逆变器是一种将直流电能转换为交流电能的电子设备,具有广泛的应用领域,如太阳能发电系统、风力发电系统等。
本文将介绍一种简易逆变器的制作方法,方便读者了解和学习。
二、材料准备制作简易逆变器所需的材料有:1. 电源:直流电源,如电池;2. 变压器:用于将输入的直流电转换为交流电;3. 电容器:用于平滑输出的交流电;4. 整流器:用于将交流电转换为直流电;5. 开关电路:用于控制电流的开关;6. 滤波电路:用于过滤掉电流中的杂波。
三、步骤1. 连接电源:将电源连接到变压器的输入端,确保电源的正负极正确连接。
2. 连接变压器:将变压器的输出端连接到整流器的输入端,确保接触良好,无松动。
3. 连接整流器:将整流器的输出端连接到滤波电路的输入端,确保接触良好,无松动。
4. 连接滤波电路:将滤波电路的输出端连接到输出端,确保接触良好,无松动。
5. 连接开关电路:将开关电路的控制端连接到电源,确保开关的正常工作。
6. 测试和调试:连接逆变器的输入和输出后,进行测试和调试,确保逆变器的正常工作。
四、注意事项1. 在制作逆变器过程中,应注意电路的连接正确,避免反接或接触不良导致损坏或事故发生。
2. 在连接电源和电路时,应先切断电源,以确保操作的安全性。
3. 在测试和调试过程中,应佩戴绝缘手套和眼镜,以防止电流和火花对人身安全的影响。
五、总结通过以上步骤,我们可以制作出一个简易的逆变器。
当然,这只是一个简单的示例,实际的逆变器制作过程可能会更加复杂,涉及到更多的电子元件和电路设计。
希望读者可以通过本文的介绍,对逆变器的制作有一个初步的了解,进一步探索和学习相关的知识。
逆变器作为一种重要的电子设备,在现代社会中具有重要的应用价值,通过不断学习和实践,我们可以更好地理解和应用逆变器技术。
如何制作一个2000W的正弦波逆变器?
如何制作一个2000W的正弦波逆变器?
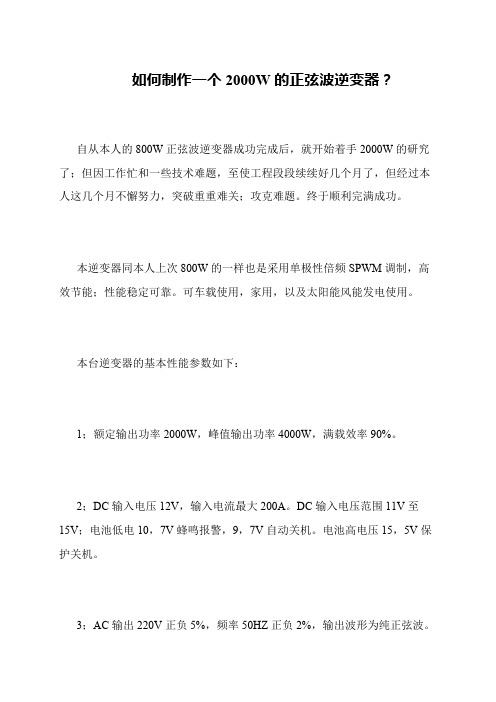
自从本人的800W正弦波逆变器成功完成后,就开始着手2000W的研究了;但因工作忙和一些技术难题,至使工程段段续续好几个月了,但经过本人这几个月不懈努力,突破重重难关;攻克难题。
终于顺利完满成功。
本逆变器同本人上次800W的一样也是采用单极性倍频SPWM调制,高效节能;性能稳定可靠。
可车载使用,家用,以及太阳能风能发电使用。
本台逆变器的基本性能参数如下:
1;额定输出功率2000W,峰值输出功率4000W,满载效率90%。
2;DC输入电压12V,输入电流最大200A。
DC输入电压范围11V至15V;电池低电10,7V蜂鸣报警,9,7V自动关机。
电池高电压15,5V保护关机。
3;AC输出220V正负5%,频率50HZ正负2%,输出波形为纯正弦波。
超级简单的逆变器制作
超级简单的逆变器制作超级简单的逆变器制作(一)自制低成本高效率的家用逆变器本文介绍的逆变器,电路简洁、成本低、易维护、效率高,稍有动手能力的人都能制作。
它虽然不具备市售优质家用逆变器高档复杂的开关电源集成线路,场效应功率放大,但功效并不逊色。
此机为准正弦波输出,空载电流小于450mA,负载能力300W以上,效率达85%以上。
平时.给电风扇、照明灯泡,电烙铁供电,或串上100W的灯泡带29英寸以下的电视都绰绰有余(由于消磁线圈的原因,启动电流太大,所以要串灯泡启动,如果拔掉消磁线圈,串接的灯泡可不用),给生活和维修带来极大的方便,出现故障也不会造成电压升高、烧坏用电器。
笔者使用一年多,没见出现过任何问题,电路如图所示。
工作原理:接通12V电源后,由V1,V2、R1-R4、C1、C2构成的多谐振荡器得电起振,V1、V2的集电极轮流输出接近50Hz的正极性方波.经过C3和R5、C4和R6组成的积分电路积分整形为准正弦波,再经V3、V4倒相放大后分别激励V5、V6,使末级功率管V7、V8轮流导通和截止,它们的集电极电流流经变压器初级绕组L1、L2在变压器的高压侧感应出约50Hz的准正弦波高压输出。
元件选择:本机的大多数元件都能从废旧电路板中拆下来。
V5、V6用D880或C2073。
V7、V8分别用三只3DD207并联而成,其参数为200V/5A/50W,也可用3DDl5D替代。
可调电阻RP可从旧彩电尾板上拆用。
其余电阻电容无特殊要求。
线圈Ll、L2为中1.62mm 的漆包线,各绕50匝。
L3、L4、L5都用0.53mm的漆包线,匝数分别为12、12,945。
功率管配上尽可能大的散热片就行了,本机配的是宽150cm的散热片。
变压器铁芯选用有效横截面积20cm2以上的,可以用足够大的废旧电瓶充电器的铁芯或功放机上的环形电源变压器铁芯,选用的是环形变压器铁芯。
制作与调试:将功率管全部装上散热片后,将其余元件全部用搭棚焊的方法焊接在功率管上,无需制作电路板。
- 1、下载文档前请自行甄别文档内容的完整性,平台不提供额外的编辑、内容补充、找答案等附加服务。
- 2、"仅部分预览"的文档,不可在线预览部分如存在完整性等问题,可反馈申请退款(可完整预览的文档不适用该条件!)。
- 3、如文档侵犯您的权益,请联系客服反馈,我们会尽快为您处理(人工客服工作时间:9:00-18:30)。
全手工DIY制作的48V-2500W纯正弦波逆变器
选专做48V逆变器的原因有几个,电流小,稳定性能非常好,温度低,不伤电瓶可延长电瓶寿命等等。
有网友在想48V电源不好找,但我认为不是的,电动车很多都是48V,在里面取出就可以了,或者可以用4个12V摩托车电瓶串联取得也可以。
有电动车的朋友不妨买个就不用担心停电了。
本逆变器和平
常的基本差不多,分为两大部分,DC-DC和DC-AC,DC-DC是由
KA7500+LM324完成过载欠压过压保护和输出PWM脉冲!MOS用
IRFP90N20,DC-AC是EG8010+IR2110输出SPWMH桥也是用IR的牛管IRFPS43N50K废话不说下面主要上图!
48V2500W逆变器原理图,有3845辅助电源,比副绕组强N倍,稳定十足!开工制作电路板。
安装成品。
tips:感谢大家的阅读,本文由我司收集整编。
仅供参阅!。
