安装指南_LAFALINK无线网卡
aigale海联达 Ai-U100 150M无线网卡 安装指南
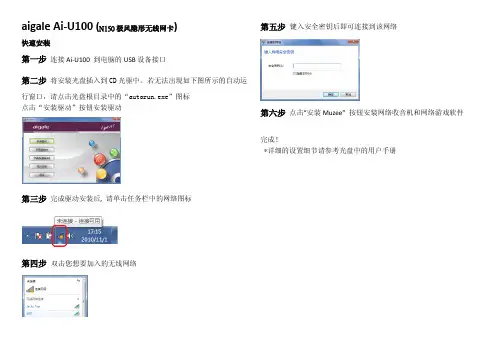
aigale Ai-U100 (N150极风隐形无线网卡)
快速安装
第一步连接Ai-U100 到电脑的USB设备接口
第二步将安装光盘插入到CD光驱中。
若无法出现如下图所示的自动运
行窗口,请点击光盘根目录中的“autorun.exe”图标
点击“安装驱动”按钮安装驱动
第三步完成驱动安装后,
请单击任务栏中的网络图标
第四步双击您想要加入的无线网络
第五步键入安全密钥后即可连接到该网络
第六步点击“安装Muzee” 按钮安装网络收音机和网络游戏软件
完成!
*详细的设置细节请参考光盘中的用户手册。
埃迪茅斯无线网卡安装和使用说明说明书
本機器屬於 Class B 產品,適用於家用環境中,由於本產品可能會產生無線電干擾,因此用戶需採取適當防範措施。
NCC 低功率電波輻射性電機管理辦法
第十二條 經型式認證合格之低功率射頻電機,非經許可,公司、商號或使用者均不得擅自變更頻率、加大功率或變更原設計 之特性及功能。
第十四條 低功率射頻電機之使用不得影響飛航安全及干擾合法通信;經發現有干擾現象時,應立即停用,並改善至無干擾時 方得繼續使用。
前項合法通信,指依電信法規定作業之無線電通信。 低功率射頻電機須忍受合法通信或工業、科學及醫療用電波輻射性電機設備之干擾。
安全性
本設備之設計已針對安裝和使用上的安全性施以最大重視。然而, 仍需對電擊和靜電的危險給予特別留意。
歐洲地區 EU Countries Intended for Use
本機器的 ETSI 版本可以使用於下列國家的一般家庭及辦公室內: 澳洲、比利時、丹麥、芬蘭、法國、德國、希臘、 愛爾蘭、義大利、盧森堡、保加利亞、塞浦路斯、捷克、愛沙尼亞、匈牙利、拉脫維亞、立陶宛、馬爾他、波蘭、 羅馬尼亞、斯洛伐克、斯洛伐尼亞、荷蘭、西班牙、葡萄牙、瑞典及英國。並且此 ETSI 版本也已被下列國家授權 准予使用: 冰島、列之敦斯敦、挪威、瑞士。請檢查您所使用的通道,歐洲標準限定最大幅射功率為 100mW EIRP, 範圍為 2.4GHz ~ 2ห้องสมุดไป่ตู้4835GHz。
FCC 警告聲明:
本設備已通過測試並符合 FCC 規則第 15 部分有關數位裝置的規定。這些限制的主要目的是在保護商業區中運作 此種設備時,提供合理程度的保護,避免有害干擾。本設備會產生、使用並放射射頻能源,若不按指示手冊安裝和 使用,會對無線通訊造成有害干擾。在住宅區中運作本設備亦可能造成有害干擾,在這種情況下,使用者會被要求 採用以下一種或多種方法來改善干擾的情形: 1. 調整接收天線的方向或移動其位置。 2. 將設備與接收天線的距離增加。 3. 諮詢經銷商或有經驗的無線電/電視技術員的協助。
LAFALINK拉法联科室外无线网卡技术说明书
150M 室外无线USB 网卡WLAN 无线接收器技术说明书(适用于LF LF--D510/LF D510/LF--D511/LF D511/LF--D520/LF D520/LF--D521/LF D521/LF--D530/LF D530/LF--D531D531))版本:版本:V2.0.0V2.0.0V2.0.0声明Copyright © 2012 深圳市深圳市拉法联科拉法联科拉法联科技术有限公司技术有限公司技术有限公司 版权所有,保留所有权利版权所有,保留所有权利未经深圳市拉法联科技术有限公司明确书面许可,任何单位或个人不得擅自仿制、复制、誊抄或转译本书部分或全部内容。
不得以任何形式或任何方式(电子、机械、影印、录制或其他可能的方式)进行商品传播或用于任何商业、赢利目的。
为深圳市拉法联科技术有限公司授权注册商标。
本文档提及的其他所有商标或注册商标,由各自的所有人拥有。
本手册所提到的产品规格和资讯仅供参考,如有内容更新,恕不另行通知。
除非有特殊约定,本手册仅作为使用指导,本手册中的所有陈述、信息等均不构成任何形式的担保。
物品清单小心打开包装盒,检查包装盒里面应有以下配件:一个150M无线USB网卡一份快速安装指南一张保修卡一张合格证一张包含驱动程序和管理软件的光盘注意:如果发现配件有损坏或者短缺的情况,请及时和当地的经销商联系。
目录第1章 产品概述 (5)1.1 产品特性 (5)1.2 安全警示: (5)第2章 安装指南 (6)2.1 硬件安装 (6)2.2 软件安装 (6)第3章 连入无线网络 (9)第4章 软AP设置 (12)第5章 STA+AP设置 (15)第6章 常见问题解答 (24)产品概述第1章产品概述感谢您购买LAFALINK拉法联科的产品,LAFALINK 150M室外无线USB网卡适用于台式电脑、笔记本等设备进行无线连接,可以提供方便、快捷的无线上网方式。
该网卡使用ABS防水外壳设计,能够防止在室外工作,其底座有螺丝孔位,可以固定在建筑物的外墙处。
无线网卡驱动怎么安装
无线网卡驱动怎么安装无线网卡驱动怎么安装1、下载安装360驱动大师。
2、安装完成后,打开360驱动大,此时360驱动大师会自动为你的电脑检测硬件信息。
3、如果你的电脑的无线网卡驱动需要更新,就点击升级,360驱动大师会为你的电脑自动安装无线网卡驱动。
4、如果你的电脑没有无线网卡驱动,360驱动大师会在检测电脑硬件信息时检测到你的电脑没有安装无线网卡驱动,这时直接点击安装无线网卡驱动就可以了。
5、进手动安装1、下载好驱动以后,解压缩,请记住存放驱动的地址。
2、插上无线网卡,如果系统提示发现新硬件,会跳出对话框,照步骤3进行。
如果没有提示,按如下步骤:在桌面上“我的电脑”图标上点击右键,选择属性;在跳出的“系统属性”窗口,点“硬件”-“设备管理器”-“操作”-“扫描检测硬件改动”。
然后应该会跳出发现新硬件的窗口,照步骤3进行。
3、WINDOWS,可以连接到windows update以搜索软件吗?否,暂时不,下一步。
4、您期望向导做什么?从列表或指定位置安装,下一步。
5、选择一种硬件类型,然后单击下一步。
从列表中选“网络适配器”,下一步。
6、请选择您的'搜索和安装选项。
不要搜索,我要自己选择要安装的驱动程序,下一步。
7、您想安装哪个网卡?点“从磁盘安装”,下一步。
8、从磁盘安装。
点“浏览”,找到保存文件的那个文件夹,确定。
9、回到您想安装哪个网卡的窗口,点第一个,也就是最长的那一串字,下一步。
10、向导正在安装软件,请稍候。
会跳出说这个软件没有通过WINDOWS验证的提示,选择“仍然继续”。
11、完成找到新硬件向导。
单击“完成”。
2019年ralink,说明书-word范文 (8页)
本文部分内容来自网络整理,本司不为其真实性负责,如有异议或侵权请及时联系,本司将立即删除!== 本文为word格式,下载后可方便编辑和修改! ==ralink,说明书篇一:Ralink平台手动WiFi射频测试指南Ralink平台手动WiFi射频测试指南 V1.0 内部公开▲Ralink平台手动WiFi射频测试指南1. 建立DUT和电脑的连接1. 修改本机ip为192.168.0.2或者不与192.168.0.1开始-运行-cmd,回车,输入 telnet 192.168.0.1 4719其中192.168.0.1是主机ip,4719是telnet端口,不同的板侧和telnet登陆端口之间用空格隔开2.要求输入用户名login和密码Password,用户名和密码默认都是admin 3. 登陆成功后,输入ated命令,如下图所示:Ralink平台手动WiFi射频测试指南 V1.0 内部公开▲务必注意输入一次并回车,输入超过一次会失效或者引起其他问题;同时请勿关闭该窗口。
4. 运行Ralink提供的QA软件,启动程序后选择连接DUT界面如下:(本例中使用的5. 进入QARalink平台手动WiFi射频测试指南 V1.0 内部公开▲用红框+1. MAC地址 MAC候请务必将其修改为12个F。
注意修改完成后点击Set使其生效。
2. 信道,不管是,都有14个信道,可以选择不同的测试信道。
3. 或者OFDM(802.11g)调制,同时设定4. 0,则进行连续不间断发射;否则DUT发射指定数5. 1,功率增减0.5dBm。
用上下箭Calibrate之后,会将当前E2PROM当中,下次启动程序后,默认值会编程当前设定值。
6. Freq:频率补偿参数,用于调整中心频率偏移(频率误差)。
如果点击Calibrate之后,会将当前的补偿值写入到E2PROM当中,下次启动程序后,默认值会编程当前设定值。
7. Frame Loss,测试灵敏度或者最大输入电平的时候,请务必勾选此项。
Araknis Networks Wi-Fi 安装指南说明书
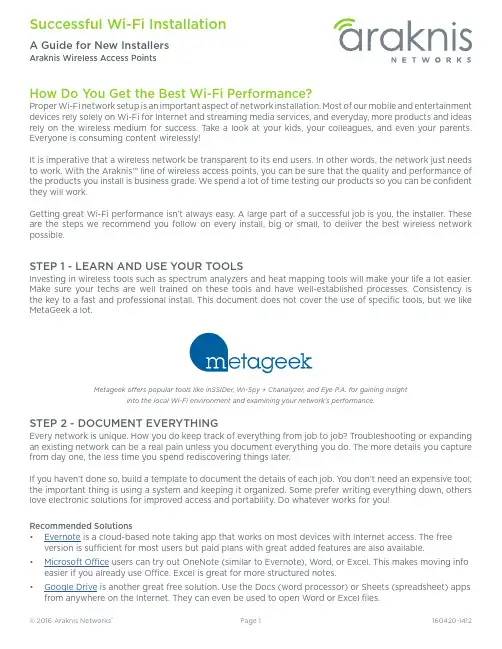
How Do You Get the Best Wi-Fi Performance?Proper Wi-Fi network setup is an important aspect of network installation. Most of our mobile and entertainment devices rely solely on Wi-Fi for Internet and streaming media services, and everyday, more products and ideas rely on the wireless medium for success. T ake a look at your kids, your colleagues, and even your parents. Everyone is consuming content wirelessly!It is imperative that a wireless network be transparent to its end users. In other words, the network just needs to work. With the Araknis™ line of wireless access points, you can be sure that the quality and performance of the products you install is business grade. We spend a lot of time testing our products so you can be confident they will work.Getting great Wi-Fi performance isn’t always easy. A large part of a successful job is you, the installer. These are the steps we recommend you follow on every install, big or small, to deliver the best wireless network possible.STEP 1 - LEARN AND USE YOUR TOOLSInvesting in wireless tools such as spectrum analyzers and heat mapping tools will make your life a lot easier. Make sure your techs are well trained on these tools and have well-established processes. Consistency is the key to a fast and professional install. This document does not cover the use of specific tools, but we like MetaGeek a lot.Metageek offers popular tools like inSSIDer, Wi-Spy + Chanalyzer, and Eye P.A. for gaining insightinto the local Wi-Fi environment and examining your network’s performance.STEP 2 - DOCUMENT EVERYTHINGEvery network is unique. How you do keep track of everything from job to job? Troubleshooting or expanding an existing network can be a real pain unless you document everything you do. The more details you capture from day one, the less time you spend rediscovering things later.If you haven’t done so, build a template to document the details of each job. You don’t need an expensive tool; the important thing is using a system and keeping it organized. Some prefer writing everything down, others love electronic solutions for improved access and portability. Do whatever works for you!Recommended Solutions• Evernote is a cloud-based note taking app that works on most devices with Internet access. The free version is sufficient for most users but paid plans with great added features are also available.• Microsoft Office users can try out OneNote (similar to Evernote), Word, or Excel. This makes moving info easier if you already use Office. Excel is great for more structured notes.• Google Drive is another great free solution. Use the Docs (word processor) or Sheets (spreadsheet) apps from anywhere on the Internet. They can even be used to open Word or Excel files.STEP 3 - CUSTOMER NEEDS AND SITE SURVEYKnow your CustomerSpend some time with your customer before the install to learn about their needs and set their expectations. Understanding expectations is essential to proper setup. Make sure to capture these pieces of information:• User types and their security needs• Coverage area and performance expectations• Types of wireless client devices in use, like computers, smart phones, media devices...• Applications that will be used on the network• Ask the customer to share floor plans if they’re available (preferably in a digital format)• Note what materials were used in constructionKnow the SiteT o provide great Wi-Fi, you need even coverage. T oo many or too few WAPs can cause equal amounts of problems, and due to interference, you can’t assume a single WAP will cover a given area. Walk around the site and look for these common trouble areas. Make notes of your findings and map them on the floor plan as you go:• Kitchen, utility rooms... any area with large electric appliances• Other wireless devices like cordless phones.• Obstacles that might block or deteriorate signal quality like metal studs, reflective glass, brick walls, etc. Next, scan the environment using your spectrum analyzer to see what channels or frequencies have interference. Scan from multiple locations, including possible trouble spots. You want a clear picture of the Wi-Fi environment around and throughout the job. Make note of existing Wi-Fi interference sources and other potential jamming signals on the floor map as you go.The image above shows MetaGeek Chanalyzer at work scanning a location for a new Wi-Fi install. The only interference we see is aboveis above the Wi-Fi spectrum.STEP 4 - PLAN ACCESS POINT LOCATIONSNow that you have a good idea of what you are getting into, go back to the floor map and decides where the access points should be installed. It’s recommended to:•Position the access points on the ceiling facing down toward clients in the most central part of the coverage area possible •Avoid natural sources of interference and signal disruption. Building materials like concrete, stucco, and metal studs can degrade signal strength.•Place access points with some overlap, but not a lot. -70dBm to -80dBm in overlap area is recommended.Cordless PhonesNanny CamsKitchen AreaMetal StudsConcrete/Brick WallsMicrowave Wireless Audio SystemCommon sources of Wi-Fi interferenceSTEP 5 - INSTALL THE ARAKNIS™ ACCESS POINTSWe designed our access points to be very installer friendly. The included mounting plate attaches to all standard junction box types and the access point snaps on without tools. Plus, standard PoE (Power over Ethernet) means one cable can be run for both network and power (PoE injector or PoE switch required). Follow the quick start guide in the box for specific installation steps.Once you have the cables for the access points installed, we highly recommend using a network analyzer to validate each run. This tool not only tells you if each connector is terminated correctly, it also tests the entire cable to be sure it’s in spec and transmitting data correctly. No more time lost searching for cable issues when something doesn’t work!STEP 6 - CLAIM IN OVRC AND CONFIGURE ACCESS POINTSWhat is OvrC?OvrC is a cloud management server that allows you to monitor, troubleshoot, and configure your Araknis devices from anywhere on the Internet through your OvrC browser or mobile app. Equipment is organized by location and you get instant notifications when network issues arise. You can change basic device settings right in the app, or use Web Connect to log into the local interface with no port forwarding required.Learn more at .Claiming Your Device in OvrCThe access point requests a DHCP IP address when it powers on, then connects to the OvrC server once an Internet connection is found. T o claim the device:1. Create or select a customer location and click + DEVICE.2. Enter the MAC address and Service T ag (ST) number (found on the bottom of the WAP and also on thebox). OvrC also scans the network for other enabled devices as you claim the first one, so you can set up an entire job in a few seconds.3. Name the device. Use a name that will help remember the device location and purpose.4. Click Save to complete the process. At this point, your device will appear in the job’s device list. Updating FirmwareAlways update the firmware (if available) before configuring your device. You will be notified in the app any time a device has new firmware available.Configuring Basic Wireless Settings in OvrCAt a minimum, you should configure the following settings before initial testing of the network. All of these settings are found on the Configure tab of the device page.1. Configure SSIDs per customer and job requirements. Use WPA2-PSK unless the requirements make youchoose another security standard.2. Configure the same SSIDs on both 2.4GHz and 5GHz radios and enable Band Steering.3. Configure the Guest Network feature (if required). Keep in mind:• The Guest Network feature is meant to be used in networks with a single access point hosting that SSID because the feature uses a separate DHCP server.• If a Guest Network is required to span across multiple access points using Fast Roaming, see the full product manual for setup instructions.Configuring Other Settings Using OvrC Web ConnectWe designed the Web Connect feature to access the full user interface from OvrC in just a few clicks. Use this feature to change settings that aren’t found on the Configure tab in OvrC. See the full product manual for detailed instructions.Default LoginUsername araknisPassword araknisSTEP 8 - TEST AND VALIDATENow that you feel comfortable about your wireless setup, start testing the performance of the network to make sure everything is working as advertised. Start by running continuous ping tests to the router while roaming around the location. Then test a couple of the applications the customer told you about so the customer is happy when they get your product. Make sure to push the limits when testing to expose any possible issues. STEP 9 - BACKUP YOUR FILESYou have done all the hard work, now make sure you document everything for future reference. Back up the configuration and log files from all of your access points. Make notes about special cases in that particular job site (each job site has one of those!). This will make your life a lot easier in the future in case the customer calls for help. And they always do.STEP 10 - SHARE WITH CUSTOMER AND CLOSEThis is an optional step, but if you want to set yourself apart, share a standard report document with your customer. Show them all the hard work and science that went into your product. Give them confidence in their choice and your abilities to deliver a phenomenal wireless network.These are the steps we recommend you get into the habit of performing on each job. No matter the size. Yes, it’s a time investment but this investment will pay off when you have fewer customer calls and a product you can stand behind.Happy Installing!。
LAFALINK拉法联科室外无线网卡技术说明书
150M 室外无线USB 网卡WLAN 无线接收器技术说明书(适用于LF LF--D510/LF D510/LF--D511/LF D511/LF--D520/LF D520/LF--D521/LF D521/LF--D530/LF D530/LF--D531D531))版本:版本:V2.0.0V2.0.0V2.0.0声明Copyright © 2012 深圳市深圳市拉法联科拉法联科拉法联科技术有限公司技术有限公司技术有限公司 版权所有,保留所有权利版权所有,保留所有权利未经深圳市拉法联科技术有限公司明确书面许可,任何单位或个人不得擅自仿制、复制、誊抄或转译本书部分或全部内容。
不得以任何形式或任何方式(电子、机械、影印、录制或其他可能的方式)进行商品传播或用于任何商业、赢利目的。
为深圳市拉法联科技术有限公司授权注册商标。
本文档提及的其他所有商标或注册商标,由各自的所有人拥有。
本手册所提到的产品规格和资讯仅供参考,如有内容更新,恕不另行通知。
除非有特殊约定,本手册仅作为使用指导,本手册中的所有陈述、信息等均不构成任何形式的担保。
物品清单小心打开包装盒,检查包装盒里面应有以下配件:一个150M无线USB网卡一份快速安装指南一张保修卡一张合格证一张包含驱动程序和管理软件的光盘注意:如果发现配件有损坏或者短缺的情况,请及时和当地的经销商联系。
目录第1章 产品概述 (5)1.1 产品特性 (5)1.2 安全警示: (5)第2章 安装指南 (6)2.1 硬件安装 (6)2.2 软件安装 (6)第3章 连入无线网络 (9)第4章 软AP设置 (12)第5章 STA+AP设置 (15)第6章 常见问题解答 (24)产品概述第1章产品概述感谢您购买LAFALINK拉法联科的产品,LAFALINK 150M室外无线USB网卡适用于台式电脑、笔记本等设备进行无线连接,可以提供方便、快捷的无线上网方式。
该网卡使用ABS防水外壳设计,能够防止在室外工作,其底座有螺丝孔位,可以固定在建筑物的外墙处。
无线网卡的使用方法
无线网卡的使用方法
导语:无线网卡的作用、功能跟普通电脑网卡一样,是用来连接到局域网上的。
下面是无线网卡的使用方法,欢迎参考!
无线网卡只是一个信号收发的设备,只有在找到上互联网的出口时才能实现与互联网的连接,所有无线网卡只能局限在已布有无线局域网的范围内。
下面,我们就来看看无线网卡安装教程分享。
安装无线网卡的驱动程序
1、把无线网卡*入USB接口后,红*指示灯会亮起,这时计算机会自动识别该无线网卡,如果无线网卡没有质量问题,计算机会在右下角显示“新硬件已安装并可以使用”。
2、然后打开我的电脑,双击无线网卡图标,安装驱动程序。
3、接着选择安装的语音,一般我们选择简体中文的。
4、然后选择安装的目录,最好不要安装在C盘系统盘,容易造成文件丢失,浏览文件安装在其它盘比较好。
安装完成后,点击“完成”即可。
使用无线网卡的方法
1、驱动程序安装完成后,双击桌面的无线网卡程序图标。
2、打开程序主界面后点击“自动连接”,如果这时最下面显示请*入调制解调器,说明无线网卡没有*好,要退出网卡重新*入USB卡槽。
3、然后程序会自动检测和验*设备,验*成功后再点击左上角的“自动连接”,就连接到网络,可以正常上网了。
4、在关闭无线上网时,要先点击主程序的“断开网络”,然后点击右上角的关闭,再点击确定即可。
不要未断开网络就直接退出程序,那样容易出问题。
无线上网卡怎么安装
无线上网卡怎么安装?一般安装步骤为:(1)首先,找到安装驱动及应用程序,运行,安装。
(2)提示“请插入上网卡“或等待程序安装完毕,将无线上网卡接入电脑相应接口。
(3)系统提示发现新硬件,自动安装。
因先插上卡,然后再装上驱动,拨号,提示连接失败。
原因:安装顺序不对。
解决方法:(1)先把卡取下,卸载硬件驱动(右击“我的电脑”图标,选择“管理”---“设备管理器”:把相应调制解调器(Modem)和COM端口(如果有的话)卸载掉);(2)重新安装驱动,再插上卡,运行程序就可以上网了。
无线上网卡使用及网络常见问题解答虽然我不推荐客户购买无线上网卡!速度慢,不管是联通的CDMA或者是移动的GPRS,都存在速度慢的出奇的情况,完全可以让你回到56K猫拨号的时代,对于一直使用宽带的你,你能忍受如此高价位,低速度的无线网络吗?但是,萝卜青菜各有所爱,使用无线上网卡的朋友毕竟还有这么多!自然出现的各种问题也多,咨询,求助巅峰问题的也多了!巅峰个人觉得无线上网卡唯一的优点就是方便。
推荐购买54M 无线路由器,实现局域网无线环境,速度和有线是没区别的咯!以下是巅峰对一些无线上网卡使用及网络常见问题解答,欢迎顶帖,转帖!(注意:插上卡后请稍等几秒)1.拨号上网和通话不能同时进行是什么原因?目前,无线上网卡暂时不支持数据业务和语音业务并发功能。
(高通方案与MTK方案支持数据业务与语音同时)2.电脑出现提示"需检查无线上网卡",是什么原因?该怎么办?是因为无线网络连接信号出现中断,重新启动应用程序或者拔出卡再插进去并重新启动网卡拨号程序即可。
3.出现提示"端口错误"又是什么原因?出现此错误提示是因为:(1)无线上网卡端口非正常关闭;(2)无线上网卡没有插好;(3)网卡的端口被禁用。
一般只需重新插一次卡并等待约10秒钟(因为电脑识别网卡需要10秒钟左右)再重新启动网卡拨号程序即可。
4.运行程序,无法打开端口原因:1.无线网卡设备未正确识别 2.端口驱动识别错误解决方法:(1)右击“我的电脑/属性/硬件/设备管理器”。
win10无线网卡驱动怎么安装
win10无线网卡驱动怎么安装
小编最近发现有些用户在使用win10系统的笔记本电脑有时候上不了网,无法去连接wifi上网,一检查才发现无线网卡驱动没有了,需要重新安装,那么该怎么办呢。
小编这里就教朋友们在win10系统上安装无线网卡驱动,安装好后我们就能在笔记本电脑上享受无线wifi上网的乐趣了。
1、找到你路由器的品牌官方网站,找到“服务支持”,小编这里使用的是“TP-LINK”。
2、输入你的路由器型号,在路由器的底部会有纸条详细的说明,输入好后点击搜索。
3、在搜索出来的下载地址中,找到该路由器的无线网卡驱动。
4、进到详细页面后,点击下载,如图所示。
5、将压缩包下载解压后,双击“setup”进行安装。
6、根据安装向导一步步的点击下一步,直到完成即可。
7、安装完无线网卡驱动后,点击右下角的wifi图标即可连接wifi。
解决win10无线网卡驱动安装方法就是上面这些,希望小编的分享能帮助到你们。
- 1、下载文档前请自行甄别文档内容的完整性,平台不提供额外的编辑、内容补充、找答案等附加服务。
- 2、"仅部分预览"的文档,不可在线预览部分如存在完整性等问题,可反馈申请退款(可完整预览的文档不适用该条件!)。
- 3、如文档侵犯您的权益,请联系客服反馈,我们会尽快为您处理(人工客服工作时间:9:00-18:30)。
(3)连接完成后会出现连接的无线信号的信息,被连接上的无线信号的前面会打上对勾,如下图所示。
电脑上的驱动图标 也会变成绿色的。
到这里无线网卡的连接设置就完成了,连接上以后就可以无线上网了。
(1)驱动安装完成后电脑桌面右下角会出现一个 图标,插上网卡后会变成 ,此时,双击该图标,会出现下面的界面。
点击左边图片上的“放大镜”图标 搜索无线信号,如右图所示。
1
2.选择“我接受许可证协议中的条款”并点击“下一步”
3.选择“安装驱动程序与ralink无线网络设定程序” 并点击“下一步”
4.选择“Ralink无线网络设定程序”并点击“下一步”
5.点击“安装”开始安装网卡驱动程序
6.点击“完成”结束安装,网卡驱动程序安装就完成了。
简介
系统需求
笔记本或者台式电脑拥有奔腾1GHz以上的处理器
Windows 2000/XP/Vista/win7,MAC OS,Linux 带有高速USB 2.0接口
非常感谢您购买LAFALINK无线网卡,LAFALINK无线网卡,采用优秀的Ralink芯片,是一款高性能,高速率,稳定性好,
接受距离远的无线网卡,让您的笔记本或者台式机电脑连接到家
里或者办公室的无线局域网,使您在任何角落都能轻松畅享高速稳定的无线网络。
1.注意: 为了正确操作,请不要在安装软件之前把无线网卡连接到您的电脑。
如果您已这样操作,请等到找到新硬件的画面出现后,点击“取消”,否则安装过程可能受到影响。
插入附带的安装CD到光驱里,打开光盘如下图所示,请选择和您电脑相符的操作系统,然后点击 Setup.exe安装
(2)选择你需要连接的无线信号,双击该信号进行连接,如果该信号有
密码,会出现下图中左下角的部分,连续点击图中的 图标进行连接,
当出现下图中输入密码的部分,请输
入密码并点击 进行连接。
A.点击 进行设置如下图所示输入无线网络名称和无线模式然后连续点击
2
(2)切换完成后,电脑上的图标和设置程序会变成如下
图所示。
B.当出现下图时,验证方法选WPA-PSK,加密选TKIP,然后点下一步
C.输入无线密码(8位以上数字或字母),然后点击下一步 密码设置完成后,只有知道无线密码的人才可以连接上你的无线信号,非常安全。
注意:网卡做软AP发射可用的无线信号的前提条件是:你的电脑已经通过有线连接获取外网,可以有线上网
(1)驱动安装完成后 ,插上网卡,右击桌面右下角的驱动图标,然后选择“切换至AP模式”如下图所示。
(1)插上网卡,右击桌面右下角的驱动图标,然后选择“切换至STA+AP模式”如下图所示。
(2)切换成功后需要填入你希望建立的无线网络的名称和密码,这里我选择LAFALINK-softAP,点击确定。
(3)软件会自动帮您建立一个ICS应用,跳出如下界面,选择WAN名称802.11n USB Wireless LAN Card也就是这个网卡作为接入,而虚拟卡作为无线覆盖,点击 。
(4)完成后,会在控制面板的网络连接界面看到软件自动创建的Microsoft Virtual Wifi Miniport Adapter虚拟网卡。
(5)此时若802.11n USB Wireless LAN Card的连接断开,可重新按照步骤2完成无线的网络连接,注意这里只有此网卡成功连接到Internet,其他设备才能通他共享无线网络连接,最终连接完成状态如下。
(6)完成步骤3或者4以后,网卡的本地小范围的无线网络就已经建立了,您其他的wifi设备,如iphone, ipad, andriod的智能手机都可以连接到LAFALINK-SoftAP的网络,共享电脑的Internet服务了。
(注意:此时,网卡已经可以发射无线信号了,如果有无线信号而不能上网,这时你需要看下你的网络连接,如果你是接的路由器,你就把电脑“本地连接”设置为共享如下图所示(我是接的路由器,所以把本地连接设置为共享),如果你是通过电脑“宽带连接”拨号的,你就把“宽带连接”设置为共享,此时应该就可以上网了)
(注意:这里如果显示启动失败,请将电脑上其他无线网卡禁用,保持仅有LAFALINK无线网卡工作中。
(3)为防止他人盗用你的密码,你可以设置你软AP的无线密码。