11WHInstallationGuide霍尼韦尔11WH震动探测器安装指南
霍尼韦尔震动探测器SC105简易安装指导

霍尼韦尔震动探测器SC105安装指导深圳市天盈隆科技有限公司2014/11/27一、安装说明确认产品包装和配件完好。
取出产品安装配件指南,并且详细阅读,充分了解产品的特性和安装方式。
二、安装步骤a)取出产品,拧开上盖螺丝。
b)连接J20跳线(默认为连接)。
J20跳线连接为常闭;断开跳线可将SC111/SC112连接至回路。
c)断开J19跳线(默认为断开)。
J19跳线配合接线端子8使用,连接跳线后,接线端子8有报警O/I输出;断开后表示接线端子8未使用。
d)J1为测试跳线。
连接引脚1和2,可进行电子测试,将接线端子10瞬间接地,测试成功探测器会发出报警;连接引脚2和3可用SC113进行功能测试,连接测试发射器SC113,将接线端子10瞬间接地,进行测试。
e)DIP拨码开关设置。
DIP拨码开关必须根据现场的实际应用场景进行设置,对应可供选择的设置参数如下:i.1和2号拨码开关为灵敏度设置。
ii.3号拨码开关为应用参数设置。
改变3号拨码开关状态会引起报警,并且在改变3号拨码开关状态后必须断电5秒以上,iii.4号拨码开关为LED指示灯开关f)EOL电阻设置。
EOL电阻分为TAMPER和ALARM两部分。
2316 SUPERII主机防区电阻为2.2K欧姆。
震动探测器内部电阻选择应该为跳线2和3引脚。
三、接线图a)2316 SUPER II和震动探测器SC105使用内部电阻,进行带防拆的接法。
TAMPER电阻选择连接2-3跳线,拔掉ALARM跳线。
电源V+和0V对应连接主机AUX和GND,NC和T2对应连接主机ZN和GND(因为内部已经设置电阻跳线,防区不需要另外增加电阻)。
b)2316 SUPER II和震动探测器SC105使用内部电阻,进行不带防拆的接法。
ALARM电阻选择连接2-3跳线,拔掉TAMPER跳线。
电源V+和0V对应连接主机AUX和GND,NC和C对应连接主机ZN和GND(因为内部已经设置电阻跳线,防区不需要另外增加电阻)。
霍尼震动探测器培训解析

8
HONEYWELL - CONFIDENTIAL
EOL输出电阻和连接方法(SC100与SC105相同)
⑤,使用2芯线连接到7(T2)和3(NC)端子,防拆和报 警在一个防区,这样不论是报警还是防拆被触发,都会 报警。
SC100/105 接线端子
Z1 C 主机防区
• 所以可以简单用一句话概括叫做: 不用电阻,一条线,连接NC和T2,防拆开关要压好,拔 掉报警ALARM EOL,报警、防拆都能管。
11
HONEYWELL - CONFIDENTIAL
三:SC100灵敏度调整方法
SC100的灵敏度调整方法
SC100的灵敏度调整方法 • 主要参考说明书和手册,建议根据现场实际情况调整,不能千篇一律, 用一种模式处理,切记! • 第一步,首先根据现场实际应用情况包括材料、探测范围、应用对象特 别是噪声等级参考下表确定灵敏度等级
14
HONEYWELL - CONFIDENTIAL
四:SC100的应用设置调整方法
SC100的应用设置调整方法
SC100的应用设置调整方法 • 应用设置由DIP开关的第3位决定,特别留意根据保护对 象设置使用条件。 其中: • 关→ 适用在自动柜员机(ATM)和夜间存款机。 • 开→ 适用在保险箱和金库。特别留意!!!
请勿将探测器靠近水管。 若水管与受保护物体直接接触,水流 声将产生干扰信号,产生误报警。
25
HONEYWELL - CONFIDENTIAL
SC100和SC105的安装注意事项
• 请勿将探测器靠近警号和响铃。 • 若无法避免此类情况,请在响铃上绑定胶带 以避 免产生探测响应频率范围内的泛音。
当金库或保险箱放在混凝土或大理石 上时,需在下方放置毛毯或其他防震 防潮材料。
震动探测器 安装使用方法

震动传感器入侵解决方案原文:史新华振动传感器(YT-JB3、YT-SHK)系统主要用于探测入侵者对企图穿过周界栅栏,切割和攀爬金属围栏网、破墙,而入等多种情况引起的防撬、防砸、防破坏振动,这些振动通过电子处理器单元进行监视和分析。
通过比对振动特征信号,判断真正的入侵企图事件,通过模拟分析转变为报警信号。
前言:随着通信ATM及基站、金库、保险柜、博物馆等不断增多和分布日趋广泛,防盗监控已成为移动通信基站的重要保障。
近年来手机用户数量的持续增长,基站的数量、分布区域不断扩大,身处城乡结合部或偏远山区的移动基站因常年无人值守成为盗窃分子的光顾之地,基站的各种附属设备如蓄电池、铁塔角钢、空调外机、铜地线(排)、馈线等设备也成了盗贼的主要偷盗目标,如果基站的附属设备发生被盗,将使基站通信设备处于高危运行状态,既严重影响通信设备的正常运行,又给运行维护部门增加大量的额外开支纵观历年来特别是近年来的被盗案件,基站偷盗呈现以下特点:1、被盗物品基本作为废品处理,因此,多以金属为主,如铜、铅、铁等,具体集中在室外变压器、空调室外机、蓄电池、电力电缆(含地线)等。
2、被盗基站普遍发生在偏远山区或高速公路附近,这些地区路途偏远,工作人员难以短时间内赶到现场,或者在公路附近,作案后迅速撤离,难以抓到现行。
3、盗窃人员以本地居民为主,且了解基站情况的人员比例比较高,特别是一些曾经从事过基站内设备的安装、维护工作的各种协作单位的临时工作人员,利用基站钥匙进行复制等手段伺机进行偷盗。
4、偷盗手段越来越五花八门,从锯断室外电缆,翻墙,撬门、气体割烧门、墙体开洞、钻馈线窗、手法专业。
针对上述特点,采取传统的某一项或两项防盗措施,已难以起到效果,这些说明振动探测器在基站周界防护中起着比较重要的作用,采取震动探测器技防措施,才能起到有效的防盗作用。
根据设备安全性能的高低来配置产品,有人非法进入基站区域或者进行破坏时,震动探测器在探测到非法侵入信息后,通过主机拨号的形式,将警情在第一时间将信息传达给电信基站接警中心,基站人员在接到信息后及时处理警情或驱动电子监控系统来记录非法侵入者的影像,起到全方位的防护作用!二、振动探测器系统设计要求基站的振动防盗报警系统要求达到如下的要求:1、实用性:振动探测器(YT-JB3、YT-SHK)系统方案设计无人值守自助设备特殊环境管理工作需要,如墙体防范、区域保护、门窗保护、ATM保护等。
霍尼韦尔防盗报警安装编程整理说明
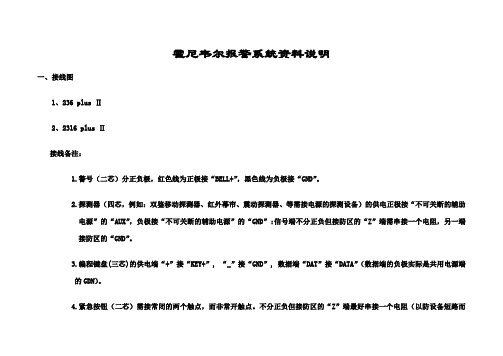
霍尼韦尔报警系统资料说明一、接线图1、236 plus Ⅱ2、2316 plus Ⅱ接线备注:1.警号(二芯)分正负极,红色线为正极接“BELL+”,黑色线为负极接“GND”。
2.探测器(四芯,例如:双鉴移动探测器、红外幕帘、震动探测器、等需接电源的探测设备)的供电正极接“不可关断的辅助电源”的“AUX”,负极接“不可关断的辅助电源”的“GND”;信号端不分正负但接防区的“Z”端需串接一个电阻,另一端接防区的“GND”。
3.编程键盘(三芯)的供电端“+”接“KEY+”, “_”接“GND”, 数据端“DAT”接“DATA”(数据端的负极实际是共用电源端的GDN)。
4.紧急按钮(二芯)需接常闭的两个触点,而非常开触点。
不分正负但接防区的“Z”端最好串接一个电阻(以防设备短路而烧坏主机板电路),另一端接防区的“GND”。
5.门磁(二芯)接法同紧急按钮。
6.空余防区,可接电阻(电阻一端接防区的“Z”端,一端接“GND”端),也可不接电阻。
7.移动探测器的软胶面向下安装,对着要监视的防区空间(只要检测到有人移动,LED灯就会亮,否则LED灯为灭的状态)。
8.主机箱的防拆开关引出的两根线不分正负但接防区的“Z”端最好串接一个电阻,另一端接防区的“GND”。
二、编程1.加电后,准备灯为绿色。
2.进入编程命令:按“012345*0#”,此时“准备”“布防”“服务”三灯亮,表示进入编程状态。
3.输入命令结束后按“#”结束当前项编程,继续下一项编程。
4.退出编程状态:按“*”“#”即可退出编程状态。
5.断电后在加电即可生效。
6.编程过程中,不要管指示灯的状态,只要提示音正常即可继续对下一项地址编程。
三、恢复初始值(一般用于编程混乱后使用)断电后用跳线短接“DEFAULT”的两脚不放,然后加电,大约5秒后(此时键盘灯会有变化)松开短接触点即可恢复初始值。
四、常用编程命令(以236 plus Ⅱ为例,其它型号请参考相应说明书)1.默认参数2.安装员密码编程3.用户密码编程(及布防和撤防时输入的密码)4.控制主机时间编程5.回路防区控制编程(重要)重点说明:1.某银行的探测器防区配置:1-5防区为墙面及自助机柜震动探测器,6-7防区为自助机门磁,8防区为紧急按钮,9防区为防盗门的门磁,10防区以后为红外探测器,空余防区均接了电阻。
霍尼韦尔氢气检测仪安全操作及保养规程

霍尼韦尔氢气检测仪安全操作及保养规程仪器简介
霍尼韦尔氢气检测仪是专门用于检测氢气浓度的仪器,其检测原理基于电化学传感器,可广泛用于氢燃料电池车、氢气气瓶、氢气发生器和实验室等领域。
安全操作
1.在操作前,必须保证仪器已充足充电或接入电源,并进行
自检后方可使用。
2.操作前要先查阅本使用手册,了解相关操作步骤及注意事
项。
3.打开仪器电源开关并等待一段时间后,待电池电量显示正
常后即可进行测量。
4.对于不同应用场景,选择不同的气体类型进行测量,如氢
气、氢气/二氧化碳。
5.检测仪的探头必须放置在测量范围内,根据测量需求选择
是否使用吸气管或延长探头。
6.检测时应尽量减少杂质干扰,如烟雾、污染物等。
7.检测过程中如发现异常情况,应立即停止操作并进行相关
维修或更换。
保养规程
1.使用完毕后,应关闭电源开关,尽量减少电池损耗。
2.检测仪使用后应定期进行维护及校准,建议一年一次或根
据使用频率进行调整。
3.检测仪外壳使用时应注意避免磨擦及碰撞,保持表面干净,
不使用时应放置于干燥通风处。
4.检测仪使用前应先查看是否有明显损坏或老化的零部件,
及时更换或修理。
5.电池使用寿命为2-3年,如发现电量衰减明显应及时更换
或充电。
6.探头使用寿命为12个月,如发现指示不准或无法读取应及
时更换探头。
7.请勿私自拆卸或改造检测仪,如需维修请联系相关售后服
务。
结语
以上就是霍尼韦尔氢气检测仪的安全操作及保养规程,使用者在使
用仪器时务必遵守相关规定,保证仪器的良好使用效果。
万利安高功能声音和警报声系统安装指南说明书

51 Winthrop RoadChester, Connecticut 06412-0684Phone: (860) 526-9504Internet: Salese-mail:*******************CustomerServicee-mail:******************M a s s N o t i f i c a t i o n®ENGINEERING COMPANY INC.For warranty information regarding this product, visit /warrantyWARNING: This product can expose you to chemicals including Methylene Chloride which is known to the State of California to cause cancer, and Bisphenol A, which is known to the State of California to cause birth defects or other reproductive harm. For more information go to .©2001 Whelen Engineering Company Inc.WPS-4000 SERIES HIGH POWER VOICE & SIREN SYSTEMINSTALLATION MANUALTable Of ContentsImportant Note To Installation Technicians..................................................................................page5 Section I :Site Selection...........................................................................................................page6 Section II:Utility Pole Preparationa) Pole Selection......................................................................................................page7b) Component Dimensions....................................................................................page7 Section III:Equipment Mountinga) Pole Top Mounting Bracket..............................................................................page12b) Electronic Cabinet Mounting...........................................................................page14c) Siren Assembly Mounting.................................................................................page16d) Antenna Mounting (optional)...........................................................................page18e) Solar Panel Mounting (optional)......................................................................page19f) Determining Solar Panel Mounting Angle.......................................................page22 Section IV:Wiringa) Siren Connections..............................................................................................page23b) AC Wiring..........................................................................................................page25c) Batteries..............................................................................................................page27d) Landline..............................................................................................................page30 Section V:System Test..............................................................................................................page31IllustrationsFig. 1 Station Drawing.....................................................................................................................page3 Fig. 2 Station Drawing (with optional Solar Panel)......................................................................page4 Fig. 3 Pole Top Mounting Bracket Dimensions.............................................................................page8 Fig. 4 Type II Electronic Cabinet Dimensions...............................................................................page9 Fig. 5 Type III Electronic Cabinet Dimensions.............................................................................page10 Fig. 6 Antenna Mounting Bracket Dimensions..............................................................................page11 Fig. 7 Pole Top Mounting Bracket..................................................................................................page13 Fig. 8 Electronic Cabinet Mounting (Side View)...........................................................................page14 Fig. 9 Siren to Pole Top Mounting Bracket (Side View)...............................................................page17 Fig. 10 Antenna Mounting Orientation..........................................................................................page18 Fig. 11 Solar Panel Wiring Connections.........................................................................................page20 Fig. 12 Solar Panel Mounting Views...............................................................................................page21 Fig. 13 Rotor Control and Siren Amplifier Connections..............................................................page24 Fig. 14 AC Outlet Installation.........................................................................................................page26 Fig. 15 Battery Connections (Type II Cabinet)..............................................................................page28 Fig. 16 Battery Connections (Type III Cabinet)............................................................................page29 Fig. 17 Landline Wiring...................................................................................................................page30 Fig. 18 System LED Indicators.......................................................................................................page32 Fig. 19 Electronic Cabinet Front Panel..........................................................................................page33Fig. 1: Sample Station Drawing (AC Powered Battery Charger)Fig. 2: Sample Station Drawing (Optional Solar Powered Battery Charger)An Important Note to the Installation Technicians...The installation of this product requires careful planning and attention to detail! The installation of this system should NOT be attempted by individuals without experience in the disciplines necessary to this procedure (i.e. High-voltage electrical wiring, utility pole installation, etc.).The installation of the WPS-4000 station provided in this manual follows a logical progression. This process is not arbitrary and was developed using information gathered from both the manufacturer and experienced field technicians. Deviations from any of these procedures are not recommended unless they are in contradiction with local codes. IN ALL INSTANCES, LOCAL CODES TAKE PRECEDENT OVER PROCEDURES OUTLINED HEREIN.It is the responsibility of the installation technicians to read this entire manual. The installation procedure should not begin until all personnel are familiar with the entire process. The overall process includes the following:Installation Sequence1.Site Selection2.Utility Pole Preparation3.Mount Pole Top Bracket and Ground Wire4.Mount Electronic Cabinet to Pole5.Mount Siren Assembly to Pole Top Bracket and Conduit to Pole6.Set Utility Pole (pointing speaker North)7.Prepare and Mount Antenna Assembly (if present)8.Prepare and Mount Solar Panels and Conduit (if present)9.Installation of AC or Solar Service and Batteries10.Confirm Proper System OperationSection I: Site SelectionThe site selection for the WPS-4000 requires careful consideration in order to achieve the optimum coverage of the siren station. For a guideline to system planning, sound propagation and site selection we direct the user to the Federal Emergency Management Agency’s “Outdoor Warning Systems Guide, CPG 1-17.”The Location of the siren site should be reviewed for its compatibility with its surroundings such as private homes, schools and hospitals. The user is cautioned to consider the use of hearing protection devices for service personnel working in close proximity to the speaker cluster.Access to the siren site is important from the standpoint of service, maintenance inspection and access to a utility service connect.Site locations for radio controlled units should be reviewed for radio reception.Section II: Utility Pole Preparation...a) Pole SelectionNOTE:This installation manual will address the procedures applicable to wooden utility poles of specific size and dimensions. Procedures for poles consisting ofother materials (steel, concrete, etc.) are not addressed within this document.The information presented, however, provides the necessary data andguidelines for a successful installation regardless of pole material.A WPS-4000-3 or WPS-4000-4 system may use a Class 2 or Class 1 utility pole. The WPS-4000-8 requires the use of a Class 1 utility pole. The length of the utility pole is consistent regardless of speaker cell quantity. The total length of the pole referenced within this document is 60 feet. The pole depth of the set pole is 10 feet, leaving a 50 foot pole as measured from the top of the pole to the ground. The utility pole should be set in accordance with local codes.The inside area of the pole top mounting bracket will accept a pole that is no greater than10.00” in diameter. On large scale projects, it is beneficial to order the pole to be “gained” toa top diameter of 9.5” +/- .50” for the top 30” section of the utility pole.b) Component DimensionsThe utility pole may be pre-drilled prior to installation. The dimensions for all potentially mounted equipment are as follows:Fig. 3: Pole Top Mounting Bracket DimensionsFig. 6: Antenna Mounting Bracket DimensionsSection III: Equipment Mountinga) Pole Top Bracket Installation...Items Required for installation (not included)....(4)5/8” x 14” Hex or Square head mounting bolts(4)5/8” Hex or Square head nuts(8)5/8” Flat Washer sized for the above referenced mounting bolt(4)5/8” Lock Washer1.Position the WPS-4000 pole top mounting bracket onto the top of the pole (see “Fig.7: Pole Top Mounting Bracket” on page13). Make sure there is a 1 inch space between the top of the pole and the pole top mounting bracket(see “Fig. 8: Electronic Cabinet Mounting (Side View)” on page14).NOTE:The inside area of the pole top mounting bracket will accept a pole that is no greater than 10.00” in diameter. On large scale projects, it is beneficial toorder the pole to be “gained” to a top diameter of 9.5” +/- .50” for the top 30”section of the utility pole.ing the pole top mounting bracket as a guide, drill four mounting holes throughthe pole at the bracket mounting hole locations. These holes should be sized to accommodate the above referenced hardware.3.Secure the bracket to the pole using the prescribed hardware (see “Fig. 7: Pole TopMounting Bracket” on page13). Be sure to position all the associated hardware items in their proper order.4.Secure a length of #4 solid copper wire to the pole top bracket grounding lug usingthe supplied nut. Make sure that this wire is of sufficient length to reach the ground when the pole has been set.NOTE:All Hardware used for connecting equipment to the utility pole should be inspected for tightness between 12 to 18 months after installation. Someshrinkage of the newly treated utility pole may occur, loosening connections.Fig. 7: Pole Top Mounting Bracketb) Electronic Cabinet Mounting and Siren Connections... MountingItems Required for installation (not included)....For Type II & III cabinetsQty. Qty.(Type II)(Type III)Description(2)(3)5/8” x 14” Hex or Square head mounting bolts(4)(6)5/8” Flat Washer sized for the above mounting bolt(2)(3)5/8” Split-Lock Washer(2)(3)5/8” Hex or Square head nuts(1)(1)Aluminum-to-Copper lug sized for #4 ground wire (crimpor screw style)(1)(1)Stainless Steel 1/4-20 x 2” bolt with appropriately sized flatwasher, split-lock washer and nut(1)(1)10’ Copper ground rodFig. 8: Electronic Cabinet Mounting (Side View)The WPS-4000 siren case assembly may be installed onto the pole and wired before setting the pole.NOTE:Note: Due to the weight of the siren amplifier panel, the electronic cabinet assembly must be transported in an upright fashion to prevent distortion ofthe amplifier panel.1.It is necessary for the installer to remember that two factors should determine theoptimum mounting location; the desired distance of the mounted cabinet to the ground (typically 10 to 12 feet as measured from the bottom of the cabinet) and available speaker wire length (speaker assemblies are provided with a minimum of50 feet of speaker wire as measured from the bottom of the speaker assembly).2.After the mounting location has been determined, drill an appropriately sized thru-hole into the pole at the top cabinet mounting hole. Install a bolt loosely into the hole and hang the cabinet onto the bolt.3.With the cabinet fitted snugly to the pole, mark the surface of the pole at the lowermounting hole location inside the battery storage compartment. Type III cabinets will have an additional mounting hole located in the second battery storage compartment (see “Fig. 5: Type III Electronic Cabinet Dimensions” on page10).Remove the cabinet from the pole and drill an appropriately sized thru-hole into the pole at the location(s) marked. Return the cabinet to its mounting location and secure to the pole using the specified hardware.4.Install an aluminum-to-copper lug (crimp or screw style) onto the #4 solid copperwire. Secure this to the cabinet mounting channel in hole supplied using stainless steel 1/4 - 20 hardware.5.Install the ground rod as specified by local codes and connect both copper wires(from pole top mounting bracket and electronic cabinet) to this rod.6.Install rigid steel conduit and necessary couplings from the speaker’s 1” conduitadapter to the 1” speaker conduit protruding from the base of the siren case assembly. The first section of conduit may be installed onto the speaker’s base casting prior to mounting the speaker to the pole top bracket. At the option of the user, conduit unions may be used between the first section of conduit and the speaker base casting and at the speaker cable conduit entrance to the siren case assembly. NOTE:If the location of the conduit on the pole requires difficult conduit bends or couplings, a section of metal bonded seal tight conduit NOT TO EXCEED 24INCHES may be used at the top of the pole and/or at the bottom of the pole asneeded for the speaker cable installation.Batteries for the system should not be installed until the siren station is set in place, otherwise some leakage of the battery fluid may occur. Batteries should not be connected to the system until AC power (or solar power if equipped) is available to the system to operate the system’s battery charger.c) Siren Assembly Mounting...Hardware required for installation (factory included)....(8)3/4” Hex Head nuts(8)7/8” Flat Washers(4)3/4” Split Lock Washers1.Mount the speaker/rotator assembly to the pole top bracket. Make sure that the “N”cast into the top of the rotor assembly is oriented to the “N” on the pole top bracket.Secure the rotor assembly to the bracket using the hardware provided.2.Sling or cradle the utility pole in a safe manner so that the pole top is 3 to 4 feet offthe ground. This will allow the speaker assembly to clear the ground when installed.3.Locate the 4 mounting studs on the bottom of the speaker assembly (see “Fig. 9:Siren to Pole Top Mounting Bracket (Side View)” on page17).4.Thread a 3/4” hex nut onto each of the mounting studs until there is approximately1” of space between the top of the nuts and the bottom of the siren assembly. This space will allow the speaker assembly to be leveled once the pole has been set.5.Install a 7/8” flat washer onto each of the mounting studs.6.Insert the four mounting studs through the mounting holes on the top of the pole topbracket. The bottom of the siren assembly should lie flat against the pole top bracket.7.Install a 7/8” flat washer onto each of the mounting studs.8.Install a 3/4” split lock-washer onto each of the mounting studs.9.Thread a 3/4” hex nut onto each of the mounting studs. Tighten this nut firmly tosecure the siren assembly to the pole top bracket.At this point the pole may now be set. However, the installer may use their own discretion as to whether to mount the electronic cabinet onto the utility pole before the pole is set.When setting the pole, make sure to rotate the pole so that the speakers are pointed North. THIS IS IMPORTANT!When the pole has been set, use the adjustment nuts (indicated in step 2) to adjust the siren assembly until it is level.Fig. 9: Siren to Pole Top Mounting Bracket (Side View)d) Antenna Mounting (optional)...NOTE:Antenna installation must be in compliance with all FCC regulations.The proper antenna bracket mounting location is determined by several considerations. The antenna bracket should be positioned as high on the utility pole as is possible. However, under no circumstances should the top of the installed antenna mast be any closer than one inch from the bottom of the Pole Top Mounting Bracket (see “Fig. 6: Antenna Mounting Bracket Dimensions” on page11). Be sure to ground the antenna bracket as shown using 4 AWG solid copper wire. The antenna cable provided by the factory is 35 feet in length.It is also important to remember that the antenna MUST be mounted on the side of the utility pole that faces the transmitter (see below)Fig. 10: Antenna Mounting OrientationRefer to the installation sheet included with your antenna kit for further information regarding cable connections and antenna trimming.e) Solar Panel Mounting (optional)...The solar panel must be installed so that it is directly facing the earth’s equator with an unobstructed view. Failure to orient the solar panel in this way will result in significantly reduced charging effectiveness.The most critical aspect of properly mounting the solar panel involves achieving the optimum tilt angle. The tilt angle is determined by the distance between the upper and lower mounting brackets, as shown.Refer to page20 for electrical connection information.Refer to page21 for general solar panel mounting.Refer to page22 for information on determining your specific mounting angle.Run rigid steel conduit from the solar panel to the 3/4” AC knockout located at the bottom of the siren case assembly. A section of up to 24 inches of metal bonded seal tight conduit may be utilized where conduit connections to the solar panel or electronic cabinet are not conveniently accomplished with rigid steel conduit and fittings. This conduit should be sealed to prevent insects and pests from entering the siren case assembly.Fig. 11: Solar Panel Wiring ConnectionsFig. 12: Solar Panel Mounting Viewsf) Determining Solar Panel Mounting Angle1.Determine the LATITUDE of your location.2.Find your Latitude on the table below and not the corresponding Tilt Angle.LATITUDE TILT ANGLE0° to 9°75° = Tilt Angle10° to 20°85° minus LATITUDE = Tilt Angle21° to 45°80° minus LATITUDE = Tilt Angle46° to 65°75° minus LATITUDE = Tilt Angle66° to 75°10° minus LATITUDE = Tilt Angle3.Locate your TILT ANGLE in the list below. For every TILT ANGLE, there is acorresponding “Dimension A”. “Dimension A” represents the distance from thebottom of the upper mounting bracket to the bottom of the lower mounting bracket.example 1:example 2:Location LATITUDE is 30°Location LATITUDE is 7°80° - 30° = 50° Tilt Angle7° = 75° Tilt Angle50° Tilt Angle = 33.60” Dimension A75° Tilt Angle =15.54” Dimension ASection IV: Wiringa) Siren ConnectionsFor WPS-4000-3 & WPS-4000-4 systems, a 5-pair harness cable is provided. This cable has 5 BLACK wires numbered 1 to 5 and 5 RED wires numbered 1 to 5. WPS-4000-8 systems use a 10-pair harness cable 10 BLACK wires numbered 1 to 10 and 10 RED wires numbered 1 to 10. Also included with all WPS-4000 systems is a 12 conductor Rotor Control harness cable. This cable is routed from the rotor to the siren cabinet. Refer to the table below for the necessary wiring connections.Unused wires should be dressed so they are out of the way. Do not cut these wires, as they can be used to replace damaged wires in the future.NOTE:The following procedure provides the information necessary for successfully connecting the siren harness wires to their designated amplifiers. Dependingupon the distance between the siren base and the electronic cabinet, there willbe varying lengths of wire remaining in the cabinet. It is the installersresponsibility to properly trim and dress these wires in a fashion that not onlyleaves the wires organized, but also includes a service loop of suitable length.WPS-4000-8 harness cables may need their outer jackets stripped to allow thewires to fit through the flex conduit and into the siren cabinet.1.Locate the siren wiring harness where it enters the electronic cabinet.2.Locate the BLACK and RED wires marked 1 on their insulation. These wires aredesignated for connection to siren amplifier 1.3.Route these wires through the cabinet’s wire loom and connect to Amp 1 (see “Fig.13: Rotor Control and Siren Amplifier Connections” on page24).4.Repeat steps 2 and 3, substituting the appropriate number for all remaining amps.5.When all amplifiers have been wired, install loom cover.6.Route rotor cable through the wire loom to the rotor control.7.Locate the 11-position Phoenix connector included with your system. Insert the rotorcontrol wires into this connector as follows:Position Color Position Color1RED (14 AWG)7ORANGE (20 AWG)2BLACK (14 AWG)8GREY (20 AWG)3BROWN (20 AWG)9VIOLET (20 AWG)4BLUE (20 AWG)10RED (20 AWG)5GREEN (20 AWG)11BLACK (20 AWG)6YELLOW (20 AWG)12WHITE (Spare/20 AWG)8.Insert this connector into the receptacle marked “RC2” on the rotor control.Fig. 13: Rotor Control and Siren Amplifier Connectionsb) AC WiringAn AC Service (Single Phase only) with an acceptable disconnect is required. A 15 amp (minimum) 120 V AC circuit is recommended.Locate the service on the pole according to local codes, taking care that the service entrance will meet height requirements once the pole is set into place.The WPS-4000 includes a 15 amp, 120 V AC outlet. The cabinet’s battery charger plugs into one of the receptacles. The remaining receptacle is available for use by service personnel (see “Fig. 14: AC Outlet Installation” on page26).NOTE: A section of up to 24 inches of metal bonded seal tight conduit may be utilized where conduit connections to the siren case assembly are not convenientlyaccomplished with rigid steel conduit and fittings.Each WPS-4000 siren system is supplied with a lightning arrestor which is to be installed on the AC service. Local codes should be reviewed and followed to establish the connection of this device on the primary or secondary side of the disconnect.NOTE:The location of the siren site should be reviewed for the quality of the AC service. AC power sources that are subject to excessive power surges ortransients are not acceptable.The AC charger is simply plugged into an AC duplex outlet (factory included) installed as follows:1.Remove the cover from the 4” x 4” box.2.Position the 3/4” knock-out in the box above the 3/4” knockout in the cabinet.3.Attach a flex fitting (not included) through the cabinet and the box. This will securethe box to the cabinet.4.Connect the AC service to the leads on the cover assembly.5.Attach the cover to the box.6.Attach ground wire (GREEN) to cabinet ground stud above the installed outlet.Fig. 14: AC Outlet Installationc) Batteries1.Make sure that the system battery switch is in the OFF position.2.Install the batteries included with your system and connect them as shown in theillustration representing your cabinet type. MAKE SURE TO OBSERVE THE POLARITY OF THE TERMINALS BEFORE MAKING ANY CONNECTIONS. NOTE:For battery wiring, DC wiring conventions are used (BLACK is ground (-)).For Type II Cabinets (see “Fig. 15: Battery Connections (Type II Cabinet)” on page28) Type III Cabinets (see “Fig. 16: Battery Connections (Type III Cabinet)” on page29)3.Rotate the system battery switch to the ON position.4.Plug the battery charger into the AC outlet.5.Verify system operation as outlined in the system maintenance check list.d) Landline (optional)As an option. the WPS-4000 may be remotely controlled by either landline or RF link. Either method communicates via a DTMF protocol. Remote control may be one-way or two-way. The one-way option simply controls the WPS-4000, while the two-way option controls the WPS-4000 and reports WPS-4000 status back to a central control point.Fig. 17: Landline WiringSection V: System Test...After the installation of the WPS-4000 station has been completed, a basic system check is recommended to confirm that the system is functioning properly. Before initiating these tests, locate the system LED’s on the main control board mounted to the cabinet door (see “Fig. 18: System LED Diagnostic Indicators” on page32).NOTE: The KEYPAD ARM button enables local station operation via keypad. Once pressed, the keypad remains active until either a) another keypad button is pressed, or b) 60 seconds have elapsed, whichever comes first. The KEYPAD ARM button must be pressed each time a keypad button is to be pressed. Note that the CANCEL button is always enabled and does not require Keypad Arm to be pressed.1.Confirm that the ACTIVE light on the control board is flashing at a rate of a 1/2second on and a 1/2 second off.2.Press KEYPAD ARM, then the SI TEST® button on the siren front panel and checkto make sure that all the siren amplifier diagnostic LED’s illuminate for 5 seconds.These LED’s are located on the front of the cabinet door. Also verify that the speaker rotated during the test.3.After the amplifier LED’s turn off, check to see if the AC, DC, PARTIAL, FULL andROTOR LED’s are on.If one of your amplifier lights did not illuminate during this test then refer to the procedure below to troubleshoot the problem.This procedure may be used when the Partial or Full LED’s indicate a failure.NOTE:In order for a “Full” indication to be valid, the “Partial” LED must also be on.1.Press KEYPAD ARM, then the SI TEST® button located on the front panel of theelectronic cabinet. Each amplifier has a red LED diagnostic indicator that is visible on the front panel (see “Fig. 19: Electronic Cabinet Front Panel (Type II).” on page33).2. A SI TEST® will cause each amplifier’s diagnostic indicator to turn on. If one ormore do not turn on, proceed to step 3. If all indicators turn on, the siren amplifiers are functioning properly.3.Open the front panel and remove the speaker driver from the amplifier that did notlight and install it onto an amplifier that did light. For example: If amplifier 1 did not light but amplifier 2 did, install speaker 1 on amplifier 2 and speaker 2 on amplifier1. This will indicate if the failure was with the speaker or the amplifier. For moreinformation on troubleshooting the system, refer to the advanced trouble shooting manual.Fig. 18: System LED Diagnostic IndicatorsFig. 19: Electronic Cabinet Front Panel (Type II).。
SureStart 110 115V HVAC Installation说明书

INSTRUCTION GUIDE SureStart 110/115V HVAC InstallationFor SureStart SS0x Series(Refer to the sample wiring schematic for all other applications)©2014 Hyper Engineering, Pty. Ltd., 4 / 14 Ralph Black Dr, Wollongong Nth, Australia 2500. Hyper Engineering has a policy of continual product research and developmentIG5601EH 03/14Parts List1 - SureStart Soft Starter1 - Red Lead1 - Blue Wire1 - Black Wire1 - Brown WireCAUTION: The Run Winding is not connected to the Run Capacitor. The Run Capacitor is usually 20 to 60 µF.WARNING:1) All voltage to equipment MUST be disconnected before removing any devices.2) Allow 2 minutes to discharge run capacitor before disconnecting.3) Prior to installation, be sure all start capacitors & start relays, along with hard-starters and/or any other related devices, are removed.4) Do not swap the Run & Start Windings.5) The start capacitor is built into the soft starter.6) In accordance with UL508 standard, use the below tightening torques. Loose terminals can lead to heating & subsequent damage to the soft starter.7) OPENING OF THE SOFT STARTER UNIT WILL VOID THE WARRANTY!FIELD WIRING TERMINALS:Wire Range: 8 to 12 AWG Cu, stranded, for terminals (Run Winding (R) and Active(T))12 to 16 AWG Cu, stranded, for terminals (Run Capacitor (RC), Start Winding (S), and Compressor/Motor Common (C), these are supplied)Tightening Torque: 11.5 lbs-in large terminals, 4.5lbs-in small terminals.Field wiring conductors shall be rated 167°F [75°C]Minimum end use enclosure size: 10” x 8” x 6”Suitable for use on a circuit capable of delivering no more than 5000rms symmetrical amperes, 240 volts maximum, when protected by a non-time delay RK5 fuse or circuit breaker rated 80A, or a time delay fuse rated 70A. The device does not provide current limiting control or equivalent.SureStart is NOT an overcurrent protection device and must NOT be used as a replacement for any primary circuit overcurrent protection.1 - Mounting Block1 - Green Terminal1) Disconnect all voltage to the HVACequipment.2) Secure the base for the SureStart inside control box.3) Remove the compressor RUN WIRE from the contactor or RUN CAPACITOR TERMINAL, as applicable.4) Strip the compressor RUN WIRE atleast 1/2 in.5) Attach the compressor RUN WIRE to the SureStart RUN WINDINGterminal.6) A ttach the BROWN WIRE supplied with the SureStart to the RUN CAPACITOR TERMINALon the Sure-Start.7) Identify the cable connecting the contactor and the RUN CAP . Remove the connection to the RUN CAP .Attach the flagged end of the BROWN WIRE the same terminal of the**(This is the Common (C) terminal for Dual Compressor/Fan Capacitors.)8) Attach the BLACK WIRE (supplied)to COMPRESSOR COMMON on the SureStart GREEN TERMINAL CONNECTOR .9)Attach the flagged end of the BLACK WIRE to the COMPRESSOR COMMON on the “T” side of the contactor.10) Attach the BLUE WIRE (supplied) to the START WINDING on the SureStart GREEN TERMINAL CONNECTOR .T ypical HVAC Application11)Attach the flagged end of the BLUE WIRE to the other terminal of the RUN CAPACITOR . Ensure that this terminal on the capacitor also joins to the START WINDING of the compressor. (This is the Herm (H)terminal for Dual Compressor/Fan Capacitors.)13)14) Apply power to the equipment and cycle to ensure proper operation.12) Attach the RED WIRE (supplied) to the ACTIVE TERMINAL on the SureStart.NOTE: The SureStart device could take up to six (6) starts to optimize performance.In accordance with UL508standard, use the following torque settings:11.5lbs-in large terminals 4.5lbs-in small terminalsRemove the loose wire (from step 7)from the ACTIVE input of the contactor and attach the stripped end of the ACTIVE WIRE in its place.。
震动探测器安装说明

SS-102(SG-2)智能振动探测器安装使用说明一.安装:1.在被防护物体中选择适当的安装位置,保证其表面清洁和平整。
2.用螺丝刀拧开外壳上的螺钉,并将外壳从底座上移开,小心地从底座上取下电路板。
3.用所提供的螺钉固定底座。
在坚硬的表面可用其它钉子等固定底座。
如需要从底部走线,可从底座预留孔把线穿出。
注:探测器安装方向不受限制。
4.电路板放回底座,进线预留约10厘米长,线头在适当长度处去皮,连接线缆到电路板的接线柱。
外壳两端留有穿线用的压坑,根据需要打破一端的压坑,并使用附件包中提供防潮橡胶穿线封套穿线。
5.做好灵敏度等各种设置后,盖上外壳并拧紧螺钉。
二.联线:端子1和2:+和-,12VDC。
端子3和4:报警输出,常闭,报警断开,接报警控制器。
端子5和6:防拆输出,常闭,打开外壳断开。
端子7:一般不用。
在加+12VDC时,如有报警触发,LED将一直闪烁,直到探测器复位。
多个探测器串联使用时,如通过47K欧姆电阻加+12VDC,第一个报警触发的探测器的LED将闪烁绿色,随后报警触发的探测器的LED将保持绿色。
三.设置和调试:1.振动次数:前3位DIP开关设置触发报警的振动次数1次振动触发报警: 1-OFF,2-OFF,3-OFF2次振动触发报警: 1-ON, 2-OFF,3-OFF4次振动触发报警: 1-OFF,2-ON, 3-OFF6次振动触发报警: 1-OFF,2-OFF,3-ON2.报警锁存复位:第4位DIP一般设置为:OFF。
如设置为ON:在报警触发时,LED闪烁琥珀色,直到+12VDC电源断开后熄灭。
3.高低灵敏度档选择:1)选择高灵敏档:连接黑色跳线短路子(出厂设置);选择低灵敏档:拔掉黑色跳线短路子。
2)调整探测灵敏度:使用螺丝刀调整DIP开关旁的旋纽,逆时针旋转到MIN,灵敏度最低;顺时针旋转到MAX,灵敏度最高。
4.LED指示说明:红灯亮:探测到振动,但没有达到报警条件;绿灯亮:达到报警条件,报警继电器动作。
- 1、下载文档前请自行甄别文档内容的完整性,平台不提供额外的编辑、内容补充、找答案等附加服务。
- 2、"仅部分预览"的文档,不可在线预览部分如存在完整性等问题,可反馈申请退款(可完整预览的文档不适用该条件!)。
- 3、如文档侵犯您的权益,请联系客服反馈,我们会尽快为您处理(人工客服工作时间:9:00-18:30)。
A TYPICAL INSTALLATION ON CE I LI NGS AND WALLS
PERFORMANCE .-The following Laboratories and a I ight tests were conducted on different wall constructions by the Underwriters Inc. In each case the contact was mounted 42 to 48 inches above the floor machini s-t’s hammer was used in determining response.
THREE COURSE BRICK At a setting of 5 grams, 36 inches from the unit. 4” CEMENT BLOCK to a light hammer blow 48 inAt a 5 gram setting, the unit gave excel lent response It was readjusted to a IO gram setting. This reduced the ches away in any direction. It was noted that a blow striking the . effective range to approximately 30 inches. Readjusting to an 8 gram setting, webbing or the mortar joints was more effective. and the unit was reasonably free the response was good at a distance of 36 inches, from false alarms. the contact was responsive to a light blow at approximately
t NSTALLAT I ON I NFORMAT I ON Operat ing companies report that where possible str i ps installed on walls and ceilings increase mendous I y . The firring strip acts as a sounding protection w.ith fewer contacts. On walls, one strip from ceiling to about 4 ft. from the floor. strips is determined by the type of construction. ‘is followed, running the firring strip from one other. . . contacts mounted on firring the sensitivity to attach treboard and affords greater company installs the firring The distance between firring On cei’lings, the same procedure end of the protected area to the
changes Fahrenhei?,
-
CAUTION:
Contact pressure below 5 grams are not recommended, as erratic operation may result and be the cause of false alarms. Contact pressure above 25 grams is not recommended as permanent injury may result to the vibration blade.
Nos.lO&li
VrsRATiON CONTACTS
They can both be adjusted for difBoth contacts operate in the same manner. ferent degrees of sensitivity. The No. II is smaller than the No. IO, made of white plastic (No. IO.is grey) and has a’ribbed back for glue on applications. Freedom from most false alarms and good sensitivity can be achieved by proper ini’tial cal ibration. The following data can help achieving this goal.
NO. I35 GRAM METER Aids in adjusting vibration contacts on di fferent types of constru 150 degrees contact.
temperature above zero,
Turning the Allen wrench in a clockwise direction, at l/2 turn from the initial contact point, the contact pressure will be approximately 20 grams. At l/4 turn from the initial contact point, the contact pressure will be approximately IO grams, At l/8 turn from the initial contact point, the contact pressure will be approximately 5 grams. TEMPERATURE CHANGES Tests conducted by the Underwriters Laboratories ranging from approximately 5 degrees below zero, have little or no effect on the operation of the
HOW TO ADJUST CONTACT PRESSURE WHEN A GRAM METER IS NOT AVAI LABLE /
Initial iontact point
NO. IO USES ALLEN WRENCH ADJUSTMENT (NO. II USES SCREW ADJUSTMENT) The initial contact point can be determined by rotating the Allen wrench in a clockwise direction until the contact points just touch. An ohmmeter placed across.the terminals will show very accurately the initial contact point by the meter reading. l/4 turn past this point sets the contact at a I3 gram pressure as shown above.
5
‘DUSTY ATMCSPHERE The contact assembly is enclosed connections are made outsrde thi:s w 1thou t fear of erratic operation in a ful.ly dust tiqht compartment. Thus, Tn dusty, or particle compartment. Terminal the contact can be used laden atmospheres,
PLYWOOD A wall of 3/4 inch thick plywood, made up in 4 x IO ft. panels, on 24 inch studs, was checked. The contact was mounted in the center, at a height of 42 i nches. It was adjusted to a setting of I8 grams. The response was excellent over the entire panel. Also, parts of the adjacent panel were responsive, particularly if the blow was near the studs. The results of these tests should not be interpreted as recommendations. Rather, they show quite conclusively that simple experiment with a light hammer will determine the proper adjustment for a particular type of construction. ADJUSTMENTS When a unit has been adjusted for a particular type of construction by experimentation, the contact pressure should be measured with a Gram Meter, (Honeywell No. 135). Place the blade of the Gram Meter under the contact of the spring blade and note the meter reading when the contacts first break or open. Do not hold the meter at an angle. The balance of detectors can then be adjusted with the meter before being installed. When a Gram Meter is not available, tact pressure can be adjusted quite as foi lows: the conaccurately