2.4G无线数字音频传输方案规格书
无线音频传输模块产品说明书

无线音频传输模块产品说明书产品名称: 2.4GHz数字无线音频收发模块产品型号:SOYO-WM24G01日期: 2007-8文档版本号:Version2.1深圳市冠标科技发展有限公司Soyo Technology Development Co. Ltd.2007-2008版权所有All rights reserved目录一、产品介绍: (3)1.1应用范围 (3)1.2功能 (3)1.3电性参数 (4)二、设计开发指引 (6)2.1 发射模块设计指引 (6)2.1.1发射模块连接图及模块尺寸: (6)2.1.2发射模块元件脚功能 (6)2.1.3发射模块使用方法 (7)2.1.4发射模块配对设置 (7)2.2 接收模块设计指引 (8)2.2.1 接收模块连接图及模块尺寸 (8)2.2.2接收模块元件脚功能 (8)2.2.3接收模块使用方法 (9)2.2.4接收模块配对设置 (9)三、订货指南 (10)四、客户常见问题答疑(FAQ) (10)一、产品介绍:SOYO-WM24G01X是冠标科技发展有限公司新开发的一款高保真、抗干扰性好的数字无线音频传输模块,该模块具有体积小、集成度高、音质好(具有HDCD的音质效果,目前本公司模块的采样率行业内最高,音质最佳),抗干扰性强,输入电压范围宽(2.3-6伏)、输出功率高达60mw, 输入接口兼容麦克风和立体声音频输入的特点。
该模块的工作频段为2.4G ISM 国际通用免费频段,适用全球市场;模块支持固定ID的工作模式,可以点对点或点对群。
且接收模块的高端版本支持自动扫频功能,这样大大方便客户的使用,只需ID配对完成,接收机便可随意放置,接收机都会自动接收发射器的信号。
如发现现用频道有干扰,只需更换发射频率便可解决问题。
弱信号或无信号时,具有静音功能。
SOYO-WM24G01X是一款适合音箱、耳机、麦克风(话筒)厂商开发高品质数字无线应用的最佳方案。
1.1应用范围z无线音箱z无线耳机z环绕声音箱z无线麦克风(或扩音器)z CD 、DVD 播放器或其它音乐设备z无线监听器1.2功能z收发频率: 2400 ~ 2483MHzz频道:20个(最大为125个)z支持麦克风和立体声音频两种输入模式z采用数字传输z麦克风输入可停供额外的20dB增益选择(适合于高灵敏度麦克风、监听器应用)z HDCD的音质,B型高保真产品采样率高达64k @ 16bit x 2;频响为20~20KHz,A型产品采样率可以达到44.1khz @ 16bit x 2的CD音质z体积小,集成度高z低延迟(< 0.5ms ),环绕性强z低功耗,输入电压范围宽z弱信号、无信号时,接收模块能自动静音;z自动扫频功能z发射功率0~18dBm可以任意选择(订货时确认),选择最大发射功率时开阔地带的最大传输距离达到150米z设计灵便,客户可以自行设计功能z使用方便,真正的“傻瓜式”操作1.3电性参数序号描述发射模块接收模块1 工作电压 3.6~ 6V DC 2.5 ~ 3.6V DC2 工作电流Max 120mA Max 40mA3 环境温度-15 ~ 65℃-15 ~ 65℃4 频率范围2400 ~ 2524 MHz 2400 ~ 2524 MHz5 可选工作频道125 CH 125 CH6 调制方式GFSK7 波特率2M bps 2M bps8 频道间隔 1MHz1MHz9 频率稳定度± 156KHz ± 156KHz10 模块实际工作频率范围2400 ~ 2483 MHz 2400 ~ 2483 MHz11 模块实际工作频道 8CH(A型) 20 CH(B型)8CH(A型) 20 CH(B型)12 模块频道间隔 4MHz 4MHz13 收发距离 100~150米(在空旷处,测试采用发射功率18dbm)14 发射功率0 ~ 18dBm(订货时选择)15 接收灵敏度-90dBm16 输入电平 1.0Vrms17 输入阻抗 10kOhm18 输入接口有麦克风和立体声音频两种输入模式可选择19 立体声输出电平1 30mW RL = 32Ω20 立体声输出电平2 50mW RL = 16Ω21 输出阻抗1kOhm22 输出输入增益比 1:123 频响范围20 ~ 20000Hz ( -3dB )24 延迟时间< 0.5 ms25 采样率44.1khz (A型) 64kHz(B型)16 bit26 信噪比 95dB27 失真度0.8 % @ 1kHz28 动态范围 90dB29 左右声道隔离度 70dB表一二、设计开发指引2.1 发射模块设计指引2.1.1发射模块连接图及模块尺寸:图1 发射模块连接2.1.2发射模块元件脚功能编号名称功能描述1 L 左声道音频输入2 R 右声道音频输入3 MIC-IN 麦克风(扩音器)输入4 SG 模拟信号地5 MIC-EN 麦克风或左右声道输入选择选择,开路为左右声道输入,接地下拉时为麦克输入6 CH 频道选择,ID配对(此功能仅B型模块具备,长按3秒后,进入5秒的ID配对,如不松开便可连续配对,即点对群功能)7 LED 工作状态显示,正常工作后常亮8 VCC 电压为DC 3.6 ~ 6V9 GND 电源地10 DS_CLK 串行显示时钟11 DS_DATA 串行显示数据13 RST 复位键,配合开关推荐电路可以完全消除开关机的静音切换2.1.3发射模块使用方法模块出厂时统一的频道和ID,按连接示意图连接完成后,上电便可工作。
立锐升2.4G 音频无线管理接口说明书
立锐升 2.4G音频无线管理接口说明书
一、产品介绍
该产品为2.4G无线转串口通讯模块,采用半双工通讯模式,可以代替符合半双工通讯模式的串口线。
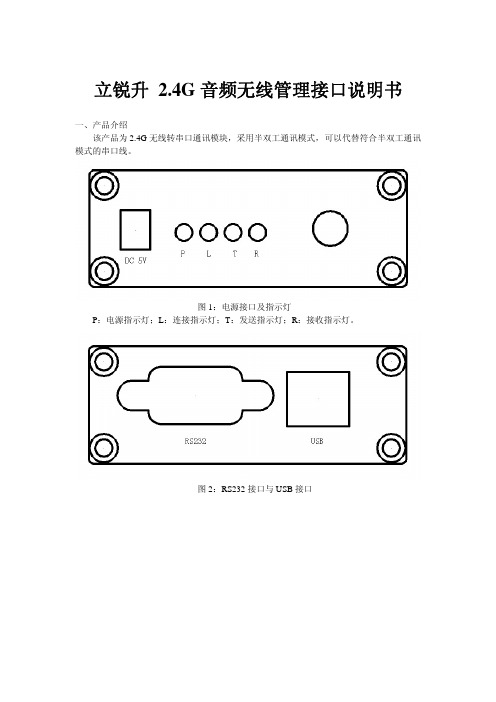
图1:电源接口及指示灯
P:电源指示灯;L:连接指示灯;T:发送指示灯;R:接收指示灯。
图2:RS232接口与USB接口
二、驱动安装
1.用USB线把无线模块与PC机连接上,此时系统会提示“检查到新硬件”如图:
2.选择“从列表或指定位置安装(高级)”然后点击下一步。
3点击“浏览”查找路径打开lrsun drivers并点击一步,驱动安装完毕。
三、使用说明
1.PC机端:用USB线连接PC机与无线模块。
2.下位机端:用串口线连接下位机与无线模块;无线模块接上5V电源。
3.线路连接完成后,电源指示灯点亮,等待4-5秒无线模块自己配对并点亮连接指示灯。
4.当连接指示灯(黄色)点亮后,无线模块即可正常通讯。
三、修改RS232串口通讯速率及无线通讯频率
1.打开RFSettting.exe软件,如图:
口选择可以在设备管理器查找串口号,如图:
3.重新连接2.4G无线模块并在5秒内点击“连接”,结果显示如下图:
注:如果在5秒内没点击“连接”则要断开USB接口并重新接上!!!
4.如图所示:可以RS232串口波特率进行修改,2.4G无线模块通讯频率修改(修改值的范围0-125)
注:修改无线通讯频率一定要两个模块同时修改为同样的数值,否则会导致无线通讯无法配对,不能正常工作。
5.点击“修改设置”参数自动保存,如图:
6.点击“断开”断开连接并拔掉USB连接线。
2.4g无线音频方案
以我给的标题写文档,最低1503字,要求以Markdown 文本格式输出,不要带图片,标题为:2.4g无线音频方案# 2.4g无线音频方案## 概述2.4g无线音频方案是一种基于2.4GHz无线技术,用于音频传输的解决方案。
该方案适用于无线耳机、无线音箱等各类音频设备,实现了音频数据的无线传输,提供了更为便捷的音频体验。
## 技术原理2.4g无线音频方案采用了2.4GHz无线频段作为传输介质。
该频段有很高的带宽,能够支持高质量的音频传输。
方案通过将音频信号转换为数字信号,并采用无线调制技术将数字信号转换为2.4GHz的无线信号进行传输。
接收端接收到无线信号后,再将无线信号解调为数字信号,然后再将数字信号转换为音频信号输出。
## 方案组成2.4g无线音频方案主要由音频转换模块、无线调制解调模块、功放模块和天线组成。
### 音频转换模块音频转换模块用于将音频信号转换为数字信号。
通常使用模数转换器(ADC)将模拟音频信号转换为数字信号。
转换后的数字信号可以更好地进行处理和压缩,以适应无线传输的要求。
### 无线调制解调模块无线调制解调模块用于实现数字信号到2.4GHz无线信号的转换。
在发送端,将数字信号通过调制技术转换为2.4GHz的无线信号。
在接收端,将接收到的无线信号解调为数字信号,以便后续处理。
### 功放模块功放模块用于将数字信号转换为音频信号输出。
通常使用数模转换器(DAC)将数字信号转换为模拟音频信号,并通过功放电路放大后输出。
### 天线天线用于发送和接收无线信号。
通过合理设计天线结构和选取合适的天线增益,可以确保信号的传输质量和传输距离。
## 优势和应用### 优势- 无线传输,免除了有线连接的麻烦,提供更自由的音频体验。
- 2.4GHz频段带宽较大,能够支持高品质音频传输。
- 采用数字信号传输,抗干扰能力强,音质更稳定。
### 应用- 无线耳机:对于用户而言,无线耳机提供了更为便捷的使用方式,没有了纠缠的有线,可以自由移动。
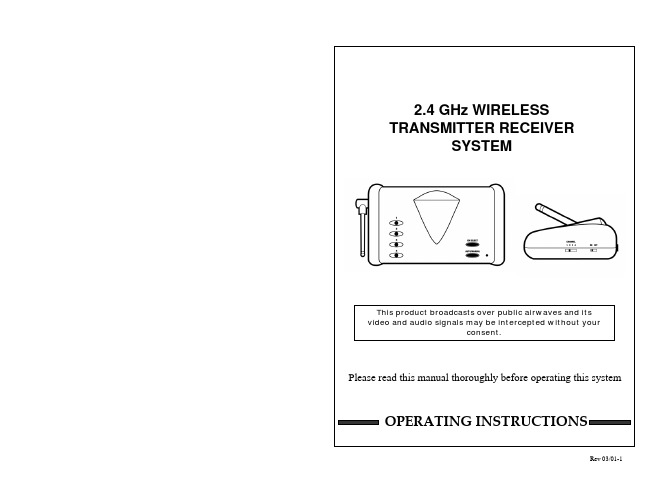
2.4GHz 无线传输接收器系统用户手册说明书
Poor reception
Causes and remedies
Camera
Receiver
- No camera (or other video - AC adapter not plugged in
device) connected to
- Power switch not turned on
- Adjust antenna direction
- Adjust antenna direction
FOR MORE INFORMATION
Because our products are subject to continuous improvement, SVC Reserves the right to modify product design and specifications without Notice and without incurring any obligation. E & OE.
CAUTION
!
RISK OF ELECTRIC SHOCK. DO NOT OPEN.
CAUTION:TO REDUCE THE RISK OF ELECTRIC SHOCK, DO NOT REMOVE COVER (OR BACK). NO USER-SERVICEABLE PARTS INSIDE. REFER SERVICING TO QUALIFIED SERVICE PERSONNEL.
2.4 GHz 无线微型音频系统用户手册说明书
User Manual2.4 GHz Wireless Microphone SystemVlink2StatementPlease read this manual carefully before use and operate and store in strict accordance with the instructions provided. Please retain for future reference.For any issues that cannot be resolved with the user manual, please refer to your retailer for help or contact us at: ******************. Cautions1. Take care not to use the unit underwater or unprotected in rainyconditions. Store in a cool, dry place.2. Designed for use and storage at normal temperatures. Do not movethe unit from overheated to cold conditions frequently, and keep away from heat sources such as heaters and ovens.3. When in use, or when storing, avoid contact with dust and moisture.4. Do not subject to device to violent collisions, as this can damage thedevice.5. In order to avoid acoustic feedback, do not hold the microphoneclose to loudspeakers.6. For optimal sound detection, do not hold your hand against themicrophone head.General IntroductionThe Saramonic Vlink2 wireless microphone system provides a premium 2-person wireless audio solution for vloggers, mobile journalists and content creators. It is an easy-to-use, high-quality and flexible 2.4GHz system. The external microphone input allows the receiver tobe connected to a mic device. The system can be powered throughits USB-C ports, allowing it to run for numerous hours on a USB-C 5V power bank.Portable Receiver Vlink2 RXIntroductionThe Saramonic Vlink2 RX is a camera-mountable dual-channel 2.4GHz wireless receiver. It features a high-contrast OLED display and talkback function to transmitter. The two detachable antennas can be rotated 360° for better reception. The receiver's output can be toggled between mono and stereo modes. The talkback and monitor function on the receiver allows camera operators to select individually if desired, and communication can be controlled by a mute button.Product Structure①Antennas ②LINE OUT Jack Connect the Vlink2 RX to a DLSR camera, smartphone with a 3.5mm headphone jack, mixer or amplifier with the supplied output cable.③3.5mm Talkback and Headphone Jack Using the talkback function with the supplied headphone, the receiver can monitor the real-time feedback and deliver talkback communication with transmitter.④USB-C Charging Port (DC 5V)⑤Cold Shoe Mount Adapter①⑪⑨⑩⑦⑥⑧⑤②③④⑥ SET ButtonLong press the SET button to enter the displayed menu. Then, short press the SET button to confirm your setting change, or long press again to exit without saving.⑦Power / Mute ButtonStatus OperationPower ON Long press for at least three secondsPower OFF Long press until it turns offMute ONShort pressMute OFF⑧RF IndicatorStatus IndicatorsDisconnected Lights offPairing Quickly flashing blue lightPaired Successfully Solid blue lightMute ON (Paired Successfully)Slowly flashing blue light⑨OLED Display⑩POWER IndicatorStatus IndicatorsPower On / Fully charged Solid blue lightLow battery / Charging Solid red lightLow battery warning Flashing red light(the unit shutdowns whitin 10 mins)⑪+/- button (Pair button)Press the buttons “+” and “-“ for 3 seconds at the same time, entering pairing mode.Attaching AccessoriesConnect the supplied cable to the output jack.①Plug the supplied cable into the LINE OUT jack.②For a secure connection, turn to lock the connector.Attach the shoe mount adapter③ Please attach the belt clip as shown before attaching the shoe mountadapter.④ Press the bottom of the belt clip to make some space between thebelt clip and the receiver.⑤ Align the belt clip with the two vertical grooves on the shoe mountadapter and insert the adapter in the direction of the arrow.⑥ Push the shoe mount adapter in fully until the belt clip fits into thehorizontal groove on the adapter holds.OLED Display Operation Guide23Home screen: If no operation is performed for 20 seconds on the other screens, the display will automatically return to the home screen.①Pairing IndicatorPaired Successfully Disconnected②Output Mode IndicatorM: Mono S: Stereo③Mic & Audio Monitoring IconMute Off Mute On④Headphone Volume⑤RX's Battery Level IndicatorDisplays the RX battery level. Please recharge the device immediately when the indicator starts flashing.⑥Channel A Icon⑦RF Level Indicator (Channel A)Indicates the current reception level.⑧Audio Input Level Meter (Channel A)Displays the audio input level.⑨TX's Battery Level Indicator (Channel A)Displays the TX battery level. Please recharge the device immediately when the indicator starts flashing.⑩Channel B Icon⑪ RF Level Indicator (Channel B)Indicates the current reception level.12Audio Input Level Meter (Channel B)Displays the audio input level.13TX's Battery Level Indicator (Channel B)Displays the TX battery level. Please recharge the device immediately when the indicator starts flashing.Mic GainAdjust the external microphone’s gain level (0-19). Default is “16”.Set Output VolumeSet the volume of output audio within the range of 0 to 31. The setting is retained even after the power is turned off. Default volume is 28.Output ModeThe output mode can be set to mono or stereo. When the output mode is in mono, the audio from the left and right channel will be mixed. When in stereo, receiver A's and receiver B's audio output will be separated to the left and right of the stereo output.System default is mono.Set BacklightSet backlight to Always On or On for 10, 30, or 60 seconds. Default is "On".Set Mute KeyEnable or Disable Mute key button function. Default is “Enable”.LanguageEnglish or (Chinese) are available. Default is English.Restore Default SettingYes: restores default settings, No: exits restore default settings.Version of the Vlink2 RX's firmwareBody-pack Transmitter Vlink2 TXIntroductionThe Saramonic Vlink2 TX is a compact body-pack transmitter. It features an easy-to-read OLED display, a detachable antenna and built-inrechargeable battery. With the 3.5mm headphone and mic input jacks, it can accept audio from the included 3.5mm locking mic, and supports efficient two-way communication with the receiver . A short press of the power button mutes the mic between takes.Product Structure⑩⑧⑨⑤⑥⑦①②③④Antennasc'vConnect headphones for monitoring communication from the receiver. MIC IN/LINE IN JackThe transmitter can be connected to a 3.5mm microphone or other line-level devices.USB-C Charging Port (DC 5V)Power / Mute ButtonStatus OperationPower ON Long press for at least three secondsPower OFF Long press until it turns offMute ONShort pressMute OFFSET ButtonRF IndicatorStatus IndicatorsDisconnected Lights offPairing Quickly flashing blue lightPaired Successfully Solid blue lightMute ON (Paired Successfully)Slowly flashing blue lightOLED displayDisplay menus, please refer to "OLED Display Operation Guide" for more details.POWER indicatorStatus IndicatorsPower On / Fully charged Solid blue lightLow battery / Charging Solid red lightLow battery warning Flashing red light(the unit shutdowns whitin 10 mins)+/- button (Pair button)Press the buttons “+” and “-“ for 3 seconds at the same time, entering pairing mode.OLED Display Operation GuideHome screen: If no operation is performed for 20 seconds on the other screens, the display will automatically return to the home screen.①Pairing IndicatorPaired Successfully Disconnected②RF Level Indicator③Battery Level IndicatorDisplays the TX battery level. Please recharge the device immediately when the indicator starts flashing.④Mute IndicatorMute Off Mute On⑤Mic Gain⑥Audio Input Level MeterDisplays the audio input level.MIC GAINAdjust the external microphone’s gain level (0-9). Default is “06”.Set Output VolumeSet the volume of output audio within the range of 0 to 31. The setting is retained even after the power is turned off.Default volume is 28.Input SettingThe input mode can be set to Mic In or Line In.Mic In: for connecting a 3.5mm microphone to the transmitter.Line In: for connecting a line level device to the transmitter.Set BacklightSet backlight to Always On or On for 10, 30, or 60 seconds. Default is "On".Input Mic In06Set Mute Key.Enable or Disable Mute key button function.Default is “Enable”Language Setting.(Chinese) are available. Default is "English".English orRestore Default Setting.Yes: restores default settings, No: exits restore default settings.1.1.3Version of the Vlink2 TX's firmware.Handheld Transmitter Vlink2 HUThe Vlink2 HU is a 2.4GHz wireless handheld microphone transmitter that features a lightweight and durable aluminum alloy body, built-in antenna and easy operation. It can be powered by a rechargeable Li-ion battery or two AA batteries. The Vlink2 HU works with the Vlink2 RX on various audio capturing occasions.Product Structure①⑤⑦②③⑥④Power IndicatorStatus IndicatorsDisconnected Slowly flashing blue lightPairing Quickly flashing blue lightPaired Successfully Solid blue lightMute ON (Paired Successfully)Flashing red lightLow Battery Solid red lightPower/Mute ButtonStatus OperationPower ON Long press for at least three secondsPower OFF Long press until it turns offMute ONShort pressMute OFFAntennaFor optimal sound detection, please do not hold the antenna.Pair ButtonBattery CompartmentAccepts two AA batteries or an customized rechargeable Li-ion battery. Charging IndicatorStatus IndicatorsFully charged Solid blue lightCharging Solid red lightError occurs Flashing red lightUSB-C Charging Port (DC 5V)Battery InstallationThe transmitter is powered by a rechargeable Li-ion battery or two AA batteries. To install batteries, please follow these steps:1. Turn the grip anti-clockwise, and pull the grip down until the battery compartment is visible.2. Open the battery cover as shown.3.Insert two two AA batteries or the supplied Li-ion battery into the battery compartment, respecting the polarity indicated inside the compartment.4.Close the battery cover, and turn the grip clockwise to tighten it.orNote:1. Replacing the batteries during operation may generate a largenoise. Be sure to turn off the unit before replacing the batteries.2. When not using the device for a long period of time, remove thebatteries.3. AA batteries can not be charged with this unit. Please do not chargethe unit when two AA batteries are inserted. The charging indicator will blink red light when this error occurs.Operation GuideHow to connect the Vlink2 TX with the Vlink2 RXBefore leaving factory, the transmitter and the receiver of a set are pre-paired. Therefore, the connection will be established once they are powered on. If transmitters and receiver are disconnected, please follow below steps:1. Turn on the receiver and the transmitter.2. Press the buttons “+” and “-“ for 3 seconds at the same time to enterpairing mode. The RF lights of receiver and transmitter flash quickly.3. The system is paired successfully when the RF lights of the TX and RXturn solid blue.How to connect the Vlink2 HU with the Vlink2 RX1. Long press the Power button to turn on the Vlink2 RX and the Vlink2HU.2. Long press the Pair button of the Vlink2 RX (press the buttons “+”and “-” at the same time) to enter pairing mode. The RF indicator will flash rapidly in blue.3. Unscrew the grip and press the Pair button of the Vlink2 HU to enterpairing mode. The indicator will flash rapidly in blue.4. The system is paired successfully when the indicators of the RX andHU turn solid blue.Connection ExampleTX+RXCompatible with TRS/TRRSheadphones (not included)TX+TX+RXCompatible withTRS/TRRS headphones(not included)Compatible withTRS/TRRS headphones(not included)Packing ListsVlink2 Kit1 (TX+RX)• Transmitter (1)• Receiver (1)• DK3 Omnidirectional Lavalier Microphone Kit (1)• Headphone (talkback and monitoring function) (1)• USB-C Charging Cable (2)• 3.5mm TRS Locking-type Plug Audio Cable for Cameras (1) • 3.5mm TRRS Locking-type Plug Audio Cable for Smartphone (1)• Cold Shoe Mount Adapter (1)• Detachable Antenna (3)• Belt clip (2)• Hard Protective Case (1)Vlink2 Kit2 (TX+TX+RX)• Transmitter (2)• Receiiver (1)• DK3 Omnidirectional Lavalier Microphone Kit (2)• Headphone (talkback and monitoring function) (1)• USB-C Charging Cable (3)• 3.5mm TRS Locking-type Plug Audio Cable for Cameras (1) • 3.5mm TRRS Locking-type Plug Audio Cable for Smartphone (1) • Cold Shoe Mount Adapter (1)• Detachable Antenna (4)• Belt clip (3)• Hard Protective Case (1)Vlink2 HU• Vlink2 HU Handheld Microphone Transmitter (1)• Type-C Charging Cable (1)Oscillator type GFSKCarrier frequencies 2.4GHz (2404-2476MHz)Operating range Up to 328'(100m)Audio connector 3.5 mm LINE OUT jack3.5mm MIC IN & 3.5mm headphone output jack Built-in battery capacity 3000mAh Continuous use time 19 hrsPower requirements Built-In Li-ion Battery or USB-C DC 5V Signal-to-noise ratio 75 dB or more Headphone output level 30mW (32 Ω)RF output power <10mW Frequency response 35Hz-18KHz Dimensions 88x69x23mm Weight189g(6.6oz)Operating temperature -10 °C to 50 °C Storage temperature–20 °C to +55°CSpecificationsVlink2 RXCarrier frequencies 2.4GHz (2404-2476MHz) Operating range Up to 328'(100m)Audio output connector 3.5mm headphone outputAudio input connector 3.5mm MIC IN/LINE IN jackBuilt-in battery capacity2000mAhContinuous use time20 hrsPower requirements Built-In Li-ion Battery or USB-C DC 5V Signal-to-noise ratio75 dB or moreSensitivity Lavalier microphone: -40dB. Headphone output level30mW (32 Ω)RF output power<10mWFrequency response35Hz-18KHzDimensions70x52x23mmWeight121g(4.3oz)Operating temperature-10 °C to 50 °CStorage temperature–20 °C to +55°CCarrier frequencies 2.4GHz (2404-2476MHz)Operating range Up to 164'(50m)Battery capacity1600mAh Li-ion battery or 2*AA batteryContinuous use time With the supplied Li-ion battery: 22 hrs With 2 AA batteries: 20 hrsPower requirements Li-ion battery or 2*AA batteries or USB-C DC 5VSignal-to-noise ratio75 dB or more Microphone type Condenser microphone Sensitivity-35dBRF output power<10mWFrequency response35Hz-18KHz Dimensions49.2x263.1x49.2mm Weight225g(7.9oz) Operating temperature-10 °C to 50 °C Storage temperature–20 °C to +55°CFor better recording experience, the applicationis recommended.SShenzhen Jiayz Photo Industrial., Ltd40 61 1096。
音箱2.4G无线传输方案!

一.系统概述你是否因为整理音箱那些杂乱缠绕的音频连接线而感到烦恼过,你是否在准备改变家庭布局挪动音箱位置时因为那复杂的布线问题而放弃过,你是否因为不能在卧室、洗手间等各个角落畅听音乐而苦恼过。
现在这一切都不再是问题了,如果你拥有一款数字无线音箱系统,你便可以将音箱随意摆放在你想要的位置而不必考虑烦人的布线问题,让你可以在家里任意角落畅享音乐自由。
二.系统要求音响行业的发展,冠标的2.4G 技术无线音响方案,广泛的应用于家庭,教育,卡拉OK,舞台等等场所,解决现场安装布线麻烦的要求,即可收到全方位高保真音频。
受到很多用户的赞同。
三.系统原理和原理框图通过将各种音频通过发射器传输出来,接收模块接收到的信号通过调制,解码,D/A 转换,最后传到扬声器。
原理框图如下:音箱2.4G 无线传输方案音源音频发射端音频接收端SOYO-WT03发射器SOYO-WM24G02R 接收模块喇叭应用到音箱无线传输四.系统配置可选音频发射器:SOYO-WT01-T/SOYO-WT02-T/SOYO-WT03-T可选音频接收模块:SOYO-WM24G01-R/SOYO-WM24G02-R/SOYO-WM24G05-R五.冠标2.4G 无线技术的优势1.2.4G 频段是国际规定的免费频段,不需要向国际相关组织交纳任何费用。
2.2.4G 技术信号处理过程是采用的数字技术,抗干扰性强,保密性强。
对人体无辐射。
3.传输距离远,冠标的2.4G 无线技术传输距离在空旷地带能传输180m-200m,在加大电路发射功率和天线灵敏度的情况下,可传输更远距离。
4.冠标2.4G 无线技术传输带宽能达到2M ,远远高于CD 音质所需。
5.功耗低,冠标的2.4G 无线发射模块的电流一般在80-90mA。
2.4G数字无线扩音系统技术参数
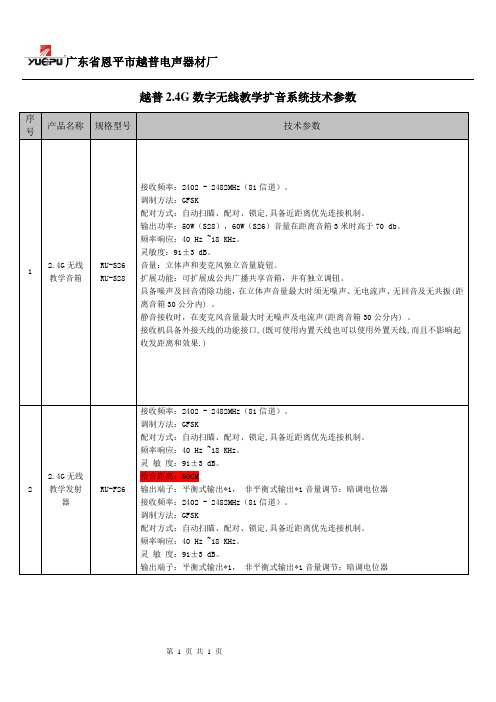
广东省恩平市越普电声器材厂第 1 页 共 1 页 越普2.4G 数字无线教学扩音系统技术参数 序号 产品名称 规格型号 技术参数1 2.4G 无线教学音箱 RU-S26 RU-S28 接收频率:2402 - 2482MHz (81信道)。
调制方法:GFSK配对方式:自动扫瞄、配对、锁定,具备近距离优先连接机制。
输出功率:50W (S28),60W (S26)音量在距离音箱3米时高于70 db 。
频率响应:40 Hz ~18 KHz 。
灵敏度:91±3 dB 。
音量:立体声和麦克风独立音量旋钮。
扩展功能:可扩展成公共广播共享音箱,并有独立调钮。
具备噪声及回音消除功能,在立体声音量最大时须无噪声、无电流声、无回音及无共振(距离音箱30公分内) 。
静音接收时,在麦克风音量最大时无噪声及电流声(距离音箱30公分内) 。
接收机具备外接天线的功能接口,(既可使用内置天线也可以使用外置天线,而且不影响起收发距离和效果.)2 2.4G 无线教学发射器 RU-F26 接收频率:2402 - 2482MHz (81信道)。
调制方法:GFSK配对方式:自动扫瞄、配对、锁定,具备近距离优先连接机制。
频率响应:40 Hz ~18 KHz 。
灵 敏 度:91±3 dB 。
拾音距离:60CM 输出端子:平衡式输出*1, 非平衡式输出*1音量调节:暗调电位器 接收频率:2402 - 2482MHz (81信道)。
调制方法:GFSK配对方式:自动扫瞄、配对、锁定,具备近距离优先连接机制。
频率响应:40 Hz ~18 KHz 。
灵 敏 度:91±3 dB 。
输出端子:平衡式输出*1, 非平衡式输出*1音量调节:暗调电位器。
2.4G 数传电台用户手册(V1.1)说明书

2.4G数传电台用户手册非常感谢您购买我司产品。
2.4G数传电台是一款优秀的无线电数据链路通信系统,采用先进的SHTT数字跳频技术,专业、稳定、通用。
为了共同维护飞行安全,也为了您能更好地使用本系统,请务必仔细阅读本手册。
如果您在使用本系统过程中遇到任何问题,请查阅本手册相关条目或者访问思翼科技官方网站()上与本系统相关的专题页面。
您也可以直接电话咨询思翼科技售后服务热线(4008382918)或邮件询问技术支持邮箱(****************)。
目录1阅读提示 (1)1.1标识符号的含义 (1)1.2飞行安全 (1)1.3携带、保管、废弃的注意事项 (3)2产品介绍 (4)2.1开关、接口定义 (4)2.2技术参数 (5)2.3LED指示灯定义 (6)3使用前 (7)3.1正确放置设备天线 (7)3.2对频 (8)4固件与波特率切换 (9)5数据输出(连接地面站) (13)6关于保修 (14)1阅读提示1.1标识符号的含义本说明书中,如出现以下符号,表示这部分内容需要特别留意:危险若忽略此操作,会有很大概率对使用者或他人造成人身伤害警告若忽略此操作,有可能会对使用者或他人造成人身伤害注意若忽略此操作,有可能会对使用者或他人造成经济损失禁止事项必须执行注释1.2飞行安全数传电台系统为专业应用场景设计制造,需要操作人员具备一定的基本技能,请务必小心使用。
任何针对本产品的不安全、不负责任的操作都有可能造成产品损坏,引起使用者或他人的经济损失甚至人身伤害。
未成年人使用本产品时须有专业人士在场监督指导。
未经思翼科技允许,禁止擅自拆卸或改装本产品。
针对本产品的安全使用和维护方法,在本手册中均有列出。
请在使用前仔细阅读本手册,严格按照其指示操作并参考注意事项,以防因不当操作造成意外。
为了共同维护飞行安全并让您更好地发挥本产品的特性,请留意以下事项:禁止使用数传电台在人群密集的地方(广场、公园等),障碍物较多的地方(街道、停车场等),有强磁场或信号干扰源的地方(高压线、高铁沿线、雷达站等)或其他可能引起经济损失乃至人身伤害的区域操控飞行器。
- 1、下载文档前请自行甄别文档内容的完整性,平台不提供额外的编辑、内容补充、找答案等附加服务。
- 2、"仅部分预览"的文档,不可在线预览部分如存在完整性等问题,可反馈申请退款(可完整预览的文档不适用该条件!)。
- 3、如文档侵犯您的权益,请联系客服反馈,我们会尽快为您处理(人工客服工作时间:9:00-18:30)。
QQ:1914047109
WA24G001
E-Mail: chipsysterm@
2.4G 无线数字音频传输方案
________________________________________________________________________________________________________________________
2) 发 射端 ADC
QQ:1914047109
WA24G001
E-Mail: chipsysterm@
2.4G 无线数字音频传输方案
________________________________________________________________________________________________________________________
2) 接收端 DAC
日期 20110518
版本 V1.0 初版
版本描述
ቤተ መጻሕፍቲ ባይዱ
三 、 主 芯 片 电 气 特 性 ( Ta = 25oC, VSS = 0V, VCC = 5.0V)
特性
符号
条件
工作电压
VCC
工作电流
I
工作温度
T
最低 3.0
-40
典型 3.3 15
最高 3.6
85
单位 V mA ºC
四、系统框图 1) 发射端
QQ:1914047109
WA24G001
E-Mail: chipsysterm@
2.4G 无线数字音频传输方案
________________________________________________________________________________________________________________________
2) 接收端
五、发射端芯片脚位
一、概述 2.4G无 线 音 频 传 输 方 案 是 款2.4G高保真无线音频传输系统,支持模拟音频线输入或者
MIC输入方式, 能够将IPOD/MP3/TV/手机/PC/说话的语音等模拟音频实现完美传输。
二 、 功能特性 1) 采 用 可 充 电 的 3.7V 标 准 锂 电 池 供 电 , 工 作 电 压 3.3V 2) 采用 2.4GHz RF 技术,工作于 2400M – 2483.5MHz 的开放频段,低延迟 3) 支持 44.1KHz/32KHz 16bit 不同采样率的数字音频 4) 室内有效距离:30m,直线空旷距离>60m 5) 支持 POWER/SET/UP/DOWN/SYNC/LOOP 6 个按键 6) 音量大小及工作频道可调 7) 长按键开/关机及短按键静音开/关功能 8) 静音 LED 指示功能 9) 带 LCD 显示功能,可显示当前音量及频道等 10) 支持单键对码功能,在一方改变通信参数后,另一方可以同步改变 11) 采用 Mini-USB 接口进行充电
七、接收端芯片脚位
1)主 控芯片(TQFP)
QQ:1914047109
WA24G001
E-Mail: chipsysterm@
2.4G 无线数字音频传输方案
________________________________________________________________________________________________________________________
六、 RF 芯片脚位
QQ:1914047109
WA24G001
E-Mail: chipsysterm@
2.4G 无线数字音频传输方案
________________________________________________________________________________________________________________________
1) 主 控芯片(TQFP)
QQ:1914047109
WA24G001
E-Mail: chipsysterm@
2.4G 无线数字音频传输方案
________________________________________________________________________________________________________________________