EPSON PLQ设置手册
EPSON 投影机 说明书

目錄安全使用須知•安全使用須知 (2)•使用和保管上的注意事項 (10)支援與維修指南•本公司提供的實用軟體 (14)•故障檢查表 (15)•Epson投影機聯繫清單 (17)安全使用須知操作投影機時,請先閱讀所有安全和操作使用須知。
閱讀所有使用須知後,請保存本注意事項以備將來參考。
本文件和投影機均使用圖像符號來顯示安全使用投影機的方法。
請了解並遵守注意事項的符號,避免造成人身傷害和財產損失。
符號說明本符號代表若有疏忽,可能因錯誤操作而造成人身傷害或甚至死亡的注意事項。
本符號代表若有疏忽,可能因錯誤操作而造成人身傷害或外傷的注意事項。
代表不能執行的動作的符號不要執行不要拆解不要觸摸不要弄濕不要在潮濕地區使用不要放置在不穩的表面上代表應該執行的動作的符號使用須知從插座上拔下插頭⨸r發生以下情況時,請將投影機插頭從插座上拔下,並將所有維修工作交由專業維修人員執行:•如果有煙霧、異味或奇怪的噪音從投影機中發出。
•如果液體或異物掉入投影機內部。
•如果投影機掉落或機殼損壞。
在以上情況繼續使用,可能會引起火災或觸電。
不要試圖自行維修投影機。
請把全部維修作業交由合格的維修人員執行。
請將投影機放在方便拔掉插頭的插座附近使用。
除非使用說明書中有特別說明,否則不要打開投影機上方的任一個蓋子。
不要試圖拆解或改裝投影機(包括消耗品)。
請把全部維修作業交由合格的維修人員執行。
投影機內的電壓會造成嚴重的人身傷害。
如果要將投影機安裝在天花板上,應由合格的技師採用認可的吊裝裝備進行安裝。
如果不正確執行安裝工作,投影機可能會掉落。
這樣可能會造成人身傷害或意外。
請向您的經銷商聯絡以便執行安裝工作。
如果您在吊裝座上使用膠粘劑以防螺釘鬆動,或在投影機上使用潤滑劑、油類製品等,可能會造成機殼破裂,使投影機從吊裝座上掉落。
這樣可能會對吊架座下方的人造成嚴重的傷害,並可能損壞投影機。
安裝或調整吊裝座時,請勿使用膠粘劑防止螺釘鬆動,也不要使用潤滑劑、油類製品等。
Epson产品用户手册说明书

Read these instructions before using your product.Important Safety Instructions: When using telephone equipment, youshould always follow basic safety precautions to reduce the risk of fire, electric shock, and personal injury, including the following:• D o not use this Epson ® product near water.• A lways keep this guide handy.• A void using a telephone during an electrical storm. There may be a remote risk of electric shock from lightning.• D o not use a telephone to report a gas leak in the vicinity of the leak.Caution: To reduce the risk of fire, use only a No. 26 AWG or largertelecommunication line cord.1 Remove all protective materials from the product.2 L ift up the scanner unit and remove all protective materialsfrom inside the product, then close the scanner unit.6 Close the ink pack tray cover and lock it.7 P ress OK on the LCD screen to start charging the ink.Ink charging takes approximately 5 minutes. A messageappears when ink charging is complete.4 Load paperFor instructions on loading envelopes or legal-size paper, or using the rear paper feed slot, see the online User’s Guide .1 M ake sure the product is done charging the ink, then pullout the paper cassette.2 S lide the side edge guides all the way out and set thefront edge guide to the paper size you are using.3 I nsert paper with the glossy or printable side down.Standard paper: Thick paper:Note: Make sure the paper is under the arrow mark for your paper type and loaded against the front edge of the cassette.4 S lide the edge guides against the paper, but not tootightly.2 P ress an ink pack tray to release it, then pull the tray out.3 S hake an ink pack 10 times, then remove it from thepackaging.Note: Do not touch the green chip on the ink pack.4 M ove the handle forward, place the ink pack into the inkpack tray until it clicks, then move the handle back to itsoriginal position .Note: Make sure the ink pack is fullyinserted and level with the top of the ink pack tray.5 I nsert the ink pack tray into the printer. Repeat steps 2 to5 for the other ink packs.Note: The ink packs are keyed to fit into the correct color slot.If you cannot insert the ink pack tray all the way, do not force it. Make sure the ink pack color matches the color slot on the printer.3 F ollow the instructions on the computer screen to run thesetup program.4 W hen you see the Select Your Connection screen, selectone of the following and follow the on-screen instructions:• Wireless connectionIn most cases, the software installer automatically attempts to set up your wireless connection. If setup is unsuccessful, you may need to enter your network name (SSID) and password.• Direct USB connectionMake sure you have a USB cable (not included).• Wired network connectionMake sure you have an Ethernet cable (not included).PCL or PostScript driver (WF-C5790)Download the software and see your online User’s Guide for instructions..jm/support/wfc5790Mobile printingConnect wirelessly from your smartphone, tablet, or computer.Print documents and photos from across the room or around the world:• Print directly from your iOS device. Simply connect your printer and device to the same network and tap the action icon to select the print option.• Use Epson Print Enabler (free from Google Play™) with Android™ devices (v4.4 or later). Then connect your printer and device to the same network and tap the menu icon to select the print option.• Print remotely with Epson Connect™ and Google Cloud Print™. See your online User’s Guide for instructions or learn more at .jm/connect .Any problems?Network setup was unsuccessful.• Make sure you select the right network name (SSID).• Restart your router (turn it off and then on), then try toconnect to it again.• The printer can only connect to a network that supports 2.4 GHz connections. If your router offers both 2.4 GHz and 5 GHz connections, make sure 2.4 GHz is enabled.• If you see a firewall alert message, click Unblock or Allow to let setup continue.• If your network has security enabled, make sure you enter your network password (WEP key or WPA passphrase) correctly. Be sure to enter your password in the correct case.56 S elect the paper settings on the product’s control panel.12 I f prompted, press Proceed on the LCD screen to set upthe fax, or press Close to set it up later.Note: If your computer does not have a CD/DVD drive or you are using a Mac, an Internet connection is required to obtain the product software.To print from a Chromebook™, go to.jm/support/gcp for instructions.Standard software package1M ake sure the product is NOT CONNECTED to your computer.Windows ®: If you see a Found New Hardware screen, click Cancel and disconnect the USB cable.2 I nsert the product CD or download and run your product’ssoftware package. For the latest software, visit:WF-C5710.jm/support/wfc5710WF-C5790.jm/support/wfc5790。
Epson 打印机用户手册说明书
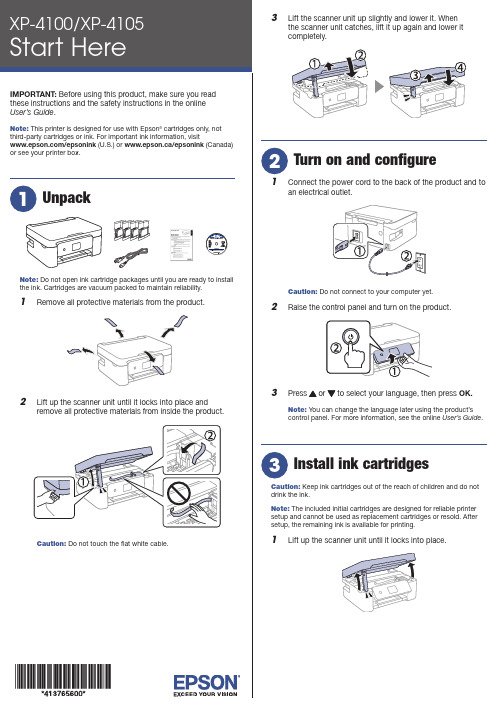
Do not open ink cartridge packages until you are ready to installthe ink. Cartridges are vacuum packed to maintain reliability.emove all protective materials from the product.3 L ift the scanner unit up slightly and lower it. Whenthe scanner unit catches, lift it up again and lower itcompletely.1 C onnect the power cord to the back of the product and toan electrical outlet.Caution: Do not connect to your computer yet.2 R aise the control panel and turn on the product.3 OK.Note: You can change the language later using the product’scontrol panel. For more information, see the online User’s Guide.Caution: Keep ink cartridges out of the reach of children and do notdrink the ink.Note: The included initial cartridges are designed for reliable printersetup and cannot be used as replacement cartridges or resold. Aftersetup, the remaining ink is available for printing.1 L ift up the scanner unit until it locks into place.9 F ollow the on-screen instructions to adjust the printquality of your product.Note:• Y ou need to load paper before you can adjust the print quality.See “Load paper” below for details.• S elect Adjust Later if you want to adjust the print quality later. For more information, see the online User’s Guide.See the online User’s Guide for information about loading capacity, available paper types and sizes, and loading envelopes.1 M ake sure the product is not charging. Then flip thefeeder guard forward, raise the paper support, and tilt itbackwards slightly.2 3 L4 S tightly.5 P6 F ollow the instructions on the LCD screen to select yourpaper settings.• Print from wherever you are, next to your printer or remotely, with Epson Connect™ and Google Cloud Print™. Learn more at /connect (U.S.) or www.epson.ca/connect (Canada).• Use voice-activated assistants to print a variety of creative and everyday items from your Epson product. Simply add your product to an Epson Connect account, then link the account to a voice-activated assistant. See /voice (U.S.) orwww.epson.ca/voice (Canada) for more information.* M ay require the Epson Print Enabler or Mopria Print Service app from Google Play™.Any problems?Network setup was unsuccessful.• M ake sure you select the right network name (SSID).• Restart your router (turn it off and then on), then try toconnect to it again.• T he printer can only connect to a network that supports 2.4 GHz connections. If your router offers both 2.4 GHz and 5 GHz connections, make sure the 2.4 GHz connection is enabled.• I f you see a firewall alert message, click Unblock or Allow to let setup continue.• I f your network has security enabled, make sure you enter your network password (WEP key or WPA passphrase) correctly. Be sure to enter your password in the correct case.AB1# for There are lines or incorrect colors in my printouts.Run a nozzle check to see if there are any gaps in the printout. Then clean the print head, if necessary. See the online User’s Guide for more information.The product’s screen is dark.Make sure your product is turned on, and press any button to wake it from sleep mode.Setup is unable to find my printer after connecting it with a USB cable.Make sure the printer is turned on and that it is securelyconnected as shown:Note:• I f you are using a Mac or your computer does not have a CD/DVD drive, an Internet connection is required to obtain the product software.• T o print from a Chromebook™, go to /support/gcp (U.S.) orwww.epson.ca/support/gcp (Canada) for instructions.Firmware Update Notice: Epson periodically provides firmware updates to address issues of security, performance, minor bug fixes and ensure your printer functions as designed. Your printer was designed to work only with genuine Epson ink cartridges, therefore some updates may affect the functionality of third-party ink.1 M ake sure the product is NOT CONNECTED to yourcomputer.W indows ®: If you see a Found New Hardware screen, click Cancel and disconnect the USB cable.2 I nsert the product CD (Windows only) or download andrun your product’s software package. For the latestsoftware, visit:XP-4100/support/xp4100 (U.S.) www.epson.ca/support/xp4100 (Canada)XP-4105/support/xp4105 (U.S.) www.epson.ca/support/xp4105 (Canada)3 F ollow the instructions on the computer screen to run thesetup program.4 W hen you see the Select Your Connection screen, selectone of the following and follow the on-screen instructions:• Wireless connectionIn most cases, the software installer automatically attempts to set up your wireless connection. If setup is unsuccessful, you may need to enter your network name (SSID) and password.• Direct USB connectionM ake sure you have a USB cable (not included).Mobile and voice-activated printing• Print directly from your iOS device. Simply connect your printer and device to the same network and tap the action icon to select the print option.• Print directly from your Android™ (v4.4 or later) devices*. Simply connect your printer and device to the same networkand tap the menu icon to select the print option.XP-4100/XP-4105 replacement ink cartridges。
PLQ-20K缺省设置(软件)
若再次按下功能键2,将在ESC/P-K后面依次打印其它“软件”仿真模式,当不再按功能键2时,最后一个即为当前模式;
3.4关闭打印机电源后自动保存设置。
3.5若想继续更改其他设置如:字体等,则重复3.2-3.3操作步骤,即按功能键1,选择“字体”菜单,再按功能键2改变设置值。
2.4按功能键2打印机会打印出图1上半部分所示的说明页。
3.更改缺省设置(本文以将“软件”仿真模式改为“ESC/P-K”为例)
3.1说明页打印完成后,打印纸退出。此时放再放入一页纸,会打印出图2内容;
3.2选择菜单项:按功能键1打印机打印出“软件PR2”, 即表明当前的菜单为软件,“软件当前值”为PR2。
二、更1两张A4幅面打印纸:用于打印缺省设置说明页;
1.2连接打印机电源。
2.进入打印缺省设置模式
2.1确保打印机已经关闭;
2.2按住功能键1与功能键2,打开打印机电源。打印机面板上的电源灯闪烁,就绪灯与脱机灯亮;
2.3放入打印纸,首先打印出图1底部红色框的内容“打印当前设置?是:功能键2/否:功能键1”;
若再次按下功能键2将在kescpk后面依次打印其它软件仿真模式当不再按2功能键2时最后一个即为当前模式
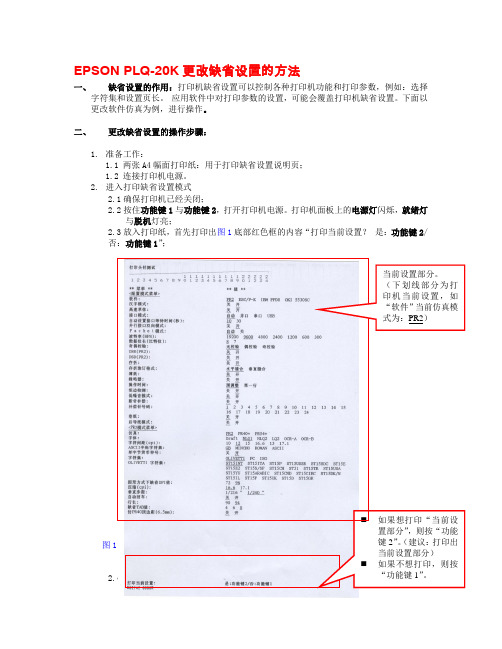
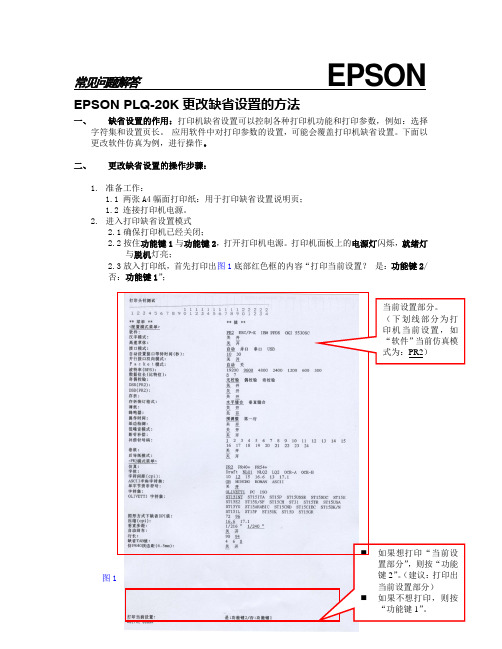
EPSON PLQ-20K更改缺省设置的方法
一、缺省设置的作用:打印机缺省设置可以控制各种打印机功能和打印参数,例如:选择字符集和设置页长。应用软件中对打印参数的设置,可能会覆盖打印机缺省设置。下面以更改软件仿真为例,进行操作。
PLQ-20K缺省设置(软件)
常见问题解答EPSON EPSON PLQ-20K更改缺省设置的方法一、缺省设置的作用:打印机缺省设置可以控制各种打印机功能和打印参数,例如:选择字符集和设置页长。
应用软件中对打印参数的设置,可能会覆盖打印机缺省设置。
下面以更改软件仿真为例,进行操作。
二、更改缺省设置的操作步骤:1.准备工作:1.1两张A4幅面打印纸:用于打印缺省设置说明页;1.2连接打印机电源。
2.进入打印缺省设置模式2.1确保打印机已经关闭;2.2按住功能键1与功能键2,打开打印机电源。
打印机面板上的电源灯闪烁,就绪灯与脱机灯亮;2.3放入打印纸,首先打印出图1底部红色框的内容“打印当前设置?是:功能键2/否:功能键1”;⏹图⏹2.4按功能键2打印机会打印出图1上半部分所示的说明页。
3.更改缺省设置(本文以将“软件”仿真模式改为“ESC/P-K”为例)3.1说明页打印完成后,打印纸退出。
此时放再放入一页纸,会打印出图2内容;图23.2选择菜单项:按功能键1打印机打印出“软件PR2”,即表明当前的菜单为软件,“软件当前值”为PR2。
3.3 更改菜单的值:按功能键2,要更改的设置值ESC/P-K会在PR2后面打印出来(如图3),表示“软件”当前仿真模式已更改为ESC/P-K。
若再次按下功能键2,将在ESC/P-K后面依次打印其它“软件”仿真模式,当不再按功能键2时,最后一个即为当前模式;首先打印出当前设置PR2,按一下功能键2打印出ESC/P-K图33.4关闭打印机电源后自动保存设置。
3.5若想继续更改其他设置如:字体等,则重复3.2-3.3操作步骤,即按功能键1,选择“字体”菜单,再按功能键2改变设置值。
Epson 打印机设置指南.pdf_1701929604.4050834说明书

3 R emove and discard the protective material piece fromthe ink pack tray.4 S hake an ink pack 10 times, then remove it from thepackaging.Note: Do not touch the green chip on the ink pack.5 Note:inserted and level with the top of the ink pack tray.6 IMobile printingConnect wirelessly from your smartphone, tablet, or computer.Print documents and photos from across the room or around the world:• Print directly from your iOS device. Simply connect your printer and device to the same network and tap the action icon to select the print option.• Use Epson Print Enabler (free from Google Play™) with Android™ devices (v4.4 or later). Then connect your printer and device to the same network and tap the menu icon to select the print option.• Print remotely with Epson Connect™ and Google Cloud Print™. See your online User’s Guide for instructions or learn more at /connect .Any problems?Network setup was unsuccessful.• Make sure you select the right network name (SSID).• Restart your router (turn it off and then on), then try to connect to it again.• The printer can only connect to a network that supports 2.4 GHz connections. If your router offers both 2.4 GHz and 5 GHz connections, make sure 2.4 GHz is enabled.• If you see a firewall alert message, click Unblock or Allow to let setup continue.• If your network has security enabled, make sure you enter your network password (WEP key or WPA passphrase) correctly. Be sure to enter your password in the correct case.There are lines or incorrect colors in my printouts.Run a nozzle check to see if there are any gaps in the printout. Then clean the print head, if necessary. See the online User’s Guide for more information.The product’s screen is dark.Make sure your product is turned on, and touch the screen orpress any button to wake it from sleep mode.Setup is unable to find my printer after connecting it with a USB cable.Make sure your product is securely connected as shown:6 S elect the paper settings on the product’s control panel.I nstall software Note: If your computer does not have a CD/DVD drive or you are using a Mac, an Internet connection is required to obtain the product software.To print from a Chromebook™, go to.jm/support/gcp for instructions.Standard software package 1 M ake sure the product is NOT CONNECTED to yourcomputer.Windows ®: If you see a Found New Hardware screen, clickCancel and disconnect the USB cable.2 I nsert the product CD or download and run your product’ssoftware package. For the latest software, visit:WF-C5210.jm/support/wfc5210WF-C5290.jm/support/wfc52903 F ollow the instructions on the computer screen to run thesetup program.4 W hen you see the Select Your Connection screen, selectone of the following and follow the on-screen instructions:• Wireless connectionIn most cases, the software installer automatically attempts to set up your wireless connection. If setup is unsuccessful, you may need to enter your network name (SSID) and password.• Direct USB connectionMake sure you have a USB cable (not included).• Wired network connectionMake sure you have an Ethernet cable (not included).PCL or PostScript driver (WF-C5290)Download the software and see your online User’s Guide for instructions:.jm/support/wfc5290EPSON and DURABrite are registered trademarks, EPSON Exceed Your Vision is a registered logomark, and Epson Connect is a trademark of Seiko Epson Corporation.Designed for Excellence is a trademark of Epson America, Inc.Mac is a trademark of Apple Inc., registered in the U.S. and other countries.Android, Google Cloud Print, Chromebook, and Google Play are trademarks of Google Inc.General Notice: Other product names used herein are for identification purposes only and may be trademarks of their respective owners. Epson disclaims any and all rights in those marks.This information is subject to change without notice.CPD-55232R1© 2018 Epson America, Inc., 2/18 Any questions?User’s GuideWindows: Click the icon on your desktop or Apps screen to access the online User’s Guide .Mac: Click the icon in Applications/Epson Software/Guide to access the online User’s Guide .If you don’t have a User’s Guide icon, go to the Epson website, as described below.SupportVisit .jm/support and search for your product to download drivers, view manuals, get FAQs, or contact Epson.You can also speak to a service technician by calling one of these numbers:Argentina(54 11) 5167-0300 Guatemala * 1-800-835-03580800-288-37766Mexico 01-800-087-1080Bolivia * 800-100-116 Mexico City (52 55) 1323-2052Chile (56 2) 2484-3400 Nicaragua * 00-1-800-226-0368Colombia 018000-915235 Panama * 00-800-052-1376Bogota (57 1) 523-5000 Paraguay 009-800-521-0019Costa Rica 800-377-6627 Peru 0800-10126DominicanLima (51 1) 418-0210 Republic * 1-888-760-0068 Uruguay 00040-5210067Ecuador * 1-800-000-044 Venezuela (58 212) 240-1111El Salvador * 800-6570* C ontact your local phone company to call this toll-free number from a mobilephone.If your country does not appear on the list, contact yournearest Epson sales office. Toll or long distance charges may apply.Need paper and ink?Ensure peak performance and brilliant results with Genuine Epson Ink and specialty papers, engineered specifically for Epson printers. You can purchase them from an Epsonauthorized reseller. To find the nearest one, visit .jm or contact Epson as described in “Any questions?” on this sheet.WF-C5210/WF-C5290 replacement ink packs。
埃森普打印机设置指南说明书
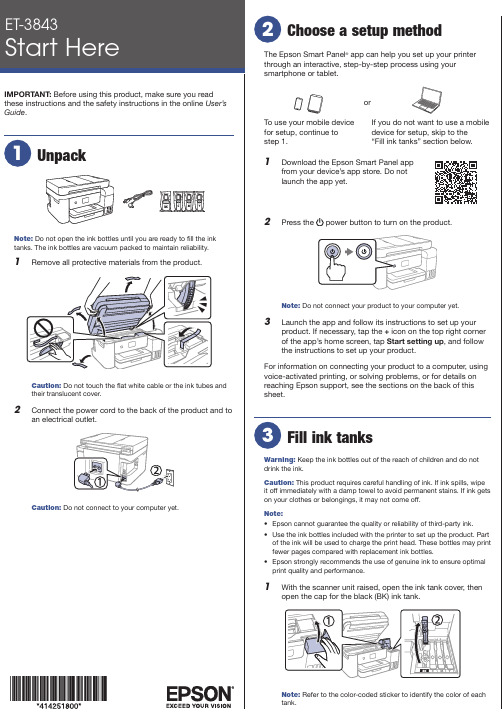
The Epson Smart Panel ® app can help you set up your printer through an interactive, step-by-step process using your smartphone or tablet.If you do not want to use a mobile device for setup, skip to the “Fill ink tanks” section below.To use your mobile device for setup, continue to step 1.or1 D ownload the Epson Smart Panel appfrom your device’s app store. Do notlaunch the app yet.2 P ress thepower button to turn on the product.Note: Do not connect your product to your computer yet.3 L aunch the app and follow its instructions to set up yourproduct. If necessary, tap the + icon on the top right cornerof the app’s home screen, tap Start setting up , and follow the instructions to set up your product.For information on connecting your product to a computer, using voice-activated printing, or solving problems, or for details on reaching Epson support, see the sections on the back of this sheet.Warning: Keep the ink bottles out of the reach of children and do notdrink the ink.Caution: This product requires careful handling of ink. If ink spills, wipe it off immediately with a damp towel to avoid permanent stains. If ink gets on your clothes or belongings, it may not come off.Note:• E pson cannot guarantee the quality or reliability of third-party ink.• U se the ink bottles included with the printer to set up the product. Part of the ink will be used to charge the print head. These bottles may print fewer pages compared with replacement ink bottles.• E pson strongly recommends the use of genuine ink to ensure optimal print quality and performance.1 W ith the scanner unit raised, open the ink tank cover, thenopen the cap for the black (BK) ink tank.tank.8 Close the ink tank cover, then close the scanner unit.9 R aise the control panel, then press the power button toturn on the product. Thepower light flashes.Note: If an error code appears, turn off the product and checkthat no protective material has been left inside the product.10 S elect your language.Note: You can change this setting later using the product’scontrol panel. For more information, see the online User’s Guide .11 W hen an Epson Smart Panel message appears on theLCD screen, select the option to continue setup withoutthe app.12 W hen the message to see the Start Here sheet appearson the LCD screen, press and hold the help button for 5 seconds .13 F ollow the on-screen instructions to start ink charging. Inkcharging takes about 10 minutes .Note: When the power light stops flashing, ink charging iscomplete. Once initial setup of the printer is complete, you can top off the ink tanks with any remaining ink. See the online User’s Guide for instructions.C aution: Do not unplug or turn off the product, or raise the scanner unit while the product is charging or you’ll waste ink.Note:printing.14 P ress the OK button to proceed with initial setup.15 F ollow the on-screen instructions to adjust the printquality of your product.Note :• Y ou need to load paper before you can adjust the print quality. See “Load paper” on this sheet for details.• S elect Adjust Later if you want to adjust the print quality later.For more information, see the onlineUser’s Guide .Caution:User’s Guide for refilling instructions.2 U npack the black (BK) ink bottle. Hold the ink bottle uprightand slowly turn the bottle cap to remove it.Caution:3 I4 WDo not squeeze the bottle orallow it to contact any other surface.Note: Ink flows into the tank and stops automatically when the ink tank is filled to the upper line. If ink does not flow from the bottle, lift and reinsert the bottle.5 W hen the ink tank is full, remove the ink bottle and securelyclose it with the bottle cap. If any ink remains in the bottle,close the bottle and store it for later use.67Note:• A n Internet connection is required to obtain the product software.• T o print from a Chromebook™, go to/support/chromebookprint (U.S.) orhttp://epson.ca/support/chromebookprint (Canada) for instructions.1 M ake sure the product is NOT CONNECTED to yourcomputer.W indows ®: If you see a Found New Hardware screen, click Canceland disconnect the USB cable.2 D ownload and run your product’s software package. Forthe latest software, visit /support/et3843(U.S.) or http://epson.ca/support/et3843 (Canada).3 F ollow the instructions on the computer screen to run thesetup program.4 W hen you see the Select Your Connection screen, selectone of the following and follow the on-screen instructions:•Wireless connectionIn most cases, the software installer automaticallyattempts to set up your wireless connection. If setup is unsuccessful, you may need to enter your network name (SSID) and password.•Direct USB connectionM ake sure you have a USB cable (not included).•Wired network connectionMake sure you have an Ethernet cable (not included).Mobile and voice-activated printing• Print directly from your Android™ (v4.4 or later) device*.Simply connect your printer and device to the same network and tap the menu icon to select the print option.• Turn your mobile device into an intuitive, easy-to-use printingand scanning control center with Epson Smart Panel. Download the app from your mobile device’s app store.• Print from wherever you are, next to your printer orremotely, with Epson Connect™. Learn more at /connect (U.S.) or http://epson.ca/connect (Canada).• Use voice-activated assistants to print a variety of creative andeveryday items from your Epson ® product. Simply add yourproduct to an Epson Connect account, then link the account to a voice-activated assistant. See /voice (U.S.) or http://epson.ca/voice (Canada) for more information.* M ay require the Epson Print Enabler or Mopria Print Service app fromGoogle Play™.Any problems?Network setup was unsuccessful.• Make sure you select the right network name (SSID).• Restart your router (turn it off and then on), then try to connectto it again.See the online User’s Guide for information about loading capacity, available paper types and sizes, using the ADF , and loading envelopes.1 M ake sure the product is not charging ink, and then open2 S3 INote: Make sure the paper is loaded against the front edge guideand not sticking out from the end of the cassette.4 S lide the side edge guides against the paper, but not too5 K eep the cassette flat as you insert it all the way .67 S elect the paper settings on the product’s control panel.EPSON and Epson Smart Panel are registered trademarks, EPSON Exceed Your Vision is a registered logomark, and Epson Connect is a trademark of Seiko Epson Corporation.Designed for Excellence is a trademark of Epson America, Inc.Windows is a registered trademark of Microsoft Corporation in the United States and/or other countries.Mac is a trademark of Apple Inc., registered in the U.S. and other countries.Android, Chromebook, and Google Play are trademarks of Google LLC.General Notice: Other product names used herein are for identification purposes only and may be trademarks of their respective owners. Epson disclaims any and all rights in those marks.This information is subject to change without notice. © 2021 Epson America, Inc., 12/21CPD-61955•The printer can only connect to a network that supports 2.4GHz connections. If your router offers both 2.4 GHz and 5 GHz connections, make sure 2.4 GHz is enabled.•If you see a firewall alert message, click Unblock or Allow to let setup continue.•If your network has security enabled, make sure you enter yournetwork password (WEP key or WPA passphrase) correctly. Be sure to enter your password in the correct case.•Print a network connection report to identify network problemsand solutions. See your online User’s Guide for instructions.There are lines or incorrect colors in my printouts.Run a nozzle check to see if there are any gaps in the printout. Then clean the print head, if necessary. See the online User’s Guide for more information.The product’s screen is dark.Make sure your product is turned on, and press any button to wake it from sleep mode.Setup is unable to find my product after connecting it with a USB cable.Make sure your product is on and the USB cable is securely connected.Any questions?User’s GuideWindows: Click the icon on your desktop or Apps screen to access the online User’s Guide .Mac: Click the icon in Applications/Epson Software/Guide to access the online User’s Guide.If you don’t have a User’s Guide icon, go to the Epson website, as described in “Technical support.”VideosVisit /support/et3843videos (U.S.) or http://epson.ca/support/et3843videos (Canada) to view support videos.Technical supportVisit /support/et3843 (U.S.) orhttp://epson.ca/support/et3843 (Canada) to download drivers, view manuals, get FAQs, or contact Epson.Call (562) 276-4382 (U.S.) or (905) 709-3839 (Canada), 7 am to 4 pm , Pacific Time, Monday through Friday. Days and hours of support are subject to change without notice. Toll or long distance charges may apply.RecyclingEpson offers a recycling program for end-of-life hardware and ink bottles. Please go to /recycle (U.S.) or http://epson.ca/recycle (Canada) for information on how to return your products for proper disposal.Need paper and ink?Ensure brilliant results with Epson specialty and plain papers, engineered specifically for Epson printers. Find Epson papers and Epson Genuine ink at (U.S. sales) or http://epson.ca (Canadian sales) and at Epson authorized resellers. Call 800-GO-EPSON (800-463-7766).ET-3843 replacement inks。
爱普生(EPSON)针式打印机恢复出厂设置及清EEPROM及其它面板操作速查指南手册

清EEPROM及其它面板操作速查针打LQ-300k+换行/换页+进纸/退纸+暂停+电源LX-300+换行/换页+进纸/退纸+暂停+电源LQ-580K:换行/换页+进退纸+暂停+电源.LQ-630K:清EEPROM:换行/换页+进退纸+暂停+电源.设置:进纸/退纸+ 暂停 + 电源键盘锁定:换行/换页+ 暂停+ 5秒以上,响二声。
解锁:进纸/退纸+ 换行/换页+on.LQ-670K:高速+切纸+电源LQ-680K :换行/换页+进纸/退纸+暂停+电源LQ-1600K3/K3+,2600K字体+切纸+电源LQ-1600K4/K4+字体+切纸+电源LQ-2600K字体+ 切纸+ 电源DLQ-1000K:Line Feed + Form Feed + Micro Adjust↓+ 电源DLQ-3000K:清EEPROM:Selec Type + Paper Select + Pause +电源DLQ-3500K:LF/FF + Load/Eject + Pause + 电源喷墨COLOR切换 + 字体 + 进/退纸 + 暂停+电源COLOR II切换+暂停+进纸+彩清洗+电源COLOR 300进纸+清洗+电源,再按清洗10秒COLOR 400/440/460进纸灯闪几秒后,按1、进/退纸清EEPROM2、清洗10秒,清废墨计数器COLOR 500进纸 + 黑头清洗 + 彩头清洗 + on ,再按进纸键3秒COLOR 600/640/66O/670进纸+清洗+电源缺纸灯闪5秒后,再按1、进/退纸清EEPROM及timer IC2、清洗10秒,清废墨计数器COLOR 800/850初始化:进纸+黑头清洗+彩头清洗+ON,松手再按彩头清洗10秒COLOR 1520K切换+进/退纸+换行/换页+微调↑+ 电源COLOR 3000暂停 + 换行/换页 + 微调↓ + 电源SP870/1270进/退纸 + 清洗 + on 然后按1、/退纸清EEPROM及timer IC2、清洗10秒,清废墨计数器SP 950:Paper + Roll paper + on 1. Paper (EEPROM)SP 2100/2200Paper + Roll paper + on 1. Paper (EEPROM)MJ-510进/退纸 + 清洗 + on 松手后再按进/退纸10秒至进纸灯和缺墨灯闪MJ-850切换 + 暂停 + 电源, 再按进/退纸至省墨灯与暂停灯闪烁再按切换MJ-1000切换 + 省墨/压缩 + 进/退纸 + 暂停 + 电源MJ-1500K/K+切换+微调↓+暂停+换行/换页+ON激光机EPL-5600:Item+1+Continue+On Line+开机EPL-5700:按切换键+操作继续键+联机键+开机EPL-5700L:操作同EPL-1220(参见1220图示)EPL-5800:按切换键+操作继续键+联机键+开机EPL-5800L:驱动 + 属性→可选设定值Alt + Ctrl + Shift + W + 鼠标左键EPL-5900&EPL-6100:按住Start/Stop + Job Cancel + Information + 电源,直到联机和错误指示灯同时亮.EPL-5900L&EPL-6100L:1、计算机中选择打印机“属性”中的“可选设定值”项;2、时按住键盘的ALT+CTRL+SHIFT+“W”键,然后用鼠标点击屏幕中“可选设定值”项的任意空白区域,参考EPL-1220图示;3、屏幕出现是否进行EEPROM初始化的对话框,选择“YES“,操作完成。
- 1、下载文档前请自行甄别文档内容的完整性,平台不提供额外的编辑、内容补充、找答案等附加服务。
- 2、"仅部分预览"的文档,不可在线预览部分如存在完整性等问题,可反馈申请退款(可完整预览的文档不适用该条件!)。
- 3、如文档侵犯您的权益,请联系客服反馈,我们会尽快为您处理(人工客服工作时间:9:00-18:30)。
EPSON PLQ-20K打印机设置方法将打印机与计算机的右上角的USB端口连接,如图示
择“开始->设置->打印机和传真”,在空白处单击右键,选择“服务器属性”
在“打印服务器属性”窗口“所有格式”中找到“A4”,单击“创建新格式”单选框,单击后,“表格名”变为可编辑状态。
给表格命名为“A4 OUOM”,修改“打印机区域边距”“顶端”参数,设置为0.20cm。
按“保存格式”按钮保存。
在EPSON PLQ-20K打印机上单击右键,选择“属性”菜单。
在“常规”页上按“打印首选项”按钮。
在“打印首选项”窗口中按“高级…”按钮。
在“高级选项”窗口->“纸张/输出”选项中选择刚刚新建的“A4 OUOM”格式。
保存以上设置。
选择打印机属性“设备设置”页,设置“按送纸器格式指派”->“手动送纸”选项,选择刚刚新建的“A4 OUOM”格式。
保存设置。
重启售电程序,补打购电证,户号:M/6094391。