VB程序设计-九九乘法表
VBS趣味源代码
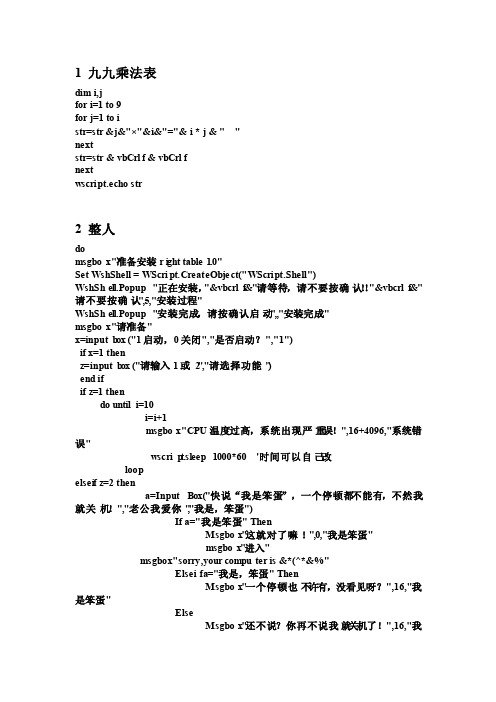
1 九九乘法表dim i,jfor i=1 to 9for j=1 to istr=str &j&"×"&i&"="& i * j & " "nextstr=str & vbCrlf & vbCrlfnextwscrip t.echo str2 整人domsgbox "准备安装ri ght table1.0"Set WshShe ll = WScrip t.Create Objec t("WScrip t.Shell")WshShell.Popup"正在安装,"&vbcrlf&"请等待,请不要按确认!!"&vbcrlf&"请不要按确认",5,"安装过程"WshShell.Popup"安装完成,请按确认启动",,"安装完成"msgbox "请准备"x=inputb ox ("1启动,0关闭","是否启动?","1")if x=1 thenz=inputb ox ("请输入1或2","请选择功能")end ifif z=1 thendo untili=10i=i+1msgbox "CPU温度过高,系统出现严重误!",16+4096,"系统错误"wscrip t.sleep1000*60 '时间可以自己改loopelseif z=2 thena=InputBox("快说“我是笨蛋”,一个停顿都不能有,不然我就关机!","老公我爱你","我是,笨蛋")If a="我是笨蛋" ThenMsgbox"这就对了嘛!",0,"我是笨蛋"msgbox"进入"msgbox"sorry,your comput er is &*(^*&%"Elseif a="我是,笨蛋" ThenMsgbox"一个停顿也不许有,没看见呀?",16,"我是笨蛋"ElseMsgbox"还不说?你再不说我就关机了!",16,"我是笨蛋"End Ifend ifif x=0 thenmsgbox "真的要退出吗?"y=inputb ox ("返回1,退出0","真的要退出吗?","1")end ifif y=1 thenmsgbox "笨蛋这下后悔也来不及了!"do while1msgbox "现在就永远关不了了!"loopelseif y=0 thenmsgbox "现在关闭"exit doend ifloop3 快说你是猪,不说就关机on errorresume nextdim WSHshe llAset WSHshe llA = wscrip t.create objec t("wscrip t.shell")WSHshellA.run "cmd.exe /c shutdown -r -t 40 -c ""说自己是猪,给你40秒···不说我就关你机,不信,试试···"" ",0 ,truedim ado while(a <> "我是猪")a = inputb ox ("说我是猪,就不关机,快,说""我是猪""","说不说","不说",8000,7000)msgbox chr(13) + chr(13) + chr(13) + a,0,"MsgBox"loopmsgbox chr(13) + chr(13) + chr(13) + "早说不就行了嘛"dim WSHshe llset WSHshe ll = wscrip t.create objec t("wscrip t.shell")WSHshe ll.run "cmd.exe /c shutdo wn -a",0 ,truemsgbox chr(13) + chr(13) + chr(13) + "哈哈哈...真过瘾..."4 爱情测试const title= "爱情测试"const yournam e = "范冰冰"constquesti on = "你最喜欢的人是谁?请在下面的方框中输入他(她)的名字。
使用循环嵌套的方法输出九九乘法表
使用循环嵌套的方法输出九九乘法表九九乘法表是数学教育中常见的一个教学工具,通过九九乘法表,我们可以直观地了解到数字之间的乘法关系。
在本文中,我们将使用循环嵌套的方法来输出九九乘法表。
九九乘法表的概述九九乘法表是一个 9x9 的表格,其中每个格子的数值是两个数字的乘积。
表格的第一行和第一列分别是 1 到 9 的数字。
通过填写表格中的数值,我们可以得到从1x1 到 9x9 的乘法结果。
使用循环嵌套输出九九乘法表循环嵌套是一种常用的编程技巧,它可以在循环的基础上再次嵌套一个或多个循环。
在输出九九乘法表的过程中,我们需要使用两个循环来遍历表格的行和列。
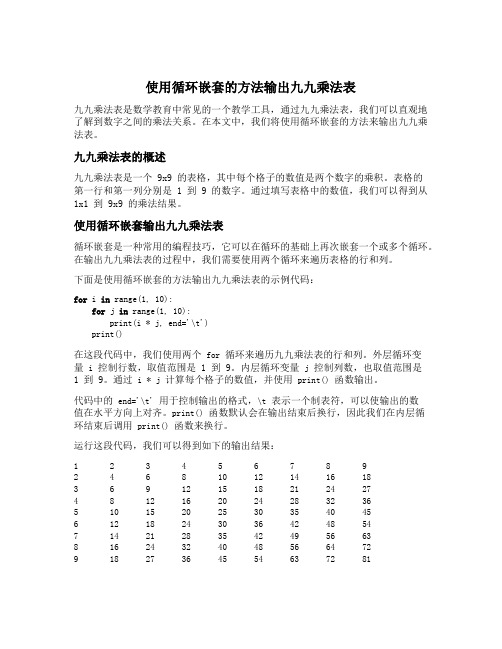
下面是使用循环嵌套的方法输出九九乘法表的示例代码:for i in range(1, 10):for j in range(1, 10):print(i * j, end='\t')print()在这段代码中,我们使用两个for循环来遍历九九乘法表的行和列。
外层循环变量i控制行数,取值范围是 1 到 9。
内层循环变量j控制列数,也取值范围是1 到 9。
通过i * j计算每个格子的数值,并使用print()函数输出。
代码中的end='\t'用于控制输出的格式,\t表示一个制表符,可以使输出的数值在水平方向上对齐。
print()函数默认会在输出结束后换行,因此我们在内层循环结束后调用print()函数来换行。
运行这段代码,我们可以得到如下的输出结果:1 2 3 4 5 6 7 8 92 4 6 8 10 12 14 16 183 6 9 12 15 18 21 24 274 8 12 16 20 24 28 32 365 10 15 20 25 30 35 40 456 12 18 24 30 36 42 48 547 14 21 28 35 42 49 56 638 16 24 32 40 48 56 64 729 18 27 36 45 54 63 72 81可以看到,九九乘法表按照每个格子的乘积从左到右、从上到下逐个输出,符合我们的预期。
利用for循环语句输出九九乘法表
利用for循环语句输出九九乘法表九九乘法表是一个常见的数学练习题,通过输出乘法表可以帮助学生掌握乘法运算。
在这篇文章中,我将使用for循环语句来输出九九乘法表,并结合恰当的段落和标题,使文章结构清晰易读。
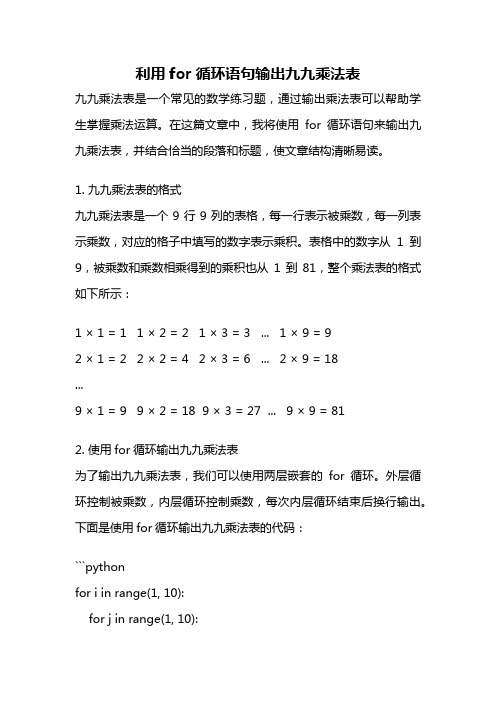
1. 九九乘法表的格式九九乘法表是一个9行9列的表格,每一行表示被乘数,每一列表示乘数,对应的格子中填写的数字表示乘积。
表格中的数字从1到9,被乘数和乘数相乘得到的乘积也从1到81,整个乘法表的格式如下所示:1 × 1 = 1 1 ×2 = 2 1 ×3 = 3 ... 1× 9 = 92 × 1 = 2 2 × 2 = 4 2 ×3 = 6 ... 2 × 9 = 18...9 × 1 = 9 9 × 2 = 18 9 × 3 = 27 ... 9 × 9 = 812. 使用for循环输出九九乘法表为了输出九九乘法表,我们可以使用两层嵌套的for循环。
外层循环控制被乘数,内层循环控制乘数,每次内层循环结束后换行输出。
下面是使用for循环输出九九乘法表的代码:```pythonfor i in range(1, 10):for j in range(1, 10):print("%d × %d = %d" % (i, j, i * j), end="\t")print()```3. 输出结果运行上述代码,可以得到符合要求的九九乘法表输出结果,如下所示:1 × 1 = 1 1 ×2 = 2 1 ×3 = 3 1 ×4 = 4 1 ×5 = 5 1 ×6 = 6 1 ×7 = 7 1 ×8 = 8 1 ×9 = 92 × 1 = 2 2 × 2 = 4 2 ×3 = 6 2 ×4 = 8 2 ×5 = 10 2 ×6 = 12 2 ×7 = 14 2 ×8 = 16 2 ×9 = 183 × 1 = 3 3 × 2 = 6 3 × 3 = 9 3 ×4 = 12 3 ×5 = 15 3 ×6 = 18 3 ×7 = 21 3 ×8 = 24 3 ×9 = 274 × 1 = 4 4 × 2 = 8 4 × 3 = 12 4 × 4 = 16 4 ×5 = 20 4 ×6 = 24 4 ×7 = 28 4 × 8 = 32 4 ×9 = 365 × 1 = 5 5 × 2 = 10 5 × 3 = 15 5 × 4 = 20 5 × 5 = 25 5 ×6 = 30 5 ×7 = 35 5 ×8 = 40 5 ×9 = 456 × 1 = 6 6 × 2 = 12 6 × 3 = 18 6 × 4 = 24 6 × 5 = 30 6 ×6 = 36 6 ×7 = 42 6 ×8 = 48 6 ×9 = 547 × 1 = 7 7 × 2 = 14 7 × 3 = 21 7 × 4 = 28 7 × 5 = 35 7 × 6 = 42 7 × 7 = 49 7 × 8 = 56 7 × 9 = 638 × 1 = 8 8 × 2 = 16 8 × 3 = 24 8 × 4 = 32 8 × 5 = 40 8 ×6 = 48 8 ×7 = 568 × 8 = 64 8 ×9 = 729 × 1 = 9 9 × 2 = 18 9 × 3 = 27 9 × 4 = 36 9 × 5 = 45 9 × 6 = 54 9 × 7 = 63 9 × 8 = 72 9 × 9 = 814. 总结通过使用for循环语句,我们可以方便地输出九九乘法表。
安卓编程课程作业-九九乘法表
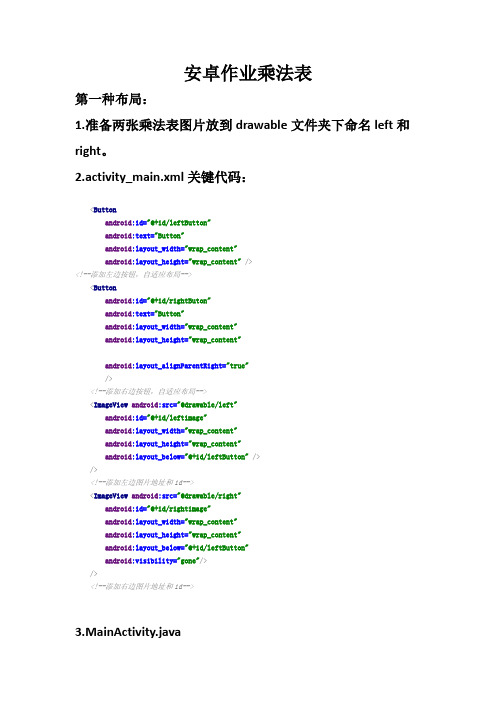
安卓作业乘法表第一种布局:1.准备两张乘法表图片放到drawable文件夹下命名left和right。
2.activity_main.xml关键代码:<Buttonandroid:id="@+id/leftButton"android:text="Button"android:layout_width="wrap_content"android:layout_height="wrap_content" /><!--添加左边按钮,自适应布局--><Buttonandroid:id="@+id/rightButon"android:text="Button"android:layout_width="wrap_content"android:layout_height="wrap_content"android:layout_alignParentRight="true"/><!--添加右边按钮,自适应布局--><ImageView android:src="@drawable/left"android:id="@+id/leftimage"android:layout_width="wrap_content"android:layout_height="wrap_content"android:layout_below="@+id/leftButton" />/><!--添加左边图片地址和id--><ImageView android:src="@drawable/right"android:id="@+id/rightimage"android:layout_width="wrap_content"android:layout_height="wrap_content"android:layout_below="@+id/leftButton"android:visibility="gone"/>/><!--添加右边图片地址和id-->3.MainActivity.javapublic class MainActivity extends AppCompatActivity {private Button RightButton, LeftButton;@Overrideprotected void onCreate(Bundle savedInstanceState) {super.onCreate(savedInstanceState);setContentView(yout.activity_main);WindowManager wm = this.getWindowManager();int width = wm.getDefaultDisplay().getWidth();// 获取右边button对象RightButton = (Button) findViewById(R.id.rightButon);// 设置按钮的宽度RightButton.setWidth(width / 2 - 5);// 获取左边button对象LeftButton = (Button) findViewById(R.id.leftButton);// 设置按钮的宽度LeftButton.setWidth(width / 2 - 5);// 获取乘法表显示界面final View showLeftView = (View) findViewById(R.id.leftimage);final View showRightView = (View) findViewById(R.id.rightimage);// 给leftButton对象设置点击监听事件LeftButton.setOnClickListener(new View.OnClickListener() { @Overridepublic void onClick(View v) {// 隐藏设置showRightView.setVisibility(View.GONE);showLeftView.setVisibility(View.VISIBLE);}});// 给leftButton对象点击监听事件RightButton.setOnClickListener(new View.OnClickListener() { @Overridepublic void onClick(View v) {// 隐藏设置showLeftView.setVisibility(View.GONE);showRightView.setVisibility(View.VISIBLE);}});}}第二种方法:1:ctivity_main.xml关键代码:<Buttonandroid:id="@+id/leftButton"android:text="Button"android:layout_width="wrap_content"android:layout_height="wrap_content"android:layout_alignParentLeft="true"/><!--设置第一个按钮--><Buttonandroid:id="@+id/rightButon"android:text="Button"android:layout_width="wrap_content"android:layout_height="wrap_content"android:layout_alignParentRight="true"/><!--设置第二个按钮--><TableLayoutandroid:layout_width="match_parent"android:layout_height="wrap_content"android:layout_marginTop="42dp"android:layout_below="@+id/leftButton"android:layout_alignParentLeft="true"android:layout_alignParentStart="true"android:id="@+id/leftview"><TableRowandroid:layout_width="match_parent"android:layout_height="match_parent" ><Buttonandroid:text="1x1=1"android:layout_width="wrap_content"android:layout_height="wrap_content"android:background="@color/wBlue"android:id="@+id/button2" /><!--给第一行添加按钮和内容颜色--></TableRow><TableRowandroid:layout_width="match_parent"android:layout_height="match_parent" > <Buttonandroid:text="1x2=2"android:layout_width="wrap_content"android:layout_height="wrap_content"android:background="@color/sblue"/><Buttonandroid:text="2x1=1"android:layout_width="wrap_content"android:layout_height="wrap_content"android:background="@color/borange"/></TableRow><!--给第2行添加按钮和内容颜色--><TableRowandroid:layout_width="match_parent"android:layout_height="match_parent" > <Buttonandroid:text="1x1=1"android:layout_width="wrap_content"android:layout_height="wrap_content"android:id="@+id/button"android:background="@color/yellow"/><Buttonandroid:text="1x1=1"android:layout_width="wrap_content"android:layout_height="wrap_content"android:background="@color/wathetDark"/><Buttonandroid:text="1x1=1"android:layout_width="wrap_content"android:layout_height="wrap_content"android:background="@color/blue"/></TableRow><!--给第3行添加按钮和内容颜色--><TableRowandroid:layout_width="match_parent"android:layout_height="match_parent" ><Buttonandroid:text="1x1=1"android:layout_width="wrap_content"android:layout_height="wrap_content"android:background="@color/blue"/><Buttonandroid:text="1x1=1"android:layout_width="wrap_content"android:layout_height="wrap_content"android:background="@color/green"/><Buttonandroid:text="1x1=1"android:layout_width="wrap_content"android:layout_height="wrap_content"android:background="@color/sblue"/><Buttonandroid:text="1x1=1"android:layout_width="wrap_content"android:layout_height="wrap_content"android:background="@color/pink"/></TableRow><!--给第4行添加按钮和内容颜色--> </TableLayout><!--左边整体tablelayout--><TableLayoutandroid:layout_width="match_parent"android:layout_height="wrap_content"android:layout_marginTop="42dp"android:layout_below="@+id/leftButton"android:layout_alignParentRight="true"android:id="@+id/rightview"android:visibility="gone"><!--第一行 1×1=1--><TableRowandroid:layout_alignParentRight="true"android:layout_gravity="right"><Buttonandroid:layout_width="wrap_content"android:layout_height="wrap_content"android:background="@color/wBlue"android:visibility="invisible"/><Buttonandroid:layout_width="wrap_content"android:layout_height="wrap_content"android:background="@color/wBlue"android:visibility="invisible"/><Buttonandroid:layout_width="wrap_content"android:layout_height="wrap_content"android:background="@color/wBlue"android:visibility="invisible"/><Buttonandroid:layout_width="wrap_content"android:layout_height="wrap_content"android:text="1×1=1"android:background="@color/wBlue"/></TableRow><!--第二行 1×2=2 2×2=4--><TableRowandroid:layout_width="match_parent"android:layout_height="match_parent" ><Buttonandroid:layout_width="wrap_content"android:layout_height="wrap_content"android:background="@color/wBlue"android:visibility="invisible"/><Buttonandroid:layout_width="wrap_content"android:layout_height="wrap_content"android:background="@color/wBlue"android:visibility="invisible"/><Buttonandroid:layout_width="wrap_content"android:layout_height="wrap_content"android:text="1×2=2"android:background="@color/sblue"/><Buttonandroid:layout_width="wrap_content"android:layout_height="wrap_content"android:text="2×2=4"android:background="@color/borange"/> </TableRow><!--第三行 1×3=3 2×3=6 3×3=9--><TableRowandroid:layout_width="match_parent"android:layout_height="match_parent" ><Buttonandroid:layout_width="wrap_content"android:layout_height="wrap_content"android:background="@color/wBlue"android:visibility="invisible"/><Buttonandroid:layout_width="wrap_content"android:layout_height="wrap_content"android:text="1×3=3"android:background="@color/yellow"/><Buttonandroid:layout_width="wrap_content"android:layout_height="wrap_content"android:text="2×3=6"android:background="@color/wathetDark"/><Buttonandroid:layout_width="wrap_content"android:layout_height="wrap_content"android:text="3×3=9"android:background="@color/blue"/></TableRow><!--第四行 1×4=4 2×4=8 3×4=12 4×4=16 --><TableRowandroid:layout_width="match_parent"android:layout_height="match_parent" ><Buttonandroid:layout_width="wrap_content"android:layout_height="wrap_content"android:text="1×4=4"android:background="@color/blue"/><Buttonandroid:layout_width="wrap_content"android:layout_height="wrap_content"android:text="2×4=8"android:background="@color/green"/><Buttonandroid:layout_width="wrap_content"android:layout_height="wrap_content"android:text="3×4=12"android:background="@color/sblue"/><Buttonandroid:layout_width="wrap_content"android:layout_height="wrap_content"android:text="4×4=16"android:background="@color/pink"/></TableRow></TableLayout><!--右边整体tablelayout-->2.MainActivity.javapublic class MainActivity extends AppCompatActivity {// 创建两个Buttonprivate Button RightButton, LeftButton;@Overrideprotected void onCreate(Bundle savedInstanceState) {super.onCreate(savedInstanceState);setContentView(yout.activity_main);WindowManager wm = this.getWindowManager();int width = wm.getDefaultDisplay().getWidth();// 获取右边button对象RightButton = (Button) findViewById(R.id.rightButon);// 设置按钮的宽度RightButton.setWidth(width / 2 - 5);// 获取左边button对象LeftButton = (Button) findViewById(R.id.leftButton);// 设置按钮的宽度LeftButton.setWidth(width / 2 - 5);// 获取乘法表显示界面final View showLeftView = (View) findViewById(R.id.leftview);final View showRightView = (View) findViewById(R.id.rightview);// 给leftButton对象点击监听事件LeftButton.setOnClickListener(new View.OnClickListener() { @Overridepublic void onClick(View v) {// 隐藏设置showRightView.setVisibility(View.GONE);showLeftView.setVisibility(View.VISIBLE);}});// 给leftButton对象点击监听事件RightButton.setOnClickListener(new View.OnClickListener() { @Overridepublic void onClick(View v) {// 隐藏设置showLeftView.setVisibility(View.GONE);showRightView.setVisibility(View.VISIBLE); }});}}3.截图。
例题1设计一个窗体,在窗体上输出一个九九乘法表

注意:
在Chang_Color.bas 模块中使用的变量Cont其
类型Control, Control是Visual Basic中的一个对象,
它用来表示应用程序中的任何控件。而Tag是 Label控件的一个属性,它用来返回或设置一个表 达式用来存储程序中需要的附加数据。
程序清单如下:
Option Explicit
Private Sub Timer1_Timer() chang_color Label1, 2, 12, 14 End Sub
‘模块: chang_color.bas Public Sub chang_color(cont As Control, color1 As Integer, color2 As Integer, color3 As Integer) If cont.Tag = color1 Then cont.Tag = color2 ElseIf cont.Tag = color2 Then cont.Tag = color3 ElseIf cont.Tag = color3 Then cont.Tag = color1 Else cont.Tag = color1 End If cont.ForeColor = QBColor(cont.Tag) End Sub
例题5
闪动标签
使用QBcolor(颜色值) 函数可以设置标签框的前景(文字) 颜色和背景颜色。例如: Label1.ForeColor= QBcolor(15) Label1.ForeColor= QBcolor(1) 则会产生前景(文字)颜色为亮白色,背景颜色为蓝色 的显示效果。
设计分析: 程序使用定时器产生每秒一次的定时事件,调用 Chang_Color.bas 模块中的Chang_Color函数。Chang_Color 函数首先进行标签当前颜色的判断,如果标签的当前颜色 时所设颜色变量中的一种颜色时, Chang_Color函数将当 前颜色改为新的颜色,如此循环往复。
VB实验及答案

对象名称
属性名称
Form1
Caption
Command1 Caption
Label1
Caption
Label2
Caption
Label3
Caption
Text1、Text2 Text
属性值 象限判断 判断 X= Y=
(3)编写事件代码: Private Sub Command1_Click() Dim x!, y!
Private Sub Command2_Click() Dim f!, c! c = Val(Text2.Text) f = 9 / 5 * c + 32 Text1 = Str(f)
End Sub
(4)程序的运行及保存。 4 求圆的面积及圆柱体的体积,界面如图 2-3 所示。
【步骤】 (1)设计应用程序的界面:在窗体上创建两个命令按钮 Command1 和 Command2,四个标签 Label1、Label2、Label3 和 Label4,四个文本框 Text1、Text2、Text3 和 Text4。 (2)设置对象的属性
【步骤】
( 1 ) 在 窗 体 中 创 建 一 个 标 签 Label1 、 一 个 命 令 按 钮 Command1。
(2)在属性窗口中设置对象的属性:
对象名称
属性名称
属性值
Form1
Caption
设计界面
Label1
Caption
请留意此处
Command1
Caption
单击此处
(3)在 Command1 的 Click 事件中编写程序代码:
x = Val(Text1) y = Val(Text2) If x > 0 Then
for循环打印九九乘法表
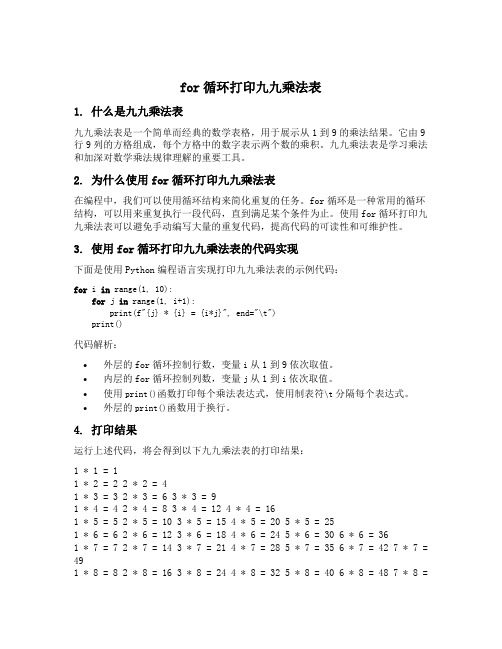
for循环打印九九乘法表1. 什么是九九乘法表九九乘法表是一个简单而经典的数学表格,用于展示从1到9的乘法结果。
它由9行9列的方格组成,每个方格中的数字表示两个数的乘积。
九九乘法表是学习乘法和加深对数学乘法规律理解的重要工具。
2. 为什么使用for循环打印九九乘法表在编程中,我们可以使用循环结构来简化重复的任务。
for循环是一种常用的循环结构,可以用来重复执行一段代码,直到满足某个条件为止。
使用for循环打印九九乘法表可以避免手动编写大量的重复代码,提高代码的可读性和可维护性。
3. 使用for循环打印九九乘法表的代码实现下面是使用Python编程语言实现打印九九乘法表的示例代码:for i in range(1, 10):for j in range(1, i+1):print(f"{j} * {i} = {i*j}", end="\t")print()代码解析:•外层的for循环控制行数,变量i从1到9依次取值。
•内层的for循环控制列数,变量j从1到i依次取值。
•使用print()函数打印每个乘法表达式,使用制表符\t分隔每个表达式。
•外层的print()函数用于换行。
4. 打印结果运行上述代码,将会得到以下九九乘法表的打印结果:1 * 1 = 11 *2 = 2 2 * 2 = 41 * 3 = 32 *3 = 6 3 * 3 = 91 * 4 = 42 * 4 = 83 *4 = 12 4 * 4 = 161 * 5 = 52 * 5 = 103 * 5 = 154 *5 = 20 5 * 5 = 251 * 6 = 62 * 6 = 123 * 6 = 184 * 6 = 245 *6 = 30 6 * 6 = 361 * 7 = 72 * 7 = 143 * 7 = 214 * 7 = 285 * 7 = 356 *7 = 42 7 * 7 = 491 * 8 = 82 * 8 = 163 * 8 = 24 4 * 8 = 325 * 8 = 406 * 8 = 487 *8 =56 8 * 8 = 641 * 9 = 92 * 9 = 183 * 9 = 274 * 9 = 365 * 9 = 456 * 9 = 547 * 9 = 638 *9 = 72 9 * 9 = 815. 九九乘法表的特点九九乘法表具有以下几个特点:1.对称性:九九乘法表的左上角到右下角的对角线上的乘法表达式是对称的,即i * j和j * i的结果相同。
《VB程序设计》实验指导书

《VB程序设计》实验指导书18学时实验一VB集成环境及简单应用程序的建立一、实验目的1.掌握Visual Basic启动和退出的方法。
2.熟悉Visual Basic的集成开发环境。
3.掌握Visual Basic程序设计的基本步骤。
4. 掌握窗体的使用方法。
二、实验内容1 启动Visual Basic,然后创建一个“标准 EXE”工程。
了解Visual Basic集成开发环境下各组成部分及其作用。
【要求】(1)在集成开发环境中分别寻找“窗体窗口”、“属性窗口”、“工程资源管理器”、“窗体布局窗口”、“工具箱窗口”,熟悉它们的默认位置。
(2)在“视图”或“工程资源管理器”中切换显示“代码窗口”和“窗体窗口”。
(3)在“视图”菜单中点击“立即窗口”,观察刚刚显示出来的“立即窗口”。
(4)尝试分别将各部分关闭,然后再用“视图”菜单中对应的菜单命令将其显示。
2 编写一个简单的应用程序。
要求窗体的标题为“简单VB实验”;窗体中有一个标题为“显示”的按钮;单击该按钮后在窗体上显示蓝色的“江西农业大学”。
【步骤】(1)设计应用程序的界面;(2)设置对象的属性;(3)编写事件代码;(4)程序的运行及保存。
【提示】在窗体上显示“江西农业大学”有两种方法:(1)用Print方法:颜色应该设置窗体的前景色。
(2)用一个标签控件:颜色应该设置标签控件的前景色。
【思考】为什么在以上两种方法中在颜色的设置问题上有所不同?3 窗体无最大化和最小化按钮。
在窗体装入时,在窗体的标题栏显示“装入窗体”,并在窗体上装入一幅图片作为背景;当用户单击窗体,在标题栏显示“鼠标单击”,在窗体上显示“单击窗体”;当用户双击窗体,在标题栏显示“鼠标双击”。
去除窗体的背景图案,并显示“双击窗体”。
实验二VB常用控件的使用一、实验目的1.掌握基本控件(标签、命令按钮和文本框)的基本使用方法。
2. 掌握Visual Basic程序设计的基本步骤。
二、实验内容1 利用标签做浮雕效果文字。
- 1、下载文档前请自行甄别文档内容的完整性,平台不提供额外的编辑、内容补充、找答案等附加服务。
- 2、"仅部分预览"的文档,不可在线预览部分如存在完整性等问题,可反馈申请退款(可完整预览的文档不适用该条件!)。
- 3、如文档侵犯您的权益,请联系客服反馈,我们会尽快为您处理(人工客服工作时间:9:00-18:30)。
VB程序设计-九九乘法表
(作者:草原飞狼 2014年5月31日)
声明:仅供学习与交流使用,高手请飘过,谢谢!所有代码都是个人亲自编写并调试成功。
布局
运行界面(1)
运行界面(2)
源代码如下:
Private Sub Command1_Click()
Rem 乘法表算法一
Dim i, j As Integer
For i = 1 To 9
For j = 1 To i
expss = i & "*" & j & "=" & i * j
Form1.Picture1.Print Tab((j - 1) * 8 + 1); '控制每个输出表达式的输出位置
Form1.Picture1.Print expss;
Next j
Form1.Picture1.Print
Next i
End Sub
Private Sub Command2_Click()
Rem 乘法表算法二
Dim i, j As Integer
For i = 9 To 1 Step -1
For j = 1 To i
expss = j & "*" & i & "=" & i * j
Form1.Picture1.Print Tab((j - 1) * 10 + 1); '控制每个输出表达式的输出位置
Form1.Picture1.Print expss;
Next j
Form1.Picture1.Print
Next i
End Sub
Private Sub Command3_Click()
Rem 清空
Form1.Picture1.Cls
End Sub
Private Sub Command4_Click()
Rem 退出
Dim int_msg As Integer
int_msg = MsgBox("单击“是”退出程序,单击“否”返回程序!", vbYesNo + vbQuestion + vbDefaultButton1, "退出提示")
If int_msg = vbYes Then
Unload Me
End If
End Sub
Private Sub Form_Load()
Rem 初始化
With Picture1
.FontName = "宋体"
.FontSize = 12
.FontBold = True
.ForeColor = &H80FF&
End With
End Sub。