EQUES智能猫眼产品功能比较表-新款
130万像素更清晰,小维智能猫眼K2新品惊艳上市!
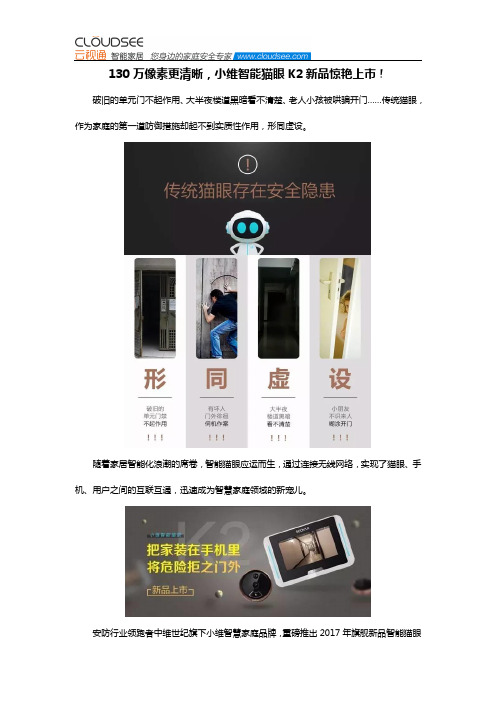
130万像素更清晰,小维智能猫眼K2新品惊艳上市!破旧的单元门不起作用、大半夜楼道黑暗看不清楚、老人小孩被哄骗开门……传统猫眼,作为家庭的第一道防御措施却起不到实质性作用,形同虚设。
随着家居智能化浪潮的席卷,智能猫眼应运而生,通过连接无线网络,实现了猫眼、手机、用户之间的互联互通,迅速成为智慧家庭领域的新宠儿。
安防行业领跑者中维世纪旗下小维智慧家庭品牌,重磅推出2017年旗舰新品智能猫眼K2,让你一手掌握家门安全,把危险拒之门外!老人、小孩再也不会为看不清、够不到而发愁了小维智能猫眼K2最大的优势就是“内外兼修”:门外有猫头,并带有门铃按键;室内有4.3寸高清显示屏,可即时显示门外画面。
无需趴在门上就能辨别来访者,在室内就可一览无余,省心又安心。
APP远程视频对讲,随时掌握门外任何风吹草动当你在小区里遛弯,远道而来的朋友突然登门“造访”,让他们在楼道苦等俩小时?或许这是以前的做法。
而现在,当你家的门铃被按响时,手机APP会自动接收到信息,实时显示来访人员面貌,并能实现双向语音对讲,就是这么简单!当你出差家里没人,不法分子在门外徘徊逗留,这种潜在的危险怎样扼杀在摇篮之中?智能猫眼K2可以自动捕捉徘徊在门口的可疑人员,并抓拍图片同步推送到手机APP,随时了解来访者信息,不放过门外任何可疑情况。
漆黑夜晚不用怕,超强红外夜视看得清小维智能猫眼K2拥有130万高清像素,猫头上面镶嵌了四颗led红外夜视灯,会根据光线的强弱自动开启。
即使在伸手不见五指的夜里,我们也可以毫不费力地看清门外一切,再也不会因半夜的门铃声而担惊受怕了。
可拆卸电池,让充电更自由既然是一款智能产品,耗电量也是大家比较关心的问题。
相比市面上同类产品耗电快、充电方式繁琐的使用体验,小维智能猫眼K2在这方面表现出色。
K2电池采用3000mAh 锂电池,可拆卸设计,并配备1个座充。
再也不会担心出去旅游,家里的猫眼“罢工”了!免施工,轻松完成安装安装难不难?只要我们原来的防盗门上有猫眼孔,简单四步即可轻松完成安装。
猫眼MSC-CY300码表中文说明书

感谢您购买 CATEYE Q3a Multi-Sport Computer 多功能运动手表。 Q3a 是一款附加有秒表功能的手表型心率监测器,能协助运动选手们更安全、 更科学地进行运动训练。 整合型踏频/速度传感器与心率传感器两者皆采用 2.4 GHz 频率数字无线技 术此种用于无线网络等日常设备的相同技术。此一技术可使计测不易受外部 信号干扰,能够记录和保存高信赖度的数据。 使用前请彻底阅读本份使用手册与熟悉手表的各项功能,并将手册妥为保存 以供未来参考之用。
继续 简体中文 -3
海拔高度与大气压力 之间关系. ........................................ 62 与天气和海拔高度 有关之知识. ................................... 62 心率训练..................................63 目标心率区. ................................... 63 比赛训练. ........................................ 66 目标区之运用. .............................. 67 故障排除..................................68 显示问题. ........................................ 68 操作问题. ........................................ 70 手表之防水性..........................71 从事水上和室外活动之前. ..... 71 更换电池..................................71 手表. .................................................. 72 心率传感器. ................................... 72 速度传感器. ................................... 72 维护. .........................................73 备用配件..................................73 画面操作之流程图. ..................74 规格. .........................................76 注册. .........................................78 有限保固..................................78 索引. .........................................79
猫眼cateye_velo8中文说明书
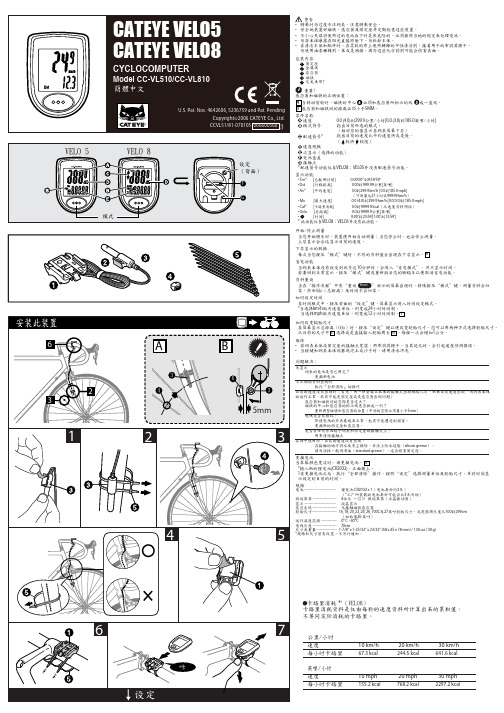
感应器和磁铁问的空隙是否过大? 磁铁的中心和感应器的标示线是否排成一列?
重新调整磁铁和感应器的位置(中间的空隙必须要小于5mm) 电线是否有损坏?
即使电线的外表看起来正常,也有可能遭受到损害。
更换新的固定座和感应器。
是否有任何东西粘于码表和固定座的接触点上? 用布清除接触点
在雨中使用时,目前的速度没有出现。 在接触的地方将水及灰尘擦除,并涂上防水硅脂(silicon grease)。
L (cm)
57-559 26 x 3.00 217
27 x 1
215
27 x 1-1/8 216
32-630 27 x 1-1/4 216
27 x 1-3/8 217
650 x 35A 209
650 x 38A 212
650 x 38B 211
18-622 700 x 18C 207
700 x 19C 208
10目前速度00402999kmh00301850mphvelo8velo5tmdstavmxcalodoclocktmdstavmxcalcmvelo169955016651501699691n169956016993021699307169930316993041699760有限保固重新設定重新設定重新設定重新設定cr2032模式模式模式模式模式模式模式模式模式模式模式模式模式模式模式模式模式模式模式时间电池托座感应组件锂电池cr2032重型金属线及托座感应组件中心固定托座组件长aero把手托座感应组件柄部固定托座组件复合轮子磁铁设定全部清除设定模式2个按键选择kmh或是mph设定设定结束选择kmh设定模式2630027118271142713865035a65038a65038b70018c70019c70020c70023c70025c70028c70030c70032c700ctubular70035c70038c70040c217215216216217209212211207208209210211214217216213217218220轮胎尺寸cm141501417516150161751815018175201752013822138221122434tubular24118241142417524200242125267826159261652612526118261382611226140261502617526195262002621026212526235102106119120134135152162177179175178179191189192196192191195195190207210200201202205206207207208轮胎尺寸cm轮子尺寸57559326301862220622236222562228622326223762240522etrto47305474064750723571375904055947559505595455957559设定结束设定轮胎尺寸轮胎尺寸设定结束快速设定尺寸详细设定尺寸设定标准磁铁资料重设时间设定重新设定设定时间设定结束设定设定设定设定设定2年保固
埃菲斯智能锁A500说明书
埃菲斯智能锁A500说明书1.初始状态1.1初始状态下管理员密码为“123456”;1.2初始状态需通过管理员密码,进入系统菜单增加用户才可正常开门。
注:“123456”为出厂默认的管理员密码,当注册管理员用户后,该密码会自动失效,下次进入系统菜单需要验证已经注册的管理员指纹或密码。
2.操作概述◆系统菜单:唤醒状态下按“*#”号键后可开始验证管理员用户,并进入系统菜单,支持指纹/密码验证,不支持刷卡进入系统菜单----管理员用户。
◆开门:直接刷卡/输入密码/指纹正常开门,不进入系统菜单----管理员/普通用户。
◆系统导航键:系统将播报数字对应的语音内容,通过选定数字来进入对应功能设置。
◆门铃键:在系统主界面按“门铃符号按键”触发门铃。
3.开锁用户管理与信息概述3.1用户信息包括:用户指纹信息(1个),用户密码信息(1个),用户刷卡信息(1个);用户ID号将对应用户权限等级信息。
3.2用户权限等级分为管理员用户,普通用户。
普通用户无法进行相关设置,只可验证身份开门;管理员用户除验证开门外,还可进入系统配置菜单。
3.3用户信息可创建,修改,删除;不能删除当前登录的管理员信息。
3.4开锁用户存储个数为100组,开锁记录信息为512个,此为门锁本地贮存的开锁日志,而云端开锁日志不限制个数。
注:密码不可重复设置,即用户A设置过的密码,用户B不可再重复使用。
4.密码开锁4.1有效密码位为最低不少于6位,最高不超过9位。
两个管理级别的密码,分为管理员密码,普通用户密码;4.2支持虚位密码,输入密码不超过12位,其中有连续的密码信息在其中,即可开锁。
4.3连续输入密码错误超过5次,门锁进入锁定状态180s。
5.指纹开锁5.1使用录入的手指触摸指纹头接触面,即可开锁;5.2胁迫指纹输入时,门锁也可打开,并推送信息给用户指定的手机(推送需定制联网);5.3连续录入指纹错误超过5次,门锁上报报警信息触发报警器。
6.刷卡开锁6.1使用录入的NFC卡即可开锁;6.2刷卡与指纹类似绑定于用户,可识别用户ID并上报;6.3响应时间1s以内。
可攜式投影機 V300X V260X V230X V260 V230 使用手冊说明书

型號
V300X/V260X/V230X/V260/V230
使用手冊
2011 年 1 月第一版
DLP 和 BrilliantColor 是 Texas Instruments (德州儀器有限公司)的商標。 IBM 爲 International Business Machines Corporation (國際商業機器公司)的商標或註冊商標。 Macintosh, Mac OS X 和 PowerBook 爲 Apple Inc. (蘋果公司)在美國和其他國家註冊的商標。 Microsoft、Windows、Windows Vista、Internet Explorer、 .NET Framework 和 PowerPoint 爲 Microsoft Corporation (微軟公司)在美國和/或其他國家的註冊商標或商標。 MicroSaver 爲 ACCO 品牌的一個分公司 Kensington Computer Products Group 的註冊商標。 Virtual Remote Tool (虛擬遙控工具)使用 WinI2C/DDC library, © Nicomsoft Ltd。 HDMI、HDMI 標誌和 High-Definition Multimedia Interface 爲 HDMI Licensing LLC.的商標或註冊商標。
切勿讓紙夾和紙屑等異物掉入投影機內。切勿試圖找回可能掉入投影機內的任何物品。切勿將鐵絲或者螺絲起子 等金屬物體插入投影機內。若發現有物體掉入投影機內部,須立即斷開電源,然後委託有維修資格的維修服務人 員取出物體。 切勿在投影機上面放置任何物體。 雷雨天不要觸摸電源插頭。此舉可能引起電擊或者火災。 投影機規定操作電源爲 200-240 伏特 50/60 赫茲交流電。在使用投影機之前,須確認所用電源是否符合本投影機 要求。 切勿在投影機啓動狀態下窺視鏡頭。此舉會導致眼睛嚴重受傷。
菲尔斯OLED+4KUHDAndroid TV - 保时感耳音有光四周P5 AI双图像引擎声音保时感
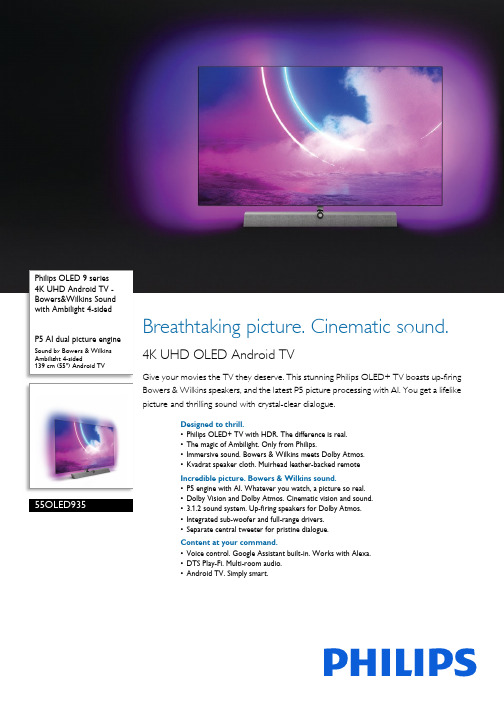
Philips OLED 9 series 4K UHD Android TV - Bowers&Wilkins Sound with Ambilight 4-sidedP5 AI dual picture engine Sound by Bowers & WilkinsAmbilight 4-sided139 cm (55") Android TV 55OLED935Breathtaking picture. Cinematic sound. 4K UHD OLED Android TVGive your movies the TV they deserve. This stunning Philips OLED+ TV boasts up-firing Bowers & Wilkins speakers, and the latest P5 picture processing with AI. You get a lifelike picture and thrilling sound with crystal-clear dialogue.Designed to thrill.•Philips OLED+ TV with HDR. The difference is real.•The magic of Ambilight. Only from Philips.•Immersive sound. Bowers & Wilkins meets Dolby Atmos.•Kvadrat speaker cloth. Muirhead leather-backed remoteIncredible picture. Bowers & Wilkins sound.•P5 engine with AI. Whatever you watch, a picture so real.•Dolby Vision and Dolby Atmos. Cinematic vision and sound.•3.1.2 sound system. Up-firing speakers for Dolby Atmos.•Integrated sub-woofer and full-range drivers.•Separate central tweeter for pristine dialogue.Content at your command.•Voice control. Google Assistant built-in. Works with Alexa.•DTS Play-Fi. Multi-room audio.•Android TV. Simply smart.HighlightsP5 engine with AIPhilips P5 processor with AI dual picture engine delivers a picture so real it feels like you could step right into it. A deep-learning AI algorithm processes images in a manner similar to the human brain. No matter what you're watching, you get lifelike detail and contrast, rich color, and smooth motion.Sound by Bowers & WilkinsAn exclusive speaker design by legendary audio engineers Bowers & Wilkins delivers thrillingly lifelike performance. Up-firing speakers let you get the most out of Dolby Atmos. A central tweeter keeps the dialogue pristine no matter how intense the drama gets.Ambilight 4-sidedWith Philips 4-sided Ambilight, every moment feels closer. Intelligent LEDs around the edgeof the TV respond to the on-screen action and emit an immersive glow that's simplycaptivating. Experience it once and wonder how you enjoyed TV without it.Philips OLED+ TVA Philips 4K UHD OLED+ TV is compatible with all major HDR formats. Whether it's a must-watch series or the latest video game, shadows will be deeper. Bright surfaces will shine. Colors will be truer. Motion is incredibly smooth.Tactile harmonyPremium materials make all the difference to your Philips TV. Kvadrat's acousticallytransparent wool-blend speaker fabric allows the sound to flow freely into the room. Responsibly sourced Muirhead leather and backlit keys add a sophisticated finish to the remote control.Voice assistantControl your Philips Android TV with your voice. Want to play a game, watch Netflix, or find content and apps in the Google Play store? Just tell your TV. You can even command all Google Assistant-compatible smart home devices, like dimming the lights and setting the thermostat on movie night. Without leaving the sofa. The days of searching for the TVremote are over. Now you can use your voice to control your Philips smart TV via Alexa-enabled devices, like Amazon Echo. Turn your TV on, change the channel, switch to your gaming console and more with Alexa.DTS Play-FiWith DTS Play-Fi on your Philips TV you can connect to compatible speakers in any room. Got wireless speakers in the kitchen? Listen to the movie while you make a snack, or keep up with the sports commentary while you get everyone a drink.Android TVYour Philips Android TV gives you the content you want-when you want it. You cancustomize the home screen to display your favorite apps, making it simple to startstreaming the movies and shows you love. Orpick up where you left off.Issue date 2022-10-25 Version: 6.0.112 NC: 8670 001 74981 EAN: 87 18863 02892 6© 2022 Koninklijke Philips N.V.All Rights reserved.Specifications are subject to change without notice. Trademarks are the property of Koninklijke Philips N.V. or their respective owners.SpecificationsAmbilight•Ambilight Version: 4-sided•Ambilight Features: Built in Ambilight+hue, Ambilight Music, Game Mode, Wall colour adaptive, Lounge mode, AmbiSleep, Sunrise Alarm Picture/Display•Display: 4K Ultra HD OLED•Panel resolution: 3840x2160•Aspect ratio: 16:9•Picture engine: P5 AI Perfect Picture Engine •Picture enhancement: Ultra Resolution, Wide Color Gamut 99% DCI/P3, Dolby Vision, Perfect Natural Motion, Super Resolution Supported Display Resolution •Computer inputs on all HDMI: up to 4K UHD 3840x2160 @60Hz, HDR supported, HDR10+/ HLG, HDR supported, HDR10/ HLG•Video inputs on all HDMI: up to 4K UHD3840x2160@60Hz, HDR supported, HDR10/HLG (Hybrid Log Gamma), HDR10+/Dolby Vision Android TV•OS: Android TV™ 9 (Pie)•Pre-installed apps: Google Play Movies*, Google Play Music*, Google Search, YouTube, BBC iplayer, Netflix, Amazon Prime Video•Memory size(Flash): 16GB*Smart TV Features•Program: Pause TV, USB recording*•Ease of Installation: Auto detect Philips devices, Device connection wizard, Network installation wizard, Settings assistant wizard•Ease of Use: One-stop smart menu button, Onscreen usermanual•Firmware upgradeable: Firmware auto upgrade wizard, Firmware upgradeable via USB, Online firmware upgrade•Screen Format Adjustments: Basic - Fill Screen, Fit to screen, Advance - Shift, Zoom, stretch, Wide screen•Remote Control: with Voice, with Key light •User Interaction: SimplyShare•Voice assistant*: Google Assistant built-in, RC with Mic., Works with AlexaProcessing•Processing Power: Quad Core Tuner/Reception/Transmission•HEVC support•Digital TV: DVB-T/T2•MPEG Support: MPEG2, MPEG4•Video Playback: PAL, SECAM•TV Program guide*: 8 day Electronic ProgramGuide•Signal strength indication•Teletext: 1000 page HypertextConnectivity•Number of HDMI connections: 4•Number of USBs: 2•Wireless connection: Bluetooth 4.2, Wi-Fi802.11ac, 2x2, Dual band•Other connections: Digital audio out (optical),Ethernet-LAN RJ-45, Headphone out•HDMI features: 4K, Audio Return Channel•EasyLink (HDMI-CEC): Remote control pass-through, System audio control, System standby,One touch play•HDCP 2.3: Yes on all HDMIMultimedia Applications•Video Playback Formats: Containers: AVI, MKV,H264/MPEG-4 AVC, MPEG-1, MPEG-2, MPEG-4,WMV9/VC1, VP9, HEVC (H.265)•Subtitles Formats Support: .SRT, .SUB, .TXT, .SMI•Music Playback Formats: AAC, MP3, WAV, WMA(v2 up to v9.2), WMA-PRO (v9 and v10)•Picture Playback Formats: JPEG, BMP, GIF, PNG,360 photo, HEIFPower•Mains power: AC 220 - 240 V 50/60Hz•Standby power consumption: <0.3W•Ambient temperature: 5 °C to 35 °C•Power Saving Features: Auto switch-off timer,Light sensor, Picture mute (for radio), Eco modeSound•Audio: Sound by Bowers & Wilkins, 3.1.2 Channel,Output power : 70 Watt (RMS)•Codec: AC-4, Dolby Atmos, Dolby Digital MS12V2.3, DTS-HD(M6)•Speaker configuration: 10W x2, 5W x1, woofer20W, height 12.5W x2•Sound Enhancement: 5 Band Equalizer, A.I. Sound,Clear Dialogue, Dolby Atmos, Dolby BassEnhancement, Dolby Volume Leveler, Night mode,Auto Volume Leveler, Bass EnhancementDimensions•Box dimensions(W x H x D):1400.0 x 953.0 x 174.0 mm•Set dimensions(W x H x D):1227.8 x 705.6 x 49.3 mm•Set dimensions with stand (W x H x D):1227.8 x 805.5 x 260.7 mm•Product weight: 21.0 kg•Product weight (+stand): 28.1 kg•Weight incl. Packaging: 32.7 kg•Wall mount compatible: 300 x 300 mmAccessories•Included Accessories: Legal and safety brochure,Power cord, Quick start guide (x1), Stand withsound solution, 2 x AAA Batteries, RemoteControlEU Energy card•Panel technology used: OLED*EPG and actual visibility (up to 8 days) is country and operatordependent.*Android App offerings vary per country. For more details please visityour local Google Play Store.*Philips TV Remote app and related functionalities vary per TV model,operator, and country, as well as smart device model and OS. Formore details please visit: /TVRemoteapp.*Smart TV app offerings vary per TV model and country. For moredetails please visit: /smarttv.*Its functionality is subject to ChromeCast built-in apps and smartdevises. For more details, please visit ChromeCast built-in productpages.*Memory size (Flash) : 16G, the actual available disc space may differ(dependant on e.g. (pre-)installed apps, installed operating system,etc.)*Image depicted on the website are non-contractual pictures. Pleasealways refer to the actual TV that are sold in the retail or stores.。
I-CUE 智能镜操作手册说明书

I-CUE INTELLIGENT MIRROR Operations ManualTable of ContentsProduct Overview pg1 Product Description pg 2 Operation pg 2 Unpacking the unit pg 3 Control and power cables pg 3 Connections pg 4 Mounting the unit pg 4 Operating the unit pg 6 Modes of Operation pg 7 Summary of Control pg 9 Troubleshooting pg 10 Technical overview pg 12 Technical specifications pg 13 Drawings pg 15 I-Cue Mirror and Broadway scroller combined pg 15 I-Cue Mirror used without a color scroller pg 15 I-Cue Intelligent Mirror Parts List pg 16 Product OverviewThe I-Cue Mirror is designed to give years of trouble free use, providing that it is r e g ularly maintained and is used in accordance with the instructions detailed in this manual. If you should experience any problems that fall outside of the scope of this manual, please contact the selling dealer for further details.If the selling dealer is unable to satisfy your servicing needs, please contact the following, for full factory service:ROTAD1330 30th StreetSuite GSan Diego CA, 92154Attn: Repair Department800-468-0114 x25Product DescriptionThe I-Cue Mirror is a motorized mirror attachment which mounts onto fixed position spotlights to achieve many of the effects traditionally only available with high priced intelligent moving lights The compact and stylish design is equally at home in a t h e atre, exhibition centre, shopping mall, or car showroom.The moving mirror accurately redirects a fixed position beam of light through a pan of 230˚ and a tilt of 57˚, making it a very cost-effective and space-saving option for illuminating multiple locations using just a single spotlight. As well as being compatible with most standard medium and narrow beam profile fixtures, the unit can also be used with a color scroller to provide moving color and daisy chained to other lantern accessories to combine moving light with dynamic color changing and gobo rotating effects.The I-Cue Mirror is designed to operate either on the USITT DMX512 (1990) protocol or in stand-alone mode.The DMX serial data system allows for the individual addressing of multiple units on one data cabling system. The unit is addressed by using the three push button switches and LED display.The unit equipped with a diagnostic section on the LED display showing Power, DMX signal and level presence.When operating in stand-alone mode, the I-Cue Mirror only requires a 24 VDC supply to operate.Note:The quantity of I-Cue Mirrors used and the maximum cable length per power supply output is dependent upon the size of PSU/splitter box used. Operation• Unpacking the Unit• Control and power cables• Connections• Mounting the unit• Operating the unit• Modes of operation•Troubleshooting•Technical overview•Technical specificationsUnpacking the unitThe I-Cue Mirror package comes with the following items:• I-Cue Mirror• Safety wire (supplied fitted)• User manualThe unit is shipped in a specially constructed shipping carton to provide protection to the unit. Carefully open the carton and remove the unit by grasping the support arm in the middle and lifting the unit vertically out of the carton. Next, carefully remove the rubber restraint band used to stabilize the mirror unit during shipment.Note:The packing material protects the fixture during shipment; always use it to transport the fixture.The front light shield had been designed so that it can act as a shipping support and must be repositioned before using the unit. Loosen the two M4 wing screws on the front of the unit and reposition the light shield by moving the shield downward to the position necessary to prevent light leaks depending on the beam angle and focusing.Control and power cablesThe I-Cue Mirror utilizes an XLR 4-pin cable system.In DMX mode, this is used to supply power and data transfer. Pins 1 and 4 are supply 24V DC power. Pins 2 and 3 supply USITT1990 DMX512 control protocol, with a ground/drain wire to the connector shell.For use in ‘Stand-alone’mode, the unit requires a suitable 24V DC connected to Pins 1 and 4, with a ground/drain wire to the connector shell (not required, but suggested). Damage will occur if power connections short to data or ground/shield connections. When assembling XLR 4-pin cables, heat shrink should be used on each individual pin to prevent short circuits. (See diagram on following page.)N o t e:It is very important to ensure that the drain wire from the cable shield is c o n nected to both the XLR connector cases.Pin #1234 ChassisFunctionGround (-ve)Control data minus (-)Control data plus (+)24 VDC (+ve)Cable shield/Drain wireMinimum Cable size2.50mm_ (14 AWG)0.35mm_ (22 AWG)0.35mm_ (22 AWG)2.50mm_ (14 AWG)0.25mm_ (24 AWG) Detail of connector wiring (typical)(Note: Cable length should not exceed more than 75 M (250’) with return line) ConnectionsCorrect connection of the units to the power supply will decrease the chances of units malfunctioning due to cabling problems. Please follow these basic rules:a) Use the correct and gauge type of cable and connectors.b) Keep cable runs as short as possible to reduce line loss.c) Always use a return cable for each run.This will ensure balanced DC power to all units that the line is correctlyt e r m i nated and that all units receive power if one link of the chain is faulty. The correct wiring between male and female connectors is ‘one to one’.Mounting the unitFor proper operation, the unit must be firmly attached to the light fixture it is mounted on. To achieve this, the mounting plate of the unit has two flat springs at the outer edge. The unit is designed to mount in the rear color frame slot of the ellipsoidal fixture.The back plate should be inserted in the rear color slot and gently pushed down until the unit is firmly seated in the bottom of the slot. The safety wire supplied with the f i x ture should then be attached as a means of secondary fixing.Input power and DMX should be brought to the unit by way of XLR-4 cable. If daisy chaining is desired, a XLR-4 cable should be run from the output connector on the unit to the next device in the chain.When DMX is first applied to the unit, it will go through a homing sequence, which will cause the mirror to momentarily move around.Note:If the rear slot is not available for mounting of the unit because of the use of a gel holder in this slot, the front slot may be used for mounting instead.I-Cue Mirror mounted on a lighting fixture.Ensure the safety wire is used as a means of secondary attachment.Control FunctionRED button Mode access and ‘Record’BLACK button Decrements the mode level, or value BLUE button Increments the mode level, or value3 digit display Displays modes, monitor, or blank display.Red ButtonBlack ButtonBlue Button3 digit DisplayOperating the unitAll the unit functions are accessed using the LED display and the three push-button switches on the left side panel.PUSH BUTTON OPERATION:The RED button is used to scroll through the different modes of operation, and the BLUE or BLACK buttons used to select the level, or value, in that mode. If any mode or value is changed, the last digit of the display will flash until the RED button is pushed to acknowledge (or record) the change.DISPLAY OPERATION:Power-up DisplayOn power-up, the display will show ‘ini’during the initialization sequence, and then show the DMX address.MONITOR DISPLAY:If left undisturbed for 5-7 seconds, the display will revert to ‘Monitor Mode’•The first vertical bar indicates that there is Power (24V DC) at the unit.•The second vertical bar indicates that there is Data (DMX) at the unit.•The horizontal bars indicate the data Signal Level (DMX) at the unit.(See also: ‘Tr o u b l e s h o o t i n g ’section of this manual)power datasignal levelDISPLAY BLANK:The display can be set to auto-blackout after short time. This is selected through the mode menu. (See later in this section)RESET:If the RED button is held down, and the BLUE buttonpressed, the unit will reset to the factory default settings.This feature is particularly useful when the units are usein many different configurations/shows.Modes of OperationEFFECTIVE (STAND-ALONE) MODEIn this mode, the unit can be used without a DMX control signal; only a 24v DC sup-ply is required. To use the stand-alone mode;• Connect a suitable 24V DC power supply to the unit.• Press the RED button to scroll through the menu until the display reads ‘At0’.• Press the BLUE button once, so that the display reads ‘At1’(Auto mode) and press the RED button.• Press the RED button to scroll through the menu until the display reads ‘Pn’. This accesses the mirror panning movement in the auto mode. Using the BLUE/BLACK buttons select the range of movement you require Pn0 – Pn7, continuous back & forth sweep Pn8, or mirror held at the centre position Pn9. Press the RED b u t t o n to store the pan value and change the display to ‘tL’, the mirror tilting movement in the auto mode.• Repeat the above process to set a tilt movement value.• When the desired effect is selected, press the RED buttonDMX CONTROL MODEIn this mode, the unit can be fully controlled using two or four DMX channels (see below). Acombined DMX and 24v DC supply cabling system is required in this system. Press the RED button to move between modes, and to record any changes made.DMX CHANNELADDRESS MODEThis mode is used to set the DMX start address in the range of 1-511 (2 channels,8 -bit resolution) and 1-509 (4 channels, 16-bit resolution).The display shows thec u r rent DMX address. (To alter the address, press BLUE or BLACK button once to increment/ decrement the value; hold down the BLUE or BLACK for fast increments/ decrements of the value.PAN / TILT MOVEMENT MODESThese modes allow the user to reverse the direction of the pan, tilt, or pan and tilt motion, when the configurations of the lighting fixture/mirror unit dictate. The display shows either the pan movement or the tilt movement (‘Pn’pan/ ‘tL’tilt) and the cur-rent direction (‘0’= normal/ ‘1’= reverse) of travel. (Press BLUE or BLACK button to switch directions, and the RED button to change modes.)DMX RESOLUTIONThis mode is used to set the movement resolution, or accuracy, of the unit. The unit operates either with two or four DMX control channels, or stand-alone mode (with no DMX control). The display shows the current DMX mode (‘rn0’= 8-bit or ‘rn1’= 16-bit resolution). (Press BLUE or BLACK to switch between modes.)DISPLAY MODEThis mode is used to switch the display on or off. This feature can be used to blank displays that may be an unwanted distraction. The display will re-activate when any button is pressed. The display shows the current display mode (‘dP0’= display off or ‘dP1’= display on),(Press BLUE or BLACK to switch between on and off.)DMX / AUTOMATIC MODEThis mode is used to select either DMX control or automatic (stand-alone) operation of the unit. The display shows the current mode (‘ A t0’= DMX control, or ‘ A t1’= a u t o matic mode). (Press BLUE or BLACK to switch between modes.)DMX channel address modePanmovement modeTilt movement modeDMX resolution modeDisplay modeDMX/Automatic modeSets the units DMX address.This mode allows the user to reverse the direction of the pan motion.This mode allows the user to reverse the direction of the tilt motion.Sets unit operating with 2or 4 DMX control c h a n nels, with 8 or 16-bit resolution.This mode is used to switch the display on or off.This mode allows the user to select to between DMX and Automatic modes.To alter the address,press BLUE or BLACK button once to increase or decrease the value;hold down the BLUE or BLACK for fast incre-ments/ decrements.To alter the mode, press BLUE or BLACK button once to switch between modes.To alter the mode, press BLUE or BLACK button once to switch between modes.To alter the mode, press BLUE or BLACK button once to switch between modes.To alter the mode, press BLUE or BLACK button once to switch between modes.To alter the mode, press BLUE or BLACK button once to switch between modes.The display shows the current DMX address.In the range of 1-511(2 channel, 8-bit resolution)In the range of 1-509(4 channel, 16-bit resolution).The display shows that the PAN movement is set for normal direction.The display shows that the PAN movement is set for reverse direction.The display shows that the TILT movement is set for normal direction.The display shows that the TILT movement is set for reverse direction.The display shows the unit is set for 8-bit resolution.The display shows the unit is set for 16-bit resolution.This shows that the display is set for auto-blanking.This shows that the display is set to be permanently on.The display shows that the unit is set for DMX control. The display shows that the unit is set for automatic operation.Summary of control functions:Note: - Press the RED button to move between modes, and to record any changes made.DEFAULT SETTINGS:‘Factory’default settingsIf the unit is reset, using the RED button (held down), and the BLUE button pressed for 2 Sec’s, the unit will revert to the factory default settings.The ‘Factory’default settings put the unit in its normal operating mode.DMX Address = 001Pan/tilt direction = NormalResolution = 8-bit Display = On DMX/Auto = DMX Display Flip = Normal‘USER’DEFAULT SETTINGSEach time the RED record button is pressed, the unit will save that change and these ‘user defaults’will take precedence on the next power cycle. These ‘User’defaults can be reset to the ‘factory’defaults using the method detailed above.TroubleshootingThe LED display aids in the troubleshooting of the system. These indicators are located on the on the side panel of each unit.The first vertical bar indicates that there is power (24VDC) at the unit.The second vertical bar indicates that there is data (DMX) at the unit.The horizontal bars indicate the data (DMX) signal level at the unit.Note:The signal level changes during normal operation of the unit, and is present during stand-alone operation. 1st bar = 25%, 2nd bar = 50% and 3rd bar = 75%.Note:A high percentage of problems are a direct result of poor cabling, corrupt DMX control signals, and lack of suitable signal termination.power datasignal levelSYMPTOMUnit does not respond to DMX control, but DMX display indicator is on.Unit does not respond to DMX, DMX display indicator is off.Units run at different speeds. Units have dim display indicators and run slowly. Display indicators appear OK but unit does not move. The tilt doesn’t respond to DMX.Mirror panning/tilting in opposite direction.The mirror vibrates in one place when it is supposed to move.POSSIBLE CAUSEUnit set to wrong or differentDMX address.Bad cable.No DMX at splitter/PSU.Cable lengths are too long.No cable return line.Overloading of chain orcable runs too long.PSU overloaded.Mechanical (or electrical)failure in the unit.16-bit mode setting when8-bit control is intended, orvice versa.Pan/tilt reverse switch withimproper setting.Broken motor cablePopped out motor connector.SOLUTIONCheck DMX addresssettings.Check cable and DMX runfrom the console.Check the cable length andconfiguration. Ensure there is acable return line in the system.Check voltage levels on lastunit. Should not be below20VDC.Turn unit on and off. Returnunit for repair.Check and reset.Check and reset.Contact distributor for serviceReconnect and checkTechnical overviewThe electronics card consists of four key components: L298 Motor driver (x 2), 75176 Transceiver, and a processor.The 75176 transceiver operates in the receive config-uration to convert serial protocol to a TTL level. All data relevant to the operation of the unit is stored onboard in ‘flash’memory.The majority of electronics problems are usually created by external factors such as shorted cables, etc. The 75176 transceivers are susceptible to damage if 24VDC is present on the DMX signal lines. Troubleshooting is a process of elimination. First, rule out the other field factors (i.e. faulty cables, power sources). If an electronics problem is suspected try replacing the electronics card first. If accuracy problems should occur, check for obvious mechanical problems. For technical advice and/ or parts, please contact your selling dealer or the offices listed in this manual.Dimensions:Weight:Resolution: Accuracy:Movement Speed:DMX Protocol:DMX Addressing: Working Voltage:Power Consumption:Connectors:Body Material:Body Color:Mounting Plate:Max. Ambient Temperature Cooling:European Approvals: North American Approvals:260 x 230 x 265 mm (10.25” x 9” x 10.5")1.6 Kg (3.5 lbs)8 or 16 bitPan(230º Max.)0.9º8-bit mode0.028º16-bit mode Tilt (57.3º Max.)0.225º8-bit mode0.028º16-bit mode0-100% pan (max)= 2 sec0-100% tilt (max)= 1 secUSITT DMX512 (1990)Digitally, via push buttons (3) and LED display 24 VDC (+/- 10%)17 watts0.7 ampsXLR-4 (male) in and XLR-4 (female) through SteelBlack powder coat(Other colors available, P.O.A.)Integral mounting plate, designed for use in any ellipsoidal fixture with a 160 mm (6.25") gel slot. 40º C (104º F)Convection (natural)PendingPendingTechnical SpecificationsSpecificationsDrawingsI-Cue Mirror and Color Scroller combined.I-Cue mirror used with a color scroller.I-Cue Intelligent Mirror Parts ListPart NumberIC-01 Mounting Plate Assembly205 81001 0000 IC-02 Broadway Mounting Bracket205 81002 0000 IC-03 XLR Connector Assembly205 81003 0000 IC-04 Stepper Motor Lead (each)205 81004 0000 IC-05 Safety Chain Assembly205 81005 0000 IC-06 Mirror/Mounting Bracket Assembly205 81006 0000 IC-07 Digital Control Card205 81007 0000 IC-08 Stepper Motor (each)205 81008 0000 IC-09 Mirror Back Plate205 81009 0000 IC-10 Front Light Shield Assembly205 8101 00000Please call Rosco or your local Rosco dealer for pricing and availability.Rosco Laboratories,I n c.52 Harbor View Ave., Stamford, CT06902(203) 708-8900 1 (800) ROSCO N Y FA X(203) 708-89191120 N. Citrus Ave., Hollywood, CA90038(323) 462-2233 1 (800)R O S C O L A FA X:(323) 462-3338Rosco Laboratories,L t d.1241 Denison St. #44, Markham, Ontario, Canada L3R 4B4(905) 475-1400 (888)R O S C O TO FA X:(905) 475-3351R o s c o l a b,L t d.Blanchard Works, Kangley Bridge Rd., Sydenham, London SE26 5AQ England (208) 659-2300 FAX: (208) 659-3153Rosco Iberica,S.A.C/ Del Oro 76A, Pol. Industrial Sur, 28770 Colmenar Viejo, Madrid, Spain (341) 846-3602 FA X:(341) 846-3634Rosco do Brasil Ltda.Rua Antonio De Barros, 827, São Paulo SP Brasil CEP03401-000Te l:( 011) 218-2865 FA X:( 011) 218-0193Rosco Australia Pty Ltd.42 Sawyer Lane, Artarmon 2064, New South Wales, A u s t r a l i a(02) 9906-6262 FAX: (02) 9906-3430。
艾奇安防产品说明书

Privacy Mask Text Overlay Image Orientation
• Audio
Compression Audio-In Audio-Out
• Network
Protocol &larm
Simultaneous dual streams based on two configurations 28 Kbps - 6 Mbps (per stream) Constant, Variable
Basic WDR (74 dB); White balance: automatic, hold, and manual; Brightness; Contrast; Sharpness (auto); Auto gain control; Digital noise reduction; Flickerless
Hemispheric
Dome
Bullet
Box
PRODUCT SPECIFICATION
E81A
• Device
Device Type Image Sensor Sensor Size Day / Night Superior Low Light Sensitivity Minimum Illumination Color to B/W Switch Mechanical IR Cut Filter IR Sensitivity Range IR LED IR Working Distance Electronic Shutter
PHOTO INDICATION
3 4
1 2
1 Reset Button 2 Memory Card Slot 3 Reset Button
- 1、下载文档前请自行甄别文档内容的完整性,平台不提供额外的编辑、内容补充、找答案等附加服务。
- 2、"仅部分预览"的文档,不可在线预览部分如存在完整性等问题,可反馈申请退款(可完整预览的文档不适用该条件!)。
- 3、如文档侵犯您的权益,请联系客服反馈,我们会尽快为您处理(人工客服工作时间:9:00-18:30)。
EQUES移康智能产品功能对比表
本产品是行业内第一家通过公安部权威认证,并通过CE、FCC认证,荣获多项国家专利,获得山西省公安厅科技部,上海闵行电视台,第一财经大力宣传的科技产品。
型号工程/酒店版先锋盾金刚盾宙斯盾B宙斯盾G
产品图片
产品颜色如图香槟色/银色香槟色/银色香槟色/锖色香槟色
屏幕尺寸 2.8英寸 2.8英寸 2.8英寸 3.7英寸 3.7英寸
屏幕像素30万30万30万200万200万
屏幕分辨率320*240(QVGA)320*240(QVGA)320*240(QVGA)480*320(HVGA)480*320(HVGA)
屏幕方式高清显示屏高清显示屏高清显示屏高清触摸屏高清触摸屏
摄像头普通摄像头日、夜两用型/安防专用日、夜两用型/安防专用日、夜两用型/安防专用日、夜两用型/安防专用门外可视角度80°165°超广角 165°超广角165°超广角165°超广角
变焦倍数固定5级数码变焦5级数码变焦42倍手动变焦42倍手动变焦
拍照室内手动门铃手动自动抓拍自动抓拍自动抓拍
录像 室内手动门铃手动自动录像自动录像自动录像
红外感应距离无无(门外2~3米)(门外2~3米)(门外2~3米)
照片格式Jpeg Jpeg Jpeg Jpeg Jpeg
录像格式AVI AVI AVI MP4MP4
标配4G卡照片数量10万张10万张10万张2万张2万张
Micro-SD卡存储最大支持32GB最大支持32GB最大支持32GB最大支持32GB最大支持32GB
适合门孔直径12~25mm12~58mm12~58mm12~58mm12~58mm
适合门厚35~110mm35~110mm35~110mm35~110mm35~110mm
供电方式1500mAh锂电池1500mAh锂电池1500mAh锂电池1500+250mAh锂电池1500+250mAh锂电池
待机时间2~3个月1~2个月1~2个月1个月左右1个月左右
USB数据线充电无支持支持支持支持
门外有人室内提示无无支持支持支持。