wireshark 实验 HTTP
实验六利用Wireshark分析协议HTTP

实验六利用W i r e s h a r k 分析协议H T T P文件编码(GHTU-UITID-GGBKT-POIU-WUUI-8968)实验六利用W i r e s h a r k分析协议H T T P 一、实验目的分析HTTP协议二、实验环境与因特网连接的计算机,操作系统为Windows,安装有Wireshark、IE等软件。
三、实验步骤1、利用Wireshark俘获HTTP分组(1)在进行跟踪之前,我们首先清空Web 浏览器的高速缓存来确保Web网页是从网络中获取的,而不是从高速缓冲中取得的。
之后,还要在客户端清空DNS高速缓存,来确保Web服务器域名到IP地址的映射是从网络中请求。
在WindowsXP机器上,可在命令提示行输入ipconfig/flushdns(清除DNS解析程序缓存)完成操作。
(2)启动Wireshark 分组俘获器。
(3)在Web 浏览器中输入:(4)停止分组俘获。
图利用Wireshark俘获的HTTP分组在URL 中,是一个具体的web 服务器的域名。
最前面有两个DNS 分组。
第一个分组是将域名转换成为对应的IP 地址的请求,第二个分组包含了转换的结果。
这个转换是必要的,因为网络层协议——IP协议,是通过点分十进制来表示因特网主机的,而不是通过这样的域名。
当输入URL http://时,将要求Web服务器从主机上请求数据,但首先Web 浏览器必须确定这个主机的IP地址。
随着转换的完成,Web浏览器与Web服务器建立一个TCP连接。
最后,Web 浏览器使用已建立好的TCP连接来发送请求“GET/HTTP/1.1”。
这个分组描述了要求的行为(“GET”)及文件(只写“/”是因为我们没有指定额外的文件名),还有所用到的协议的版本(“HTTP/1.1”)。
2、HTTP GET/response交互(1)在协议框中,选择“GET/HTTP/1.1” 所在的分组会看到这个基本请求行后跟随着一系列额外的请求首部。
实验7 利用分组嗅探器(Wireshark)分析协议HTTP和DNS

实验七利用分组嗅探器(Wireshark)分析协议HTTP和DNS一、实验目的1、分析HTTP协议2、分析DNS协议二、实验环境与因特网连接的计算机网络系统;主机操作系统为Windows;Wireshark、IE 等软件。
三、实验步骤1、HTTP GET/response交互首先通过下载一个非常简单的HTML文件(该文件非常短,并且不嵌入任何对象)。
(1)启动Web browser。
(2)启动Wireshark分组嗅探器。
在窗口的显示过滤说明处输入“http”,分组列表子窗口中将只显示所俘获到的HTTP报文。
(3)一分钟以后,开始Wireshark分组俘获。
(4)在打开的Web browser窗口中输入一下地址(浏览器中将显示一个只有一行文字的非常简单的HTML文件):/ethereal-labs/HTTP-ethereal-file1.html(5)停止分组俘获。
图1分组俘获窗口2、HTTP 条件GET/response交互(1)启动浏览器,清空浏览器的缓存(在浏览器中,选择“工具”菜单中的“Internet选项”命令,在出现的对话框中,选择“删除文件”)。
(2)启动Wireshark分组俘获器。
开始Wireshark分组俘获。
(3)在浏览器的地址栏中输入以下URL:/ethereal-labs/HTTP-ethereal-file2.html 你的浏览器中将显示一个具有五行的非常简单的HTML文件。
(4)在你的浏览器中重新输入相同的URL或单击浏览器中的“刷新”按钮。
(5)停止Wireshark分组俘获,在显示过滤筛选说明处输入“http”,分组列表子窗口中将只显示所俘获到的HTTP报文。
3、获取长文件(1)启动浏览器,将浏览器的缓存清空。
(2)启动Wireshark分组俘获器。
开始Wireshark分组俘获。
(3)在浏览器的地址栏中输入以下URL:/ethereal-labs/HTTP-ethereal-file3.html 浏览器将显示一个相当大的美国权力法案。
网络协议 实验二wireshark_分析http
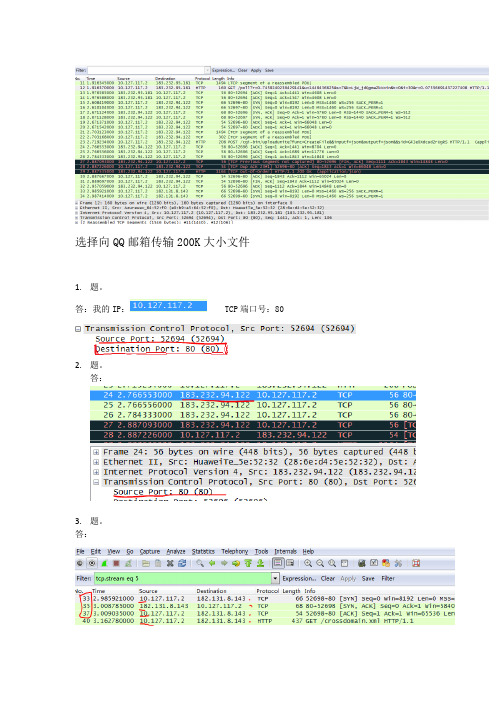
选择向QQ邮箱传输200K大小文件1.题。
答:我的IP: TCP端口号:802.题。
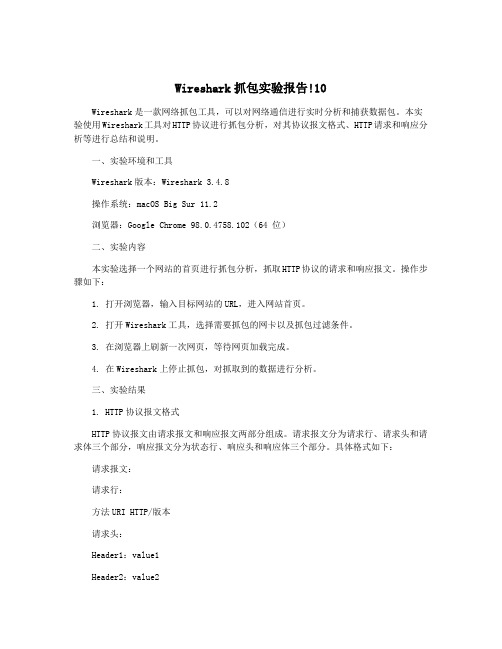
答:3.题。
答:图中可以看到wireshark截获到了三次握手的三个数据包。
第四个包才是HTTP的,这说明HTTP的确是使用TCP建立连接的。
4.题。
答:如图所示:5.题。
答:6.题。
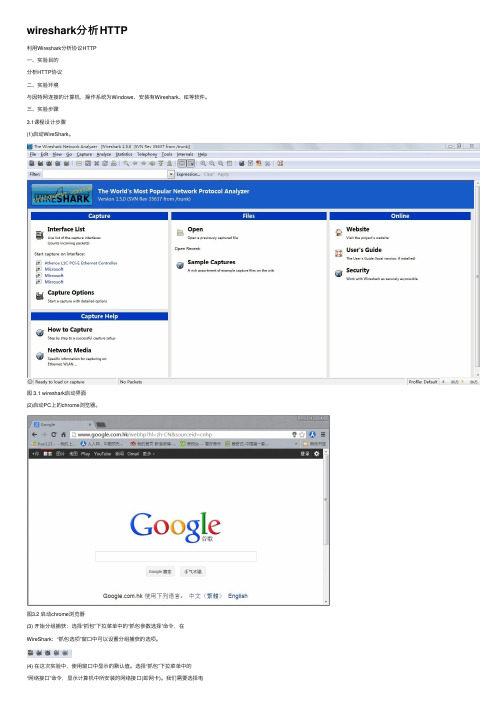
答:编号24:RTT编号25:RTT编号26:RTT编号27:RTT编号28:RTT7.题。
答:最先的六个TCP 片段的每一个长度分别为750 bytes、1408 bytes、1408 bytes、1408 bytes、1408 bytes、1408 bytes规律:一般的话只有第一个和最后一个片段长度特殊,其他片段等长。
8.题。
答:接受方通知给发送方的最低窗口大小为5840字节,即在服务器端传回的第一个ACKz 中的窗口大小。
接收方的窗口大小没有抑制发送方的传输速率,因为窗口大小从5840逐步增加到65535,窗口大小始终大于发送方发送的分组的容量。
9.题。
答:没有,从表中可以看出从源端发往目的地的序号逐渐增加,如果这其中有重传的报文段,则其序号中应该有小于其临近的分组序号的分组,图中未看到这样的分组,故没有重发片段。
12.题。
13.题。
答:TCP的发送方会试探性的发送数据(即慢启动阶段),如果太多的数据使网络拥塞了,那么发送方会根据AIMD算法进行调整。
但是在实际中,TCP的行为主要依赖于应用程序怎么设计。
在这次抓包中,在发送方还可以发送数据的时候,已经没有数据可发了。
在web 应用中,有些web对象比较小,在慢启动还没有结束之前,传送就结束啦,因此,传送小的web对象受到TCP慢启动阶段的影响,导致较长的延迟。
wireshark分析HTTP
wireshark分析HTTP利⽤Wireshark分析协议HTTP⼀、实验⽬的分析HTTP协议⼆、实验环境与因特⽹连接的计算机,操作系统为Windows,安装有Wireshark、IE等软件。
三、实验步骤3.1课程设计步骤(1)启动WireShark。
图 3.1 wireshark启动界⾯(2)启动PC上的chrome浏览器。
图3.2 启动chrome浏览器(3) 开始分组捕获:选择“抓包”下拉菜单中的“抓包参数选择”命令,在WireShark:“抓包选项”窗⼝中可以设置分组捕获的选项。
(4) 在这次实验中,使⽤窗⼝中显⽰的默认值。
选择“抓包”下拉菜单中的“⽹络接⼝”命令,显⽰计算机中所安装的⽹络接⼝(即⽹卡)。
我们需要选择电脑真实的⽹卡,点击后显⽰本机的IP地址。
(5) 随后,点击“开始”则进⾏分组捕获,所有由选定⽹卡发送和接收的分组都将被捕获。
图3.4 抓包选项设置(6) 待捕获⼀段时间,关闭浏览器,选择主窗⼝中有的“stop”按钮,可以停⽌分组的捕获。
图3.5 结束按钮3.2 抓包并分析过程这次实验通过分析打开⾕歌主页来分析http协议的作⽤。
在filter中输⼊http进⾏筛选。
wireshark所抓的含有http请求报⽂的帧:图3.6 打开⾕歌主页抓到的HTTP包对打开⾕歌⽹页这个事务进⾏分析:在浏览器中输⼊⾕歌主页地址,敲击回车的过程中,浏览器向DNS请求解析/doc/263e29c283d049649b665872.html 的IP地址。
域名系统DNS 解析出⾕歌服务器的IP地址为173.194.72.199在这个过程中本机IP 10.10.22.75。
然后浏览器与服务器建⽴TCP连接(服务器端的IP地址为173.194.72.199,端⼝是80)。
然后浏览器发出取⽂件命令:GET /webhp?hl=zh-CN&sourceid=cnhp HTTP/1.1\r\n。
服务器给出响应把⽂件(text/html)发送给浏览器,浏览器显⽰text/html中的所有⽂本。
实验7 利用分组嗅探器(Wireshark)分析协议HTTP和DNS
实验七利用分组嗅探器(Wireshark)分析协议HTTP和DNS一、实验目的1、分析HTTP协议2、分析DNS协议二、实验环境与因特网连接的计算机网络系统;主机操作系统为Windows;Wireshark、IE 等软件。
三、实验步骤1、HTTP GET/response交互首先通过下载一个非常简单的HTML文件(该文件非常短,并且不嵌入任何对象)。
(1)启动Web browser。
(2)启动Wireshark分组嗅探器。
在窗口的显示过滤说明处输入“http”,分组列表子窗口中将只显示所俘获到的HTTP报文。
(3)一分钟以后,开始Wireshark分组俘获。
(4)在打开的Web browser窗口中输入一下地址(浏览器中将显示一个只有一行文字的非常简单的HTML文件):/ethereal-labs/HTTP-ethereal-file1.html(5)停止分组俘获。
图1分组俘获窗口2、HTTP 条件GET/response交互(1)启动浏览器,清空浏览器的缓存(在浏览器中,选择“工具”菜单中的“Internet选项”命令,在出现的对话框中,选择“删除文件”)。
(2)启动Wireshark分组俘获器。
开始Wireshark分组俘获。
(3)在浏览器的地址栏中输入以下URL:/ethereal-labs/HTTP-ethereal-file2.html 你的浏览器中将显示一个具有五行的非常简单的HTML文件。
(4)在你的浏览器中重新输入相同的URL或单击浏览器中的“刷新”按钮。
(5)停止Wireshark分组俘获,在显示过滤筛选说明处输入“http”,分组列表子窗口中将只显示所俘获到的HTTP报文。
3、获取长文件(1)启动浏览器,将浏览器的缓存清空。
(2)启动Wireshark分组俘获器。
开始Wireshark分组俘获。
(3)在浏览器的地址栏中输入以下URL:/ethereal-labs/HTTP-ethereal-file3.html 浏览器将显示一个相当大的美国权力法案。
Wireshark抓包实验报告!10
Wireshark抓包实验报告!10Wireshark是一款网络抓包工具,可以对网络通信进行实时分析和捕获数据包。
本实验使用Wireshark工具对HTTP协议进行抓包分析,对其协议报文格式、HTTP请求和响应分析等进行总结和说明。
一、实验环境和工具Wireshark版本:Wireshark 3.4.8操作系统:macOS Big Sur 11.2浏览器:Google Chrome 98.0.4758.102(64 位)二、实验内容本实验选择一个网站的首页进行抓包分析,抓取HTTP协议的请求和响应报文。
操作步骤如下:1. 打开浏览器,输入目标网站的URL,进入网站首页。
2. 打开Wireshark工具,选择需要抓包的网卡以及抓包过滤条件。
3. 在浏览器上刷新一次网页,等待网页加载完成。
4. 在Wireshark上停止抓包,对抓取到的数据进行分析。
三、实验结果1. HTTP协议报文格式HTTP协议报文由请求报文和响应报文两部分组成。
请求报文分为请求行、请求头和请求体三个部分,响应报文分为状态行、响应头和响应体三个部分。
具体格式如下:请求报文:请求行:方法URI HTTP/版本请求头:Header1:value1Header2:value2…请求体:Content-Type:typeContent-Length:lengthContent:data2. HTTP请求分析通过Wireshark抓取到的数据包,可以看到浏览器发送的HTTP请求报文。
请求报文的三个部分如下:请求体为空。
请求行包括请求方法、URI和HTTP版本号。
请求方法有GET、POST、HEAD、PUT、DELETE、OPTIONS等。
URI是请求的资源地址,如/表示根目录下的index.html文件。
HTTP 版本号有HTTP/1.0、HTTP/1.1等。
请求头包括Host、User-Agent、Accept、Accept-Encoding、Accept-Language等信息。
wireshark抓包实验之HTTP(陕师大)
1. Is your browser running HTTP version 1.0 or 1.1? What version of HTTP is the server running?我的浏览器运行的HTTP版本是1.1服务器运行的HTTP版本是1.12.What languages (if any) does your browser indicate that it can accept to the server?我的浏览器能接受服务器的中文。
3. What is the IP address of your computer? Of the server? 我的电脑的IP地址是192.168.139.53;服务器的IP是128.119.245.12;4. What is the status code returned from the server to your browser?状态码是2005. When was the HTML file that you are retrieving last modified at the server?最后修正的时间是:Sat, 20 Oct 2012 15:22:01 GMT6. How many bytes of content are being returned to your browser?482字节7. By inspecting the raw data in the packet content window, do you see any headerswithin the data that are not displayed in the packet-listing window? If so, nameone.?8. Inspect the contents of the first HTTP GET request from your browser to theserver. Do you see an “IF-MODIFIED-SINCE” line in the HTTP GET?无,因为IE 浏览器选择工具-Internet 选项-删除文件,钩选“删除全部文件”从你的浏览器中移除缓存的文件9. Inspect the contents of the server response. Did the server explicitly return thecontents of the file? How can you tell?Yes10. Now inspect the contents of the second HTTP GET request from your browser tothe server. Do you see an “IF-MODIFIED-SINCE:” line in the HTTP GET? Ifso, what information follows the “IF-MODIFIED-SINCE:” header?有显示的内容:If-Modified-Since: Fri, 05 Oct 2012 05:25:01 GMT\r\n11. What is the HTTP status code and phrase returned from the server in response tothis second HTTP GET? Did the server explicitly return the contents of the file?Explain.状态码是304;没有显示返回文件的具体内容,而是返回304 告诉客户端其本地cache 的页面是最新的,于是客户端就可以直接从本地加载页面了,这样在网络上传输的数据就会大大减少,同时也减轻了服务器的负担。
利用WireShark分析HTTP和DNS
利用WireShark分析HTTP和DNS一、实验目的及任务1、熟悉并掌握WireShark的基本操作,了解网络协议实体间的交互以及报文交换。
2、分析HTTP协议3、分析DNS协议二、实验环境与因特网连接的计算机网络系统;主机操作系统为Windows2000或Windows XP;WireShark等软件。
三、预备知识要深入理解网络协议,需要仔细观察协议实体之间交换的报文序列。
为探究协议操作细节,可使协议实体执行某些动作,观察这些动作及其影响。
这些任务可以在仿真环境下或在如因特网这样的真实网络环境中完成。
观察在正在运行协议实体间交换报文的基本工具被称为分组嗅探器(packet sniffer)。
顾名思义,一个分组嗅探器捕获(嗅探)计算机发送和接收的报文。
一般情况下,分组嗅探器将存储和显示出被捕获报文的各协议头部字段内容。
图1为一个分组嗅探器的结构。
图1右边是计算机上正常运行的协议(在这里是因特网协议)和应用程序(如:web浏览器和ftp客户端)。
分组嗅探器(虚线框中的部分)是附加计算机普通软件上的,主要有两部分组成。
分组捕获库接收计算机发送和接收的每一个链路层帧的拷贝。
高层协议(如:HTTP、FTP、TCP、UDP、DNS、IP等)交换的报文都被封装在链路层帧(Frame)中,并沿着物理介质(如以太网的电缆)传输。
图1假设所使用的物理媒体是以太网,上层协议的报文最终封装在以太网帧中。
分组嗅探器的第二个组成部分是分析器。
分析器用来显示协议报文所有字段的内容。
为此,分析器必须能够理解协议所交换的所有报文的结构。
例如:我们要显示图1中HTTP协议所交换的报文的各个字段。
分组分析器理解以太网帧格式,能够识别包含在帧中的IP数据报。
分组分析器也要理解IP数据报的格式,并能从IP数据报中提取出TCP报文段。
然后,它需要理解TCP报文段,并能够从中提取出HTTP消息。
最后,它需要理解HTTP消息。
WireShark是一种可以运行在Windows, UNIX, Linux等操作系统上的分组分析器.用户界面如图2所示。
实验1Wireshark协议分析-HTTP协议
实验1Wireshark协议分析-HTTP协议实验⼆利⽤Wireshark分析协议HTTP⼀、实验⽬的分析HTTP协议⼆、实验环境与因特⽹连接的计算机,操作系统为Windows,安装有Wireshark、IE等软件。
三、实验步骤1、利⽤Wireshark俘获HTTP分组(1)在进⾏跟踪之前,我们⾸先清空Web 浏览器的⾼速缓存来确保Web⽹页是从⽹络中获取的,⽽不是从⾼速缓冲中取得的。
打开浏览器,找到Internet选项,点击后出现如图1所⽰的界⾯。
以IE浏览器为例,步骤为:点击浏览器右上⾓的“⼯具”-“Internet选项”。
图1 Internet选项之后,还要在客户端清空DNS⾼速缓存,以确保Web服务器域名到IP地址的映射是从⽹络中请求的。
在Windows系列的机器上,可在命令提⽰⾏输⼊ipconfig/flushdns 完成操作(如图2所⽰);具体步骤及Linux、MAC等系统的清空⽅法请参见:。
图2 命令提⽰⾏输⼊ipconfig/flushdns完成操作(2)启动Wireshark 分组俘获器。
(3)在Web 浏览器中输⼊:(重庆⼤学⽹站)。
(4)停⽌分组俘获。
图3 利⽤Wireshark俘获的HTTP分组在URL 中,是⼀个具体的web 服务器的主机名。
最前⾯有两个DNS分组。
第⼀个分组是将主机名转换成为对应的IP 地址的请求,第⼆个分组包含了转换的结果。
这个转换是必要的,因为⽹络层协议——IP协议,是通过点分⼗进制来表⽰因特⽹主机的,⽽不是通过这样的主机名。
当输⼊URL 时,将要求Web服务器从主机上请求数据,但⾸先Web浏览器必须确定这个主机的IP地址。
⼩提⽰--域名和主机关系举例:域名下,有主机server1和server2,其主机全名就是和。
随着转换的完成,Web浏览器与Web服务器建⽴⼀个TCP连接。
最后,Web 浏览器使⽤已建⽴好的TCP连接来发送请求“GET/HTTP/”。
网络抓包分析实验报告(HTTP)
网络抓包分析实验报告一:实验目的:1.学习使用网络数据抓包软件Ethereal,对互连网进行数据抓包,巩固对所学知识的理解二:实验内容:1:分析http协议请求的响应过程。
2:分析TCP的处理过程,HTTP,TCp的报文格式。
三:实验工具Wireshark抓包软件四:实验步骤1、安装Wireshark,简单描述安装步骤。
2、打开wireshark,选择接口选项列表。
或单击“Capture”,配置“option”选项。
3、设置完成后,点击“start”开始抓包,显示结果。
4、选择某一行抓包结果,双击查看此数据包具体结构五:分析1:http请求报文分析(第8个包)请求行:方法字段:GET,版本是http/1.1.首部行:主机host:;Connection:Keep-Alive,即保持持久连接;Accept-language:zh-cn,即接收语言是中文。
2.http响应报文(第55个包)状态行:http/1.1 200 OK;请求成功。
首部行:响应Date:sat,21,Apr 2012 04:58:18 GMT;Content-Type:text/html 指示实体主体中的对象是text/html文本;Content-Length:35593 表明了被发送对象的字节数是35593个字节。
:3:TCP报文格式分析:报文格式:如截图可知:源端口号:80,目的端口号3968,序号:1,确认号:424,首部长度:20 bytes,Flags=0X10(URG=0,ACK=1,PSH=0,RST=0,SYN=0,FIN=0)接收窗口大小:65112;检验和:0x8a44。
4:TCP响应(3次握手)分析:1)服务器应用启动,进入LISTEN状态;2)客户端向服务器端发送一个TCP报文段,该段设置SYN标识,请求跟服务器端应用同步,之后进入SYN-SENT状态,等待服务器端的响应;(第5个包)3)服务器端应用收到客户端的SYN 段之后,发送一个TCP段响应客户端,该段设置SYN和ACK标识,告知客户端自己接受它的同步请求,同时请求跟客户端同步。
- 1、下载文档前请自行甄别文档内容的完整性,平台不提供额外的编辑、内容补充、找答案等附加服务。
- 2、"仅部分预览"的文档,不可在线预览部分如存在完整性等问题,可反馈申请退款(可完整预览的文档不适用该条件!)。
- 3、如文档侵犯您的权益,请联系客服反馈,我们会尽快为您处理(人工客服工作时间:9:00-18:30)。
Wireshark Lab: HTTPVersion: 2.0 (Sept. 2009)© 2009 J.F. Kurose, K.W. Ross. All Rights Reserved Computer Networking: A Top-down Approach, 5th edition .Having gotten our feet wet with the Wireshark packet sniffer in the introductory lab, we’re now ready to use Wireshark to investigate protocols in operation. In this lab, we’ll explore several aspects of the HTTP protocol: the basic GET/response interaction, HTTP message formats, retrieving large HTML files, retrieving HTML files with embedded objects, and HTTP authentication and security. Before beginning these labs, you might want to review Section 2.2 of the text.1. The Basic HTTP GET/response interactionLet’s begin our exploration of HTTP by downloading a very simple HTML file - one that is very short, and contains no embedded objects. Do the following:1. Start up your web browser.2. Start up the Wireshark packet sniffer, as described in the Introductory lab (but don’t yet begin packet capture). Enter “http” (just the letters, not the quotation marks) in the display-filter-specification window, so that only captured HTTP messages will be displayed later in the packet-listing window. (We’re only interested in the HTTP protocol here, and don’t want to see the clutter of all captured packets).3. Wait a bit more than one minute (we’ll see why shortly), and then begin Wireshark packet capture.4. Enter the following to your browser /wireshark-labs/HTTP-wireshark-file1.htmlYour browser should display the very simple, one-line HTML file.5. Stop Wireshark packet capture.Your Wireshark window should look similar to the window shown in Figure 1. If you are unable to run Wireshark on a live network connection, you can download a packet trace that was created when the steps above were followed.11Download the zip file /wireshark-labs/wireshark-traces.zip and extract the file http-ethereal-trace-1. The traces in this zip file were collected by Wireshark running on one of the author’sFigure 1: Wireshark Display after /wireshark-labs/ HTTP-wireshark-file1.html has been retrieved by your browserThe example in Figure 1 shows in the packet-listing window that two HTTP messages were captured: the GET message (from your browser to the web server) and the response message from the server to your browser. The packet-contents window shows details of the selected message (in this case the HTTP GET message, which is highlighted in the packet-listing window). Recall that since the HTTP message was carried inside a TCP segment, which was carried inside an IP datagram, which was carried within an Ethernet frame, Wireshark displays the Frame, Ethernet, IP, and TCP packet information as well. We want to minimize the amount of non-HTTP datacomputers, while performing the steps indicated in the Wireshark lab. Once you have downloaded the trace, you can load it into Wireshark and view the trace using the File pull down menu, choosing Open, andthen selecting the http-ethereal-trace-1 trace file. The resulting display should look just like Figure 1.displayed (we’re interested in HTTP here, and will be investigating these other protocols is later labs), so make sure the boxes at the far left of the Frame, Ethernet, IP and TCP information have a plus sign (which means there is hidden, undisplayed information), and the HTTP line has a minus sign (which means that all information about the HTTP message is displayed).(Note: You should ignore any HTTP GET and response for favicon.ico. If you see a reference to this file, it is your browser automatically asking the server if it (the server) has a small icon filethat should be displayed next to the displayed URL in your browser. We’ll ignore references tothis pesky file in this lab.).By looking at the information in the HTTP GET and response messages, answer the following questions. When answering the following questions, you should print out the GET and response messages (see the introductory Wireshark lab for an explanation of how to do this) and indicate where in the message you’ve found the information that answers the following questions.1.Is your browser running HTTP version 1.0 or 1.1? What version of HTTP is theserver running?2.What languages (if any) does your browser indicate that it can accept to theserver?3.What is the IP address of your computer? Of the server?4.What is the status code returned from the server to your browser?5.When was the HTML file that you are retrieving last modified at the server?6.How many bytes of content are being returned to your browser?7.By inspecting the raw data in the packet content window, do you see any headerswithin the data that are not displayed in the packet-listing window? If so, nameone.In your answer to question 5 above, you might have been surprised to find that the document you just retrieved was last modified within a minute before you downloaded the document. That’s because (for this particular file), the server is setting the file’s last-modified time to be the current time, and is doing so once per minute. Thus, if you wait a minute between accesses, the file will appear to have been recently modified, and hence your browser will download a “new” copy of the document.2. The HTTP CONDITIONAL GET/response interactionRecall from Section 2.2.6 of the text, that most web browsers perform object caching and thus perform a conditional GET when retrieving an HTTP object. Before performing the steps below, make sure your browser’s cache is empty. (To do this under Firefox, select Tools->Clear Private Data, or for Internet Explorer, select Tools->Internet Options->Delete File; these actions will remove cached files from your browser’s cache.) Now do the following:∙Start up your web browser, and make sure your browser’s cache is cleared, as discussed above.∙Start up the Wireshark packet sniffer∙Enter the following URL into your browser/wireshark-labs/HTTP-wireshark-file2.htmlYour browser should display a very simple five-line HTML file.∙Quickly enter the same URL into your browser again (or simply select the refresh button on your browser)∙Stop Wireshark packet capture, and enter “http” in the display-filter-specification window, so that only captured HTTP messages will be displayed later in thepacket-listing window.∙(Note: If you are unable to run Wireshark on a live network connection, you can use the http-ethereal-trace-2 packet trace to answer the questions below; seefootnote 1. This trace file was gathered while performing the steps above on oneof the author’s computers.)Answer the following questions:8.Inspect the contents of the first HTTP GET request from your browser to theserver. Do you see an “IF-MODIFIED-SINCE” line in the HTTP GET?9.Inspect the contents of the server response. Did the server explicitly return thecontents of the file? How can you tell?10.Now inspect the contents of the second HTTP GET request from your browser tothe server. Do you see an “IF-MODIFIED-SINCE:” line in the HTTP GET? Ifso, what information follows the “IF-MODIFIED-SINCE:” header?11.What is the HTTP status code and phrase returned from the server in response tothis second HTTP GET? Did the server explicitly return the contents of the file?Explain.3. Retrieving Long DocumentsIn our examples thus far, the documents retrieved have been simple and short HTML files. Let’s next see what happens when we download a long HTML file. Do the following:∙Start up your web browser, and make sure your browser’s cache is cleared, as discussed above.∙Start up the Wireshark packet sniffer∙Enter the following URL into your browser/wireshark-labs/HTTP-wireshark-file3.htmlYour browser should display the rather lengthy US Bill of Rights.∙Stop Wireshark packet capture, and enter “http” in the display-filter-specification window, so that only captured HTTP messages will be displayed.∙(Note: If you are unable to run Wireshark on a live network connection, you can use the http-ethereal-trace-3 packet trace to answer the questions below; seefootnote 1. This trace file was gathered while performing the steps above on oneof the author’s computers.)In the packet-listing window, you should see your HTTP GET message, followed by a multiple-packet response to your HTTP GET request. This multiple-packet response deserves a bit of explanation. Recall from Section 2.2 (see Figure 2.9 in the text) that the HTTP response message consists of a status line, followed by header lines, followed by a blank line, followed by the entity body. In the case of our HTTP GET, the entity body in the response is the entire requested HTML file. In our case here, the HTML file is rather long, and at 4500 bytes is too large to fit in one TCP packet. The single HTTP response message is thus broken into several pieces by TCP, with each piece being contained within a separate TCP segment (see Figure 1.24 in the text). Each TCP segment is recorded as a separate packet by Wireshark, and the fact that the single HTTP response was fragmented across multiple TCP packets is indicated by the “Continuation” phrase displayed by Wireshark. We stress here that there is no “Continuation” message in HTTP!Answer the following questions:12.How many HTTP GET request messages were sent by your browser?13.How many data-containing TCP segments were needed to carry the single HTTPresponse?14.What is the status code and phrase associated with the response to the HTTP GETrequest?15.Are there any HTTP status lines in the transmitted data associated with a TCP-induced “Continuation”?4. HTML Documents with Embedded ObjectsNow that we’ve seen how Wireshark displays the captured packet traffic for large HTML files, we can look at what happens when your browser downloads a file with embedded objects, i.e., a file that includes other objects (in the example below, image files) that are stored on another server(s).Do the following:∙Start up your web browser, and make sure your browser’s cache is cleared, as discussed above.∙Start up the Wireshark packet sniffer∙Enter the following URL into your browser/wireshark-labs/HTTP-wireshark-file4.htmlYour browser should display a short HTML file with two images. These twoimages are referenced in the base HTML file. That is, the images themselves are not contained in the HTML; instead the URLs for the images are contained in the downloaded HTML file. As discussed in the textbook, your browser will have to retrieve these logos from the indicated web sites. Our publisher’s logo isretrieved from the web site. The image of our book’s cover isstored at the server.∙Stop Wireshark packet capture, and enter “http” in the display-filter-specification window, so that only captured HTTP messages will be displayed.∙(Note: If you are unable to run Wireshark on a live network connection, you can use the http-ethereal-trace-4 packet trace to answer the questions below; seefootnote 1. This trace file was gathered while performing the steps above on oneof the author’s computers.)Answer the following questions:16.How many HTTP GET request messages were sent by your browser? To whichInternet addresses were these GET requests sent?17.Can you tell whether your browser downloaded the two images serially, orwhether they were downloaded from the two web sites in parallel? Explain.5 HTTP AuthenticationFinally, let’s try visiting a web site that is password-protected and examine the sequence of HTTP message exchanged for such a site. The URL/wireshark-labs/protected_pages/HTTP-wireshark-file5.html is password protected. The username is “wireshark-students” (without the quotes), and the password is “network” (again, without the quotes). So let’s access this “secure” password-protected site. Do the following:∙Make sure your browser’s cache is cleared, as discussed above, and close down your browser. Then, start up your browser∙Start up the Wireshark packet sniffer∙Enter the following URL into your browser/wireshark-labs/protected_pages/HTTP-wireshark-file5.htmlType the requested user name and password into the pop up box.∙Stop Wireshark packet capture, and enter “http” in the display-filter-specification window, so that only captured HTTP messages will be displayed later in thepacket-listing window.∙(Note: If you are unable to run Wireshark on a live network connection, you can use the http-ethereal-trace-5 packet trace to answer the questions below; seefootnote 1. This trace file was gathered while performing the steps above on oneof the author’s computers.)Now let’s examine the Wireshark output. You might want to first read up on HTTP authentication by reviewing the easy-to-read material on “HTTP Access Authentication Framework” at /stories/storyReader$2159Answer the following questions:18.What is the server’s response (status code and phrase) in response to the initialHTTP GET message from your browser?19.When your browser’s sends the HTTP GET message for the second time, whatnew field is included in the HTTP GET message?The username (wirehsark-students) and password (network) that you entered are encoded in the string of characters (d2lyZXNoYXJrLXN0dWRlbnRzOm5ldHdvcms=) following the “Authorization: Basic” header in the client’s HTTP GET message. While it may appear that your username and password are encrypted, they are simply encoded in a format known as Base64 format. The username and password are not encrypted! To see this, go to /tools/base64.php and enter the base64-encoded string d2lyZXNoYXJrLXN0dWRlbnRz and press decode. Voila! You have translated from Base64 encoding to ASCII encoding, and thus should see your username! To view the password, enter the remainder of the string Om5ldHdvcms= and press decode. Since anyone can download a tool like Wireshark and sniff packets (not just their own) passing by their network adaptor, and anyone can translate from Base64 to ASCII (you just didit!), it should be clear to you that simple passwords on WWW sites are not secure unless additional measures are taken.Fear not! As we will see in Chapter 7, there are ways to make WWW access more secure. However, we’ll clearly need something that goes beyond the basic HTTP authentication framework!。