ros多线负载qos限速生成器教程
ROS3.30全套多线负载平衡设置脚本

ROS3.30全套多线负载平衡设置脚本ROS3.30设置脚本如果你是菜鸟,下面的脚本也许会帮了,如果你是高高手,请你多指证,谢谢下面是我花了一整天的时间整理出来的,第一次用ROS3.30,走了很多弯路,还好以前有点2.9的基础,结合在网上找些前辈门的脚本,终于测试一切正常,我自己在我的线路上测试通过,如果到你机器上有问题,请嘴上留情,别骂我,请仔细检查,相信你也一定能行的。
如果有问题实在搞不懂,可以加我QQ307237303(请先自己多钻研一下在加我)# dec/03/2011 20:55:29 by RouterOS 3.30# software id = K6BP-MUXD#/interface ethernetset 0 arp=enabled auto-negotiation=yes cable-settings=default comment="" \disable-running-check=yes disabled=no full-duplex=yes mac-address=\00:03:47:95:C8:66 mtu=1500 name=W AN3 speed=100Mbpsset 1 arp=enabled auto-negotiation=yes cable-settings=default comment="" \disable-running-check=yes disabled=no full-duplex=yes mac-address=\00:03:47:95:C2:FC mtu=1500 name=LAN speed=100Mbpsset 2 arp=enabled auto-negotiation=yes cable-settings=default comment="" \disable-running-check=yes disabled=no full-duplex=yes mac-address=\00:20:ED:1C:B3:90 mtu=1500 name=W AN1 speed=100Mbpsset 3 arp=enabled auto-negotiation=yes cable-settings=default comment="" \disable-running-check=yes disabled=no full-duplex=yes mac-address=\00:20:ED:1C:B3:91 mtu=1500 name=W AN2 speed=100Mbps以上是网卡名称设置/ip pooladd name=PPPOE-IP ranges=10.0.0.5-10.0.0.200以上是PPPOE拔号地址池/portset 0 baud-rate=9600 data-bits=8 flow-control=hardware name=serial0 parity=\none stop-bits=1set 1 baud-rate=9600 data-bits=8 flow-control=hardware name=serial1 parity=\none stop-bits=1以上是导出后不知用处的/ppp profileset default change-tcp-mss=yes comment="" name=default only-one=default \use-compression=default use-encryption=default use-vj-compression=defaultadd change-tcp-mss=default comment="" dns-server=210.21.196.6 local-address=\10.0.0.1 name=PPPOE-1 only-one=yes rate-limit=\"108k/1400k 128k/1600k 90k/1m" remote-address=PPPOE-IP use-compression=\default use-encryption=default use-vj-compression=default wins-server=\221.5.88.88add change-tcp-mss=default comment="" dns-server=210.21.196.6 local-address=\10.0.0.1 name=LOW only-one=yes rate-limit="88k/900k 108k/1100k 90k/1m" \remote-address=PPPOE-IP use-compression=default use-encryption=default \use-vj-compression=default wins-server=221.5.88.88set default-encryption change-tcp-mss=yes comment="" name=default-encryption \ only-one=default use-compression=default use-encryption=yes \use-vj-compression=default以上是PPPOE服务建立/interface pppoe-clientadd ac-name="" add-default-route=no allow=pap,chap,mschap1,mschap2 comment="" \ dial-on-demand=no disabled=no interface=WAN1 max-mru=1480 max-mtu=1480 \ mrru=disabled name=pppoe-out1 password=123 profile=default \service-name="" use-peer-dns=no user=123add ac-name="" add-default-route=no allow=pap,chap,mschap1,mschap2 comment="" \ dial-on-demand=no disabled=no interface=WAN2 max-mru=1480 max-mtu=1480 \ mrru=disabled name=pppoe-out2 password=123456 profile=default \service-name="" use-peer-dns=no user=123add ac-name="" add-default-route=no allow=pap,chap,mschap1,mschap2 comment="" \ dial-on-demand=no disabled=no interface=WAN3 max-mru=1480 max-mtu=1480 \ mrru=disabled name=pppoe-out3 password=3 profile=default service-name="" \ use-peer-dns=no user=3 以上是ADSL拔号上网的建立/queue treeadd burst-limit=0 burst-threshold=0 burst-time=0s disabled=no limit-at=0 \ max-limit=12M name=totaldown parent=global-in priority=8/queue typeset default kind=pfifo name=default pfifo-limit=50set ethernet-default kind=pfifo name=ethernet-default pfifo-limit=50set wireless-default kind=sfq name=wireless-default sfq-allot=1514 \sfq-perturb=5set synchronous-default kind=red name=synchronous-default red-avg-packet=1000 \ red-burst=20 red-limit=60 red-max-threshold=50 red-min-threshold=10set hotspot-default kind=sfq name=hotspot-default sfq-allot=1514 sfq-perturb=\ 5add kind=pcq name=PCQ-up pcq-classifier=src-address pcq-limit=50 pcq-rate=\ 1000000 pcq-total-limit=10000 add kind=pcq name=PCQ-down pcq-classifier=dst-address pcq-limit=50 pcq-rate=\ 1000000 pcq-total-limit=10000 add kind=pcq name=80-Down pcq-classifier=dst-address pcq-limit=50 pcq-rate=\ 800000 pcq-total-limit=10000 add kind=pcq name=other_down pcq-classifier=dst-address pcq-limit=50 \ pcq-rate=0 pcq-total-limit=2000 add kind=pcq name=server_down pcq-classifier=dst-address pcq-limit=50 \ pcq-rate=0 pcq-total-limit=2000add kind=pcq name=game-down pcq-classifier=dst-address pcq-limit=50 pcq-rate=\ 400000 pcq-total-limit=10000 set default-small kind=pfifo name=default-small pfifo-limit=10/queue treeadd burst-limit=0 burst-threshold=0 burst-time=0s disabled=no limit-at=1M \ max-limit=10M name=otherdown packet-mark=Port_Packet parent=totaldown \ priority=8 queue=defaultadd burst-limit=0 burst-threshold=0 burst-time=0s disabled=no limit-at=1M \ max-limit=12M name=portdown packet-mark=Port_Packet parent=totaldown \priority=1 queue=defaultadd burst-limit=0 burst-threshold=0 burst-time=3s disabled=no limit-at=5M \ max-limit=12M name=80down packet-mark=80_packet parent=totaldown \priority=2 queue=defaultadd burst-limit=0 burst-threshold=0 burst-time=3s disabled=yes limit-at=0 \ max-limit=18M name=totalup packet-mark=PCQ-up parent=global-out priority=\7 queue=default以上是网络优先设置,感觉用处不大,我是3*4M AD/snmpset contact="" enabled=no engine-boots=0 engine-id="" location="" \time-window=15 trap-sink=0.0.0.0 trap-version=1/snmp communityset public address=0.0.0.0/0 authentication-password="" \ authentication-protocol=MD5 encryption-password="" encryption-protocol=\DES name=public read-access=yes security=none write-access=no/system logging actionset memory memory-lines=100 memory-stop-on-full=no name=memory target=memory set disk disk-file-count=2 disk-file-name=log disk-lines-per-file=100 \disk-stop-on-full=no name=disk target=diskset echo name=echo remember=yes target=echoset remote bsd-syslog=no name=remote remote=0.0.0.0:514 src-address=0.0.0.0 \ syslog-facility=daemon syslog-severity=auto target=remote /user groupadd comment="" name=read policy="local,telnet,ssh,reboot,read,test,winbox,pass\word,web,sniff,sensitive,!ftp,!write,!policy"add comment="" name=write policy="local,telnet,ssh,reboot,read,write,test,winb\ox,password,web,sniff,sensitive,!ftp,!policy"add comment="" name=full policy="local,telnet,ssh,ftp,reboot,read,write,policy\ ,test,winbox ,password,web,sniff,sensitive"/interface bridge settingsset use-ip-firewall=no use-ip-firewall-for-pppoe=no use-ip-firewall-for-vlan=\ no/interface ethernet mirrorset/interface l2tp-server serverset authentication=pap,chap,mschap1,mschap2 default-profile=\default-encryption enabled=no max-mru=1460 max-mtu=1460 mrru=disabled/interface ovpn-server serverset auth=sha1,md5 certificate=none cipher=blowfish128,aes128 default-profile=\ default enabled=no keepalive-timeout=60 mac-address=FE:46:57:28:66:CB \max-mtu=1500 mode=ip netmask=24 port=1194 require-client-certificate=no/interface pppoe-server serveradd authentication=pap,chap,mschap1,mschap2 default-profile=PPPOE-1 disabled=\ yes interface=LAN keepalive-timeout=10 max-mru=1480 max-mtu=1480 \max-sessions=0 mrru=disabled one-session-per-host=no service-name=\service1/interface pptp-server serverset authentication=mschap1,mschap2 default-profile=default-encryption \ enabled=no keepalive-timeout=30 max-mru=1460 max-mtu=1460 mrru=disabled /ip accounting set account-local-traffic=no enabled=no threshold=256/ip accounting web-accessset accessible-via-web=no address=0.0.0.0/0以上也是不知的东东/ip addressadd address=192.168.2.1/24 broadcast=192.168.2.255 comment="" disabled=no \ interface=LAN network=192.168.2.0 以上是设置ROS的内网IP/ip dhcp-server configset store-leases-disk=5m/ip dnsset allow-remote-requests=yes cache-max-ttl=1w cache-size=2048KiB \ max-udp-packet-size=512 primary-dns=210.21.196.6 secondary-dns=\221.5.88.88以上是设置DNS,你的可能不一样/ip firewall connection trackingset enabled=yes generic-timeout=10m icmp-timeout=10s tcp-close-timeout=10s \ tcp-close-wait-timeout=10s tcp-established-timeout=1d \tcp-fin-wait-timeout=10s tcp-last-ack-timeout=10s \tcp-syn-received-timeout=5s tcp-syn-sent-timeout=5s tcp-syncookie=no \tcp-time-wait-timeout=10s udp-stream-timeout=3m udp-timeout=10s以上是系统默认值/ip firewall mangleadd action=change-mss chain=postrouting comment="" disabled=yes new-mss=1460 \ protocol=tcp tcp-flags=syn add action=mark-routing chain=prerouting comment="" disabled=yes \ new-routing-mark=add passthrough=no src-address-list=src1add action=mark-connection chain=prerouting comment=1 disabled=yes \ in-interface=LAN new-connection-mark=1 passthrough=yes \per-connection-classifier=src-address-and-port:3/0add action=mark-routing chain=prerouting comment="" connection-mark=1 \ disabled=yes in-interface=LAN new-routing-mark=1 passthrough=noadd action=mark-connection chain=prerouting comment=2 disabled=yes \ in-interface=LAN new-connection-mark=2passthrough=yes \per-connection-classifier=src-address-and-port:3/1add action=mark-routing chain=prerouting comment="" connection-mark=2 \ disabled=yes in-interface=LAN new-routing-mark=2 passthrough=noadd action=mark-connection chain=prerouting comment=3 disabled=yes \ in-interface=LAN new-connection-mark=3 passthrough=yes \per-connection-classifier=src-address-and-port:3/2add action=mark-routing chain=prerouting comment="" connection-mark=3 \ disabled=yes in-interface=LAN new-routing-mark=3 passthrough=noadd action=change-mss chain=forward comment="" disabled=no new-mss=1400 \ protocol=tcp tcp-flags=syn add action=add-src-to-address-list address-list=src1 address-list-timeout=5s \ chain=prerouting comment="" disabled=no dst-port=80 protocol=tcp \src-address-list=!src2add action=add-src-to-address-list address-list=src2 address-list-timeout=3h \ chain=prerouting comment="" disabled=no dst-port=80 protocol=tcp \src-address-list=!src2add action=accept chain=prerouting comment="" disabled=no dst-port=443 \in-interface=LAN protocol=tcpadd action=mark-connection chain=input comment="" disabled=no in-interface=\pppoe-out1 new-connection-mark=1 passthrough=yesadd action=mark-connection chain=input comment="" disabled=no in-interface=\pppoe-out2 new-connection-mark=2 passthrough=yesadd action=mark-connection chain=input comment="" disabled=no in-interface=\pppoe-out3 new-connection-mark=3 passthrough=yesadd action=mark-routing chain=output comment="" connection-mark=1 disabled=no \new-routing-mark=to_1 passthrough=yesadd action=mark-routing chain=output comment="" connection-mark=2 disabled=no \new-routing-mark=to_2 passthrough=yesadd action=mark-routing chain=output comment="" connection-mark=3 disabled=no \new-routing-mark=to_3 passthrough=yesadd action=mark-connection chain=prerouting comment="" disabled=no \dst-address-type=!local new-connection-mark=1 passthrough=yes \per-connection-classifier=both-addresses:3/0 src-address=10.0.0.0/24add action=mark-connection chain=prerouting comment="" disabled=no \dst-address-type=!local new-connection-mark=2 passthrough=yes \per-connection-classifier=both-addresses:3/1 src-address=10.0.0.0/24add action=mark-connection chain=prerouting comment="" disabled=no \dst-address-type=!local new-connection-mark=3 passthrough=yes \per-connection-classifier=both-addresses:3/2 src-address=10.0.0.0/24add action=mark-routing chain=prerouting comment="" connection-mark=1 \disabled=no new-routing-mark=to_1 passthrough=yes src-address=10.0.0.0/24add action=mark-routing chain=prerouting comment="" connection-mark=2 \disabled=no new-routing-mark=to_2 passthrough=yes src-address=10.0.0.0/24add action=mark-routing chain=prerouting comment="" connection-mark=3 \disabled=no new-routing-mark=to_3 passthrough=yes src-address=10.0.0.0/24以上是PPPOE 负载平衡,为both-addresses形式的(好像和PCC一样,不明白,还有就是我没做IP负载平衡,我用不着,做了也删了)add action=mark-connection chain=prerouting comment="" disabled=no dst-port=\8291 in-interface=pppoe-out3 new-connection-mark=in_3 passthrough=yes \protocol=tcpadd action=mark-routing chain=output comment="" connection-mark=in_3 \disabled=no new-routing-mark=3 passthrough=yes以上是指定外网访问ROS的线路和端口,我这样理解,具体也不明白add action=mark-connection chain=prerouting comment=\ "\D3\C5\CF\C8\B6\CB\BF\DA" disabled=no dst-port=443 new-connection-mark=\Port_Conn passthrough=yes protocol=tcpadd action=mark-connection chain=prerouting comment="" disabled=no dst-port=\3724 new-connection-mark=Port_Conn passthrough=yes protocol=tcpadd action=mark-connection chain=prerouting comment="" disabled=no dst-port=\8000 new-connection-mark=Port_Conn passthrough=yes protocol=udpadd action=mark-packet chain=prerouting comment="" connection-mark=Port_Conn \disabled=no new-packet-mark=Port_Packet passthrough=noadd action=mark-connection chain=prerouting comment="web\B6\CB\BF\DA" \disabled=no dst-port=80 new-connection-mark=80_Conn passthrough=yes \protocol=tcpadd action=mark-connection chain=prerouting comment="" disabled=no dst-port=\53 new-connection-mark=80_Conn passthrough=yes protocol=udpadd action=mark-packet chain=prerouting comment="" connection-mark=80_Conn \ disabled=no new-packet-mark=80_packet passthrough=noadd action=mark-connection chain=prerouting comment=\ "\C6\E4\CB\FB\CA\FD\BE\DD" disabled=no new-connection-mark=Other_Conn \passthrough=yesadd action=mark-packet chain=prerouting comment="" connection-mark=Other_Conn \ disabled=no new-packet-mark=Other_Packet passthrough=no以上是端口优先标记,和前面的一起使用,不用就都不要加/ip firewall natadd action=masquerade chain=srcnat comment=10 disabled=no out-interface=\pppoe-out1add action=masquerade chain=srcnat comment=11 disabled=no out-interface=\pppoe-out2add action=masquerade chain=srcnat comment=12 disabled=no out-interface=\pppoe-out3以上是IP伪装,我是三知AD,和2.9的不一样,开始这里按2.9的搞,搞了很久上不了网/ip firewall service-portset ftp disabled=no ports=21set tftp disabled=no ports=69set irc disabled=no ports=6667set h323 disabled=noset sip disabled=no ports=5060,5061set pptp disabled=no/ip neighbor discoveryset WAN3 discover=yesset LAN discover=yesset WAN1 discover=yesset WAN2 discover=yesset pppoe-out1 discover=noset pppoe-out2 discover=noset pppoe-out3 discover=no/ip proxyset always-from-cache=no cache-administrator=webmastercache-hit-dscp=4 \cache-on-disk=no enabled=no max-cache-size=none max-client-connections=\600 max-fresh-time=3d max-server-connections=600 parent-proxy=0.0.0.0 \parent-proxy-port=0 port=8080 serialize-connections=no src-address=\0.0.0.0以上是不知用的东东/ip routeadd check-gateway=ping comment="" disabled=yes distance=1 dst-address=\0.0.0.0/0 gateway=pppoe-out2 routing-mark=2add check-gateway=ping comment="" disabled=yes distance=1 dst-address=\0.0.0.0/0 gateway=pppoe-out3 routing-mark=3add check-gateway=ping comment="" disabled=yes distance=1 dst-address=\0.0.0.0/0 gateway=pppoe-out1add check-gateway=ping comment="" disabled=yes distance=1 dst-address=\0.0.0.0/0 gateway=pppoe-out1 routing-mark=1add check-gateway=ping comment="" disabled=yes distance=2 dst-address=\0.0.0.0/0 gateway=pppoe-out2add comment=WAN1 disabled=no distance=1 dst-address=0.0.0.0/0 gateway=\pppoe-out1 routing-mark=to_1add comment=WAN3 disabled=no distance=1 dst-address=0.0.0.0/0 gateway=\pppoe-out3 routing-mark=to_3add check-gateway=ping comment="" disabled=yes distance=2 dst-address=\0.0.0.0/0 gateway=pppoe-out1add check-gateway=ping comment=WAN2 disabled=no distance=10 dst-address=\0.0.0.0/0 gateway=pppoe-out2add check-gateway=ping comment="" disabled=yes distance=2 dst-address=\0.0.0.0/0 gateway=pppoe-out3add comment=WAN2 disabled=no distance=1 dst-address=0.0.0.0/0 gateway=\pppoe-out2 routing-mark=to_2add check-gateway=ping comment=WAN1 disabled=no distance=10 dst-address=\0.0.0.0/0 gateway=pppoe-out1add check-gateway=ping comment=WAN3 disabled=no distance=10 dst-address=\0.0.0.0/0 gateway=pppoe-out3以上这里就是路由了,看着有点长,设好后其实就只有3*2+1条了,为什么?我这样理解的,3条AD+3条备用+1条默认/ip serviceset telnet address=0.0.0.0/0 disabled=no port=23set ftp address=0.0.0.0/0 disabled=no port=21set www address=0.0.0.0/0 disabled=no port=80set www-ssl address=0.0.0.0/0 certificate=none disabled=yes port=443set api address=0.0.0.0/0 disabled=yes port=8728set winbox address=0.0.0.0/0 disabled=no port=8291/ip socksset connection-idle-timeout=2m enabled=no max-connections=200 port=1080/ip traffic-flowset active-flow-timeout=30m cache-entries=4k enabled=no \inactive-flow-timeout=15s interfaces=all/ip upnpset allow-disable-external-interface=yes enabled=yes show-dummy-rule=yes以上这些也是不知用的东东,也不用管吧/ppp aaaset accounting=yes interim-update=0s use-radius=no/ppp secretadd caller-id="" comment="" disabled=no limit-bytes-in=0 limit-bytes-out=0 \name=ADSC110 password=110110 profile=LOW routes="" service=anyadd caller-id="" comment="" disabled=no limit-bytes-in=0 limit-bytes-out=0 \name=ADSC207 password=207207 profile=default routes="" service=any以上是我拔号上网的用户名和密码,按自己的加,PPPOE服务前面已建立好了set WAN3 queue=ethernet-defaultset LAN queue=ethernet-defaultset WAN1 queue=ethernet-defaultset WAN2 queue=ethernet-defaultset pppoe-out1 queue=defaultset pppoe-out2 queue=defaultset pppoe-out3 queue=default/radius incomingset accept=no port=3799/storeadd comment="" disabled=no disk=primary-master name=web-proxy1 type=web-proxy /system clockset time-zone-name=manual/system clock manualset dst-delta=+00:00 dst-end="jan/01/1970 00:00:00" dst-start=\"jan/01/1970 00:00:00" time-zone=+00:00/system consoleadd disabled=no port=serial0 term=vt102set [ find vcno=1 ] disabled=no term=linuxset [ find vcno=2 ] disabled=no term=linuxset [ find vcno=3 ] disabled=no term=linuxset [ find vcno=4 ] disabled=no term=linuxset [ find vcno=5 ] disabled=no term=linuxset [ find vcno=6 ] disabled=no term=linuxset [ find vcno=7 ] disabled=no term=linuxset [ find vcno=8 ] disabled=no term=linux/system console screenset line-count=25/system hardwareset multi-cpu=yes/system healthset state-after-reboot=enabled/system identityset name=MikroTik/system loggingadd action=memory disabled=no prefix="" topics=infoadd action=memory disabled=no prefix="" topics=erroradd action=memory disabled=no prefix="" topics=warning add action=echo disabled=no prefix="" topics=critical/system noteset note="" show-at-login=yes/system ntp clientset enabled=no mode=broadcast primary-ntp=0.0.0.0 secondary-ntp=0.0.0.0上面的我也没搞明白是什么,也不用去理会/system scheduleradd comment="" disabled=no interval=30s name=getadsl on-event=":global assign\ \r\\n:global new\r\\n:global status\r\\n:global x\r\\n:set x 3\r\(红字3改成你的AD条数)\n:for i from=1 to=\$x do={\r\\n :set status [/interface get [/interface find name=(\"pppoe-out\" . \\$i)] running]\r\\n :if (\$status=true) do={\r\\n :set new [/ip address get [/ip address find dynamic=yes interface=(\\"pppoe-out\" . \$i)] address]\r\\n :set new [:pick \$new 0 ([:len \$new] -3)]\r\\n :set assign [/ip address get [/ip address find dynamic=no interface\=(\"pppoe-out\" . \$i)] address]\r\\n :set assign [:pick \$assign 0 ([:len \$assign] -3)]\r\\n :if (\$assign != \$new) do={ /ip address set [/ip addressfind c\omment=(\"adsl\" . \$i)] address=\$new network=\$new broadcast=\$new\r\\n /ip route set [/ip route find comment=(\"adsl\" . \$i)] gateway\=\$new\r\\n }\r\\n }\r\\n} \r\\n" start-time=startup以上是刷网关的脚本,很重点的哟add comment="" disabled=no interval=5m name=DDNS on-event=":log info \"DDNS: B\ egin\"\r\\n:global ddns-user \"123456\"\r\\n:global ddns-pass \"123456\"\r\\n:global ddns-host \"/doc/143656614.html,\"\r\(将红字改成你的)\n:global ddns-interface \"pppoe-out1\"\r\(这个是用那条线做DDNS)\n:global ddns-ip [ /ip address get [/ip address find interface=\$ddns-int\erface] address ] \r\\n:log info \"DDNS: Sending UPDATE!\"\r\\n:log info [ /tool dns-update name=\$ddns-host address=[:pick \$ddns-ip 0\\_[:find \$ddns-ip \"/\"] ] key-name=\$ddns-user key=\$ddns-pass ]\r\\n:log info \"DDNS: End\"" start-time=startup以上是DDNS,很好用的/system scriptadd name=ADSL policy=\ftp,reboot,read,write,policy,test,winbox,password,sniff,sensit ive source="\:global assign\r\\n:global new\r\\n:global status\r\\n:global x\r\\n:set x 2\r\\n:for i from=1 to=\$x do={\r\\n :set status [/interface get [/interface find name=(\"pppoe-out\" . \\$i)] running]\r\\n :if (\$status=true) do={\r\\n :set new [/ip address get [/ip address find dynamic=yes interface=(\\"pppoe-out\" . \$i)] address]\r\\n :set new [:pick \$new 0 ([:len \$new] -3)]\r\\n :set assign [/ip address get [/ip address find dynamic=no interface\=(\"pppoe-out\" . \$i)] address]\r\\n :set assign [:pick \$assign 0 ([:len \$assign] -3)]\r\\n :if (\$assign != \$new) do={ /ip address set [/ip address find c\omment=(\"adsl\" . \$i)] address=\$new network=\$new broadcast=\$new\r\\n /ip route set [/ip route find comment=(\"adsl\" . \$i)] gateway\=\$new\r\\n }\r\\n }\r\\n} \r\\n"/system upgrade mirrorset check-interval=1d enabled=no primary-server=0.0.0.0 secondary-server=\0.0.0.0 user=""/system watchdogset auto-send-supout=no automatic-supout=yes no-ping-delay=5m watch-address=\ none watchdog-timer=yes /tool bandwidth-serverset allocate-udp-ports-from=2000 authenticate=yes enabled=yes max-sessions=\ 100/tool e-mailset from=<> password="" server=0.0.0.0:25 username=""/tool graphingset page-refresh=300 store-every=5min/tool graphing interfaceadd allow-address=0.0.0.0/0 disabled=no interface=all store-on-disk=yes/tool mac-serveradd disabled=no interface=all/tool mac-server pingset enabled=yes/tool smsset allowed-number="" channel=0 keep-max-sms=0 receive-enabled=no secret="" /tool snifferset file-limit=10 file-name="" filter-address1=0.0.0.0/0:0-65535 \filter-address2=0.0.0.0/0:0-65535 filter-protocol=ip-only filter-stream=\yes interface=all memory-limit=10 only-headers=no streaming-enabled=no \ streaming-server=0.0.0.0/useradd address=0.0.0.0/0 comment="system default user" disabled=no group=full \ name=admin/user aaaset accounting=yes default-group=read interim-update=0s use-radius=no以上的我还是搞不懂的。
【新提醒】ros多线负载方法

【新提醒】ros多线负载方法
本帖最后由 zaiyongni 于 2013-6-11 20:40 编辑
吐槽一下,伪ros高手太多了。
前段时间一时大意给一个骗了。
结果还是自己慢慢研究透了。
PS,不要太相信网络上所谓高手帮你解决问题,只要你肯下决心去研究,多找找资料就没什么解决不了的。
正题:有段时间在想办法减少防火墙里规则的时候发现一个很有意思的事情:
本帖隐藏的内容
看这个有没有人看懂呢?
然后我在自家的出租房把所有的规则删除掉,连限速都没有留,,然后就成了这样
实测15天,在这里我解释一下,其实在路由表里直接添加一条规则就可以了,不用那么麻烦,如果你的是多isp的话就需要分开来做,还是只要在路由表里面添加,这样的话就省了做PCC的规则,而且经测试负载均衡也可以实现,你只需要再做下限速或者二次树形就可以了。
313以上理论上应该都可以,实测330和524的
这样做还有一个问题就是当你负载太高的时候类似QQ之类的软件会掉线,这个问题其实也不算什么问题,只要做一下回流就好了。
这样省了很多做了PCC之后的后遗症。
在这里说明一下给人骗的是关于多ISP负载均衡的!并不是PCC负载之类的。
这个问题我问过很多人,后面被催的急了病急乱投医。
结果你们懂的。
冷静下来后我又找过一些高手,在这里我还真的要谢谢大玩家,本来我打算出个千多块钱买个脚本来的,后面在跟大玩家沟通过程中才知道具体问题的思考方向。
PS,大玩家虽然不愿意接这个活,但是给了我些中肯的建议。
在这里,谢谢。
如果不是你,我可能现在还在问题死角里钻着。
网吧ROS路由器做PCQ限速教程
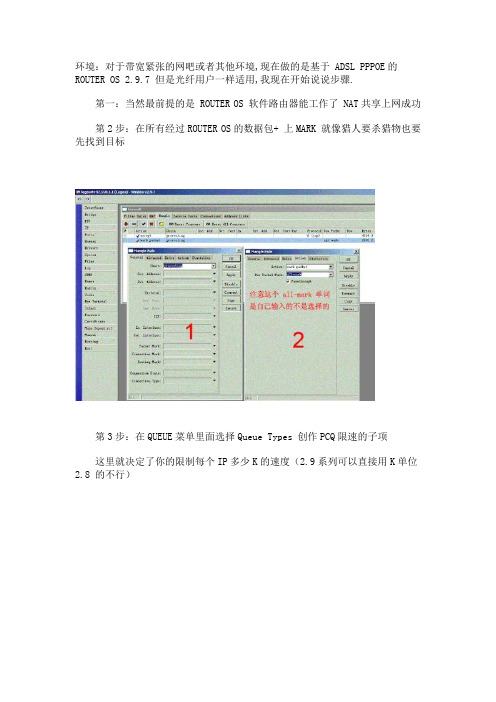
环境:对于带宽紧张的网吧或者其他环境,现在做的是基于 ADSL PPPOE的ROUTER OS 2.9.7 但是光纤用户一样适用,我现在开始说说步骤.第一:当然最前提的是 ROUTER OS 软件路由器能工作了 NAT共享上网成功第2步:在所有经过ROUTER OS的数据包+ 上MARK 就像猎人要杀猎物也要先找到目标第3步:在QUEUE菜单里面选择Queue Types 创作PCQ限速的子项这里就决定了你的限制每个IP多少K的速度(2.9系列可以直接用K单位2.8 的不行)这里多说2句网吧的带宽和银行道理一样总带宽不能平均处以IP数量这个公式不合适可以想象网吧的客人不可能同时全部去下载或者全部去上传网吧的目标追求网络利用最大化这个IP的限制要看你自己的网吧的需要的1般来说每个IP限制下载最高 512K;上传128K已经可以流畅游戏和视频----------------------------------------------------------------------------------------------------另外:这个也和你的开关频繁开启和关闭有关系如果设置得不合理网络带宽浪费严重客户也会对你的网吧的网络速度抱怨的!(这可是得不尝失)第4步:做好流量监视触发器就像1个条件过滤器注意2 和3 红色数字那里*要选择对你的外网线路*要注意ABOVE是 > 的意思,就是大于多少K的时候启动这个限制,只要模糊数字就可以如果你的带宽是10M,你可以直接设置 10000000*另外1个就是BELOW 当然就是 < 小于的意思,这里很关键的地方就是你刚才设置的每IP限制数了你们看第2张图的2那里,你这个BELOW的数值一定要 < 它不然你在限速的时候客户的机器就会1会快1会慢的,其中的道理你们慢慢体会就会理解第5步:做1个执行这个限制的脚本很简单的就2行,但是注意脚本的名字要和你的在第四张图EVEN里面的一致(如果你想我拷贝那几句命令出来给你,你就不要看了,这么懒的都有的!)做到这里这个PCQ 脚本限速就做好了,希望大家喜欢.。
ROS软路由流控中PCQ动态限速设置教程

ROS软路由流控中PCQ动态限速设置教程PCQ即per connection queuing(每次连接排序)。
踏实唯⼀⼀种能⽆等级排序的限流策略。
PCQ会根据pcq-classifier参数产⽣⼦队列。
每个⼦队列都有⼀个pcq-rate的数据率限制和pcq-limit⼤⼩的数据包。
PCQ总⼤⼩不能⼤于PCQ-total-limit。
为什么需要配置PCQ呢?⽐如在局域⽹中总带宽为20M的带宽,如果不做流控⼀个⽤户可能把带宽资源全部霸占掉,从⽽影响掉其他⽤户的带宽。
如果做每个带宽限制在1M,那么内⽹只有⼏个⽤户上⽹时,从⽽会浪费带宽。
所以我们做⼀个PCQ,限制下载为4M,上传为2M。
这样当⽤户为2台时,他们的下载为4M,上传为2M。
当⽤户为5台时下载为4M,上传为2M。
当⽤户超过5个时,那门所以的⽤户就共享20M的带宽了。
PCQ实例单线接⼊⾸先做好⼀个⽹络连通的基本配置步骤:外⽹连接:固定IP接⼊或者PPPOE-client拨号NAT配置DNS配置内⽹配置,⼀般设置DHCP其他设置就是路由器的时间设置能正常连通外⽹后,就可以设置其他的策略了。
PCQ设置步骤:抓取内外⽹的数据对抓取到的数据做PCQ策略⽹络的基本配置就不多说了,这⾥直接配置PCQ1.抓取内外⽹数据:Mangle配置通过mangle的prerouting链表抓取tel⼝和lan⼝的数据标记电信接⼝,即⽹络的下载,in-interface=ether2-tel,passthrough=no(passthrough=no意思是标记的该条规则的数据不传递给下⼀条规则。
也就可以这样说,把这条数据标记出来然后提取后就交给相应的规则处理,其他的规则就不能处理该条规则了)标记电信接⼝,即⽹络的上传,in-interface=ether1-lan,passthrough=no2. 对抓取到的数据做PCQ策略总带宽12Mbps,主机120台为每台主机下载分配总带宽的1/3,即down规则的pcq-rate=4M 通过计算total-limit=limit*120=6000下载通过dst-address分类,上传通过src-addre分类本帖隐藏的内容本帖隐藏的内容配置queue tree在queue tree中添加规则,配置下⾏流量控制,取名为down配置下⾏数据时注意总带宽为12M,需要保留部分缓冲带宽⼤概在1-2M,这⾥保留1.5M,在ROS中不⽀持⼩数,需要⽤整数表⽰,即max-limit-10500k配置上⾏流量,取名为up配置上⾏流量数据⼀般⼩于实际带宽,通常情况下上⾏带宽较⼩,所以设置为8M,在max-limit=8M。
ROS 多线路路由

多线路复合应用
某网吧有5M电信光纤一条,5M网通光纤一条,5条 4MADSL,内部主机120台。 简单网络结构
结合网页数据上传小,下行比较大的特点,让网页数据负载均衡走ADSL 线路,然后导入网通路由表,让网通数据走网通光纤,默认路由走电信 光纤
接口配置
IP配置
80端口分流路由标记
:for i from=1 to=5 do= {/ip firewall mangle add chain=prerouting in-interface=ether3-lan\ protocol=tcp dst-port=80 per-connection-classifier=("bot"both-addresses:5/".($i-1)) \ dst-address-type=!local action=mark-connection new-connection-mark=("web-conn".$i);\ /ip firewall mangle add chain=prerouting in-interface=ether3-lan protocol=tcp \ dst-port=80 connection-mark=("web-conn".$i) action=mark-routing\ new-routing-mting-mark=("web-rout".$i)}
导入之后可以在ip rout rule目录下面看到路由表信息
最后添加一条网关为电信,routing-mark为路由表标记Tlecom的路由
同ISP多线路
对于同类型ISP线路,将数据按带宽比例进行划分,让相应比例的数据 走相应线路。 如下示例,我们将内网的访问连接按连接的源地址和目标地址分组 (PCC)为3份,其中1/3走电信1,其余2/3走电信2。
ROS双线负载均衡图文教程

首先说一下我为什么要用两条ADSL来代理上网.本网吧开始用25M光纤带了400台机子,有一段时间感觉网络比较卡,于是老板考虑加带宽. 但是考虑到深圳的光纤费超贵的,就申请了两条4M的ADSL来分流..25M带340台,其它的60台用两条ADSL来带..(文章中我并不是带的60台,这个大家自己看)为什么要用负载呢, 因为你用ROUTER OS接两个外网网卡,拔号上网以后,同时能用的就只有一条ADSL,即使两条都拔上了也是这样.所以为了不浪费资源,我们就要负载来让两条ADSL同时工作,同时来代理上网....先引用一个高手的话.--------------------------------------------------------------------------注:很多人问1.动态的ADSL怎么办?你仔细观察一下IP Routes 里面动态ADSL重拨IP是变的网关是不变的你在interfaces里的ADSL拨号把Add Default Route 去掉然后在IP Routes里手动添加网关2.ADSL网关都一样怎么办?简单嘛...其中一个Moden开启路由功能就就不同网关了不?---------------------------------------------------------------------------首先说一下ADSL负载大部分都是根据IP分流,或者是根据端口分流,由于我网吧的IP段比较乱,我就根据IP分流来带60台机子..端口分流的话如果你喜欢可以自己试用一下.我的ADSL拔号后的情况...我拔号后,每次网关都会变,,网关就是那次拔号后的子网掩码. 那么应该怎么做呢? 往下看就是了..第一步:安装好routeros(我用的是2.927) 装上三个网卡,一个内网的,二个外网的..接好内网的网线,使你能访问路由...并且改好路由网卡的名称. 如图1第二步:外网(WAN1,WAN2)两个网卡添加pppoe client第一个命名为ADSL1 并且加上拔号的用户名和密码, 第二条命名为ADSL2 同时加上拔号的用户名和密码.这里要注意: 把Add Default Route 去掉. 如图2, 3第三步:设置IP伪装这个大家都会吧...如图4,5第四步:设置MARK标记标记你要分流的IP范围如图6,7设置new routeing mark为ADSL1,ADSL2第五步:在IP-routers中添加路由标记,命名为link1,link2这里的MARK要和你上一步中设的一致这里的gateway你可以随便填,因为下面会用脚本来更新这个路由. 如图8,9第六步:添加监控拔号状态的脚本,把拔号后得到的网关更新到上一步的路由表中...总共要加两个脚本. ADSL1,ADSL2 如图10,11 (system--scripts)第七步:添加一个计划任务,每隔10(或者是20)秒运行一下上面的ADSL1,ADSL2脚本.如图12,13 这里更改时间的话,就是interval后面改就行了,注意看图就OK了.(system--scheduler这个和XP中计划任务服务的名称是一样的.)第八步: OK了,希望你能够成功...大家看看我做好以后的效果吧!!真实环境测试的.下面是我的两条ADSL的真实流量图!现在碰到问题了想请教完全按照楼主的做但是第二根ADSL不能拨号连接就是没有反映请你先用ADSL做到单机能够拔号上网了以后再来试router拔号.....如果单机能拔再试一下把拔号选项的第一个勾勾上,也就是手动拔号,然后再把勾去掉,让他自动拔号,我开始的时候也有的时候不能拔上,我试过后就可以了,还是不行就换一下网卡,因为我这里有这种情况,我两个3com的网卡,只有一个能拔上,所以我就换了一个TP的垃圾网卡居然拔上了...。
Ros3.30PCC多线负载均衡脚本脚本

Ros 3.30 PCC双线负载均衡脚本脚本如下/ip address add address=内网网关IP/内网子网掩码interface=内网网卡名称comment="\D1\CC\C9\F1\B6\E0\CF\DF\50\43\43\BD\C5\B1\BE\52\6F\73\BC\BC\ CA\F5\BD\BB\C1\F7\C8\BA\A3\BA\31\30\32\38\37\32\30\35\38"/ip dns set primary-dns=首选DNS secondary-dns=备用DNSallow-remote-requests=yes/interface pppoe-client add name="pppoe-out1" interface=外网网卡1名称user="PPPoE帐号1" password="密码1" add-default-route=no disabled=no/interface pppoe-client add name="pppoe-out2" interface=外网网卡2名称user="PPPoE帐号2" password="密码2" add-default-route=no disabled=no/ip firewall mangleadd action=change-mss chain=forwardcomment="\D1\CC\C9\F1\B6\E0\CF\DF\50\43\43\BD\C5\B1\BE\52\6F\73\BC\BC\ CA\F5\BD\BB\C1\F7\C8\BA\A3\BA\31\30\32\38\37\32\30\35\38" disabled=no new-mss=1440 protocol=tcp tcp-flags=synadd action=mark-connection chain=input comment="" disabled=noin-interface=pppoe-out1 new-connection-mark=pppoe-out1_conn passthrough=yesadd action=mark-connection chain=input comment="" disabled=noin-interface=pppoe-out2 new-connection-mark=pppoe-out2_conn passthrough=yesadd action=mark-routing chain=output comment=""connection-mark=pppoe-out1_conn disabled=nonew-routing-mark=to_pppoe-out1 passthrough=yesadd action=mark-routing chain=output comment=""connection-mark=pppoe-out2_conn disabled=nonew-routing-mark=to_pppoe-out2 passthrough=yesadd action=mark-connection chain=prerouting comment="" disabled=nodst-address-type=!local in-interface=ether1new-connection-mark=pppoe-out1_conn passthrough=yesper-connection-classifier=both-addresses:2/0 src-address=内网网断/内网子网掩码add action=mark-connection chain=prerouting comment="" disabled=nodst-address-type=!local in-interface=ether1new-connection-mark=pppoe-out2_conn passthrough=yesper-connection-classifier=both-addresses:2/1 src-address=内网网断/内网子网掩码add action=mark-routing chain=prerouting comment=""connection-mark=pppoe-out1_conn disabled=no in-interface=ether1new-routing-mark=to_pppoe-out1 passthrough=yes src-address=内网网断/内网子网掩码add action=mark-routing chain=prerouting comment=""connection-mark=pppoe-out2_conn disabled=no in-interface=ether1new-routing-mark=to_pppoe-out2 passthrough=yes src-address=内网网断/内网子网掩码/ip routeadd comment=1 disabled=no distance=1 dst-address=0.0.0.0/0gateway=pppoe-out1 routing-mark=to_pppoe-out1 check-gateway=pingadd comment=2 disabled=no distance=1 dst-address=0.0.0.0/0gateway=pppoe-out2 routing-mark=to_pppoe-out2 check-gateway=pingadd check-gateway=ping comment="pppoe-out1" disabled=no distance=10 dst-address=0.0.0.0/0 gateway=pppoe-out1add check-gateway=ping comment="pppoe-out2" disabled=no distance=10 dst-address=0.0.0.0/0 gateway=pppoe-out2/ip firewall natadd action=masquerade chain=srcnat comment="1" disabled=noout-interface=pppoe-out1add action=masquerade chain=srcnat comment="2" disabled=noout-interface=pppoe-out2Ros 3.30 PCC三线负载均衡脚本脚本如下/ip address add address=内网网关IP/内网子网掩码interface=内网网卡名称comment="\D1\CC\C9\F1\B6\E0\CF\DF\50\43\43\BD\C5\B1\BE\52\6F\73\BC\BC\ CA\F5\BD\BB\C1\F7\C8\BA\A3\BA\31\30\32\38\37\32\30\35\38"/ip dns set primary-dns=首选DNS secondary-dns=备用DNSallow-remote-requests=yes/interface pppoe-client add name="pppoe-out1" interface=外网网卡1名称user="PPPoE帐号1" password="密码1" add-default-route=no disabled=no/interface pppoe-client add name="pppoe-out2" interface=外网网卡2名称user="PPPoE帐号2" password="密码2" add-default-route=no disabled=no/interface pppoe-client add name="pppoe-out3" interface=外网网卡3名称user="PPPoE帐号3" password="密码3" add-default-route=no disabled=no/ip firewall mangleadd action=change-mss chain=forwardcomment="\D1\CC\C9\F1\B6\E0\CF\DF\50\43\43\BD\C5\B1\BE\52\6F\73\BC\BC\ CA\F5\BD\BB\C1\F7\C8\BA\A3\BA\31\30\32\38\37\32\30\35\38" disabled=no new-mss=1440 protocol=tcp tcp-flags=synadd action=mark-connection chain=input comment="" disabled=noin-interface=pppoe-out1 new-connection-mark=pppoe-out1_conn passthrough=yesadd action=mark-connection chain=input comment="" disabled=noin-interface=pppoe-out2 new-connection-mark=pppoe-out2_conn passthrough=yesadd action=mark-connection chain=input comment="" disabled=noin-interface=pppoe-out3 new-connection-mark=pppoe-out3_conn passthrough=yesadd action=mark-routing chain=output comment=""connection-mark=pppoe-out1_conn disabled=nonew-routing-mark=to_pppoe-out1 passthrough=yesadd action=mark-routing chain=output comment=""connection-mark=pppoe-out2_conn disabled=nonew-routing-mark=to_pppoe-out2 passthrough=yesadd action=mark-routing chain=output comment=""connection-mark=pppoe-out3_conn disabled=nonew-routing-mark=to_pppoe-out3 passthrough=yesadd action=mark-connection chain=prerouting comment="" disabled=nodst-address-type=!local in-interface=ether1new-connection-mark=pppoe-out1_conn passthrough=yesper-connection-classifier=both-addresses:3/0 src-address=内网网断/内网子网掩码add action=mark-connection chain=prerouting comment="" disabled=nodst-address-type=!local in-interface=ether1new-connection-mark=pppoe-out2_conn passthrough=yesper-connection-classifier=both-addresses:3/1 src-address=内网网断/内网子网掩码add action=mark-connection chain=prerouting comment="" disabled=nodst-address-type=!local in-interface=ether1new-connection-mark=pppoe-out3_conn passthrough=yesper-connection-classifier=both-addresses:3/2 src-address=内网网断/内网子网掩码add action=mark-routing chain=prerouting comment=""connection-mark=pppoe-out1_conn disabled=no in-interface=ether1new-routing-mark=to_pppoe-out1 passthrough=yes src-address=内网网断/内网子网掩码add action=mark-routing chain=prerouting comment=""connection-mark=pppoe-out2_conn disabled=no in-interface=ether1new-routing-mark=to_pppoe-out2 passthrough=yes src-address=内网网断/内网子网掩码add action=mark-routing chain=prerouting comment=""connection-mark=pppoe-out3_conn disabled=no in-interface=ether1new-routing-mark=to_pppoe-out3 passthrough=yes src-address=内网网断/内网子网掩码/ip routeadd comment=1 disabled=no distance=1 dst-address=0.0.0.0/0gateway=pppoe-out1 routing-mark=to_pppoe-out1 check-gateway=pingadd comment=2 disabled=no distance=1 dst-address=0.0.0.0/0gateway=pppoe-out2 routing-mark=to_pppoe-out2 check-gateway=ping add comment=3 disabled=no distance=1 dst-address=0.0.0.0/0gateway=pppoe-out3 routing-mark=to_pppoe-out3 check-gateway=ping add check-gateway=ping comment="pppoe-out1" disabled=no distance=10 dst-address=0.0.0.0/0 gateway=pppoe-out1add check-gateway=ping comment="pppoe-out2" disabled=no distance=10 dst-address=0.0.0.0/0 gateway=pppoe-out2add check-gateway=ping comment="pppoe-out3" disabled=no distance=10 dst-address=0.0.0.0/0 gateway=pppoe-out3/ip firewall natadd action=masquerade chain=srcnat comment="1" disabled=noout-interface=pppoe-out1add action=masquerade chain=srcnat comment="2" disabled=noout-interface=pppoe-out2add action=masquerade chain=srcnat comment="3" disabled=noout-interface=pppoe-out3Ros 3.30 PCC四线负载均衡脚本脚本如下/ip address add address=内网网关IP/内网子网掩码interface=内网网卡名称comment="\D1\CC\C9\F1\B6\E0\CF\DF\50\43\43\BD\C5\B1\BE\52\6F\73\BC\BC\ CA\F5\BD\BB\C1\F7\C8\BA\A3\BA\31\30\32\38\37\32\30\35\38"/ip dns set primary-dns=首选DNS secondary-dns=备用DNSallow-remote-requests=yes/interface pppoe-client add name="pppoe-out1" interface=外网网卡1名称user="PPPoE帐号1" password="密码1" add-default-route=no disabled=no/interface pppoe-client add name="pppoe-out2" interface=外网网卡2名称user="PPPoE帐号2" password="密码2" add-default-route=no disabled=no/interface pppoe-client add name="pppoe-out3" interface=外网网卡3名称user="PPPoE帐号3" password="密码3" add-default-route=no disabled=no/interface pppoe-client add name="pppoe-out4" interface=外网网卡4名称user="PPPoE帐号4" password="密码4" add-default-route=no disabled=no/ip firewall mangleadd action=change-mss chain=forwardcomment="\D1\CC\C9\F1\B6\E0\CF\DF\50\43\43\BD\C5\B1\BE\52\6F\73\BC\BC\ CA\F5\BD\BB\C1\F7\C8\BA\A3\BA\31\30\32\38\37\32\30\35\38" disabled=nonew-mss=1440 protocol=tcp tcp-flags=synadd action=mark-connection chain=input comment="" disabled=no in-interface=pppoe-out1 new-connection-mark=pppoe-out1_conn passthrough=yesadd action=mark-connection chain=input comment="" disabled=no in-interface=pppoe-out2 new-connection-mark=pppoe-out2_conn passthrough=yesadd action=mark-connection chain=input comment="" disabled=no in-interface=pppoe-out3 new-connection-mark=pppoe-out3_conn passthrough=yesadd action=mark-connection chain=input comment="" disabled=no in-interface=pppoe-out4 new-connection-mark=pppoe-out4_conn passthrough=yesadd action=mark-routing chain=output comment=""connection-mark=pppoe-out1_conn disabled=nonew-routing-mark=to_pppoe-out1 passthrough=yesadd action=mark-routing chain=output comment=""connection-mark=pppoe-out2_conn disabled=nonew-routing-mark=to_pppoe-out2 passthrough=yesadd action=mark-routing chain=output comment=""connection-mark=pppoe-out3_conn disabled=nonew-routing-mark=to_pppoe-out3 passthrough=yesadd action=mark-routing chain=output comment=""connection-mark=pppoe-out4_conn disabled=nonew-routing-mark=to_pppoe-out4 passthrough=yesadd action=mark-connection chain=prerouting comment="" disabled=nodst-address-type=!local in-interface=ether1new-connection-mark=pppoe-out1_conn passthrough=yesper-connection-classifier=both-addresses:4/0 src-address=内网网断/内网子网掩码add action=mark-connection chain=prerouting comment="" disabled=nodst-address-type=!local in-interface=ether1new-connection-mark=pppoe-out2_conn passthrough=yesper-connection-classifier=both-addresses:4/1 src-address=内网网断/内网子网掩码add action=mark-connection chain=prerouting comment="" disabled=nodst-address-type=!local in-interface=ether1new-connection-mark=pppoe-out3_conn passthrough=yesper-connection-classifier=both-addresses:4/2 src-address=内网网断/内网子网掩码add action=mark-connection chain=prerouting comment="" disabled=nodst-address-type=!local in-interface=ether1new-connection-mark=pppoe-out4_conn passthrough=yesper-connection-classifier=both-addresses:4/3 src-address=内网网断/内网子网掩码add action=mark-routing chain=prerouting comment=""connection-mark=pppoe-out1_conn disabled=no in-interface=ether1new-routing-mark=to_pppoe-out1 passthrough=yes src-address=内网网断/内网子网掩码add action=mark-routing chain=prerouting comment=""connection-mark=pppoe-out2_conn disabled=no in-interface=ether1new-routing-mark=to_pppoe-out2 passthrough=yes src-address=内网网断/内网子网掩码add action=mark-routing chain=prerouting comment=""connection-mark=pppoe-out3_conn disabled=no in-interface=ether1new-routing-mark=to_pppoe-out3 passthrough=yes src-address=内网网断/内网子网掩码add action=mark-routing chain=prerouting comment=""connection-mark=pppoe-out3_conn disabled=no in-interface=ether1new-routing-mark=to_pppoe-out4 passthrough=yes src-address=内网网断/内网子网掩码/ip routeadd comment=1 disabled=no distance=1 dst-address=0.0.0.0/0gateway=pppoe-out1 routing-mark=to_pppoe-out1 check-gateway=pingadd comment=2 disabled=no distance=1 dst-address=0.0.0.0/0gateway=pppoe-out2 routing-mark=to_pppoe-out2 check-gateway=pingadd comment=3 disabled=no distance=1 dst-address=0.0.0.0/0gateway=pppoe-out3 routing-mark=to_pppoe-out3 check-gateway=pingadd comment=4 disabled=no distance=1 dst-address=0.0.0.0/0gateway=pppoe-out4 routing-mark=to_pppoe-out4 check-gateway=pingadd check-gateway=ping comment="pppoe-out1" disabled=no distance=10 dst-address=0.0.0.0/0 gateway=pppoe-out1add check-gateway=ping comment="pppoe-out2" disabled=no distance=10 dst-address=0.0.0.0/0 gateway=pppoe-out2add check-gateway=ping comment="pppoe-out3" disabled=no distance=10 dst-address=0.0.0.0/0 gateway=pppoe-out3add check-gateway=ping comment="pppoe-out4" disabled=no distance=10 dst-address=0.0.0.0/0 gateway=pppoe-out4/ip firewall natadd action=masquerade chain=srcnat comment="1" disabled=noout-interface=pppoe-out1add action=masquerade chain=srcnat comment="2" disabled=noout-interface=pppoe-out2add action=masquerade chain=srcnat comment="3" disabled=noout-interface=pppoe-out3add action=masquerade chain=srcnat comment="4" disabled=noout-interface=pppoe-out4Ros 3.30 PCC五线负载均衡脚本脚本如下/ip address add address=内网网关IP/内网子网掩码interface=内网网卡名称comment="\D1\CC\C9\F1\B6\E0\CF\DF\50\43\43\BD\C5\B1\BE\52\6F\73\BC\BC\ CA\F5\BD\BB\C1\F7\C8\BA\A3\BA\31\30\32\38\37\32\30\35\38"/ip dns set primary-dns=首选DNS secondary-dns=备用DNSallow-remote-requests=yes/interface pppoe-client add name="pppoe-out1" interface=外网网卡1名称user="PPPoE帐号1" password="密码1" add-default-route=no disabled=no/interface pppoe-client add name="pppoe-out2" interface=外网网卡2名称user="PPPoE帐号2" password="密码2" add-default-route=no disabled=no/interface pppoe-client add name="pppoe-out3" interface=外网网卡3名称user="PPPoE帐号3" password="密码3" add-default-route=no disabled=no/interface pppoe-client add name="pppoe-out4" interface=外网网卡4名称user="PPPoE帐号4" password="密码4" add-default-route=no disabled=no/interface pppoe-client add name="pppoe-out5" interface=外网网卡5名称user="PPPoE帐号5" password="密码5" add-default-route=no disabled=no/ip firewall mangleadd action=change-mss chain=forwardcomment="\D1\CC\C9\F1\B6\E0\CF\DF\50\43\43\BD\C5\B1\BE\52\6F\73\BC\BC\ CA\F5\BD\BB\C1\F7\C8\BA\A3\BA\31\30\32\38\37\32\30\35\38" disabled=no new-mss=1440 protocol=tcp tcp-flags=synadd action=mark-connection chain=input comment="" disabled=noin-interface=pppoe-out1 new-connection-mark=pppoe-out1_conn passthrough=yesadd action=mark-connection chain=input comment="" disabled=noin-interface=pppoe-out2 new-connection-mark=pppoe-out2_conn passthrough=yesadd action=mark-connection chain=input comment="" disabled=noin-interface=pppoe-out3 new-connection-mark=pppoe-out3_conn passthrough=yesadd action=mark-connection chain=input comment="" disabled=noin-interface=pppoe-out4 new-connection-mark=pppoe-out4_conn passthrough=yesadd action=mark-connection chain=input comment="" disabled=noin-interface=pppoe-out5 new-connection-mark=pppoe-out5_conn passthrough=yesadd action=mark-routing chain=output comment=""connection-mark=pppoe-out1_conn disabled=nonew-routing-mark=to_pppoe-out1 passthrough=yesadd action=mark-routing chain=output comment=""connection-mark=pppoe-out2_conn disabled=nonew-routing-mark=to_pppoe-out2 passthrough=yesadd action=mark-routing chain=output comment=""connection-mark=pppoe-out3_conn disabled=nonew-routing-mark=to_pppoe-out3 passthrough=yesadd action=mark-routing chain=output comment=""connection-mark=pppoe-out4_conn disabled=nonew-routing-mark=to_pppoe-out4 passthrough=yesadd action=mark-routing chain=output comment=""connection-mark=pppoe-out5_conn disabled=nonew-routing-mark=to_pppoe-out5 passthrough=yesadd action=mark-connection chain=prerouting comment="" disabled=nodst-address-type=!local in-interface=ether1new-connection-mark=pppoe-out1_conn passthrough=yesper-connection-classifier=both-addresses:5/0 src-address=内网网断/内网子网掩码add action=mark-connection chain=prerouting comment="" disabled=nodst-address-type=!local in-interface=ether1new-connection-mark=pppoe-out2_conn passthrough=yesper-connection-classifier=both-addresses:5/1 src-address=内网网断/内网子网掩码add action=mark-connection chain=prerouting comment="" disabled=nodst-address-type=!local in-interface=ether1new-connection-mark=pppoe-out3_conn passthrough=yesper-connection-classifier=both-addresses:5/2 src-address=内网网断/内网子网掩码add action=mark-connection chain=prerouting comment="" disabled=nodst-address-type=!local in-interface=ether1new-connection-mark=pppoe-out4_conn passthrough=yesper-connection-classifier=both-addresses:5/3 src-address=内网网断/内网子网掩码add action=mark-connection chain=prerouting comment="" disabled=nodst-address-type=!local in-interface=ether1new-connection-mark=pppoe-out5_conn passthrough=yesper-connection-classifier=both-addresses:5/4 src-address=内网网断/内网子网掩码add action=mark-routing chain=prerouting comment=""connection-mark=pppoe-out1_conn disabled=no in-interface=ether1new-routing-mark=to_pppoe-out1 passthrough=yes src-address=内网网断/内网子网掩码add action=mark-routing chain=prerouting comment=""connection-mark=pppoe-out2_conn disabled=no in-interface=ether1new-routing-mark=to_pppoe-out2 passthrough=yes src-address=内网网断/内网子网掩码add action=mark-routing chain=prerouting comment=""connection-mark=pppoe-out3_conn disabled=no in-interface=ether1new-routing-mark=to_pppoe-out3 passthrough=yes src-address=内网网断/内网子网掩码add action=mark-routing chain=prerouting comment=""connection-mark=pppoe-out3_conn disabled=no in-interface=ether1new-routing-mark=to_pppoe-out4 passthrough=yes src-address=内网网断/内网子网掩码add action=mark-routing chain=prerouting comment=""connection-mark=pppoe-out3_conn disabled=no in-interface=ether1new-routing-mark=to_pppoe-out5 passthrough=yes src-address=内网网断/内网子网掩码/ip routeadd comment=1 disabled=no distance=1 dst-address=0.0.0.0/0gateway=pppoe-out1 routing-mark=to_pppoe-out1 check-gateway=pingadd comment=2 disabled=no distance=1 dst-address=0.0.0.0/0gateway=pppoe-out2 routing-mark=to_pppoe-out2 check-gateway=pingadd comment=3 disabled=no distance=1 dst-address=0.0.0.0/0gateway=pppoe-out3 routing-mark=to_pppoe-out3 check-gateway=pingadd comment=4 disabled=no distance=1 dst-address=0.0.0.0/0gateway=pppoe-out4 routing-mark=to_pppoe-out4 check-gateway=pingadd comment=5 disabled=no distance=1 dst-address=0.0.0.0/0gateway=pppoe-out5 routing-mark=to_pppoe-out5 check-gateway=pingadd check-gateway=ping comment="pppoe-out1" disabled=no distance=10 dst-address=0.0.0.0/0 gateway=pppoe-out1add check-gateway=ping comment="pppoe-out2" disabled=no distance=10dst-address=0.0.0.0/0 gateway=pppoe-out2add check-gateway=ping comment="pppoe-out3" disabled=no distance=10 dst-address=0.0.0.0/0 gateway=pppoe-out3add check-gateway=ping comment="pppoe-out4" disabled=no distance=10 dst-address=0.0.0.0/0 gateway=pppoe-out4add check-gateway=ping comment="pppoe-out5" disabled=no distance=10 dst-address=0.0.0.0/0 gateway=pppoe-out5/ip firewall natadd action=masquerade chain=srcnat comment="1" disabled=noout-interface=pppoe-out1add action=masquerade chain=srcnat comment="2" disabled=noout-interface=pppoe-out2add action=masquerade chain=srcnat comment="3" disabled=noout-interface=pppoe-out3add action=masquerade chain=srcnat comment="4" disabled=noout-interface=pppoe-out4add action=masquerade chain=srcnat comment="5" disabled=noout-interface=pppoe-out5。
ROS双线做法
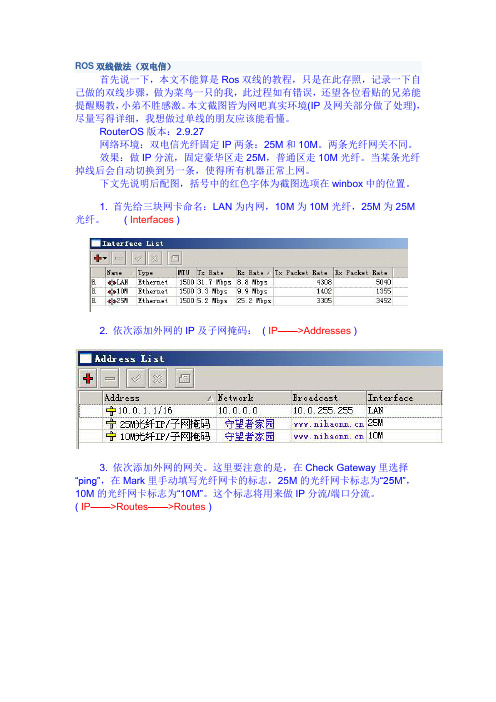
ROS双线做法(双电信)首先说一下,本文不能算是Ros双线的教程,只是在此存照,记录一下自己做的双线步骤,做为菜鸟一只的我,此过程如有错误,还望各位看贴的兄弟能提醒赐教,小弟不胜感激。
本文截图皆为网吧真实环境(IP及网关部分做了处理),尽量写得详细,我想做过单线的朋友应该能看懂。
RouterOS版本:2.9.27网络环境:双电信光纤固定IP两条:25M和10M。
两条光纤网关不同。
效果:做IP分流,固定豪华区走25M,普通区走10M光纤。
当某条光纤掉线后会自动切换到另一条,使得所有机器正常上网。
下文先说明后配图,括号中的红色字体为截图选项在winbox中的位置。
1. 首先给三块网卡命名:LAN为内网,10M为10M光纤,25M为25M 光纤。
( Interfaces )2. 依次添加外网的IP及子网掩码:( IP——>Addresses )3. 依次添加外网的网关。
这里要注意的是,在Check Gateway里选择“ping”,在Mark里手动填写光纤网卡的标志,25M的光纤网卡标志为“25M”,10M的光纤网卡标志为“10M”。
这个标志将用来做IP分流/端口分流。
( IP——>Routes——>Routes )4. 为外网网卡添加注释,即Comment。
可以在第三步的时候就完成,也可以第3步完成后再做。
这个注释将在自动切换脚本里用到。
25M的网卡注释为“25M”,10M的网卡注释为“10M”。
( IP——>Routes——>Routes )5. 添加IP伪装,让内网能够共享上网。
( IP——>Firewall——>NAT )6. 开始做IP分流策略,( IP——>Firewall——>Mangle——>"+"——>General页) Chain选择“prerouting”, Src. Address里填写要分流的IP段,即起始IP到结束IP,起末IP 用减号“-”相连,也可以填写单个IP。
- 1、下载文档前请自行甄别文档内容的完整性,平台不提供额外的编辑、内容补充、找答案等附加服务。
- 2、"仅部分预览"的文档,不可在线预览部分如存在完整性等问题,可反馈申请退款(可完整预览的文档不适用该条件!)。
- 3、如文档侵犯您的权益,请联系客服反馈,我们会尽快为您处理(人工客服工作时间:9:00-18:30)。
ROS多线负载QOS限速生成器教程
内网接口就填ROS的内网网卡接口名。
(只支持一个内网接口)
外网线路数有几条就写几条,这个不用多说吧,最多支持12条。
勾选精确识别网页可以有效排除迅雷,快车等P2P走80端口下载工具。
P2P分类识别有3种选择。
1.禁用。
(不启用P2P的L7识别)2.启用。
(启用P2P的L7识别,全放到P2P分类中,不单设子分类。
)3.分类(启用P2P的L7识别,全放到P2P分类中,单独设子分类。
)本人建议禁用。
勾选流量差压制主要用于某些网吧内外网流量差过大,部分网吧有这个流量差问题(和网吧内客户使用的某些网络软件有关。
),会影响HTB效果。
勾选后可以压制50%左右的流量差。
(开启这个选项前必须先填好其他参数,最后开启。
)
游戏识别方式默认为保守。
由于某些地方网络情况不同,如果游戏分类带宽剩余充裕,可以使用进取选项。
如果游戏分类带宽的流量经常达到或接近限速带宽的情况下建议用保守选项。
(建议使用保守)
内网机器数照实际机器数填就可以了。
保障带宽所有分类之和不能超过100%。
最大带宽单项建议小于80%
线路带宽里的接口名必须和ROS的外网接口名对应,若是PPPOE拨号就填拨号的接口名。
上行带宽和下行带宽建议填实际带宽的90%—95%。
(例如一个10M的光纤,建议设置上下行值为8000-9000。
)
扩展选项里的“UDP压制”建议开启。
扩展选项里的“视频优先”建议开启。
扩展选项里的“排除服务器走游戏限速”建议单线外网开启,多线的话不建议开启,可能会造成服务器断网的情况。
然后点生成脚本并复制按钮,如果是多条线路,会自动分段。
然后按提示分多次粘贴到ROS 内执行即可。
如果需要降低单IP的网络带宽占用,可以开启单IP应用限速功能,光纤线路参数建议为30-90之间,ADSL线路参数建议为75-95之间。
如果是借线环境需要限速,先按多线进行生成限速导入。
实体线路按实际带宽值填,借线按自己需要借的带宽来填。
导入限速后在生成器里按“F12”会显示借线限速设置界面。
源接口名填自己的实体线路,比如光纤就填网卡名,ADSL就填拨号接口名。
借线接口填VPN 的接口名,比如pptp-out1,eoip1等。
然后点调整限速按钮,到ROS命令终端粘贴脚本后完成借线的限速调整。
如果是ADSL借线环境,先按实际网络情况做好限速,不要做借线接口的限速。
导入限速后在生成器里按“F11”。
按借线实际情况填写参数,生成借线限速标记,然后再次导入即可。
生成清除限速脚本时需要填写所有限速的外网接口,包括借线的。