3dmax2013破解及汉化方法
3DsMax2013中文版Slate材质编辑器界面图文详解教程
3DsMax2013中⽂版Slate材质编辑器界⾯图⽂详解教程
四、活动视图:
在3DsMax2013“视图”中显⽰材质和贴图节点,⽤户可以在节点之间创建关联。
1.编辑节点:
可以折叠节点隐藏其窗⼝,如图1所⽰;也可以展开节点显⽰窗⼝,如图2所⽰;还可以在⽔平⽅向调
整节点⼤⼩,这样可以更易于读取窗⼝名称。
通过双击预览,可以放⼤节点标题栏中预览的⼤⼩。
要减⼩预览⼤⼩,再次双击预览即可。
在节点的标题栏中,材质预览的拐⾓处表明材质是否是热材质。
没有三⾓形则表⽰场景中没有⽤
材质,如果材质没有应⽤于场景中的任何对象,就称它是冷材质,如图所⽰。
轮廓是⽩⾊三⾓形表⽰此材质是热材质,换句话说,它已经在场景实例化,如图所⽰。
实⼼⽩⾊三⾓
形,材质不仅是热,⽽且已经应⽤到当前选定的对象上,如图所⽰。
2.关联节点:
要设置材质组件的贴图,请将⼀个贴图节点关联到组件窗⼝的输⼊套接字。
从贴图套接字拖到材质套接字上,图为所创建的关联。
若要移除选定项,单击⼯具栏中的“删除选定对象”按钮,如图所⽰。
Autodesk 3ds Max 2013和3ds Max Design 2013产品更新2软件安装
Autodesk 3ds Max / 3ds Max Design 2013 Product Update 2 ReadmeThis readme contains recent information regarding the installation and use of Autodesk® 3ds Max® 2013 Product Update 2 and Autodesk® 3ds Max® Design 2013 Product Update 2 software. It is strongly recommended that you read this entire document before installing the software. For future reference, you should save this readme to your hard drive.Use the following table to locate various resources related to 3ds Max 2013 / 3ds Max Design 2013:Note: Autodesk is not responsible for errors or failures of Autodesk software arising from the installation of updates, extensions or new releases issued by third-party hardware or software vendors for the qualified software or hardware identified in this document (or for any other third party software or hardware that you may use in connection with Autodesk products).ContentsKnown Issues (2)Versions of the Product Update (2)Installation (2)Uninstall Instructions (2)Windows XP (2)Windows Vista / Windows 7 (2)Supported Operating Systems (3)Customer Involvement Program (CIP) (3)To enable CIP: (3)Customer Error Reports (CERs) (4)Fixes in this Product Update (4)Known IssuesVersions of the Product UpdateInstallation1.Download the appropriate file for your system. See Versions of this Product Update2.Double-Click the Product Update 2 executable3.Follow the installation prompts in the Product Update 2 installerUninstall InstructionsWindows XP1.Open Start > Settings > Control Panel > Add Or Remove Programs dialog.2.Turn on Show Updates at the top of the Add Or Remove Programs dialog.3.Select Autodesk 3ds Max 2013 Product Update 2 / Autodesk 3ds Max Design 2013 ProductUpdate 2.4.Click Remove.Windows Vista / Windows 71.Open Start > Control Panel > Programs and Features.2.Click View Installed Updates.3.Select Autodesk 3ds Max 2013 Product Update 2 / Autodesk 3ds Max Design 2013 ProductUpdate 2.4.Click Uninstall.If there are previously installed versions of any beta software (including Release Candidate (RC) versions) of Autodesk 3ds Max 2013 / Autodesk 3ds Max Design 2013, uninstall and delete these beta versions before installing the commercial version. Instructions on how to uninstall the beta versions are posted on the beta portal in the Beta and RC Readme files.Note: When uninstalling Product Update 2, if the Product Update 1 was also installed a disk source error might display. If this happens, the uninstall will fail. To correct this problem and successfully uninstall Product Update 2, the original Product Update 1 source files are needed. They can be extracted from the Product Update 1 available at /3dsmax-updates.Supported Operating SystemsUse the following supported operating systems for the 32-bit or 64-bit version of the Autodesk 3ds Max 2013 / Autodesk 3ds Max Design 2013 Product Update 2:∙Microsoft® Windows® XP Professional (SP2 or higher) operating system∙Microsoft® Windows® XP Professional x64 (SP2 or higher) operating system∙Microsoft® Windows Vista® Business (SP2 or higher) operating system∙Microsoft® Windows Vista® Business x64 (SP2 or higher) operating system∙Microsoft® Windows® 7 Professional operating system∙Microsoft® Windows® 7 Professional x64 operating system∙Mac® operating system: You can run 3ds Max 2013 / 3ds Max Design 2013 Product Update2 ona Mac® with either Boot Camp® or via Parallels Desktop for Mac, provided certain systemrequirements are met. Refer to the Autodesk 3ds Max 2013 and Autodesk 3ds Max Design 2013 Installation Guide for further details (found on the product media).Autodesk is not responsible for errors or failures of Autodesk software arising from the installation of updates, extensions or new releases issued by third-party hardware or software vendors for the qualified software or hardware identified in this document (or for any other third-party software or hardware that you may use in connection with Autodesk products).Customer Involvement Program (CIP)If you choose to participate in the Customer Involvement Program, 3ds Max or 3ds Max Design will automatically send Autodesk information about system configuration, which features are used most frequently problems encountered, and other information helpful to the future direction of the product. For further information, see /cip.To enable CIP:1.Install and start 3ds Max / 3ds Max Design.2.If the Customer Involvement Program dialog is not displayed automatically, then in the Helpmenu, click Customer Involvement Program.3.In the Customer Involvement Program dialog, select "Participate - with contact information."4.Click OK.Customer Error Reports (CERs)We can improve the stability of Autodesk 3ds Max / Autodesk 3ds Max Design largely because of the Customer Error Reports (CERs) that end-users submit. We thank you for taking the time to fill out these reports and ask you to include as much information as possible about what actions you were performing at the time the error occurred. These details raise the value of the report immensely and are very much appreciated by the Autodesk 3ds Max Quality Engineering team.For further information about CERs refer to /cer.Fixes in this Product UpdateFixes for Autodesk 3ds Max 2013 / Autodesk 3ds Max Design 2013 Product Update 2:Autodesk, Alias, and 3ds Max are registered trademarks or trademarks of Autodesk, Inc., and/or its subsidiaries and/or affiliates in the USA and/or other countries. mental ray, mental mill and iray are registered trademarks of NVIDIA® Corporation licensed for use by Autodesk, Inc. All other brand names, product names, or trademarks belong to their respective holders. Autodesk reserves the right to alter product and services offerings, and specifications and pricing at any time without notice, and is not responsible for typographical or graphical errorsthat may appear in this document.© 2012 Autodesk, Inc. All rights reserved.。
3DsMax2013中文版教程
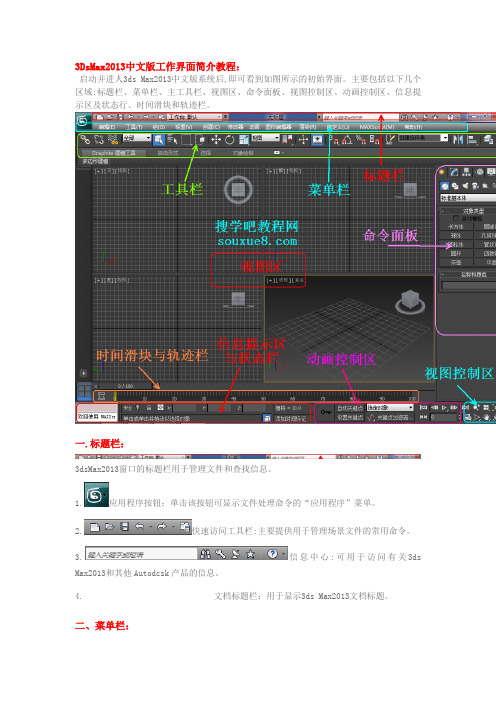
3DsMax2013中文版工作界面简介教程:启动并进人3ds Max2013中文版系统后,即可看到如图所示的初始界面。
主要包括以下几个区域:标题栏、菜单栏、主工具栏、视图区、命令面板、视图控制区、动画控制区、信息提示区及状态行、时间滑块和轨迹栏。
一.标题栏:3dsMax2013窗口的标题栏用于管理文件和查找信息。
1.应用程序按钮:单击该按钮可显示文件处理命令的“应用程序”菜单。
2.快速访问工具栏:主要提供用于管理场景文件的常用命令。
3.信息中心:可用于访问有关3ds Max2013和其他Autodcsk产品的信息。
4.文档标题栏:用于显示3ds Max2013文档标题。
二、菜单栏:3DsMax2013菜单栏位于屏幕界面的最上方,如图所示。
菜单中的命令如果带有省略号,表示会弹出相应的对话框,带有小箭头的表示还有下一级的菜单。
菜单栏中的大多数命令都可以在相应的命令面板、工具栏或快捷菜单找到,远比在菜单栏中执行命令方便得多。
三、主工具栏:在3DsMax2013莱单栏的下方有一栏工具按钮,称为主工具栏,通过主工具栏可以快速访问3ds Max2013中很多常见任务的工具和对话框。
如图所示。
将鼠标移动到按钮之间的空白处,鼠标箭头会变为状,这时可以拖动鼠标来左右滑动主工具栏,以看到隐藏的工具按钮。
在主工具栏中,有些按钮的右下角有一个小三角形标记,这表示此按钮下还隐藏有多重按钮选择。
当不知道命令按钮名称时,可以将鼠标箭头放置在按钮上停留几秒钟,就会出现这个按钮的中文命令提示。
提示:找回丢失的主工具栏的方法:单击菜单栏中的【自定义】|【显示】|【显示主工具栏】命令,即可显示或关闭主工具栏,也可以按键盘上的【Alt+6】键进行切换。
四、视图区:视图区位于界面的正中央,几乎所有的操作,包括建模、赋予材质、设置灯光等工作都要在此完成。
当首次打开3ds Max2013中文版时,系统缺省状态是以四个视图的划分方式显示的,它们是顶视图、前视图、左视图和透视视图,这是标淮的划分方式,也是比较通用的划分方式。
教你3d_max_2013如何安装和汉化
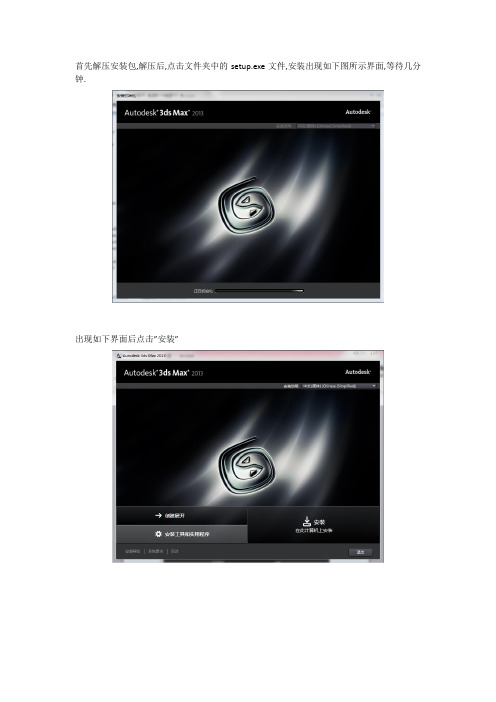
首先解压安装包,解压后,点击文件夹中的setup.exe文件,安装出现如下图所示界面,等待几分钟.出现如下界面后点击”安装”出现如下图所示界面,选择”我接受“然后点击”下一步”出现下图界面后选择”单机”,填入序列号”666-69696969”, ”400-45454545”,”066-66666666”667-98989898产品密钥”128E1””657E1”可改变安装路径,然后点击安装安装等待安装成功!重新打开3D max后弹出激活界面,后面的操作要确保已断开网络如下图所示选项框打勾,点击I agree如下图所示点击activate(激活)选择使用脱机激活(选项第二项),点击NEXT选择Individual(个人),China,NEXT有红色星号的框都要填上,可任意填写,点击NEXT再次点击activate(激活)打开注册机(32位系统),先单击一下注册机中的Patch,会弹出下图中间的那个小窗口,点确定。
注意,如果你是Wind7系统,请使用管理员身份打开注册机,并且,如果你的wind7是64位的系统,则要使用64位的注册机。
然后点击注册机中的Generate生成激活码,将其复制到3d max 第一个框中即可,如下图所示,点击NEXT激活成功如下图,点击finish然后打开3d max 发现此时界面仍为英文如下图,需经汉化汉化,新建一个文本文档,将下面的内容复制进去,文档另存为reg格式的用户请在工具—文件夹选项—查看把“隐藏已知文件类型的扩展名”去掉勾。
把“txt”改为“reg”Windows Registry Editor Version 5.00[HKEY_LOCAL_MACHINE\SOFTWARE\Autodesk\3dsMax\15.0]"Language"="Simplified Chinese""DefaultLanguage"="CHS"[HKEY_CURRENT_USER\Software\Autodesk\3dsMax\15.0] "CurrentLanguage"="CHS"将这个文件保存到的安装目录下,之后双击该文件,点击“是”即可汉化成功,如下图所示。
3DsMax2013中文版教程.
3DsMax2013中文版工作界面简介教程:启动并进人3ds Max2013中文版系统后,即可看到如图所示的初始界面。
主要包括以下几个区域:标题栏、菜单栏、主工具栏、视图区、命令面板、视图控制区、动画控制区、信息提示区及状态行、时间滑块和轨迹栏。
一.标题栏:3dsMax2013窗口的标题栏用于管理文件和查找信息。
1.应用程序按钮:单击该按钮可显示文件处理命令的“应用程序”菜单。
2.快速访问工具栏:主要提供用于管理场景文件的常用命令。
3.信息中心:可用于访问有关3ds Max2013和其他Autodcsk产品的信息。
4.文档标题栏:用于显示3ds Max2013文档标题。
二、菜单栏:3DsMax2013菜单栏位于屏幕界面的最上方,如图所示。
菜单中的命令如果带有省略号,表示会弹出相应的对话框,带有小箭头的表示还有下一级的菜单。
菜单栏中的大多数命令都可以在相应的命令面板、工具栏或快捷菜单找到,远比在菜单栏中执行命令方便得多。
三、主工具栏:在3DsMax2013莱单栏的下方有一栏工具按钮,称为主工具栏,通过主工具栏可以快速访问3ds Max2013中很多常见任务的工具和对话框。
如图所示。
将鼠标移动到按钮之间的空白处,鼠标箭头会变为状,这时可以拖动鼠标来左右滑动主工具栏,以看到隐藏的工具按钮。
在主工具栏中,有些按钮的右下角有一个小三角形标记,这表示此按钮下还隐藏有多重按钮选择。
当不知道命令按钮名称时,可以将鼠标箭头放置在按钮上停留几秒钟,就会出现这个按钮的中文命令提示。
提示:找回丢失的主工具栏的方法:单击菜单栏中的【自定义】|【显示】|【显示主工具栏】命令,即可显示或关闭主工具栏,也可以按键盘上的【Alt+6】键进行切换。
四、视图区:视图区位于界面的正中央,几乎所有的操作,包括建模、赋予材质、设置灯光等工作都要在此完成。
当首次打开3ds Max2013中文版时,系统缺省状态是以四个视图的划分方式显示的,它们是顶视图、前视图、左视图和透视视图,这是标淮的划分方式,也是比较通用的划分方式。
3ds Max 2013中文版基础教程目录(初稿)

第1章3ds Max 2013设计概述1.1 三维动画与3ds Max 2013简介1.2 3ds Max 2013的设计环境1.2.1 认识工作界面1.2.2 设置工作环境1.3 3ds Max 2013项目开发流程1.4 3ds Max 2013基础操作1.4.1 文件操作1.4.2 选择对象1.4.3 编辑对象1.5 教师辅导1.6 一章一技巧——常用快捷键第2章三维建模2.1 基本体建模——制作“自行车车轮”2.1.1 基础知识——基本体的创建2.1.2 案例剖析——制作“自行车车轮”2.1.3 拓展案例——制作“精美小屋”2.2 修改器建模——制作“飞鱼导弹”2.2.1 基础知识——修改器的应用2.2.2 案例剖析——制作“飞鱼导弹”2.2.3 拓展案例——制作“卡通企鹅”2.3 教师辅导2.4 一章一技巧——使用自动栅格创建对象第3章二维建模3.1 二维图形的创建和编辑——制作“中式屏风”3.1.1 基础知识——二维图形的创建和编辑3.1.2 案例剖析——制作“中式屏风”3.1.3 拓展案例——制作“古典折扇”3.2 二维建模的方法——制作“立体广告文字”3.2.1 基础知识——二维转三维的方法3.2.2 案例剖析——制作“立体广告文字”3.2.3 拓展案例——制作“酷爽冰淇淋”3.3 教师辅导3.4 一章一技巧——创建确切长度的样条线第4章高级建模4.1 复合建模4.1.1 基础知识——认识复合工具4.1.2 案例剖析——制作“时尚鼠标”4.1.3 拓展案例——制作“红玫瑰”4.2 多边形建模4.2.1 基础知识——多边形建模思想4.2.2 案例剖析——制作“水晶鞋”4.2.3 拓展案例——制作“马克杯”4.3 综合案例——制作“直板手机”4.4 教师辅导4.5 一章一技巧——软选择的使用第5章渲染基础5.1 三维世界中的照明方式5.2 mental ray渲染器简介5.3 使用最终聚集实现间接光照5.3.1 基础知识5.3.2 案例剖析——制作“落地窗式客厅效果”5.3.3 拓展案例——制作“书房效果”5.4 全局光照配合最终聚集实现间接光照5.4.1 基础知识5.4.2 案例剖析——制作“阳光休闲大厅”5.4.3 拓展案例——制作“夜间客厅效果”5.5 教师辅导5.6 一章一技巧——巧用光度学自由灯光补光第6章材质基础6.1 Arch & Design(mi)材质简介6.2 乳胶漆、木地板材质——制作“房间一角”6.2.1 基础知识——乳胶漆、木地板材质的制作方法6.2.2 案例剖析——制作“房间一角”6.3 透明材质——制作“玻璃水杯”6.3.1 基础知识——玻璃材质简介6.3.2 案例剖析——制作“玻璃水杯”6.3.3 拓展案例——制作“雕花圆盘”6.4 金属材质——制作“牛顿撞撞球”6.4.1 基础知识——金属材质简介6.4.2 案例剖析——制作“牛顿撞撞球”6.5 石材材质——制作“浴室效果”6.5.1 基础知识——石材材质简介6.5.2 案例剖析——制作“浴室效果”6.6 教师辅导6.7 一章一技巧——3ds Max归档操作第7章贴图基础7.1 基本贴图手法7.1.1 基础知识——认识2D贴图和3D贴图7.1.2 案例剖析——制作“汽车人影集”7.1.3 拓展案例——制作“熔岩星球”7.2 合成器贴图和颜色贴图——制作“精美酒瓶”7.2.1 基础知识——认识合成器贴图和颜色贴图7.2.2 案例剖析——制作“精美酒瓶”7.2.3 拓展案例——制作“被遗忘的角落”7.3 教师辅导7.4 一章一技巧——反射与折射贴图第8章摄影机与灯光8.1 摄影机8.1.1 基础知识——摄影机及其应用8.1.2 案例剖析——制作“画室景深效果”8.1.3 拓展案例——制作“穿越动画”8.2 灯光8.2.1 基础知识——灯光及其应用8.2.2 案例剖析——制作“夜景照明”8.2.3 拓展案例——制作“日光照明”8.3 教师辅导8.4 一章一技巧——安全框的使用第9章环境和效果9.1 环境9.1.1 基础知识——大气效果的应用9.1.2 案例剖析——制作“美丽海岛”9.1.3 拓展案例——制作“水底世界”9.2 效果9.2.1 基础知识——效果的应用9.2.2 案例剖析——制作“浪漫烛光”9.2.3 拓展案例——制作“烈日晴空”9.3 教师辅导9.4 一章一技巧——合并效果第10章动画制作基础10.1 关键帧动画——制作“翻书效果”10.1.1 基础知识——认识动画10.1.2 案例剖析——制作“翻书效果”10.1.3 拓展案例——制作“水墨画效果”10.2 IK动画——制作“连杆的运动效果”10.2.1 基础知识——创建IK动画的方法10.2.2 案例剖析——制作“连杆的运动效果”10.2.3 拓展案例——制作“炫光夺目”10.3 Reactor动画——制作“打保龄球效果”10.3.1 基础知识——认识刚体和柔体10.3.2 案例剖析——制作“打保龄球效果”10.3.3 拓展案例——制作“旗帜飘扬”10.4 Biped骨骼动画——制作“足迹动画”10.4.1 基础知识——认识Biped骨骼10.4.2 案例剖析——制作“足迹动画”10.4.3 拓展案例——制作“角色蒙皮”10.5 教师辅导10.6 一章一技巧——关键帧的操作技巧第11章粒子系统与空间扭曲11.1 空间扭曲在粒子系统中的应用11.1.1 基础知识——认识空间扭曲11.1.2 案例剖析——制作“清清流水”11.1.3 拓展案例——制作“蜡烛余烟”11.2 非事件驱动粒子系统的动画应用11.2.1 基础知识——认识非事件驱动粒子系统11.2.2 案例剖析——制作“野外篝火”11.2.3 拓展案例——制作“夜空礼花”11.3 事件驱动粒子系统的动画应用11.3.1 基础知识——认识事件驱动粒子系统11.3.2 案例剖析——制作“片头动画”11.3.3 拓展案例——制作“灰飞烟灭”11.4 教师辅导11.5 一章一技巧——AfterBurn插件的使用。
3DMAX2013中英文菜单对照翻译解析
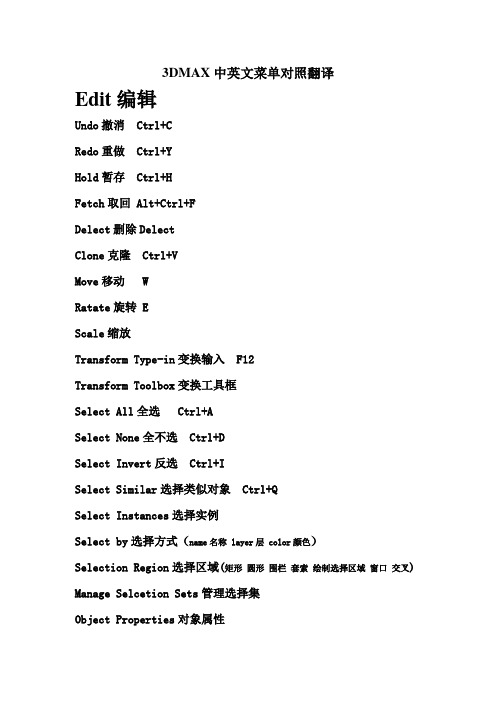
3DMAX中英文菜单对照翻译Edit编辑Undo撤消 Ctrl+CRedo重做 Ctrl+YHold暂存 Ctrl+HFetch取回 Alt+Ctrl+FDelect删除DelectClone克隆 Ctrl+VMove移动 WRatate旋转 EScale缩放Transform Type-in变换输入 F12Transform Toolbox变换工具框Select All全选 Ctrl+ASelect None全不选 Ctrl+DSelect Invert反选 Ctrl+ISelect Similar选择类似对象 Ctrl+QSelect Instances选择实例Select by选择方式(name名称 layer层 color颜色)Selection Region选择区域(矩形圆形围栏套索绘制选择区域窗口交叉) Manage Selcetion Sets管理选择集Object Properties对象属性Tools工具Open container/New scene/Manage scene/Saved scene explorer 打开/新建/管理/保存场景资源管理器Containers 容器Inherit Containers 继承容器Create Container from selection利用所选内容创建容器 Select content~s Container选择内容容器(un )Load/Open /close/update/edit Container加载/卸载/打开/关闭/更新编辑Make all content unique使所有内容唯一Override Object Properties覆盖对象属性Local content局部内容Add selected to container将选定对象添加到容器中 Remove slected from container从容器中移除对象 Save/reload container保存/重新加载容器Inherited content继承内容Merge container source合并容器源Isolate selection 孤立当前选择 Alt+QDisplay floater显示浮动框Manage layers层管理器Manage scene states管理场景状态Light listers/Mirror/Array灯光列表/镜像/阵列Align对齐Align/quick align 对齐Alt+A/ 快速对齐shift+A Spacing tool 间隔工具shift+IClone and align 克隆并对齐Align to view 对齐到视图Normal align 法线对齐Alt+NAlign camera 对齐摄影机Place highlinght 放置高光Snapshot 快照Rename objects 重命名对象Assign vertex colors 指定顶点颜色Color clipboard 颜色剪贴板Camera match 摄影机匹配Viewport canvas 视口画布Views-grab viewport 抓取视口Create still image/animated sequence file View/rename animated sequence fileGrids and snaps 栅格和捕捉Grids and snaps settings 栅格和捕捉设置Show/Actived home grid 显示/激活主栅格Actived grid object 激活栅格对象Align grid to view 对齐栅格到视图Snaps/ Angle snap/percent snap toggle捕捉/ 角度捕捉/百分比捕捉shift+ctrl+p 切换Snaps use axis constraints 捕捉使用轴约束Mersure distance 测量距离Channel info 通道信息Group 组Group /Ungroup /Open/ Close /Attach /Detach /Explode成组 /解组 /打开 /关闭 /附加 /分离 /炸开Assembly 集合Assemble/Disassemble/Open/Close/Attach/Detach/Explode 集合/分解/打开/关闭/附加/分离/炸开View 视图Undo/Redo view change 撤消shift+Z/重做shift+Y视图更改Viewport configuration 视口配置Redraw all view 重画所有视图Set active viewport 设置活动视口Perpestive /Orthographic /Front /Back /top /Botttom 透视 /正交 /前 /后 /顶 /底Left /Right 左 /右Save/Restore active Perpestive view 保存/还原活动透视视图Viewcube立体视图Show the viewcube显示立体视图 Alt+Ctrl+VShow for active view/all views 显示活动/所有视图Home /Orthographic /Perpestive 主栅格Al+Ct+H/正交/透视 Set current view as home/front将当前视图设为主栅格/前 Reset front 重置“前”/ Configure 配置Steering wheels 转向轮Toggle Steering wheels 切换转向轮(Mini)View object wheel (迷你)视图对象轮子(Mini)Tour buliding wheel (迷你)漫游建筑轮子(Mini)Full navigation wheel (迷你)完整导航轮子Configure 配置Create camera from view 从视图创建摄影机 Ctrl+CShow materials in viewport as 视口中的材质显示为Enable transparency 能透明Shaded materials without/with maps(有贴图的)标准显示 Realistic materials without/with maps 硬件显示Viewport lighting and shadows 视口照明和阴影Auto display selected lights 自动显示选定的灯光Lock/unlock selected lights 锁定/解除锁定选定的灯光XviewShow statistics 显示统计Face orientation 面方向Overlapping faces 重叠面Open /Multiple edges 开放/多重边Isolated /Overlapping /T- vertices 孤立 /重叠 /T 顶点 Missing UVW coordinates 缺少UVW坐标Flipped /Overlapped UVW faces UVW 翻转/重叠面Select results 选择结果See-through 透明Auto update 自动更新Display on top 在顶部显示Viewport background 视口背景Gradient/solid color 渐变梯度/纯色彩Environment background 环境背景Custom image fileConfigure viewport background 配置视口背景Show transform gizmo /ghosting /key times显示变换gizmo /重影 /关键点时间Shade seleced 明暗处理选定对象Show dependencies 显示从属关系Update during spinner drag 微调器拖动期间更新Progressive display 自适应降级Expert mode 专家模式Create 创建Standard primitivies 标准基本体Box长方体 Cone圆锥体 Sphere球体 Geosphere几何球体Cylinder圆柱体 Tube管状体 Torus圆环 Pyramid四棱锥Teapot茶壶 Plane平面Extended primitivies 扩展基本体Hedra异面体 Torus knot环形结 Chamfer box切角长方体 Chamfer cylinder切角圆柱体 Oil tank油罐 Capsule胶罐 Spindle 纺锤 L-extrusion L形挤出 Gengon 球菱柱C-extrusionC形挤出 Ringwave环形波 Hose软管 Prism 棱柱AEC object AEC对象Foliage /Railing /Wall 植物栏杆墙Pivot /sliding /bifold door 枢轴推拉折叠门Straight /L-Type /U-Type /spiral stair 直线LC螺旋楼梯 Awning/casement/fixed/pivoted/sliding/projected window 遮蓬平开固定旋开推拉伸出式窗户Compound 复合Morph变形 Scatter散布 Conform一致 Connect 连接Blobmesh水滴网格 Shapemerge图形合并 Boolean 布尔 Terrain地形 Loft放样 Mesher网格化ProbooleanProcutterParticle 粒子Particle flow sourse粒子流源Spray喷射 Snow雪 Blizzard暴风雪 PArray粒子阵列PCloud粒子云 Super spray超级喷射Patch grids 面片栅格Quad patch四边形面片 Tri patch三角形面片NURBSCV /Point surface CV /点曲面CV /Point curve CV/点曲线Dynamic 动力学Damper阻尼器 Spring弹簧Mental rayMr proxy Mr代理Shapes图形Line线 Rectangle矩形 Circle圆 Ellipse椭圆 Arc弧 Donut圆环 NGon多边形 Star星形 Text文本Helix螺旋线 Section截面 Egg蛋形Extended shapes扩展图形W Rectangle墙矩形Channel通道 Angle角度Tee T形Wide flange宽法兰(盘)Lights灯光Photometric lights光度学灯光Target/Free light目光/自由灯光Mr sky portal Mr sky门户Standard lights标准灯光Target/Free spotlight目标/自由聚光灯(Target) directional (目标)平行光Omin泛光灯 Skylight天光Mr area spot/omin mr区域聚光/泛光灯Add default lights to scene添加默认灯光到场景Cameras摄影机Free/Target camera自由/目标摄影机Create camera from view从视图创建摄影机Helpers辅助对象Dummy虚拟对象 Expose transform露出变换Grid栅格 Point点 Container容器Tapy measure卷尺 Protractor量角器Compass指南针 Camera point摄影机点Delegate代理 Crowd群组Atmospherics 大气Box/Cylinder/Sphere gizmo长方体圆柱体球体gizmoManipulators操纵器Slider滑块Plane/Cone angle 平面/圆锥体角度Particle flow粒子流Speed by iconFind targetParticle paintBirth textureInitial stateGroup selectSpacewarps空间扭曲Forces力Motor马达 Push推力 Drag阻力 Vortex漩涡 Path follow路径跟随 PBomb粒子爆炸Displace置换 Gravity重力 Wind 风Deflectors导向器POmniFlect全动力学导向SOmniFlect全泛方向导向SDeflector泛方向导向板UOmniFlectUDeflector全导向器Deflector导向板Geometric/Deformable几何可变形FFD(Box,Cyl)长方体圆柱体 Wave波浪 Ripple涟漪 Displace置换 Conform一致 Bomb爆炸Modifier based基于修改器Bend弯曲 Noise噪波 Skew倾斜Taper锥化 Twist扭曲 Stretch拉伸Particles&Dynamics粒子和动力学Vector field向量场System 系统Bones IK chain骨骼IK链BipedDaylight system日光系统Modifiers修改器Selection 选择FFD /mesh /patch /poly /spling /volume selectFFD /网格 /面片 /多边形 /样条线 /体积选择Select by channel 按通道选择Patch/Spline editing面片/样条线编辑Cross section横截面Delect patch/spline删除面片/样条线Edit patch/spline编辑面片/样条线Fillet/Chamfer圆角/切角 Lathe车削Normalize spline规格化样条线Renderable spline modifier可渲染样条线编辑Surface曲面 Sweep扫描 Trim/Extend修剪/延伸Mesh editing网格编辑Cap holes补洞 Delect/Edit mesh删除/编辑网格Edit normals/poly编辑法线/多边形(Face)Extrude(面)挤出 MultiResNormal modifier法线修改器 Optimize优化ProOptimizer Quadify mesh四边形网格化Smooth平滑 STL cheak STL检查 Symmetry对称 Tessellate细化 Vertex paint/weld 顶点绘制/焊接Conversion转化Turn to mesh/patch/poly转换成网格/面片/多边形Animation动画Attribute holder属性承载器 Flex柔体Linked XForm链接变换 Melt融化 Morpher变形器Patch deform(WMS)面片变形 Path deform(WMS)路径变形 Skin (morph/wrap/wrap patch)蒙皮(变形/包裹/包裹面片) SplineIK control 样条线IK控制Surf deform(WSM))曲面变形ClothCloth Garment maker Welder 焊接Hair and fur(WSM)UV coordonates UV坐标Camera maps(WSM)摄影机贴图Map scaler(WSM))贴图缩放器 Projection投影Unwarp UVW 展开 UVW map 贴图UVW mapping add/clear贴图添加/清除 UVW XForm变换Cache tools缓存工具Point cache(WSM)点缓存Subdivision surfaces细分曲面HSDS modifier HSDS修改器Meshsmooth网格平滑 Turbosmooth涡轮平滑Free form deformer自由形式变形器FFD2*2*2/3*3*3/4*4*4/Box/Cylinder 长方体圆柱体Parametric deformers参数化变形器Affect region影响区域 Bend弯曲 Displace置换Lattic晶格 Mirror镜像 Noise噪波 PhysiquePush推力 Preserve保留 Relax松弛 Rapple涟漪Shell壳 Slice切片 Skew倾斜 Stretch拉伸Spherify球形化 Squeeze挤压 Twist扭曲 Taper锥化 Substitute替换 XForm变换 Wave波浪Surface曲面Disp approx置换近似Diplace mesh(WSM)置换网格Material (by element)按元素分配材质NURBS editing NURBS编辑Disp approx置换近似Surf deform曲面变形 Surface select曲面选择Radiosity光能传递Subdivide(WSM)细分Cameras correction摄影机校正Animation 动画Load/Save animation加载/保存动画IK solvers IK解算器HI /HD /IKLimbIK肢体 /SplineIK样条线IKsolver解算器Constraint约束Attachment附着/Surface曲面/Path路径/Position位置L Link链接/Lookat注视 /Orientation Constraint 方向约束Transform controllers变换控制器Link constraint链接约束器Position rotation scale位置/旋转/缩放Script脚本Position controllers位置控制器Audio音频 Bezier Expression表达式 Linear线性Motion capture运动捕捉 Noise噪波 Script脚本 XYZQuaternion(TCB)四元数 Reaction反应 Spring弹簧Attachment /Path /Position /Surface constraint 附着/路径/位置/曲面约束Rotation controlles旋转控制器Audi音频 Euler XYZ Linear线性 Quaternion四元数Motion capture运动捕捉 Noise噪波Reaction反应 Script脚本 Smooth平滑Lookat /Orientation constraint 注视/方向约束Scale controllers缩放控制器Audio音频 Bezier Expression表达式 Linear线性Motion capture运动捕捉 Noise噪波 XYZQuaternion(TCB)四元数 Reaction反应 Script脚本Animation-CATCapture animation捕捉动画Pose mixerRig resizeApply maxIKSimulation-massFXRigid bodiesSet selected as dynamic rigidSet selected as kinematic rigidSet selected static rigidCreate dynamic ragdollCreate kinematic ragdollRemove ragdollMClothCreate MClothRemove MClothConstraintsCreate rigid/slide/hinge/twist/ball andSocket/universal ConstraintSimulationPlay /step /reset Simulation(Un)Bake all/selected objectUtilitiesShow MassFX toolsOpen dynamic explorerValidate/Export MassFX scenceCapture current transformsAbout MassFXParameter Editor/collector 参数编辑器/收集器Wire parameters关联参数Wire parameters关联参数Ctrl+5Parameters wire dialog参数关联对话框Alt+5 Animation layers动画层Reaction manager反应管理器Bone tools骨骼工具Set as skin pose设为蒙皮姿势Assume skin pose采用蒙皮姿势Skin pose mode蒙皮姿势模式Toggle limits切换限制Delete selected animation删除选定动画Walk through assistant穿行助手Autodesk animation storeGraph editors 图形编辑器Track view-cure editor轨迹视图曲线编辑器Track view-dope sheet轨迹视图摄影表New/delete track view新建/删除轨迹视图Saved track views保存的轨迹视图New/delete schematic view新建/删除图解视图Saved schematic view保存的图解视图Particle view粒子视图Motion mixer运动混合器Rendering 渲染Render渲染Render setup渲染设置Rendered frame window渲染帧窗口State sets光跟踪器RadiosityLight tracer光跟踪器Exposure control曝光控制Environment环境Effects效果Raytracer settings光线跟踪器设置Raytracer global include/exclude光线跟踪全局包含/排除Render to texture渲染到纹理Render surface map渲染曲面贴图Material editor材质编辑器Compact Material editorSlate Material editorMaterial/map browser材质/贴图浏览器Material explorer材质资源管理器Video postView image file查看图像文件Panorama exporter全景导出器Batch render批处理渲染Print size assisant打印大小助理Gamma/LUT setup 设置Render messager windowRAM player 播放器Customize 自定义。
3dsMax注册破解方法
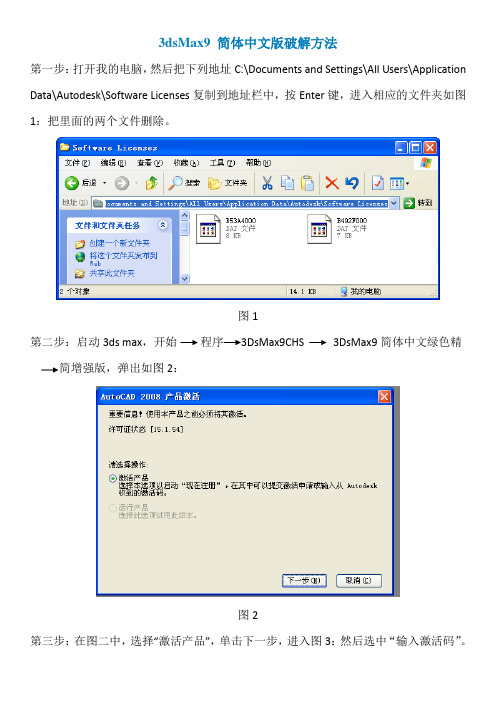
3dsMax9 简体中文版破解方法
第一步:打开我的电脑,然后把下列地址C:\Documents and Settings\All Users\Application Data\Autodesk\Software Licenses复制到地址栏中,按Enter键,进入相应的文件夹如图1:把里面的两个文件删除。
图1
第二步:启动3ds max,开始程序3DsMax9CHS 3DsMax9简体中文绿色精简增强版,弹出如图2:
图2
第三步:在图二中,选择“激活产品”,单击下一步,进入图3:然后选中“输入激活码”。
图3
第四步:打开d盘下“3dxmax9破解说明”文件夹中的“max9keygen”文件,弹出窗口如图4:
图4
第五步:将图3中的申请号使用ctrl+c,ctrl+v复制到图4中,然后点击计算,算出3dsmax 2009 简体中文版的激活码,如图5
图5
第六步:选中激活码,使用ctrl+c,ctrl+v复制到图3中,然后在图3中单击下一步,进入如图5,3dsmax 2009激活成功。