bginfo部署
Sysinternals Suit使用方法

利用Sysinternals Suite加强Windows系统管理发布时间:2009-02-11 09:17:31 来源:友佳学院网友评论 0 条Sysinternals Suite是微软技术团队开发的一套功能强大的免费工具程序集,2009年2月4日微软发布了它的最新版本,其版本号为Build 20090204。
新版本的Sysinternals Suite包括72个相互独立的工具,这些工具囊括了文件、进程、磁盘、网络、安全等系统管理的方方面面,而Sysinternals Suite中的工具比系统中集成的类似工具功能更为强大,针对系统的可操作性更灵活。
系统管理员如果能够熟练、灵活使用这些工具,无疑将会极大地提升系统管理效率。
下面笔者基于系统管理的实际需要,实例演示其中某些工具的使用方法。
下载及其安装访问/zh-cn/sysinternals/0e18b180-9b7a-4c49-8120-c47c5a6 93683(en-us).aspx可下载Sysinternals Suite包。
下载完毕后不需要安全,只需将其解压到某个目录即可。
1、用数字签名甄别可疑程序随着使用时间的增长,就会在系统中会汇集越来越多的文件。
这些文件大多数是正常的,但也有不少可疑文件,特别上网、安装软件等操作,很容易造成系统中毒、中马。
现在的病毒木马非常狡猾,它们往往将自己装扮成系统文件以逃避杀毒软件和用户的追杀。
这些可疑文件不仅与系统文件同名,而且其大小、文件属性都和系统文件一样。
系统管理员遇到这些此类情况,如何甄别呢?数字签名是我们分辨系统程序和可疑程序的依据。
大家知道,对于Windows系统来说重要的系统文件都有类似Verified: Signed、Signing date:12:14 2004-8-17、Publisher: Microsoft Corporation的微软的数字签名,而可疑程序则没有。
比如在笔者的C:/Windows 下有一个名为svchost.exe的程序,其大小及文件属性和系统中的svchost.exe的完全一样。
用组策略统一部署Bginfo软件

用组策略统一部署Bginfo软件(显示计算机信息到桌面)下面来说说如何在企业内部使用组策略统一部署Bginfo的:1.下面是主程序的界面图中间蓝色部分就是显示项,左边的设置项是可以更改的,比如改成中文;<>内的不可修改,fields下面就是显示设置的可选项2.清空蓝色区域,在fields中选择要在工作站桌面上显示的内容,我选择的是Host Name和IP Address,并将字体大小,颜色等设置完毕3.另存当前的配置文件”File”->”Save as”这里保存为bginfo.bgi4.建立两个批处理,内容如下:copyfile.bat-------------------------------------------------------------------------@echo offcopy %logonserver%\netlogon\bginfo.exe %systemroot%\bginfo.exebginfo.bat---------------------------------------------------------------------------@echo offbginfo.exe %logonserver%\netlogon\bginfo.bgi /nolicprompt /timer:05.把bginfo.exe、bginfo.bgi、bginfo.bat、copyfile.bat文件,拷贝到%logonserver%\netlogon目录下。
6.通过组策略管理器(GPMC),编辑或新建的一个组策略(OU组织单位),在"计算机配置"选择"windows设置","脚本(启动/关机)",在"启动"中添加copyfile.bat文件(把bginfo.exe、bginfo.bgi、bginfo.bat、copyfile.bat文件复制到“显示文件”按钮点开的文件夹内,按添加把copyfile.bat文件选中);7.在计算机配置中选择 "windows设置","安全设置",右键点击"文件系统",选择"添加文件",在打开的窗口中输入“%systemroot%bginfo.exe”,并将上两项的user权限改为可读写。
packageinfo 原理 -回复

packageinfo 原理-回复什么是packageinfo 原理?为了更好地理解packageinfo 原理,首先需要了解软件包和其在计算机科学中的作用。
在计算机科学中,软件包是一种将一组相关的文件组织在一起的方法。
它们通常包含了执行特定功能所需的程序代码、库文件、配置文件以及其他必要的资源。
软件包的设计目的是将复杂的软件系统进行模块化,使其易于分发、安装和管理。
软件包的元数据(Metadata)是描述软件包内容和信息的附加数据。
这些元数据包含了软件包的名称、版本号、作者、依赖关系、授权方式等等。
在大型软件仓库中,软件包的元数据起着至关重要的作用,因为它们使得用户和开发者能够快速地搜索、浏览和理解软件包的信息。
在这个背景下,packageinfo 原理是指用于获取和展示软件包元数据的机制。
通过解析软件包中的元数据文件,可以获取到软件包的基本信息,如名称、版本号和作者等。
packageinfo 原理可以帮助用户和开发者更好地理解软件包的构成和特点,从而有效地进行软件包的选择和管理。
那么,packageinfo 原理的具体实现方式是什么呢?一种常见的实现方式是通过在软件包中添加特定的元数据文件来存储软件包的相关信息。
这些元数据文件可以是文本文件、XML 文件或者JSON 文件等。
对于一个软件包而言,它可能包含多个元数据文件,每个文件存储不同的元数据信息。
在获取软件包的元数据时,通常首先需要定位到软件包中的元数据文件。
这可以通过查找软件包的文件结构或者使用特定的工具进行实现。
一旦找到了元数据文件,就可以使用相应的解析器来读取和解析其中的数据。
解析器可以根据元数据文件的格式,例如文本解析器、XML 解析器或者JSON 解析器等,来进行数据的提取和解析。
解析后的元数据可以被用于各种用途,例如在软件仓库中展示软件包信息、在软件依赖管理中检测依赖关系、根据授权方式判断软件包是否符合使用条件等等。
在软件包管理工具中,packageinfo 原理常常被用于帮助用户了解软件包的特性,提供便捷的软件包搜索和过滤功能,从而更好地满足用户的需求。
Bginfo软件在域的部署和应用
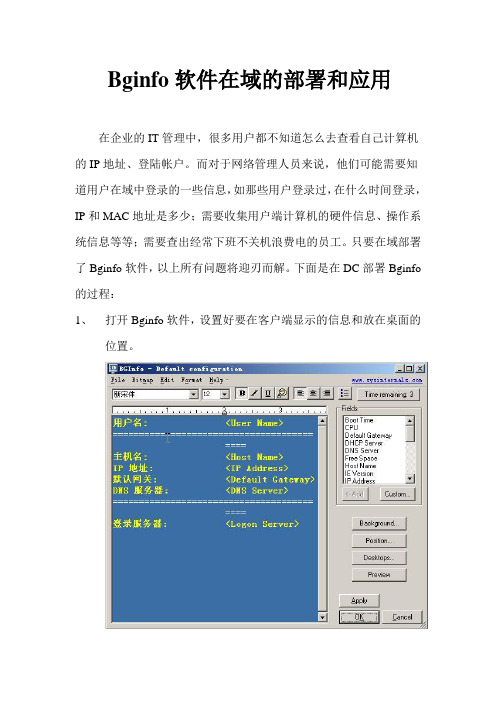
Bginfo软件在域的部署和应用在企业的IT管理中,很多用户都不知道怎么去查看自己计算机的IP地址、登陆帐户。
而对于网络管理人员来说,他们可能需要知道用户在域中登录的一些信息,如那些用户登录过,在什么时间登录,IP和MAC地址是多少;需要收集用户端计算机的硬件信息、操作系统信息等等;需要查出经常下班不关机浪费电的员工。
只要在域部署了Bginfo软件,以上所有问题将迎刃而解。
下面是在DC部署Bginfo 的过程:1、打开Bginfo软件,设置好要在客户端显示的信息和放在桌面的位置。
2、另存为一个名为gzjhc.bgi,bgi是默认的扩展名。
3、下面是保存后的画面:4、点击:我的电脑->管理->共享文件夹->共享->打开NETLOGO5、新建一个bginfo文件夹,设置bginfo这个文件夹的权限,保证通过验证的用户能读取和运行这个软件。
6、单击“高级”选项注意画红框的地方打上钩,这样做是确保权限应用到整个文件夹里面所有的文件。
7、新建一个"文本文档“命名为logon.cmd8、编辑这个文件9、在文件里输入以下内容;cmd /c@echo off%logonserver%\netlogon\bginfo\bginfo.exe /nolicprompt /i%logonserver%\netlogon\bginfo\gzjhc.bgi /timer:0010、打开组策略管理,编辑要应用这个策略的OU11、Windows设置->脚本(登录/注销)->登录->显示文件12、把刚才编辑的logon.cmd文件复制到这个目录里。
13、单击添加->浏览->logon.cmd->打开->确定14、刷新组策略15、到客户端测试组策略是否生效。
把正在使用的用户“注销”重新登录;如不生效强制刷新一下组策略:gpupdate /force;下面是生效后的客户端:16、如果以后需要更改桌面上的显示信息,直接在DC上的NETLOGON\bginfo\gzjhc.bgi更改,更改后“应用设置并退出”即可。
华为GGSN软件功能描述

目录第1章GGSN系统软件体系结构 ............................................................................................ 1-1 第2章功能.............................................................................................................................. 2-12.1 会话管理功能..................................................................................................................... 2-12.1.1 PDP Context激活、修改和去激活.......................................................................... 2-12.1.2 PDP激活过程中的鉴权与认证功能......................................................................... 2-22.2 分组数据路由和转发功能 .................................................................................................. 2-22.2.1 分组路由及传输 ...................................................................................................... 2-22.2.2 中继功能 ................................................................................................................. 2-32.2.3 封装功能 ................................................................................................................. 2-32.2.4 VPN功能................................................................................................................. 2-32.3 七号信令功能..................................................................................................................... 2-52.4 GprsSSF功能.................................................................................................................... 2-62.5 GTP信令转发功能............................................................................................................. 2-62.6 计费功能............................................................................................................................ 2-62.6.1 计费基本功能.......................................................................................................... 2-62.6.2 RADIUS计费........................................................................................................... 2-8 第3章操作维护 ...................................................................................................................... 3-13.1 概述................................................................................................................................... 3-13.2 告警管理功能..................................................................................................................... 3-13.2.1 告警管理的特点 ...................................................................................................... 3-13.2.2 告警处理的方式 ...................................................................................................... 3-23.3 性能测量管理功能 ............................................................................................................. 3-23.3.1 测量任务管理.......................................................................................................... 3-23.3.2 测量结果管理.......................................................................................................... 3-33.4 维护管理功能..................................................................................................................... 3-33.4.1 整体结构 ................................................................................................................. 3-33.4.2 主要特点 ................................................................................................................. 3-43.5 数据配置............................................................................................................................ 3-43.6 SNMP网管 ........................................................................................................................ 3-43.7 安全管理............................................................................................................................ 3-4 第4章接口.............................................................................................................................. 4-14.1 Gn/Gp接口 ........................................................................................................................ 4-14.2 Gi接口 ............................................................................................................................... 4-14.2.1 透明接入 ................................................................................................................. 4-24.2.2 非透明接入.............................................................................................................. 4-34.2.3 两种接入方式下的RADIUS计费策略..................................................................... 4-34.2.4 RADIUS功能说明 ................................................................................................... 4-4 4.3 Ga接口.............................................................................................................................. 4-5 4.4 Ge接口.............................................................................................................................. 4-5 4.5 操作维护接口..................................................................................................................... 4-5第1章 GGSN系统软件体系结构M900/M1800 GGSN软件是指运行在GGSN业务模块中各处理板上的程序,从物理结构上来说,GGSN采用的是一种分布式体系结构,每种单板上运行的是不同的软件系统。
bginfo用法

Bginfo是一个系统信息工具,可以显示各种系统信息,如IP地址、计算机名称、操作系统版本、已安装的补丁程序、正在运行的进程等。
它可以通过以下步骤来使用:
下载并安装Bginfo。
可以从Microsoft官方网站或其他可靠的下载站点下载Bginfo。
打开Bginfo。
安装完成后,可以在开始菜单或桌面上找到Bginfo的快捷方式。
双击打开Bginfo。
配置要显示的信息。
在Bginfo窗口中,可以选择要显示的信息和布局。
可以通过单击“配置”按钮来配置要显示的信息。
在弹出的对话框中,可以选择要显示的信息、字体、颜色、位置等。
保存配置。
配置完成后,可以单击“保存”按钮将配置保存到文件中,以便以后使用。
运行Bginfo。
配置完成后,可以单击“应用”按钮来显示系统信息。
也可以选择将Bginfo添加到启动项中,以便每次启动时自动显示系统信息。
总之,Bginfo是一个非常实用的系统信息工具,可以帮助用户快速查看各种系统信息,以便更好地了解和管理计算机系统。
info操作手册
info操作手册info操作手册是用于阅读GNU项目的手册的文档阅读器。
它使用Node来组织文档,每个Node代表一个主题,并且每个Node可以包含其他Node 的链接(菜单项)。
使用info操作手册可以通过以下步骤进行:1. 打开info阅读器。
您可以在终端中输入"info"命令来启动info阅读器。
2. 选择要阅读的Node。
info阅读器会显示一个菜单,列出了所有可用的Node。
您可以使用箭头键或Tab键在菜单中导航,并使用Enter键选择要阅读的Node。
3. 阅读Node的内容。
一旦您选择了要阅读的Node,info阅读器将显示该Node的内容。
您可以滚动文本或使用箭头键来浏览内容。
4. 跳转到其他Node。
每个Node可能包含到其他Node的链接(菜单项)。
要跳转到其他Node,请选择相应的菜单项,然后按照步骤3继续阅读。
5. 退出info阅读器。
要退出info阅读器,请按下"q"键。
除了基本的导航和阅读功能,info阅读器还支持一些其他有用的命令和功能,例如:输入'h'查看帮助菜单,输入'm'进入菜单项。
输入'n'进入下一个Node,输入'p'返回上一个Node。
在菜单项中按Tab键可以自动补全菜单项名称。
在底行最右面显示当前页是否包含全部内容,如All表示包含全部内容,Top表示未包含全部内容。
请注意,以上信息仅供参考,具体操作可能因操作系统和版本而有所不同。
如果您在使用info操作手册时遇到问题,请参考官方文档或寻求专业帮助。
Infoblox Integration with Aruba ClearPass 部署指南说明书
Deployment GuideIntegration with Aruba ClearPass Outbound APIContentsIntroduction (3)Prerequisites (3)Known Limitations (3)Best Practices (3)Configuration (4)Workflow (4)Before you get Started (4)Download Templates from the Infoblox Community Web-Site (4)Editing Instance Variables (5)Supported Notification (5)Infoblox Permissions (5)Aruba ClearPass Configuration (6)Adding Attributes (6)Adding Operator Profile (Permissions) (7)Adding API Client (8)Enable Insight (9)Infoblox NIOS Configuration (10)Check if the Security Ecosystem License is Installed (10)Add/Upload Templates (10)Modifying Templates (12)Adding Client Secret and Client ID (13)Add a Rest API Endpoint (14)Add a Notification (15)Check the Configuration (17)Summary (19)Additional Integrations (19)IntroductionInfoblox and Aruba ClearPass: Securing Network Access ControlFrom IoT to an always-on mobile workforce, organizations face increasingly complex IT infrastructures that are more exposed to attacks than ever before. By combining Infoblox’s DNS security and network visibility with Aruba’s control on the network, users can automate their network.•Visibility, Control, Response:Malicious insiders and IoT-based attacks continue to grow, bypassing your perimeter security defenses.With Infoblox and Aruba integration you are able to automate the defense.•Certified secure. The best defense for wired and wireless connections:Malware have become increasingly intelligent, using the DNS in over 90% of its campaigns. With Infoblox and Aruba integration you are more protected then ever from DNS attacks and data exfiltration via DNS.•Identify what’s on your multi-vendor wired and wireless network:Automatic population of your Arub a ClearPass endpoints list with Mac address’s that are found by Infoblox so that you can see every network asset with unmatched clarity, context, and insight.The integration was developed in collaboration with HPE Aruba.PrerequisitesThe following are prerequisites for the integration using Outbound API notifications:•Infoblox:o NIOS 8.3 or higher.o Security Ecosystem License.o Outbound API integration templates.o Prerequisites for the templates (e.g. configured and set extensible attributes).o Pre-configured services: DNS, DHCP, RPZ, Threat Analytics, Threat Protection, Network Discovery.o NIOS API user with the following permissions (access via API only):▪All Host – RW.▪All IPv4 DHCP Fixed Addresses/Reservations – RW.▪IPv6 DHCP Fixed Addresses/Reservations – RW.•Arubao Aruba ClearPass 6.7 or higher.o Configured API client with client credentials.o Enable InsightKnown LimitationsThe current templates support DNS Firewall (RPZ), Advanced DNS Protection (ADP), Network Discovery, Threat Insight (DNS Tunneling), Host IPv4, Host IPv6, Fixed address IPv4, Fixed address IPv6, and lease events only. The asset management template does not support IPAM DB DELETE events and does not delete endpoints from Aruba ClearPass. It is possible to modify the template and add support for DELETE event.Only assets with MAC address can be synchronized to Aruba ClearPass Policy Manager.Best PracticesOutbound API templates can be found on the Infoblox community site on the partners integration page. After registering an account, you can subscribe to the relevant groups and forums. If additional templates come out they will be found on the community site.For production systems, it is highly recommended to set the log level for an end-point to “Info”or higher (“Warning”, “Error”).Please refer to the Infoblox NIOS Administrator’s Guide about other best practices, limitations and any detailed information on how to develop notification templates. The NIOS Administrator’s Guide can be found through the Help panel in your Infoblox GUI, or on the Infoblox Support portal.ConfigurationWorkflow•Aruba:1. Add Aruba ClearPass Attributes.2. Add an API Client.3. Enable Insight.•Infoblox:1. Install the Security Ecosystem license if it was not installed.2. Check that the necessary services and features are properly configured and enabled, including DNS,RPZ, Threat Analytics, Threat Protection and Discovery.3. Create the required Extensible Attributes.4. Download (or create your own) notification templates (Aruba_Security.json, Aruba_Assets.json,Aruba_Login.json, Aruba_Logout.json, Aruba_Session.json) from the Infoblox community web-site.5. Add the templates.6. Add a REST API Endpoint.7. Add Notifications.8. Emulate an event, check Rest API debug log and/or verify changes on the grid.Before you get StartedDownload Templates from the Infoblox Community Web-SiteOutbound API templates are an essential part of the configuration. Templates fully control the integration and steps required to execute the outbound notifications. Detailed information on how to develop templates can be found in the NIOS Administrator’s guide.Infoblox does not distribute any templates (out-of-the-box) with the NIOS releases. Templates are available on the Infoblox community web-site. Templates for the Aruba integration will be located in the “Partners Integrations”. You can find other templates posted in the “API & Integration” forum.Templates may require additional extensible attributes, parameters or WAPI credentials to be created or defined. The required configuration should be provided with a template. Don’t forget to apply any changes required by the template before testing a notification.Table 1. Extensible AttributesEditing Instance VariablesAruba ClearPass templates use an instance variable to adjust the templates’ behavior. Instance variables can be entered through the grid GUI at “Grid” →“Ecosystem” →“Notification”and then selecting the notification you created at“Edit” →“Templates”.Table 2. Instance VariablesSupported NotificationA notification can be considered as a "link"between a template, an endpoint and an event. In the notification properties, you define which event triggers the notification, the template which is executed and the API endpoint to which NIOS will establish the connection. The Aruba ClearPass templates support a subset of available notifications (refer to the limitations chapter in this guide for more details). In order to simplify the deployment, only create required notifications and use the relevant filters. It is highly recommended to configure deduplication for RPZ events and exclude a feed that is automatically populated by Threat Analytics.Table 3. Supported NotificationsInfoblox PermissionsThe Infoblox and Aruba ClearPass integration requires a few permissions for the integration to work. Navigate to “Administration” →“Administrators” and add a “Roles”, “Permissions”, “Groups” and “Admins” to include permissions that are required for the integrations. When creating a new group, under the “Groups” tab, select the “API” interface under the “Allowed Interfaces” category.Aruba ClearPass ConfigurationAdding AttributesThe Infoblox and Aruba ClearPass integration requires endpoint attributes that may not be already created. In order to add the attributes:1. Navigate to “Administration” →“Dictionaries”→“Attributes”, then click Add.2. In the “Add Attribute” window, set the Entity field to Endpoint, add the correct name to the Attribute, selectthe correct “Data Type”, set “Is Mandatory” to “No”, set the Allow Multiple to “No”, Enter the Default Values and then click “Add”.Repeat the above step and add the attributes from the table below.Table 4. Aruba AttributesAdding Operator Profile (Permissions)1. Inside the ClearPass Guest Manager navigate to “Administration” →“Operator Logins” →“Profiles”and click “Create a new operator profile”.2. Enter the name of the operator profile and then select the “Custom” option from the drop down of theoperator privileges that are found in the list below.Table 5. Aruba Operator PrivilegesAdding API Client1. Inside the ClearPass Guest Manager navigate to “Administration” →“API Services” →“API Clients”and click Create API client.2. On the “Create API Client” form, add the “Client ID”, set the “Operator Profile” to a “Profile” with thecorrect permissions, set the “Grant Type” to “Client credentials (grant_type=client_credentials)” and Remember the “Client Secret” key for later.3. Click “Create API Client” when finished.Enable Insight1. Inside the ClearPass Policy Manager navigate to “Administration” →“Server Manager” →“ServerConfiguration” and click the Aruba ClearPass server name to edit it.2. On the “System” tab click the check box to “Enable Insight Current”.3. Click save on the bottom right of the window to save the settings.Infoblox NIOS ConfigurationCheck if the Security Ecosystem License is InstalledSecurity Ecosystem License is a “Grid Wide” License. Grid wide licenses activate services on all appliances in the same Grid.In order to check if the license was installed navigate to “Grid” →“Licenses” →“Grid Wide”.Add/Upload TemplatesIn order to upload/add templates:1. Navigate to “Grid” →“Ecosystem” →“Templates”, and press “+” or “+ Add Template”.2. Press the “S elect” button on the “Add template” window.3. If a template was previously uploaded, press “Yes” to overwrite the template.4. Pres the “Select” button on the “Upload” window. The standard file selection dialog will open.5. Select the file and press the “Upload” button on the “Upload” window.6. Press the “Add” button and the template will be added/uploaded.7. You can review the uploaded results in the syslog or by pressing the “View Results” button.8. There is no difference between uploading session management and action templates.Modifying TemplatesNIOS provides the facility to modify the templates via the web-interface.1. Navigate to “Grid” →“Ecosystem” →“Templates”, and then press the gear icon next to the templateyou want to modify.2. Press the “Edit” button to open up the “Template” window.The template editor is a simple interface for making changes to templates. It is recommended to only use the template editor to make minor changes. You can also edit, cut and paste template snippets from a text editor of your choice.Note: You cannot delete a template if it is used by an endpoint or by a notification.Adding Client Secret and Client ID1. Navigate to “Grid” →“Ecosystem” →“Templates”and then press the gear icon next to the“Aruba_Session.json” template and click edit to modify it.2. Inside the “Aruba_Session.json” template insert the “Client Secret” key into the “value” field of the“endpoint_variables” with the name "KEY”.3. Inside the “Aruba_Session.json”template insert the “Client ID”value into the “value”field of the“endpoint_variables” with the name "Client_ID”.4. (NIOS 8.3 or later) Navigate to “Grid” →“Ecosyste m →“Outbound Endpoint” and click on the ArubaClearPass endpoint and click “Edit”.5. (NIOS 8.3 or later) Navigate to the “Session Management” tab and add the “Client_ID” and “KEY” tothe value fields.Add a Rest API EndpointA “REST API Endpoint” is basically a remote system which should receive changes based on a notification and a configured template. A Grid, for example, can not only send notifications, it can also receive the notifications from itself (e.g. for testing purposes).In order to add REST API Endpoints:1. Navigate to “Grid” →“Ecosystem” →“Outbound Endpoints”and press “+”or “+ Add REST APIEndpoint” buttons. The “Add REST API Endpoint Wizard” window will open.2. The URI and Name for the appliance you are integrating with are required.3. The URI should be the IP of the appliance you are integrating with, with the correct URI scheme.4. Specify “Auth Username”, “Auth Password”(Aruba Web Service account credentials), “W APIIntegration Username” and “WAPI Integration Password” (NIOS credentials).5. (Optional) For debug purposes only: Under “Session Management”, set “Log Level” to “Debug”.6. The Client_ID and the KEY can be found when you create the Aruba ClearPass API client.When possible, it is recommended to send notifications from a Grid Master Candidate instead of from the Grid Master.Add a NotificationAn endpoint and a template must be added before you can add a notification.In order to add notifications:1. Navigate to “Grid” →“Ecosystem” →“Notification” and press “+” or “+ Add Notification Rule” thenthe “Add Notification Wizard” window will open.2. Specify the notification’s name and select an endpoint (Target), click “Next”.3. Select an event type and define a filter. Note: For optimal performance, it is best practice to make the filteras narrow as possible. Click “Next”.4. (For RPZ notifications only) Check “Enable RPZ event deduplication” and specify relevant parameters.Click “Next”.5. Select a relevant template and specify the template's parameters if any are required. Click “Save & Close”.Check the ConfigurationYou can emulate an event for which a notification was added by going to “DashBoards” → “Status” → “Security” then on the “Dig Request” panel, fill in the “Domain Name to Query”text box and click the “Perform Dig” button.When performing the dig request above, make sure that the “Domain Name to Query” is blocked by your RPZ. To check this, navigate to “Data Management” → “DNS” → “Response Policy Zone”. You can export a RPZ feed or check the content of a local RPZ.To check a debug log for an endpoint, go to “Grid” → “Ecosystem” → “Notification”, click on the gear wheel and select “View Debug Log”.Depending on a browser, the debug log will be downloaded or opened in a new tab. You may need to check your popup blocker or download settings.SummaryThe integration solution from Infoblox and Aruba ClearPass Modernizes your IT service by giving increased Visibility, control, and responses with the best defense for wired and wireless devices and Increased Identification on what on your multivendor wired and wireless network.Additional Integrations1. Integrating ClearPass with Infoblox typically tags the username context, as well as the external device beingauthenticated, along with its respective MAC address, which further simplifies IP address management on the Infoblox side.2. This integration allows ClearPass to send Username and Mac Address mapping information to Infoblox’sMac Address Filters.3. This integration authenticates a device on Aruba ClearPass and then based on data received from Infobloxthrough an enforcement profile puts the device onto a chosen network.。
Windows 2008 用AD组策略在桌面显示用户信息
在Windows server 2008 DC上利用Bginfo部署组策略,实现客户端显示IP,计算机名等到用户桌面。
用AD组策略-----部署Bginfo软件,桌面显示用户端信息!在现实的IT治理中,发现N多的用户不知道如何查看自己的计算机名和登陆帐户,做远程技术支持时需要这些信息,花个十来分钟教用户查看计算机名,IP地址,登录帐户,把治理员累得要死,碰到一些计算机盲用户跟他解释半天还是不会,那治理员就要吐血了.这款软件可以从微软官方下载,最新版本是V4.16下载地址:/en-us/sysinternals/bb897557以下操作全是在DC上完成。
1、打开bginfo软件,设置好要在客户端显示那些信息,及放在桌面的位置2、另存为一个文件,这里我保存为ABinbev. bgi是默认的扩展名;3、下面是保存后的画面;4、把bginfo这个文件夹放到DC默认共享文件夹netlogon下。
并设置bginfo这个文件夹的权限,保证通过验证的用户能读取和运行这个软件5、单击“高级”选项,确保权限继承到该文件夹下面所有的子文件6、新建一个"文本文档“,命名为logon.bat的记事本。
在文件里输入以下内容;cmd /ccd\@echo off\\172.31.193.51\netlogon\bginfo\bginfo.exe /nolicprompt\\172.31.193.51\netlogon\bginfo\ABinbev.bgi /timer:00*//172.31.193.51是我的域控制器的IP地址/*网络上很多文档都是这么写的cmd /c@echo off%logonserver%\netlogon\bginfo\bginfo.exe /nolicprompt/i%logonserver%\netlogon\bginfo\ABinbev.bgi/timer:00但是我按照网络上广为流传的这段代码的话,却遇到下面这个错误。
INFO项目实施步骤及方法
交付内容:
业务评审包 (BRP)
阶段 5 – 设计和发展
发展环境准备 主控、客户化配置和调试数据 硬件方案设计 标准运作流程(SOP) FBR设计和开展 系统和整合测试
交付内容:
完全客户化方案
阶段 6 – 部署
测试环境,生产环境准备和调试 数据准备 完全客户化方案培训 方案验收测试 系统试运行
交付内容:
项目管理:发票和财务ห้องสมุดไป่ตู้时间和过程管理, 合同管理,项目 文件控制 项目总管理
准备评审
在第4和第6阶段末还安排了2次准 备评审 第4阶段后的评审:
目的是确保Infor和客户都同意业务评 审高级会议的结果和业务评审包的内 容。
第6阶段后的评审:
目的是为了准备上线,在客户同意上线 之前再一次评审调试结果,数据下载, 系统试运行等准备。
9: 执行后评估
3. Check
2. Do
阶段 0 – 业务发展支持
销售支持 初步解决方案和范围 初步实施估计 项目执行方法 合同和协议
阶段 1 – 项目启动
项目定位 客户/Infor项目指导委员会 (Steering Committee) 初步风险管理 执行计划准备 变化管理 IT 支持计划准备 整合计划准备
Earned Value Release 1 Start Earned Value Release 2 0: 1: 2: 3: 4:
业务发展支持 项目启动 培训 信息收集 业务评审高级会议
4. Act
1. Plan
READINESS REVIEW DELIVERY 5: 设计和发展 6: 部署 READINESS REVIEW DELIVERY 8: 项目完成和支持转移 7: 客户上线
- 1、下载文档前请自行甄别文档内容的完整性,平台不提供额外的编辑、内容补充、找答案等附加服务。
- 2、"仅部分预览"的文档,不可在线预览部分如存在完整性等问题,可反馈申请退款(可完整预览的文档不适用该条件!)。
- 3、如文档侵犯您的权益,请联系客服反馈,我们会尽快为您处理(人工客服工作时间:9:00-18:30)。
Bginfo軟體部署
以下操作全是在DC上完成
1、打開bginfo軟體,裏面有許多選項,大家根據自己的需要選取,設置好要在
用戶端顯示哪些資訊,及顯示在桌面的位置
2、選取好之后,在主程式作如下設定:Bitmap---location---%TEMP%\BGInfo.bmp 然后另存為一個BGI檔,這里我保存為king.bgi,bgi是默認的副檔名;
3、設置bginfo 這個檔案的權限,保證通過驗證的用戶能讀取和運行這個軟體
4、單擊“高級”選項注意畫紅框的地方打上溝,這樣做是確保許可權應用到整個檔夾裏面所有的檔;
5、把bginfo檔夾copy到netlogon的共用目錄;
6、新建一個批處理檔,命名為logon.bat,在批處理檔裏輸入以下內容:
cmd /c
@echo off
%logonserver%\netlogon\bginfo\bginfo.exe/nolicprompt/i%logonserver%\ netlogon\bginfo\king.bgi /timer:00
7、設置組策略,編輯要應用這個策略的OU;
8、在指定者設定---windows設定---指令碼---登入---單擊“顯示文檔”將之前編輯好的批處理king.bgi文件復制到這個目錄裏。
9、設置登錄腳本
10、刷新組策略
到用戶端測試組策略是否生效:
1、把正在使用的用戶“註銷”重新登錄;
2、如不生效強制刷新一下組策略:gpupdate /force
3、下面是生效後的用戶端;
将来要更改桌面上的显示信息直接在DC上的NETLOGON\bginfo\king.bgi上更改,更改后“应用设置并退出”即可,其它组策略等不需要任何设置。
整理人:許德亮 2008/05/21。