java布局(java布局)
Java语言程序设计:第十章 Java图形用户界面
t}ryesflrs{eaetmD{teer.fypaau{cltkC(l)o; seOperation(EXIT_ON_CLOSE);
选中“ToGoelnUyke}DsiItrMt.caiegmtjefaebreamxtaeIcHtncnmDnLheeaistoea}ep((gidf)oE.ctae;veinkxoaurarAc单.ntcllsstcieo.dTnc击ephmpoardrtetmotLi(i“FneoeEleokte(nnFnS)xoieiSttl”ec(te;kla)}iC”exzA.cgceplkneaetT=dtipsoS“rFtsanicoSNecrnaeeeav)(exlem(){nc;ASeellp”(iz)t)ei保;o()n存;)源{ 文U件I和M工an程a文g件er.getS
边
有间距
CENTER
的 East
组 容se器tHgap(int hgap)
件
setVgap(int vgap)
组
将组件间的水平间距设置为指定的值
件
将组件间的垂直间距设置为指定的值
下边的组件
South
天津职业技术师范大学
BorderLayout
…… class testFrame extends JFrame {
天津职业技术师范大学
BorderLayout
North
左
边 West 的
组 容器
件
上边的组件 CENTER
下边的组件
South
右 边 的 East 组 件
天津职业技术师范大学
BorderLayout
North
方法
左 BorderLay边out( )
West 的
java中Swing的GridBagLayout使用简介

java中Swing的GridBagLayout使⽤简介⼀、GridBagLayout 布局管理器以及其GridBagConstraints布局参数详解GridBagLayout主要使⽤到以下4个参数:columnWidths:设置列数;例如:gridBagLayout.columnWidths = new int[]{0}; 表⽰只有⼀列rowHeights:设置⾏数;例如:gridBagLayout.rowHeights = new int[]{0, 0}; 表⽰总共有2⾏columnWeights:设置各列所占宽度⽐例;gridBagLayout.columnWeights = new double[]{1.0}; 表⽰,列的宽度为容器的宽度,即撑满容器rowWeights:设置各⾏所占的⾼度⽐例;gridBagLayout.rowWeights = new double[]{0.2,0.8};;表⽰第⼀⾏的⾼度只占容器⾼度的2分,第⼆⾏的⾼度占容器的8份GridBagContraints壳设置的参数如下:在使⽤GridBagLayout布局⽅式之前,需要了解下⾯的参数:例如如下代码:public class ClientPanel extends JPanel {/*** Create the panel.*/public ClientPanel() {GridBagLayout gridBagLayout = new GridBagLayout();gridBagLayout.columnWidths = new int[]{0}; //设置了总共有⼀列gridBagLayout.rowHeights = new int[]{0, 0}; //设置了总共有2⾏gridBagLayout.columnWeights = new double[]{1.0}; //设置了列的宽度为容器宽度gridBagLayout.rowWeights = new double[]{0.2,0.8}; //第⼀⾏的⾼度占了容器的2份,第⼆⾏的⾼度占了容器的8份setLayout(gridBagLayout);JPanel panel = new JPanel();panel.setBackground(Color.PINK);GridBagConstraints gbc_panel = new GridBagConstraints();gbc_panel.insets = new Insets(0, 0, 5, 0);gbc_panel.fill = GridBagConstraints.BOTH;gbc_panel.gridx = 0;gbc_panel.gridy = 0;add(panel, gbc_panel);JPanel panel_1 = new JPanel();panel_1.setBackground(Color.ORANGE);GridBagConstraints gbc_panel_1 = new GridBagConstraints();gbc_panel_1.fill = GridBagConstraints.BOTH;gbc_panel_1.gridx = 0;gbc_panel_1.gridy = 1;add(panel_1, gbc_panel_1);}}运⾏结果如下:以下代码:public class ClientPanel extends JPanel {/*** Create the panel.*/public ClientPanel() {GridBagLayout gridBagLayout = new GridBagLayout();gridBagLayout.columnWidths = new int[]{0, 0, 0,0}; //设置了4列gridBagLayout.rowHeights = new int[]{0, 0}; //设置了2⾏gridBagLayout.columnWeights = new double[]{0.25,0.25,0.25,0.25}; gridBagLayout.rowWeights = new double[]{0.2,0.8};setLayout(gridBagLayout);JPanel panel = new JPanel();panel.setBackground(Color.PINK);GridBagConstraints gbc_panel = new GridBagConstraints();gbc_panel.insets = new Insets(0, 0, 5, 0);gbc_panel.fill = GridBagConstraints.BOTH;gbc_panel.gridx = 3;gbc_panel.gridy = 0;add(panel, gbc_panel);JPanel panel_1 = new JPanel();panel_1.setBackground(Color.ORANGE);GridBagConstraints gbc_panel_1 = new GridBagConstraints();gbc_panel_1.insets = new Insets(0, 0, 0, 5);gbc_panel_1.fill = GridBagConstraints.BOTH;gbc_panel_1.gridx = 0;gbc_panel_1.gridy = 1;add(panel_1, gbc_panel_1);}}运⾏结果为:。
java jpanel方法

Java JPanel方法一、什么是JPanelJPanel是Java中的一个Swing组件,它扩展了JComponent类,并提供了一种轻量级的容器,用于组织图形界面的其他组件。
JPanel可用于创建各种界面元素,例如按钮、文本框、标签等,并将它们以特定布局方式放置在一个面板中。
二、JPanel的创建与使用1. 创建JPanel对象在Java中,可以通过直接实例化JPanel类来创建JPanel对象,如下所示:JPanel panel = new JPanel();2. 添加组件创建JPanel对象后,可以通过添加其他组件来完善界面。
可以使用add方法将组件添加到JPanel中,如下所示:panel.add(new JButton("按钮"));panel.add(new JTextField(10));panel.add(new JLabel("标签"));3. 设置布局JPanel可以使用不同的布局管理器来控制添加的组件的排列方式。
常见的布局管理器有FlowLayout、BorderLayout和GridLayout等。
例如,使用FlowLayout布局:panel.setLayout(new FlowLayout());4. 设置其他属性除了布局管理器,JPanel还有其他一些常用的属性可以进行设置,如背景色、前景色和边框等。
设置背景色和前景色可以使用setBackground和setForeground方法,设置边框可以使用setBorder方法。
panel.setBackground(Color.WHITE);panel.setForeground(Color.BLACK);panel.setBorder(BorderFactory.createLineBorder(Color.GRAY, 1));5. 添加事件监听器JPanel也支持添加事件监听器,以便对用户操作进行响应。
JAVA SWING 4中布局方式
创建一个新的流布局管理器,它具有指定的对齐方式以及指定的水 平和垂直间隙。
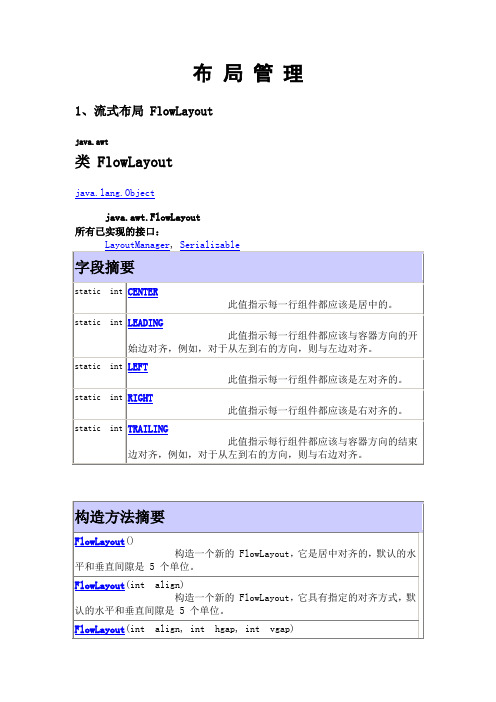
方法摘要
void
addLayoutComponent(String name, Component comp) addLayoutComponent 将指定的组件添加到布局中。 getAlignment() getAlignment 获取此布局的对齐方式。 getAlignOnBaseline() getAlignOnBaseline 如果组件将沿其基线垂直对齐,则返回 true。 getHgap() getHgap 获取组件之间以及组件与 Container 的边之间的水平间 隙。
构造方法摘要
BorderLayout() BorderLayout 构造一个组件之间没有间距的新边框布局。 BorderLayout(int hgap, int vgap) BorderLayout 构造一个具有指定组件间距的边框布局。
方法摘要
void
addLayoutComponent(Component comp, Object constraints) addLayoutComponent 使用指定的约束对象将指定组件添加到布局中。 addLayoutComponent(String name, Component comp) addLayoutComponent 已过时。 已过时。 由 addLayoutComponent(Component, Object)
float
float
Component getLayoutComponent getLayoutComponent(Container target, Object constraints)
Component getLayoutComponent getLayoutComponent(Object constraints)
Java开发桌面程序学习(二)————fxml布局与控件学习
Java开发桌⾯程序学习(⼆)————fxml布局与控件学习JavaFx项⽬新建完项⽬,我们的项⽬有三个⽂件Main.java 程序⼊⼝类,载⼊界⾯并显⽰Controller.java 事件处理,与fxml绑定Sample.fxml 界⾯sample.fxml需要通过标签fx:controller定义对应的controller<!-- 最外层的那个布局使⽤fx:controller属性即可 --><FlowPane fx:controller="sample.Controller" ..></FlowPane>专业术语舞台(Stage),场景(Scene),容器(Container),布局(Layout )和控件(Controls)之间的关系常⽤容器(布局)Container可以把容器和布局统⼀成⼀个概念Vbox相当于垂直⽅向LinearLayoutHbox相当于垂直⽅向的LinearLayoutFlowPanel相当于LinearLayout,⽅向可以定义⽔平或者垂直,设置⽔平⽅向,第⼀⾏排满之后,会⾃动换⾏排列,设置垂直⽅向,第⼀列排满之后,会⾃动换下⼀列BorderPane上中下左右五个部分AnchorPane相当于Android⾥⾯的约束布局,⽐如让某个控件离右边100px,离下边100pxScrollPane 滑动的布局GridPane 通常⽤于这样的布局:第⼀列上的只读标签的输⼊表单和第⼆列上的输⼊字段,也就是常⽤的⽤户名后⾯加⼀个输⼊框常⽤控件(Control)默认的为原⽣的,JFX前缀则是Jfoenix⾥⾯的⽂本labelJFXPasswordField 密码框JFXTextField 单⾏输⼊框JFXTextArea 多⾏输⼊框按钮JFXButton选择框JFXCheckboxJFXRadioButtonMenuButton 下拉选择图⽚ImageView进度条JFXProcessbarJFXSlider ⽔平调节,类似按下⾳量键出现横线JFXSpinner 圆圈进度条开关JFXToggleButton列表JFXListView菜单MenuBar ⾃带有⿏标滑过变⾊,就像SceneBuilder的菜单栏MenuMenuItemRadioMenuItem 点击之后前⾯会有√,⼀列菜单可以有多个,但是只能选择⼀个RadioMenuItem,RadioMenuItem之间是互斥的,需要使⽤toggleGroup分为同⼀组CheckMenuItem 多选,⼀列菜单有多个,也可以选多个ToggleGroup toggleGroup = new ToggleGroup();RadioMenuItem radioItem1 = new RadioMenuItem("Option 1");radioItem.setOnAction(new EventHandler<ActionEvent>() {@Override public void handle(ActionEvent e) {System.out.println("radio toggled");}});radioItem1.setToggleGroup(toggleGroup);RadioMenuItem radioItem2 = new RadioMenuItem("Option 2");radioItem.setOnAction(new EventHandler<ActionEvent>() {@Override public void handle(ActionEvent e) {System.out.println("radio toggled");}});radioItem2.setToggleGroup(toggleGroup);SeparatorMenuItem 分割线**前⾯需要在添加到MenuBar⾥⾯才能使⽤ **SpiltMenuButton 左边是某个按钮,右边是⼀个下拉箭头,点击左边,就会实现按钮操作,点击右边,在出现的列表中选择某⼀项,就可以改变左边按钮使⽤SceneBuilder⽣成fxml布局由于现有的⼯具不多,只有个界⾯化的⼯具,所以就不过多去研究fxml代码部分了。
JavaGUI布局管理器
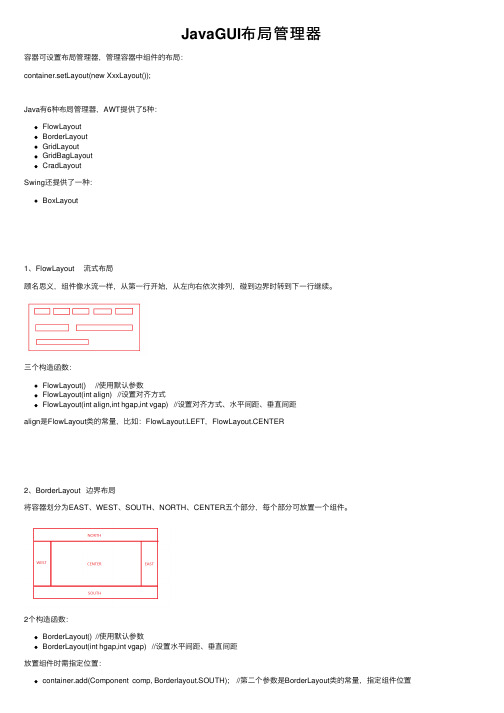
JavaGUI布局管理器容器可设置布局管理器,管理容器中组件的布局:container.setLayout(new XxxLayout());Java有6种布局管理器,AWT提供了5种:FlowLayoutBorderLayoutGridLayoutGridBagLayoutCradLayoutSwing还提供了⼀种:BoxLayout1、FlowLayout 流式布局顾名思义,组件像⽔流⼀样,从第⼀⾏开始,从左向右依次排列,碰到边界时转到下⼀⾏继续。
三个构造函数:FlowLayout() //使⽤默认参数FlowLayout(int align) //设置对齐⽅式FlowLayout(int align,int hgap,int vgap) //设置对齐⽅式、⽔平间距、垂直间距align是FlowLayout类的常量,⽐如:FlowLayout.LEFT,FlowLayout.CENTER2、BorderLayout 边界布局将容器划分为EAST、WEST、SOUTH、NORTH、CENTER五个部分,每个部分可放置⼀个组件。
2个构造函数:BorderLayout() //使⽤默认参数BorderLayout(int hgap,int vgap) //设置⽔平间距、垂直间距放置组件时需指定位置:container.add(Component comp, Borderlayout.SOUTH); //第⼆个参数是BorderLayout类的常量,指定组件位置container.add(Component comp); //缺省位置时,默认为BorderLayout.CENTER,放在中间⼀共5个位置,⼀个位置最多放1个组件。
当然,可以在⼀个位置放置多个组件,只是后放置的组件会覆盖之前放置的组件。
也可以⼀个都不放。
3、GridLayout ⽹格布局将容器划分为指定⾏数、列数的⽹格,每个格⼦的尺⼨都相同,⼀个格⼦中放置⼀个组件,适合组件⼤⼩差不多的,⽐如放置计算器的按钮。
JAVA图形界面各种布局及使用方法
1.布局对于JFrame窗口,默认布局是BorderLayout布局。
对于JPanel,默认布局是FlowLayout布局。
容器可以使用方法:setLayout(布局对象);来设置自己的布局。
(1)FlowLayout布局FlowLayout类创建的对象称做FlowLayout型布局。
FlowLayout类的一个常用构造方法如下:FlowLayout()该构造方法可以创建一个居中对齐的布局对象。
例如:FlowLayout flow=new FlowLayout();如果一个容器con使用这个布局对象:con.setLayout(flow);那么,con可以使用Container类提供的add方法将组件顺序地添加到容器中,组件按照加入的先后顺序从左向右排列,一行排满之后就转到下一行继续从左至右排列。
FlowLayout布局对象调用flow.setAlignment(FlowLayout.LEFT);来设置组件靠左对齐FlowLayout布局对象调用setHgap(int hgap) 方法和setVgap(int vgap)可以重新设置布局的水平间隙和垂直间隙。
(2)BorderLayout布局BorderLayout 布局是Window型容器的默认布局,例如JFrame、JDialog都是Window类的间接子类,它们的默认布局都是BorderLayout 布局。
容器使用BorderLayout 布局,那么容器空间简单地划分为东、西、南、北、中五个区域。
每加入一个组件都应该指明把这个组件添加在哪个区域中,区域由BorderLayout中的静态常量CENTER、NORTH、SOUTH、WEST、EAST表示.添加到某个区域的组件将占据整个这个区域。
每个区域只能放置一个组件,如果向某个已放置了组件的区域再放置一个组件,那么先前的组件将被后者替换掉。
(3)CardLayout 布局使用CardLayout 的容器可以容纳多个组件,但是实际上同一时刻容器只能从这些组件中选出一个来显示,这个被显示的组件将占据所有的容器空间。
逐步掌握JavaSwingUI界面设计

逐步掌握JavaSwingUI界面设计一、Swing界面设计概述Java Swing UI界面设计是Java语言中常用的图形用户界面(GUI)设计工具。
它提供了一系列的组件和容器,可以帮助开发人员创建出美观、交互性强的用户界面。
本文将介绍逐步掌握Java Swing UI界面设计的相关内容。
二、基础知识与组件1. Swing组件分类Java Swing UI界面设计中,可以使用多种不同类型的组件构建用户界面。
常用的Swing组件包括按钮、标签、文本框、下拉列表、菜单等。
这些组件可以通过布局管理器灵活地组合在一起,实现不同样式和功能的用户界面。
2. 布局管理器布局管理器是Java Swing UI界面设计中非常重要的一部分。
它负责决定组件在容器中的位置和大小。
Java Swing提供了多种布局管理器,如流式布局、边界布局、网格布局等。
开发人员可以根据具体需求选择适合的布局管理器,并结合组件的特性进行布局设计。
3. 事件处理在用户界面中,用户的交互行为会触发相应的事件,如点击按钮、选择菜单等。
Java Swing提供了事件模型和事件监听器机制,开发人员可以通过注册监听器来捕获和处理这些事件。
事件处理是Java Swing UI界面设计中的重要环节,可以实现用户交互的逻辑功能。
三、界面设计实例1. 登录界面设计以登录界面为例,介绍如何使用Java Swing进行界面设计。
首先,通过各种组件创建登录界面的基本元素,包括标签、文本框和按钮等。
然后,选择合适的布局管理器,将这些组件适当地放置在面板中。
接下来,通过事件监听器,实现登录按钮的点击事件,验证用户输入的用户名和密码是否正确,并进行相应的操作,如弹出提示框或跳转至其他界面。
2. 菜单设计菜单是用户界面中常见的功能区域,可以实现各种操作的选择和执行。
在Java Swing界面设计中,可以使用菜单条、菜单和菜单项等组件构建菜单。
通过设置相应的监听器,可以捕获菜单项的点击事件,并执行相应的功能操作。
- 1、下载文档前请自行甄别文档内容的完整性,平台不提供额外的编辑、内容补充、找答案等附加服务。
- 2、"仅部分预览"的文档,不可在线预览部分如存在完整性等问题,可反馈申请退款(可完整预览的文档不适用该条件!)。
- 3、如文档侵犯您的权益,请联系客服反馈,我们会尽快为您处理(人工客服工作时间:9:00-18:30)。
java布局(java布局)java布局(java布局)GridBagLayoutFree setting component locationBefore use, set the layout to setLayout (), and the parameter is empty, that is, setLayout (null).Create a layout for the component's (x, y) coordinates, as well asthe width and height as parameters.SetBonds (new, Rectangle (int, x, int, y, int, W, int, H)): parameters are coordinates and width, height.The setSize (int, int) sets the size of the componentThe setLocation (int, int) sets the coordinates of the components Example: Rectangle, re=new, Rectangle (10,10,50,30);Button.setBounds (re);Sequential layout (FlowLayout)Constructor:FlowLayout (): establish the sequence layout manager by default that the components on each row will be centered;FlowLayout (int): Specifies alignment, no arguments,FlowLayout.CENTER, or 1: the components on each row will be centered; arguments FlowLayout.LEFT or 0: left justified; argumentsFlowLayout.RIGHT or 2: right aligned.FlowLayout (int, int, int): a parameter: FlowLayout.LEFT and FlowLayout.CENTER center, left FlowLayout.RIGHT, right aligned; two parameters: the horizontal spacing between components, in pixels; three parameters: the vertical spacing between components, in pixels.Method:SetLayout (): Associate containers with layout managers;GetAlignment (): get the alignment;SetAlignment (): sets the alignment;SetHgap (): sets the horizontal spacing;SetVgap (): sets the vertical spacing.Grid layout (GridLayout)Constructor:The GridLayout (int, int) parameters are the number of rows and the number of columns. If the row number and column number do not match the actual number, the number of rows is satisfied first.GridLayout (int, int, int, int) parameter one or two: row number and column number respectively. Parameter three or four: horizontal spacing and vertical spacing, respectively. The default horizontal spacing and vertical spacing are 0.Method:SetHgap (): sets the horizontal spacing;SetVgap (): sets the vertical spacing.Border layout (BorderLayout)Constructor:GridBagLayout (): create a grid bag layout;GridBagConstraints (): creates a grid bag layout assistant. Properties that are used to set components: layout, size, alignment, etc..Steps to create grid bags:1) creates a GridBagLayout object and specifies it as the current layout manager;2) create a GridBagConstraints instance;3) set the constraint for the component;4) tell the layout manager the components and theirconstraints;5) add components to a container.Method:BuildConstraints (): accepts seven arguments: aGridBagConstraints object and six integers:Gridx and gridy: the coordinates of the cells in which the component is located;Gridwidth and gridheight: the number of cells, rows, and rows spanned by the component;Weightx and weighty: sets the ratio of rows and columns.SetConstraints (): associate with an object. Two parameters are received: the component and the constraints of the component. Constraints: fill and anchor.The constraint fill determines which direction the component extends. Fill takes four values: they are the four class variables in GridBagConstraints:GridBagConstraints.BOTH: stretch in two directions to fill the cell;GridBagConstraints.NONE: display components in the smallest size;GridBagConstraints.HORIZONTAL: the components stretch horizontally;GridBagConstraints.VERTICAL: the components extend in the vertical direction.The constraint anchor determines how the cell is displayed. Auchor takes the four class variable in GridBagConstraints:CENTER, NORTH, EAST, SOUTH, WEST, NORTHEAST, SOUTHEAST, SOUTHWEST, NORTHWEST. The default is CENTER.JAVA interface layout principle: because Java is a cross platform language, the use of absolute coordinates will obviously lead to problems, that is, in different platforms, different resolutions of the display effect is not the same. Java in order to realize the characteristics of cross platform and dynamic layout effect, Java will arrange all the components within the container to a layout manager is responsible for the management, such as: the order of the size of the components, such as position, when the container layout manager windowto move or resize components after how to change the function to the corresponding authorization to manage and use different algorithms and strategies layout manager is different, the container can be determined by selecting the layout layout manager is different. There are 6 kindsof layout managers in Java, and they can design complex interfaces by using 6 kinds of layout manager combinations, and they can display the same interface on different operating system platforms. The 6 layout managers are BorderLayout, BoxLayout, FlowLayout, GirdBagLayout, GirdLayout, and CardLayout. CardLayout must beused in conjunction with the other 5, not particularly. Eachinterface manager has its own functions.CardLayout (cassette layout)CardLayout layout manager can help users deal with two or more members share the same display space, the container is divided into many layers, the display space to occupy the entire container size of each layer, but each layer only allowed to place a component of each layer can be achieved by using the Panel complex user interface layout management. Device (CardLayout) is like a pair of neatly folded cards, 54 cards, but you can only see the top of a card, each card is equivalent to the layout manager in each layer. The implementation procedure is as follows:First, define the panel, set different layouts for each panel, and place the components in each panel as needed:PanelOne.setLayout (new, FlowLayout);PanelTwo.setLayout (New GridLayout (2,1));Set the main panel againCardLayout card = new, CardLayout ();PanelMain.setLayout (card);The next step is to start the prepared panels and add them to the main panelPanelMain.add ("red panel", panelOne);panelmain。