飞利浦电饭煲产品介绍ppt
飞利浦多功能电饭煲用户手册说明书

用户手册属于您的多功能电饭煲感谢您的惠顾,欢迎光临飞利浦!为了您能充分享受飞利浦提供的支持,请在/welcome 上注册您的产品。
重要信息使用产品前,请仔细阅读本说明书,并妥善保管以备日后参考。
危险保留备用出版日期:2020-01-06©2020 Koninklijke Philips N.V.All rights reserved.HD4514_UM_China_v5.0HD4514本表格依据SJ/T11364的规定编制。
表示该有害物质在该部件所有均质材料中的含量均在GB/T26572规定的限量要求以下。
表示该有害物质至少在该部件的某一均质材料中的含量超出GB/T26572规定的限量要求。
除表格中部件外,磁条、发热盘、硅胶件、塑料件、五金件、包装及其他件均质材料中的含量均在GB/T26572规定的限量要求以下。
部件名称铅(Pb)汞(Hg)镉(Cd)六价铬(Gr(VI))多溴联苯 (PBB)多溴二苯醚(PBDE)有害物质电路板组件电源线主温控器组件温度传感器组件固定螺丝×○×××○○○○○×××○○○○○○○○○○○○*该表格中所显示的“有害物质”在产品正常使用情况下不会对人身和环境产生任何伤害。
*该表格中所显示的“有害物质”及其存在的部件向消费者和回收处理从业者提供相关物质的存在信息,有助于产品废弃时的妥善处理。
煮粥/煲汤1 将需要烹调的食材放入内锅。
2 完成“煮饭”中的步骤 6 和 7。
3 轻触功能选择键()来选择煮粥或煲汤功能。
»选定的功能指示灯开始闪烁。
4 按开始烹调按钮()启动烹饪程序。
»选定的功能指示灯保持常亮。
»屏幕上以倒计时方式显示剩余烹饪时间。
5 完成烹调时,您将会听到 4 下滴声。
电饭煲将会自动切换至保温模式。
»保温/取消指示灯亮起。
注意•请勿超出内锅标注的最高水位线,否则可能令电饭煲内的食材溢出。
飞利浦智能电饭煲远程控制说明
飞利浦智能电饭煲远程控制说明在快节奏的现代生活中,人们对于厨房电器的智能化需求日益增长。
飞利浦智能电饭煲以其出色的性能和便捷的远程控制功能,为我们的烹饪生活带来了全新的体验。
接下来,就让我们详细了解一下这款电饭煲的远程控制功能。
一、远程控制的准备工作要使用飞利浦智能电饭煲的远程控制功能,首先需要确保您的电饭煲已正确连接到家庭无线网络。
在电饭煲的设置菜单中,您可以找到网络连接选项,按照提示输入您家中的 WiFi 密码,完成连接。
同时,您还需要在手机上下载并安装飞利浦官方提供的相关应用程序。
在应用商店中搜索“飞利浦智能电饭煲”,找到对应的应用并进行安装。
安装完成后,打开应用程序,按照引导进行注册和登录。
二、与电饭煲进行配对在应用程序中,点击“添加设备”或“配对新设备”的选项。
此时,应用程序会自动搜索附近已连接到同一网络的飞利浦智能电饭煲。
当您的电饭煲出现在设备列表中时,点击选择并进行配对。
配对过程中,可能需要您输入一些验证信息,例如电饭煲的序列号或验证码等。
这些信息通常可以在电饭煲的机身、说明书或包装盒上找到。
完成配对后,您的手机和电饭煲就成功建立了远程控制的连接。
三、远程控制的主要功能1、预约烹饪通过远程控制功能,您可以随时随地设置电饭煲的预约烹饪时间。
无论您是在上班途中、外出购物还是在外地出差,只要您能连接到网络,就可以提前安排好饭菜的烹饪时间。
例如,您知道自己晚上 7 点才能到家,那么您可以在下午 4 点的时候通过手机设置电饭煲在 6 点开始煮饭,这样您一回到家就能享用到热气腾腾的美味饭菜。
在预约烹饪功能中,您可以选择不同的烹饪模式,如煮饭、煮粥、煲汤等,还可以根据自己的需求调整烹饪的时长和温度。
2、实时监控在电饭煲工作过程中,您可以通过手机实时监控烹饪的进度。
应用程序会为您显示电饭煲当前的工作状态,包括剩余时间、温度变化等信息。
这让您能够更加精确地掌握烹饪情况,及时做出调整。
3、远程操作如果您在烹饪过程中突然改变了主意,想要调整烹饪模式或者延长烹饪时间,也可以通过远程控制功能轻松实现。
飞利浦Pronto中控产品介绍
(第二章) Pronto产品介绍
2010/1
1
目录
1)Pronto与传统中控的区别
1.1) 1.2) 1.3) 1.4)
2.1) 2.2) 2.3) 2.4) 2.5) 2.6)
传统中控系统 Pronto中控系统 Pronto中控系统优势 词汇
TSU系列触摸屏 各触摸屏功能及技术参数对比 RFX系列扩展器 各扩展器功能及技术参数对比
16
支持ProntoScript 网络连接
初级培训
(2.3) RFX系列扩展器
2010/1
17
RFX系列扩展器
RFX9400
RFX9600
18
RFX9400
• 开箱即用,无需其它网络设备,具有独立网络 • 可设地址IR端口 • 在有线或WiFi无线网络下可靠工作19Biblioteka 无线扩展器 - RFX9400
8
初级培训
(2) Pronto产品线
2010/1
9
初级培训
(2.1) TSU系列触摸屏
2010/1
10
TSU9400
高分辨率3.5”触摸屏 人体工程学设计适于单手手持操作 弧形边缘,屏幕齐平安装设计
11
TSU9600
3.7’’横向设计触摸屏 优化的按键布局便于双手操作 支持声音波形文件
12
TSU9800
型 功 能 尺寸 分辨率 版式设计 声音支持
号
TSU9800 6.4’’ 640x480 横向 有 支持 无线WiFi/ 有线以太网
TSU9600 3.7’’ 640x480 横向 有 支持 无线WiFi
TSU9400 3.5’’ 320x240 竖向 无 支持 无线WiFi
菲利普电子空气炖锅产品说明书

Viva CollectionTurboStarLow fat fryerRed, 1425W, 0.8kgHD9623/31Great tasting fries with up to 80% less fat*Thanks to patented TurboStar technologyWith Philips unique TurboStar technology you can fry food using minimal oil andprepare delicious and evenly cooked dishes. There’s no need for preheating andwith the new compact design you can still cook large amount of food.Fast, easy and time efficientDetachable parts- dishwasher safeEasy clean in 90 secs- QuickClean basket with non-stick meshFry, bake, grill and roast your favorite foods at homeTasty food in less time: no pre-heating requiredGrill pan accessory for more versatile recipesHealthy and tasty results every timeDelicious dishes:tender on the inside, crispy on the outsideOver 200 recipes in app and free recipe book includedUp to 50% more homogenous end results-TurboStar technology*Unique TurboStar technology for healthier fryingThoughtfully designedLarge 0.8 kg capacity, 20% compacter*Universal EasyClick handle - easily exchange accessoriesHighlightsCrispy and tender resultsThanks to Philips TurboStar technology, all food is exposed to this constant, circulating heat and is cooked through simultaneously.The result is evenly fried food – with no turning needed - even when food is piled up. In addition to the heated air flow, powerful direct heat from above quickly crisps the food for delicious, golden-brown results. “Crispy on the outside, tender on the inside”QuickClean basketWith Philips’ Airfryer QuickClean basket which includes a removable non-stick mesh, cleaning becomes easier and faster. Theremovable nonstick coated drawer and the food basket are dishwasher safe for easy cleaning.Philips Airfryer with TurboStar technology saves you and your home from the smell of fried oil compared to a regular fryer.Versatile cookingNot just great for frying, the innovative Philips Airfryer with Rapid Air technology also lets you grill, bake and even roast your favorite dishes for a one stop solution for all of your meals.Small in size, big in capacityThe new Airfryer has been designed withcompactness in mind (20% smaller) while still enabling to cook large amount of food (800 gr).With its reduced size it blends in perfectly onto the kitchen counter-top and serves delicious meals for the whole family. Its thoughtful size enables every day usage and a world of possibilities.Instant heat-upPhilips Airfryer is ready to use immediately.Integrally faster from start to end it drives every day usage by superiority along the whole cooking process.Healthier fryingThe unique Philips TurboStar generates fast superheated air to fry your food with little to no added oil. Philips Airfryer also creates less smell than conventional fryers, it is easy to clean, safe and economical for your daily use!Universal EasyClick handlePhilips' new universal EasyClick handle helps you mix and match the right cooking accessory and achieve the best results for your key dishes- every day. Additionally it allows for compacter storage after use.Grill pan accessoryEnjoy more of your favorite foods with the grill pan accessory. Perfect for grilling fish, meat,vegetables and more in an easy, quick &healthier way.Inspiring recipesThe Philips Airfryer app is free and filled with delicious recipes and easy to follow step-by-step cooking instructions. Get inspired with quick, healthy snacks or meals for special occasions.50% more homogenous resultsThe innovative Philips TurboStar technology swirls the hot air rapidly through the whole basket. This results in more homogenous heat distribution and therefore 50% more evenly fried food*. There is no need for turning- even when food is piled up. In addition, powerful direct heat from above quickly crisps the food.SpecificationsAccessoriesIncluded: Grill panGeneral specificationsProduct features: Automatic shut-off, Cool wall exterior, Cord storage, Dishwasher safe, Non-slip feet, On/off switch, Ready signal, Temperature control, Time control, Power-on light, Quickclean Service2-year worldwide guaranteeSustainabilityPackaging: > 90% recycled materialsUser manual: 100% recycled paperTechnical specificationsPower: 1425 WVoltage: 220 - 240 VCapacity basket: 800 kgWeight and dimensionsDimensions of product (LxWxH):365x266x292 mmWeight of product: 5,3 kgDesignColor: Red, SilverFinishingMaterial of main body: Plastic* Compared to fresh fries prepared in a conventionalPhilips fryer.* versus Philips Viva Collection Airfryer, total capacity canfit 800 gr of fries* measured vs Airfryer without TurboStar with frozenfries, evaluated on browning and doneness© 2019 Koninklijke Philips N.V.All Rights reserved.Specifications are subject to change without notice. Trademarks are the property of Koninklijke Philips N.V. or their respective owners.Issue date 2019‑03‑27 Version: 6.0.1EAN: 08 71010 38015 35 。
飞利浦多功能电饭煲说明书

HD2238User manual• Always put the inner pot in the appliance before you put the plug in the power outlet and switch it on.• Do not place the inner pot directly over an open fire to cook food.• Do not use the inner pot if it is deformed.• Make sure that the sealing ring is clean and in good condition.• The accessible surfaces may become hot when the appliance is operating. Take extra caution when touching the surfaces.• Beware of hot steam coming out of the floating valve and pressure regulator valve during cooking or when you open the lid. Keep hands and face away from the appliance to avoid the steam.• Do not lift and move the appliance while it is operating.• Do not exceed the maximum water level indicated in the inner pot to prevent overflow.• Do not place the cooking utensils inside the pot while cooking.• Only use the cooking utensils provided. Avoid using sharp utensils.• To avoid scratches, itis not recommendedto cook ingredients with crustaceans and shellfish. Remove the hard shells before cooking.• Do not place a magnetic substanceon the lid. Do not use the appliance near a magnetic substance.• Always let the appliance cool downto room temperature before you clean or move it.• Always clean theappliance after use. Donot clean the appliancein dishwasher.• Always unplug theappliance if not usedfor a longer period.• If the appliance isused improperly orfor professional orsemi-professionalpurposes, or if it isnot used accordingto the instructions inthis safety leaflet, theguarantee becomesinvalid and Philipsrefuses liability for anydamage caused.• Visit /support to downloadthe user manual.Electromagnetic fields (EMF)This Philips appliance complies with all applicablestandards and regulations regarding exposure toelectromagnetic fields.2 What’s in the box (fig. 1)Main unit Power cordRice & Soup ladle Steaming plateMeasuring cup Glass lidUser manual Recipe bookletWarranty card3 Overview (fig. 1)Product overviewa Lid handle h Control Panelb Top lid i Heating elementc Detachable inner lid j Power socketd Sealing ring k Locking pineWater levelindications l Floaterf Side handle m Pressure regulatorg Inner pot n Safety valveControls overviewo Heating indicator z Increase buttonp Power indicator{Cooking time buttonqKeep warm/Cancelbutton|Bake buttonr Slow cook button }Yogurt buttons Sauté/sear button ~Kaya buttontSauce thickeningbutton Display panelu Fried rice button€Stew buttonv Preset time button Start/Reheat buttonw Decrease button‚Keep warm indicatorxTemperature/Pressure indicatorƒMaintain pressureindicatoryTemperature/Pressure button…Start pressureindicatorFunctions overviewPressure cooking functionsCookingfunctionDefaultpressurekeeping time(minute)Pressure keepingtime regulatingrange (minute)Soup2020-59Porridge1515-59Rice14Not adjustableSteam83-20Chicken/Duck1515-59Beaf/Lamb3030-59Beans/Tendons3030-59Normal cooking functions(non-pressure)CookingfunctionDefaultcooking timeCooking timeregulating rangeSlow cook 6 hours 2 - 12 hoursSauté/sear(low /mid/hightemperature)3 minutes 2 - 59 minutesSaucethickening(low /mid/hightemperature)8 minutes 5 - 59 minutesFried rice11 minutes7 - 59 minutesBake45 minutes10 - 59 minutesYogurt8 hours 6 - 12 hoursKaya18 minutes 5 - 59 minutesStew 1 hour35 minutes -10 hoursReheat25 minutes20 - 59 minutes4 Using the All-in-one MultiCookerBefore first use1 Remove all packaging materials from theappliance.2 Take out all the accessories from the inner pot.3 Clean the parts of the All-in-one Multi Cookerthoroughly before using it for the first time (seechapter "Cleaning and Maintenance").Note•Make sure all parts are completely dry beforeyou start using the All-in-one Multi Cooker.Preparations before cooking(fig. 2)Before using the All-in-one Multi Cooker to cookfood, follow below preparation steps:1 Hold the lid handle and turn it anti-clockwiseuntil the top lid cannot move any more, then liftup the top lid.2 Take out the inner pot from the All-in-one MultiCooker and put the pre-washed food in the innerpot.3 Wipe the outside of the inner pot dry, then put itback into the All-in-one Multi Cooker.4 Place the top lid onto the All-in-one MultiCooker and turn it clockwise. You will hear a“click” sound when the top lid is properly locked.Note•Make sure the sealing ring is properlyassembled around the edge of the detachableinner lid.•Make sure the pressure regulator valve andfloating valve are clean and not blocked.•Make sure the outside of the inner pot is dryand clean, and that there is no foreign residueon the heating element.•Make sure the inner pot is in proper contactwith the heating element.Cooking food (fig. 3)Note•Do not fill the inner pot with less than 1/3 ormore than 2/3 full of food and liquid.•For food that expands during cooking, do notfill the inner pot with more than 1/2 full of foodand liquid.•For rice cooking, follow the water levelindications on the inside of the inner pot. Youcan adjust the water level for different types ofrice and according to your own preference. Donot exceed the maximum quantities indicatedon the inside of the inner pot.•Make sure the floater on the top lid dropsdown before cooking.•After the cooking process is started, you canpress Cancel/Warm to deactivate the currentwork, and the appliance goes to standbymode.Pressure cooking1 Follow the steps in “Preparations beforecooking”.2 Turn the pressure regulator to seal.3 Put the plug in the power socket.»The power indicator starts flashing.4 Press Pressure cook to choose one of thepressure cooking functions - Soup, Porridge,Rice, Steam, Chicken/Duck, Beaf/Lamb orBeans/Tendons.»The default pressure keeping time is displayedon the screen.Note•The pressure keeping time is not adjustablefor Rice.•You can adjust the pressure(Low. High) bypressing the Temp/kPa button.•When cooking 2 cups of rice (small amount),for better result, spread the rice evenly in theinner pot before cooking.5 To set a different pressure keeping time, pressCooking time.6 Press or to set the pressure keeping time.7 Press Start/Reheat to start the cooking process.8 When the All-in-one Multi Cooker reaches theworking pressure:»Maintain Pressure lights up;9 When the pressure keeping time has elapsed,the All-in-one Multi Cooker automaticallyswitches to keep warm mode.»The keep warm indicator (Keep warm) lightsup.10 Turn the pressure regulator to vent.»The All-in-one Multi Cooker starts releasingpressure.»The floater drops down when the pressure isreleased sufficiently.11 Hold the top lid handle and turn the lid anti-clockwise until it cannot move any more, then liftit up.Note•When cooking soup or viscous liquid, donot release pressure by turning the pressureregulator to vent, otherwise liquid might spurtfrom the pressure regulator valve. Wait untilthe pressure is naturally released and thefloater has dropped down to open the top lid.•The pressure keeping timer will start countingdown when the working pressure is reached.•After the cooking is finished and the pressureis released, you can press the cancel button(Warm/Cancel) and unplug the All-in-oneMulti Cooker to turn off the keep warmfunction or when not in use.Normal cookingNote•For normal cooking, you can cook foodwithout adding water in the inner pot. In thiscase, make sure to turn the pressure regulatorto bake.•Make sure to keep the top lid open for theentire time when you cook food in the Sauté/sear mode.•To choose the Reheat function, press Start/Reheat when the appliance is in standbymode.•You can press the Temp/kPa button to adjusttemparature (Low, Mid, High) for the followingfunctions: Sauté/sear and Sauce thickening.•The glass lid shall be used for non-pressurecooking functions.To cook food with normal pressure, press thecooking buttons and choose Slow cook, Sauté/sear, Fried rice, Sauce thickening, Stew, Yogurt,Kaya or Bake.1 Follow the steps in “Preparations beforecooking”.2 Turn the pressure regulator to bake or seal.• For Slow cook, Stew and Yogurt, turn thepressure regulator to seal.• For Bake, turn the perssure regulator to bake.3 Put the plug in the power socket.»The power indicator (Power) starts flashing.4 Press the desired cooking function button tochoose a cooking mode.5 To set a different cooking time, press Cookingtime.»The cooking time flashes on the screen.6 Press or to set the cooking time.7 Press Start/Reheat to start the cooking process.8 When the cooking time has elapsed, the All-in-one Multi Cooker automatically switches to keepwarm or standby mode.9 Turn the pressure regulator to vent.10 Hold the top lid handle and turn the lid anti-clockwise until it cannot move any more, then liftit up.Preset time for delayed cooking(fig.4)You can preset the delayed cooking time fordifferent cooking functions. The preset timer isavailable up to 24 hours.1 After the cooking function is selected, pressPreset timer.»The hour unit starts flashing on the display.2 Press or to set the hour unit.3 After the hour unit is set, press Preset timeragain.»The minute unit starts flashing on the display.4 Press or to set the minute button.5 Press Preset timer to confirm the preset time.6 Press Start/Reheat to start the cooking process.7 When the preset time has elapsed, the All-in-one Multi Cooker starts working automatically.Note•The preset function is not available in thefollowing modes: Sauté/Sear (both low andhigh temperatures), Reheat and Warm.Assembling and disassemblingthe pressure regulatorWarning•Do not disassemble the pressure regulatorduring cooking. Always unplug the All-in-oneMulti Cooker and wait until the pressure hasbeen released sufficiently to do so.• To disassemble the pressure regulator:1 Turn the lower screw anticlockwise until itbecomes loose.2 Pull it up and take out the pressure regulator.• To assemble the pressure regulator:1 Assemble the lower screw back to the regulator.2 Make sure the regulator points at the sealedposition ( ) and put it back to the steam valve.3 Turn the screw clockwise until it is fastened.5 Cleaning andMaintenanceNote•Unplug the All-in-one Multi Cooker beforestarting to clean it.•Wait until the All-in-one Multi Cooker hascooled down sufficiently before cleaning it.InteriorInside of the top lid, glass lid, and the main body:• Wipe with wrung out and damp cloth.• Make sure to remove all the food residuesstuck to the All-in-one Multi Cooker.Heating element:• Wipe with wrung out and damp cloth.• Remove food residues with wrung out anddamp cloth.Sealing ring:• Soak in warm water and clean with sponge.Inner lid:• Remove the detachable inner lid. Soak it inwarm water and clean with sponge.ExteriorSurface of the top lid, glass lid and outside of themain body:• Wipe with a cloth damped with soap water.• Only use soft and dry cloth to wipe the controlpanel.• Make sure to remove all the food residuesaround the pressure regulator valve andfloating valve.Pressure regulator valve and floating valve:• Disassemble the pressure regulator, soak it inwarm water, and clean with sponge.• Remove food residues in the pressureregulator valve and floating valve.AccessoriesMeasuring cup, rice & soup ladle, and inner pot:• Soak in hot water and clean with sponge.6 SpecificationsModel Number HD2238Rated voltage220-240VRated frequency50-60HzRated power input1370-1630WRated capacity8.0LWarm keeping temperature60-80°CNote•Always unplug the appliance if not used for alonger period.7 RecyclingDo not throw away the product with the normalhousehold waste at the end of its life, but hand it inat an official collection point for recycling. By doingthis, you help to preserve the environment.Follow your country's rules for the separatecollection of electrical and electronic products.Correct disposal helps prevent negativeconsequences for the environment and humanhealth.8 Guarantee and serviceIf you need service or information, or if you have aproblem, visit the Philips website at or contact the Philips CustomerCare Center in your country. You can find its phonenumber in the worldwide guarantee leaflet. If thereis no Customer Care Center in your country, go toyour local Philips dealer.9 TroubleshootingIf your All-in-one Multi Cooker does not function properly or if the cooking quality is insufficient, consult thetable below. If you are unable to solve the problem, contact a Philips service center or the Consumer CareCenter in your country.Problem Cause SolutionI have difficultiesopening the lid aftercooking.Need to release thepressure.PressureControl ValveFloater bakeventsealSet the pressure control valve to 'Vent'.And wait until the floater has dropped.Floater stuck in upposition.Set the pressure control valve to 'Vent'.And wait until the floater has dropped.I have difficultiesclosing the top lid.The sealing ring is not wellassembled.Make sure the sealing ring is well assembledaround the inside of the top lid.The floater stuck in upposition.The floater blocks the locking pin. Push down thefloater so that it does not block the locking pin.Leaking from under lid.Sealing ring missing.Sealing ringInner lidSealing ringInner lidPut sealing ring in place correctly on inner lid.Food or debris undersealing ring.Remove the sealing ring, clean and replace.Lid not correctly closed.Open and reclose the lid, checking for correctclosing.The pressure level insideof the appliance isabnormal.In this case the safety valve will be releasingsteam. Take the appliance to your Philips dealeror a service center authorized by Philips.Leaking from floaterSealing ring broken.Replace the sealing ring.Food or debris undersealing ring.Remove the sealing ring, clean and replace.Floater does not riseup after the appliancestarts pressurizing.Food&water are belowminimum level.Add food/water. Make sure there is enough foodand water in the inner pot.Leaking from lid orpressure control valve.Take the appliance to a Philips service dealer.E3 displays on thescreen.The temperature insidethe inner pot is too high.Wait until it falls down to room temperature.E1, E2, or E4 displayson the screen.The All-in-one MultiCooker has malfunction.Take the appliance to a Philips service center.。
PHILIPS HD4775 说明书
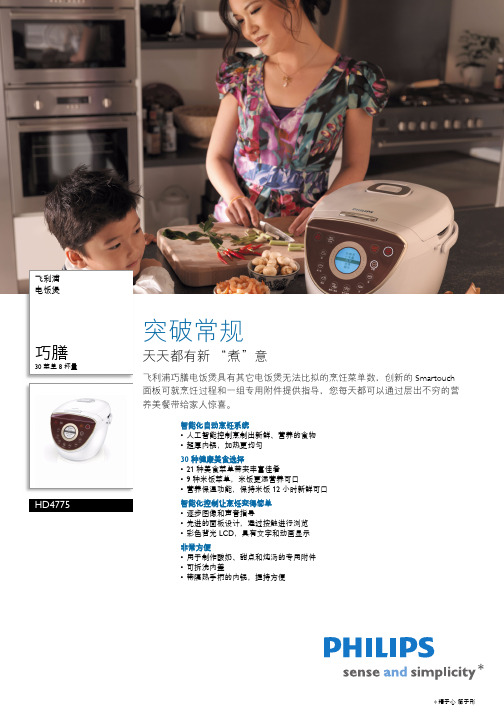
飞利浦电饭煲巧膳30 菜单 8 杯量HD4775突破常规天天都有新“煮”意飞利浦巧膳电饭煲具有其它电饭煲无法比拟的烹饪菜单数,创新的 Smartouch面板可就烹饪过程和一组专用附件提供指导,您每天都可以通过层出不穷的营养美餐带给家人惊喜。
智能化自动烹饪系统•人工智能控制烹制出新鲜、营养的食物•超厚内锅,加热更均匀30 种健康美食选择•21 种美食菜单带来丰富佳肴•9 种米饭菜单,米饭更添营养可口•营养保温功能,保持米饭 12 小时新鲜可口智能化控制让烹饪变得简单•逐步图像和声音指导•先进的面板设计,通过按触进行浏览•彩色背光 LCD,具有文字和动画显示非常方便•用于制作酸奶、甜点和炖汤的专用附件•可拆洗内盖•带隔热手柄的内锅,握持方便*精于心简于形产品亮点人工智能控制智能化加热机制和温度控制使得各种烹饪程序都能实现最佳烹饪效果超厚内锅涂层下超厚铸铁的铁铝合金特性可确保产生高水平的加热功率,并在内锅周围均匀加热9 种米饭菜单米饭菜单包括白米、快煮、小米量、寿司米、糙米、糯米、杂锦米、煲仔饭和泡饭。
21 种美食菜单它具有 21 种烹饪菜单,包括煮粥 - 稠粥、稀粥、绿豆粥、小米粥、鸡粥;意大利面;煲汤 - 菜汤、冬荫功、老火汤;燕麦;酸奶;甜品 - 绿豆汤、芝麻糊、木瓜雪耳糖水、莲子桂圆汤;蛋糕;焖/炖;蒸制;炖汤;鸡蛋/牛奶布丁。
12 小时自动保温使用保温功能,保持食物的营养与美味。
烹饪结束后,电饭煲自动切换到保温模式逐步指导设置和烹饪过程中,每个烹饪程序都伴随有逐步图像和声音指导。
用户只需遵照屏幕上显示的说明即可。
电饭煲为文本指导提供了三个语言设置选项。
触摸面板设计创新的触摸感应控件让用户可以轻松地浏览烹饪程序。
它由带 LED 按钮的触摸感应面板组成,中央的旋转式控件用于设置时间和浏览屏幕菜单。
彩色背光 LCD带彩色背光的 LCD 可清晰地指示各种烹饪状态(设置为白色;烹饪/翻热为红色;保温为绿色)。
Philips Viva Collection 电子饭煲说明书

Philips Viva CollectionRice cookerProCeramic Pot with big handleSmart 3D heating48hr keep warmBig capacity of 2LHD3132Cooks every grain of rice perfectlyWith the ultimate, long lasting ProCeramic+ PotPhilips state of the art 5-layer ProCeramic+ pot is 5x harder than normal coatingsensuring your pot lasts longer and thanks to the 3D heating system, every grain is wellcooked for you and your family to enjoy for up to 48 hoursThe ultimate in convenience•Inner pot with cool-touch handles for easy access•Fully detachable inner lid for easy cleaning•Extra large 2.0L capacity serves up to 14 peopleEvery grain well cooked•Automatic keep warm function for up to 48 hours•Extra thick alloy ensures every grain is cooked perfectly•Smart 3D heating system cooks rice evenly•Outer layer contains copper element for even cookingStrong and durable design•Durable stainless steel body for long lasting performanceLong lasting ProCeramic+ pot•High gloss non-stick coating by Whitford for easy cleaning•State of the art ProCeramic+ coating is 5x harderHighlightsInner pot with handlesEasy carrying out the innerpot when you cook different varieties.Automatic keep warmKeep warm function automatically starts to work after rice is cooked and ensures your rice remains hot and fluffy for up to 48 hoursExtra thick alloyExtra thick alloy ensures every grain is cooked perfectlySmart 3D heating system Smart 3D heating system cooks the rice from all directions, delivering great tasting rice grain by grainFully detachable inner lidFully detachable inner lid for easy cleaning. The inner lid also encompasses a unique design that can efficiently remove foam and prevent overflow during cookingstainless steel bodyDurable stainless steel body for long lasting performanceNon-stick coatingHigh gloss non-stick coating by Whitford for easy cleaningEvenly cookingOuter layer contains copper element for even cookingProCeramic+ coatingProCeramic plus: up to 5 times more durable than conventional rice cookers*. Its super scratch resistant surface is for longer usage (*Philips rice cooker inner pot is made of 5-layer ProCeramic+ and conventional rice cooker inner pot is made of non-stick coating)Extra Large capacityExtra large 2.0L capacity, ideal to serve up to 14 peopleIssue date 2021-12-24 Version: 1.1.1EAN: 08 71010 39219 43© 2021 Koninklijke Philips N.V.All Rights reserved.Specifications are subject to change without notice. Trademarks are the property of Koninklijke Philips N.V. or their respective owners.SpecificationsCountry of origin•Made in: ChinaTechnical specifications•Power: 875 W•Cord length:0.8 m•Voltage: 230 V•Frequency: 50 HzDesign•Color: SilverAccessories•Included: Measuring cup, Spatula, Steaming tray/ basketConsumer Trade Item•Height:33•Width: 32.5•Length: 32.7•Net Weight: 3.28•Gross Weight: 4.3•GTIN: 08710103921943•Country of origin: CN •Harmonized system code: 85167970 Outer Carton•Height:69•Width: 34•Length: 66.8•Net Weight: 13.12•Gross Weight: 18.8•GTIN: 18710103921940 Finishing•Material of main body: Metal Service•2-year worldwide guarantee Sustainability•Packaging: > 90% recycled materials •User manual: 100% recycled paper。
机电产品学 ——电饭煲PPT

By :
谢谢!
段 梅 梅 欧 阳 慧 敏
使用中的注意事项
1.当不使用电饭锅时,或内锅未放入锅体时, 不能将电源线插入锅的插座内。 2.不允许把除内锅以外的其它容器放在发热 板上加热使用。 3.内锅在放入锅体之前,应将其周围、底部 及发热板上的异物揩试干净,否则就会煮生 成饭或糊饭。
先找出故障的部位
1.先在锅里放人一杯凉水,插上电源,按下加热(煮饭)按钮开关,看指示灯亮否? 若指示灯不亮,说明电源线、指示灯电路或开关控制部分有问题。这时要先查电 源线内芯有没有老化折断的地方。尤其是煮粥时溢出的米汤容易落在插头上,往 往会导致电源插头与插销接触不良。 2.水能加热,说明电加热盘是好的;水不能加热,说明电热盘有故障。据维修统 计,电热盘出现故障的概率较低。 3.随着锅内的水温不断上升,当水中有小气泡向上冒时(水温大约在70℃左右), 用手将按钮开关向上抬起,看指示灯是否亮,判断保温开关工作是否正常。正常 状态是,指示灯从亮到灭,过几分钟后,又点亮到灭,并不断反复。如果指示灯 一直点亮或一直熄灭,则是保温开关(或称恒温器)出了故障. 4.继续按下按钮开关,让锅里的水继续加热,由70℃上升到 100℃,水蒸气开 始蒸发,当完全蒸发后,温度上升到 103左右时.便会听到"咔嗒"一声响,限温器 迅速切断电源,指示灯随即熄灭,这说明限温器工作正常。 如果锅内的水蒸发 干后,在1分钟左右听到"咔嗒"声,指示灯也不见熄灭,说明限温器出了问题。
电饭煲的基本结构
发热盘: 这是电饭煲的主要发热元件。这是一个内嵌电发热管的铝合金圆盘,内 锅就放在它上面,取下内锅就可以看见。 限温器: 又叫磁钢。它的内部装有一个永久磁环和一个弹簧,可以按动,位置在 发热盘的中央。煮饭时,按下煮饭开关时,靠磁钢的吸力带动杠杆开关使电源触 点保持接通,当煮米饭时,锅底的温度不断升高,永久磁环的吸力随温度的升高 而减弱,当内锅里的水被蒸发掉,锅底的温度达到103±2C时,磁环的吸力小于 其上的弹簧的弹力,限温器被弹簧顶下,带动杠杆开关,切断电源。 保温开关: 又称恒温器。它是由一个弹簧片、一对常闭触点、一对常开触点、一 个双金属片组成。煮饭时,锅内温度升高,由于构成双金属片的两片金属片的热 伸缩率不同,结果使双金属片向上弯曲。当温度达到80C以上时,在向上弯曲的 双金属片推动下,弹簧片带动常开与常闭触点进行转换,从而切断发热管的电源, 停止加热。当锅内温度下降到80C以下时,双金属片逐渐冷却复原,常开与常闭 触点再次转换,接通发热管电源,进行加热。如此反复,即达到保温效果。 杠杆开关: 该开关完全是机械结构,有一个常开触点。煮饭时,按下此开关,给 发热管接通电源,同时给加热指示灯供电使之点亮。饭好时,限温器弹下,带动 杠杆开关,使触点断开。此后发热管仅受保温开关控制。 限流电阻: 外观金黄色或白色为多,大小象3W电阻,按在发热管与电源之间, 起着保护发热管的作用。常用的限流电阻为185C 5A或10A(根据电饭煲功率而 定)。限流电阻是保护发热管的关键元件,有能用导线代替。