误删VMware快照导致无法启动虚拟系统的问题
VMware vSphere常见问题汇总(17)
VMware vSphere常见问题汇总(十七)170. Vmdk 的重做日志已损坏解题思路[vmware-]环境:esxi5.0,vc5.0故障问题:执行storage vmotion之后,虚拟机出现了报错。
报错信息:xssj-000003.vmdk is corrupted.power off the virtual machine. If the problem still persists, discard the redo log.解提思路:【故障原因】由于快照之间的关系出现异常,导致vm启动失败:Vmware-34.log:2013-01-14t08:36:53.885z| vmx| disklib-chain :"/vmfs/volumes/50f13506-075ed29b-86b5-5ef3fd359eab/???è???3????184/xssj-000005.vmdk" : failed to open (the parent virtual disk has been modified 34.log:2013-01-14t08:36:53.886z| vmx| disklib-lib : failed to open'/vmfs/volumes/50f13506-075ed29b-86b5-5ef3fd359eab/???è???3????184/xssj-000006.vmdk' with flags 0xa the parent virtual disk has been modified since the child was created. The content id of the parent virtual disk does not match the corresponding parent content id in the child (18).Vmware-34.log:2013-01-14t08:36:53.886z| vmx| disk: cannot open disk"/vmfs/volumes/50f13506-075ed29b-86b5-5ef3fd359eab/???è???3????184/xssj-000006.vmdk": the parent virtual disk has been modified since the child was created. The content id of the parent virtual disk does not match the corresponding parent content id in the child (18).Vmware-34.log:2013-01-14t08:36:53.886z| vmx| msg_post: errorVmware-34.log:2013-01-14t08:36:53.886z| vmx| [msg.disk.nobackend] cannot open the disk '/vmfs/volumes/50f13506-075ed29b-86b5-5ef3fd359eab/???è???3????184/xssj-000006.vmdk' or one of the snapshot disks it depends on.Vmware-34.log:2013-01-14t08:36:53.886z| vmx| [msg.disk.configurediskerror] reason: the parent virtual disk has been modified since the child was created. The content id of the parent virtual disk does not match the corresponding parent content id in the child.Vmware-34.log:2013-01-14t08:36:53.900z| vmx| module diskearly power on failed.【快照之间的联系】正常情况下,原始磁盘与快照是通过parent content id来关联,父快照与子快照之间也是通过parent content id,但是现在我们查看原始磁盘与快照磁盘之间的关系,发现它们的cid和parentcid是混乱的,信息如下:Xssj.vmdk:cid=ba60eb23Xssj.vmdk:parentcid=ffffffffXssj-000001.vmdk:cid=27f8a456Xssj-000001.vmdk:parentcid=ba60eb23Xssj-000002.vmdk:cid=11ed1dacXssj-000002.vmdk:parentcid=27f8a456Xssj-000003.vmdk:cid=2583a010Xssj-000003.vmdk:parentcid=2583a010Xssj-000004.vmdk:cid=2583a010Xssj-000004.vmdk:parentcid=11ed1dacXssj-000005.vmdk:cid=4d38fabfXssj-000005.vmdk:parentcid=2583a010Xssj-000006.vmdk:cid=9402bf1aXssj-000006.vmdk:parentcid=a30d0e91可以看到这个磁盘关系从xssj.vmdk磁盘到xssj-000002.vmdk之间的关系都是没有问题的。
误删VMware快照导致无法启动虚拟系统的问题
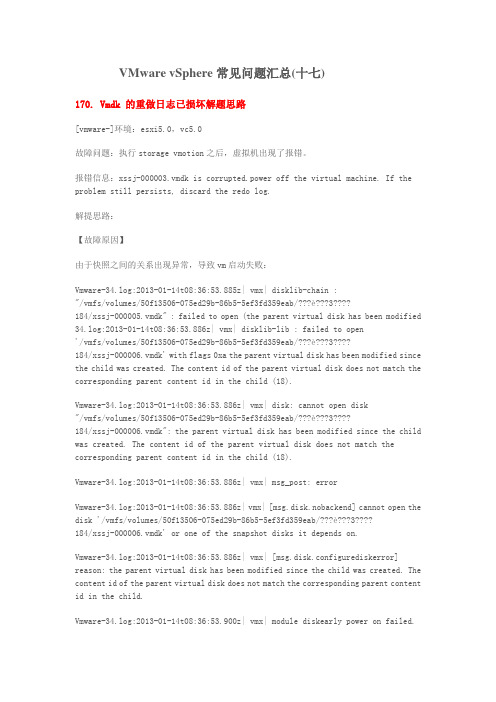
误删VMware快照导致无法启动虚拟系统的问题由于ESXi虚拟机需要扩盘,扩盘需要删除原来的快照,但是虚机磁盘较大,删除快照时没有从最早的快照开始,而是直接选择从中间删除,导致删除快照在99%出现卡死现象,客户急于上线,因此手动停止了快照,结果导致虚机磁盘容量为零,启动时报如下错误:VC界面告警要求整合快照,执行后仍然报错。
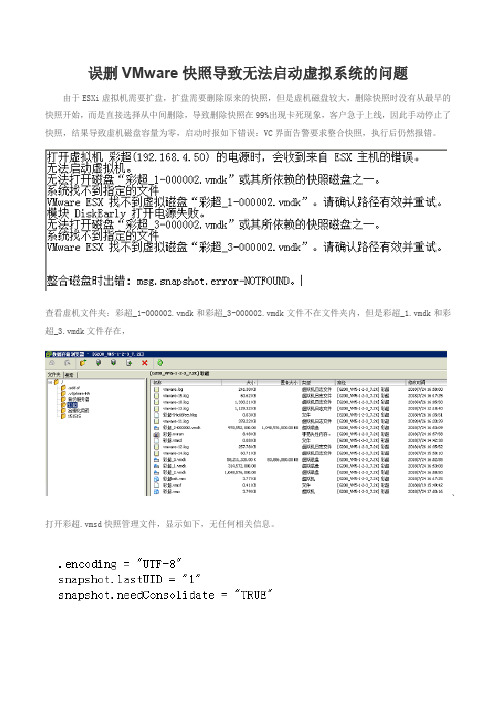
查看虚机文件夹:彩超_1-000002.vmdk和彩超_3-000002.vmdk文件不在文件夹内,但是彩超_1.vmdk和彩超_3.vmdk文件存在,、打开彩超.vmsd快照管理文件,显示如下,无任何相关信息。
浏览虚机所在存储,下载虚拟系统的vmx配置文件到本地PC进行编辑,原文件如下:.encoding = "UTF-8"config.version = "8"virtualHW.version = "8"vmci0.present = "TRUE"displayName = "褰╄秴(192.168.4.50)"extendedConfigFile = "褰╄秴.vmxf"svga.vramSize = "8388608"numvcpus = "8"memSize = "16384"sched.cpu.units = "mhz"tools.upgrade.policy = "manual"scsi0.virtualDev = "lsisas1068"scsi0.present = "TRUE"ide1:0.deviceType = "cdrom-image"ide1:0.fileName = "emptyBackingString"ide1:0.present = "TRUE"scsi0:0.deviceType = "scsi-hardDisk"scsi0:0.fileName = "褰╄秴_3-000002.vmdk"sched.scsi0:0.shares = "normal"scsi0:0.present = "TRUE"scsi0:1.deviceType = "scsi-hardDisk"scsi0:1.fileName = "褰╄秴_1-000002.vmdk"sched.scsi0:1.shares = "normal"sched.scsi0:1.throughputCap = "off"scsi0:1.present = "TRUE"floppy0.startConnected = "FALSE"floppy0.clientDevice = "TRUE"floppy0.fileName = "vmware-null-remote-floppy"scsi0:2.deviceType = "scsi-hardDisk"scsi0:2.fileName = "褰╄秴_2-000002.vmdk"sched.scsi0:2.shares = "normal"sched.scsi0:2.throughputCap = "off"scsi0:2.present = "TRUE"guestOS = "windows7srv-64"toolScripts.afterPowerOn = "TRUE"toolScripts.afterResume = "TRUE"toolScripts.beforeSuspend = "TRUE"toolScripts.beforePowerOff = "TRUE"tools.syncTime = "FALSE"uuid.bios = "42 0c 25 cd bb 27 34 6b-7b 58 61 e5 7d ba 06 53"vc.uuid = "50 0c ea e1 54 4c 85 60-28 45 d7 e1 29 91 78 14"tencySensitivity = "normal"vmci.filter.enable = "true"sched.scsi0:0.throughputCap = "off"tools.guest.desktop.autolock = "false"nvram = "褰╄秴.nvram"pciBridge0.present = "true"svga.present = "true"pciBridge4.present = "true"pciBridge4.virtualDev = "pcieRootPort"pciBridge4.functions = "8"pciBridge5.present = "true"pciBridge5.virtualDev = "pcieRootPort"pciBridge5.functions = "8"pciBridge6.present = "true"pciBridge6.virtualDev = "pcieRootPort"pciBridge6.functions = "8"pciBridge7.present = "true"pciBridge7.virtualDev = "pcieRootPort"pciBridge7.functions = "8"hpet0.present = "TRUE"virtualHW.productCompatibility = "hosted"cpuid.coresPerSocket = "2"disk.EnableUUID = "true"replay.supported = "FALSE"pciBridge0.pciSlotNumber = "17"pciBridge4.pciSlotNumber = "21"pciBridge5.pciSlotNumber = "22"pciBridge6.pciSlotNumber = "23"pciBridge7.pciSlotNumber = "24"scsi0.pciSlotNumber = "160"vmci0.pciSlotNumber = "33"scsi0.sasWWID = "50 05 05 6d bb 27 34 60"hostCPUID.0 = "0000000b756e65476c65746e49656e69" hostCPUID.1 = "000206f20040080002bee3ffbfebfbff" hostCPUID.80000001 = "0000000000000000000000012c100800" guestCPUID.0 = "0000000b756e65476c65746e49656e69" guestCPUID.1 = "000206f200020800829822031fabfbff" guestCPUID.80000001 = "00000000000000000000000128100800" userCPUID.0 = "0000000b756e65476c65746e49656e69" userCPUID.1 = "000206f200400800029822031fabfbff" userCPUID.80000001 = "00000000000000000000000128100800" evcCompatibilityMode = "FALSE"vmotion.checkpointFBSize = "8388608"softPowerOff = "TRUE"tools.remindInstall = "FALSE"stInstallError = "0"toolsInstallManager.updateCounter = "4"vmotion.checkpointSVGASize = "11534336"guestinfo.toolsInstallErrCode = "0"chipset.onlineStandby = "FALSE"sched.cpu.min = "0"sched.cpu.shares = "normal"sched.mem.min = "0"sched.mem.minSize = "0"sched.mem.shares = "normal"migrate.hostlog = "./褰╄秴-54c66fee.hlog"sched.swap.derivedName = "/vmfs/volumes/577f9eed-8bda4f74-3345-441ea170ef66/褰╄秴/褰╄秴-54c66fee.vswp"uuid.location = "56 4d f0 e4 12 66 9a e4-a1 9d 1c 9d 6e 83 5c 53"replay.filename = ""scsi0:0.redo = ""scsi0:1.redo = ""scsi0:2.redo = ""vmci0.id = "2109343315"cleanShutdown = "TRUE"ide1:0.allowGuestConnectionControl = "TRUE"config.readOnly = "FALSE"ethernet0.pciSlotNumber = "32"ethernet0.virtualDev = "e1000"workName = "VM Network"ethernet0.addressType = "vpx"ethernet0.generatedAddress = "00:50:56:8c:3e:6d"ethernet0.present = "TRUE"ide1:0.startConnected = "FALSE"更改下列文件如下图:保存后,把原虚机目录XXX.vmx改名,重新上传更改的XXX.vmx到虚机目录,查看虚机属性,磁盘恢复,重新启动虚机OK。
该虚拟机的某个磁盘已经由虚拟机或者快照使用vmware损坏.vmdk为空

该虚拟机的某个磁盘已经由虚拟机或者快照使用vmware损
坏.vmdk为空
这问题出现的原因就是中途断电了,没其他可能了.
以下每一步操作完之后都可以,试试成功没.删除不要+shift,删错了还能垃圾桶找回来
•删除虚拟机配置文件下面的.lck文件
•删除类型为快照的.vmsn/.vmsd文件
•到虚拟机设置,删除硬盘重新导入
•如果是vmdk,以前有快照的话,恭喜你秒解决.找到000002.vmdk 结尾的,打开,复制到对应的,里面的数字改为损坏的数字
•例如5损坏了,把2改成5,就可以用旧快照救新快照,这解决方法自己试出来的,搜遍全网没人告诉我T.T
现在csdn到处都是软文,我这种却发不出去…。
虚拟机无法启动的方法

当虚拟机无法启动时,可以尝试以下方法来解决问题:
1. 检查虚拟机配置:确保虚拟机的配置符合系统要求,包括处理器、内存、硬盘空间等。 如果虚拟机配置不足,可以尝试增加资源分配。
2. 重新启动虚拟机:有时候虚拟机可能会遇到临时问题,重新启动虚拟来自可以解决一些常 见的启动问题。
3. 检查虚拟机设置:检查虚拟机的设置,包括启动顺序、启动设备等。确保设置正确,以 确保虚拟机能够从正确的设备启动。
虚拟机无法启动的方法
7. 重建虚拟机:如果以上方法都无法解决问题,可以尝试重新创建虚拟机,并将原始虚拟 机的配置和数据导入到新的虚拟机中。
如果以上方法仍然无法解决虚拟机无法启动的问题,可能需要进一步检查虚拟机日志或咨 询相关技术支持人员以获取更详细的帮助。
虚拟机无法启动的方法
4. 检查虚拟机软件更新:确保使用的虚拟机软件是最新版本,因为更新可能修复了一些已 知的启动问题。
5. 检查宿主机防火墙和安全软件:有时候,宿主机的防火墙或安全软件可能会阻止虚拟机 的启动。尝试暂时禁用这些软件,并重新启动虚拟机。
6. 检查虚拟机磁盘文件完整性:如果虚拟机的磁盘文件损坏或丢失,可能会导致无法启动 。检查虚拟机磁盘文件的完整性,并尝试修复或还原虚拟机磁盘文件。
修复VMware虚拟机里Ubuntu编译内核之后无法启动的问题

修复VMware虚拟机里Ubuntu编译内核之后无法启动的问题最近在VMware虚拟机里面安装了Ubuntu10.04,尝试修改内核代码,无奈最后一次编译连系统都启动不了,只好通过iso安装文件启动进入原来的系统进行修复。
把这个过程记录下来,以备后用。
1、在VMware虚拟机中按Ctrl+D打开“虚拟机设置”,在“硬件”设备中选择“CD/DVD (IDE)”,在“连接”中选择“使用ISO镜像文件”,选择Ubuntu的iso安装文件,“确定”。
2、重启虚拟机,在显示“VMware”文字是按下Esc键,进入“Boot Menu”,选择“Enter Setup”-”Boot“,将”CD-ROM Drive“设为第一启动项,按F10,重启。
3、系统重启后通过iso文件启动,选择语言”English“,选择”Try Ubuntu without installing“,进入系统。
4、打开终端,输入 sudo su 转换为root用户;输入fdisk -l 查看主分区是哪个,如我的是sda1;输入以下命令,将原来无法启动的系统挂载到现在的系统上;mount /dev/sda1 /mnt{mount --bind /proc /mnt/procmount --bind /dev /mnt/devmount --bind /sys /mnt/sys}可以不用输入chroot /mnt 进入到原来的系统,可以进入/home目录确认;5、和使用原来系统一样的操作(自己该干嘛干嘛去,我是需要重新编译内核:)。
如果你知道原来系统进不了是因为grub损坏的话,那么这一步就进行grub修复,具体命令如下grub-install --root-directory=/mnt /dev/sda(未尝试)6、修改完卸载之前挂载的磁盘exit 退出chrootumount /mnt7、重新启动,将启动项改为硬盘启动。
OK。
虚拟机快照功能导致空间不足问题分析
正文:监控发现网管服务器第一台无法ping通,服务异常。
经检查发现该虚拟机死机。
由于服务器挂死,尝试使用命令进行重启,但重启后虚拟机客户端报redo log空间不足。
经进一步检查发现,承载虚拟机的实体机分配给该虚拟机的磁盘空间目录/vmfs/volumes/OA_NET002/80.7.3.1中有一个8G的快照文件80.7.3.1-Snapshot1.vmsn和一个24G的增量包文件80.7.3.1-000001-delta.vmdk,导致空间不足。
在实体机上使用命令vmware-cmd /vmfs/volumes/OANET002/80.7.3.1/80.7.3.1.vmx stop hard停止虚拟机后,删除快照文件并将增量包与当前虚拟机服务器合并释放空间。
重新启动服务器及相关服务,恢复正常。
分析结论:在对虚拟机执行快照动作时会同步产生一个快照文件和一个增量包文件,快照文件用来记录执行快照动作时虚拟机的状态,增量包文件用来记录执行快照后虚拟机的增删修改等更新操作,因此随着虚拟机的运行,增量包文件会不断增长,直到承载虚拟机的实体机分配给该虚拟机的空间完全耗尽,导致虚拟机挂死。
建议措施:快照功能只适合短期记录服务器状态,不适合作为服务器的长期备份,应慎重使用该功能。
实施方法:登录承载该虚拟机的实体机,进入该虚拟机的目录,删除快照文件,通过将该虚拟机克隆的方式将增量包与当前虚拟机服务器合并。
删除原虚拟机,启动克隆后的虚拟机服务器即可。
备注:承载虚拟机的实体机的磁盘空间是指该实体机的本地硬盘空间及分配给该实体机的外部存储。
虚拟机服务器的磁盘空间是指用户建立虚拟机时划分的磁盘空间,用户划分磁盘空间后会在承载虚拟机的实体机的磁盘上建立一个以该虚拟机名称命名的文件夹,用户的所有虚拟机文件包括该虚拟机划分的空间都会放在该文件夹下。
VmwarevSphere常见问题及解决办法
VmwarevSphere常见问题及解决办法1. 虚拟机文件被锁,无法正常 power on故障状态:启动虚拟机时95%,停顿并且进程中断,提示:ubable to access files since it is locked。
祸根:HA解决方法:(1)首先将cluster中的HA功能关闭。
如果该功能不关闭,容易造成死锁,,VM不断跳动,,不断再不同的ESX内循环被锁,徒劳而无功。
(2)磁盘文件被锁,要解决,必须要知道到底是哪台ESX把他给锁住了,这是关键。
方法:看/var/log/vmkernel但是,在做这些前, 再准备些别的工作。
(3)在VC中,把被锁的VM从Inventory中remove掉。
原因很简单,这是一个 unregister的过程。
(4)根据/var/log/vmkernel,搜索owner,可以找到类似以下的语句:Oct 19 04:23:33 esx-hostname vmkernel: 3:06:29:47.992 cpu6:1656)FS3: 1975: Check ing if lock holders are live for lock [type 10c00001 offset 52008 960 v 380, hb offset 3554304 Oct 19 04:23:33 esx-hostname vmkernel: gen 17, mode 1, owner 48f5f637-462688bc-fd28-0e1a6434b6f8 mtime 38112]OK,owner后面的48f5f637-462688bc-fd28-0e1a6434b6f8就是你的target了。
因为他就是锁住VM 的宿主.。
(5)根据以下命令,,找出到底哪台ESX的UUID是 48f5f637-462688bc-fd28-0e1a6434b6f8[root@esxhostname root]# esxcfg-info |grep -i 'system uuid'(6)找到目标主机后,当然是杀死他锁住VM的进程。
慎用vmwareEsx的snaphost(快照)功能
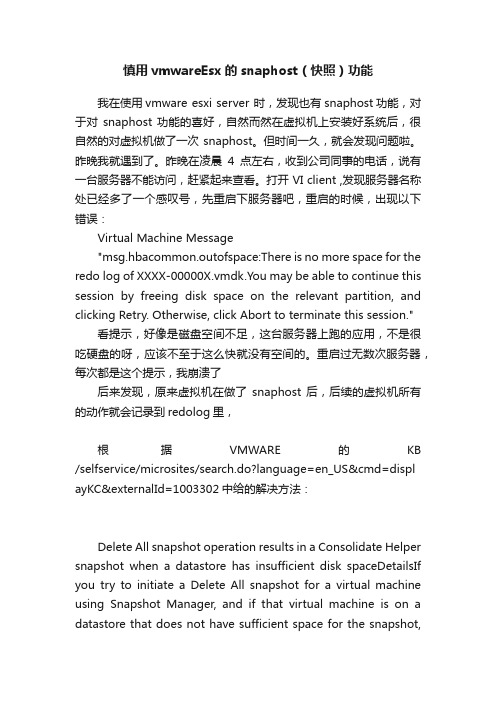
慎用vmwareEsx的snaphost(快照)功能我在使用vmware esxi server 时,发现也有snaphost功能,对于对snaphost 功能的喜好,自然而然在虚拟机上安装好系统后,很自然的对虚拟机做了一次 snaphost。
但时间一久,就会发现问题啦。
昨晚我就遇到了。
昨晚在凌晨4点左右,收到公司同事的电话,说有一台服务器不能访问,赶紧起来查看。
打开 VI client ,发现服务器名称处已经多了一个感叹号,先重启下服务器吧,重启的时候,出现以下错误:Virtual Machine Message"msg.hbacommon.outofspace:There is no more space for the redo log of XXXX-00000X.vmdk.You may be able to continue this session by freeing disk space on the relevant partition, and clicking Retry. Otherwise, click Abort to terminate this session."看提示,好像是磁盘空间不足,这台服务器上跑的应用,不是很吃硬盘的呀,应该不至于这么快就没有空间的。
重启过无数次服务器,每次都是这个提示,我崩溃了后来发现,原来虚拟机在做了snaphost 后,后续的虚拟机所有的动作就会记录到redolog里,根据VMWARE的KB /selfservice/microsites/search.do?language=en_US&cmd=displ ayKC&externalId=1003302中给的解决方法:Delete All snapshot operation results in a Consolidate Helper snapshot when a datastore has insufficient disk spaceDetailsIf you try to initiate a Delete All snapshot for a virtual machine using Snapshot Manager, and if that virtual machine is on a datastore that does not have sufficient space for the snapshot,the following message displays in VMware Infrastructure (VI) Client:msg.hbacommon.outofspace: there is no more space for the redo log of <VMname>-0000xx.vmdk.You are given the option to abort or retry.•If you choose Abort, the virtual machine is powered off, the snapshot is aborted, and a Consolidate Helper snapshot is created. The Snapshot Manager UI displays that Consolidate Helper snapshot. You can delete the Consolidate Helper snapshot after you have made space available.••If you click Retry, the Snapshot Manager returns to Consolidate Helper snapshot mode unless you have made more disk space available.••SolutionFree up disk space if possible, or extend the VMFS volume using VI Client. To extend the VMFS volume:1.Select the host on which the virtual machine resides and click the Configuration tab.2.Select the datastore on which the virtual machine resides and click Properties.3.4.Note: If there is no available storage, a new LUN must be presented to every ESX host that can see the LUN.5.In the dialog that appears, click Add Extent and follow the prompts in the Add Extend wizard to add an extent.6.Perform a rescan on every ESX host that is being presentedthe new LUN so that the addition of the extent is detected.7.After you have extended the VMFS volume, you can check the Retry option of the Redo log pop-up.Caution: When using Delete All in the Snapshot Manager, the snapshot furthest from the base disk is committed to its parent, causing that parent snapshot to grow. When that commit is complete, that snapshot is removed and the process starts over on the newly updated snapshot to its parent. This continues until every snapshot has been committed. This can lead to an aggressive use of additional disk space if the snapshots are large. Use care when exercising this option if there is not much space available on the datastore.但好像ESXI中没有扩展VMFS卷功能,找了半天我都找不到,实在是郁闷呀。
- 1、下载文档前请自行甄别文档内容的完整性,平台不提供额外的编辑、内容补充、找答案等附加服务。
- 2、"仅部分预览"的文档,不可在线预览部分如存在完整性等问题,可反馈申请退款(可完整预览的文档不适用该条件!)。
- 3、如文档侵犯您的权益,请联系客服反馈,我们会尽快为您处理(人工客服工作时间:9:00-18:30)。
误删VMware快照导致无法启动虚拟系统的问题由于ESXi虚拟机需要扩盘,扩盘需要删除原来的快照,但是虚机磁盘较大,删除快照时没有从最早的快照开始,而是直接选择从中间删除,导致删除快照在99%出现卡死现象,客户急于上线,因此手动停止了快照,结果导致虚机磁盘容量为零,启动时报如下错误:VC界面告警要求整合快照,执行后仍然报错。
查看虚机文件夹:彩超_1-000002.vmdk和彩超_3-000002.vmdk文件不在文件夹内,但是彩超_1.vmdk和彩超_3.vmdk文件存在,、打开彩超.vmsd快照管理文件,显示如下,无任何相关信息。
浏览虚机所在存储,下载虚拟系统的vmx配置文件到本地PC进行编辑,原文件如下:.encoding = "UTF-8"config.version = "8"virtualHW.version = "8"vmci0.present = "TRUE"displayName = "褰╄秴(192.168.4.50)"extendedConfigFile = "褰╄秴.vmxf"svga.vramSize = "8388608"numvcpus = "8"memSize = "16384"sched.cpu.units = "mhz"tools.upgrade.policy = "manual"scsi0.virtualDev = "lsisas1068"scsi0.present = "TRUE"ide1:0.deviceType = "cdrom-image"ide1:0.fileName = "emptyBackingString"ide1:0.present = "TRUE"scsi0:0.deviceType = "scsi-hardDisk"scsi0:0.fileName = "褰╄秴_3-000002.vmdk"sched.scsi0:0.shares = "normal"scsi0:0.present = "TRUE"scsi0:1.deviceType = "scsi-hardDisk"scsi0:1.fileName = "褰╄秴_1-000002.vmdk"sched.scsi0:1.shares = "normal"sched.scsi0:1.throughputCap = "off"scsi0:1.present = "TRUE"floppy0.startConnected = "FALSE"floppy0.clientDevice = "TRUE"floppy0.fileName = "vmware-null-remote-floppy"scsi0:2.deviceType = "scsi-hardDisk"scsi0:2.fileName = "褰╄秴_2-000002.vmdk"sched.scsi0:2.shares = "normal"sched.scsi0:2.throughputCap = "off"scsi0:2.present = "TRUE"guestOS = "windows7srv-64"toolScripts.afterPowerOn = "TRUE"toolScripts.afterResume = "TRUE"toolScripts.beforeSuspend = "TRUE"toolScripts.beforePowerOff = "TRUE"tools.syncTime = "FALSE"uuid.bios = "42 0c 25 cd bb 27 34 6b-7b 58 61 e5 7d ba 06 53"vc.uuid = "50 0c ea e1 54 4c 85 60-28 45 d7 e1 29 91 78 14"tencySensitivity = "normal"vmci.filter.enable = "true"sched.scsi0:0.throughputCap = "off"tools.guest.desktop.autolock = "false"nvram = "褰╄秴.nvram"pciBridge0.present = "true"svga.present = "true"pciBridge4.present = "true"pciBridge4.virtualDev = "pcieRootPort"pciBridge4.functions = "8"pciBridge5.present = "true"pciBridge5.virtualDev = "pcieRootPort"pciBridge5.functions = "8"pciBridge6.present = "true"pciBridge6.virtualDev = "pcieRootPort"pciBridge6.functions = "8"pciBridge7.present = "true"pciBridge7.virtualDev = "pcieRootPort"pciBridge7.functions = "8"hpet0.present = "TRUE"virtualHW.productCompatibility = "hosted"cpuid.coresPerSocket = "2"disk.EnableUUID = "true"replay.supported = "FALSE"pciBridge0.pciSlotNumber = "17"pciBridge4.pciSlotNumber = "21"pciBridge5.pciSlotNumber = "22"pciBridge6.pciSlotNumber = "23"pciBridge7.pciSlotNumber = "24"scsi0.pciSlotNumber = "160"vmci0.pciSlotNumber = "33"scsi0.sasWWID = "50 05 05 6d bb 27 34 60"hostCPUID.0 = "0000000b756e65476c65746e49656e69" hostCPUID.1 = "000206f20040080002bee3ffbfebfbff" hostCPUID.80000001 = "0000000000000000000000012c100800" guestCPUID.0 = "0000000b756e65476c65746e49656e69" guestCPUID.1 = "000206f200020800829822031fabfbff" guestCPUID.80000001 = "00000000000000000000000128100800" userCPUID.0 = "0000000b756e65476c65746e49656e69" userCPUID.1 = "000206f200400800029822031fabfbff" userCPUID.80000001 = "00000000000000000000000128100800" evcCompatibilityMode = "FALSE"vmotion.checkpointFBSize = "8388608"softPowerOff = "TRUE"tools.remindInstall = "FALSE"stInstallError = "0"toolsInstallManager.updateCounter = "4"vmotion.checkpointSVGASize = "11534336"guestinfo.toolsInstallErrCode = "0"chipset.onlineStandby = "FALSE"sched.cpu.min = "0"sched.cpu.shares = "normal"sched.mem.min = "0"sched.mem.minSize = "0"sched.mem.shares = "normal"migrate.hostlog = "./褰╄秴-54c66fee.hlog"sched.swap.derivedName = "/vmfs/volumes/577f9eed-8bda4f74-3345-441ea170ef66/褰╄秴/褰╄秴-54c66fee.vswp"uuid.location = "56 4d f0 e4 12 66 9a e4-a1 9d 1c 9d 6e 83 5c 53"replay.filename = ""scsi0:0.redo = ""scsi0:1.redo = ""scsi0:2.redo = ""vmci0.id = "2109343315"cleanShutdown = "TRUE"ide1:0.allowGuestConnectionControl = "TRUE"config.readOnly = "FALSE"ethernet0.pciSlotNumber = "32"ethernet0.virtualDev = "e1000"workName = "VM Network"ethernet0.addressType = "vpx"ethernet0.generatedAddress = "00:50:56:8c:3e:6d"ethernet0.present = "TRUE"ide1:0.startConnected = "FALSE"更改下列文件如下图:保存后,把原虚机目录XXX.vmx改名,重新上传更改的XXX.vmx到虚机目录,查看虚机属性,磁盘恢复,重新启动虚机OK。