实验3_使用Wireshark分析DNS协议
Wireshark抓包实例分析 (DNS和HTTP协议)

(八)参考资料
《计算机科学网络 自顶向下的方法》 第四版 陈鸣 译 《WireShark 教程用户使用手册》 《学习用 wireshark 进行抓包分析》 罗小嘉
表单数据以及浏览记录等等。 3、单击开始,打开运行,输入'cmd',输入命令'ipconfig/flushdns',回车,即
可看到成功刷新 DNS 缓存的显示。
2、WireShark 的使用
(1) 启动 WireShark。 (2) 启动 PC 上的 IE 浏览器。 (3) 开始分组捕获:选择“抓包”下拉菜单中的“抓包参数选择”命令,在
图二
其中,第一行为该包的信息,第二行为以太网,属于链路层,第三行为 IP 协 议,属于网络层(源 IP 与目的 IP 显示在该行),第四行为 UDP 协议,属于传输 层,第五行为 DNS 的有关数据。下面将通过图三详细分析 DNS 报文的内容。
这是一个请求查询 的报文(0),该报文没有 被删节,采用的是递归调 用的查询,问题数为 1, 回答 RR 数,权威 RR 数 以及附加 RR 数均为 0。 在问题区域显示了名字 字段与被查询的问题类 型 A(即主机地址)。
计算机网络技术基础目录一封面第1页二目录第2页三内容一实验背景介绍第3页二实验目的及任务第3页三实验环境第3页四实验原理第3页五实验步骤第3页1实验前的准备工作第4页2wireshark的使用第4页六实验结果分析第4页1dns分析第45页2http分析第67页七实验总结第7页八参考资料第7页内容一实验背景介绍wireshark简介wireshark原ethereal是目前最流行的一款网络封包分析软件
利用Wireshark分析DNS协议
实验七利用Wireshark分析DNS协议一、实验目的分析DNS协议二、实验环境与因特网连接的计算机,操作系统为Windows,安装有Wireshark、IE等软件。
三、实验步骤nslookup工具允许运行该工具的主机向指定的DNS服务器查询某个DNS记录。
如果没有指明DNS服务器,nslookup将把查询请求发向默认的DNS服务器。
其命令的一般格式是:(请在实验中将该例中的改为, 改为并写到实验报告中!)nslookup –option1 –option2 host-to-find dns-server1、打开命令提示符(Command Prompt),输入nslookup命令。
图中显示三条命令,第一条命令:nslookupwww.tu “提出一个问题”即:“将主机的IP地址告诉我”。
屏幕上出现了两条信息:(1)“回答这一问题”DNS服务器的名字和IP地址;(2)主机名字和IP地址。
第二条命令:nslookup –type=NS 在这个例子中,我们提供了选项“-type=NS”,域为。
执行这条命令后,屏幕上显示了DNS服务器的名字和地址。
接着下面是三个TUST DNS服务器,每一个服务器是TUST校园里缺省的DNS服务器。
第三条命令:nslookup 在这个例子中,我们请求返回 DNS server 而不是默认的DNS服务器()。
此例中,DNS 服务器提供主机的IP地址。
2、ipconfigipconfig用来显示TCP/IP 信息, 你的主机地址、DNS服务器地址,适配器等信息。
如果你想看到所有关于你所在主机的信息,可在命令行键入:ipconfig /allipconfig在管理主机所储存的DNS信息非常有用。
如果查看DNS缓存中的记录用命令:ipconfig /displaydns要清空DNS缓存,用命令:ipconfig /flushdns3、利用Wireshark捕获DNS信息(1)利用ipconfig /flushdns命令清空你的主机上的DNS缓存。
实验7 利用分组嗅探器(Wireshark)分析协议HTTP和DNS

实验七利用分组嗅探器(Wireshark)分析协议HTTP和DNS一、实验目的1、分析HTTP协议2、分析DNS协议二、实验环境与因特网连接的计算机网络系统;主机操作系统为Windows;Wireshark、IE 等软件。
三、实验步骤1、HTTP GET/response交互首先通过下载一个非常简单的HTML文件(该文件非常短,并且不嵌入任何对象)。
(1)启动Web browser。
(2)启动Wireshark分组嗅探器。
在窗口的显示过滤说明处输入“http”,分组列表子窗口中将只显示所俘获到的HTTP报文。
(3)一分钟以后,开始Wireshark分组俘获。
(4)在打开的Web browser窗口中输入一下地址(浏览器中将显示一个只有一行文字的非常简单的HTML文件):/ethereal-labs/HTTP-ethereal-file1.html(5)停止分组俘获。
图1分组俘获窗口2、HTTP 条件GET/response交互(1)启动浏览器,清空浏览器的缓存(在浏览器中,选择“工具”菜单中的“Internet选项”命令,在出现的对话框中,选择“删除文件”)。
(2)启动Wireshark分组俘获器。
开始Wireshark分组俘获。
(3)在浏览器的地址栏中输入以下URL:/ethereal-labs/HTTP-ethereal-file2.html 你的浏览器中将显示一个具有五行的非常简单的HTML文件。
(4)在你的浏览器中重新输入相同的URL或单击浏览器中的“刷新”按钮。
(5)停止Wireshark分组俘获,在显示过滤筛选说明处输入“http”,分组列表子窗口中将只显示所俘获到的HTTP报文。
3、获取长文件(1)启动浏览器,将浏览器的缓存清空。
(2)启动Wireshark分组俘获器。
开始Wireshark分组俘获。
(3)在浏览器的地址栏中输入以下URL:/ethereal-labs/HTTP-ethereal-file3.html 浏览器将显示一个相当大的美国权力法案。
主要协议分析实验报告(3篇)
第1篇一、实验背景随着计算机网络技术的飞速发展,网络协议作为计算机网络通信的基础,扮演着至关重要的角色。
为了更好地理解网络协议的工作原理和功能,我们开展了主要协议分析实验。
本实验旨在通过分析常用网络协议的报文格式和工作机制,加深对网络协议的理解。
二、实验目的1. 熟悉常用网络协议的报文格式和工作机制。
2. 掌握网络协议分析工具的使用方法。
3. 培养网络故障排查和问题解决能力。
三、实验环境1. 实验设备:PC机、网线、Wireshark软件。
2. 实验网络:局域网环境,包括路由器、交换机、PC等设备。
四、实验内容本实验主要分析以下协议:1. IP协议2. TCP协议3. UDP协议4. HTTP协议5. FTP协议五、实验步骤1. IP协议分析(1)启动Wireshark软件,选择合适的抓包接口。
(2)观察并分析IP数据报的报文格式,包括版本、头部长度、服务类型、总长度、标识、标志、片偏移、生存时间、协议、头部校验和、源IP地址、目的IP地址等字段。
(3)分析IP分片和重组过程,观察TTL值的变化。
2. TCP协议分析(1)观察TCP数据报的报文格式,包括源端口号、目的端口号、序号、确认号、数据偏移、标志、窗口、校验和、紧急指针等字段。
(2)分析TCP连接建立、数据传输、连接终止的过程。
(3)观察TCP的重传机制和流量控制机制。
3. UDP协议分析(1)观察UDP数据报的报文格式,包括源端口号、目的端口号、长度、校验和等字段。
(2)分析UDP的无连接特性,观察UDP报文的传输过程。
4. HTTP协议分析(1)观察HTTP请求报文和响应报文的格式,包括请求行、头部字段、实体等。
(2)分析HTTP协议的请求方法、状态码、缓存控制等特性。
(3)观察HTTPS协议的加密传输过程。
5. FTP协议分析(1)观察FTP数据报的报文格式,包括命令、响应等。
(2)分析FTP的文件传输过程,包括数据传输模式和端口映射。
wireshark协议分析

wireshark协议分析Wireshark协议分析Wireshark是一个功能强大的网络协议分析工具,它能够捕获、分析和显示网络数据包中的数据。
通过使用Wireshark,我们可以深入了解网络通信过程中的协议细节,追踪数据包的传输路径,发现潜在的安全风险,并进行网络性能优化。
在进行协议分析之前,我们首先需要捕获网络数据包。
Wireshark支持在多个平台上运行,包括Windows、Mac OS和Linux。
它能够通过本地网络接口或远程连接捕获网络数据包。
当我们开始捕获数据包时,Wireshark会显示一个实时的数据包列表,并提供详细的信息,如源IP地址、目标IP地址、协议类型、端口号等。
在开始分析数据包之前,我们可以通过使用过滤器来限制需要关注的数据包。
Wireshark支持使用协议、源IP地址、目标IP地址、端口号等作为过滤条件。
通过设置适当的过滤器,我们可以只关注我们感兴趣的数据包,而忽略其他不相关的数据。
一旦我们捕获了数据包,我们就可以开始进行协议分析了。
Wireshark提供了许多工具和功能来帮助我们分析协议。
其中一个很有用的功能是重构TCP流。
当网络中的数据包是以多个片段的形式传输时,Wireshark可以将它们重新组装成完整的数据流,以便我们更好地分析和理解通信内容。
此外,Wireshark还可以对数据包进行解码。
它支持解码多种网络协议,包括TCP/IP、UDP、HTTP、DNS等。
通过解码数据包,我们可以查看每个协议中的字段和值,以便更好地理解和分析网络通信过程。
在分析数据包时,我们还可以使用Wireshark提供的统计功能。
Wireshark可以统计网络中的数据包数量、协议类型、数据包大小等信息,并以图表的形式展示。
通过分析这些统计信息,我们可以了解网络的负载情况、流量模式以及网络性能状况。
除了基本的协议分析功能外,Wireshark还支持操作和导出数据包。
我们可以对数据包进行重发、制作过滤器、设置标记等操作。
wireshark抓包分析报告
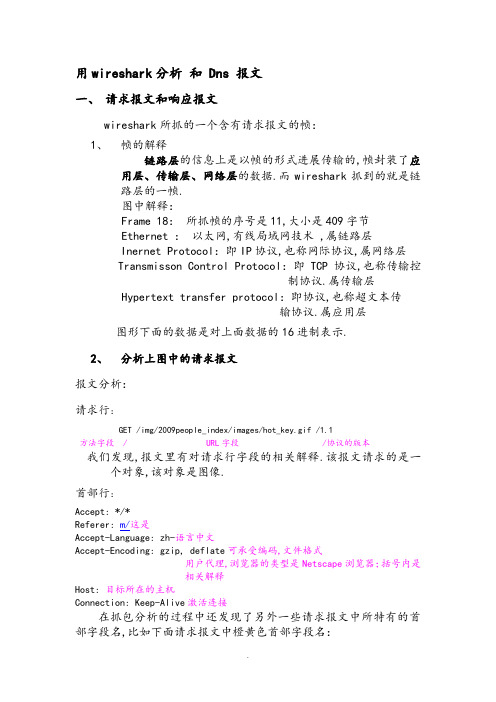
用wireshark分析和 Dns 报文一、请求报文和响应报文wireshark所抓的一个含有请求报文的帧:1、帧的解释链路层的信息上是以帧的形式进展传输的,帧封装了应用层、传输层、网络层的数据.而wireshark抓到的就是链路层的一帧.图中解释:Frame 18:所抓帧的序号是11,大小是409字节Ethernet :以太网,有线局域网技术 ,属链路层Inernet Protocol:即IP协议,也称网际协议,属网络层Transmisson Control Protocol:即TCP协议,也称传输控制协议.属传输层Hypertext transfer protocol:即协议,也称超文本传输协议.属应用层图形下面的数据是对上面数据的16进制表示.2、分析上图中的请求报文报文分析:请求行:GET /img/2009people_index/images/hot_key.gif /1.1方法字段 / URL字段 /协议的版本我们发现,报文里有对请求行字段的相关解释.该报文请求的是一个对象,该对象是图像.首部行:Accept: */*Referer: m/这是Accept-Language: zh-语言中文Accept-Encoding: gzip, deflate可承受编码,文件格式用户代理,浏览器的类型是Netscape浏览器;括号内是相关解释Host: 目标所在的主机Connection: Keep-Alive激活连接在抓包分析的过程中还发现了另外一些请求报文中所特有的首部字段名,比如下面请求报文中橙黄色首部字段名:Accept: */*Referer: 这是html文件Accept-Language: zh-语言中文Accept-Encoding: gzip, deflate可承受编码,文件格式If-Modified-Since: Sat, 13 Mar 2010 06:59:06 GMT内容是否被修改:最后一次修改时间If-None-Match: "9a4041-197-2f11e280"关于资源的任何属性〔 ETags值〕在ETags的值中可以表现,是否改变用户代理,浏览器的类型是Netscape浏览器;括号内是相关解释目标所在的主机Connection: Keep-Alive激活连接Cookie: cdb_sid=0Ocz4H; cdb_oldtopics=D345413D; cdb_visitedfid=17; __gads=ID=7ab350574834b14b:T=1287731680:S=ALNI_Mam5QHAAK2cJdDTRuSxY24VDbjc1Acookie,允许站点跟踪用户,coolie ID是7ab350574834b14b3、分析的响应报文,针对上面请求报文的响应报文如下:wireshark对于2中请求报文的响应报文:展开响应报文:报文分析:状态行:/1.0 200 OK首部行:Content-Length: 159内容长度Accept-Ranges: bytes承受X围Server: nginx服务器X-Cache经过了缓存服务器路由响应信息Date: Fri, 22 Oct 2010 12:09:42 GMT响应信息创建的时间Content-Type: image/gif内容类型图像Expires: Fri, 22 Oct 2010 12:10:19 GMT设置内容过期时间Last-Modified: Fri, 11 Jun 2010 00:50:48 GMT内容最后一次修改时间Powered-By-ChinaCache:PENDINGfromC-BJ-D-3BA ChinaCache的是一家领先的内容分发网络〔CDN〕在中国的服务提供商.Age: 34缓存有效34天Powered-By-ChinaCache: HIT from USA-SJ-1-3D3ChinaCache是一家领先的内容分发网络〔CDN〕在中国的服务提供商.Connection: keep-alive保持TCP连接图中最后一行puserve GIF 是对所传图像的信息的描述GIF是puserve公司开发的图像格式标准.二、DNS查询报文和回答报文1、 Wireshark所抓的DNS查询报文:展开DNS查询报文:报文分析:首部区域:标识符:Transaction ID: 0x4b48 16位比特数,标志该查询标志: Flags: 0x0100〔standard query〕0………. ….= Respone:Messsage is a query0表示为dns查询报文.000 0……. ….=opcode: standard query<0>操作码为标准查询.…..0. …. ….=Truncated:message is not truncated信息没有被截断.… ..1. …. ….=Recursion desired:Do queryrecursively 执行递归查询…. …. .0.. …..=z:reserved〔0〕…. …. …0 …..=Nontheticated data: unacceptable 问题数:Question:1 只查询一个主机名回答RR数:Answer RRS:0权威RR数:Authority RRS:0附加RR数:Additional RRS:0问题区域:Type A<Host address> class:IN<0x0001>包含最初请求的名字的资源记录权威〔资源记录的变量数〕:无附加信息:无2、Wireshark 对应的DNS回答报文:展开DNS回答报文:报文分析:首部区域:标识符:Transaction ID: 0x4b48 16位比特数,与对应的查询报文标识符一样标志: Flags: 0x8180〔standard query〕问题数:Question:1 表示只查询一个主机回答RR数:Answer RRS:5 表示该主机对应的有5条资源记录权威RR数:Authority RRS:0附加RR数:Additional RRS:0问题区域:Type A<Host address> class:IN<0x0001>最初请求的名字的资源记录回答〔资源记录的变量数〕:Answers 5条RR,即主机与ip的5条资源记录权威〔资源记录的变量数〕:无附加信息:无。
使用wireshark进行协议分析实验报告
使用wireshark进行协议分析实验报告一、实验目的本次实验旨在掌握使用Wireshark进行网络协议分析的方法与技巧,了解网络通信特点和协议机制。
二、实验内容及步骤1.实验准备b.配置网络环境:保证实验环境中存在数据通信的网络设备和网络流量。
2.实验步骤a. 打开Wireshark软件:启动Wireshark软件并选择需要进行抓包的网络接口。
b. 开始抓包:点击“Start”按钮开始抓包,Wireshark将开始捕获网络流量。
c.进行通信:进行网络通信操作,触发网络流量的产生。
d. 停止抓包:点击“Stop”按钮停止抓包,Wireshark将停止捕获网络流量。
e. 分析流量:使用Wireshark提供的分析工具和功能对抓包所得的网络流量进行分析。
三、实验结果通过Wireshark软件捕获的网络流量,可以得到如下分析结果:1. 抓包结果统计:Wireshark会自动统计捕获到的数据包数量、每个协议的数量、数据包的总大小等信息,并显示在界面上。
2. 协议分析:Wireshark能够通过解析网络流量中的各种协议,展示协议的各个字段和值,并提供过滤、等功能。
3. 源和目的地IP地址:Wireshark能够提取并显示各个IP数据包中的源IP地址和目的地IP地址,帮助我们分析网络通信的端点。
四、实验分析通过对Wireshark捕获到的网络流量进行分析,我们可以得到以下几个重要的分析结果和结论:1.流量分布:根据抓包结果统计,我们可以分析不同协议的数据包数量和比例,了解网络中各个协议的使用情况。
2. 协议字段分析:Wireshark能够对数据包进行深度解析,我们可以查看各个协议字段的值,分析协议的工作机制和通信过程。
3.网络性能评估:通过分析网络流量中的延迟、丢包等指标,我们可以评估网络的性能,并找出网络故障和瓶颈问题。
4. 安全分析:Wireshark能够分析HTTP、FTP、SMTP等协议的请求和响应内容,帮助我们发现潜在的网络安全问题。
利用WireShark分析HTTP和DNS
利用WireShark分析HTTP和DNS一、实验目的及任务1、熟悉并掌握WireShark的基本操作,了解网络协议实体间的交互以及报文交换。
2、分析HTTP协议3、分析DNS协议二、实验环境与因特网连接的计算机网络系统;主机操作系统为Windows2000或Windows XP;WireShark等软件。
三、预备知识要深入理解网络协议,需要仔细观察协议实体之间交换的报文序列。
为探究协议操作细节,可使协议实体执行某些动作,观察这些动作及其影响。
这些任务可以在仿真环境下或在如因特网这样的真实网络环境中完成。
观察在正在运行协议实体间交换报文的基本工具被称为分组嗅探器(packet sniffer)。
顾名思义,一个分组嗅探器捕获(嗅探)计算机发送和接收的报文。
一般情况下,分组嗅探器将存储和显示出被捕获报文的各协议头部字段内容。
图1为一个分组嗅探器的结构。
图1右边是计算机上正常运行的协议(在这里是因特网协议)和应用程序(如:web浏览器和ftp客户端)。
分组嗅探器(虚线框中的部分)是附加计算机普通软件上的,主要有两部分组成。
分组捕获库接收计算机发送和接收的每一个链路层帧的拷贝。
高层协议(如:HTTP、FTP、TCP、UDP、DNS、IP等)交换的报文都被封装在链路层帧(Frame)中,并沿着物理介质(如以太网的电缆)传输。
图1假设所使用的物理媒体是以太网,上层协议的报文最终封装在以太网帧中。
分组嗅探器的第二个组成部分是分析器。
分析器用来显示协议报文所有字段的内容。
为此,分析器必须能够理解协议所交换的所有报文的结构。
例如:我们要显示图1中HTTP协议所交换的报文的各个字段。
分组分析器理解以太网帧格式,能够识别包含在帧中的IP数据报。
分组分析器也要理解IP数据报的格式,并能从IP数据报中提取出TCP报文段。
然后,它需要理解TCP报文段,并能够从中提取出HTTP消息。
最后,它需要理解HTTP消息。
WireShark是一种可以运行在Windows, UNIX, Linux等操作系统上的分组分析器.用户界面如图2所示。
wireshark 实验 DNS
Wireshark Lab: DNSVersion: 2.0© 2009 J.F. Kurose, K.W. Ross. All Rights Reserved Computer Networking: A Top-down Approach, 5th edition .As described in Section 2.5 of the textbook, the Domain Name System (DNS) translates hostnames to IP addresses, fulfilling a critical role in the Internet infrastructure. In this lab, we’ll take a closer look at the client side of DNS. Recall that the client’s role in the DNS is relatively simple – a client sends a query to its local DNS server, and receives a response back. As shown in Figures 2.21 and 2.22 in the textbook, much can go on “under the covers,” invisible to the DNS clients, as the hierarchical DNS serverscommunicate with each other to either recursively or iteratively resolve the client’s DNS query. From the DNS client’s standpoint, however, the protocol is quite simple – a query is formulated to the local DNS server and a response is received from that server.Before beginning this lab, you’ll probably want to review DNS by reading Section 2.5 of the text. In particular, you may want to review the material on local DNS servers , DNS caching , DNS records and messages , and the TYPE field in the DNS record.1. nslookupIn this lab, we’ll make extensive use of the nslookup tool, which is available in mostLinux/Unix and Microsoft platforms today. To run nslookup in Linux/Unix, you just type the nslookup command on the command line. To run it in Windows, open the Command Prompt and run nslookup on the command line.In it is most basic operation, nslookup tool allows the host running the tool to query any specified DNS server for a DNS record. The queried DNS server can be a root DNS server, a top-level-domain DNS server, an authoritative DNS server, or an intermediate DNS server (see the textbook for definitions of these terms). To accomplish this task, nslookup sends a DNS query to the specified DNS server, receives a DNS reply from that same DNS server, and displays the result.The above screenshot shows the results of three independent nslookup commands (displayed in the Windows Command Prompt). In this example, the client host is located on the campus of Polytechnic University in Brooklyn, where the default local DNS server is . When running nslookup, if no DNS server is specified, then nslookup sends the query to the default DNS server, which in this case is dns-. Consider the first command:nslookup In words, this command is saying “please send me the IP address for the host”. As shown in the screenshot, the response from this command provides two pieces of information: (1) the name and IP address of the DNS server that provides the answer; and (2) the answer itself, which is the host name and IP address of. Although the response came from the local DNS server at Polytechnic University, it is quite possible that this local DNS server iteratively contacted several other DNS servers to get the answer, as described in Section 2.5 of the textbook.Now consider the second command:nslookup –type=NS In this example, we have provided the option “-type=NS” and the domain “”. This causes nslookup to send a query for a type-NS record to the default local DNS server. In words, the query is saying, “please send me the host names of the authoritative DNS for ”. (When the –type option is not used, nslookup uses the default, which is to queryfor type A records.) The answer, displayed in the above screenshot, first indicates the DNS server that is providing the answer (which is the default local DNS server) along with three MIT nameservers. Each of these servers is indeed an authoritative DNS server for the hosts on the MIT campus. However, nslookup also indicates that the answer is “non-authoritative,” meaning that this answer came from the cache of some server rather than from an authoritative MIT DNS server. Finally, the answer also includes the IP addresses of the authoritative DNS servers at MIT. (Even though the type-NS query generated by nslookup did not explicitly ask for the IP addresses, the local DNS server returned these “for free” and nslookup displays the result.)Now finally consider the third command:nslookup www.aiit.or.kr In this example, we indicate that we want to the query sent to the DNS server rather than to the default DNS server (). Thus, the query and reply transaction takes place directly between our querying host and . In this example, the DNS server provides the IP address of the hostwww.aiit.or.kr, which is a web server at the Advanced Institute of Information Technology (in Korea).Now that we have gone through a few illustrative examples, you are perhaps wondering about the general syntax of nslookup commands. The syntax is:nslookup –option1 –option2 host-to-find dns-serverIn general, nslookup can be run with zero, one, two or more options. And as we have seen in the above examples, the dns-server is optional as well; if it is not supplied, the query is sent to the default local DNS server.Now that we have provided an overview of nslookup, it is time for you to test drive it yourself. Do the following (and write down the results):1.Run nslookup to obtain the IP address of a Web server in Asia.2.Run nslookup to determine the authoritative DNS servers for a university inEurope.3.Run nslookup so that one of the DNS servers obtained in Question 2 is queried forthe mail servers for Yahoo! mail.2. ipconfigipconfig (for Windows) and ifconfig (for Linux/Unix) are among the most useful little utilities in your host, especially for debugging network issues. Here we’ll only describe ipconfig, although the Linux/Unix ifconfig is very similar. ipconfig can be used to show your current TCP/IP information, including your address, DNS server addresses, adaptertype and so on. For example, if you all this information about your host simply by enteringipconfig \allinto the Command Prompt, as shown in the following screenshot.ipconfig is also very useful for managing the DNS information stored in your host. In Section 2.5 we learned that a host can cache DNS records it recently obtained. To see these cached records, after the prompt C:\> provide the following command:ipconfig /displaydnsEach entry shows the remaining Time to Live (TTL) in seconds. To clear the cache, enter ipconfig /flushdnsFlushing the DNS cache clears all entries and reloads the entries from the hosts file.3. Tracing DNS with WiresharkNow that we are familiar with nslookup and ipconfig, we’re ready to get down to some serious business. Let’s first capture the DNS packets that are generated by ordinary Web-surfing activity.∙Use ipconfig to empty the DNS cache in your host.∙Open your browser and empty your browser cache. (With Internet Explorer, go to Tools menu and select Internet Options; then in the General tab selectDelete Files.)∙Open Wireshark and enter “ip.addr == your_IP_address” into the filter, where you obtain your_IP_address with ipconfig. This filter removes all packets thatneither originate nor are destined to your host.∙Start packet capture in Wireshark.∙With your browser, visit the Web page: ∙Stop packet capture.If you are unable to run Wireshark on a live network connection, you can download a packet trace file that was captured while following the steps above on one of the author’s computers1. Answer the following questions:4.Locate the DNS query and response messages. Are then sent over UDP or TCP?5.What is the destination port for the DNS query message? What is the source portof DNS response message?6.To what IP address is the DNS query message sent? Use ipconfig to determine theIP address of your local DNS server. Are these two IP addresses the same?7.Examine the DNS query message. What “Type” of DNS query is it? Does thequery message contain any “answers”?8.Examine the DNS response message. How many “answers” are provided? Whatdo each of these answers contain?9.Consider the subsequent TCP SYN packet sent by your host. Does the destinationIP address of the SYN packet correspond to any of the IP addresses provided inthe DNS response message?10.This web page contains images. Before retrieving each image, does your hostissue new DNS queries?1 Download the zip file /wireshark-labs/wireshark-traces.zip and extract the file dns-ethereal-trace-1. The traces in this zip file were collected by Wireshark running on one of the author’s computers, while performing the steps indicated in the Wireshark lab. Once you have downloaded the trace, you can load it into Wireshark and view the trace using the File pull down menu, choosing Open, and then selecting the dns-ethereal-trace-1 trace file.Now let’s play with nslookup2.∙Start packet capture.∙Do an nslookup on ∙Stop packet capture.You should get a trace that looks something like the following:We see from the above screenshot that nslookup actually sent three DNS queries and received three DNS responses. For the purpose of this assignment, in answering the following questions, ignore the first two sets of queries/responses, as they are specific to nslookup and are not normally generated by standard Internet applications. You should instead focus on the last query and response messages.2 If you are unable to run Wireshark and capture a trace file, use the trace file dns-ethereal-trace-2 in the zip file /wireshark-labs/wireshark-traces.zip11.What is the destination port for the DNS query message? What is the source portof DNS response message?12.To what IP address is the DNS query message sent? Is this the IP address of yourdefault local DNS server?13.Examine the DNS query message. What “Type” of DNS query is it? Does thequery message contain any “answers”?14.Examine the DNS response message. How many “answers” are provided? Whatdo each of these answers contain?15.Provide a screenshot.Now repeat the previous experiment, but instead issue the command:nslookup –type=NS Answer the following questions3 :16.To what IP address is the DNS query message sent? Is this the IP address of yourdefault local DNS server?17.Examine the DNS query message. What “Type” of DNS query is it? Does thequery message contain any “answers”?18.Examine the DNS response message. What MIT nameservers does the responsemessage provide? Does this response message also provide the IP addresses of the MIT namesers?19.Provide a screenshot.Now repeat the previous experiment, but instead issue the command:nslookup www.aiit.or.kr Answer the following questions4:20.To what IP address is the DNS query message sent? Is this the IP address of yourdefault local DNS server? If not, what does the IP address correspond to?21.Examine the DNS query message. What “Type” of DNS query is it? Does thequery message contain any “answers”?22.Examine the DNS response message. How many “answers” are provided? Whatdoes each of these answers contain?23.Provide a screenshot.3 If you are unable to run Wireshark and capture a trace file, use the trace file dns-ethereal-trace-3 in the zip file /wireshark-labs/wireshark-traces.zip4 If you are unable to run Wireshark and capture a trace file, use the trace file dns-ethereal-trace-4 in the zip file /wireshark-labs/wireshark-traces.zip。
网络解析协议实验报告(3篇)
第1篇一、实验目的1. 理解网络解析协议的基本概念和工作原理。
2. 掌握DNS、ARP等网络解析协议的报文格式和报文分析。
3. 学会使用抓包工具分析网络解析协议的报文传输过程。
4. 提高网络故障排查能力。
二、实验环境1. 硬件设备:PC机、网线、路由器。
2. 软件环境:Wireshark抓包软件、网络解析协议实验平台。
三、实验内容1. DNS协议分析(1)实验目的:了解DNS协议的工作原理,掌握DNS报文格式。
(2)实验步骤:① 在实验平台上配置好DNS服务器和客户端。
② 使用nslookup命令进行域名解析,并观察DNS服务器返回的结果。
③ 使用Wireshark抓包工具,捕获DNS查询和响应报文。
④ 分析DNS查询和响应报文的格式,包括报文类型、报文长度、域名、IP地址等信息。
2. ARP协议分析(1)实验目的:了解ARP协议的工作原理,掌握ARP报文格式。
(2)实验步骤:① 在实验平台上配置好主机A和主机B。
② 在主机A上使用ping命令ping主机B的IP地址,观察ARP请求和响应报文。
③ 使用Wireshark抓包工具,捕获ARP请求和响应报文。
④分析ARP请求和响应报文的格式,包括硬件类型、协议类型、硬件地址、协议地址等信息。
3. IP协议分析(1)实验目的:了解IP协议的工作原理,掌握IP数据报格式。
(2)实验步骤:① 在实验平台上配置好主机A和主机B。
② 在主机A上使用ping命令ping主机B的IP地址,观察IP数据报传输过程。
③ 使用Wireshark抓包工具,捕获IP数据报。
④ 分析IP数据报的格式,包括版本、头部长度、服务类型、总长度、生存时间、头部校验和、源IP地址、目的IP地址等信息。
四、实验结果与分析1. DNS协议分析结果:通过实验,我们了解到DNS协议在域名解析过程中的作用,以及DNS查询和响应报文的格式。
DNS协议通过查询和响应报文,实现域名到IP地址的转换,从而实现网络设备之间的通信。
- 1、下载文档前请自行甄别文档内容的完整性,平台不提供额外的编辑、内容补充、找答案等附加服务。
- 2、"仅部分预览"的文档,不可在线预览部分如存在完整性等问题,可反馈申请退款(可完整预览的文档不适用该条件!)。
- 3、如文档侵犯您的权益,请联系客服反馈,我们会尽快为您处理(人工客服工作时间:9:00-18:30)。
实验八利用Wireshark分析DNS协议
一、实验目的
分析DNS协议
二、实验环境
与因特网连接的计算机,操作系统为Windows,安装有Wireshark、IE等软件。
三、实验步骤
nslookup工具允许运行该工具的主机向指定的DNS服务器查询某个DNS记录。
如果没有指明DNS服务器,nslookup将把查询请求发向默认的DNS服务器。
其命令的一般格式是:
nslookup –option1 –option2 host-to-find dns-server
1、打开命令提示符(Command Prompt),输入nslookup命令。
图中显示三条命令,第一条命令:nslookup “提出一个问题”
即:“将主机的IP地址告诉我”。
屏幕上出现了两条信息:(1)“回答这一问题”DNS服务器的名字和IP地址;(2)主机名字和IP地址。
第二条命令:nslookup –type=NS
在这个例子中,我们提供了选项“-type=N S”,域为。
执行这条命令后,屏幕上显示了DNS服务器的名字和地址。
接着下面是三个MIT DNS服务器,每一个服务器是MIT校园里权威的DNS服务器。
第三条命令:nslookup www.aiit.or.kr
在这个例子中,我们请求返回 DNS server 而不是默认的DNS服务器()。
此例中,DNS 服务器提供主机www.aiit.or.kr 的IP地址。
2、ipconfig
ipconfig用来显示TCP/IP 信息, 你的主机地址、DNS服务器地址,适配器等信息。
如果你想看到所有关于你所在主机的信息,可在命令行键入:
ipconfig /all
ipconfig在管理主机所储存的DNS信息非常有用。
如果查看DNS缓存中的记录用命令:ipconfig /displaydns
要清空DNS缓存,用命令:ipconfig /flushdns
3、利用Wireshark捕获DNS信息
(1)利用ipconfig命令清空你的主机上的DNS缓存。
(2)启动浏览器,将浏览器的缓存清空。
(3)启动Wireshark分组俘获器,在显示过滤筛说明处输入
“ip.addr==your_IP_address”(如:ip.addr==202.202.210.104),过滤器(filter)将会删除所有目的地址和源地址都与指定IP地址不同的分组。
(4)开始Wireshark俘获。
(5)在浏览器的地址栏中输入:
(6)停止分组俘获。
(7)重复上面的实验,只是将命令替换为:nslookup –type=NS
(8)重复上面的实验,只是将命令替换为:
nslookup www.aiit.or.kr
四、实验报告
在实验的基础上,回答以下问题:
(1)你的浏览器运行的是HTTP1.0,还是HTTP1.1?你所访问的服务器所运行的HTTP版本号是多少?
(2)你的浏览器向服务器指出它能接收何种语言版本的对象?
(3)你的计算机的IP地址是多少?服务器的IP地址是多少?
(4)从服务器向你的浏览器返回的状态代码是多少?
(5)你从服务器上所获取的HTML文件的最后修改时间是多少?
(6)返回到你的浏览器的内容以供多少字节?
(7)分析服务器响应报文的内容,服务器是否明确返回了文件的内容?如何获知?
(8)服务器对第二个HTTP GET请求的响应中的HTTP状态代码是多少?服务器是否明确返回了文件的内容?请解释。
(9)与这个HTTP GET请求相对应的响应报文的状态代码和状态短语是什么?
(10)你的浏览器一共发出了多少个HTTP GET请求?这些请求被发送到的目的地的IP地址是多少?
(11)对于浏览器发出的最初的HTTP GET请求,服务器的响应是什么(状态代码和状态短语)?
(12)当浏览器发出第二个HTTP GET请求时,在HTTP GET报文中包含了哪些新的字段?
(13)DNS查询报文的目的端口号是多少?DNS查询响应报文的源端口号是多少?。