java实现文件上传、下载
java sftp 常用方法
一、介绍随着信息化时代的到来,数据传输变得越来越重要。
在企业中,有时候需要通过网络将数据从一个服务器传输到另一个服务器。
而其中一种常用的数据传输协议就是SFTP(Secure File Transfer Protocol)。
SFTP是一种基于SSH协议的安全文件传输协议。
它提供了一种安全的通信渠道以及文件传输功能,能够有效地保护传输的数据安全。
在Java中,我们可以通过一些常用的方法来实现SFTP的文件传输,本文将介绍一些Java中SFTP常用的方法。
二、建立SFTP连接在Java中,我们可以使用JSch库来建立SFTP连接。
需要在项目中导入JSch库的jar包。
我们可以通过以下方法来建立SFTP连接:1. 创建JSch对象我们可以通过new JSch()来创建一个JSch对象,用于后续的SFTP连接。
2. 建立Session使用JSch对象的getSession方法建立一个Session对象,需要传入用户名、主机位置区域和端口号等参数,并通过setPassword或setPrivateKey方法设置认证方式。
3. 打开Channel在建立Session之后,可以通过Session对象的openChannel方法打开一个Channel,类型为" sftp"。
4. 建立SFTP连接使用ChannelSftp的connect方法来建立SFTP连接。
以上即为建立SFTP连接的步骤,通过这些方法,我们可以在Java中轻松地实现SFTP连接的功能。
三、上传文件一旦建立了SFTP连接,我们就可以进行文件的上传操作了。
通过以下方法可以实现文件的上传:1. 使用put方法在ChannelSftp对象中,可以使用put方法来上传文件。
需要传入本地文件路径和远程文件路径两个参数。
2. 设置传输模式在上传文件之前,可以通过ChannelSftp对象的setmode方法来设置传输模式,常用的传输模式包括OVERWRITE、RESUME等。
java hutool multipart参数
java hutool multipart参数摘要:1.简介:Hutool工具类库2.Java中Multipart参数的使用3.Hutool中的Multipart操作方法4.实例:使用Hutool和Multipart处理文件上传5.总结:Hutool与Multipart合作的优势和局限性正文:近年来,Java开发中,上传下载文件变得越来越普遍。
为了简化这个过程,许多开发者选择使用Hutool工具类库。
本文将介绍如何在Java中使用Hutool与Multipart参数进行文件上传和下载,以及相关操作方法。
首先,简要介绍一下Hutool工具类库。
Hutool是一个Java工具类库,提供了许多实用的功能,如文件操作、日期处理、加密解密等。
它极大地简化了Java开发中的常见操作,使开发者能够更加专注于业务逻辑的实现。
在Java中,Multipart参数主要用于处理文件上传和下载。
通常,我们在Web开发中,通过HttpServletRequest对象获取Multipart对象。
而在Hutool中,我们可以直接使用其提供的Multipart操作方法,更加方便地处理文件上传和下载。
下面,我们来看一下Hutool中Multipart操作的方法。
1.获取Multipart对象:```javaMultipartMap multipartMap =ServletUtil.getMultipartMap(request);```2.获取文件上传:```javaFileUpload fileUpload = FileUpload.init(multipartMap);```3.获取文件下载:```javaFileDownload fileDownload = FileDownload.init(multipartMap);```4.处理文件上传:```java// 实例化一个文件上传处理器FileUploadListener fileUploadListener = new FileUploadListener() { @Overridepublic void fileUploaded(File file) {System.out.println("文件上传成功:" +file.getAbsolutePath());}@Overridepublic void fileUploadFailed(File file, Exception e) {System.out.println("文件上传失败:" + file.getAbsolutePath());}};// 设置文件上传处理器fileUpload.setListener(fileUploadListener);// 判断是否包含文件上传if (fileUpload.isMultipart()) {// 上传文件File uploadFile = fileUpload.execute();System.out.println("上传文件:" + uploadFile.getAbsolutePath());}```5.处理文件下载:```java// 实例化一个文件下载处理器FileDownloadListener fileDownloadListener = new FileDownloadListener() {@Overridepublic void fileDownloaded(File file) {System.out.println("文件下载成功:" +file.getAbsolutePath());}@Overridepublic void fileDownloadFailed(File file, Exception e) {System.out.println("文件下载失败:" +file.getAbsolutePath());}};// 设置文件下载处理器fileDownload.setListener(fileDownloadListener);// 下载文件String downloadFilePath = fileDownload.execute();System.out.println("下载文件:" + downloadFilePath);```通过以上方法,我们可以方便地在Java项目中处理文件上传和下载。
JavaWeb文件上传下载实例讲解(酷炫的文件上传技术)
JavaWeb⽂件上传下载实例讲解(酷炫的⽂件上传技术)⼀、课程概述在Web应⽤系统开发中,⽂件上传功能是⾮常常⽤的功能,今天来主要讲讲JavaWeb中的⽂件上传功能的相关技术实现,并且随着互联⽹技术的飞速发展,⽤户对⽹站的体验要求越来越⾼,在⽂件上传功能的技术上也出现许多创新点,例如异步上传⽂件,拖拽式上传,黏贴上传,上传进度监控,⽂件缩略图,⼤⽂件断点续传,⼤⽂件秒传等等。
本课程需要的基础知识:了解基本的Http协议内容基本IO流操作技术Servlet基础知识javascript/jQuery技术基础知识⼆、⽂件上传的基础对于⽂件上传,浏览器在上传的过程中是将⽂件以流的形式提交到服务器端的,并且所有流数据都会随着Http请求携带到服务器端。
所以,⽂件上传时的请求内容格式要能够基本看懂。
⽂件上传页⾯:<form action="/itheimaUpload/UploadServlet" method="post" enctype="multipart/form-data">请选择上传的⽂件:<input type="file" name="attach"/><br/><input type="submit" value="提交"/></form>Http请求内容:三、Java后台使⽤Servlet接收⽂件如果使⽤Servlet获取上传⽂件的输⼊流然后再解析⾥⾯的请求参数是⽐较⿇烦,所以⼀般后台选择采⽤Apache的开源⼯具common-fileupload这个⽂件上传组件。
//Java后台代码:Commons-fileUpload组件上传⽂件public class UploadServlet extends HttpServlet {public void doGet(HttpServletRequest request, HttpServletResponse response)throws ServletException, IOException {//1.配置缓存DiskFileItemFactory factory = new DiskFileItemFactory(1*1024*1024,new File("c:/tempFiles/"));//2.创建ServleFileUpload对象ServletFileUpload sfu = new ServletFileUpload(factory);//解决⽂件名称中⽂问题sfu.setHeaderEncoding("utf-8");//3.解析try {List<FileItem> list = sfu.parseRequest(request);//解析所有内容if(list!=null){for(FileItem item:list){String fieldName = item.getFieldName();//获取表单参数值String value = item.getString("utf-8");}else{//⽂件if(item.getName()!=null && !item.getName().equals("")) {//保存到服务器硬盘FileUtils.copyInputStreamToFile(item.getInputStream(), new File("c:/targetFiles/"+item.getName()));item.delete();}}}}} catch (FileUploadException e) {e.printStackTrace();}}public void doPost(HttpServletRequest request, HttpServletResponse response)throws ServletException, IOException {doGet(request, response);}}四、使⽤WebUploader上传组件⽂件上传页⾯的前端我们可以选择使⽤⼀些⽐较好⽤的上传组件,例如百度的开源组件WebUploader,这个组件基本能满⾜⽂件上传的⼀些⽇常所需功能,如异步上传⽂件,拖拽式上传,黏贴上传,上传进度监控,⽂件缩略图,甚⾄是⼤⽂件断点续传,⼤⽂件秒传。
Java文件上传与文件下载实现方法详解
Java⽂件上传与⽂件下载实现⽅法详解本⽂实例讲述了Java⽂件上传与⽂件下载实现⽅法。
分享给⼤家供⼤家参考,具体如下:Java⽂件上传数据上传是客户端向服务器端上传数据,客户端向服务器发送的所有请求都属于数据上传。
⽂件上传是数据上传的⼀种特例,指客户端向服务器上传⽂件。
即将保存在客户端的⽂件上传⼀个副本到服务器,并保存在服务器中。
1、上传表单要求⽂件上传要求客户端提交特殊的请求——multipart请求,即包含多部分数据的请求。
必须将<form/>标签的enctype属性值设为“multipart/form-data”,enctype表⽰encodingType,及编码类型由于客户端上传⽂件的⼤⼩是不确定的,所以http协议规定,⽂件上传的数据要存放于请求正⽂中,不能出现在URL地址栏内。
也就是说,想要上传⽂件必须提交POST请求。
表单中要有<input type="file" />标签注意:multipart/form-data请求与普通请求不同2、下载⽂件上传jar包并查看官⽅⽂档选择Commons中的FileUpload项⽬,并下载jar包和源⽂件查看FileUpload的⼯作⽅式查看FileUpload项⽬的API3、使⽤第三⽅jar包上传⽂件public class RegisterServlet extends HttpServlet {private static final long serialVersionUID = 1L;public RegisterServlet() {super();}protected void doGet(HttpServletRequest request, HttpServletResponse response)throws ServletException, IOException {response.getWriter().append("Served at: ").append(request.getContextPath());}protected void doPost(HttpServletRequest request, HttpServletResponse response)throws ServletException, IOException {//第⼀步、判断请求是否为multipart请求if(!ServletFileUpload.isMultipartContent(request)) {throw new RuntimeException("当前请求只⽀持⽂件上传");}try {//第⼆步、创建FileItem⼯⼚DiskFileItemFactory factory = new DiskFileItemFactory();//设置临时⽂件存储⽬录String path = this.getServletContext().getRealPath("/Temp");File temp = new File(path);factory.setRepository(temp);//单位:字节。
基于Java文件输入输出流实现文件上传下载功能
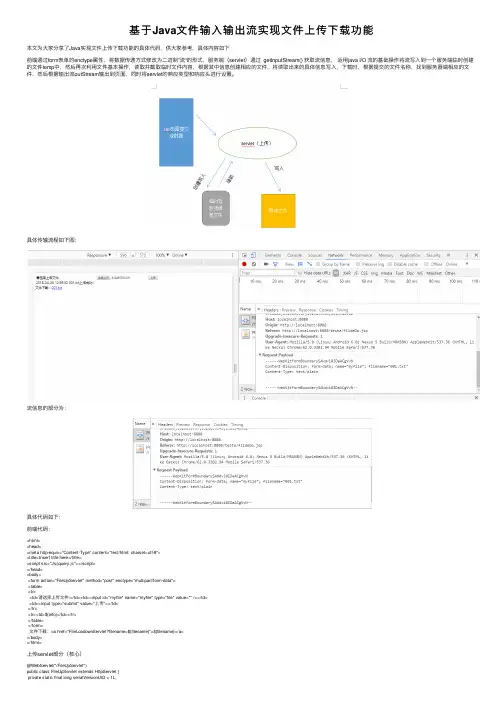
基于Java⽂件输⼊输出流实现⽂件上传下载功能本⽂为⼤家分享了Java实现⽂件上传下载功能的具体代码,供⼤家参考,具体内容如下前端通过form表单的enctype属性,将数据传递⽅式修改为⼆进制”流“的形式,服务端(servlet)通过 getInputStream() 获取流信息,运⽤java I/O 流的基础操作将流写⼊到⼀个服务端临时创建的⽂件temp中,然后再次利⽤⽂件基本操作,读取并截取临时⽂件内容,根据其中信息创建相应的⽂件,将读取出来的具体信息写⼊,下载时,根据提交的⽂件名称,找到服务器端相应的⽂件,然后根据输出流outStream输出到页⾯,同时将servlet的响应类型和响应头进⾏设置。
具体传输流程如下图:流信息的部分为:具体代码如下:前端代码:<html><head><meta http-equiv="Content-Type" content="text/html; charset=utf-8"><title>Insert title here</title><script src="Js/jquery.js"></script></head><body><form action="FileUpServlet" method="post" enctype="multipart/form-data"><table><tr><td>请选择上传⽂件:</td><td><input id="myfile" name="myfile" type="file" value="" /></td><td><input type="submit" value="上传"></td></tr><tr><td>${info}</td></tr></table></form>⽂件下载:<a href="FileLoadownServlet?filename=${filename}">${filename}</a></body></html>上传servlet部分(核⼼)@WebServlet("/FileUpServlet")public class FileUpServlet extends HttpServlet {private static final long serialVersionUID = 1L;/*** @see HttpServlet#HttpServlet()*/public FileUpServlet() {super();// TODO Auto-generated constructor stub}/*** @see HttpServlet#doGet(HttpServletRequest request, HttpServletResponse response)*/protected void doGet(HttpServletRequest request, HttpServletResponse response) throws ServletException, IOException { // TODO Auto-generated method stubdoPost(request, response);}/*** @see HttpServlet#doPost(HttpServletRequest request, HttpServletResponse response)*/protected void doPost(HttpServletRequest request, HttpServletResponse response) throws ServletException, IOException { // TODO Auto-generated method stubrequest.setCharacterEncoding("utf-8");InputStream filesource = request.getInputStream();//request获取流信息String tempname = "D:/temp";//tempfile代表临时存放⽂件File tempfile = new File(tempname);//创建临时⽂件FileOutputStream outputStream = new FileOutputStream(tempfile);//输出流对象,指定输出指tempfile⽬录下byte b[] = new byte[1024];int n;while((n = filesource.read(b))!= -1)//从输出流中每次读取1024字节,直⾄读完{outputStream.write(b,0,n);}outputStream.close();filesource.close();//关闭输⼊输出流/*以下为具体的⽂件操作,主要为解析临时产⽣的 temp⽂件,知识多为java输⼊输出流的内容!*/RandomAccessFile randomfile = new RandomAccessFile(tempfile, "r");//随机流,指定要读临时⽂件,只读randomfile.readLine();//读取第⼀⾏,⽆效数据,不需要String str = randomfile.readLine();//读取第⼆⾏int beginIndex = stIndexOf("=")+2;//指定所需数据的开始位置int endIndex = stIndexOf("\"");//指定所需数据截⾄位置String filename = str.substring(beginIndex,endIndex);//截取⽂件名//重新定位⽂件指针,获取⽂件内容randomfile.seek(0);//⽂件指针从头开始long startext = 0;int i = 1;//⽂件内容开始位置while((n=randomfile.readByte()) != -1&&i <= 4){if(n=='\n'){startext = randomfile.getFilePointer();i++;}}startext = randomfile.getFilePointer() - 1;//获取⽂件内容结束位置randomfile.seek(randomfile.length());long endtext = randomfile.getFilePointer();int j = 1;while(endtext >= 0 && j <= 2){endtext--;randomfile.seek(endtext);if(randomfile.readByte()=='\n'){j++;}}endtext = endtext-1;//将临时⽂件保存⾄指定⽬录中String realpath = getServletContext().getRealPath("/")+"images";//设置⽂件保存⽬录System.out.println(realpath);File fileupload = new File(realpath);if(!fileupload.exists()){fileupload.mkdir();//⽬录不存在则创建}File savefile = new File(realpath,filename);RandomAccessFile randomAccessFile = new RandomAccessFile(savefile, "rw");randomfile.seek(startext);while(startext<endtext){randomAccessFile.write(randomfile.readByte());//⽂件写⼊startext = randomfile.getFilePointer();}//关闭各种输⼊输出流randomAccessFile.close();randomfile.close();tempfile.delete();//删除临时⽂件SimpleDateFormat timed = new SimpleDateFormat("yyyy-MM-dd HH:mm:ss");Date nowdate = new Date();String time = timed.format(nowdate.getTime());request.setAttribute("info", time+" "+filename+"上传成功!");request.setAttribute("filename", filename);request.getRequestDispatcher("/fildeOp.jsp").forward(request, response);}}下载部分protected void doPost(HttpServletRequest request, HttpServletResponse response) throws ServletException, IOException { // TODO Auto-generated method stubString filename = request.getParameter("filename");String path = getServletContext().getRealPath("/")+"images/";File file = new File(path+filename);//找到⽂件if(file.exists())response.setContentType("application/x-msdownload"); //设置响应类型,此处为下载类型response.setHeader("Content-Disposition", "attachment;filename=\""+filename+"\"");//以附件的形式打开 InputStream inputStream = new FileInputStream(file);ServletOutputStream outputStream = response.getOutputStream();byte b[] = new byte[1024];int n;while((n = inputStream.read(b)) != -1){outputStream.write(b,0,n);}outputStream.close();inputStream.close();}else{request.setAttribute("result", "⽂件不存在!下载失败!");request.getRequestDispatcher("/fildeOp.jsp").forward(request, response);}}以上就是本⽂的全部内容,希望对⼤家的学习有所帮助,也希望⼤家多多⽀持。
java实现ftp上传下载(jdk1.7以上)
网上有很多关于java实现ftp的上传与下载,但都是jdk1.7以下的,最近在做java实现ftp文件上传与下在,搜到的代码不是jdk1.7一下的,就是apache 的。
将我测试通过的代码与大家共享。
完整代码,复制可用FTP实现代码:package com.pifeng.util;import java.io.File;import java.io.FileInputStream;import java.io.FileOutputStream;import java.io.IOException;import java.io.InputStream;import java.io.OutputStream;import .InetSocketAddress;import .SocketAddress;import .ftp.FtpClient;import .ftp.FtpProtocolException;/**** @author皮锋 java自带的API对FTP的操作**/public class FtpUtil {// FTP客户端private FtpClient ftpClient;/*** 服务器连接** @param ip* 服务器IP* @param port* 服务器端口* @param user* 用户名* @param password* 密码* @param path* 服务器路径*/public void connectServer(String ip, int port, String user, String password, String path) {try {ftpClient = FtpClient.create();try {SocketAddress addr = new InetSocketAddress(ip, port);this.ftpClient.connect(addr);this.ftpClient.login(user,password.toCharArray());System.out.println("login success!");if (path.length() != 0) {// 把远程系统上的目录切换到参数path所指定的目录this.ftpClient.changeDirectory(path);}} catch (FtpProtocolException e) {e.printStackTrace();}} catch (IOException ex) {ex.printStackTrace();throw new RuntimeException(ex);}}/*** 上传文件** @param localFile* 本地文件* @param remoteFile* 远程文件*/public void upload(String localFile, String remoteFile) { //this.localFilename = localFile;//this.remoteFilename = remoteFile;OutputStream os = null;FileInputStream is = null;try {try {// 将远程文件加入输出流中os = this.ftpClient.putFileStream(remoteFile);} catch (FtpProtocolException e) {e.printStackTrace();}// 获取本地文件的输入流File file_in = new File(localFile);is = new FileInputStream(file_in);// 创建一个缓冲区byte[] bytes = new byte[1024];int c;while ((c = is.read(bytes)) != -1) {os.write(bytes, 0, c);}System.out.println("upload success");} catch (IOException ex) {System.out.println("not upload");ex.printStackTrace();throw new RuntimeException(ex);} finally {try {if (is != null) {is.close();}} catch (IOException e) {e.printStackTrace();} finally {try {if (os != null) {os.close();}} catch (IOException e) {e.printStackTrace();}}}}/*** 文件下载** @param remoteFile* 远程文件* @param localFile* 本地文件*/public void download(String remoteFile, String localFile) { InputStream is = null;FileOutputStream os = null;try {try {// 获取远程机器上的文件filename,借助TelnetInputStream把该文件传送到本地is = this.ftpClient.getFileStream(remoteFile);} catch (FtpProtocolException e) {e.printStackTrace();}File file_in = new File(localFile);os = new FileOutputStream(file_in);byte[] bytes = new byte[1024];int c;while ((c = is.read(bytes)) != -1) {os.write(bytes, 0, c);}System.out.println("download success");} catch (IOException ex) {System.out.println("not download");ex.printStackTrace();throw new RuntimeException(ex);} finally {try {if (is != null) {is.close();}} catch (IOException e) {e.printStackTrace();} finally {try {if (os != null) {os.close();}} catch (IOException e) {e.printStackTrace();}}}}/*** 关闭连接*/public void closeConnect() {try {this.ftpClient.close();System.out.println("disconnect success");} catch (IOException ex) {System.out.println("not disconnect");ex.printStackTrace();throw new RuntimeException(ex);}}}测试代码:package test;import java.text.SimpleDateFormat;import com.pifeng.util.FtpUtil;public class TestFtpUtil {public static void main(String agrs[]) {FtpUtil fu=new FtpUtil();String filepath[] = { "AWC1002972G020-1.dwg", "AWC1002974G020-1.cgm" };String localfilepath[] = { "D:\\AWC1002972G020-1.dwg","D:\\AWC1002974G020-1.cgm" };/* * 使用默认的端口号、用户名、密码以及根目录连接FTP服务器*/fu.connectServer("127.0.0.1", 21, "pifeng", "19920720", "/");// 下载for (int i = 0; i < filepath.length; i++) {fu.download(filepath[i], localfilepath[i]);}String localfile = "D:\\WorkToolKit\\PDF\\ReadMe.htm";String remotefile = "ReadMe.htm";// 上传SimpleDateFormat sDateFormat = new SimpleDateFormat("yyyy-MM-dd hh:mm:ss");System.out.println(sDateFormat.format(new java.util.Date()));// new Date()为获取当前系统时间fu.upload(localfile, remotefile);System.out.println(sDateFormat.format(new java.util.Date()));// new Date()为获取当前系统时间fu.closeConnect();}}。
基于Java写minio客户端实现上传下载文件
@RequestParam("file") MultipartFile file) throws Exception { String objectName = UUID.randomUUID().toString(); fileService.storeFile(bucketName, category, objectName, file.getBytes()); return String.format("files/download/%s/%s/%s/%s", bucketName, category, objectName, file.getOriginalFilename()); } }
JAVA中使用FTPClient实现文件上传下载实例代码
JAVA中使⽤FTPClient实现⽂件上传下载实例代码在java程序开发中,ftp⽤的⽐较多,经常打交道,⽐如说向FTP服务器上传⽂件、下载⽂件,本⽂给⼤家介绍如何利⽤jakarta commons中的FTPClient(在commons-net包中)实现上传下载⽂件。
⼀、上传⽂件原理就不介绍了,⼤家直接看代码吧/*** Description: 向FTP服务器上传⽂件* @Version1.0 Jul 27, 2008 4:31:09 PM by 崔红保(cuihongbao@)创建* @param url FTP服务器hostname* @param port FTP服务器端⼝* @param username FTP登录账号* @param password FTP登录密码* @param path FTP服务器保存⽬录* @param filename 上传到FTP服务器上的⽂件名* @param input 输⼊流* @return 成功返回true,否则返回false*/publicstaticboolean uploadFile(String url,int port,String username, String password, String path, String filename, InputStream input) {boolean success = false;FTPClient ftp = new FTPClient();try {int reply;ftp.connect(url, port);//连接FTP服务器//如果采⽤默认端⼝,可以使⽤ftp.connect(url)的⽅式直接连接FTP服务器ftp.login(username, password);//登录reply = ftp.getReplyCode();if (!FTPReply.isPositiveCompletion(reply)) {ftp.disconnect();return success;}ftp.changeWorkingDirectory(path);ftp.storeFile(filename, input);input.close();ftp.logout();success = true;} catch (IOException e) {e.printStackTrace();} finally {if (ftp.isConnected()) {try {ftp.disconnect();} catch (IOException ioe) {}}}return success;}<pre></pre>/*** Description: 向FTP服务器上传⽂件* @Version1.0 Jul 27, 2008 4:31:09 PM by 崔红保(cuihongbao@)创建* @param url FTP服务器hostname* @param port FTP服务器端⼝* @param username FTP登录账号* @param password FTP登录密码* @param path FTP服务器保存⽬录* @param filename 上传到FTP服务器上的⽂件名* @param input 输⼊流* @return 成功返回true,否则返回false*/public static boolean uploadFile(String url,int port,String username, String password, String path, String filename, InputStream input) {boolean success = false;FTPClient ftp = new FTPClient();try {int reply;ftp.connect(url, port);//连接FTP服务器//如果采⽤默认端⼝,可以使⽤ftp.connect(url)的⽅式直接连接FTP服务器ftp.login(username, password);//登录reply = ftp.getReplyCode();if (!FTPReply.isPositiveCompletion(reply)) {ftp.disconnect();return success;}ftp.changeWorkingDirectory(path);ftp.storeFile(filename, input);input.close();ftp.logout();success = true;} catch (IOException e) {e.printStackTrace();} finally {if (ftp.isConnected()) {try {ftp.disconnect();} catch (IOException ioe) {}}}return success;}下⾯我们写两个⼩例⼦:1.将本地⽂件上传到FTP服务器上,代码如下:@Testpublicvoid testUpLoadFromDisk(){try {FileInputStream in=new FileInputStream(new File("D:/test.txt"));boolean flag = uploadFile("127.0.0.1", 21, "test", "test", "D:/ftp", "test.txt", in); System.out.println(flag);} catch (FileNotFoundException e) {e.printStackTrace();}}<pre></pre>@Testpublic void testUpLoadFromDisk(){try {FileInputStream in=new FileInputStream(new File("D:/test.txt"));boolean flag = uploadFile("127.0.0.1", 21, "test", "test", "D:/ftp", "test.txt", in); System.out.println(flag);} catch (FileNotFoundException e) {e.printStackTrace();}}2.在FTP服务器上⽣成⼀个⽂件,并将⼀个字符串写⼊到该⽂件中@Testpublicvoid testUpLoadFromString(){try {InputStream input = new ByteArrayInputStream("test ftp".getBytes("utf-8")); boolean flag = uploadFile("127.0.0.1", 21, "test", "test", "D:/ftp", "test.txt", input); System.out.println(flag);} catch (UnsupportedEncodingException e) {e.printStackTrace();}}<pre></pre>@Testpublic void testUpLoadFromString(){try {InputStream input = new ByteArrayInputStream("test ftp".getBytes("utf-8")); boolean flag = uploadFile("127.0.0.1", 21, "test", "test", "D:/ftp", "test.txt", input); System.out.println(flag);} catch (UnsupportedEncodingException e) {e.printStackTrace();}}⼆、下载⽂件从FTP服务器下载⽂件的代码也很简单,参考如下:/*** Description: 从FTP服务器下载⽂件* @Version. Jul , :: PM by 崔红保(cuihongbao@)创建* @param url FTP服务器hostname* @param port FTP服务器端⼝* @param username FTP登录账号* @param password FTP登录密码* @param remotePath FTP服务器上的相对路径* @param fileName 要下载的⽂件名* @param localPath 下载后保存到本地的路径* @return*/publicstaticboolean downFile(String url, int port,String username, String password, String remotePath,String fileName,String localPath) { boolean success = false;FTPClient ftp = new FTPClient();try {int reply;ftp.connect(url, port);//如果采⽤默认端⼝,可以使⽤ftp.connect(url)的⽅式直接连接FTP服务器ftp.login(username, password);//登录reply = ftp.getReplyCode();if (!FTPReply.isPositiveCompletion(reply)) {ftp.disconnect();return success;}ftp.changeWorkingDirectory(remotePath);//转移到FTP服务器⽬录FTPFile[] fs = ftp.listFiles();for(FTPFile ff:fs){if(ff.getName().equals(fileName)){File localFile = new File(localPath+"/"+ff.getName());OutputStream is = new FileOutputStream(localFile);ftp.retrieveFile(ff.getName(), is);is.close();}}ftp.logout();success = true;} catch (IOException e) {e.printStackTrace();} finally {if (ftp.isConnected()) {try {ftp.disconnect();} catch (IOException ioe) {}}}return success;}<pre></pre>。
java实现文件上传和下载
java实现⽂件上传和下载本⽂实例为⼤家分享了java实现⽂件上传和下载的具体代码,供⼤家参考,具体内容如下⽂件的上传upload:⽂件上传客户端通过表单的⽂件域file 把客户端的⽂件上传保存到服务器的硬盘上页⾯⾸先对上传的表单有以下要求:必须有⽂件域:input type=file表单提交⽅式:method=post表单的 enctype=multipart/form-data<form method="post" action="/user/regist" enctype="multipart/form-data"><table style="border: chartreuse;solid:2px"><tr><th>⽤户名</th><td><input type="text" name="username"></td></tr><tr><th>密码</th><td><input type="password" name="password"></td></tr><tr><th>⽤户头像</th><td><input type="file" name="photo"> </td></tr><tr><td colspan="2"><input type="submit" value="提交"></td></tr></table></form>Servlet1)⾸先要导⼊以下两个jar包,通过commons-fileupload实现⽂件上传2)创建⼀个⼯⼚对象DiskFileItemFactory,在创建⼀个多部件表单解析器ServletFileUpload,构造⽅法传⼊⼯⼚对象3)解析器解析请求对象,获得⼀个list集合,其中list集合存储的是⼀个⼀个的fileItem对象,⼀个fileItem对应⼀个组件,也就是⼀个<input>4) 遍历集合⽤isFormField()⽅法判断是否为普通组件,然后着重处理⽂件域组件5)获取⽂件名,并⽤getRealPath⽅法获取服务器上传⽂件所在路径,创建新⽂件夹6)获取输⼊流和创建输出流,进⾏⽂件的读写@WebServlet(value = "/user/regist")public class UploadServlet extends HttpServlet {protected void doPost(HttpServletRequest req, HttpServletResponse resp) throws ServletException, IOException {//创建⼀个⼯⼚对象DiskFileItemFactory factory = new DiskFileItemFactory();//创建⼀个多部件解析器对象ServletFileUpload fileUpload = new ServletFileUpload(factory);User user = new User();FileOutputStream out=null;try {//⽤解析器对象解析请求,返回⼀个FileItem类型的集合List<FileItem> list = fileUpload.parseRequest(req);for (FileItem fileItem : list) {/*** fileItem.getFieldName());:::获取组件的name值* fileItem.getName());::::获取⽂件域的⽂件名* fileItem.getSize());::::获取数据的字节个数* fileItem.getString());::::获取数据的字符串* fileItem.isFormField());:::判断是否为普通组件*///判断部件是否为普通组件if (fileItem.isFormField()) {//普通组件//获取组件名字也就是name的值String fieldName = fileItem.getFieldName();//获取组件的值也就是value的值String value = fileItem.getString("utf-8");if ("username".equals(fieldName)) { //设置实体类的属性user.setUsername(value);} else if ("password".equals(fieldName)) {user.setPassword(value);}} else {// ⽂件域//获取⽂件名String fielName = fileItem.getName();//输⼊流来读数据InputStream in = fileItem.getInputStream();//设置⽂件写出的路径,并⽤随机码来保证图⽚可以重复String path=req.getServletContext().getRealPath("/imgs/"+ UUID.randomUUID()+fielName);System.out.println("⽂件路径为:"+path);File file = new File(path);out = new FileOutputStream(file);//利⽤commons-io-1.4.jar的IOUtils的copy⽅法直接实现⽂件的复制IOUtils.copy(in,out);user.setPhoto(file.getName());}}} catch (Exception e) {e.printStackTrace();}finally {if(out!=null){out.close();}}req.getSession().setAttribute("user",user);req.getRequestDispatcher("/sucess.jsp").forward(req,resp);}}⽂件的下载页⾯只需⼀个超链接,传需要下载的⽂件名,或者直接输⼊路径在浏览器例: <a href="<c:url value='/file/download?fileName=14.jpg'/>" >狗狗1</a><br/>Servlet1)接收参数,获取⽂件名2)获取imgs的路径,也就是存储⽂件的⽂件夹的路径,然后创建⽂件,传⼊该路径和⽂件名3)创建输⼊流读取⽂件4)设置响应头,⾸先根据⽂件名字获取⽂件的⼤类型,设置响应头Content-Type指定响应的类型;设置响应头Content-Disposition,指定⽂件以附件形式保存到本地磁盘5)⽤响应获取输出流,读出⽂件到客户端@WebServlet("/user/download")public class DownloadServlet extends HttpServlet {protected void doGet(HttpServletRequest request, HttpServletResponse response) throws ServletException, IOException {request.setCharacterEncoding("UTF-8");//获取要下载的⽂件名String fileName = request.getParameter("fileName");System.out.println(fileName);//获取服务器中存储图⽚的⽂件夹的路径String path1 = request.getServletContext().getRealPath("/imgs");String path=path1+"/"+fileName;File file = new File(path);//创建输⼊流读⽂件FileInputStream in = new FileInputStream(file);//通过⽂件名字获取⽂件的⼤类型String type = request.getServletContext().getMimeType(fileName);//设置响应头ContentType指定响应内容的类型response.setHeader("Content-type",type);//设置响应头Content-Disposition 指定以附件形式保存响应的信息response.setHeader("Content-Disposition","attachment;filename="+(URLEncoder.encode(fileName, "utf-8"))); ServletOutputStream out = response.getOutputStream();//实现⽂件的读写IOUtils.copy(in,out);if(in!=null){in.close();}}}以上就是本⽂的全部内容,希望对⼤家的学习有所帮助,也希望⼤家多多⽀持。
18.Javaweb中文件的上传和下载【重要】
18.Javaweb中⽂件的上传和下载【重要】Javaweb中⽂件的上传和下载⽂件上传⽂件上传指的是⽤户通过浏览器向服务器上传某个⽂件,服务器接收到该⽂件后会将该⽂件存储在服务器的硬盘中,通常不会存储在数据库中,这样可以减轻数据库的压⼒并且在⽂件的操作上更加灵活,常见的功能是上传头像图⽚。
⽂件上传的原理所谓的⽂件上传就是服务器端通过request对象获取输⼊流,将浏览器端上传的数据读取出来,保存到服务器端。
⽂件上传的要求提供form表单,表单的提交⽅式必须是post【get请求装不下那么多】form表单中的enctype属性必须是 multipart/form-data 【照着做就⾏】表单中提供input type=”file”上传输⼊域 【⽂件那个表单】先来个表单:<!DOCTYPE html><html lang="en"><head><meta charset="UTF-8"><meta name="viewport" content="width=device-width, initial-scale=1.0"><title>Document</title></head><body><figure><img src=""></figure><form action="#" method="post" accept-charset="utf-8" enctype="multipart/form-data"> <!--# 提交地址记得改!--><input type="file" name="photo"><br><input type="submit" value="上传头像"></form></body></html>来个Servlet来接收⼀下这个图⽚:package upload;import java.io.IOException;import java.io.InputStream;import javax.servlet.ServletException;import javax.servlet.http.HttpServlet;import javax.servlet.http.HttpServletRequest;import javax.servlet.http.HttpServletResponse;/*** ⽂件上传例⼦*/public class file extends HttpServlet {protected void doGet(HttpServletRequest request, HttpServletResponse response) throws ServletException, IOException {}protected void doPost(HttpServletRequest request, HttpServletResponse response) throws ServletException, IOException {//获取请求的输⼊流InputStream is = request.getInputStream();//读取输⼊流中的数据int leng = 0;byte[] bytes = new byte[1024];while ((leng = is.read(bytes)) != -1) {//先打印控制台看看System.out.println(new String(bytes,0,leng));}}}打印出来的数据:------WebKitFormBoundarypM4ZEsxzVdl0NfZVContent-Disposition: form-data; name="photo"; filename="4-2 鍥剧墖鍒囨崲鏁堟灉[20210508-164643].jpg"Content-Type: image/jpeg反正⼀堆乱码但是头部我们是看的懂的就是⼀些标签的属性和上传的照⽚名字!和⽂件类型!如何解决?请看:FileUpload⼯具的使⽤在实际开发中通常会借助第三⽅⼯具来实现上传功能,应⽤较多的是apache旗下的Commons-fileupload。
- 1、下载文档前请自行甄别文档内容的完整性,平台不提供额外的编辑、内容补充、找答案等附加服务。
- 2、"仅部分预览"的文档,不可在线预览部分如存在完整性等问题,可反馈申请退款(可完整预览的文档不适用该条件!)。
- 3、如文档侵犯您的权益,请联系客服反馈,我们会尽快为您处理(人工客服工作时间:9:00-18:30)。
tomcat上传文件下载文件首先介绍一下我们需要的环境:我用的是myeclipse8.5的java开发环境,tomcat是用的apache-tomcat-6.0.26这个版本。
首先先需要准备一下使用到的jar包这些jar包是struts2的jar包。
这些jar包是都是用于上传文件的。
注意:这里的jar包版本必须是对应的,如不是可能会tomcat下报错。
所以大家最好注意一下啊。
最好是用这套jar包。
我将会在csdn上将项目jar包发上去。
Jar下载地址(0分):/detail/woaixinxin123/4193113 源代码下载(10分):/detail/woaixinxin123/4193134开始搭建我们的项目。
创建web项目名字为File。
第一步:搭建struts2框架。
1、到jar包。
2、编辑web.xml<?xml version="1.0"encoding="UTF-8"?><web-app version="2.5"xmlns="/xml/ns/javaee"xmlns:xsi="/2001/XMLSchema-instance"xsi:schemaLocation="/xml/ns/javaee/xml/ns/javaee/web-app_2_5.xsd"><!-- 增加struts2的支持 --><filter><filter-name>struts2</filter-name><filter-class>org.apache.struts2.dispatcher.ng.filter.StrutsPrepa reAndExecuteFilter</filter-class></filter><filter-mapping><filter-name>struts2</filter-name><url-pattern>/*</url-pattern></filter-mapping><welcome-file-list><welcome-file>index.jsp</welcome-file></welcome-file-list></web-app>3、添加struts.xml<?xml version="1.0"encoding="UTF-8"?><!DOCTYPE struts PUBLIC"-//Apache Software Foundation//DTD Struts Configuration 2.0//EN""/dtds/struts-2.0.dtd"><struts></struts>4、启动tomcat测试。
配置完成的tomcat提示。
第二步:编写首页代码:<%@page language="java"import="java.util.*" pageEncoding="utf-8"%><%@taglib uri="/struts-tags"prefix="s"%><%String path = request.getContextPath();String basePath = request.getScheme()+"://"+request.getServerName()+":"+request.get ServerPort()+path+"/";%><!DOCTYPE HTML PUBLIC"-//W3C//DTD HTML 4.01 Transitional//EN"><html><head><base href="<%=basePath%>"><title>多文件上传</title></head><body><s:form action="upload.action"method="post" enctype="multipart/form-data"><s:file name="upload"label="上传的文件一"></s:file><s:file name="upload"label="上传的文件二"></s:file><s:file name="upload"label="上传的文件三"></s:file><s:submit value="上传"></s:submit></s:form></body></html>第三部:编写action代码:package file.action;import java.io.File;import java.io.FileInputStream;import java.io.FileOutputStream;import java.io.InputStream;import java.io.OutputStream;import java.util.List;import com.opensymphony.xwork2.ActionSupport;public class UploadAction extends ActionSupport {/****///上传文件的路径地址(文件夹提前创建)private static final String PATH= "D:\\apache-tomcat-6.0.26\\webapps\\uploadFiles\\";private static final long serialVersionUID = 1L;private List<File> upload;public List<File> getUpload() {return upload;public void setUpload(List<File> upload) {this.upload = upload;}public List<String> getUploadFileName() {return uploadFileName;}public void setUploadFileName(List<String> uploadFileName) { this.uploadFileName = uploadFileName;}private List<String> uploadFileName;public String execute() throws Exception{//判断文件是否为空if(upload!=null){//循环遍历文件for(int i=0;i<upload.size();i++){//取到文件流InputStream is=new FileInputStream(upload.get(i));//创建文件输出流OutputStream os=new FileOutputStream(PATH+uploadFileName.get(i));//缓存字节byte buffer[]=new byte[1024];//缓存字节大小int count=0;//写文件while((count=is.read(buffer))>0){os.write(buffer,0,count);}//关闭流os.close();is.close();}}else{return INPUT;}return SUCCESS;}第四部:配置struts.xml<?xml version="1.0"encoding="UTF-8"?><!DOCTYPE struts PUBLIC"-//Apache Software Foundation//DTD Struts Configuration 2.0//EN""/dtds/struts-2.0.dtd"><struts><constant name="struts.devMode"value="true"/><!--规定上传文件的大小 --><constant name="struts.multipart.maxSize" value="102400000"></constant><!--配置action --><package name="default"extends="struts-default"><action name="upload"class="file.action.UploadAction"> <result name="success">/success.jsp</result><result name="input">/input.jsp</result></action></package></struts>第五步:创建缺省页面Success.jsp<%@ page language="java"import="java.util.*" pageEncoding="utf-8"%><html><head><title>文件上传</title></head><body><h2>上传成功</h2></body></html>Input.jsp<%@page language="java"import="java.util.*" pageEncoding="utf-8"%><html><head><title>文件上传</title></head><body><h2>文件为空,不能上传</h2></body></html>上传文件测试:启动tomcat添加File 打开浏览器输入网址查看文件是否在:确认,而且数据都对。