博朗M-30, M-60, M-90说明书中文版
博朗Max 6合1体温计用户手册说明书

thermometerQuick-start GuidePress the FACE button and keep holding it down whilst approaching the centre of the forehead until you see the temperature displayed inside the rectangle.Too FarToo closeCorrect distanceIf, when pressing the “face” button, the projection shows CAL (“face” and “home” lights will flash), press the “face” and “home” buttons simultaneously and direct the projection onto an internal wall or another hard surface. Release the buttons. Now the device is calibrated to the room temperature and ready to take accurate body temperature measurements when pressing the “face” button.To take temperature of objects, walls etc., press the “home” button.The 6-in-1 Thermometer is an infrared thermometer,Therefore, when the “face” button is pressed, the 6-in-1 Thermometer software automatically applies a correction factor and thus the resulting value is comparable to that experienced in more commonly used temperature-taking methods, such as underarm (axillary), oral or rectal, or other core temperature locations as preferred by the user..An oral reading is generally 0.2°C (0.4°F) higher than an axillary reading while a rectal or core reading is usually0.8°C (1°F) higher (see no.7).The 6-in-1 Thermometer temperature reading taken on thetemperature reading for them.4. HOW TO USE4.1 Taking the body temperature: FOREHEAD• When using for the first time, insert 4 AAA batteries as explained in no.11 Replacing batteries.• Open the protective cap by rotating it 90° (see fig. 2).• Point the 6-in-1 Thermometer at the forehead.• Press the “face” button and hold it down. The two aiming lights will turn on and you will see the temperature reading projected onto the forehead between or overlapping the sides of the projected rectangle shape. • While keeping the 6-in-1 Thermometer perpendicular to the centre of the forehead, move it back or forth until the temperature reading is positioned evenly inside the rectangle (see fig. 2): if the thermometer is too close, or too far away, the temperature reading will overlap the sides of the rectangle (see figs. 3 and 4).• When the temperature reading sits evenly inside the rectangle, the thermometer is at the correct distance (see fig. 5); release the button, keep the thermometer steady while the projection flashes and then read the temperature value.If necessary, you can immediately take another reading. After the measurement has been taken, the light on the(recommended for professional use only).Proceed as you would do for a forehead reading (see no.4.1), but press the “home” button : the projected reading will appear on the surface.After the measurement, the projection of the temperature value will remain visible for about 10 seconds. If it is difficult to see the temperature value (for example, on transparent, shiny or irregular surfaces, such as bathwater or soup) then release the button and direct the projection onto a solid, preferably dark, surface. This time you will not need to worry about holding the thermometer the correct distance from the surface as, in this case, the thermometer is not taking a temperature, but merely projecting the temperature value that has already been taken.5. AMBIENT TEMPERATURE and MEMORY FUNCTION The “Mem” button lets you see the ambient temperature and call up the last 9 temperature readings (memory function).• Aim the device at any uniform and opaque surface.• Press once the “Mem” button: the projection will show the letter “A” , (Ambient) alternating with the ambient temperature value, and the light of the “Mem” b utton will turn itself on.• Press the “Mem” button again, and the projection will show the number 1 alternating with the last temperature value taken. The light of the button which had been used for that measurement (“face” or “home”) will turn itself on. If you push the button again before the memory’s light turns itself off, the number 2, alternating with the second to last temperature taken will be projected, and the light of the used button will turn itself on, and so on.6. ROOM TEMPERATURE CALIBRATIONIf, when pressing the “face” button, the projection shows “CAL” , (“face” and “home” lights will flash) this means the device needs to be stabilised (see no.2.1.2).In this instance, the thermometer will not let you take a measurement, as it would not be correct. On the contrary, it will activate the Automatic Quick Calibration System (AQCS). Now you have two possibilities:1. Wait about 5 minutes without touching the thermometer, until the AQCS ends.2. Perform the MQCS (Manual Quick Calibration System) procedure as follows:focus the thermometer on an internal wall or wardrobe with uniform temperature and at a point between approximately between 80 and 150 cm (30 and 60 inches) from the surface press the “face” and “home” button simultaneously (see fig. 8) (lights will flash).• once the correct distance is reached (CAL inside the rectangle, fig. 5), release the button: the projection will flash slowly showing the room temperature.To ensure a reliable temperature reading, do not focus the thermometer on an outside wall, window, source of heat or cold (radiator, air conditioner, lamp, computer, surface in contact with the human body, etc.).The thermometer is now ready to take a reading and willIf necessary, these settings can be changed as follows: • when the thermometer is off, aim the thermometer at any flat surface.• press and hold the “Mem” button; the projection will show the letter “A” and after about 8 seconds it will change, showing the settings in sequence:…..C...…….F……..Or…….rEc……..Ax…….Cor…• when the desired setting appears, release the button.appears.DESCRIPTION: “E.1” is projected alternately withthe symbol “bAt” ( ),or the unit does not turn on at all.PROBLEM: the batteries are dead. SOLUTION: remove thebatteries immediately and replace them (see no. 11).DESCRIPTION: the projection reads "E.8". PROBLEM: the thermometer was moved before the light started flashing, or the area is subject to strong electromagnetic fields. SOLUTION: wait until the light starts to flash before moving the thermometer; make certain that there are no mobile or cordless telephones in the vicinityDESCRIPTION: the projection shows “CAL” and the lights of the “face” and the “home” buttons flash. PROBLEM: the thermometer has not stabilised. The symbol “CAL” and the lights indicate that you should perform an MQCS. SOLUTION: perform an MQCS (see no. 6).DESCRIPTION: "Hi.4" not guaranteed. DESCRIPTION: "Hi.4" appears on the projection. PROBLEM: the room temperature is too high(above 45°C / 113°F).SOLUTION: move toanother, cooler site.DESCRIPTION: “Lo.5"and the temperature valueare projected alternately.PROBLEM: If you havepressed the “face” button:the room temperature isbetween 10 and 15.9°C(50 and 60.6ºF).If you have pressed the“home” button”: the room temperature is between 5and 9.9°C (41 andDESCRIPTION: the projection reads PROBLEM: the room temperature is too low (below 10°C or 50°F if you habutton ORbelow 5°C or 41°F if you habutton.SOLUTION: move to another, warmer room. DESCRIPTION: "Hi.2" and the value are projected alternately. PROBLEM: if you have pressed the “face” button: the temperature is over 40°C/104°F. SOLUTION: seek medical attention. DESCRIPTION: the projection reads "Hi.2". PROBLEM: if you’ve pressed the “face” button: the temperature detected exceeds the limit for operation with this button (>42,5°C or >108.5ºF ).If you’ve pressed the “home” button: the temperature detected exceeds the limit for operation with this button (>80°C or >176°F ). SOLUTION: temperature reading cannot be taken. DESCRIPTION: the projection reads “Lo.3”. PROBLEM: the forehead temperature appears to be too low (<34.0°C or<93.2°F if you have pressed the “face” button OR <1°C/33.8°F if you’ve pressed the “home” button).SOLUTION: if you have pressed the “face” button: make certain the sensor is not dirty or damaged and that the subject has not come from a cold room.If you have pressed the “home” button: the temperature readingcompliance with IEC 62471.Follow instructions for useATTENTION: read thewarningsDevice designed for continuous useApplied part: type BFProtected against insertion of objects >12.5 mm andagainst vertical drippingwater when tilted up to 15°.Recyclable materialDispose of the device incompliance with applicablelegislation regarding electrical equipment andbatteries.Brother Max 6-in-1 ThermometerUS 6,196,714 - US 6,527,439 - US 7,001,066 - US 7,651,266 - US 8,128,280 - EP0909377 -EP1051600B1 - EP1283983B10051Manufactured in Italy by TECNIMED srl 12, P.le Cocchi , 21040 Vedano O. (VA) - ITALY****************Tel. +39 0332 402350。
Philips 电动剃须刀系列9000 100% 水抗性 SkinIQ 智能剃须刀说明书
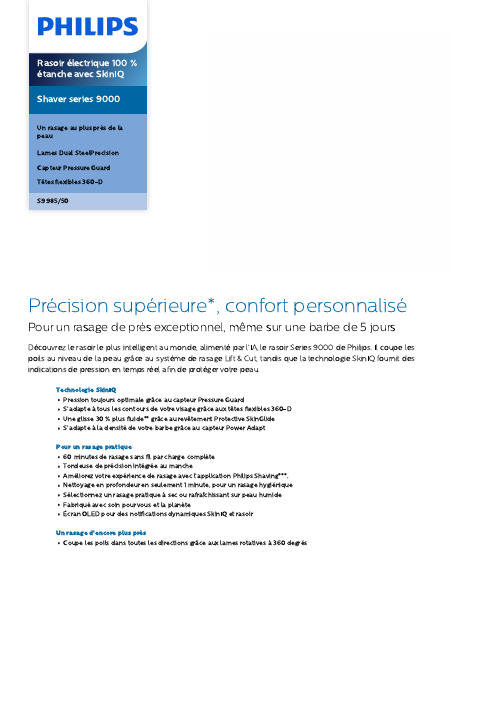
Précision supérieure*, confort personnaliséPour un rasage de près exceptionnel, même sur une barbe de 5 joursDécouvrez le rasoir le plus intelligent au monde, alimentépar l’I A, le rasoir Series 9000 de Philips. Il coupe les poils au niveau de la peau grâce au système de rasage Lift & Cut, tandis que la technologie SkinIQ fournit des indications de pression en temps réel afin de protéger votre peau.Technologie SkinIQPression toujours optimale grâce au capteur Pressure GuardS’adapteàtous les contours de votre visage grâce aux têtes flexibles 360-DUne glisse 30 % plus fluide** grâce au revêtement Protective SkinGlideS’adapteàla densitéde votre barbe grâce au capteur Power A daptPour un rasage pratique60 minutes de rasage sans fil par charge complèteTondeuse de précision intégrée au mancheA méliorez votre expérience de rasage avec l’application Philips Shaving***.Nettoyage en profondeur en seulement 1 minute, pour un rasage hygiéniqueSélectionnez un rasage pratiqueàsec ou rafraîchissant sur peau humideFabriquéavec soin pour vous et la planèteÉcran OLED pour des notifications dynamiques SkinIQ et rasoirUn rasage d'encore plus prèsCoupe les poils dans toutes les directions grâce aux lames rotativesà 360 degrésPoints fortsSystème Lift &CutNotre technologie rotative unique et brevetée Lift & Cut soulève délicatement le poil à la racine avant de le couper avec précision au plus près de la peau (jusqu ’à 0,00 mm de la peau ) sans même que les lames ne touchent votre peau .Lames DualSteelPrecisionLes rasoirs rotatifs Philips sont spécialement conçus pour s ’adapter à la pousse naturelle des poils et capturer tous les poils qui poussent dans n ’importe quelle direction ,grâce aux lames rotatives à 360 degrés . Les lames Dual SteelPrecision réalisent jusqu ’à150 000 coupes par minute , pour un rasage au plus près de la peau .Capteur PressureGuardIl est essentiel d 'exercer la bonne pression pour obtenir un rasage de près qui respecte la peau . Les capteurs avancés du rasoir détectent la pression que vous exercez et le voyant innovant vous indique lorsque vous appuyez trop fort ou trop peu . Pour un rasage personnalisé optimal .Têtes flexibles 360-DConçu pour suivre les contours de votre visage et même de votre cou , ce rasoir électrique Philips est doté de têtes entièrement flexibles qui pivotent à 360° pour un rasage impeccable et confortable .Revêtement protecteurSkinGlideUn revêtement de protection sépare les têtes de rasoir et votre peau . Composé de 250 000billes micro -tech par centimètre carré, le revêtement améliore la glisse de 30 %** a fin de réduire les irritations .Capteur Power AdaptCe rasoir électrique est doté d ’une technologie de détection intelligente de la pilosité faciale qui détecte la densité des poils 500 fois par seconde . Le capteur Power A dapt ajusteautomatiquement la puissance de coupe pour vous procurer un rasage en douceur et sans e ffort .Personnalisation via l 'applicationPerfectionnez votre rasage en appairant votre rasoir à l ’application Philips Shaving . Rasage après rasage , suivez la progression de votre peau , personnalisez votre rasage etperfectionnez votre technique , pour un rasage de près qui respecte la peau .Quick Clean Pod sanscâbleCe puissant module de nettoyage nettoie et lubri fie votre rasoir en seulement 1 minute ,pour un fonctionnement optimal pluslongtemps . Il est 10 fois plus e fficace qu 'unnettoyage à l 'eau .**** Ce module de nettoyage ultra -compact est facile à ranger et à utiliser en tout lieu .À sec ou avec de lamousseA daptez votre technique de rasage à vos besoins . A vec le système Wet & Dry , vous pouvez opter pour un rasage à secconfortable , ou pour un rasage rafraîchissant sur peau humide - avec du gel ou de la mousse - même sous la douche .CaractéristiquesA ccessoiresTrousse: Housse de voyageSmartClick: Brosse nettoyanteQuick Clean Pod: Oui, 1 cartouche incluse Tondeuse rétractable intégréeA limentationCharge: Charge complète en 1 heure, Recharge rapide en 5 minType de batterie: Li-ionA utonomie: 60 minutes DesignManche: Design ergonomique pour une bonneprise en mainCouleur: A rgent chroméFinition: Élégance intemporelleEntretienGarantie de 2 ansTête de rechange: Remplacer tous les 2 ansavec SH91Performance de rasageSystème de rasage: Système Lift&Cut, LamesDual SteelPrecisionSuivi des contours: Têtes flexibles 360-DTechnologie SkinIQ: Capteur Pressure Guard,Revêtement protecteur SkinGlide, CapteurMotion Control, Capteur Power A daptFacile d'utilisationNettoyage: Quick Clean Pod sans câble,Ouverture d'une simple pression, EntièrementlavableÀsec ou avec de la mousse: Utilisableàsec ouavec de la mousseAfficheur: Indicateur de niveau de charge en %SmartClickA daptéaux types de produits: Le produitRQ585/51 NE s’adapte P A S au type de têteangulaire* par rapport au modèle Philips Series 9000 précédent* * Par rapport au matériau sans revêtement* ** Basésur les utilisateurs du Philips Series S7000 et del’application Philips Shaving en 2019© 2023 Koninklijke Philips N.V. Tous droits réservés.Les caractéristiques sont sujettesàmodification sans préavis. Les marques commerciales sont la propriétéde Koninklijke Philips N.V. ou de leurs détenteurs respectifs.Date de publication 2023‑12‑17 Version: 12.12.1E A N: 87 10103 96482 7 。
博朗IRT6500中文说明书家用版

若错误持续。
若错误再持续 电量低,但耳温计仍能正确操 作。 电量太低,无法正确测量温 度。
……将电池取出重置后再开 启。 ……请与服务中心联系。 插入新电池。
插入新电池。
产品规格:
显示的温度范围: 工作环境的温度范围: 存储温度范围: 工作和存储相对湿度: 显示分辨率:
34-42.2℃(93.2-108℉) 10-40℃(50-104℉) -25-55℃(-13-131℉) 10-95%RH(非冷凝) 0.1℃/℉
钟。
所得温度不在正常体温范围 (34-42.2℃或 93.2-108℉) HI=太高
LO=太低
确保红外探针和探头干净,且 佩戴的是全新干净的耳套。确 保耳温计插入方式正确后再 进行测温。
系统错误——自我检测不停 闪烁,且随后无准备蜂鸣音和 准备标志出现。
等待 1 分钟,直到耳温计自 动关闭,然后重新打开。
2、红外耳温枪是一种高科技,高灵敏度的测量仪,在使用过程中,对操作环境,测量方法 (是否对准耳鼓)均有较高的要求,所以容易造成人为的测量不准而非仪器本身的问题,具 体注意事项:
①在新环境下,需待 30 分钟后才能使用。
②新生儿体温相当均匀,不必将探头插入太深。 ③将耳朵向上向后拉让耳道变直,以便对准耳鼓。 a)1 周岁以内的幼儿,测量时外耳需往耳朵后方拉。 b)1 周岁以上及成人,耳朵需往上及往耳朵后方拉,以便耳道拉直。 ④拉耳朵的同时,将探测头温柔地插入耳道里,并按下开始键,显示屏会显示测量到的 温度。 ⑤为了确保读数准确,连续测量 3-5 次后请等至少 30 秒。多次测量后,取最高值为耳 温测量值。 ⑥对婴儿使用时,最好让小孩躺平,将头侧放,让耳朵朝上,对于较大的儿童或成人, 持仪器者最好站在被测人后面,稍微朝向被测人的侧面。 ⑦一定要测同一个耳朵的温度,因为左耳及右耳测到的温度可能不同。 ⑧睡醒之后请等几分钟再测温。 ⑨在下列情形里建议同一个耳朵测三次温度,取其中最高的一个作为读数。 a)出生未满 100 天的新生儿。 b)3 周岁以下、免疫系统有缺陷的儿童。 因为每个人左、右的耳道不尽相同,所以测量的温度是因人而异。一般人相差 0.5℃,亦有 相差高达 1.0℃,但有少部分人左、右耳温是相同的。
红色战神:前苏联M-30式122毫米榴弹炮
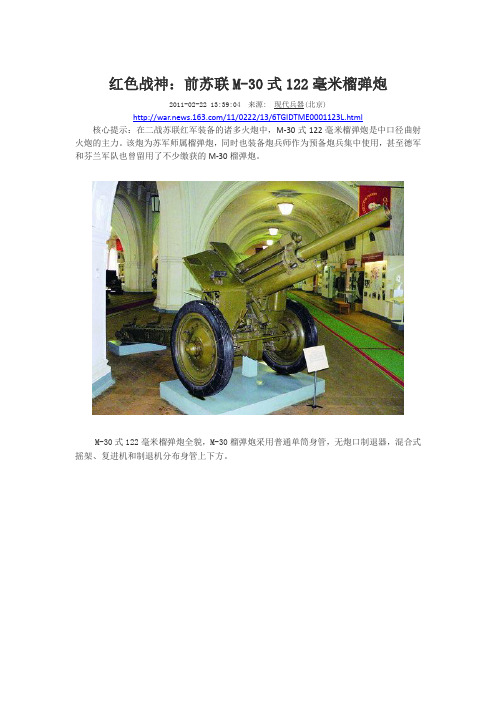
红色战神:前苏联M-30式122毫米榴弹炮2011-02-22 13:39:04 来源: 现代兵器(北京)/11/0222/13/6TGIDTME0001123L.html 核心提示:在二战苏联红军装备的诸多火炮中,M-30式122毫米榴弹炮是中口径曲射火炮的主力。
该炮为苏军师属榴弹炮,同时也装备炮兵师作为预备炮兵集中使用,甚至德军和芬兰军队也曾留用了不少缴获的M-30榴弹炮。
M-30式122毫米榴弹炮全貌,M-30榴弹炮采用普通单筒身管,无炮口制退器,混合式摇架、复进机和制退机分布身管上下方。
M-30榴弹炮采用螺式炮闩,向右后方扳动白色手柄,炮闩闩体先以自身轴线为轴旋转90°,然后随锁扉一起朝右后方转动打开炮闩。
锁扉上横向的杠杆即为拉火机,连接拉火绳后拉动就能击发火炮。
斯大林曾说过:“炮兵是战争之神。
”在二战陆地战场上,炮兵是除了航空兵之外拥有火力最强大的。
因此,苏联军队一直对炮兵有着极高的重视程度,苏军的“大炮兵主义”众所周知。
二战时期,在苏联红军引以为豪的大纵深战术中炮兵扮演着极其重要的角色,苏军每一次大规模的进攻都是以预备炮兵火力的急袭开始的。
在这一时期苏联红军装备的诸多火炮中,M-30式122毫米榴弹炮是中口径曲射火炮的主力。
该炮为苏军师属榴弹炮,同时也装备炮兵师作为预备炮兵集中使用,甚至德军和芬兰军队也曾留用了不少缴获的M-30榴弹炮。
今天我们就从这种火炮开始讲起。
设计研发在上世纪30年代,苏联红军高层打算研制一种新型师属榴弹炮用以代替帝俄时代的M1909和M1910式122毫米榴弹炮。
尽管后两者分别在1937年和1930年进行了一定程度的现代化改进,但还是不能满足战争的需要,因此研制一种新型榴弹炮的任务就落到了苏军火炮设计部门身上。
第一个拿出的样炮是KB-2设计局在德国工程师协助下设计的M1934式122毫米榴弹炮。
此炮身管长度为23倍口径,最大仰角50°,水平方向射角7°。
SDQ 中文说明书

安 全该机电设备是在工业强电流的条件下使用的。
在操作中,该设备上有些裸露零件带电,同时有些零件能够运动或转动,都是很危险的。
因此,未经许可拆下所需的罩盖,不合理的使用,不正确的操作或不合适的维护,均会造成严重的人身伤害或损坏设备性能。
为了设备的安全,必须保证:——仅允许有资格的人员对这些机械和设备进行作业。
——无论何时,在上述有资格的人员对该机械和设备进行作业时,他们都应备有这些机械和设备的操作说明书或其它产品文件,以便按说明书的要求执行。
——严禁没有资格的人员对该机械和设备进行作业或在其附近进行作业。
目录一、 概述二、 产品型号三、 主要工作原理四、 主要技术数据及性能参数五、 外形及安装尺寸六、 安装与调整七、 电气控制八、 隔爆要点(隔爆型)九、 故障及排除方法一、概述SDQ/J(H)(B)系列部分回转/角行程阀门电动执行机构适用于开启和关闭蝶阀、球阀、挡板等90°角行程阀门。
该产品广泛应用于电站、给排水、船舶、市政工程等工业部门。
其中核电型严格按照美国IEEE 382-1996标准进行了振动老化试验和地震试验并已获通过,试验中OBE 的地震加速度为4g ,SSE 的地震加速度达6g ,在国内同类产品中尚属首例,符合EJ/T1022.11-1996《压水堆核电厂阀门电动装置》中1E 级K3类产品安全方面的要求;隔爆型可在Ⅱ类A 、B 级T 1、T 2、T 3、T 4组爆炸性气体的工况环境下工作。
其使用环境如下:1、 环境温度:-20℃~60℃2、 相对湿度:≤90%(25℃时)3、 工作环境:无强腐蚀性介质4、 防护等级:IP655、 电 源:220V AC ,50 Hz 或三相 380V ,50Hz6、 隔爆型防爆等级:Exd ⅡBT47、 工作制式:调节型为S5,负载持续率为10%,最大工作次数为1200c/h ;开关型为S2,10 min 。
二、产品型号1、产品型号表示方法·m{表示隔爆型字母非隔爆型不表示B {表示核电型字母非核电型不表示H {表示部分回转字母表示角行程字母Q J三、主要工作原理 电动执行机构由电机、减速机构、控制机构、手轮和机械限位等组成。
博朗,说明书
篇一:博朗产品说明书全系列buran博朗系列超细干粉自动灭火装置南京燕苑博朗消防设备有限公司目录第一部分第二部分第三部分第四部分第五部分第六部分悬挂式超细干粉灭火装置1 适用范围2 技术性能3 结构和工作原理4 运输、保管注意事项5 安装注意事项6 维护注意事项7 装箱单8 售后服务悬挂式超细干粉灭火装置1 适用范围2 技术性能3 结构和工作原理4 运输、保管注意事项5 安装注意事项6 维护注意事项7 装箱单8 售后服务悬挂式超细干粉灭火装置1 适用范围2 技术性能3 结构和工作原理4 运输、保管注意事项5 安装注意事项6 维护注意事项7 装箱单8 售后服务自动温感启动器手动启动功能模块1 概述2 探测器性能特点3 主要技术指标4 安装方法5 使用方法6 维护安装注意事项备注 fzxa2.5-buran fzxa5-buran fzxa8-buran第一部分 fzxa2.5-buran悬挂式超细干粉灭火装置1 适用范围1.1 能迅速扑灭a、b、c类火灾和带电电气火灾。
如生产车间、办公室、小型仓库、商店、配电房等层高比较小的相对封闭空间及火车、船舶等交通工具消防使用。
1.2 防爆标志exibiibt32 技术性能2.1 外形尺寸(含固定架;mm)直径 ??????????????200±5高度??????????????375±52.2 灭火装置重量(kg)?????????????????????6.0±0.5 2.3 灭火超细干粉重量(kg)???????????????????2.5±0.125 2.4保护面积、体积(不密闭程度5%)2.5自动温感启动器启动温度(℃)???????????????? ≥70 2.6启动电流(a)????????????????????????≥1 2.7 检查电启动的安全电流(ma)????????????????≤150 2.8 喷射时间(秒)????????????????????????≤5 2.9 灭火时间(秒)???????????????????????≤1 2.10 使用环境温度(℃)?????????????????? -40~+50 2.11 装置启动有效期(年)?????????????????????10 2.12 可人控电启动或与火灾自动报警系统配套使用。
博朗听书机使用手册_42756

博朗听书机使用手册EV960 V2.0目录一. 本机概况-------------------------------------------------------------------21.1功能特点-----------------------------------------------------------------21.2示意图-------------------------------------------------------------------21.3按键介绍-----------------------------------------------------------------31.4开/关机、开机密码及背光--------------------------------------------------31.5充电---------------------------------------------------------------------41.6磁盘选择-----------------------------------------------------------------41.7界面图标说明-------------------------------------------------------------4二. 操作过程-------------------------------------------------------------------42.1阅读电子书---------------------------------------------------------------42.2 朗读---------------------------------------------------------------------42.3听音乐-------------------------------------------------------------------52.4录音及录音回放-----------------------------------------------------------52.5系统功能设置-------------------------------------------------------------5三. 规格参数、注意事项及简单故障处理-------------------------------------------5四. 电脑驱动程序安装说明-------------------------------------------------------6五. 电脑驱动程序使用说明-------------------------------------------------------65.1电脑驱动程序功能介绍-----------------------------------------------------65.2 DOC格式文件转为TXT格式-------------------------------------------------75.3听书机程序烧录-----------------------------------------------------------7前言感谢您使用广州博朗电子产品有限公司的产品。
SIEMENS Silver WD1000 中文版 说明书 滚筒洗衣机

S
O n 1 20 0 Wo o l O ff 6 0 0
TEMPE RATUR E
DR YI NG T IM E
c old
90 80 70 60
20
30
120
30 40
110
40 50
1 00 50
60
90
70 80
ÍP R OG R AM S E LE C T IO N
Sto p
A
SR
B
C
ÍQ
St op
A
SR
B
C
ÍQ
N
St op
M
L
D
ÍG F
K H Stop
11 12 13 14
15 17 16
处理方法注意事项
zh 安全注意事项及警告
新机器的包装
洗衣时及干衣时:
认真负责地处理包装材料。
!只允许用冷自来水。
让包装材料远离儿童,包装材料不是玩具。
!由于使用了冷凝器式干衣的原理,因此在使
再加工及再利用包装材料可以节约原材料,
用干衣功能时,必须打开水龙头。
减少废料。
!您的洗衣机仅为家用型,即仅为适宜机洗及
所使用的全部包装材料均为适合环境及可再
烘干的织物所设计。
利用的。
!禁止用易燃、易爆或有毒性溶剂,如汽油、
硬纸板箱包含有80%至100%再生纸。 塑料包装薄膜材料是聚乙烯(PE),胶粘带是
酒精等作为洗涤剂。请只选择适合机洗的市 售家用洗涤剂。 !禁止洗涤地毯。
器的负荷要求。
!请使用运输螺栓。 !排干机内的积水。 !小心搬运,在抬高时勿抓住机器各突出部分。
机门不能用作搬运时的把手。