德国GMC-I高美测仪GOSSEN测光表中文介绍
GOSSEN电表

GOSSEN照度计、GOSSEN电表、GOSSEN万用表、GOSSEN电压表、GOSSEN电气测试仪、GOSSEN多功能电量表、GOSSEN电量变送器、GOSSEN角位传感器、GOSSEN录仪
德国高森GOSSEN 公司简介: 德国GOSSEN METRAWA TT公司发展已逾百年, 历史悠久. 专业研发制造测试/测量以及工业过程测量控制用仪器, 仪表和执行元器件. 产品研发和生产基地分别位于德国, 美国和瑞士. 产品分类1.电气/器安全测试仪/电气测试仪: ProfiTest, SecuTest系列2.便携式电能质量分析仪/在线电能质量监测分析系统: MavoWatt系列3.绝缘/接地测试仪: Geohm, MetrISO系列 4.高端万用表: MetraHit系列 5.高精度直流电源: Konstanter系列6.多功能电量表, 能源管理系统, 电量变送器, 角位传感器, 记录仪等电能质量检测分析仪.
上海智川工贸有限公司专业销售德国GOSSEN照度计、GOSSEN电表、GOSSEN万用表、GOSSEN电压表、GOSSEN电气测试仪、GOSSEN多功能电量表、GOSSEN电量变送器、GOSSEN角位传感器、GOSSEN录仪。
Gossen Metrawatt 电能计计量器操作说明书

Operating Instructions3-349-868-037/8.21Gossen Metrawatt GmbH Südwestpark 1590449 Nürnberg, Germany Phone +49-911-8602-111 Fax +49 911 8602-777e-mail ************************ENERGY MIDElectronic Energy Meters Direct conn. EM2281/EM2289Transformer conn. EM2381/2387/2389© Gossen Metrawatt GmbHEdited in Germany • Subject to change without notice / Errors excepted • A pdf version is available on the InternetAll trademarks, registered trademarks, logos, product names, and companynames are the property of their respective owners.1Scope of Delivery1Energy meter2Operating instructions (German and English)1Calibration certificate (with feature P9 only)Important information such as technical data, interface descrip -tions, and operating instructions for features can be found on the Internet. The link can be found on the cover page.2Safety Precautions – Symbols–Check the specified nominal voltage on the serial plate before placing the instrument into service.–Observe maximum pulse output voltage.–When wiring the instrument, make sure the connec -tor cables are not damaged, and that they are volt -age-free.–If it can be assumed that safe operation is no longer possible, the instrument must be immediately removed from service (disconnect input voltage!). Safe operation can no longer be relied upon if the instrument demonstrates visible damage.The device may not be placed back into operation until troubleshooting and repair have been per -formed, and calibration and dielectric strength have been tested and approved at our factory or an autho -rized service center.–Voltage conducting parts may be exposed if the cover is opened.If balancing, maintenance or repair of a live open instrument is required, this may only be carried out by trained personnel who are familiar with the dangers involved.–When connecting measuring current, it is important to provide for low-ohmic contact and to select an appropriate conductor diameter.Meanings of Symbols on the InstrumentDE MTP 17 B 002 MI-003 (EM228x) DE MTP 16 B 004 MI-003 (EM238x)DE MTP 20 B 004 (EM228x Z2)DE MTP 20 B 005 (EM238x Z2) Prototype test certificateTotal insulation,protection class II deviceWarning concerning a point of danger (attention, observe documentation!)This device may not be disposed of with the trash. Further information can be accessed on the Internet at by entering the search term “WEEE”.Metrology markwith indication of year (M16) and register no. of the notified body for module D, country-specific calibration validity periodMarking with stamp of the federally approved test laboratory(for recalibration only)Tamper-Proof Sealing – Opening the Meter / RepairsTamper-Proof Calibration Sealing with Manufacturer’s Seal (at the side)If the manufacturer’s seal is damaged or removed, all guarantee claims are rendered null and void.The meter may only be opened by authorized, trained per -sonnel in order to ensure flawless operation and to assure that the guarantee is not rendered null and void.If it can be ascertained that the meter has been opened by unauthorized personnel, no guarantee claims can be honored by the manufacturer with regard to personal safety, measuring accuracy, compliance with applicable safety measures or any consequential damages.Tamper-proof sealing for the terminal cover may be attached either to the left or the right of the terminal cover.3Rating Plate Entries4Connector Pin Assignments and Wire GaugeNote: Observe the wiring diagrams in the top and bot -tom terminal covers.Meas. Inputs, EM228X Direct Meter (top & bottom terminals)Meas. Inputs, EM238X Transf. Meter (bottom terminals)Terminal 23 (SØ1) import, terminal 25 (SØ2) export*Type of energy can also be selected with feature V2, V4. Underlined values are default values.!M161948EBY 816Connections Direct, EM228XTransformer, EM238XCurrent inputSolid wire ≤ 16 sq. mm Fine wire ≤ 25 mm 2 or ≤ 16 mm 2 with wire end ferrule Tightening torque: 3-4 NmSolid wire ≤ 4 sq. mm Tightening torque: 0,5-0,6 Nm Voltage inputN: solid wire ≤ 2.5 sq. mm Tightening torque: 0,4 NmSolid wire ≤ 4 sq. mm Tightening torque: 0,5-0,6 NmSØ pulse output Bus output, tariff input (power utility pulse)Solid wire ≤ 2.5 sq. mm Tightening torque: 0,4 Nm Solid wire ≤ 2.5 sq. mm Tightening torque: 0,4 NmTCP/IPRJ-45 (8P8C)Prototype test certificateAccuracy class / operating temperature Pulse outputType designation (article number)← Energy export / → energy import Nominal voltageImin - In (Imax.) / nominal frequency WarningProtective insulationSymbol for system type Year of manufacture Metrology markLED constant2D code orcalibration mark (feature P9)EBY 816Serial numberUp keyEnter keyCurrent/voltage transformer ratio Anti-reversing for the registers in both energy directionsBidirectional meter L2L1L3Voltage VoltageCurrent Current Current VoltageCurrent CurrentCurrentNVoltage Voltage VoltageCurrent Current Current L3L2L1NCurrentCurrentCurrentTCP/IPPulse Rates V1/V3, fixed V7V8V9,fixedV2/V4, programmable[pulses per kWh]Direct U228x1000100—— 1 ⋯ 1000 pls/kWhTransformer U2381 / U238xf (secondary)100 ...CT x VT = 1 (Q0)1000100 1000 500001...1000...10,000 pls/kWh CTxVT=1(Q0)U6/71000100 1000 200001...1000...10,000 pls/kWh CTxVT=1(Q0) U31000100 1000 500001...1000...10,000 pls/kWh CT, VT , progr. (Q1)1000100 1000 500001...1000...50,000 pls/kWh CT, VT, progr. (Q1)U6/71000100 1000 200001...1000...50,000 pls/kWh CT, VT, progr. (Q1)U31000100 1000 500001...1000...50,000 pls/kWh CTxVT; CT, VT, fixed (Q9) f (primary) f (primary)2 ⋯ 101000100—— 1 ⋯ 1000 pls/kWh 11 ⋯ 10010010——0.1 ⋯ 100 pls/kWh 101 ⋯ 1000101——0.01 ⋯ 10 pls/kWh 1001 ⋯ 10,0001100—— 1 ⋯ 1000 pls/MWh 10,001 ⋯ 100,0000.110——0.1 ⋯ 100 pls/MWh 100,001..1,000,0000.011——0.01 ⋯ 10 pls/MWh 6Display and Control Panel6.1Test LEDsThe test LEDs are located above the control keys. The left-hand LED indicates energy export, and the right-hand LED energy import. LED blinking frequency increases along with measured power. If all currents are smaller than start -ing current, both LEDs light up continuously.LED ConstantEM228x: 10,000 pls/kWh (direct meter)EM238x: 100,000 pls/kWh(transformer meter)6.2Resolution, Main Display (large characters) Energy Import Internally, increased resolution is used for counting. As a result, the total register may be a few digits higher than the sum of the individual registers in the last place when using multi-tariffs.*An additional place to the right of the decimal point is included for the calibration display in the case of a main display which can be calibrated (Q0 or Q9). And thus the leading digit is eliminated in the case of an 8-place display.**In the case of Q1, the secondary display can be calibratedQ0, for which reason display overflow is based on the secondary display.The normal display is shifted one place to the left if necessary.6.3Meanings of Symbols at the LCDuMain display , not calibrated (feature Q1, programmable CT/VT, see section 6.2). T1 ... T8: active tariffDisplay of instantaneous power in 4 quad -rants: positive or negative active power P , positive or negative reactive power Q.Correct connection:Continuous illumination of the phase symbols where P ≥ 0Phase failure:Symbol for affected phase is cleared from the display.Incorrect phase sequence:Phase symbols blink in following order: 3 - 2 - 1.The background illumination blinks red.Negative power:Respective phase symbol blinks.For bus connection: appears when the meter transmits a data packet.Key symbols for parameters configuration (see next column)Key Symbols for Parameters Configuration for Feature Q1 and V2, V4:Key and 2nd key bit blanked :Parameter CT, VT and SØ configurable according to features, disabling with enable key.Key displayed with one bit:Parameter CT, VT and SØ disabled, change after activating the enable key.Remaining feature combinations:Key blanked, 2nd key bit displayed:parameters CT, VT or SØ (which are or can be cali -brated) are preset at the factory, can be queried in the display mode, other parameters can be set by the user.Key displayed with 2nd bit: parameters which are or can be calibrated are preset at the factory; other parameters are disabled with the enable key and must be reset after clearing disabling.Values which are preset at the factory are printed addi -tionally on the rating plate.6.4LCD Background IlluminationBackground illumination is activated each time a key is activated. Background illumination goes off after about 2 minutes.Background illumination colors indicate various display menus:–White:query menus–Red:display of firmware version–Pink:parameters display and setting menu –Blinking red: in case of error6.5Key OperationQuerying Parameter ValuesIn addition to the LCD test, the UP and ENTER keys also make it possible to query currently set parameter val -ues, as well as to change parameters for certain fea -tures after first pressing the enable key .If no keys are pressed for a period of 1 minute, the meter is returned automatically to its standard display.Parameters can be changed for the following meters:Parameters CT and VT for U238x with feature Q1, Parameter SØ for U228x/U238x with feature V2/V4Further parameters in accordance with the interface description.a) Enabling Parameter ChangesThe enable key makes it possible to enable or disable parameter changes. It’s located underneath the top ter -minal cover between terminals 21 and 22 and is acti -vated with a pointed object (e.g. a ballpoint pen).Pressing the enable key activates the “change parame -ters” operating mode (key off):Pressing the enable key again disables the “change parameters” operating mode (key on):If no keys are pressed for a period of about 2 minutes, the “change parameters” operating mode is exited auto -matically and disabled (key on).b) Changing Parameter Values➭Briefly press the enabling key as described in pointa) above (this activates the “change parameters” operating mode).➭See the operating overview on the back with regardto changing the parameters.➭Press and hold the ENTER key until the firmware ver -sion appears (red background).➭Press the UP key. The display test appears.Briefly press and hold the ENTER key in order to dis -play two further test patterns.➭Then repeatedly press the UP key until the parame -ter to be changed appears at the display.➭Briefly press the ENTER key in order to access thesetting menu.➭The input cursor blinks at the leftmost entry posi -tion. Each tine the ENTER key is pressed the cursor is advanced to the next position to the right. The value of the blinking digit can be increased bypressing the UP key. When the rightmost digit is ac -knowledged by pressing the ENTER key, the se -lected value is accepted and SAVinG appears briefly at auxiliary display 2. If no keys are pressed for a period of about one minute, the setting menu is exited.➭Press and hold the ENTER key or wait for one minutein order to change to the normal display.➭Press the enable key once again. This disables the“change parameters” operating mode.Disabling takes place automatically after 2 minutes.Meter /Feature CTxVT min.CTxVT max.Normal display Calibration display *Unit U2281, U2289——123456.7823456.789kWh U 238xQ01112345.6782345.6789kWh Q92412345.6782345.6789kWh 540123456.783456.7890kWh 414001234567.834567.890kWh 401400012345678345678.90kWh 400140000123456.783456.7890MWh 400014000001234567.834567.890MWh 400001100000012345678345678.90MWh Q1 **14u12345.67**kWh 540u123456.7**kWh 41400u1234567**kWh 4014000u12345.67**MWh 400140000u123456.7**MWh 40001100000u1234567**MWhMain display (active energy* in kWh or MWh)Auxiliary display 1 (active power* in kW or MW)* EM238x transformer meter: CT and VT are taken into account Auxiliary display 2 (e.g. IN, OUT for import or export)In case of error: error code alternates with current display (M2/M3: reactive energy* in kVArh or MVArh)(M2/M3: reactive energy or power in kVAr(h) or MVAr(h)*) Power: negative sign for exportEnable Key→→Repair and Replacement Parts Service RecalibrationRecalibration can be conducted at any time by our fed -erally approved test laboratory (EBY-8).GMC-I Service GmbH Service CenterBeuthener Straße 4190471 Nürnberg, Germany Phone +49-911-817718-0Fax +49-911-817718-253e-mail ***************************This address is only valid in Germany. Please contact our representatives or subsidiaries for service in other coun -tries.Industrial Product Support If required please contact:Gossen Metrawatt GmbH Industrial Product Support Hotline Phone +49-911-8602-500Fax +49-911-8602-340e-mail *************************************Read and adhere to the complete supplementary product documentation which can be found on the Internet at > Englisch > Products > Industrial Measurement > Energy Meters > EM2281 ... EM23897Switching Amongst TariffsHardware ControlledTariff inputs Ta and Tb are each connected with refer -ence to Tn.Level 0: < 12 VLevel 1: > 45 V (max. 265V permissible!)Software Controlled (not included in MID scope of approval)In the case of meters with bus (featureW1 … W7), four further tariffs can be selected (software controlled).8Overview of Bus Systems–LON-Bus (feature W1)–M-Bus (feature W2)–Modbus TCP (feature W4)–Modbus RTU (feature W7)Interface descriptions for energy meters with bus connectioncan be found on the Internet at .9Error Messages – ResetDisplayIf an error occurs, the respective error code and active energy or instantaneous power are displayed alter -nately.LOVoLt errorIn case of LOVoLt error (phase voltages too low), the background illumination and bus connection are deacti -vated for meters with feature U3 (100...110 V L-L) with bus connections TCP/IP and Modbus RTU (W4 and W7).The counter reading profile (feature Z1) cannot be viewed as long as the error is pending. The remaining meter function is not affected.10Repair and RecalibrationNote for Test LaboratoriesDirect measuring meter: Testing is only possible with source which supply currents superimposed on volt -ages.Calibration DisplayDisplay of energy values with increased resolution can be selected for testing or calibration purposes.➭Press and hold the ENTER key once to this end. Thefirmware version is displayed with a red back -ground.➭Press the UP key twice. The calibration display ap -pears with a pink background.See section 6.2 with regard to resolution depending on type and feature.Recalibration can be conducted at any time by our fed -erally approved test laboratory (EB-8) (see repair and service address on the back of the folder).Calibration capability is valid for 8 years in Germany.11Manufacturer’s GuaranteeThe energy meters are guaranteed for a period of 3 years after shipment. The manufacturer’s guarantee covers materials and workmanship. Damages resulting from use for any other than the intended purpose or operating errors, as well as any and all consequential damages, are excluded.12Ambient Conditions13Return and Environmentally Sound DisposalThe instrument is a category 9 product (monitoring and control instrument) in accordance with ElektroG (Ger -man electrical and electronic device law). This device is subject to the WEEE directive. Furthermore, we make reference to the fact that the current status in this regard can be accessed on the Internet at www.gos by entering the search term WEEE.We identify our electrical and electronicdevices in accordance with WEEE 2012/19/EU and ElektroG using the symbol shown at the right per DIN EN 50419.These devices may not be disposed of with the trash.14CE DeclarationThe instrument fulfills all requirements of applicable EU directives and national regulations.We confirm this with the CE mark. The CE Declaration of Conformity is available upon request. See cover page for the link.Tariff Input Tb Ta Tariff 100Tariff 201Tariff 310Tariff 411Error CodeMeaningCause / Remedy 0L0voltAll phase voltages < 75%Check connection 0VHi1Maximum value for U1 exceededCheck connection 0 V Hi 2Maximum value for U2 exceededCheck connection 0 V Hi3Maximum value for U3 exceededCheck connection 1Hi1Maximum value for I1exceededCheck connection 1Hi2Maximum value for I2exceededCheck connection 1Hi3Maximum value for I3exceededCheck connection 0SYnc Frequency measuring errorMeter connected to direct voltage0C0mInterface error Check connection EnErgY Meter defective Send device to repair service 0cALib Balancing required 0AnALog DC offset too high0MemErr Memory errorSend device to repair service 0 C ERTTemper-proof calibration logReplace device!!!!!!!!!!!!!!Operating temperature range –25 ... +55 °C Storage temperature range –25 ... +70 °C Relative humidity < 75% annual average Elevation to 2000 m DeploymentIndoors mechanical classification M1electromagnetic classification E2Protection (built-in device)front panel: IP 51Protection terminal areaIP20Key for ControlsKeysENTER key (press briefly)ENTER key (press and hold)UP key (press briefly)Abbreviations ct Transformation ratio, currentI NN conductor current (calculated)SØSØ pulse output THD Distortion component (for voltage andcurrent)vt Transformation ratio, voltage Features M1Multifunctional variant:measurement of U, I, P , Q, S, PF, f, THD, InM2Measurement of reactive energy M3Multifunctional variant:measurement of U, I, P , Q, S, PF, f, THD, In, reactive energyQ1Programmable transformation ratios Q9Fixed transformation ratios V2/V4Programmable SØV9Customer-specific SØ rate W1 ... 7Bus connections Z1Counter reading profile (only possible with bus)Z2Certified meter reading profilelonglonglong→→→→→→。
哥森迪吉闪光灯测光表使用说明书
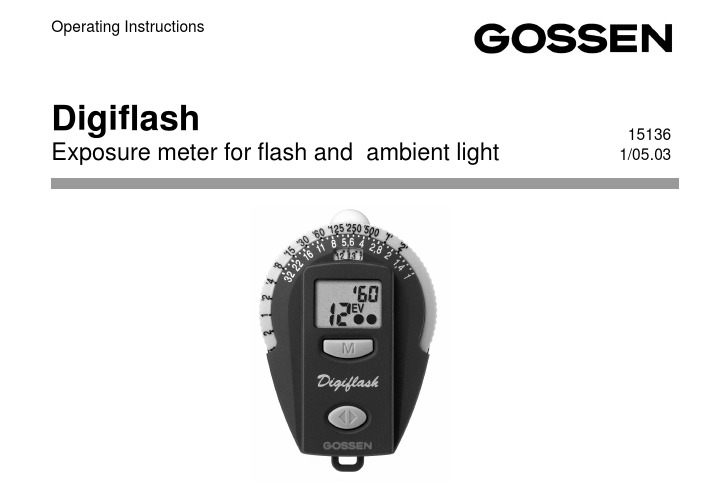
DigiflashExposure meter for flash and ambient light15136 1/05.03Operating InstructionsDisplaySetting windowExp. timesShutter speed scaleDiffuserAperture/f-stops scaleFunction buttonEyelet for carrying strapMeasuringkeySocket for tripodCameramounting clipContents1The functioning of the Digiflash . 4 1.1Preparation and self-test (4)1.2Incident light and reflected light (5)1.3Duration of read-out in display (5)2Functions of the Digiflash (6)2.1Setting the film speed (6)2.2Exposure measuring ambient light . 7 2.2.1Read-out of the values measured .. 7 2.3Flash measurement (8)2.3.1Setting the sync speed (meas. time) 8 2.3.2Measuring (8)2.3.3Fill-in Flashes (9)2.4Taking a measurementoutside the measuring range 102.5Contrast measurements (10)2.6Setting correction values (11)2.7Function TIMER (12)2.8Watch/Alarm clock (13)2.9Measuring temperatures (15)2.9.1Min./Max. temperatures (15)3Service and repairs (16)4Technical data ............................ 17The Digiflash is a small but smart GOS-SEN exposure meter, with digital read-out, for ambient light and flash. The Digiflash is made to exacting GOSSEN calibration standards for high precision measure-ments. The trendy styling and logical func-tioning make it easy and comfortable to operate. Key features:•Incident and reflected light meas. mode •Measuring of ambient and flash light •µP controlled•Digital LCD read-out in the display in 1/3 stop increments•Contrast readout in 1/3 EV steps •Storage of the measuring results •Indication of all suitable combinations of shutter speeds and f-stops•Signal "range over" or "range under"•Automatic battery check•Countdown timer for long exposures •Function Watch/Alarm clock •Measuring temperatures1The functioning of the Digiflash 1.1Preparation and self-testBatteryThe Digiflash is powered by a 3 V Lithium battery, type CR 2032. When the battery is running low, BAT appears in the display.–The battery should be replaced as soon as possible. When BAT is shown alone in the display, the battery will need to be replaced before further measurements are possible.–To replace the battery, pull out the battery compartment located under the eyelet for the carrying cord.–Remove the old battery and insert the new one. Observe the "+" and "–" polarity!–Close the battery compartment Attention! The Digiflash is provided with a battery memory of 10 seconds. If the battery is removed briefly or replaced only within those ten seconds, the values stored in memory will be maintained. Otherwise changing the battery or pressing one of the buttons will cancel all the individually stored values.Self-TestAfter the new battery has been inserted, the microcomputer will carry out a self-test. Every display segment appears in the display panel. The self-test takes 10 sec-onds. It can be interrupted before by press-ing any button.After the self-test, the standard settings willbe shown as set by the factory.Standard settingsISO100/21°COR0ambient EV8 t1/125flash EV121.2Incident light and reflected light Incident light methodFor the incident mode, the diffusor is to be shifted to the left and placed in front of the measuring aperture. Taking measurements using the incident light mode in particular produces in most cases perfectly exposed shots. In this mode, the DF measures from the subject towards the camera. This guar-antees that the tone quality of the picture is equivalent to that of the subject. This is es-pecially important for very bright or dark subjects. Even under very difficult lighting conditions, as e.g. with subjects which have a lot of contrast, the incident light mode is a more reliable way of producing well ex-posed pictures.Reflected light methodFor the reflected mode, the diffuser must be shifted to the right. Care must be taken, that the light sensor is entirely free.The measurement is taken from the position of the camera towards the subject. In this method, only the light reflected from the subject is detected by the meter. Therefore, the measuring values always depend on the reflection capacity of the subject. As a result of this, bright subjects are reproduced darker and therefore not properly exposed. Consequently, this mode is conveniently used, when the suject does not show too high contrasts between bright and dark areas.1.3Duration of read-out in displayThe Digiflash will always display the last function used. The meter does not automatically switch off, as the power consumption is extremely low.2Functions of the Digiflash Press the function button for selecting the individual functions of the Digiflash.Each time the button is pushed, the next function will be activated.The display panel will show the functions in the following sequence:•Ambient light•Flash light•Timer•Watch•Alarm clock•TemperatureThe next function will only be activated after the Function button has been released. When the Function button is kept pressed down for more than two seconds, the settings of that function are displayed and can be adjusted as desired.2.1Setting the film speed–Select the function "Exposure ambient light" and hold down the function button until the OK-signal sounds. The display will show ISO, blinking.–Use the measuring key M to select the desired film speed.When holding the key M pressed down, the film speed will automatically beincreased. When getting close to thedesired ISO value, release the key Mand set the desired film speed by pushing the key in individual steps.Each time you push the key, the filmspeed is increased by a 1/3 stop.–Confirm the speed you selected by pushing the Function button until the OK-signal sounds and the Digiflash re-turns to the function "Exposure ambient light". The film speed is shown in the up-per right corner of the display.If the film speed is changed, the measure-ment read-out stored in the memory will be immediately converted to the new ISO settings.The film speed selected will stay storedin memory until it is changed in the way described above.The film speed selected will be valid both for ambient and flash light.2.2Exposure measuring ambient light –Use the Function button to select the function …Exposure measuring ambient light“.–The measurement is taken by briefly pressing down the measuring key M.2.2.1Read-out of the values measured The EV value measured will appear in the display. The values will be indicated in1/3 - stop increments by one dot, the 2/3 - stop increments by two dots.–Transfer that EV value from the display to the setting window in the calculator rings and place it precisely under the red indi-cator line.–All the suitable combinations of aperture (f-stops) - t (shutter speeds) can now be seen at the upper part of the circular scales (see previous example).2.3Flash measurement2.3.1Setting the sync speed(measuring time)–Press the function button for selecting the function …flash measurement“. A small stroke in front of the sync time will appear in the display to signal …flash metering“.–Keep the function button pressed down until the ok signal sounds. The display will now show the sync speed blinking.–Use the measuring key to input the desi-red sync speed, in the range of 1 sec to1/500 sec. and confirm by pressing the function button.2.3.2Measuring–Push the measuring key.The Digiflash is ready to measure for30sec, as long as …F“in the display is on.–Trigger the flash.–Transfer the value measured from the display to the window in the printed sca-les above and set it precisely under the red indicator line.–Read the f/stop in the upper part of the scale opposite the sync speed you had preselected (for 1/90 read between 1/60 and 1/125).2.3.3Fill-in FlashesYou will find the right combination in two steps:First you take a reading of the background in the function …ambient light“. Transfer the EV value from the display to the setting win-dow above. Then set the corresponding combined shutter speed and f/stop to your camera, while taking care that the shutter speed must be equal to the flash sync speed.In the second step, you determine the fill-in flash by measuring the flash in the incident mode. From the shadow area of the subject you direct the Digiflash towards the came-ra in such a way that the meter will only re-ceive the fill-in flash and the stray light, but definitely not the main light source.The resulting EV value should be lower by 1to 2 stops than the EV value for the ambi-ent light. If not, adjust the power of the flash unit or change the distance to get the desi-red EV value.2.4Taking a measurementoutside the measuring rangeThe Digiflash will not produce any useable readings outside its measuring range:in the display Eu (too dark) or E n (too bright) will appear. 2.5Contrast measurements–Use the Function button to select the function "Exposure ambient light".–Keep the measuring key M pressed down and the meter will switch over to contrast measurement. Continue holding downthe key to measure various other areas in the subject. In the display, the difference between the individual results of theadditional measurements and the firstmeasuring value will be indicated in EV.A new metering will be made approx.2times a second.After you have released the measuring key M, the value of the first exposure measure-ment will reappear.2.6Setting correction valuesIn order to deliberately change the exposure of your photos, you may adjust the factory calibration.–Remove the battery from the Digiflash and press one of the buttons (battery memory will be deactivated). Put the bat-tery back in the compartment. The meter will then make the self-test.–During this test, keep the measuring key and also the function button pressed down until the accoustic signal sounds. Release the key to enter the CORRECTION function.Use the measuring key M to enter or change the correction value.Press the function button again and hold it down until the OK signal sounds to return the meter to the normal measuring func-tions.The EV in the display will blink to remind you that the standard factory calibration has been changed. Input of the correction in1/3-stops in the range of ± 3 EV.For cancelling the correction value, remove the battery from the compartment and then put it back again.In case of over-exposure a positive correction, in case of under-exposurea negative correction value should be set.2.7Function TIMERA timer function is provided in the Digiflash, useful for long exposure or other timings ranging from one second to thirty minutes.–Use the function button to select the function TIMER and hold it down until the OK-signal sounds. The display shows the last value used. The read-out will show the "minutes" and will flash to allow the countdown timer to be adjusted.–Use the key M to enter the desired time in minutes.–Confirm by pushing the function button. The read-out "seconds" in the display will flash. –Enter the "seconds" of the desired length of time. Confirm by pressing and holding the function button until the OK-signal will sound. The timer will now be in the Start/ Stop function.–Push the key M to start the timer.The display will show the remaining time of the count-down. In addition to that,during the last 10 seconds of the count-down, interrupted signals can be heard.At the end of the set time, a continuedsignal will sound.–To pause the count-down, push the measuring key; pressing it again will restart the count-down.The timer will work in the background so that you can use other measurements.2.8Watch/Alarm clockWATCH – Setting the time–Use the function button to select the function WATCH and hold the key down until the OK-signal will sound.12/24 will flash.–With the function button select either 12hours (AM/PM) – 24hour display.–Confirm with the function button.The read-out "hours" will flash.–Use the key M to set the hours and confirm with the function button.The read-out "minutes" in the display will flash.–Use the key M for setting the minutes. To confirm settings hold down the function button until the OK-signal is heard. ALARM CLOCK–Use function button to enter the function "ALARM CLOCK" and hold it presseddown until the OK-signal will sound.The time of the alarm clock is set in the same way as the watch.–Hold the function button until the OK-signal sounds.–The alarm is activated or deactivated with the measuring button.–When the alarm is activated it is shown in the display with a bell symbol.–When the alarm is sounded it will soundeach second for 1 min. It can be stopped by pressing either the measuring key orthe function button.2.9Measuring temperatures–Use the function button to select the function TEMPERATURE and hold the button pressed down until the OK-signal sounds. To change between °C or °F read-outs, press and hold the function button until the display changes.The Digiflash will indicate the actual ambi-ent temperature. The temperature probe is incorporated in the meter housing.As a result, the temperature measurement may be affected if you are holding the meter in your hand. If you attach the Digiflash with the clip to your camera, these errors can be avoided.2.9.1Min./Max. temperaturesWhen repeatedly pressing the measuring key, the minimum (Lo) and maximum (Hi) temperature values will be indicated. The minimum and maximum values indicated are those that have been measured since the last cancellation operation.The min. and max. temperature values stored in memory can be cancelled by pressing the measuring key until the OK-signal sounds. The temp. measurements are repeated automatically every two min. providing always the actual values. These min. and max. temp. values will make it pos-sible for you to check, whether your films may have been exposed to excessive high temperatures and have been damaged.3Service and repairsIn the event that your Digiflash is not work-ing to your complete satisfaction, please send it to:GOSSEN Foto- und Lichtmeßtechnik GmbH Thomas-Mann-Str. 16-20D - 90471 Nürnbergor to the GOSSEN agency in your country.4Technical dataExposure meterMeasuring modes Ambient lightFlash light (non cord)Incident light methodReflected lightmethodContrast measurem. Light sensor sbc photo diode Meas. range ambient light(when ISO 100/21°)EV 0 to 18Shutter speeds1/2000 s to 4 min Apertures f/1 to f/32Meas. range flash light(when ISO 100/21°)f/2 to f/32Synch speeds (Measuring times)1 to 1/500 sec. incl. 1/90 sec.Correction values± 3 stops Film speeds ISO 6 to 3200in 1/3 increments Measuring anglereflected light mode approx. 25°Timer 1 sec to 30 minWatch adjustable to 12 hrs(AM + PM) or 24 hrs Accuracy 5 min / yearThermometer adjustable to °C/ °F Measuring range–15 ... 70 °C or5 ... 160 °F Accuracy± 2 °C or ± 4 °FDisplay Digital read-out ofmeasuring valuesand analogue scales Duration of read-out The DF will alwaysdisplay the lastfunction used Battery 1 x 3V Lithiumbattery CR 2032 Operating temp.–10 °C ... 60 °C Dimensions75x50x23mm Weight40g incl. battery Accessories incl. Battery, carryingcase, cord,instruction manual Optional accessory Mounting clipfor camera shoesOrder code V069APrinted in Germany • Subject to change without notice GOSSEN Foto- und Lichtmeßtechnik GmbH Thomas-Mann-Str. 16-20D-90471 NürnbergPhone:+49 911 / 8602-181Fax:+49 911 / 8602-142。
GMC-I 高美测仪 METRAHIT 27M, 27I and H+E CAR 数字多用表 + 毫
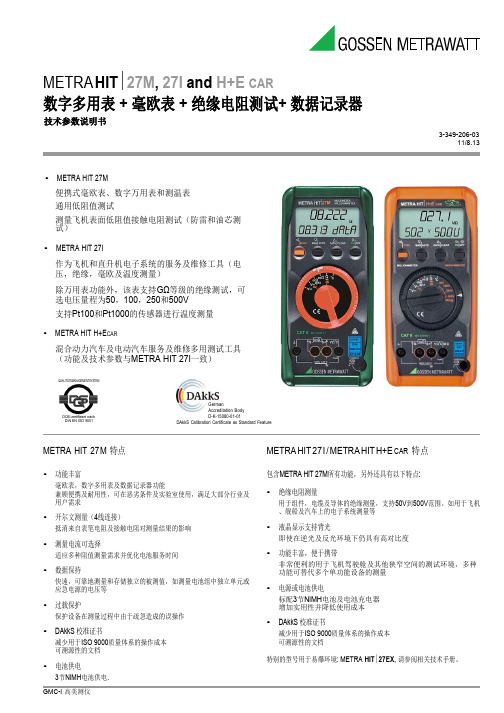
METRA HIT∣27M, 27I and H+E CAR数字多用表 + 毫欧表 + 绝缘电阻测试+ 数据记录器技术参数说明书3-349-206-0311/8.13•METRA HIT 27M便携式毫欧表、数字万用表和测温表通用低阻值测试测量飞机表面低阻值接触电阻测试(防雷和油芯测试)•METRA HIT 27I作为飞机和直升机电子系统的服务及维修工具(电压,绝缘,毫欧及温度测量)除万用表功能外,该表支持GΩ等级的绝缘测试,可选电压量程为50,100,250和500V支持Pt100和Pt1000的传感器进行温度测量•METRA HIT H+E CAR混合动力汽车及电动汽车服务及维修多用测试工具(功能及技术参数与METRA HIT 27I一致)QUALITÄTSMANAGEMENTSYSTEMDQS-zertifiziert nach DIN EN ISO 9001GermanAccreditation BodyD-K-15080-01-01DAkkS Calibration Certificate as Standard FeatureMETRA HIT 27M 特点•功能丰富毫欧表,数字多用表及数据记录器功能兼顾便携及耐用性,可在恶劣条件及实验室使用,满足大部分行业及用户需求•开尔文测量(4线连接)抵消来自表笔电阻及接触电阻对测量结果的影响•测量电流可选择适应多种阻值测量需求并优化电池服务时间•数据保持快速,可靠地测量和存储独立的被测值,如测量电池组中独立单元或应急电源的电压等•过载保护保护设备在测量过程中由于疏忽造成的误操作•DAkkS 校准证书减少用于ISO 9000质量体系的操作成本可溯源性的文档•电池供电3节NiMH电池供电. METRA HIT 27I / METRA HIT H+E CAR 特点包含METRA HIT 27M所有功能,另外还具有以下特点:•绝缘电阻测量用于组件,电缆及导体的绝缘测量,支持50V到500V范围。
德国GMC-I高美测仪手持多用表Metrahit energy产品介绍

三行显示的LCD 屏 (尺寸 65 x 36 mm) 带背光功能, 特别适用于昏暗环境下的测量
仪器技术参数可溯源,例如 满足 DIN EN ISO 90000-9004标准要求
TRMS Power Multimeter
附件选择
型号
描述
订货号
Replacement fuses Fuses (pack of 10), FF (UR) 10 A / 1000 V AC/DC
Z207E
METRAFLEX 300M
Flexible miniature AC current sensor, measuring range: 3/30/300 A, 1000 mV / 100 mV / 10 mV/A, 1%, frequency range: 20 Hz to 100 kHz, with battery, sensor length: 16 cm
手持式 功率万用表
HIGH-END DIGITAL MULTIMETER
广泛适用于电气工程 测量行业
如今,万用表仍然是电气工程领域不可或缺的应用很广的测试 工具.专业便携功率表 METRAHIT ENERGY 带电能质量分析功能, 在同类型产品中脱颖而出,卓尔不凡 .
应用
应用范围
METRAHIT ENERGY 广泛应用于用于电气工程,电气安装,实验室应用,培训,电信等领域。
Z216D
METRAwin10
Windows software
GTZ3240000R0001
Temperature Measuring Accessories
Z3409
Standard Pt100 sensor, class A, for surface and immersion measurements, –40 to +600 °C
德国 高美测仪
德国 Metrawatt International
感谢您关注 GMC-I 高美测仪!
欢迎到纽伦堡/天津做客
GMC-I 欧洲各国销售子公司
1906
1919
1944 1957 1962
1993
2005
德国 Metrawatt International: 关键字
德国 Metrawatt International 集团
� 总部位于德国巴伐利亚州纽伦堡市 , 全球员工约 550 人 � 公司标识与形象色 :
Europe
Nürnberg, Germany Wohlen, Switzerland
Kazakhstan USA
Edison, NJ, USA
Azerbaijan Turkmenistan Iran Egypt UAE Saudi Arabia India Thailand Malaysia Singapore Indonesia China Taiwan Korea
Mexico
Columbia
Peru
Brazil
Australia Chile South Africa Uruguay
Argentina
德国 GMC-Instruments: 历史与传承
毫伏表, 1923 年 电压盘表, 1952 年 MetraWatt GmbH Camille Bauer AG
� 2010年集团销售额 : 约8,100 万 欧元 � Internet: � Email: info@
德国 GMC-Instruments 世界各地
生产基地 销售子公司 ▪ 法国 ▪ 意大利 ▪ 英国 ▪ 荷兰 ▪ 奥地利 ▪ 瑞士 ▪ 西班牙 ▪ 捷克 ▪ 中国 ▪ 美国 销售伙伴:埃及 比利时 墨西哥 保加利亚 爱沙尼亚 克罗地亚 伊朗 丹麦 芬 兰 韩国 希腊 爱尔兰 南非 荷兰 挪威 波兰 葡萄牙 新加坡 哥伦比亚 瑞典 土耳其 等… Russia
GOSSEN MAVOLUX 5032 C B USB 光照度计说明书

Luxmeters / Footcandle Meters MAVOLUX 5032 C/B USBIlluminance meters of the precision class C or BFeatures• Precision meters for measuring the illuminance inLux and Footcandles meeting StandardSpecification DIN 5032-7, Class C or B andEN 13032-1, Appendix B• The silicon photo diode is colour corrected, i.e. itsspectral responsitivity is matched to the photopicdaylight vision of the human eye V(λ).• Luminance can be measured in cd/m² or fL whenusing the Luminance Attachment (optional accessory)• Cosine correction for light inciding at an angle• Easy to use• 3 ½ digits display• Backlight display illumination (only inMAVOLUX 5032 B USB)• Data storage of up to 100 measurements• Auto and manual range selection• USB Port 1.1• CD-Rom with software for processing the valuesmeasured and controlling the meter• Compact transport case and USB cable includedT he GOSSEN digital precision luxmeters are classified according to DIN 5032-7 in Class C or B and EN 13032-1, Appendix B. Wide range of applications: for lighting engineers and specifiers, for the control of light sources, street lights, lighting of work places, public buildings, sport facilities, for quality control and quality assurance in the manufacture of lamps and light sources, for light designers and architects, for light measurements in agriculture, gardening and forestry.B oth MAVOLUX types are optimally suited for measuring very high light intensities (brightestdaylight, head lights) without any additional accessories. Especially the MAVOLUX 5032 B USB having an initial sensitivity of 0.01 lx also allows measuring extremely low light intensities, such as emergency lighting. Most important: Due to its high precision acc. to Class B, the MAVOLUX 5032 B USB has been approved for certification and official inspection procedures. W hen attaching the Luminance Attachment to the measuring probe of the MAVOLUX 5032C or B USB, they can be used also for measuring the luminance; the measuring angle being approx. 20°. Luminance is the reflected light effect of self luminous or reflecting surfaces. The measuring unit is candela per square meter (cd/m²) or foot Lambert (fL).Calibration CertificateWhen required, to be specificly ordered together with the lightmeter. Please see page 12 of this brochure for more information.2Gossen Foto- und Lichtmesstechnik GmbHLuxmeters / Footcandle MetersMAVOLUX 5032 C/B USBModel MAVOLUX 5032 C USBMAVOLUX 5032 B USBType Illuminance meter for measuring lightAccuracy Class C acc. DIN 5032-7Class B acc. DIN 5032-7LCD Display 3 1/2 digits3 1/2 digits,with backlight display illuminationLight sensor Silicon photo diode with V (λ) filteringMeasuring unitLux or footcandle (fc) and with Luminance Attachment cd/m² orfoot Lambert (fL)Measuring ranges Automatic and manual measuring range selection0.1 lx to 199 900 lx and1 cd/m² to 1 999 000 cd/m² in 4 ranges (with Luminance Attachment)0.01 lx to 199 900 lx and0.1 cd/m² to 1 999 000 cd/m² in 5 ranges (with Luminance Attachment)Data memory 100 individual measuring values Measuring rate 2 measurements per secondUSB Port USB 1.1Operating temperature 0° C to 50° CAccording EN 61010-1:2001, cl. 1.4.1Storagetemperature -20°C to +70° CPower supply 1 x 1,5 V, size AA , when meter is connected to PC,power will be supplied via USB cableSoftwaregLux Software and additional applicationsConnection cable 1.5 m cable, firmly attached1.5 m cable (plugged in)Weight 200 g without batteryStandard Accessories Lightmeter in transport case, gLux Software incl. meter driver,USB cable, battery, instruction manualOptional AccessoriesLuminance Attachment (measuring angle 20°)Adapter disk for luminance contact measurement (eliminating lightincident from the sides)Specifications:Applications - Examples:Measuring the emergency lighting in emergency exitsTV StudiosSports Arenas 3Gossen Foto- und Lichtmesstechnik GmbHMAVOLUX 5032 C/B USBDescriptionOrdering code MAVOLUX 5032 C USBincl. transport case, software, USB cable, battery, instruction manual M502G MAVOLUX 5032 B USBincl. transport case, software, USB cable, battery, instruction manual M503G Calibration Certificate for Mavolux 5032 C/B USB * (please see page 12)H997BAccessories for MAVOLUX 5032 C /B USBLuminance Attachment for measuring in cd/m² and fL5908V0120Adapter disk for contact measurement (for use only with the Luminance Attachment)M499G Special length cables for MAVOLUX 5032 C or B USB 3 meters for MAVOLUX 5032 C USB *151435 meters for MAVOLUX 5032 C USB *1514410 meters for MAVOLUX 5032 C USB *151453 meters for MAVOLUX 5032 B USB *151465 meters for MAVOLUX 5032 B USB *1514710 meters for MAVOLUX 5032 B USB *15148* The extra length cables and the Calibration Certificates must be ordered already together with the meters.Ordering information:The MAVOLUX 5032 C/B USB is supplied in a practical and compact transport case.Measuring probe with Luminance Attachment mounted and Adapter disk4Gossen Foto- und Lichtmesstechnik GmbHOptional accessories:Luminance Attach- ment, Adapter disk for eliminating light inciding from the sides, with contact measurement.Luxmeters / Footcandle Meters。
德国GMC-I高美测仪多参数电量表Sineax A2XX系列产品介绍
带有系统分析功能的多参数电量表SINEAX A210, A220, A230s, A230带有系统分析的多功能电能监控单元SINEAX A210和A220合理和经济的测量48个被测参数,8个能耗值显示,平均和最大/最小值功能。
电气系统可以在所有四个象限中进行全面评估。
显示单元被测物通过高对比度,14 毫米高,可调光的LED进行显示,该LED带有3位数字和符号(电度表为8位数字,频率为4位数字)。
计量集成式电度表记录有功电能(进/出)和无功电能(感应/电容)。
如果使用扩展模块的数字输入来切换费率,则活动仪表的数量将增加一倍。
输出有 2 个 S0 输出可用于控制继电器。
可以输出能量脉冲,也可以输出可编程极限的状态。
SINEAX A230s和A230多功能准确的测量134个测量值,8个能耗值显示,综合平均值和最大值/最小值值函数,THD和谐波分析,不对称电压和零位移电压。
所有这些被测量构成了对所有四个象限中电气系统进行综合分析和评估的基础。
显示单元被测物通过高对比度,14毫米高,可调光的LED进行显示,并带有4位数字和符号(电度表为8位数字)。
在用户模式下,不需要的被测物可以被抑制。
LOOP模式依次显示2到10个可编程显示器。
分析趋势分析可用于所有平均值。
谐波含量和系统不对称性的计算为操作员提供了有关系统状态的重要信息。
A210A220A230s A230正面尺寸96 x 96毫米144 x 144毫米96 x 96毫米144 x 144毫米连接方式单相,3/4线平衡,3/4线不平衡输入LL: 0 – 500 V, LN: 0 – 290 V, F: 45 – 65 Hz, I: 0 – 1/5A精度U, I: 0,5%;P,Q,S,meters:1%U, I: 0,2%;P,Q,S,meters:0,5%14mm显示3位数字+符号4位数字+符号,可编程电源输出100 – 230 V AC / DC或24 – 60 V AC / DC 2个数字量输出作为脉冲或限值输出被测量85266能量计88平均值5个P,Q和S平均值各种功能THD没有谐波分析没有是15次电压不平衡没有是连接弹簧夹或螺丝夹端子防护等级(前面板)IP66扩展模块扩展了 A210,A220,A230s 和 A230 的功能它们可以简单地卡在基本仪器的背面并从其获取电源。
- 1、下载文档前请自行甄别文档内容的完整性,平台不提供额外的编辑、内容补充、找答案等附加服务。
- 2、"仅部分预览"的文档,不可在线预览部分如存在完整性等问题,可反馈申请退款(可完整预览的文档不适用该条件!)。
- 3、如文档侵犯您的权益,请联系客服反馈,我们会尽快为您处理(人工客服工作时间:9:00-18:30)。
1成功的摄影师用光创作摄影作品752动态范围 [EV / f-stops]记录媒介再现媒介动态范围 [EV / f-stops]8灰黑比可调范围的使用—优化工作流程对比度测量:平均值测量:区域测量:直方图0255对比度测量52结构紧凑、得心应手的轻量化设计Array406SIXTOMAT F2凭借其出色的多样性和高性能,SIXTOMAT F2不仅是那些拥有自己摄影棚闪光灯套件的业余发烧友的理想曝光工具,同时也适用于光学测量专家及专业电影摄制组。
它所包含的技术和功能是高质量的,并且操作清晰易懂。
通用的SIXTOMAT F2可以在演播室以及室外使用。
它可以快速测量入射光和反射光的闪光和环境光,显示混合照明条件以及所需的多次闪光,并执行对比度测量。
计算出的曝光值可以完整,1/2或1/3的增量显示。
它以出色的精度和经过时间考验的质量,掌握了模拟和数字摄影以及电影制作的所有常见照明情况。
8电影制片人的简单CINE表胶卷速度在CINE模式下是有规定的,通过计算并输入滤波系数作为校正值(COR),可以考虑偏离180°的开光角。
测量完成后,以1/10的增量数字显示f-stop值,并以模拟的f-stop刻度另外显示,四舍五入为1/2增量。
因此,为摄影者提供了正确曝光图像的基本数据。
人机工程学设计SIXTOMAT F2的布局便于单手操作,只需几个按键,操作简单直观。
高对比度LCD面板清晰易读,并以清晰的方式显示值。
其紧凑但坚固的设计确保了曝光计完美地适合用户的握手姿势,并作为摄影师不可或缺的工具陪伴摄影师完成所有任务。
9SIXTOMAT F2 10摄影师通用曝光表可以使用光圈或快门优先预选以及曝光值来执行环境光测量。
滑动漫射器可用于在入射和反射光测量之间来回切换。
测量完成后,可以通过按数值键查询光圈/快门速度组合。
测量值以1/10的增量数字显示,f-stop值以1/2的增量出现在模拟刻度上。
如果在快门预选和曝光值功能中按住测量键,则可以确定对比度范围并以f级标尺显示-这是使对象的对比度范围与记录介质匹配的理想功能。
从f档开始的广泛测量范围1.0至90和1/8000 s(最长60分钟)支持使用快速光圈镜头进行的光线摄影,以及在极端黑暗的环境中进行夜间摄影。
高达±7.9 EV的校正值的测量或设置可用于中性密度滤光片的曝光时间延长。
在进行闪光测量时,可以手动触发或通过同步电缆触发。
如果使用无线闪光触发系统,则可以根据所选的测量模式手动或通过同步输出操作变送器。
测量完成后,指定同步速度的f-stop值出现在显示屏上。
它以模拟f-stop标尺以及环境光比的f-stop值显示。
更改同步速度可能会影响闪光灯与环境光之间的关系,从而可以调节填充闪光灯或柔化环境光。
如果测量结果表明一次闪光无法实现所需的工作光圈,则可以使用上限值键进行调整。
然后,数字时间显示被指示器代替,该指示器显示工作光圈所需的闪光次数。
技术指标全面的计量方法–入射光和反射光测量,以可调的测量值显示,以1/2或1/3的增量显示测量范围广–f-stop从1.0到90,曝光时间从1/8000 s到60分钟精确的测量和显示–重复精度为±0.1 EV,以1/10增量显示测量值灵活的环境光测量–光圈或快门优先预选以及曝光值显示轻松的主体对比度控制–模拟对比度显示为半光圈值个性化的适应–在±7.9 EV校正值范围内以1/10的增量输入或测量全面的闪光测量–闪光曝光测量(软线/非软线),同步速度可调至1/1000 s,显示环境光比和多次闪光计算电影制片人的CINE功能–确定用于8到64 fps可调电影速度的f-stop,包括电视的25 fps和30 fps,以及偏离180°的扇区的校正因子人体工程学设计–紧凑的外壳,具有清晰的时尚显示和单手操作各种警告–电池电量,超量程或量程不足报警自动关机–保留最新设置和最新测量值11技术参数综合计量方法 – 入射光测量,反射光测量,可选1/2或1/3增量显示测量值精密测量和显示 –重复精度±0.1EV,以1/10增量显示测量值灵活环境光测量 –光圈或者快门优先,曝光值显示被摄物对比度调节 –模拟对比1/2增量光圈值显示综合闪光测量 –闪光灯同步速度可调曝光测量(线性/非线性),显示环境光比和多重闪光计算电影制作功能 –光圈值可调胶片速度范围8~64帧,电视是25~30帧,及其行业偏离180°的校正因子的测定个性化设置 –输入设备具体校正值±7.9,1/10增量人体工学设计 –带旋转头的紧凑外形设计,单手操作警示信息 –充足,电量不足自动关机 –最近设置,最后测得值保存910测光表DIGISKY潮、炫,高品质DIGISKY是一个与时俱进的测光表。
传承技术与产品特点的高标准,树立产品设计与行业使用新标准。
室内室外均可使用DIGISKY,测量平面或者球面,需要配一个可调整的漫射器。
DIGISKY能测试闪光和环境光的入射光、反射光,根据设置可以满量程,1/2、1/3增量显示。
DIGISKY能处理所有普通照明条件下的模拟、数字摄影,以及电影拍摄,并保持无以伦比的精度和久经考验的品质。
12摄影师的理想测光工具环境光测量,可预设定光圈优先或快门优先。
被摄物与照明对比度可测量。
对比度值被模拟、数字两种方式显示。
按下DATA键,可查询预选的光圈与快门组合速度的中间值,最大值和最小值,数据被传给需要做HDR摄影的照相机。
通过同步数据线或者无线模块可以触发闪光测量。
测量完成后,光圈值和最有效的闪光百分比率以指定的同步速度出现在显示器上。
同步速度被改变时,闪光对环境光的比率也受到影响,测光表自动计算光圈值和闪光照度百分比。
对于调整补充闪光和柔和环境光,这一功能非常有用。
在这个功能模式中,多达4组闪光被选择,8个无线电频率触发。
能分成多种不同的摄影套装。
假如曝光表能够无线控制Elinchrom RX和BXRI闪光灯头的功率,就省掉了额外的闪光灯头或者远程控制。
只要闪光灯制造商使用Elichrom Skyprot通用无线电协议,DIGISKY 很容易被触发并实现测量。
13技术参数人体工学设计–鲜亮显示 – 程多语种选择 –综合测量方法–灵活的环境光测量–被摄物对比度调节 –综合闪光测量–电影制作功能–个性化设置 –人体工学设计 –Dynamic change –Always up to date –Modern power supply –Extremely long rechargeable battery life –电影摄像师的理想CINE表完美的人体工学设计14专业、高性能的测光表STARLITE 216综合闪光测量 – 程调节同步速度,闪光曝光测量,环境光比和多闪光计算值显示对摄像师的CINE功能–光圈值决定了片速2~360 fps,张角5°~355°,照度或亮度测量双重ISO敏感性–仅按下一个键,光圈值/快门速度组合转换个性化修正 –条目或测量值范围±9.9修正以1/10的分辨率独特的人体工学设计–高实用性单手操作,通过环形按键选择功能,通过旋钮设置,通过DIP开关选择高级功能自动显示照度 –在黑暗环境中确保易读性多种警示 – 电池水平,过量或者过低显示自动关机 – 最近设置及最后测量值被保存适合户外使用 – 机身防溅水设计1924TECHNICAL DATAM e a s u r i n g F u n c t i o n s P h o t o g r a p h yM e a s u r i n g F u n c t i o n s P h o t o m e t r yf-stopsDIGISIX 2H262A ■■■■硅光电二极管■Approx. 25°EV 0 to 181/2000 sec. to 4 min.f/1 to f/32DIGIFLASH 2H263A ■■■■■硅光电二极管■Approx. 25°EV 0 to 181/2000 sec. to 4 min.f/1 to f/32T e c h n i c a l D a t aSIXTOMAT F2H264A ■■■■■■■■■硅光电二极管■Approx. 25°EV -2.5 to 18+/- 0,1 LW1/8000 sec. to 60 min.f/1 to f/90型号订货号环境光入射光计量方法反射光激光方法预设光圈或快门优先对比度测量中间值产生区域测量闪光(非线缆)闪光(非线缆-无线电)选项按钮组/通道闪光(有线)环境光比率显示多种闪光计算照度测量亮度测量闪光光照强度闪光亮度测量传感器旋转头球形漫射器扁平漫射器反射光测量入射角反射光测量1°,5°环境光测量范围反射光测量5°反射光测量1°重复精度曝光时间21 DIGIPRO F2H261A■■■■■■■■■硅光电二极管■■25°EV -2.5 to 18± 0,1 EV1/8000 sec. to 60 min.f/1 to f/90.9DIGISKYH260A■■■■■■■Elinchrom (Skyport and SKYPORTspeed)All, 1 to 4 / 1 to 8■■0.5 to 199900 lx0.05 to 50000 fc0.2 to 30,000 cd/m²0.05 to 9000 fL入射反射光修正硅光电二极管■■20°EV -2.5 to 18.5± 0,1 EV1/8000 sec. to 30 min.f/0.5 to f/128H258A■■■■■■■■■■■0.5 to 199,900 lx0.05 to 50000 fc0.2 to 30,000 cd/m²0.05 to 9000 fL2 to 30,000 lx*s0.2 to 3000 fc*s0.3 to 1800 cd*s/m²0.1 to 500 fL*s入射反射光修正硅光电二极管■■■■EV -2.5 to 18EV 0 to 18EV 2 to 18± 0,1 EV1/8000 sec. to 60 minf/0.5 to f/12826TECHNICAL DATAT e c h n i c a l D a t aM i s c e l l a n e o u sDIGISIX 2± 3.0ISO 6 to 3200 in 1/3 increments ■1 sec. to 30 min.Switchable between 12 and 24 hours ■5 min. per year °C or °F can be selected -15 to 70 °C or 5 to 160 °F ± 2 °C or ± 4 °F ■Digital LCD panel and setting ring 3 V lithium battery, CR 2032■-10 to 60 °C / 14 to 140 °F 75 mm x 50 mm x 23 mm 2.95 x 1.97 x 0.91 inch 40 g / 0.088 lbs incl. battery Case, carrying strap, battery and operating instructionsMounting clip for camera shoes, order no. V069ADIGIFLASH 2f/2 to f/321 to 1/500 sec. incl. 1/90 sec.± 3.0ISO 6 to 3200 in 1/3 increments ■1 sec. to 30 min.Switchable between 12 and 24 hours ■5 min. per year °C or °F can be selected -15 to 70 °C or 5 to 160 °F ± 2 °C or ± 4 °F ■Digital LCD panel and setting ring 3 V lithium battery, CR 2032■-10 to 60 °C / 14 to 140 °F 75 mm x 50 mm x 23 mm 2.95 x 1.97 x 0.91 inch 40 g / 0.088 lbs incl. battery Case, carrying strap, battery and operating instructionsMounting clip for camera shoes, order no. V069ASIXTOMAT F2f/1 bis f/901 to 1/1000 sec. incl. 1/908 fps to 64 fpsincl. 25 fps to 30 fps (TV)± 7.91.0 to 240ISO 3.2 to 8000 in 1/3 increments ■Digital LCD panel1.5 V mignon, type AA ■120 sec.-10 to 50 °C / 14 to 140 °F 118 mm x 65 mm x 19 mm 4.65 x 2.56 x 0.75 inch 95 g / 0.21 lbs without battery Case, carrying strap, battery and operating instructions型号闪光测量范围 (at ISO 100/21°)反射光测量5°反射光测量1°闪光同步时间CINE 值矫正值延长因素胶卷敏感性测量值存储计时器时钟警报功能精度温度计测量范围测量精度最小最大值USB2.0软件升级充电功能内存显示器背景照明可调LCD 亮度可调关机时间选择语言电池/可充电电池自动电池监控充电电池寿命充电时间/充电器自动关机工作温度外形尺寸重量包含附件选购配件23DIGIPRO F2f/1 bis f/901 to 1/1000 sec. incl. 1/908 fps to 64 fps incl. 25 fps to 30 fps (TV) ± 7.91.0 to 240ISO3.2~8000 ,1/3增量■数字LCD1.5V干电池AA ■120 sec.-10 to 50 °C / 14 to 140 °F 150 mm x 65 mm x 19 mm 5.91 x 2.56 x 0.75 inch 100g,不包含电池包,带,电池,操作说明书DIGISKYf/0.5 to f/1281 to 1/1000 sec. incl. 1/902 fps to 1000 fps incl. 25 fps to 30 fps (TV) ± 5.0ISO3~16000,1/3增量■■■■1 filmmaking and 3 camera profilesTFT 彩色图示■50 to 100 % in steps of 10 % Off, 30, 45 or 60 sec.德语,英语3.7V锂电池,890mAh锂离子■无显示/关闭8小时,待机:45,关机:180秒,大约4周3小时Off, 60, 120, 180 or 240 sec.-10 to 50 °C / 14 to 122 °F 139 mm x 60 mm x 16 mm 5.47 x 2.36 x 0.63 inch 100g,包含电池包,带,可充电电池,充电器,USB 线,操作说明书CD 充电锂离子电池f/1.0 to f/128f/1.4 to f/128f/2.8 to f/1281 to 1/1000 sec. incl. 1/908 fps to 64 fps incl. 25 fps to 30 fps (TV)± 9.9ISO3~8000,1/3增量■数字LCD ■1.5V干电池AA ■120 sec.-10 to 50 °C / 14 to 122 °F 164 mm x 66 mm x 26 mm 6.46 x 2.6 x 1.02 inch 195g,不包含电池包,带,电池,操作说明书。