Roland R-1录音机说明书
Roland TD-25_中文说明书
* 当所有设备正确连接后,请确认按以下顺序开启设备电 源。设备开启顺序错误可能产生故障或损坏。
开启电源
1. 请将所连接有源音箱的音量调节至最低。 2. 请开启 TD-25 的 [POWER] 开关。
电源开启。
3. 请开启所连接有源音箱的电源并调节其音量。
* 本设备配置有电路保护,开启设备电源后需等待片刻(数 秒钟)才能正常操作。
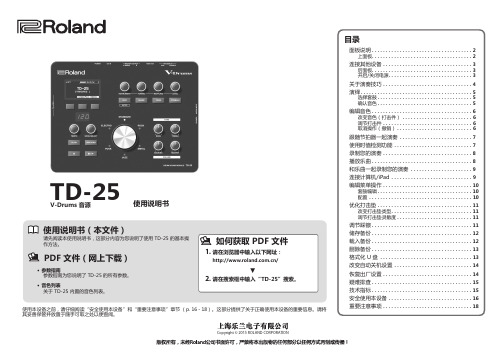
PHONES 接口
该接口用于连接耳 机(另购)。 即使您连接耳机, 音频信号同样将从 MASTER OUTPUT 接口输出。
AUDIO INPUT 接口
您可以连接音频播放器 并与您喜欢的乐曲一起 弹奏(或录音)。 从该接口输入的音频信 号将同样从 MASTER OUTPUT 接口和 PHONES 接口输出。
[SONG SELECT] 旋钮 [USB SONG] 按键
您可以选择 U 盘中的音频文件。 &p. 8
套鼓选择转轮
套鼓选择转轮用于选择套鼓。 按下套鼓选择转轮用于切换套鼓变化。&p. 5 按下套鼓选择转轮将使屏幕返回 KIT 界面。
打击件按键 当您按下任一按键,各打击垫的音色 将显示于屏幕中。 每当您按下 [TOMS] 和 [CYMBALS] 按键,打击垫将进行交替变化。 &p. 5
ROLAND M-200i说明书V1

请确保线缆安全 ● 请避免电源线与其它导线相互缠绕。此外,也
请让儿童远离电源线和导线。
106
请勿踩踏设备或在设备上放置重物 ● 请勿踩踏在设备上,也不要将重物放置在设备
上。
..............................................................................................................
ࡉڿ
110b
如有雷电天气请先断开连接 ● 若怀疑您所在的地区可能发生雷击,请将电源
插头拔离插座。
113
请小心使用锂电池 ● 请使用指定类型的锂电池( 型号CR2032)(p.
16)。请在插入时注意极性。
● 处理使用过的锂电池时必须符合您所在地区的 要求。
118d
将小物件放置于远离儿童的地方 ● 为了防止意外请将下述小物件放置于远离儿童
010
请勿在过高音量下使用设备
● 无论单独使用本产品或连接放大器、音箱或耳 机时,过大的音量可能会导致听力永久的损 害。请勿长期在过大音量或任何会导致不适的 音量下使用。如果您感到任何听力的损失或产 生耳鸣,请迅速求诊。
...............................................................................................................
007
● 请确保将设备放置于平坦之处使其水平稳固。 请勿将其放置于摇晃或倾斜之处。
ਖ਼ղ
008c
请使用产品附带的变压器。并确保电压正确。
● 请使用随机提供的变压器,并确认线路电压与 变压器上标明的电压相符。其它变压器使用的 电极或电压可能不同,使用不当将导致设备损 坏、发生故障或者电击。
QUAD-CAPTURE_中文说明书

安装驱动时的问题………………… 36 使用 QUAD-CAPTURE 时的 问题………………………………… 37 使用 SONAR LE 的问题………… 43 当使用 192kHz 设置时的限制…… 43 为避免问题改变计算机的设置…… 44
驱动程序签署选项设置 (Windows XP)…………………44 电源管理设置…………………… 45 系统“性能设置” (Windows)…………………… 46 设置系统音量…………………… 47 语音通信软件设置 (Windows 7)………………… 48 监听功能设置(Windows 7)… 48 重新安装驱动……………………… 49 删除驱动………………………… 49 驱动高级设置……………………… 51
基本使用方法…………………… 23
播放准备……………………………23 输出设备设置……………………24
录音准备……………………………25 调节输入电平……………………25 自动调节输入电平………………26 输入设备设置……………………27
控制面板的设置………………… 28
启动控制面板………………………28 设置前置放大器……………………29 设置压缩器…………………………30 设置混音输入………………………31 设置采样率…………………………31 从 COAXIAL OUT(3/4)接口 选择音频输出………………………32 保存和载入您的设置………………32
关于 CD 光盘 y 避免触碰或刮伤背面闪亮的表面。损坏
的光盘可能无法读取数据。请用市售
CD 清洁剂保持光盘的干净。
版权 2011 ROLAND CORPORATION 版权所有,未经 ROLAND CORPORATION 书面许可,严禁将本出版物的任何部分以 任何方式复制! Roland 是 Roland Corporation 在美国和/或其他国家的注册商标。
Roland R3 综合音模拟器说明书

E a s y S t a r t C O N T E N T SGetting Started:R3 Connections 2 Operation:Loading the Factory Data; Playing the Demo Songs; Customizing the R3 in Global Mode 2 Selecting and Editing a timbre 3 Assigning parameters to the 4 knobs 3 Jump/catch3 Multi-Mode Filter, Virtual Patching, MOD Sequencing 4 Arpeggiator, Vocoder 5 Formant Motion Recording, Creating your own programs, R3 Editor/Librarian 6 Shift Functions (7)R3 EasyStartGetting Started - Connections1.First, connect the AC power cable: a two-part cable.2.Make sure that the MASTER VOLUME dial is all the way down and then connect audio cables from theOUTPUT L/R jacks on the back of the R3 to your stereo powered monitor system (or connect headphones to the mini phone jack on the front).3.Press the ON button on the rear panel.Loading the Factory Data!Make sure to back up any of your own Programs and Formants via USB to your computer using the included Editor/Librarian before proceeding. See the R3 Owner’s Manual for more information.1.Press and hold the SHIFT key and press Program key #8, PROTECT.2.Rotate the PAGE dial counter-clockwise to “Off” and press the Program #8 key to confirm.3.Press and hold the SHIFT key and press Program key #7, PRELOAD.4.Rotate the PAGE dial clockwise to “All Data” and press the Program #7 key to confirm.5.Set Memory Protect back to “On” following Step 1.6.Rotate the PAGE dial clockwise to “On” and press the Program #8 key to confirm.Playing the Demo Songs1.Press and hold the SHIFT key and press the ARPEGGIATOR ON/OFF key - the R3 will automatically startplayback of eight Demo Songs in succession.2.Press any of the eight PROGRAM SELECT keys to jump to a particular demo.3.Press the EXIT key at any time to return to Program play mode.Selecting and Playing Programs1.Programs are organized from the factory in banks of eight by sound type > Select a category with the BANKdial.2.Press one of the PROGRAM SELECT 1-8 keys to play the sound indicated in the display.!Keep in mind that all 128 Program locations are User locations: any sound can be written / moved to any location!Check out these great R3 Programs:BANK/PROG NAME TRY WORKING WITH THESE REAL TIME CONTROLS: M-3 700s Lead [Analog] Knob 3: Portamento TimeC-3 Wired Lead [Unison] ModWhl: Osc 2’s Tune / Knob 3: LFO 1’s Freq.L-8 VPM Bass [VPM] ModWhl: Overtones/ Knob 2: Harmonic intensityG-5 CrossMod [CrossMod] Arp: On/Off / Knob 1: Mod DepthH-7 Glacial [Noise] Knob3:WS DepthH-6 Wave Seq [DWGS/Mod Sequence] Knob 1: Waveform SelectMotion] ModWhl: PW Mod / Knob 3: WS Depth O-2 Aliens [FormantP-3 Airy Voc [Vocoder] Use MIC / Knob 3: Noise Level / Knob 4: DelayR3 EasyStartSelecting and Editing a TimbreEach R3 Program can make use of up to two Timbres. A Timbre is a complete two-oscillator structure. The Timbre whose key is flashing is active for immediate sound editing. The page select dial gives you immediate access to 45 pages of parameters that can be edited using the 4 knobs.1.Choose Program A-1 Hypnotic.2.Press the TIMBRE 2 key and play with Knobs 1 and 2 (Cutoff and Resonance).3. A Timbre may be soloed for in-depth editing by pressing and holding the SHIFT key and pressing the desiredTIMBRE 1 or TIMBRE 2 key (The MAIN DISPLAY will momentarily show, “Timbre [#] Solo On”)4.Press and hold SHIFT and the same Timbre1 or 2 key to turn its solo function off (The MAIN DISPLAY willmomentarily show, “Timbre [#] Solo Off”)5.Rotate the PAGE SELECT knob to the desired page following the PAGE MENU printed on the front of the R3.6.Let’s choose “P30 Ins FX2”ing Knob #1, choose something drastic like “S. RingMd” (Ring Modulator) to hear just how far you can takea sound.8.Turn Solo off as in Step 4 above.9.Press the EXIT key to get to the outermost view of a Program with its name in the display.Assigning parameters to the 4 knobsAny R3 parameter can be assigned to any of the 4 knobs…1.Press and hold SHIFT and press FORMANT MOTION ON/OFF/KNOB ASSIGN > Notice that all four Knobdisplays flash, waiting to be chosen…2.Rotate Knob 3 and choose “NoiseLv” in the current example.3.Press FORMANT MOTION ON/OFF/KNOB ASSIGN to confirm the selection.4.Now rotate Knob 3 as you play our edited example, to bring a noise generator into the mix.Customize the R3 in Global Mode: Jump/CatchGlobal Mode allows you to make overall decisions for the instrument, like Master Tuning, Transpose, and Velocity Curve. Check out the Jump/Catch function in Global Mode:1.Rotate the PAGE SELECT knob to “P. 41, Global-B”.2.Rotate Knob #2, “Knob Mode” > Notice that there are two choices:Jump comes in handy for sound editing, when you need to hear immediate results as you move a knob:the selected parameter “jumps” to the value marked by the current physical location of the knob.Catch is useful for performance situations in which you may not wish to hear an abrupt value change:the selected parameter is not affected until you’ve turned the knob through its preset value.3.If you’ve made a change and want to keep it, turn off Memory Protect (Step 1 in the Loading the Factory Datasection), press the WRITE key and rotate the PAGE SELECT knob to select “Write Global”> Press theWRITE key twice.R3 EasyStartUsing the Multi Mode FilterFilter 1 of the R3’s two filters offers unique control over the filter type: it can actually generate a percentage blend of two filter types at once!1.Select Program B-2 RingBass.2.Rotate Knob 3, “FiltBal1” fully counter-clockwise, and slowly rotate it clockwise as you play:The filter smoothly morphs from pure -24dB/Oct Low Pass to a blend with -12dBP/Oct Low Pass; which then blends with High Pass; which then blends with Band Pass; which then blends with “Thru”, unfiltered signal. This smooth transition between filter types offers an unparalleled level of sonic possibilities. Virtual PatchingThe R3 provides six Virtual Patch routes that let you create more sophisticated sounds. Each patch lets you select a modulation source (Source) and modulation destination (Dest), and specify the intensity of modulation.1.Rotate the PAGE dial to P20: Patch 1: Virtual.2.Rotate Knob 1 to select “ModWheel” as Source 1.3.Rotate Knob 2 to select “Noise Lvl” as “Dest 1” (Destination 1).4.Rotate Knob 3, “P.Int 1” (Patch Intensity) fully clockwise to +63.5.Play the keyboard and push the Mod Wheel back, adding the noise generator in a fluid fashion to our sound.Modulation SequencingModulation sequencers allow you to change your sound over time and create dynamic and evolving patches. One modulation sequencer is provided for each timbre in the R3.1.We can animate the R3’s DWGS (Digital Waveform Generation System) wave selection choice, as well as anyother real-time modulation, and record it as a Mod Sequence.Mod Sequences can be recorded either in Program or Edit Mode.Here’s how to record one in Edit Mode…2.Rotate the PAGE SELECT knob to the number that has the parameter you wish to record.3.Select P05: OSC 1 for this example.4.Press the MOD SEQUENCE ON/OFF key to turn it on.5.Press the REC key: it flashes, and the LEDS around the BANK/PROGRAM SELECT dial light in succession.6.Hold a note on the keyboard down and rotate Knob 4, “Wave Sel” >The REC light automatically turns offafter the maximum 16 steps have been recorded.7.Now play a key and listen to the result: by recording a Mod Sequence of the DWGS Wave selection, we’ve justcreated a mini “Wave Sequence”!R3 EasyStart This Modulation Sequence is also editable:8.Rotate the PAGE dial to P27:ModSeq-B.9.Knob3 selects a Step number,and Knob 4 allows you to change the value for the chosen step.Working with the ArpeggiatorThe arpeggiator can be used to create sequences of notes based on the chords you play.The R3’s Arpeggiator can generate six types of Arp activity through up to four octaves of range, and is independently available to Timbre 1, Timbre 2 or both Timbres at once.1.Press the ARPEGGIATOR ON/OFF key to turn on the Arpeggiator.2.Rotate the PAGE dial to either P32 or P33, “Arpeg-A” or “Arpeg-B”.3.Try pressing some of the Program 1-8 keys, to turn Arp steps on and off in real time.4.Press the EXIT key when satisfied with just how much mangling and motion you can provide to any Program!Using the VocoderThe Vocoder Mode of the R3 is every bit as powerful as its big brother, the RADIAS synthesizer. Any Program can easily be “Vocoded”, and one of sixteen recordable Formant Motion phrases can be applied.1.Make sure the MIC switch(to the left of the included MIC) is in its lower, recessed position in order to workwith the included microphone.2.The AUDIO INPUT 1 knob allows you to optimize the level; intermittent green on the LED works the best.3.Select Program E-1, Strings.4.Press the VOCODER key, play some notes on the keyboard, and speak into the MIC: That’s it!The Vocoder’s tone is extremely editable via the PAGE dial (pages 34-39)…1.P37, Filter, Knob 1, “Frmnt Shift” quickly changes the character of the tone.2.P39 Lvl/Pan allows you to dial in separate level and pan for each of the 16 channels or frequency bands ofthe Vocoder! > (Knob 1 selects the Channel, Knob 2 set the level, and Knob 3 sets the pan).Besides the ability to turn any synth Program into a Vocoded one, there are 16 Vocoder Programs already optimized for your enjoymentR3 EasyStartRecording Formant MotionsThe R3 allows you to record your voice as a “Formant” so that you do not need the microphone to modulate the Vocoder’s carrier signal. R3 can store up to 16 Formant motions.1.Select Vocoder Program P-2, “PulseVoc”.2.Notice that the VOCODER key is already lit; press it once (it flashes).3.Press the FORMANT MOTION ON/OFF key (it lights up).4.Press the REC key (it flashes).5.Press REC again (it will be solidly lit) and immediately hold down a key on the keyboard and say something,up to 7 ½ seconds long.6.If the REC light hasn’t turned off by exceeding the allotted time, press REC and turn it off.7.Now play the keyboard and hear your phrase!The Formant Motion phrases are written to Global memory, so that any of the 128 Programs can attach to any one of the 16 phrases!Creating your own ProgramsBesides customizing sounds by editing a preset Program, the R3 also allows programming from an initialized state, allowing you to create Programs “from scratch”…1.To initialize any Program, press and hold SHIFT and press the Program #2 key, “Init Prog” (The MAINDISPLAY asks “Init OK?”).2.Press the Program #2 key to execute the Initialize command >Notice that Knobs 1 and 2 default to allowingyou to shape Filter 1’s Cutoff and Resonance.3.Rotate the PAGE dial to P13: Drive/WS:Drive and Wave Shape provide additional tools to make a sound more complex and edgy.4.Rotate Knob 1”WS Type” to select Drive.5.Rotate Knob 3, “WS Depth” to about 80; playing and listening to the results as Drive “saturates” the Ampstage.6.Leave Knob 3 parked where it is, and rotate Knob 1 to listen to the other Wave Shape choices: our InitProgram is taking on some mangled character!R3 Editor/Librarian SoftwareThe R3 ships with a CD-ROM containing the Korg USB MIDI Driver as well as a powerful, easy to use editor/librarian. Once the keyboard is connected to a computer via USB, the editor lets you freely edit Programs, sending sounds back and forth one at a time or in banks. The Editor is also handy for Formant Motion editing: its Global page provides a Normalize and Auto Trim function.For more information on working with the R3 Editor/Librarian, see the R3 Owner’s Manual.R3 EasyStart SHIFT Key ShortcutsThere are many useful functions that you can access by holding the SHIFT key and pressinganother key on the R3. Below is a listing of those functions.For more information on each function, refer to the R3 Owner’s Manual, starting on page 75.•Play Demos: SHIFT and ARPEGGIATOR ON/OFF•Calibrate a continuous pedal: SHIFT and ARPEGGIATOR LATCH•Solo a Timbre: SHIFT and TIMBRE 1 or TIMBRE 2 – Repeat to defeat•Audio In Thru: SHIFT and VOCODER•Knob Assign: SHIFT and MOD SEQUENCE/FORMANT MOTION ON/OFF – Press TIMBRE 1, TIMBRE 2, or VOCODER depending on which area of aProgram you wish to re-assign knobs.•Memory Protect: SHIFT and Program #8•Preload: SHIFT and Program #7and Program #1•Rename a Program: SHIFT•Initialize a Program: SHIFT and Program #2•Copy Timbre: SHIFT and Program #3and Program #4•Swap Timbre: SHIFT•Initialize Vocoder: SHIFT and Program #3 – when VOCODER is first selected for editing•Copy Effect: SHIFT and Program #5•MIDI Data Dump: SHIFT and Program #6 (Note: for MIDI Data Reception back into the R3, make sure Memory Protect is OFF, rotate the PAGE dial toP43:“MIDIfilt”and rotate Knob 4, “SystemEX” to “Enable”)For more information, see the R3 Owner’s Manual, and visit /R3 for more support, tips and tricks!。
Roland XP-10高质量音源说明书
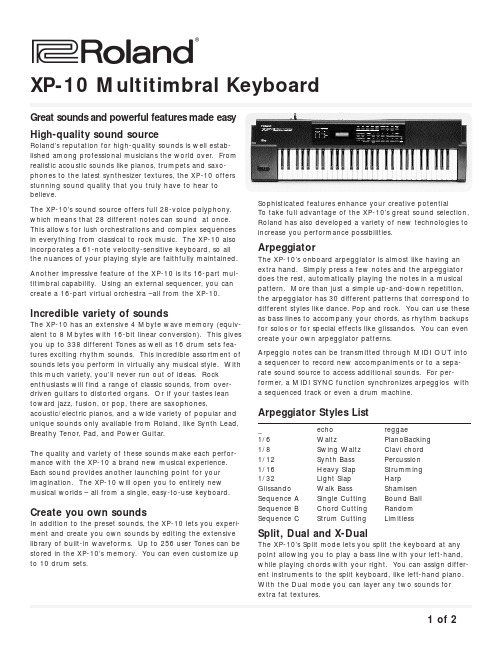
®ÂØÒňήXP-10 Multitimbral Keyboard1of 2Keyboard:61 keys (with velocity)Multitimbral capability:16 parts Max polyphony:28 voices Effect:Reverb (8 types), Chorus (8 types)Internal memory:Tones Preset: 338User:256Drum sets Preset: 16User: 20Performances Preset: 64User: 64Display:16 character, 2-line LCD Connectors:Output (L(moon), R), Phones,Pedal (used as both pedal switch and expression pedal), MIDI (in, out, thru), Computer IF (Mac/PC-1PC-2), DC InPower supply:AC adapter Power consumption:360 mA Dimensions:1034 (W) x 296 (D) x 94 (H) mm40-3/4 (W) x 11-11/16 (D) x 3-3/4 (H) inchesWeight: 5.0 kg/11 lbs 1 oz Accessories:Owner’s manual, AC adapterOptionsPedal Switch DP-2/6Foot SwitchFS-5U (Boss)Expression Pedal EV-5Keyboard Stand KS-8Keyboard StandKS-12ArpeggiatorOctave range:-3 ~ +3 oct Sync source:Internal, MIDI Key velocity:Fixed (1~ 127)RealGroove ratio:0 ~ 100%Shuffle ratio:50 ~ 90%Tempo:20 ~ 250 bpm Styles:30Motifs:33Beat patterns:52STYLES (See Arpeggiator Style List)MOTIFS:SINGL UP , SINGL DOWN, SINGL UP&DW, SINGL RANDM,DUANL UP , DUAL DOWN, DUAL UP&DW, DUL RANDOM,NOTE ORDER, GLISSANDO, CHORD, BAS+CHORD~5M BASS+UP 1~5, BASS+UP 1~8, BASS+RND 1~3, TOP +UP 1~6BEAT PATTERNS:1/4, 1/6, 1/8, 1/12, 1/16 1~3, 1/32 1~3, SEQ-A1~6, SEQ-B1~4, SEQ-C1~2, ECHO1~3, MUTE1~12, CUT1~2, REGGAE, REF1~2, PERC1~4, WALKBS, STRUM 1~2, HARP , BOUND, RANDOM*Appearance and specifications subject to change without notice.®ÂØÒňÎXP-10 Multitimbral Keyboard cont.®2of 2The X-Dual mode is an innovative variation of this capabili-ty. With X-Dual, the two sounds that you layer can interact in different ways. For instance, you can “morph” one sound so that I gradually changes into the second sound.Or you can integrate the two sounds using the modulation lever, an external pedal or the XP-10’s Combination Palette.Combination PaletteThe Combination Palette provides two sliders that give you realtime control over various settings on the XP-10. For instance, in Dual mode you can modify sound parameters in realtime. While in X-Dual mode, you can expressively modify the way the two tones interact. You can also use the Combination Palette’s sliders to instantly change the tempo, shuffle ratio or groove ration of the arpeggiator.User-friendly operationDespite having a range of professional functions, you don’t have to be a pro to enjoy the XP-10. The ergonomic layout of the controls in intuitive and logical, so you can get start-ed right away without even cracking the owner’s manual.A 16-character x 2-line LCD makes it easy to step through functions without getting lost and the convenient onboard sliders make adjusting parameters a simple process.Compact, lightweight designThough it’s packed with features, the XP-10 is surprisingly lightweight and portable, letting you take it just about any-where, from parties to school functions to onstage perfor-mances.The serious choice for both professionals and beginnersThe XP-10 Multitimbral Synthesizer is professional quality keyboard that combines great sounds with user-friendly operation in a compact design. Whether you’re an experi-enced pro or an excited novice, the XP-10 makes it easy to create outstanding music. Despite its easy operation and affordability, the XP-10 doesn’t compromise on quality.Roland’s vast experience producing professional musical instruments affords the unique ability to create a keyboard which is ideal for beginners, you retains the quality and functionality that serious players demand.Specifications。
Roland MP-100 中文说明书

演绎 . . . . . . . . . . . . . . . . . . . . . . . . . . . . . . . . . . . . . . . . . . . . . . 9 演绎各种音色 . . . . . . . . . . . . . . . . . . . . . . . . . . . . . . . . . . . . 9 切换音色. . . . . . . . . . . . . . . . . . . . . . . . . . . . . . . . . . . . 9 演绎双重音色 . . . . . . . . . . . . . . . . . . . . . . . . . . . . . . . . . . . . . . . . . . . . 9 左右手演奏不同音色 . . . . . . . . . . . . . . . . . . . . . . . . . . . . . . . . . . . . . 9 双钢琴演奏 . . . . . . . . . . . . . . . . . . . . . . . . . . . . . . . . . . . . . . . . . . . . . . . . . . . 10 和节拍器一起演奏. . . . . . . . . . . . . . . . . . . . . . . . . . . . . . . . 10 改变节拍器的速度. . . . . . . . . . . . . . . . . . . . . . . . . . . . 10 改变节拍器的时值. . . . . . . . . . . . . . . . . . . . . . . . . . . . 10 改变节拍器的音量. . . . . . . . . . . . . . . . . . . . . . . . . . . . 10 调节音色. . . . . . . . . . . . . . . . . . . . . . . . . . . . . . . . . . . . . . . 10 添加混响. . . . . . . . . . . . . . . . . . . . . . . . . . . . . . . . . . . 10 添加合唱效果. . . . . . . . . . . . . . . . . . . . . . . . . . . . . . . 11 使用踏板. . . . . . . . . . . . . . . . . . . . . . . . . . . . . . . . . . . . . . . 11 移调 . . . . . . . . . . . . . . . . . . . . . . . . . . . . . . . . . . . . . . . . . . . . . . . . . . . . . . . . . . 11
罗兰 JUNO 新一代合成器说明书

Great Sound, Great Features, Great Price. . . JUNO!Roland's JUNO-series synthesizers are feature packed, portable, and affordable.JUNOs are easy to use, great sounding, and available to everyone.Thanks to their lightweight design and battery-power capability*, JUNO synths can be played anywhere.Get your hands on a new-generation JUNO and take your show on the road!* JUNO-Di and JUNO-Gi onlyStudioPlug in the Entire Band!StreetTravel Light, Play HeavyStageA New-Generation Synth for the Stage• High-quality multi-track recorder onboard; connect a guitar or microphone directly.• Built-in Rhythm T rack for songwriting, recording, and live performance.• Powerful multi-effects for guitar and vocal derived from top-of-line BOSS effects.Special Live Set: Layer/Split screen• Loaded with over 1,000 of the latest sounds, including 88-key stereo multi-sampled piano, rock organ, ethnic instruments, sound effects, and more.• Select sounds instantly with the touch of a button or play harmonies and riffs with one finger. It's friendly enough for a first-timer!Easy to Use and Packed with Cool Sounds• Built-in Song Player function lets you play music files for backing tracks.• Super Layer mode adds depth to your sounds.• Plug into a power outlet using the AC adaptor or play on battery power (eight AA batteries)* — great for street gigs! * Supports rechargeable nickel-hydride batteries.Loaded with Features that Make Playing Fun• Packed with great “stage-ready” sounds, including organs, electric pianos, brass, and more.• Newly developed weighted keyboard.• Onboard Song Player lets you play MP3s and WAVs as backing tracks.Born to Perform!• Equipped with a mic input (with phantom power) and dedicated reverb, this synth is all you need to play-and-sing on the street, in cafes, or on any stage.• Supports up to two optional SRX expansion boards so you can add new sounds.• Equipped with a USB jack for connection to a PC.Versatile Features for Expression & Expansion• Over 1,300 newly designed sounds optimized for live performance. These sounds shine onstage.• The Special Live Set provides rich, layered sounds that take full advantage of the JUNO-Gi. Steal the show with these jaw-dropping sounds!• Patch names are clearly displayed on the large LCD — great for gigs.• Song Player function, battery power, and other great features for live performers.Powerful, Cutting-Edge Sounds Onboard!8-Track Recorder OnboardNEWThe first JUNO synthesizer was born in 1981: The JUNO-6, a full-featured polyphonic synthesizer, set a new standard for price and performance. It quickly received worldwide acclaim.From the beginning, the JUNO concept has remained the same: great sound, great features, and great price.Decades of Affordable Quality.Roland JUNO Synthesizers — Making Waves Since 1981Why JUNO is the #1 Portable Synth Line:L et 'sGow it hJ UN O!The fact that many pro musicians use JUNO is testimony to its great sound quality!Great Sounds!The Song Player lets you play WAV and MP3 files stored on USB memory — great for backing tracks.Play Audio Files From USB MemoryChoosing sounds is a breeze with the dedicated sound-category buttons and value dial.Fast, Easy Sound SelectionHeavy synths can be a drag to carry around, but not the ultra-lightweight JUNO!Lightweight, Tough, and Ready to TravelJUNO-Di and JUNO-Gi can be powered via AC adaptor or battery power (eight AA batteries). Great for street gigs!Battery PowerThe large backlit LCD is easy to view in dark environments — great for live performance.Large LCD for EZ ViewingTwist the control knobs to vary sounds dramatically,and save your custom creations for instant recall.Turn Knobs, Make SoundsPlay along with vocals by plugging into the MIC input, or create “electro” voices with the built-in vocoder.Connect a MicrophoneExcite your audience with the D Beam controller, which lets you manipulate sounds by moving your hand over the beam.Steal the Show!JUNO-Gi makes to easy to record songs and live performances. Enjoy BOSS multi-effects and play along with guitar by plugging into the GUITAR/MIC input.Built-In 8-track Recorder and Multi-Effects!Keyboard61 keys (with velocity)61 keys (with velocity)76 keys (with velocity)Sound Generator Maximum Polyphony 128 voices128 voices128 voicesWave Memory64 MB (16-bit linear equivalent)128 MB (16-bit linear equivalent)128 MB (16-bit linear equivalent)Preset Memory Patches: 1,082 + 256 (GM2), Rhythm Sets: 20 + 9 (GM2), Performances: 64Live Set: 1,379, T one: 788 + 256 (GM2), Rhythm Set: 14 + 9 (GM2)Patches: 1027 + 256 (GM2), Rhythm Sets: 32 + 9 (GM2), Performances: 64User MemoryPatches: 128, Rhythm Sets: 8, Performances: 64, Favorites: 100Live Set: 256, Favorite: 100Patches: 256, Rhythm Sets: 32, Performances: 64EffectsMulti-Effects: 3 systems, 79 types, Chorus: 3 types,Reverb: 5 types, Mic Input Reverb: 8 typesMulti-Effects: 2 systems, 79 types, Chorus: 3 types, Reverb: 5 typesMulti-Effects: 3 systems, 79 types, Chorus: 3 types,Reverb: 5 types, Mic Input, Reverb: 8 typesSong Player Section File Format: Standard MIDI File (format-0/1), Audio File (WAV , AIFF , MP3)File Format: Standard MIDI File (format-0/1), Audio File (WAV , AIFF , MP3)File Format: Standard MIDI File (format-0/1), Audio File (WAV/AIFF/MP3)Digital Recorder Section——T rack: 8 (V-T rack: 64 (8 V-T racks per each T rack))* Up to 2 tracks can be recorded simultaneously,and up to 8 tracks can be played back simultaneously. *Details are below.——ConnectorsOutput Jacks (L/MONO, R): 1/4 inch phone type,Headphone Jack: Stereo 1/4 inch phone type,Mic Input Jack: 1/4 inch phone type,EXT Input Jack: Stereo miniature phone type,Hold Pedal Jack, MIDI Connectors (IN, OUT),USB COMPUTER Connector (supports USB MIDI)Output Jacks (L/MONO, R) (1/4 inch phone type), Headphone Jack (stereo 1/4 inch phone type),Song/Click Out Jack (stereo 1/4 inch phone type),Line Input Jacks (L, R) (1/4 inch phone type),Guitar/Mic Input Jack: Mic; 1/4 inch phone type or XLR type (phantom power),Guitar; 1/4 inch phone type (Hi-Z), Control Pedal Jack,Hold Pedal Jack, MIDI Connectors (IN, OUT),USB COMPUTER Connectors (USB Hi-Speed Audio/MIDI) (Use a USB cable and a computer with a USB connector that support USB 2.0 Hi-Speed.), DC IN JackOutput Jacks (L (MONO), R): 1/4 inch phone type,Headphone Jack, Song/Click Out Jack,Mic Input Jack: 1/4 inch phone type or XLR type (phantom power),MIDI Connectors (IN, OUT), Hold Pedal Jack,Control Pedal Jack, Patch Select Jack,USB COMPUTER Connector (Supports USB MIDI)Size/Weightmm: 1,008 (W) x 300 (D) x 104 (H), inches: 39-11/16 (W) x 11-13/16 (D) x 4-1/8 (H)/5.2 kg, 11 lbs 8 oz.(Excluding AC Adaptor)mm: 1008 (W) x 300 (D) x 105 (H), inches: 39-11/16 (W) x 11-13/16 (D) x 4-3/16 (H)/5.7 kg, 12 lbs 10 oz (Excluding AC Adaptor)mm: 1,251 (W) x 344 (D) x 112 (H), inches: 49-1/4(W) x 13-9/16 (D) x 4-7/16 (H)/9.8 kg, 21 lbs. 10 oz.(Excluding AC Adaptor)OtherPhrase/ArpeggioPreset: 128Preset: 128, User: 64Preset: 128, User: 128Rhythm Pattern Preset: 24 groups x 6Preset: 371, User: 99, Song (Digital Recorder): 99Preset: 256 (26 groups), User: 256 (32 groups)Chord Memory Preset: 17Preset: 17Preset: 64, User: 64ControllersD Beam Controller, Pitch Bend/Modulation Lever, Sound Modify Knob x 5D Beam Controller, Pitch Bend/Modulation Lever, S1/S2 Buttons,Sound Modify Knob x 6D Beam Controller, Pitch Bend/Modulation Lever, S1/S2 Switches,Sound Modify Knob x 7Display18 characters 1 line + 20 characters 2 lines, custom LCD (with backlit)240 x 64 dots graphic LCD (with backlit)240 x 64 dots graphic LCD (with backlit)Expansion Slot ————SRX expansion board: 2 slotExternal Storage USB MEMORY (supports USB 2.0 Hi-Speed Flash Memory)SD/SDHC CardUSB MEMORY (supports USB 2.0 Hi-Speed Flash Memory)Power/Current Draw DC 9V: AC Adaptor or Ni-MH AA SIZE Rechargeable Battery (optional) x 8/600 mA *Carbon-zinc batteries or alkaline batteries cannot be used.DC 9V: AC Adaptor or Ni-MH AA SIZE Rechargeable Battery (optional) x 8used./750 mA*Carbon-zinc batteries or alkaline batteries cannot be used.DC 9 V (AC Adaptor) /2,000 mAAccessoriesCD-ROM (Sound Editor, Librarian, Playlist Editor,USB Driver), USB Memory Protector, AC Adaptor (PSB-1U)Quick Guide, CD-ROM (USB Driver), DVD-ROM (Cakewalk PPP),SD Card (2 GB, installed in the JUNO-Gi when shipped from the factory),SD Card Protector (installed in the JUNO-Gi when shipped from the factory),USB Memory Protector, AC AdaptorCD-ROM x 2 (Sound Editor/Librarian/USB MIDI driver, SONAR LE),Music Player Pad, Music Player Cable, USB Memory Protector, AC Adaptor*JUNO-Gi details of digital recorder section Maximum Number Of Songs: 99, Memory Capacity: SD memory card (supports SDHC cards to a maximum of 32 GB) / Sample Rate: 44.1 kHz, Recording Time (conversion in one track); Card Capacity/Recording Times=1 GB/6 hours, 2 GB/12 hours, 4 GB/24 hours, 8 GB/48 hours, 16 GB/96 hours, 32 GB/192 hours *The maximum recording time (storage used) for one song is approximately 12 hours (2 GB). *The above recording times are approximate and for when only one track is used. For example, if you record using all eight tracks, the available time for each track will be one eighth of the time listed. *Since the 2 GB SD card included with the JUNO-Gi contains a demo song, the available recording time will be shorter than listed above. *With the Track Export function, a maximum of approximately 6 hours and 40 minutes worth of monaural data (approximately 3 hours and 20 minutes worth of stereo data) can be output. / Nominal Input Level: Line Input jacks; -10 dBu), Guitar/Mic Input jack; Guitar: -20 dBu/Mic: -40 dBu / Effects: Insert Effects; 3 banks (Guitar, Mic, Line), Mastering Tool Kit: Reverb*For JUNO-Gi and JUNO-Di onlyJUNO Series SpecificationsOptionsSeries HistoryThe JUNO-106 made its debut in 1983, and became a top-selling synthesizer. In recent years it has experienced a resurgence of popularity. In 2004,the JUNO-D was released with an expanded concept: supreme cost-performance with lightweight. Write, record, and perform from any location. Never before has JUNO been more accessible and versatile.JUNO-6 1982JUNO-106 1984JUNO-D 2004Visit us online at Printed in Japan Jul. RAM-4628 ABF-2 GR-UPR-SSAll specifications and appearances are subject to change without notice.All trademarks used in this catalog are the property of their respective companies.Roland, BOSS, JUNO, JUNO-ST AGE, and COSM are either registered trademarks or trademarksof Roland Corporation in the United States and/or other countries.Carrying case for JUNO seriesCB-61JNStereo Keyboard AmplifierKC-110Battery-Powered Stereo Amplifier [MB-CUBE]MOBILE CUBEBattery Powered Stereo Amplifier [CUBE-ST/CUBE-ST-R]CUBE StreetCube Monitor [CM-30]CUBE MONITORKeyboard standKS-18ZKeyboard standKS-12Keyboard standKS-8Stereo HeadphonesRH-300Damper PedalDP-10USB MemoryM-UF2G*Actual D Beam is invisible.。
ROLAND SPD-S中文说明书

* CompactFlash 与 为 SanDisk 公司的商标,并且由 Compact-Flash 组织所 授权。
* Roland 为 CompactFlash 与 CF 商标 所认证授权的公司。 * Fugue ©2003 Kyoto Software Research 公司,版权所有。
编号:RSHM-2409
z 不要自行修理本设备,或换件(若 本手册有专门提示,要求这样做 除外)。所有服务事项,请向您购 买设备的商行、最近的乐兰服务
z 务必使用随机提供的交流适配 器。还要确保连接线路电压与使 用的交流适配器的电压相符。其 它适配器也许电极不同或电压不 同,如果使用,可能导致设备损 坏、故障或短路。
z 不要过分折叠电源线,不要在线 上压放重物,以免产生不良因素 或引起短路。损坏的电线易引起 触电和火灾。
插取记忆卡(袖珍闪存)…………………………………………………….. 23
插入记忆卡……………………………………………………………………………... 23 关闭操作系统后取出记忆卡………………………………………………………... 23
快速入门……………………………………………………………………. 24
z 每日用柔软干布或潮布擦拭。顽固污垢 用浸有中性无沙磨洗涤剂的布擦拭。然 后,用柔软干布彻底擦净。
z 请勿用苯、稀料、酒精或其它溶剂擦洗, 以免造成本机退色或变形。
维修与数据
z 请注意,机器送修时,机内保存的所有 数据都可能丢失。重要数据应随时备份 到袖珍闪存卡上,或尽可能记在纸上。 修理时小心不要让数据丢失。但是在有 些情况下(比如记忆相关电路断电)则 无法恢复这些数据,很遗憾,乐兰对此 不承担责任。
△是提醒用户注意重要提示或警告。符 号的特定意义由三角中的内容而定。左 边符号用于普通提示、警告或提醒注意 危险。
- 1、下载文档前请自行甄别文档内容的完整性,平台不提供额外的编辑、内容补充、找答案等附加服务。
- 2、"仅部分预览"的文档,不可在线预览部分如存在完整性等问题,可反馈申请退款(可完整预览的文档不适用该条件!)。
- 3、如文档侵犯您的权益,请联系客服反馈,我们会尽快为您处理(人工客服工作时间:9:00-18:30)。
编号:RSHM-2510
Copyright02005 ROLAND CORPORATION 版权所有,未经上海乐兰电子有限公司书面许可,严禁将本出版物以任何方式复制!
安全使用指南
避免发生火灾、触电、以及有害人身安全的指示
关于 WARNING 与 CAUTION 注意事项
用来提醒使用者本产品不当 WARNING 的使用可能会致命或导致严
y 当您将本机移至温度与湿度差异相 当大的场所使用时,可能会发生内部 水气凝结现象。因此请在使用之前先 静置数小时,直到水气消失再使用。
保养
y 日常保养请用柔软干布或微湿的布 轻轻擦拭。要去除顽垢污渍,请将布 沾上中性非溶蚀性的清洁剂。最后再 用柔软干布擦拭机体。
y 请勿使用苯、稀释剂、酒精或任何溶 剂以免造成机件损毁或变色。
■ R-1
■ AC 变压器
此为 R-1 专用 AC 变压器。请勿使用 其它变压器于 R-1。
“ 连 接 AC 变 压 器 与 开 机”(p.17)
■ USB 连接线 (mini B type:1 米)
您可以利用这条连接线将 R-1 与计 算机的 USB 进行连接。
“将 R-1 连接至您的计算机” (p.42) * 若 AC 变压器或 USB 导线受损,或是 您因故必须更换,请与 Roland 服务 中心联系。
y 本机的记忆卡插槽可以支持 CompactFlash 记 忆 卡 。 无 法 支 持 Microdrive 储存媒体。
y CompactFlash 记忆卡的结构使用了 精密的组件,请小心地使用记忆卡, 注意以下的要点。 y 为了避免静电使记忆卡受损,请 在拿起记忆卡之前,将您自己的 静电释放掉。 y 请勿接触或让金属物品接触记忆 卡的接触位置。 y 请勿弯折、掉落,或使记忆卡遭 受重击或震动。 y 请避免将记忆卡放在日光直射、 密闭车厢,或是类似地点(存放温 度:摄氏-25 至 85 度)。 y 请勿弄湿记忆卡。 y 请勿拆解或改装记忆卡。
4
重要注意事项
请参考除了“使用安全指南”所列的事项以外,请详读并遵守以下安全注意事项:
电力供应
y 请勿将本机使用在其它容易产生杂 音的装置之相同电路(例如电动马 达,或灯光系统等)。
y 当您使用一段时间后,AC 变压器会 有微热现象,这是正常的情况。
y 因为本机的电力消耗较高,建议您 使用 AC 变压器。若您想用电池,请 使用碱性电池。
y 请勿将本机使用于侵犯第三方的版 权之目的。若您利用本机来作为侵 犯他人版权之情事,我们恕无连带 责任。
重要注意事项
* Microsoft 与 Windows 为微软公司的注册商标。 * Windows®是指:”Microsoft®Windows®操作系统”。 * MacOS 是 Apple 计算机公司之注册商标。 * CompactFlash 与 是由 ComplactFlash 组织授权的 SanDiske 公司的注册商标。 * Roland 公司已获授权使用 CompactFlashTM 与 CF 商标( )商标。
y 要将本机运送到外国时,请装 置原纸箱或使用适当外包装。
y 电池请勿充电、加热、拆开、 或投入火或水中。
上海乐兰电子有限公司
3
y 请将本机或 AC 变压器,放置 于不影响其通风的场所。
y 将插头插入或拔离本机或是 插座时,请用手拿紧 AC 变压 器电源线的插头部分。
y 请定期拔下 AC 变压器,并使 用用干布清除插头的灰尘与 积聚物。此外,长时间不使 用本机时,请拔除电源插座。 任何堆积在 AC 变压器与电 源插座的灰尘可能会因为绝 缘不佳而导致火灾发生。
维修与数据
y 请注意内存中的数据可能会因维修 而流失。重要数据请记载于文书。维 修时我们会避免数据流失,但是某些 状况下(尤其内存本身电路故障),我 们很遗憾无法还原数据,Roland 对 于此类数据之流失恕无承担之义务。上海乐兰电子ຫໍສະໝຸດ 限公司5重要注意事项
其它注意事项
y 请注意内存中的数据可能会因为故 障,或是操作不当而导致流失。为 了避免损失您的重要数据,我们建 议您定期将您所储存的数据另存备 份或是记载为文字。
符号用以提醒使用者禁止做哪些 事。圆形中的图指示止使用者从事的 事项。当出现如左符号时,表示不可 以拆开重组该机件。 ●符号用以提醒使用者必须要执行的 事。圆形中的标志指示使用者该做的 事。当出现如左符号时,表示必须将 插头拔离插座。
………………………………………请随时遵循以下的指示……………………………………
y 若电池渗漏,请使用柔软 布料或纸巾,擦拭清除电 池座的残屑物。 再安装新的电池,为了避 免造成皮肤发炎,请确认 您的手部与皮肤没有电 池的残留物。请注意切勿 让电池渗漏液靠近您的 眼睛。若不慎接触眼睛, 请立即用清水清洗。
y 请勿将电池与金属物品 放置在一起,例如原子 笔、项链、发夹等。
y 废弃电池请遵从当地法规,回 收后进行安全处理。
y 当您的地区有打雷闪电的可 能时,请先将 AC 变压器自插 座拔掉。
y 若您使用不当,电池可能会爆 裂或渗漏液体导致损坏。为了 安全以见,请阅读并遵守以下 事项(p.18)。
y 请依安装说明方式谨慎 安装电池,并确认安装正 确的极性。
y 请避免同时混用新旧电 池。此外请勿混用不同种 类的电池。
y 长期不使用本机时,请取 出电池。
6
版权
y 未经授权,将第三方的版权之作品 的部分或全部(音乐、录像、广播、 公开演奏等等)作录音、分销、出售、 租借、公开演奏、广播等,为侵权 违法行为。
y 当您通过数字信号线来连接外接设 备作声音信号之传送时,本机可以 不 受 连 续 拷 贝 管 理 系 统 (Serial Copy Management System)(SCMS) 的约束传送数据。这是因为本机是 为音乐制作之目的设计,用于作不 违反他人版权的录音(例如录制自 己的作品)时不受到约束。(SCMS 是 一种不容许经由数字方式来作第二 次转录的防拷码。这种码内置于 MD 机以及其它消费性数字音频器材, 作为智能财产权保号之用途。)
y 本机遭到雨水淋湿(或其 它状况受潮);
y 本机操作不正常或是外 观上有显著的变化。
y 请注意家中幼童,成人应监 督儿童行为,直到他有能力 遵循必要的指示操作本机。
y 避免强烈的碰撞。 (请勿摔落!)
y 请勿将过多的电器与本产品 共享一个插座。在使用延长线 时请特别小心-您所连接在 延长线上所有设备的总功率, 绝对不可超过延长线所能承 受的功率。电流的超载会导致 导线发热,并熔解包覆电线的 绝缘皮。
y 请避免电源线与各种导线互 相缠绕纠缠。此外,也请让 儿童远离电源线与导线。
y 请勿踩踏在机器上方,或将 重物置放于机身上面。
y 手部潮湿时,请勿以手拿取 电源线或将插头插入或拔离 插座。
y 当您想要移动本机之前,请 将 AC 变压器与所有外部器 材的连接导线拔掉。
y 进行清洁工作之前,请关闭 电源,并将变压器拔掉 (p.17)。
■ CompactFlash 记忆卡(64MB) 您可以使用记忆卡,在 R-1 上作录音 与播放。 “记忆卡的使用”(p.23)
■ 保护套 您可以使用这个保护套,在移动或储 存时保护 R-1。
■ 使用手册 请将本手册放置在可随手取阅之处。
8
y 当安装或更换电池时,请关闭本机 的电源,并解除其它连接的设备, 可避免造成音箱或其它设备的机能 故障或受损。
y 进行其它设备连接之前,请关闭所 有器材的电源。这样可以避免造成 音箱或其它设备的故障或损坏。
放置场所
y 若本机邻近功放(或其它有大量电 流的器材)使用可能会产生杂音。为 了减低此现象,可以移动本机置放 方向,或移开干扰源。
24 bit WAVE/MP3 便携式数字录音机
中文使用说明书
在您使用本设备前,请仔细阅读下面章节:“安全使用指 南”与“重要注意事项”(第 3 页;第 5 页)。这些章节 提供了正确使用本设备的重要信息。此外,为了您更好掌 握本设备的全部功能,请仔细阅读本说明的全部内容。为 了便于参考请妥善保管本说明。
y 请务必使用附属的电源线。此 外,附属的电源线请勿使用于其 它设备。
y 请勿过度扭曲及弯折电源线,或 在上面放置重物。这样做可能会 损害电源线造成短路。损坏的电 线可能导致火灾与触电的危险!
2
y 无论单独使用本产品或与 功放、音箱、或耳机一起连 接使用时,过大的音量可能 会产生能导致听力永久的 损害。请勿长期在过大音 量,或任何会导致不适的音 量下使用。如果您感到任何 听力的损失或产生耳鸣,请 您尽速求诊。
y 使用本产品前,请先阅读以下指 示,以及使用手册。
y 请勿拆开(或修改内部)机器或 其变压器。
y 请勿自行修理或更换本机零件。 (除非本手册提供有安装选购配 备的指示)。请洽询 Roland 服务 中心。
y 请勿将本机放置以下场所:
y 过度高温的环境(例如,阳 光直射下的密闭车辆中、 或是邻近热输送管路处、 或是发热机上方);
y 储存至记忆卡内的记忆数据一旦流 失,就无法回复。Roland 公司恕无 承担资料流失之责任。
y 请小心使用按键、滑杆、或是其它 控制装置与各类接头、连接器。粗 蛮使用可能会造成损害。
y 请不要在显示屏幕上敲打或者施加 重压。
y 在正常操作之下,屏幕可能会有微 量噪音发生。
y 当连接或是移除各种连接线时,请 拿取连接头,切勿拉扯连接线。以 避免造成短路或是损害连接线内部 结构。
y 请勿将任何物品(易燃物、 硬币、别针等),或任何液 体(水、饮料等),掉入或渗 入机体。
y 当发生以下状况时,请立即 关闭电源,拔开在插座上的 AC 变压器,再向 Roland 维 修服务中心联络:
y AC 变压器、电源导线, 或是插头损坏;
y 冒烟或不寻常的异味;