TEAC录音座说明书
音频设备用户手册说明书

nAudio Remote ControlsVolume Switch (+/-):Press to adjust the volume.Left Selector Wheel:Roll up/down to cycle through the available audiomodes.n Adjusting the SoundAdjust various sound settings.USB Audio and AUX Input Mode1.Press the Home button.AUDIO AND CONNECTIVITY2.Select an audio source icon.3.Select SOUND.4.Select the setting you want.FM Radio, AM Radio, Sirius XM, and Bluetooth® Audio Mode1.Press the Home button.2.Select an audio source icon.3.Select Menu.4.Select Sound Settings.5.Select the setting you want.FM/AM Radio1.Favorite Station Icons, AddFavorite - Tune the radiofrequency for favorite station.Select Add Favorite to store thestation. Swipe left or right on thetrue touchpad A to diaplay thenext or previous favorite stationlist.2.Tune Up/Down Icons - Select tosearch up and down the selectedband for a station with a strongsignal.3.Station List - Select to display thestation list screen.4.MENU - Select to display thestation list screen.5.HD icon - Select to display thesubchannel list screen.6.Tune - Select to display themanual input screen of radiofrequency.7.Scan - Select to sample each ofthe strongest stations on theselected band for 10 seconds.SiriusXM ®*1Available on a subscription basis only. For more information or to subscribe,contact your dealer, or visit /subscribenow (U.S.) or www.sirius.ca/subscribe-now(Canada).1.(Seek/Skip) Buttons - Press to switch to the previous or next channel. Press and hold to rapidly skip 10 channels at a time.2.Category Icons - Select to change the category.3.Channels - Select to display the channel list screen.4.MENU - Select to display the Menu screen.5.Channel Up/Down Icons - Select for the previous or next channel.6.Album Art7.Favorite Channel Icons, Add Favorite - Tune the channel for favorite channel. Select Add Favorite to store the channel.Swipe left or right on truetouchpad A to display the next or previous favorite channel.*1 - If equippedAUDIO AND CONNECTIVITYBluetooth ®AudioPlay audio from your compatible phone when it is paired to Bluetooth®HandsFreeLink ®(see Pairing a Phone). Visit (US) to check phone compatibility. Canada customers can phone (855) 490-7351 for anyHandsFreeLink ®related inquiry.1.Track Icons - Select to change tracks. Select and hold to move rapidly within a track.2.Music Library - Select to display the music search screen.3.Bluetooth ®Indicator - Appears when your phone is connected to HFL.4.Repeat Icon - Select to repeat the current file.5.Play/Pause Icon6.Current Track Information -Select to display the play list screen.7.Random Icon - Select to play all files in the current folder in random order.n Searching for MusicApplicable laws may prohibit the operation of handheld electronic devices while operating a vehicle.Launch streaming audio on your phone only when safe to do so.AUDIO AND CONNECTIVITYAUDIO AND CONNECTIVITY1.Select Music Library. Array2.Select a search category (e.g.,Albums).3.Select an item.Note:•Make sure the volume on your phone is properly adjusted.•You may need to enable additional settings on your phone for playback.•The resume/pause function and remote audio controls are notsupported on all phones.。
胜利td v1卡座说明书
胜利td v1卡座说明书1、首次采用了机箱隔板镀铜处理结构,仓门应用了外形稳定器技术,进出仓的手感很好,同时在磁带运行的过程中可以吸收来自机芯的抖动,电动舱门!2、该机具有超大荧光显示屏,可以独立显示时间,计数方式,电平大小,峰值等等,多种操作信息。
美观实用。
3、手动偏磁微调调节功能,录音时可以随时调节音色。
4、手动电平微调调节功能,录音时可以对录音进行电平补偿。
5、石英锁相,数字脉冲伺服,走带速度更恒定,精确。
6、具备峰值电平保持显示器,可随时观察电平是否过载。
7、磁头放大应用了场效应管做磁头放大,声音柔和细腻。
8、耦合电容大部分采用了无极电解电容,解析力高。
9、采用AMORPHOUS非晶态耐磨磁头,硬度高,频响宽,不用担心磁头磨损带来的问题。
10、多种计数,计时显示切换,可随时观察磁带运行时间状态。
11、HX-PRO杜比动态扩展系统搭载,录音时打开该功能可提高高频的线性延伸。
12、长寿的大型ALPS铁壳电位器做电平控制,线性好,寿命长。
不会出现普通电位器常见的旋动带来的噪音问题。
13、直接驱动的大飞轮无刷电机。
运转噪音小,效率高,由于是无刷电机,寿命特长。
不用担心普通电机带来的电刷磨损的问题。
14、闭合环路双的主导轴结构,走带轨迹更精确,磁头和磁带结合更紧密的特点,录音抖晃率更低。
15、采用齿轮传动系统,无摩擦轮结构设计,具有快进,倒带有力的特点,最大限度的消除绞带现象。
16、信号处理部分采用镀铜的基板做屏蔽,最大限度的吸收外界干扰的能力,使得感应的噪音更低。
17、独立3磁头结构,具有监听功能,在录音时可以马上放音监听录音效果,以便随时调节录音效果。
18、马达的机芯设计,具有分工精细,可靠性更高的特点。
19、杜比B,C降噪系统搭载,杜比芯片为经典2片SONY20187,同时赋予铜皮屏蔽。
具有动态大,减噪效果明显的特点。
20、多组音源输入选择,镀金输出端子。
接触电阻小,最大限度的消除接触不良的现象。
Tascamdr07mkII中文说明书

Tascamdr07mkII中文说明书中文说明书感谢您购买TASCAM DR07MKII便携式录音机,请仔细阅读此说明以便最大限度地使用到DR07MKII的所有功能,我们希望您能尽情使用此设备。
此设备具备以下功能:A.手持便携式录音机B.可调节内置电容话筒的录音制式XY或ABC.可达到最高96KHZ/24BIT的WAVE PCM线性录音D.MP3录音指标可达到32-320 kbpsE.内置混响效果F.配音录制模式G.自动录音和自动标记功能H.峰值减少功能,优化的音乐录音,自动设定录音时的增益I.限制和低切滤波器,以帮助防止失真J.自动或手动电平设置K.自定义录音开始5或10秒。
在按下录音键等待,直到你准备好L.自动和手动追踪增益M.变速播放(50%-150%),而不改变音高N.循环和重复播放O.电平对齐功能可以防止在播放过程中不均衡的音量P.播放EQ设置Q.编辑功能(分离和删除)R.每个文件最多99个标记点S.音调调谐器T.1 / 8“立体声麦克风/线路输入B 2.0传输至PC和外部电源端口V.高达2秒预录音缓冲W.跳回到先前的点(1-10,20,30秒)X.1 / 8“耳机/线路输出Y.内置扬声器此设备原厂配有2节AA(5号)电池,也可使用AC变压器(可选:TASCAM PS- P515U)或USB总线供电,并装有2GB Micro SD (64MB-2GB)卡,同时可支持Micro SDHC (4GB-32GB)卡,默认录音为44.1KHZ,16BIT的WAV录音制式;并可通过USB与电脑连接,进行文件传输。
一、面板介绍前面板:1.内置的心形麦克;可调整为(打开)AB或(关闭)XY的录音制式;如果你要用外部麦克,可连接至后面板的MIC/EXT in接口,这时,内置的心形麦克失效。
2.峰值指示灯;亮起说明输入信号过大3.显示窗口;显示当前状态和信息4.开关机和停止/回到主页面;当在回放过程中按下时,则表示节目在当前播放位置下暂定;若在暂定时间段按下此键,则表示播放回到初始起点上;若在录音过程或待录状态下,按此键则会停止录音;当其他窗口打开时,按此键则会回到主菜单;在需要确认信息时,此键还代表“NO”(否定)的意思;长按此键代表开机和关机5.+ 加号键; 当显示主页面或调音界面时,按此键代表提高内置扬声器和外接耳机的音量;当回放控制窗口显示时,按此键代表提升回放速度;当设定界面显示时,按此键代表改变选定的项目6.MENU菜单键;当主页面显示时,按此键代表打开菜单界面;按此键可从任何设置界面返回到菜单窗口;当菜单界面显示时,再按此键代表返回到主页面;当轨道的进出时间点被选定和回放控制页面显示时,按此键会关闭循环回放状态7.向前倒带键;按此键代表将在节目中途播放或停止的状态返回到起始位置;当节目轨道的进出时间点被选定后,按此键代表取出这些点;如果节目停在开头,按下此键会跳到上一个节目,长按此键会从后向前寻找;同时按下此键和MARK标记键时,系统会跳到上一个标记点;在设置窗口中,使用此键可移动光标至左;在浏览BROWSE页面中,按此键则会提升一个级别;在录音或待录状态下按此键,则会衰减来自内置或外接话筒的输入电平,在调整过程中,屏幕也会随之反应8.PB CONT回放控制键;此键代表进入了回放控制界面,此界面显示时,再按此键会回复到主页面;在待录状态下按此键会关闭自计时器的功能或改变某点时间9.-减号键;当主页面或调音界面显示时,按此键代表衰减内置扬声器以及外接耳机的音量;在调整过程中,屏幕也会是指反应;当回放控制页面打开时,按此键会衰减回放速度,当设置页面开启时,使用此键来改变所设定的项目10.录音灯;在待录状态下此灯会闪烁,在录音时此灯亮起11.录音键;当节目停止时,按此键代表进入到待录状态,录音灯会闪;当在监听混合窗口下,输入时打开时,会弹出一个对话框问你是否打开配音状态;在待录状态下,按此键开始录音,录音灯为亮起状态;当录音时,按此键会暂停录音12.快速QUICK按键;在主页面,不管是回放,停止还是暂定或是待录,或者显示回放控制页面时,按此键会进出快速菜单页面,当按下此键时,会依照你的机器处于的哪种状态来定义功能:在停止时:按此键为当前歌曲的删除,分离或电平对齐回放或回放控制页面时:电平对齐待录:电平控制按此键会分离正在录音状态并建立新文件;当浏览窗口或播放列表状态显示时,按此键会显示或取消弹出文件或文件夹操作的窗口13.向后倒带键;在回放或停止时按此键会跳至下一首节目开头,当进出点设定为在当前位置到节目结束时,按此键会跳到那些点;长按此键会从前向后寻找;同时按下此键和MARK标记键时,系统会跳到下一个标记点;在设置窗口中,使用此键可移动光标至右;在浏览BROWSE页面中,按此键则会下降一个级别;在录音或待录状态下按此键,则会提升来自内置或外接话筒的输入电平,在调整过程中,屏幕也会随之反应14.播放键;当主页面回放停止时,按此键会开始回放;在回放过程中,按此键则会跳回到播放;当设置页面打开时,用此键来确认设定;当文件或文件夹在浏览窗口选定时,按此键会回到主页面,并且播放文件或从其文件夹的第一个文件开头开始播放15.MARK标记键:当录音时,用此键手动增加标记点;同时按下此键与和可分别移动上一个或下一个标记点的位置;当回放控制窗口打开时,使用此键可设定开始in 和结束out的区间以便在此位置循环回放,当开始结束点设定后,按此键可取消循环回放并且提出开始结束点底面板:16. 套环扣;可用套背环使用顶面板:17. MIC/EXT IN外部输入接口用此接口可连接至Mini立体声接口的话筒或外部输入设备,此接口可提供插入供电,并需要在输入设置窗口进行相关设定,若插入此接口,内置话筒将不起作用左侧面板:18. 耳机和线路输出接口;此接口可连接至耳机或带有任何模拟输入设备19. HOLD锁定键;向箭头方向移动可锁定所有的机器上的所有功能键,并使其所有功能键失效右侧面板:20.USB口可使用附送的USB线连接至电脑进行文件传输。
扩音喇叭录音说明书

扩音喇叭录音说明书
1、先将扩音器插入TF内存卡或者U盘。
2、开机后正确插入麦克风话筒。
3、切换到录音模式,短按“播放键”即可开始录音,开始录音后显示屏上的显示时间会跳动,是扩音器自动累计录音时间;录音过程中短按“播放键”可以暂停和恢复录音,长按“口”键2秒钟,扩音器会自动保存录音文件。
切换到音乐模式后,即可找到录音文件并播放。
4、注意:录音过程中,如果要结束录音,需要长按播放键2秒钟来保存录音,如果直接关机,那当前的录音文件不会保存。
录音笔说明书

数码录音棒 IC Recorder
操作说明
在使用产品前,请仔细阅读本使用说明书
开始 基本操作 各种录音模式 播放 / 删除 编辑信息 使用菜单功能 将 IC 录音机与电脑组合 使用 故障排除
制造商:索尼(中国)有限公司 地 址:北京市朝阳区东三环 北路霞光里 18 号 佳程大厦 A 座 25 层 产 地:广东省东莞市 产品标准:Q/CYSNC007
12
CS
存取数据须知
当显示窗口出现更新的动画信息,或 操作指示灯呈橙色闪烁或呈红色点亮 时,则表明 IC 录音机正在存取数据。 存取数据过程中,请不要取出电池。 否则可能会破坏数据。 注
若用 IC 录音机处理大量的数据,则更新的 动画信息可能会持续显示一段时间。这并 非 IC 录音机故障。 请等该动画信息消失后再开始操作。
CS
(录音 / 暂停)按钮 (15, 16, 19, 35) (停止)按钮 (16, 24, 25, 28, 31, 32) (提示 / 快进)按钮 (23, 24, 25) (播放 / 停止)按钮 (16, 23, 25) (回顾 / 快退)按钮 (16, 23, 24, 25) (重复)A-B 按钮 (23, 27) HOLD 开关 *3 DPC 开关 (23, 26, 36) 手提带开口(不附带手提带 )。 USB 护盖 扬声器 电池插槽 (11)
要 暂停录音 *
请 按 (录音 / 暂停) 。 在录音暂停期间,操作 指示灯呈红色闪烁,且 显示窗口中的“ ” 也将闪烁。 再次按 (录音 / 暂停) 。 将从该点恢复录音。 (暂 停后若要停止录音,请 按 (停止) 。 ) 按 。 录音停止,并从刚录制 的信息开头开始播放。 在录音或录音暂停过程 中按住 。录音停止, 此时可一边听快放的声 音,一边向后查找。松 开 后,将从该点开 始播放。
录音机初始设置指南说明书
Legal Notices
In the United States, TV GUIDE and other related marks are registered marks of Gemstar-TV Guide International, Inc. and/or one of its affiliates. In Canada, TV GUIDE is a registered mark of Transcontinental, Inc. and is used under license by Gemstar-TV Guide International, Inc. Aux Etats Unis TV GUIDE et d’autres marques relatives sont des marques déposées de Gemstar-TV Guide International, Inc. et/ou d’une de ses sociétés affiliées. Au Canada TV GUIDE est une marque déposée de Transcontinental Inc., utilisée sous licence de GemstarTV Guide International, Inc.
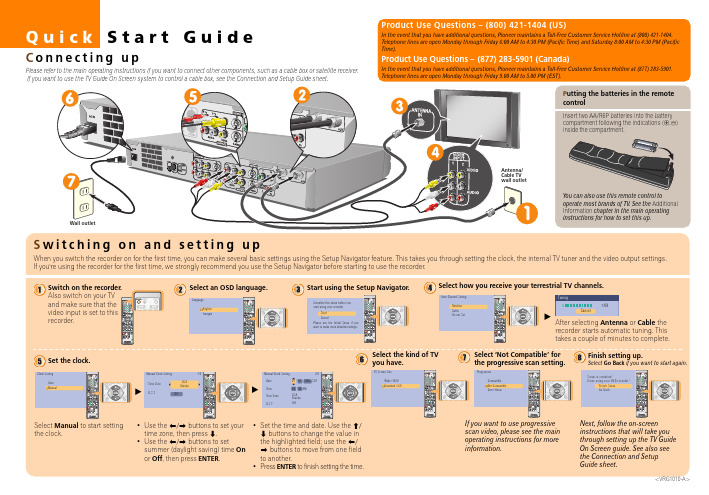
Quick Start Guide
Connecting up
Please refer to the main operating instructions if you want to connect other components, such as a cable box or satellite receiver. If you want to use the TV Guide On Screen system to control a cable box, see the Connection and Setup Guide sheet.
简约主义的DVD播放机——TEAC DV-3100VK DVD机

简约主义的DVD播放机——TEAC DV-3100VK DVD机逸敏
【期刊名称】《现代音响技术》
【年(卷),期】2001(000)005
【摘要】@@ 入行Hi-Fi稍久些的朋友相信不会对TEAC(东京电器声学公司的文缩写,又称"第一音响")这个品牌感到陌生,这家前身为"东京电视音频公司"的"老店"成立于1953年,至今差不多已有半个世纪的历史.早年的TEAC以磁记录技术称雄于世,即便是美国太空总署的航天飞机也使用了它的产品作为记录仪器.而在发烧圈,当年的许多用家都以拥有TEAC的卡式录音座为傲(还记不记得那个口碑甚好的V 系列卡座),可是音响界响当的名牌!
【总页数】3页(P29-31)
【作者】逸敏
【作者单位】无
【正文语种】中文
【相关文献】
1.松下新品DVD"知音"系列DVD之二松下DVD-Audio音视频播放机 DVD-RA671让声音看得见 [J],
2.雅马哈DVD-S2700·DVD-S1700 DVD播放机 [J], 闻多
3.天龙DVD-3910DVD/SACD、DVD-Audio播放机 [J], 秦欢
4.DVD时代的最终武器 Denon DVD-3930&DVD-2930 DVD播放机 [J], Roy
5.CELESTION DVD—K300Pro及DVD—K200 DVD播放机 [J], 叶新海
因版权原因,仅展示原文概要,查看原文内容请购买。
录音笔说明书

录音笔说明书录音笔说明书1. 产品介绍录音笔是一款用于录制音频的便携式设备。
它可以方便地记录会议、讲座、采访等场合的音频内容,并可以通过电脑或其他设备进行播放和编辑。
录音笔具有体积小巧、操作简便、音质清晰等特点,是广大用户进行音频录制的理想工具。
2. 功能特点2.1 高品质录音录音笔采用先进的音频处理技术,能够实现高质量的录音效果。
它配备了高灵敏度的麦克风,可以捕捉到细微的声音细节,保证录音质量的清晰度和还原度。
2.2 多种录音模式录音笔具有多种录音模式可供选择,以应对不同场景下的录音需求。
用户可以根据实际情况选择普通录音、会议录音、采访录音等模式,以达到最佳的录音效果。
2.3 大容量存储空间录音笔内置了大容量的存储空间,可轻松存储大量的音频文件。
用户无需担心存储空间不足的问题,可以自由录制和保存需要的音频内容。
2.4 USB连接功能录音笔支持通过USB连接到电脑或其他设备,方便用户进行数据传输和文件管理。
用户可以将录音文件快速传输到电脑进行编辑和存储,也可以将电脑上的音频文件传输到录音笔进行播放。
3. 使用说明3.1 开机与关机按下录音笔背面的电源按钮,即可开机。
长按电源按钮3秒以上,录音笔将会关机。
3.2 录音操作开机后,录音笔会自动处于录音待机状态。
按下录音按钮开始录音,再次按下录音按钮结束录音。
录音文件将会自动保存。
3.3 播放音频在录音笔主界面上,通过方向键选择需要播放的音频文件,按下确认键即可开始播放。
同时,可以使用方向键控制音频的前进、后退和快进等功能。
3.4 USB连接将录音笔与电脑或其他设备通过USB线连接,录音笔将会自动识别并与设备进行连接。
在连接状态下,可以进行音频文件的传输、管理和编辑等操作。
4. 注意事项4.1 音频文件的保存录音笔会将录制的音频文件保存在内置存储空间中。
为了防止意外数据丢失,建议定期将音频文件导出到电脑或其他存储设备中进行备份。
4.2 防止长时间不用电如果因为长时间不用电或未充电导致录音笔电量耗尽,再次使用时请务必充电至少30分钟以上,避免因电压不稳定引发的不良影响。
- 1、下载文档前请自行甄别文档内容的完整性,平台不提供额外的编辑、内容补充、找答案等附加服务。
- 2、"仅部分预览"的文档,不可在线预览部分如存在完整性等问题,可反馈申请退款(可完整预览的文档不适用该条件!)。
- 3、如文档侵犯您的权益,请联系客服反馈,我们会尽快为您处理(人工客服工作时间:9:00-18:30)。
TEAC V-5010录音机英文说明书important(for U.K. customers)The wires in this mains lead are colored in accordance with the following code: Blue: neutralBrown: liveAs the colors of the wires in the mains lead of this apparatus may not correspond with the colored markings identifying the terminals in your plug, proceed as follows:The wire which is colored blue must be connected to the terminal which is marked with the letter N or colored black. The wire which is colored BROWN must be connected to the terminal which is marked with the letter Lord colored RED.In the U.K, this unit is sold without an AC plug.1. Power switchpress to switch the deck on, the display window will be illuminated. Press again to turn the deck off.note: WHEN SWITCHING THE POWER ON AGAIN AFTER SWITCHING IT OFF,BE SURE TO WAIT FOR MORE THAN 3 SECONDS.2.REMOTE SENSOR(Remote Control infrared Signal Receptor)this receives signals from the provided RC393(v-5010) infrared remote control unit.3. Linear counterIndicates recording and playback time in minute and second.4. Mode indicatorCD sync: lights when cd synchro start is activated.Rec: lights in the recording mode and flickers during record muting.Play: lights during playback and recording.Pause: lights when the tape is stopped temporarily.5. Clear buttonPressing the clear button resets the linear counter to aero (0000).press this button before starting recording or play back.6. Tape length buttonSet this to minimize the error in the counter reading. (See page7.)7. RTZ buttonif this button is pressed, the tape is fast forwarded or rewound until a counter reading of00M00S is reached, then the deck stops.(see page 9)8.Cassette Holderload the cassette here.9.auto monitor buttonto change the monitor mode between source and tape, press this button. the monitor mode is automatically selected in accordance with the tape operation.10.mpx filter buttonpress this button when making a recording of an fm broadcast using Dolby NR, the indicator lights. This eliminates the pilot tone(19khz)and subcarrier tone(38khz)of the fm broadcastwhich could affect operation of the dolby noise reduction system. to release this function, press the MPX FILTER button again.11.DOLBY NR Selectoroff: set to this position when you do not want to use any noise reduction system.**B: set to this position when making a recording using the dolly B noise reduction system, or playing back tapes recorded with Dolby B NR.**C: Set to this position when making a recording using the Dolby C noise reduction system, or playing back tapes recorded with Dolby C NR.12. Multi-Display Window(a)PEAK LEVEL METERthis meter shows the peak level of the input or playback signal. the meter has a peak hold feature; when the level exceeds-/db, the peak level is held for approx.2 seconds.(b)Tape type indicatorTape type indicator above the meter indicates the type of tape being used, the v-5010 has an auto tape selector function, with which the NORMAL, CRO2 or METAL indicator lights when a tape is loaded.(c) Calibration indicatorLights together with "level/bias" in the calibration mode.(d)Dolby nr b c indicatorLights when the Dolby nr selector is set to the **B or **C position(e)**HX PRO: the Dolby HX Pro indicator lights during the recording mode, indicating that the Dolby HX Pro circuit in the deck is operating. This is engaged automatically whenever the deck is used for recording.(f)MPX FILTER IndicatorLights when the multiplex filter has been activated.(g)LEVEL/BIAS IndicatorIndicates the level (sensitivity) and bias when calibration is performed.(h) tape/source indicatorindicates whether the deck is set for tape or source monitoring.(I)level indicator(v-7010 only)the level shown by the PEAK LEVEL METER is indicated numerically from 0 to 12 db, when the level reaches 13 db or more, the OVER indicator comes on and the level 12 db stays lit until the power is switched off or the MARGIN RESET button is pressed.13. Tape travel operation buttonsSTOP buttonPress to stop tape travel and release the current operation mode.Play button ( )Pressing this button causes the tape to run at normal speed. This button is also used to release the pause mode.pause button( )press to temporarily stop tape travel during recording or playback. in the pause mode, the pause indicator lights. to release the pause mode, press this button again or press the ( )button to restart the tape (the indicator goes out).record buttonif the record button is pressed, the deck enters the rec/pause mode.the REC and PAUSE indicators light.to start recording, press the ( )or( )button( )rewind buttonpress this button to rewind the tape at high speed.( )fast-forward buttonpress this button to advance the tape at high speed.14.timer switchPLAY: for timer playbackOFF: set to this position when not using a timer.REC: for timer recording(see bage10.)15.--- ---(cps) buttonthis button is used to activate the CPS(Computomatic program search) facility. for details, refer to page 9.16.open/close button( )press this button to open or close the cassette holder. as this deck employs a power loading mechanism, opening and closing the cassette holder is possible only when the power is on. even if the holder is open, it closes automatically and the corresponding operation is performed when the (-)button, etc. is pressed. the cassette holder can also be closed manually.17.cd sync buttonthis button is pressed when CD synchro dubbing is performed.(see page 10)18. Rec mute buttonPress this button during recording to leave a blank section between tunes(approx.4seconds).the deck will enter the record-pause mode, (see page 8)19. Calibration level controlsCal start button:Press this button to start the calibration operation. For details, refer to "calibra-tion procedure" on bage 9.Bias controls:Used to adjust the bias current to obtain the optimum recording characteristics for the tape used.Level controls:Used to adjust the tape's recording sensitivity (level).20.CD CHECK BUTTONPress this button when checking CD level.(see page 8)21. BALANCE ControlAdjust the balance of the input signals between the left and right channels to be recorded on tape.22. CD DIRECT Buttonif the CD DIRECT button is set to the on (-) position, the signals supplied from a CD player to the CD DIRECT IN connectors will have priority over the LINE IN signals, and will be recorded.23. REC LEVEL (-dB) Control:When recording, turn the REC LEVEL control clockwise to fade the input sound in and turn itcounterclockwise to fade the sound out, for smooth tune-to-tune transitions24. PHONES JackPlug stereo headphones into this jack for private listening or monitoring.25. PHONES LEVEL ControlAdjust the level of the signals output from the PHONES jack. This knob does not affect the level of the signals output from the OUTPUT jacks on the rear panel or the level indicated by the PEAK LEVEL METER.26. MARGIN RESET (V-7010 only)Press this button to release the peak hold memory.Remote control unit27. DISPLAY ButtonPress this button to switch off the multi display and the linear counter indication (illumination).OperationsPlayback and recordingTape length buttonThe linear counter of this deck indicates the recording/playback time in minute and second. To minimize the error in the counter reading due to the difference in tape length (duration), be sure to press the TAPE LENGTH button until the appropriate tape length appears.When the TAPE LENGTH button is pressed, the linear counter will indicate the tape length. TAPE LENGTH*since the linear counter is not a clock, there is a discrepancy between the actual recording/playback time and counter reading.*once the power is switched off,"C-60" appears when the power is switched on again.*after setting is complete, the tape length is indicated for approx.5 seconds’, after that, the counter indication is resumed.*set the tape length again after a cassette with a different length is loaded or the power is switched on.Stereo playback1. Press the POWER switch to ON.2. Press the OPEN/CLOSE (-) button and load the required cassette.3. Set the tape length. (See previous section.)4. Select the required NR system.5. Press the (-) button to start playback.6. Adjust the volume with the amplifier's control.7. To end playback, press the STOP buttonStereo recordingRecording from a stereo system:1. Press the power switch to on.2. Press the open/close (-) button and load the cassette on which the recording is to be made.3. Set the tape length.4. Select the NR system used in recording.5. Press the MPX FILTER button as required.6. Set the BIAS/LEVEL controls to their center click positions.7. Select the input using the CD DIRECT select button.Note:Since the audio signal is directly input to the CD DIRECT IN terminal, clearer sound can be recorded.When the CD DIRECT select button is set to ON (-), the signal is input via the CD DIRECT IN terminal whereas if it is set to OFF (-), the signals are input via the LINE IN terminals.8. Play the source to be recorded.9. Press the RECORD button. The REC and PAUSE indicators light.10. Adjust the recording level.Using the REC LEVEL/BALANCE controls, adjust the recording level of each channel.11. Press the () or () button to release the rec/pause mode and start recording.12. To end recording, press the stop button.Notes:*as this deck has an auto tape selector mechanism, be sure to use cassettes with tape detection holes. if the cassette does not have a detection hole, the optimum results will not be obtained with chrome and metal tapes.*as c-120 tapes are physically weak and could become entangled in the transport mechanism, do not use them.CAUTION:recording pre-recorded tapes, records, or other published or broadcast material may infringe copyright laws. check before recording.checking CD levelthis is only possible with certain CD players, including the TEAC CD-P4500.When the CD CHECK button is pressed, the deck enters the monitor state (SOURCE),allowing you to adjust the recording level with the CD player in the "fast play back"mode.1.set the deck to the STOP mode,then press the CD CHECK button.the linear counter will indicate "cdch".2.start the CD player and set to the fast playback mode.3.during fast playback,adjust the recording level using the REC LEVEL control and BALANCE control.4. To release the CD level check, press the STOP button.*the checking of CD level is possible when this deck is in the stop mode.*recording level adjustment using CD level check is only possible when the CD player is in the fast play mode; do not perform this adjustment when the CD player is in the normal play mode. *some CD players do not output signals at the correct level in the fast play mode.adjusting recording levelby setting the recording level appropriately, it is possible to make best use of any tape's characteristics.if the recording level is too low, hiss noise will be conspicuous in recording, conversely, if it is too high, the recording will contain distorted sound.1. set the AUTO MONITOR button to SOURCE. in the recording or rec/pause mode, it is automatically set to SOURCE.2. So that the beak in the source to be recorded indicates the specified level on the REC LEVELcontrol and BALANCE control.when the level reaches 13dB or more, OVER will light.A level from 0 to 12 dB is indicated.press this to clear the peak hold indication.margin reset(v-7010 only)Record muting operationthe ability to leave blank unrecorded (erased) sections on a tape during recording is a real advantage in many recording situations. for instance, you may want to eliminate undesired portions of an FM broadcast that you are recording, such as commercials, station break or announcements. you may also want to record a complete program with controlled spacing between tunes. such blank sections can easily be left using the REC MUTE function.*Automatic spacing operation-for a 4-second blank-(during recording)press the REC MUT button during recording. the tape continues t run, and a bland or about 4 seconds is left (the REC indicator flashes).After 4 seconds, the deck automatically switches to the record-pause mode (both the REC and PAUSE indicators light). to start recording the next tune, press the ()or ( )button (the PAUSE indicator goes off).*For a blank of more than 4 secondsduring recording, keep the REC MUTE button pressed for a longer blank section release the button to enter the record pause mode.*For a blank or less than 4 secondsafter pressing the REC MUTE or PAUSE button before the 4-second interval has expired,to cancel the muting mode and engage the record-pause mode. to restart recording press the ( )or( ) button.calibration procedureEach cassette tape has different characteristics depending on the manufacturer and type. By properly adjusting bias and level (sensitivity) according to the tape. It is possible to record making the most of the tape's characteristics.1. Load the cassette to be recorded.2. Press the CAL START button.(CALIBRATION, LEVEL, () LIGH.)3. Press the RECORD and () buttons to start recording. The built-in test tone will be recorded.4. Adjust the LEVEL controls (of both the L and R channels) so that the meter deflection comes to the () mark.--------------------------------------------------5. Press the CAL START button once again.----------------------------------------------------------(LEVEL goes out and BIAS comes on.)6. Adjust the BIAS controls (of both L and R channels) so that the meter deflectioncomes to the () mark.--------------------------Now, the optimum bias and level (sensitivity) have been set.Press the STOP button to end the calibration.Erase the recorded test tone or rewind the tape and record over it.*stick a seal, etc. on the front panel around the LEVEL and BIAS controls to facilitate setting the next time you made a recording with the same type of tape.Cps (computomatic program search) functionCPS allows the selection and playback of any tune up to 15 tunes ahead or before the one being played. This function operates by detecting blank spaces of at least 4 seconds between tunes. These blanks can be created using the REC MUTE facility.1.press the ()or() button repeatedly until the number of tunes to be skipped appears in the multi-display counter. refer to the chart "how to select any required tune using CPS"*if you count past the required number, keep on pressing the CPS button as 1 appears after 15 is indicated.*when the () button is pressed, tee next tune is counted as "1" and when the () button is pressed, the current tune is counted as "1".-------------------How to select any required tune using CPSEx: see (1).to select the 3rd tune past the current tape position,select"3"---------------------------------------current tape positionDirection of tape travelAhead Beforein example (1),if "t" is less than 4 seconds, it will not be counted as a blank space, designate the 3rd tune in this case .2. As the tape is fast-forwarded or rewound and blank spaces between runes are detected. the displayed number will be counted down untl it reaches"1",at which point playback will start.Notes on CPSCPS operates by detecting and counting blanks of about 4 seconds, normally the intervals between tunes .therefore, with the following types of tapes, search functions may not work correctly.*when the intervals between tunes cannot be detected.-intervals of less than 4 seconds.-high levels of noise in intervals (due to recording old scratched records, poor FM or AM reception, etc .)separate sounds are recorded on the right and left channels as on a language learning tape, etc.when parts of the program are likely to be detected as intervals between tunes:--long low level sections (in classical music, etc.)--momentary pauses in a speech at a conference, etc.--continuing low level portions created by fading out, etc.*in the case of tapes containing fade-outs, because the length of the blanks can differ depending on how fading out was performed, some tune intervals may be detected and others may not.this problem can be corrected using the REC MUTE facility.RTZ(Return to zero) functionto locate the position on tape corresponding to the linear counter reading of 00m00s,press the RTZ button.the fast forward or rewind of the tape starts. the moment a counter reading of 00m00s is found, the deck stops.note: this function does not work when the deck is in the record, rec/pause or rec/mute mode.to start playback from 00m00sWhile the tap is running after the RTZ button is pressed, press the () button.The deck temporarily stops at the 00m00s counter reading, then playback starts.*if the () button is pressed instead of the () button, the deck enters the pause mode at the 00m00s counter reading.to start playback, press the () or () button.*when the deck is in the recording mode, the RTZ button is disabled.CD Synchro dubbingBy combining the deck with a CD synchro compatible CD player (such as our CD-P4500) which has a CD/DECK SYNC terminal on the rear panel, dubbing (recording) interlocked with the CD player is possible.Preparation1.connect the deck's CD/DECD SYNC terminal to the CD player's CD/DECK SYNC terminal using an optional cable (with miniplugs at both ends.(see page 4.)2.perform programming of "time edit", etc. of the CD Player beforehand (refer to the instructions of the CD player).3.Either press the CD DIRECT button or set the source to CD using the amplifier's source select buttons.4.Set the recording level.(see page 8)1.Set the deck and the CD player to the stop mode.2.press the CD SYNC button on the deck. the CD player will automatically start in approx.1 sec following the start of recording and dubbing is performed.(the CD SYNC indicator lights.)(see the top chart below.)to temporarily stop during dubbing:to temporarily stop CD synchro dubbing(A) press the STOP button of the deck. the CD player will return to the beginning of the tune and stop there. to restart, press the deck's CD SYNC button.(B) press the stop button of the CD player. the deck enters the rec/pause mode. to restart, press the CD player's play button.*when the CD player has entered the pause mode. it stands by after returning to the beginning of the tune just played.*when recording is done up to the end of the tape, the CD player stands by after returning to the beginning of the tune just played.(note) if the CD player is connected to the stereo amplifier by the optical cable alone, synchro dubbing i not per formed. be sure to connect the analog output using the pin plug cords.timer-controlled operations(fig.8)timer-controlled recording1.connect your deck and stereo system to a commercially available audio timer as shown in the diagram.2.set the audio timer(optional) to ON.3.set the power switches of all components to ON, then tune to the station broadcasting the program to be recorded.4. Set the input select switch, the REC OUT selector, ate .of the amplifier to TUNER(refer to the instructions of the amplifier).5.load the cassette to be recorded, then set the recording level, DOLBY NR,BIAS,LEVEL controls as required.6. set the audio timer to the required start (power on) and stop(power off) times. when this setting is complete, the power to all components will be switched off.7. set the TIMER switch to REC.When the preset start time is reached, power will be supplied and recording will start.timer-controlled playback1.connect the power cords of all components as shown in the diagram.2.set the audio timer(optional) to ON.3. Set the stereo amplifier to TAPE.4. load a pre-recorded tape into the deck, then set the DOLBY NR as required.5. set the audio timer tor the required start (power on)and stop (power off) times. After these settings, the power to all components will be switched off.6. set the TIMER switch of this deck to PLAY.*when the preset start time is reached, playback will start in a few seconds.*be sure to set the TIMER switch to OFF upon completion of timer-controlled recording/playback.remote controlled operation (figs,4 and 5)the provided RC=394(V-7010) or RC-393 (V-5010) remote control unit allows the V-7010/V-5010 to be operated from a distance. the control buttons on the remote control unit function in almost the same way as those on the front panel of the V-7010/V-5010, but they have slightly different names, etc.precautions on remote control operation (fig.4)1.battery replacement1. remove the lid.2.insert 2 "AA" type dry batteries. be sure that the batteries are inserted withtheir negative and positive terminals positioned correctly.3. close the lid until it clicks.how often should the batteries be changed?the batteries will normally last about six months. however if you notice that the distance between the remote control unit and the V-7010/V05010 required for operation becomes shorter, the batteries should be changed. replace the batteries with two new ones.precautions regarding batteries*be sure to insert the batteries with the positive(+) and negative(-) terminals positioned correctly.*never use old and new batteries together.*replacement batteries should be of the same type. never use batteries of different types together.*rechargeable and non-rechargeable batteries can be used. refer to their precaution labels.*remove the batteries from the remote control unit when it will not be used for a long period of time.*when the batteries are weak, replace them as soon as possible.*do not heat or disassemble batteries and do not dispose of them by throwing them into a fire.2. remote control unit RC 394 or RC-393when operating using the remote control, point the front of the unit at the remote sensor of the V7010/V5010. The remote control unit can be used within the range shown in Fig.5.notes:*even if the remote control unit is operated within the effective range, remote control operation may be impossible if there is any obstruction between the V7010/V5010 and the remote control unit.*if the deck is operated in the vicinity of other appliances generating infrared rays. or if other remote control devices using infrared rays are used near the V-7010/V-5010, the deck may operate incorrectly. conversely, if the V-7010/V-5010's remote control unit is operated in the vicinity of other appliances which use an infrared remote control device. the other appliance may operate incorrectly.*When the unit will not be used for a long period of time (more than one month), remove the batteries to prevent them from leaking, if they do lead, wipe off the liquid inside the battery compartment and replace the batteries with new ones.*do not place books or other objects on the remote control unit as they could press the buttons and discharge the batteries.Dolby HX pro is an "active bias" technique that can improve the quality of audio tape recordings. high-level high frequencies can be recorded more accurately, without sacrificing signal-to-noise ratio, while such side effects of tape saturation as distortion are reduced.what is bias?bias is a very high-frequency signal generated within a tape deck and recorded on the tape simultaneously with the program material. this inaudible signal allows a low noise, low distortion recording and flat frequency response. different magnetic tape formulations require different amounts of bias for optimum performance. if the bias level is too high, high-frequency maximum output level (MOL) decreases. the problem of self-biasunfortunately, bias level is often influenced by the signal being recorded. the high frequencies contained in some music act as bias. this unpredictable source of bias is added to the existing bias, resulting in a loss of high-frequency response. as the high frequency content of the signal increases, the ability of the recorder to record high frequencies (MOL0 decreases. this phenomenon is called self-biasing.How Dolby HX pro solutionThe Dolby HX pro monitors the high frequency content of the program material and adjusts the recorder bias oscillator to maintain a constant total bias oscillator to maintain a constant total bias level. The result is improved high-frequency response and lower distortion. Depending on the type of tape, the improvement in headroom can be 6 dB or more.The benefitsWith Dolby HX Pro, it is easier to make more accurate recordings of the kind of music which contains high-level high frequencies. The improvement is similar to that of high-performance tape over conventional tape, so regardless of the type of tape used, the results will sound better.Most important of all, Dolby HX pro requires no decoding process. Once the tape is recorded with it, the improvements will be realized when playing the tape back on any machine.Example of improved frequency response using Dolby HX Pro function图:Maintenance (fib.7)The heads and tape path should be cleaned and demagnetized periodically.Cleaning the tape path*apply head cleaning fluid *to special cotton swabs or a soft cloth, and lightly rub the heads. Capstans and all metal parts in the tape path.*also clean the pinch rollers using rubber cleaning fluid**both are available as TEAC HC-2 and RC-2 in the U.S.A.or in the TEAC TZ-261 Tape Recorder cleaning kit in other areas.demagnetizing headsbe sure that the power is off, then demagnetize the heads using a TEAC E-3 demagnetizer or equivalent. for details of its use, read its instructions.troubleshootingbasic troubleshooting of a cassette tape deck is similar to troubleshooting any other electrical or electronic equipment. always check the most obvious possible causes first. to give you a few ideas of what to look for, check the following:.no power: is the power cord connected?.tape begins running when power is turned on. is the TIMER function switched on?.no audio output: have all connections been done correctly?.degraded sound quality: are the heads dirty or magnetized? are you using good quality tape? is the NR selector in the correct position?.unable to select the record mode: are the record protection tabs of the tape in place? TEAC V-5010录音机英文说明书重要的(英国客户)此电源线中的导线的颜色均按照下面的代码:蓝色:中性布朗:活导致该设备的电源线中的颜色可能与颜色标记的插头端子,请按以下步骤操作:是蓝色的电线必须连接到的终端,其被标记为与字母N或黑色。