iMC产品升级业务指导书V1.55
H3C-iMC-用户手册

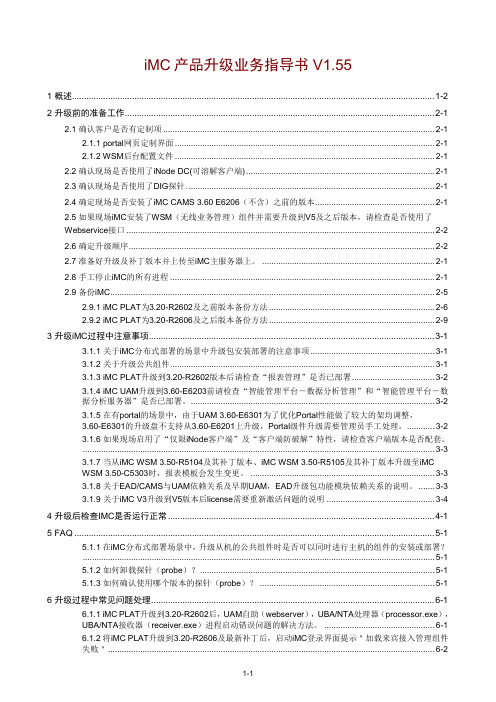
2.2.1 访问iMCiMC 采用 B/S 结构开发,用户访问时无需安装任何客户端,直接在Web 浏览器的地址栏中输入 iMC 服务器的URL 即可,URL 如下:•http://<IP 地址>:<端口>/imc iMC 的默认 HTTP 端口为 8080•https://<IP 地址>:<端口>/imc iMC 的默认 HTTPS 端口为 8443•HTTPS即安全超文本传输协议,采用这种方式登录iMC,可以更好的保证信息在交互过程中的安全性。
通过HTTPS方式访问iMC时,如果使用的是IE7.0 或以上版本的浏览器,可能会提示证书错误,请参考第五章常见问题解答进行处理。
•如需限制 iMC 只能通过 HTTPS 方式访问,在<iMC 安装目录>\client\conf\下找到 applicationContext.xml 文件,用文本编辑器将<property name="protocols" value="HTTP,HTTPS"/>修改为<property name="protocols" value="HTTPS"/>即可。
图2-1 登录页面在登录页面中,输入正确的操作员和密码后单击<登录>按钮,即可进入系统首页。
•首次登录系统时,可使用默认的操作员登录。
登录名和密码均为admin。
进入系统后请及时修改该密码。
修改方法请参见第五章常见问题解答。
•在 iMC 中可以根据需要增加不同权限的操作员。
具体配置方法请参见产品附带的联机帮助。
•iMC支持登录时输入验证码功能。
管理员可通过修改配置文件开启该功能。
关于如何开启验证码功能,请参见第五章常见问题解答。
iMC 对浏览器的基本要求如下:表2-1 对浏览器的基本要求条件详细说明iMC 支持哪些浏览器?推荐使用:•Internet Explorer 8.0•Firefox 3.6如果使用低版本浏览器访问iMC,可能会出现登录异常等情况,具体情况请参考第五章常见问题解答进行处理。
智能管理中心(iMC)部署和硬件配置方案 V5.0(20110527)

目录1 硬件要求 (4)1.1 整体部署要求 (4)1.2 智能管理平台部署方案 (6)1.Windows环境(32位) (7)2.Windows环境(64位)(推荐) (7)3.Linux环境(32位) (8)4.Linux环境(64位)(推荐) (8)5.短信猫(可选) (9)1.3 NTA/UBA组件部署方案 (9)1.3.1 NTA组件部署方案(处理NetStream V5或NetFlow V5日志) (10)1.3.2 NTA组件部署方案(处理sFlow日志) (10)1.3.3 UBA组件部署方案(处理NetStream V5或NetFlow V5或NAT或Flow日志) 111.3.4 NTA与UBA组件部署在一台服务器方案(处理NetStream V5或NetFlow V5)111.3.5 DIG采集器组件部署方案 (11)1.3.6 NTA组件部署方案(与DIG采集器组件配合) (12)1.3.7 UBA组件部署方案(与DIG采集器组件配合) (12)1.3.8 NTA与UBA组件部署在一台服务器方案(与DIG采集器组件配合) (13)1.3.9 与设备的配套关系 (13)1.4 SLA组件部署方案 (13)1.5 APM部署方案(仅限Windows操作系统) (14)1.6 SOM部署方案 (14)1.6.1 Windows\Linux环境(32位) (14)1.6.2 Windows\Linux环境(64位) (14)1.7 UAM部署方案 (15)1.7.1 Windows环境(32位) (15)1.7.2 Windows环境(64位)(推荐) (16)1.7.3 Linux环境(32位) (18)1.8 EAD部署方案 (19)1.8.1 Windows环境(32位) (20)1.8.2 Windows环境(64位)(推荐) (22)1.8.3 Linux环境(32位) (23)1.9 CAMS部署方案 (24)1.9.1 Windows环境(32位) (25)1.9.2 Windows环境(64位)(推荐) (26)1.9.3 Linux环境(32位) (28)1.10 MVM部署方案 (29)1.10.1 Windows环境(32位) (29)1.10.2 Windows环境(64位)(推荐) (30)1.10.3 Linux环境(32位) (30)1.10.4 Linux环境(64位)(推荐) (31)1.11 WSM部署方案 (32)1.11.1 Windows环境(32位) (32)1.11.2 Windows环境(64位)(推荐) (32)1.12 EPM部署方案 (33)1.12.1 Windows环境(32位) (33)1.12.2 Windows环境(64位)(推荐) (34)1.13 EoCM部署方案 (34)1.13.1 Windows环境(32位) (34)1.13.2 Windows环境(64位)(推荐) (35)1.14 VSM部署方案 (35)1.14.1 Windows环境(32位) (35)1.14.2 Windows环境(64位)(推荐) (36)1.15 IVM部署方案 (36)1.15.1 Windows环境(32位) (36)1.15.2 Windows环境(64位)(推荐) (36)1.16 BIMS部署方案 (37)1.16.1 Windows环境(32位) (37)1.16.2 Windows环境(64位)(推荐) (38)1.16.3 Linux环境(32位) (38)1.16.4 Linux环境(64位)(推荐) (38)1.17 NEMS组件部署方案(仅限V3,Windows 32位操作系统) (39)2 软件要求 (39)2.1 操作系统(推荐使用64位操作系统) (39)2.1.1 Windows (39)2.1.2 Linux (40)2.2 数据库 (40)2.2.1 iMC内嵌数据库 (40)2.2.2 Oracle 11g Release 1和Release 2 (仅限于Linux系统上) (40)2.2.3 SQL Server 2005 SP3 (40)2.2.4 SQL Server 2008 SP2 (40)2.2.5 SQL Server 2008 R2 (40)2.3 Web浏览器 (41)智能管理中心(iMC)部署和硬件配置方案1 硬件要求1.1 整体部署要求目前iMC提供的业务包括智能管理平台(含资源管理、告警管理、性能管理、ACLM、iCC、Syslog管理、VLAN管理等)、用户接入管理组件、EAD安全策略组件、iMC CAMS组件、MPLS VPN管理组件、WSM无线业务管理组件等,根据业务需求不同,用户可以在智能管理平台基础上按需部署所需业务组件。
IMC 安装手册

目录1 概述·········································································································1-12 安装前的准备工作···················································································2-12.1 硬件配置需求················································································2-12.2 软件配置需求················································································2-12.3 安装环境确认················································································2-23 安装及部署说明·······················································································3-13.1 安装过程·······················································································3-13.2 部署过程·····················································································3-133.2.1 集中式部署过程·······························································3-133.2.2 分布式部署过程·······························································3-193.3 iMC各组件逻辑组成及部署说明··················································3-264 卸载说明··································································································4-14.1 卸载单个iMC组件的过程及注意事项············································4-14.1.1 单个组件卸载过程······························································4-14.1.2 单个组件卸载的注意事项···················································4-24.2 一次性卸载所有iMC组件的过程····················································4-24.2.1 集中式部署的卸载过程·······················································4-24.2.2 分布式部署的卸载过程·······················································4-25 软件注册··································································································5-15.1 许可证的获取方法········································································5-15.2 注册方法·······················································································5-36 常见问题解答··························································································6-11 概述H3C 智能管理中心(以下简称iMC)可以基于Windows和Solaris操作系统运行,分别采用Microsoft SQL Server和Oracle数据库来实现数据存储和管理。
IMC用户手册

目录第1章 iMC的安装............................................................................1-11.1 必备资源.............................................................................1-11.2 安装特点.............................................................................1-1第2章体验iMC...............................................................................2-12.1 智能管理中心能做什么?...................................................2-12.2 智能管理从这里开始...........................................................2-12.2.1 从Web浏览器进入智能管理中心..............................2-12.2.2 首次登录后要做什么?............................................2-22.2.3 熟悉iMC的管理界面.................................................2-42.3 如何更便捷的使用iMC?....................................................2-62.3.1 强大的iMC帮助系统.................................................2-62.3.2 个性化的收藏夹功能................................................2-82.3.3 业务操作流导航.......................................................2-8第3章 iMC中的基础资源管理..........................................................3-13.1 iMC的网络资源管理............................................................3-13.1.1 查看拓扑..................................................................3-33.1.2 设备性能监控数据以及告警查询..............................3-63.2 iMC的用户管理...................................................................3-8第4章 iMC对各种网络业务的管理..................................................4-14.1 用户接入管理组件..............................................................4-14.2 EAD安全策略组件..............................................................4-44.3 智能配置中心组件..............................................................4-54.4 MPLS VPN管理组件...........................................................4-74.5 ACL管理组件......................................................................4-74.6 接入网资源管理组件...........................................................4-94.7 无线业务管理组件..............................................................4-94.8 EPON管理组件.................................................................4-104.9 网络流量分析组件............................................................4-11第5章常见问题解答.......................................................................5-1第1章 iMC的安装1.1 必备资源z软件安装盘(产品包装盒内)除安装程序外,各组件安装盘中\manual目录下存放系统安装指导。
H3C-iMC-EAD升级实施方案

技术文档H3C iMC EAD系统升级实施方案修改记录目录一、项目概述 (4)1.1项目背景 (4)1.2目标及范围 (4)1.3定义及术语 (5)1.4项目原则 (5)二、项目分析 (6)2.1需求分析 (6)2.2现网架构 (6)2.2.1组网架构 (6)2.2.2用户结构 (6)2.2.3认证流程 (7)三、解决方案 (8)3.1整体方案 (8)3.1.1可选方案 (8)3.1.2推荐方案 (8)3.2总体架构 (10)3.2.1系统中间架构 (10)3.2.2新系统目标架构 (10)3.3.3新系统用户结构 (11)3.2.4新系统的认证流程 (11)3.3新系统规格要求 (12)3.3.1服务器硬件要求 (12)3.3.2服务器软件要求 (12)3.4账户迁移 (12)3.5策略迁移 (13)3.6实施步骤 (13)3.6.1 iNode升级 (13)3.6.2 认证迁移 (13)四、项目实施组织安排 (13)4.1项目实施组织结构 (13)4.2技术支持人员 (14)五、实施步骤 (14)5.1服务器部署调试 (14)5.2 iNode试点 (14)5.3 iNode推广 (14)5.4 认证迁移 (15)六、功能定义 (15)6.1策略定义 (15)6.2配置规则 (16)6.2.1系统帐号分组 (16)6.2.2用户分组 (16)6.2.3防病毒策略命名 (18)6.2.4防病毒策略命名(与上一项一致) (18)6.2.5客户端ACL命名 (18)6.2.6内网外联审计策略命名 (18)6.2.7内网外联策略命名 (18)6.2.8可控软件组命名 (18)6.2.9 安全级别命名 (19)6.2.10安全策略命名 (19)6.2.11接入策略命名 (20)6.2.12接入服务命名 (20)6.2.13资产编号命名 (21)6.2.14资产策略命名 (21)6.2.15资产方案命名 (21)七、回退方案 (21)7.1认证回退 (21)7.2 iNode回退 (21)八、项目验收 (22)8.1.进行验收测试 (22)8.2.验收 (22)一、项目概述1.1项目背景网络是园区的信息传输管道,目前园区的业务数据、管理数据传输主要依赖网络传输。
Moxa IMC-P101系列产品说明书

P/N: 1802001015015*1802001015015*IMC-P101 Series Quick Installation GuideMoxa PoE Media ConverterVersion 4.2, February 2022Technical Support Contact Information/support2022 Moxa Inc. All rights reserved.OverviewThe IMC-P101 Series is an Ethernet-to-fiber-optic media converter. It provides Ethernet media conversion from 10/100 BaseT(X) to 100 BaseFX (SC/ST connectors). These media converters are classified as power source equipment (PSE), and when used in this way, the IMC-P101 Series provides up to 30 watts to powered devices (PD). The IMC-P101 Series can be used to power IEEE 802.3at compliant powered devices (PD), eliminating the need for additional wiring, and supports IEEE 802.3/802.3u/802.3x with 10/100M, full/half-duplex, andMDI/MDI-X auto-sensing to provide a total solution for your industrial Ethernet network.The IMC-P101 Series includes the following models:•IMC-P101-M-SC: PoE Industrial 10/100BaseT(X)-to-100BaseFX media converter, multi-mode port with SC connector, 0 to 60°Coperating temperature.•IMC-P101-M-ST: PoE Industrial 10/100BaseT(X)-to-100BaseFX media converter, multi-mode port with ST connector, 0 to 60°Coperating temperature.•IMC-P101-S-SC: PoE Industrial 10/100BaseT(X)-to-100BaseFX media converter, single-mode port with SC connector, 0 to 60°C operating temperature.•IMC-P101-S-ST: PoE Industrial 10/100BaseT(X)-to-100BaseFX media converter, single-mode port with ST connector, 0 to 60°Coperating temperature.•IMC-P101-M-SC-T: PoE Industrial 10/100BaseT(X)-to-100BaseFX media converter, multi-mode port with SC connector, -40 to 75°C operating temperature.•IMC-P101-M-ST-T: PoE Industrial 10/100BaseT(X)-to-100BaseFX media converter, multi-mode port with ST connector, -40 to 75°C operating temperature.•IMC-P101-S-SC-T: PoE Industrial 10/100BaseT(X)-to-100BaseFX media converter, single-mode port with SC connector, -40 to 75°C operating temperature.•IMC-P101-S-ST-T: PoE Industrial 10/100BaseT(X)-to-100BaseFX media converter, single-mode port with ST connector, -40 to 75°C operating temperature.NOTE Throughout this Hardware Installation Guide, we often use IMC as an abbreviation for Moxa Industrial Media Converter:IMC = Moxa Industrial Media ConverterPatent/doc/operations/Moxa_Patent_Marking.pdf Package ChecklistMoxa PoE Media Converter is shipped with the following items. If any of these items is missing or damaged, please contact your customer service representative for assistance.•IMC-P101 Series media converter.•Quick installation guide (printed).•Warranty card.Features•10/100BaseT(X) Auto-Negotiation and Auto-MDI/MDI-X.•IEEE 802.3af/at, PoE+ standards.•Power failure by relay output.•Provides up to 30 W of power to powered devices (PD). •Support store-and-forward mode and pass-through mode.•-40 to 75°C operating temperature range (T models). •Redundant dual VDC power inputs.Panel Layout of the IMC-P101 Series1.Grounding screw2.Terminal block for power inputPWR1/PWR23.Heat dissipation vents and relayoutput4.DIP switch5.Power input PWR1 LED6.Power input PWR2 LED7.Fiber Link/Active LED8.100BaseFX (ST/SC connector)Port9.PSE Indicator LED10.10/100BaseT(X)11.TP port 10 Mbps LED12.TP port 100 Mbps LED13.Model Name14.Screw hole for wall mounting kit15.DIN-rail mounting kitMounting DimensionsDIN-rail MountingThe aluminum DIN-rail attachment plate should be fixed to the back panel of the IMC when you take it out of the box. If you need toreattach the DIN-rail attachment plate to the IMC, make sure the stiff metal spring is situated towards the top, as shown in the figures below. STEP 1:Insert the top of the DIN-rail intothe slot just below the stiff metalspring. STEP 2: The DIN-rail attachment unit will snap into place as shown below.To remove the Moxa Industrial Media Converter from the DIN-rail, simply reverse Steps 1 and 2 above. Wall Mounting (Optional)For some applications, you will find it convenient to mount the Moxa PoE Media Converter on the wall, as illustrated below.STEP 1:Remove the aluminum DIN-rail attachment plate from theMoxa PoE Media Converter,and then attach the wallmount plates, as shown inthe diagrams below.STEP 2: Mounting the Moxa PoE Media Converter on the wallrequires 4 screws. Use the IMC, with wall mountplates attached, as a guide to mark the correctlocations of the 4 screws. The heads of the screwsshould be less than 6.0 mm in diameter, and theshafts should be less than 3.5 mm in diameter, asshown in the figure at the right.NOTE Test the screw head and shank size by inserting the screw intoone of the keyhole shaped apertures of the Wall MountingPlates, before it is screwed into the wall.Do not screw the screws in all the way—leave a space of about 2 mm to allow room for sliding the wall mount panel between the wall and the screws.STEP 3:Once the screws are fixed in thewall, insert the four screw headsthrough the large openings of thekeyhole-shaped apertures, andthen slide Moxa PoE MediaConverter downwards, as indicatedbelow. Tighten the four screws foradded stability.Grounding the Moxa Industrial Media Converter Grounding and wire routing help limit the effects of noise due toelectromagnetic interference (EMI). Run the ground connection from the ground screw to the grounding surface prior to connecting devices.Wiring the Redundant Power InputsThe top five contacts of the 8-contact terminal block connector on the IMC’s top panel are used for the IMC’s two DC inputs. Top and front views of one of the terminal block connectors are shown here.STEP 1: Insert the negative/positive DCwires into the V-/V+ terminals.STEP 2: To keep the DC wires from pullingloose, use a small flat-blade screwdriver totighten the wire-clamp screws on the front ofthe terminal block connector.STEP 3: Insert the plastic terminal blockconnector prongs into the terminal blockreceptor, which is located on the IMC’s toppanel.Communication ConnectionsIMC-P101 models have one 10/100BaseT(X) Ethernet port, and one 100BaseFX (SC or ST type connector) fiber port.10/100BaseT(X) Ethernet Port ConnectionThe 10/100BaseT(X) Ethernet port located on the IMC’s front panel is used to connect to Ethernet-enabled devices.Illustrated below are pinouts for both MDI (NIC-type) ports and MDI-X (HUB/Switch-type) ports, and also cable wiring diagrams for straight-through and cross-over Ethernet cables.10/100Base T(x) RJ45 Pinouts MDI Port Pinouts MDI-X Port Pinouts 8-pin RJ45 Pin Signal1Tx+2 Tx-3 Rx+6 Rx- Pin Signal 1 Rx+ 2 Rx- 3 Tx+ 6 Tx-RJ45 (8-pin) to RJ45 (8-pin) Straight-Through Cable WiringRJ45 (8-pin) to RJ45 (8-pin) Cross-Over Cable Wiring100BaseFX Ethernet Port ConnectionThe concept behind the SC port and cable is quite straightforward. Suppose you are connecting devices I and II. Unlike electrical signals, optical signals do not require a circuit in order to transmit data. Consequently, one of the optical lines is used to transmit data from device I to device II, and the other optical line is used transmit data from device II to device I, for full-duplex transmission.All you need to remember is to connect the Tx (transmit) port of device I to the Rx (receive) port of device II, and the Rx (receive) port ofdevice I to the Tx (transmit) port of device II. If you are making your own cable, we suggest labeling the two sides of the same line with the same letter (A-to-A and B-to-B, as shown below, or A1-to-A2 and B1-to-B2).SC-Port Pinouts SC-Port to SC-Port Cable WiringST-Port Pinouts ST-Port to ST-Port Cable WiringRedundant Power InputsBoth power inputs can be connected simultaneously to live DC power sources. If one power source fails, the other live source acts as a backup, and automatically supplies all of the Moxa Industrial Media Converter’s power needs.DIP Switch SettingDIP No.FunctionON OFF1 Auto Negotiation Enable* Disable “ON”: Enables “Auto Negotiation” function, the speed and duplexstates for each port link segment are automatically configured using the highest performance interoperation mode.“OFF”: Disables “Auto Negotiation” function, the speed and duplexstates depend on the manual setting configuration.2 Force TP Speed 100Mbps* 10Mbps (Only when Auto Negotiation is disabled)“ON”: Forces 100Mbps on Ethernet port.“OFF”: Forces 10Mbps on Ethernet port.DIP No. Function ON OFF3 Force TP DuplexFull Duplex* Half Duplex (Only when Auto Negotiation is disabled)“ON”: Forces Full Duplex on Ethernet port.“OFF”: Forces Half Duplex on Ethernet port.4 Link Fault Pass Through Enable* Disable “ON”: Enables “Link Fault Pass Through”, the link status on the TXport will inform the FX port of the same device and vice versa. “OFF”: Disables “Link Fault Pass Through”, the link status on the TX port will not inform the FX port.5 Operating Mode Store-and-Forward* Pass Through “ON”: Selects “Store-and-Forward” mode, begins to forward a packetto a destination port after an entire packet is received. Thelatency depends on the packet length.“OFF”: Selects “Pass-through” mode, operates with the minimumlatency. Both transceivers are interconnected via internal MIIs and the internal switch engine and data buffer are not used.Note: With “Pass-through” mode enabled, the Ethernet port and fiberport should transmit at 100 Mbps, which is equivalent to fullduplex mode.6 PSE Disable Enable* PSE: Power Source Equipment.“ON”: Disables “PSE”, IMC-P101 Series do NOT provide power to PD(Powered Device).“OFF”: Enables “PSE”, IMC-P101 Series provides power to PD(Powered Device).7 P.R.R. Enable Disable* P.R.R.: Power Remote Reset“ON”: Enables “P.R.R” function, when fiber port link down 3 secondsand “PSE” setting is enabled, IMC-P101 Series STOP providing power to PD (Power Device) which means the PD power willturn OFF. After 1 second later, IMC-P101 Series start to continue provide power to PD, and then the PDpower turn back ON for reset PD.“OFF”: Disables “P.R.R” function, no reset PD function.(*): Default DIP switch setting.LED IndicatorsThe front panel of Moxa Industrial Media Converter contains several LED indicators. The function of each LED is described in the table below.LEDColor State Description PWR1 GreenON Power is being supplied to power input PWR1 OFF Power is not being supplied to powerinput PWR1LED Color State DescriptionPWR2 Green ONPower is being supplied to powerinput PWR2OFFPower is not being supplied to powerinput PWR2Fiber Link/Act GreenON Fiber port is active.Blinking Data is being transmitted or received.OFF Fiber port is inactive.PSE Indicator GreenON PSE is enabled.2 Flash PoE current overloading5 FlashDetected invalid discovery signatureresistanceOFF No PoE power output10M YellowON Ethernet port 10 Mbps link is active. Blinking Data is being transmitted at 10 Mbps. OFF Ethernet port 10 Mbps link is inactive.100M GreenON Ethernet port 100 Mbps link is active. BlinkingData is being transmitted at 100Mbps.OFFEthernet port 100 Mbps link isinactive.SpecificationsTechnologyStandards IEEE 802.3 for 10BaseT,IEEE 802.3u for 100BaseT(X), 100BaseFXIEEE 802.3at for Power-over-Ethernet InterfaceRJ45 ports 10/100BaseT(X)Fiber ports 100BaseFX (SC, ST connectors available) LED Indicators PWR1, PWR2, Fiber Link/Act, 10/100M(Ethernet port), PSE IndicatorDIP Switches:Dip No. Function ON OFF1 Auto Negotiation Enable* Disable2 Force TP Speed 100Mbps* 10Mbps3 Force TP Duplex Full Duplex* Half Duplex4 Link Fault PassThroughEnable* Disable5 Operating Mode Store-and-Forward* Pass-Through6 PSE Disable Enable*7 P.R.R.(PD Remote Reset)Enable Disable**Default DIP switch setting.Alarm Contact One relay output with current carryingcapacity of 1A @ 24 VDCOptical Fiber:100BaseFXMulti-mode Single-mode Wavelength 1300 nm 1310 nm Max. TX -10 dBm 0 dBm Min. TX -20 dBm -5 dBmRX Sensitivity -32 dBm -34 dBmLink Budget 12 dB 29 dBTypical Distance 5 km a/4 km b40 km c Saturation -6 dBm -3 dBma. 50/125 μm, 800 MHz*km fiber optic cableb. 62.5/125 μm, 500 MHz*km fiber optic cablec. 9/125 μm, 3.5 PS/(nm*km) fiber optic cablePhysical CharacteristicsHousing MetalDimensions (W x H x D) 144.45 x 110.2 x 51.65 mm(5.69 x 4.34 x 2.03 in)Weight Product only: 525 gPackaged: 710 gInstallation DIN-rail mounting, Wall Mounting (optional kit) Environmental LimitsOperating Temperature Standard Models: 0 to 60°C (32 to 140°F)Wide Temp. Models: -40 to 75°C (-40 to167°F)Storage Temperature -40 to 85°C (-40 to 185°F)Ambient Relative5 to 90% (non-condensing)HumidityPower RequirementsInput Voltage 12 to 57 VDC, redundant inputsPower Consumption 3.6 A @ 12 VDCConnection Removable terminal block5 AOverload CurrentProtectionRegulatory ApprovalsSafety UL 508, EN 62368EMI FCC Part 15, CISPR 32 class AEMS EC 61000-4-2 ESD: Contact: 8 kV; Air: 15 kVIEC 61000-4-3 RS: 80 MHz to 1 GHz: 3 V/mIEC 61000-4-4 EFT: Power: 4 kV; Signal: 4 kVIEC 61000-4-5 Surge: Power: 2 kV; Signal: 2kVIEC 61000-4-6 CS: 150 KHz to 80 MHz: 3 to 1VIEC 61000-4-8 PFMFShock IEC 60068-2-27Free Fall IEC 60068-2-31Vibration IEC 60068-2-6WarrantyWarranty Period 5 yearsDetails See /warrantyNOTE Altitudes up to 2000 mNOTE Complies with 21 CFR 1040.10 and 1040.11, except for conformance with IEC 60825-1 Ed. 3., as described in LaserNotice No. 56, dated May 8, 2019.。
H3C-IMC安装指导

资料获取方式
您可以通过H3C网站()获取最新的产品资料: H3C 网站与产品资料相关的主要栏目介绍如下: z [服务支持/文档中心]:可以获取硬件安装类、软件升级类、配置类或维护类等产品资料。 z [产品技术]:可以获取产品介绍和技术介绍的文档,包括产品相关介绍、技术介绍、技术白皮
2 安装前的准备工作.............................................................................................................................. 2-1 2.1 服务器配置要求 ................................................................................................ 2-1 2.1.1 硬件配置需求 .......................................................................................................................... 2-1 2.1.2 软件配置需求 .......................................................................................................................... 2-2 2.2 客户端配置需求 ................................................................................................................................. 2-4 2.3 安装环境确认..................................................................................................................................... 2-4 2.4 系统时间确认..................................................................................................................................... 2-5
iMC产品升级业务指导书V1.55
iMC产品升级业务指导书V1.551 概述....................................................................................................................................................... 1-22 升级前的准备工作................................................................................................................................. 2-12.1 确认客户是否有定制项 ...................................................................................................................... 2-12.1.1 portal网页定制界面 ................................................................................................................ 2-12.1.2 WSM后台配置文件 ................................................................................................................ 2-12.2 确认现场是否使用了iNode DC(可溶解客户端) ................................................................................. 2-12.3 确认现场是否使用了DIG探针. ......................................................................................................... 2-12.4 确定现场是否安装了iMC CAMS3.60 E6206(不含)之前的版本................................................... 2-12.5 如果现场iMC安装了WSM(无线业务管理)组件并需要升级到V5及之后版本,请检查是否使用了Webservice接口 ..................................................................................................................................... 2-22.6 确定升级顺序..................................................................................................................................... 2-22.7 准备好升级及补丁版本并上传至iMC主服务器上。
- 1、下载文档前请自行甄别文档内容的完整性,平台不提供额外的编辑、内容补充、找答案等附加服务。
- 2、"仅部分预览"的文档,不可在线预览部分如存在完整性等问题,可反馈申请退款(可完整预览的文档不适用该条件!)。
- 3、如文档侵犯您的权益,请联系客服反馈,我们会尽快为您处理(人工客服工作时间:9:00-18:30)。
iMC产品升级业务指导书V1.551 概述....................................................................................................................................................... 1-22 升级前的准备工作................................................................................................................................. 2-12.1 确认客户是否有定制项 ...................................................................................................................... 2-12.1.1 portal网页定制界面 ................................................................................................................ 2-12.1.2 WSM后台配置文件 ................................................................................................................ 2-12.2 确认现场是否使用了iNode DC(可溶解客户端) ................................................................................. 2-12.3 确认现场是否使用了DIG探针. ......................................................................................................... 2-12.4 确定现场是否安装了iMC CAMS3.60 E6206(不含)之前的版本................................................... 2-12.5 如果现场iMC安装了WSM(无线业务管理)组件并需要升级到V5及之后版本,请检查是否使用了Webservice接口 ..................................................................................................................................... 2-22.6 确定升级顺序..................................................................................................................................... 2-22.7 准备好升级及补丁版本并上传至iMC主服务器上。
.......................................................................... 2-12.8 手工停止iMC的所有进程.................................................................................................................. 2-12.9 备份iMC ............................................................................................................................................ 2-52.9.1 iMC PLAT为3.20-R2602及之前版本备份方法...................................................................... 2-62.9.2 iMC PLAT为3.20-R2606及之后版本备份方法...................................................................... 2-93 升级iMC过程中注意事项..................................................................................................................... 3-13.1.1 关于iMC分布式部署的场景中升级包安装部署的注意事项 .................................................... 3-13.1.2 关于升级公共组件................................................................................................................... 3-13.1.3 iMC PLAT升级到3.20-R2602版本后请检查“报表管理”是否已部署 ................................. 3-23.1.4 iMC UAM升级到3.60-E6203前请检查“智能管理平台-数据分析管理”和“智能管理平台-数据分析服务器”是否已部署。
...................................................................................................... 3-23.1.5 在有portal的场景中,由于UAM 3.60-E6301为了优化Portal性能做了较大的架均调整,3.60-E6301的升级盘不支持从3.60-E6201上升级,Portal级件升级需要管理员手工处理。
........ 3-23.1.6 如果现场启用了“仅限iNode客户端”及“客户端防破解”特性,请检查客户端版本是否配套。
......................................................................................................................................................... 3-33.1.7 当从iMC WSM 3.50-R5104及其补丁版本、iMC WSM 3.50-R5105及其补丁版本升级至iMCWSM 3.50-C5303时,报表模板会发生变更。
................................................................................ 3-33.1.8 关于EAD/CAMS与UAM依赖关系及早期UAM,EAD升级包功能模块依赖关系的说明。
.. 3-33.1.9 关于iMC V3升级到V5版本后license需要重新激活问题的说明 .......................................... 3-44 升级后检查IMC是否运行正常 ............................................................................................................. 4-15 FAQ ...................................................................................................................................................... 5-15.1.1 在iMC分布式部署场景中,升级从机的公共组件时是否可以同时进行主机的组件的安装或部署?......................................................................................................................................................... 5-15.1.2 如何卸载探针(probe)?...................................................................................................... 5-15.1.3 如何确认使用哪个版本的探针(probe)? ............................................................................ 5-16 升级过程中常见问题处理...................................................................................................................... 6-16.1.1 iMC PLAT升级到3.20-R2602后,UAM自助(webserver),UBA/NTA处理器(processor.exe),UBA/NTA接收器(receiver.exe)进程启动错误问题的解决方法。
................................................ 6-16.1.2 将iMC PLAT升级到3.20-R2606及最新补丁后,启动iMC登录界面提示"加载来宾接入管理组件失败" .......................................................................................................................................... 6-2文档修订记录1 概述iMC产品采用平台+组件化的架构,支持从低版本到高版本的升级。