UPS蓄电池安装手册
蓄电池及UPS系统安装作业指导书
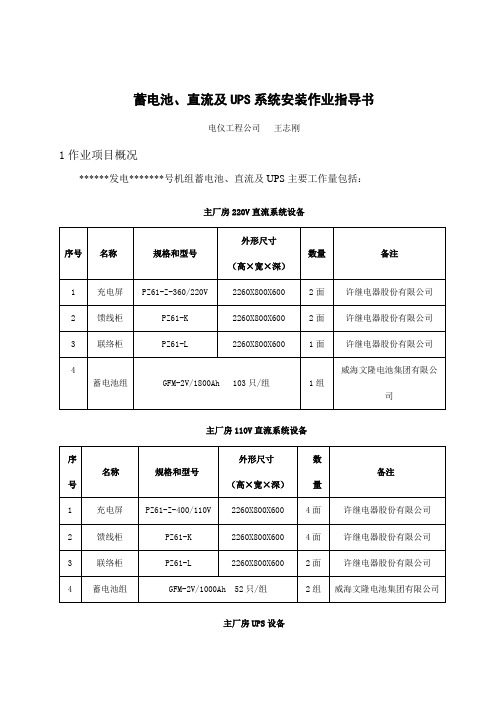
蓄电池、直流及UPS系统安装作业指导书电仪工程公司王志刚1作业项目概况******发电*******号机组蓄电池、直流及UPS主要工作量包括:主厂房220V直流系统设备主厂房110V直流系统设备主厂房UPS设备2施工所需工机具和测量器具3施工所需的材料4施工场地和环境要求4.1基础安装前要求土建的预埋铁件符合设计要求并且固定牢固。
4.2盘柜安装前要求屋顶、楼板施工完毕,不能渗漏,结束室内地面工作,室内沟道无积水、杂物,门窗安装完毕,进行装饰工作时有可能损坏已安装设备或设备安装后不能再进行施工的装饰工作全部结束,以免盘柜安装完后而对设备造成二次污染。
4.3配电室内应照明充足,若光线不足应加装照明用具。
4.4工作前对施工人员进行技术交底,使施工人员对现场条件、工序、施工要求了解清楚,做到心中有数。
4.5对隐蔽性工作应在隐蔽前让有关部门确认、检查完后再进行下一道工作。
5作业顺序、方法及要求5.1作业流程图:5.2作业内容、方法及要求5.2.1 蓄电池安装前的检查及准备:(1)蓄电池清点及外观检查:a、根据设备装箱资料开箱清点设备,检查设备的数量,制造厂提供的产品说明书、试验记录、合格证件及安装图纸等技术文件应齐全。
b、蓄电池应无裂纹、损伤,槽盖应密封良好。
c、蓄电池的正负端柱必须极性正确,并应无变形, 使用前应仔细阅读本技术手册,以保证正确施工。
d、对透明的蓄电池槽,应检查极板无严重受潮和变形;槽内部件应齐全无损伤。
e、连接条、螺栓及螺母应齐全。
5.2.2蓄电池支架安装:(1)在施工时应先按图纸设计位置做好埋管工作。
(2)蓄电池采用双层双列支架固定,该支架由厂家成套供货。
(3)根据设计院图纸,确定支架的安装位置。
(4)测量蓄电池室内地面水平。
(5)蓄电池支架水平安装,根据地面水平的测量结果决定支架的安装基准面,不平之处用垫铁垫高。
(6)用基础槽钢将支架安装到位,测量支架水平面水平度,整体水平后紧固地脚螺栓,根据厂家指导确定支架底板的高度,要排列整齐、安装平稳、固定牢固,其水平误差应≤5mm 。
UPS电源安装和维护指南说明书

00 1000Safety and General InformationSAVE THESE INSTRUCTIONS –This manual contains important instructions that should be followed during installation and maintenance of the UPS and batteries.Inspect the package contents upon receipt. Notify the carrier and dealer if there is any damages.• This UPS is intended for indoor use only.• Mains socket outlet that supplies the UPS shall be installed near the UPS and shall be easilyaccessible.•batteries and required precautions.•When replacing battery the UPS must be OFF, and its AC inlet unplugged.• CAUTION Do not dispose of batteries in a re. The batteries may explode.•CAUTION Risk of explosion if battery is replaced by an incorrect type. Dispose of used batteries according to the instructions.•Do not open or mutilate batteries. They contain an electrolyte that is toxic and harmful to the skin and eyes.•CAUTION A battery can present a risk of electrical shock and high short circuit current.The following precautions should be observed when working on batteries.a. Remove watches, rings or other metal objects.e tools with insulated handles.c. Wear rubber gloves and boots.d.Do not lay tools or metal parts on top of batteries.e. Disconnect the charging source prior to connecting or disconnecting battery terminals.f.Determine if battery is inadvertently grounded. If inadvertently grounded, remove source fromground. Contact with any part of a grounded battery can result in electrical shock. The likelihood of such shock can be reduced if such grounds are removed during installation and maintenanceRadio Frequency WarningThis is a category C2 UPS product. In a residential environment, this product may cause radio interference, in which case the user may be required to take additional measures.FeaturesON/OFF button with indicator Battery connector Input power cordCircuit breakerEasy UPS BV Series 500VA, 650VA, 800VA, 1000VA2Place and Power On1. Place the Easy UPS to avoid :• Direct sunlight • Excessive heat • Excessive moisture • Excessive dust/dirtFor operation, please place the unit on the floor.2. Connect the battery by pulling the battery handle up,and then pushing it into the unit.4. Plug the Easy UPS power cord directly into a wall outlet, not into a surge protector or power strip.5. Press the ON/OFF button to turn on the unit.The green “Power On” indicator confirms that the Easy UPS is on and ready to provide protection.The Easy UPS should charge for at least 6 hours to ensure sufficient runtime. The unit is being charged whenever it is connected to AC power, whether the unit is turned ON or OFF.*only for model with Schuko outletBattery backup and surge protected outletsAC power inlet with AC fuse*only for model with Schuko outlet36-8 Hours 9.25 cm x 16.05 cm x 30.5 cmSpecificationsInputOutputProtection BatteryPhysicalV oltage Frequency230 V AC 50 Hz or 60 Hz Brownout Transfer Over-voltage Transfer170 V AC, typical 280 V AC, typicalUPS Capacity (total)500V A / 300W V oltage On Battery 230V AC 10%± Frequency - On Battery Transfer Time50 Hz / 60 Hz ± 1Hz6ms typicalTypical Recharge TimeNet WeightDimensions (Hx Wx D)12V , 7AH lead acid650V A / 375W 800V A / 450W 1000V A / 600W12V , 4.5AH lead acid4.5 kg3.9 kg5.3 kg5.7 kg12V , 7AH lead acid12V , 9AH lead acidThe battery typically lasts for three to ve years.Environmental factors impact battery life.Elevated temperatures, high humidity, poor quality mains power, and frequent, short duration discharges will shorten battery life.The battery in the Easy UPS Series is not user-replaceable.Contact SEIT Technical Support for a list of authorized service centers near you.ModelWall Mount Installation• Horizontal installation, use 2 screws 11.1"(282 mm) apart.• Allow 5/16'’ (8 mm), of the screw to protrude from the wall.Easy UPS BV Series 500VA, 650VA, 800VA, 1000VA AC InputCircuit Breaker*(*only for model with Schuko outlet)Type(maintenance-free)Average Life5A 5A 7A 7A AC Input Fuse5A 5A 10A 10A BV500IBV650IBV800IBV1000ILED ConditionOnOff Constant ToneOn (Off during 4 beeps) 4 beeps repeatedevery 30 secondsFlashingConstant beeping (every 1/2 second) Constant toneOffShort beep every 4 seconds Constant ToneAudible AlarmLong beep every 4 secondsS tatus IndicatorsOn-line - The Easy UPS is supplying AC power to the connected equipmentOn Line Overload - The power being used by the connected equipment has exceeded the capacity of the unit.Disconnect some equipment.Over-temperature - The unit is overheating and will operate in A VR mode for 5 minutes. The Easy UPS will shut down if the temperature is not lowered. Disconnect some of the connected equipment.On-Battery - The Easy UPS is supplying battery power.Low Battery - The Easy UPS is supplying battery power and the battery is near a total discharge state.Bad Battery Detected - The battery needs to be charged,or is at end of life.Low Battery Shutdown - During On Battery operation the battery power was almost completely exhausted, and the Easy UPS is waiting for AC power to return to normal.On Battery Overload - The connected equipment requires more power than provided by the Easy UPS battery.Unplug devices one at a time to remove overload. If the problem is not corrected, contact SEIT Technical SupportCharger Detected Fault - Easy UPS has an internal problem,and is no longer powering the load.Contact SEIT Technical SupportOver-temperature Protected - The Easy UPS hasoverheated and has shut down. Unplug connected devices one at a time or wait for a few hours for system to cool down.Constant b eeping (every 1/2 s econd)4Easy UPS BV Series 500VA, 650VA, 800VA, 1000VAOperational FeaturesAutomatic V oltage Regulation boosts/trims the AC voltage when it drops/exceeds levels.This allows the equipment plugged into the unit to operate during low/high voltage conditions, conserving the battery power in the event of a power cut.The Easy UPS will switch to battery power if the input voltage level becomes too low/high for the Automatic V oltage Regulation to compensate, or if the AC power is distorted.Automatic Voltage Regulation (AVR)TroubleshootingProblem and Possible CauseThe Easy UPS will not turn onThe Easy UPS has not been turned on.SolutionPress the ON/OFF button.Make sure the power cord is securely connected to the wall outlet, and that there is AC power available at the wall outlet.Where applicable, check that the wall outlet is switched on.Remove all nonessential equipment connected to theoutlets. One at a time reconnect equipment to the Easy UPS.Charge the battery for 24 hours to make sure it is fully charged. If the overload condition still occurs, replace the battery.The Easy UPS is not connected to AC power,there is no AC power available at the wall outlet, or the AC power is experiencing a brownout or over voltage condition.The battery is disconnected.Connected equipment loses powerA Easy UPS overload condition has occurred.The Easy UPS battery is completely discharged.The Easy UPS may require service.The Easy UPS is operating on battery power.The Easy UPS battery has approximately empty and will shutdownThe ON/OFF button is green and ashing every 30 seconds. 4 beeps repeated every 30 seconds.The ON/OFF button ashes green and constant beeps every 1/2 second.Connected equipment does not accept the step-approximated sine waveform from the Easy UPS.Refer to the Place and Power On on page 2.Connect the Easy UPS to AC power and allow the battery to recharge for ten hours.Contact Schneider Electric Technical Support for more in depth troubleshootingThe Easy UPS is operating normally on batterypower. At this point the user should save all open les,and shutdown the computer. When AC power is restored the battery will recharge.The Easy UPS battery is near a total discharge state.At this point the user should save all open les, and shutdown the computer. When AC power is restored the battery will recharge.The output waveform is intended for computers and peripheral devices. It is not intended for use with motor driven equipment.The Easy UPS has an inadequate battery runtime The battery is not fully charged.The battery is near the end of useful life and should be replaced.Leave the Easy UPS connected to AC power for ten hours while the battery charges to full capacity.As a battery ages, the runtime capability decreases.The UPS have shut down due to low battery,but control power exists.The UPS and outlets are off but the UPS keeps beeping once every 4 seconds. The alarm will mute after 32 seconds.The UPS will return to normal operation once the AC input voltage has returned to a normal range.5Easy UPS BV Series 500VA, 650VA, 800VA, 1000VAServiceIf the unit requires service, do not return it to the dealer. Follow these steps:1. Review the Troubleshooting section of the manual to eliminate common problems.2. If the problem persists, contact Schneider Electric IT (SEIT) Customer Support through the APC by Schneider Electric website, .a. Note the model number and serial number and the date of purchase. The model and serial numbers are located on the rear panel of the unit.b.Call SEIT Customer Support and a technician will attempt to solve the problem over the phone. If this is not possible, the technician will issue a Returned Material Authorization Number (RMA#).c. If the unit is under warranty, the repairs are free.d.Service procedures and returns may vary internationally. Refer to the APC by Schneider Electric website for country specific instructions.3. Pack the unit in the original packaging whenever possible to avoid damage in transit. Never use foam beads for packaging. Damage sustained in transit is not covered under warranty.4. Always DISCONNECT THE UPS BATTERIES before shipping. The United States Department of Transportation (DOT), and the International Air Transport Association (IATA) regulations require that UPS batteries be disconnected before shipping. The internal batteries may remain in the UPS.5. Write the RMA# provided by Customer Support on the outside of the package.6. Return the unit by insured, pre-paid carrier to the address provided by Customer SupportAPC by Schneider Electric IT Customer Support WorldwideWarrantyRegister y our p roduct o n-line. h ttp://The standard warranty is two (2) years from the date of purchase. SEIT standard procedure is to replace the original unit with a factory reconditioned unit. Customers who must have the original unit back due to the assignment of asset tags and set depreciation schedules must declare such a need at first contact with an SEIT Technical Support representative. SEIT will ship the replacement unit once the defective unit has been received by the repair department, or cross-ship upon the receipt of a valid credit card number. The customer pays for shipping the unit to SEIT. SEIT pays ground freight transportation costs to ship the replacement unit to the customer.For country specific customer support, go to the APC by Schneider Electric website, www .apc .com .EN 990-91065A01/2019© 2019 APC by Schneider Electric. APC, the APC logo are owned by Schneider Electric Industries S.A.S., or their af liated companies. All other trademarks are property of their respective owners.。
UPS安装指导

UPS 安装指导一、 UPS 的分类1. 标准型:用内置电池,后备供电时间较短,一般在5~15分钟2. 长效型:机内不带电池但增加了充电器,用户可以根据自身需要配接多组电池以延长供电时间二、 UPS 容量选择UPS 容量≥负载容量÷0.8三、 蓄电池的安装◆ UPS 安装前需仔细阅读其使用说明书,如因品牌不同与下述有异,以说明书为准。
1. 转矩扳手、扳子等的金属工具,需用塑料胶带进行绝缘处理后使用;2. 安装时必须使用绝缘手套;3. 安装工作需由单人完成,避免多人同时进行电池安装及连接工作;4. 使用多个蓄电池时,需按照电池连接示意图正确地进行相互间的连接,避免正负极连接错误;5. 蓄电池安装完毕后,应检查电池箱输出电压;6. 常用山特UPS 的蓄电池安装示意图如下:◆ MT1000V AS –UPS (需配置“12V DC 电池”2节,2节串联,正常输出电压为24V DC ) SANTAKMT1000VAS UPS 输出供负载使用输入市电AC 220V+-UPS 电池箱◆ C1KV AS -UPS (需配置“12V DC 电池”3节,3节串联,正常输出电压为36V DC ) SANTAKC1KVAS UPS 输出供负载使用输入市电AC 220V+-UPS 电池箱◆ C2KV AS -UPS (需配置“12V DC 电池”16节,8节一组串联,然后两组并联,正常输出电压为96V DC ) SANTAKC2KVAS UPS 输出供负载使用输入市电AC 220V+-UPS 电池箱◆ C3KV AS -UPS (需配置“12V DC 电池”16节,8节一组串联,然后两组并联,正常输出电压为96V DC ) SANTAKC3KVAS UPS 输出供负载使用输入市电AC 220V+-UPS 电池箱◆ C6KV AS -UPS (需配置“12V DC 电池”20节,20节串联,正常输出电。
UPS 操作手册完整版
接点
组件
解释
F021
逆变器输出保险
当逆变器发生重大故障时保护负载,当逆变器发生重大故障时系统将会切换到旁路,同时保险F021将会断开并不影响输出电压。前面板将会显示警报
A035
(A030)
静态旁路转换开关EN
具有3组不平行转换电源可控硅
A201
内部电源供应
由内部整流器主线或旁路主线供电,此供电是内部供电冗余系统的一部分与A202一起由电池供电,二者之中的每一个都可以充足为系统供电,当二者之中的一个发生故障,前面板将会将会发出警报
每一个并机系统是独立的,有其独立的旁路,除了输出配电柜,不再需要其他的共用组件或者中央部件
一个有问题的系统将会立刻与输出配电柜隔离
负载为各个独立的系统所分配供电
特性
产品特点
优点
冗于组件为并机冗于所使用(无公共故障点)
保证连续为负载供电
风扇监测
每一个独立的长寿命风扇由一个霍尔发生器监测(防尘)并且可以在线更换,不会对负载及人身造成危险
在此状态下负载由系统供电(逆变器或静态旁路)
TEST旁路主线供电,UPS系统可被检测,而用电设备可以在安全的母线工作
BYPASS在此状态下负载由旁路主线供电,UPS系统可被检测,而用电设备可以在安全的母线工作,要完全的隔离系统部分Q028,Q001,和Q004必须是断开的
X001
整流器主线端子
用于连接整流器主线(L1,L2,L3,PE)整流器主线输入已被保护,代替外部的保护设备保险管或断路器可以应技术需要而使用
滤波电抗器
与CB03一同过滤PWM的输出低级别
消除逆变变压器T002输的出非线性失真因素
UPS更换蓄电池技术规格 书
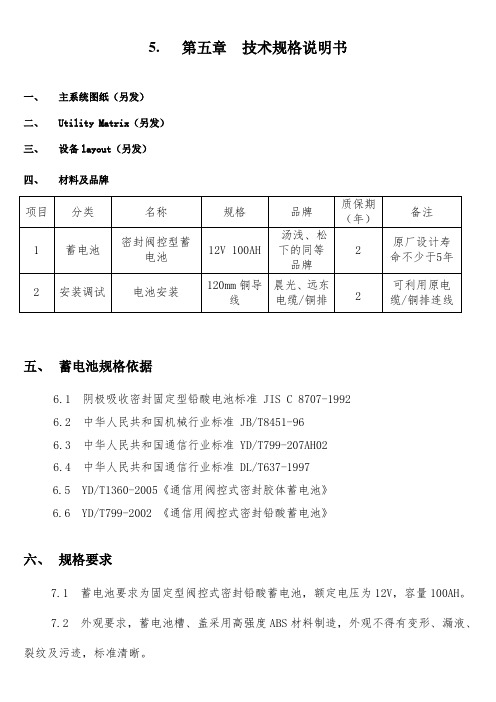
5.第五章技术规格说明书一、主系统图纸(另发)二、Utility Matrix(另发)三、设备layout(另发)四、材料及品牌项目分类名称规格品牌质保期(年)备注1 蓄电池密封阀控型蓄电池12V 100AH汤浅、松下的同等品牌2原厂设计寿命不少于5年2 安装调试电池安装120mm铜导线晨光、远东电缆/铜排 2可利用原电缆/铜排连线五、蓄电池规格依据6.1 阴极吸收密封固定型铅酸电池标准 JIS C 8707-19926.2 中华人民共和国机械行业标准 JB/T8451-966.3 中华人民共和国通信行业标准 YD/T799-207AH026.4 中华人民共和国通信行业标准 DL/T637-19976.5 YD/T1360-2005《通信用阀控式密封胶体蓄电池》6.6 YD/T799-2002 《通信用阀控式密封铅酸蓄电池》六、规格要求7.1 蓄电池要求为固定型阀控式密封铅酸蓄电池,额定电压为12V,容量100AH。
7.2 外观要求,蓄电池槽、盖采用高强度ABS材料制造,外观不得有变形、漏液、裂纹及污迹,标准清晰。
7.3 阻燃性能符合GB/T 2408-1996中8.3.2FH-1(水平)和第9.3.2FV0(垂直)的要求。
7.4 气密性要求承受50PA的正压或负压不破裂、开胶,压力释放后壳体无残余变形。
7.5 蓄电池重量应符合YD/T799-2002 《通信用阀控式密封铅酸蓄电池》中的要求。
7.6 容量按照规定的试验方法,10H率容量1次循环不低于0.95C10,在第3次循环应达到C10;3h和1h率的容量座分别在第4次和5次以前达到,放电终止电压符合表2规定。
表2 放电率放电率蓄电池放电单格终止电压10h 1.8v3h 1.8v1h 1.75v7.7 蓄电池以30I10(A)放电3min,极按、内部汇流排不应熔断,外观不得出现异常。
7.8 完全充电的蓄电池,在25±5℃的环境中,静置28天后其容量保存率不低于96%,静置180天,其容量保持率应在85%以上。
UPS安装作业指导书书
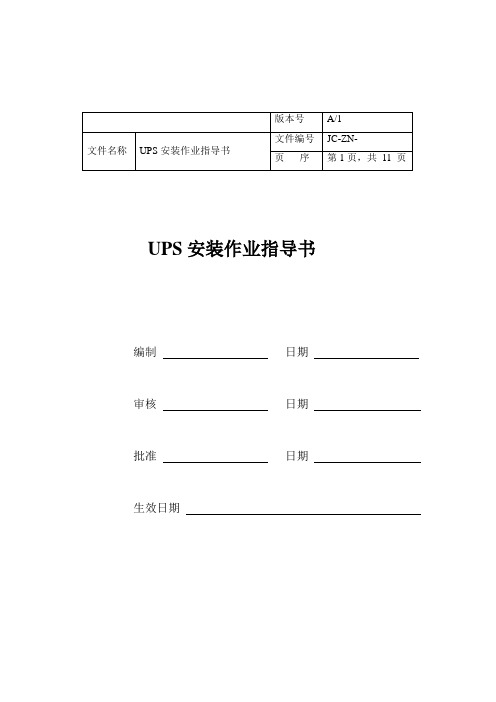
UPS安装作业指导书编制日期审核日期批准日期生效日期目录1编制目的 (3)2适用范围 (3)3 编制依据 (3)4 作业准备 (3)4.1 施工现场检查 (3)4.1.1机房建筑条件检查 (3)4.1.2环境条件检查 (3)4.1.3临时供电条件检查 (4)4.1.4地线条件检查 (4)4.2 施工图纸及技术资料准备 (4)4.3 人力资源准备 (4)4.4 材料与工具准备 (4)5施工流程 (4)5.1施工准备 (4)5.2施工阶段 (5)5.2.1施工安全 (5)5.2.2UPS设备的安装 (5)5.2.3电池组安装 (7)5.3 通电测试 (8)5.4竣工验收阶段 (10)1编制目的1.1为了加强UPS现场安装施工的规范化管理与施工工艺要求,确保UPS供电设备运行可靠,维护方便的要求。
1.2为了保护施工人员的安全,必须遵循正确的施工规范和工艺。
1.3用于指导UPS系统工程施工及验收。
2适用范围2.1适用于新建﹑扩建及改建UPS工程的现场安装和施工2.2 本公司系统集成部工程施工3 编制依据3.1 计算机机房施工验收规范3.2 公司施工水平及现状4 作业准备设备安装前,对设备安装的机房做好施工勘查,客户应该保证机房电源、地线等满足施工必要条件,对于用户当时尚不能满足的条件,一定要明确向用户提出,协助用户给出解决方案和时间。
4.1 施工现场检查4.1.1机房建筑条件检查(1)屋顶﹑楼板施工完毕,不渗漏。
(2)门窗安装完毕,场地干净,道路畅通4.1.2环境条件检查照明满足要求﹑机房温度需﹤35℃,湿度需在20℃时,≤95%,地板上不能有明显灰尘,尤其不能有带导电性质的粉屑,机房空气中不能含有酸雾或其他导电介质;机房应配备合格的消防、防雷措施。
4.1.3临时供电条件检查用户应为机房施工现场提供临时施工用电,临时用电为三相五线制。
4.1.4地线条件检查由接地装置引来的接地线铺设到位。
4.2 施工图纸及技术资料准备4.3 人力资源准备4.3.1 特殊工种需持有国家颁发的特殊工种操作证上岗,施工过程中如需使用电焊应提前向用户和业主申请动火操作。
UPS产品安装与操作说明书
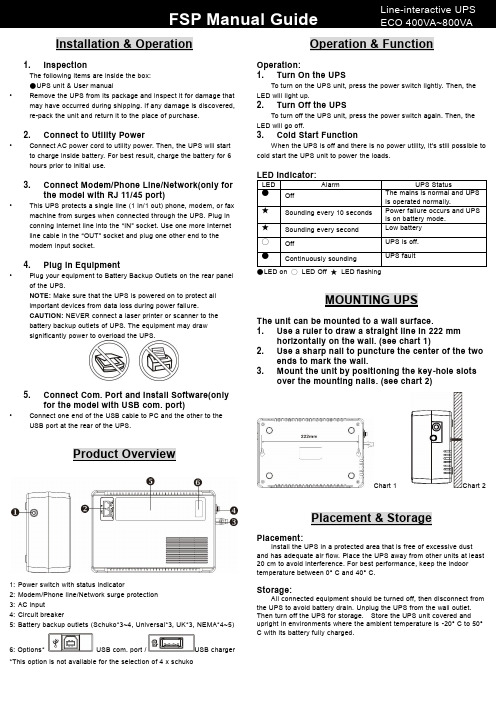
Installation & Operation1. InspectionThe following items are inside the box:●UPS unit & User manual•Remove the UPS from its package and inspect it for damage thatmay have occurred during shipping. If any damage is discovered,re-pack the unit and return it to the place of purchase.2. Connect to Utility Power•Connect AC power cord to utility power. Then, the UPS will startto charge inside battery. For best result, charge the battery for 6hours prior to initial use.3. Connect Modem/Phone Line/Network(only forthe model with RJ 11/45 port)•This UPS protects a single line (1 in/1 out) phone, modem, or faxmachine from surges when connected through the UPS. Plug inconning Internet line into the “IN” socket. Use one more Internetline cable in the “OUT” socket and plug one other end to themodem input socket.4. Plug in Equipment•Plug your equipment to Battery Backup Outlets on the rear panelof the UPS.NOTE: Make sure that the UPS is powered on to protect allimportant devices from data loss during power failure.CAUTION: NEVER connect a laser printer or scanner to thebattery backup outlets of UPS. The equipment may drawsignificantly power to overload the UPS.5. Connect Com. Port and Install Software(onlyfor the model with USB com. port)•Connect one end of the USB cable to PC and the other to theUSB port at the rear of the UPS.Product Overview1:Power switch with status indicator2:Modem/Phone line/Network surge protection3:AC input4:Circuit breaker5:Battery backup outlets (Schuko*3~4, Universal*3, UK*3, NEMA*4~5)6: Options* USB com. port /USB charger*This option is not available for the selection of 4 x schukoOperation & FunctionOperation:1. Turn On the UPSTo turn on the UPS unit, press the power switch lightly. Then, theLED will light up.2. Turn Off the UPSTo turn off the UPS unit, press the power switch again. Then, theLED will go off.3. Cold Start FunctionWhen the UPS is off and there is no power utility, it's still possible tocold start the UPS unit to power the loads.LED Indicator:LED Alarm UPS Status●Off The mains is normal and UPSis operated normally.★Sounding every 10 seconds Power failure occurs and UPSis on battery mode.★Sounding every second Low battery○Off UPS is off.●Continuously sounding UPS fault●LED on ○LED Off ★LED flashingMOUNTING UPSThe unit can be mounted to a wall surface.1. Use a ruler to draw a straight line in 222 mmhorizontally on the wall. (see chart 1)2. Use a sharp nail to puncture the center of the twoends to mark the wall.3. Mount the unit by positioning the key-hole slotsover the mounting nails. (see chart 2)Chart 1 Chart 2Placement & StoragePlacement:Install the UPS in a protected area that is free of excessive dustand has adequate air flow. Place the UPS away from other units at least20 cm to avoid interference. For best performance, keep the indoortemperature between 0° C and 40° C.Storage:All connected equipment should be turned off, then disconnect fromthe UPS to avoid battery drain. Unplug the UPS from the wall outlet.Then turn off the UPS for storage. Store the UPS unit covered andupright in environments where the ambient temperature is -20° C to 50°C with its battery fully charged.Safety cautionThis manual contains important instructions that should be followed during installation andmaintenance of the UPS and batteries.•This UPS utilizes voltage that may be hazardous. Do not attempt to disassemble the unit. The unit contains no user replaceableparts. Only factory service personnel may perform repairs.•This pluggable type A equipment with battery already installed by the supplier is operator installable and may be operated bylaymen.•The mains socket outlet that supplies the UPS shall be installed near the UPS and shall be easily accessible.•During the installation of this equipment it should be assured that the sum of the leakage currents of the UPS and the connectedloads does not exceed 3.5mA.•Connection to any other type of receptacle other than a two-pole, three-wire grounded receptacle may result in shock hazard aswell as violate local electrical codes.•In the event of an emergency, press the "OFF" button and disconnect the power cord from the AC power supply to properlydisable the UPS.•Do not allow any liquids or any foreign object to enter the UPS.•Do not place beverages or any other liquid-containing vessels on or near the unit.•This unit intended for installation in a controlled environment (temperature controlled, indoor area free of conductivecontaminants). Avoid installing the UPS in locations where thereis standing or running water, or excessive humidity.•Do not plug the UPS input into its own output.•Do not attach a power strip or surge suppressor to the UPS.•Do not attach non-computer-related items, such as medical equipment, life-support equipment, microwave ovens, or vacuumcleaners to UPS.•Do not dispose of batteries in a fire as they may explode.• A battery can present a risk of electrical shock and high short circuit current. The following precautions should be observedwhen working on batteries:1) Remove watches, rings, or other metal objects from the hands.2) Use tools with insulated handles.3) Wear rubber gloves and boots.4) Do not lay tools or metal parts on top of batteries.5) Disconnect charging source prior to connecting ordisconnecting batteries terminal.6)Remove battery grounds during installation and maintenance toreduce likelihood of shock.•Internal battery voltage is 12VDC.Sealed, lead-acid, 6-cell battery.•Servicing of batteries should be performed or supervised by personnel knowledgeable of batteries and the requiredprecautions. Keep unauthorized personnel away from batteries.•When replacing batteries, replace with the same number and type of sealed lead-acid battery.•Do not open or mutilate the battery or batteries. Release electrolyte is harmful to the skin and eyes. It may be toxic.•Attention, hazardous through electric shock. Also with dis- connection of this unit from the mains, hazardous voltage still may be accessible through supply from battery. The battery supplyshould be therefore disconnected in the plus and minus pole atthe connectors of the battery when maintenance or service workinside the UPS is necessary.•To reduce the risk of overheating the UPS, do not cover the UPS' cooling vents and avoid exposing the unit to direct sunlight orinstalling the unit near heat emitting appliances such as spaceheater or furnaces.•Unplug the UPS prior to cleaning and do not use liquid or spray detergent.TroubleshootingProblem Possible Cause SolutionsLED not lit.The UPS is noton.Press the power switch again toturn on the UPS.Battery voltageis too low.Charge the battery at least 6hours.Battery fault.Replace the battery.The UPSalways onbattery mode.Power cordloose.Re-plug the power cord.The UPScontinuouslybeeps.Please checkthe fault codefor the details.Please check the fault code forthe details.Backup timetoo short.Battery voltageis too low.Charge the battery at least 6hours.Overload.Remove some unnecessaryloads. Before reconnectingequipment, please verify that theload matches the UPS capabilityspecified in the specs.Battery defect.Replace the battery.If any abnormal situations occur that are not listed above, please call for service immediately.Specification400VA/600VA/800VAModel400600800 Capacity400VA/240W600VA/360W800VA/480WInput voltage220/230/240 VacInput VoltageRange162-290 VacOutput VoltageRegulation±10%(bat mode)Transfer Time Typical 2-6 msWaveform Simulated SinewaveBattery Type12V/4.5Ah12V/5Ah12V/5Ah Battery Number111 Charging Time 4 hours recover to 90% capacity Dimension(mm)245 x 163 x 90Net Weight (kgs) 3.5 4.0 4.5 Humidity0-90% RH @ 0-40°C non-condensing) Noise Level Less than 40dB*Specifications are subject to change without notice.Placement & StoragePlacement:Install the UPS in a protected area that is free of excessive dust and has adequate air flow. Place the UPS away from other units at least 20 cm to avoid interference. For best performance, keep the indoor temperature between 0° C and 40° C.Storage:All connected equipment should be turned off, then disconnect from the UPS to avoid battery drain. Unplug the UPS from the wall outlet. Then turn off the UPS for storage. Store the UPS unit covered and upright in environments where the ambient temperature is -20° C to 50° C with its battery fully charged.。
UPS不间断电源安装培训手册
UPS不间断电源安装培训手册目录UPS不间断电源安装培训手册 (1)一、蓄电池容量的计算方法 (2)1.1、计算容量的必要条件 (2)1.2、容量的计算公式 (2)1.3、容量的计算举例 (2)二、关于UPS容量的计算举例 (3)三、UPS外置电池包接法120V、192V及实际图片 (4)四、UPS工作方式 (6)4.1、正常运行方式 (6)4.2、电池工作方式 (6)4.3、旁路运行方式 (6)4.4、旁路维护方式 (6)五、整流器 (6)六、逆变器 (7)七、UPS知识促成 (7)7.1、UPS是什么? (7)7.2、UPS分哪些种类? (7)7.3、为什么要配备UPS? (7)7.4、我应该配备什么样的UPS? (8)7.5、我应该配备多大功率的UPS? (8)八、如何正确使用和维护UPS不间断电源 (8)九、UPS的安装和注意事项 (10)一、蓄电池容量的计算方法蓄电池的容量必须是以所定的电压、所定的时间可向负载提供的容量。
以下就容量计算方法进行说明:1.1、计算容量的必要条件A、放电电流有必要明确放电过程中负载电流的增减变化和其随时间变化情况。
B、放电时间可预期的负载的最大时间。
C、最低蓄电池温度预先推定蓄电池放置场所的温度条件,决定蓄电池温度最低值。
一般设置在室内时为50C,设置在特别寒冷地区室内时为-50C。
用空调保证室内温度时按实际温度作为最低温度。
D、允许的最低电压单格允许的最低电压(V/单格)=(负载所允许的最低电压+导线的电压损失)/串联格数1.2、容量的计算公式C= 1*[K1I1+K2(I2-I1)、、、、、、、KN(IN-IN-1)]/LC:250C的额定放电率换算容量(AH)、、、、、、UXL电池是10HR 容量。
L:对因维护系数、使用年数、使用条件的变化而引起的容量变化而使用的修正值。
一般L值采用0.8。
K:由放电时间T、电池的最低使用温度、允许的最低电压而决定的容量换算时间。
- 1、下载文档前请自行甄别文档内容的完整性,平台不提供额外的编辑、内容补充、找答案等附加服务。
- 2、"仅部分预览"的文档,不可在线预览部分如存在完整性等问题,可反馈申请退款(可完整预览的文档不适用该条件!)。
- 3、如文档侵犯您的权益,请联系客服反馈,我们会尽快为您处理(人工客服工作时间:9:00-18:30)。
UPS安装手册
一.安装方式选择原则
1.安装面积:电池安装应当根据实际情况预留维护和检测通道。
2.楼面承重:根据楼房设计的承重要求,选择合适的层数与摆放方式。
3.出线方式:有一端出线和两端出现两种方式供选择。
4.外观选择:从美观角度出发,可以选择铁架安装和柜式安装。
5.是否需要集中监控。
二.安装注意事项
1.准备工作
1) 工具:14~17mm开口扳手或梅花扳手2把;14mm套筒扳手1把;8mm内六角扳手1把;数字万用一只,标签纸。
;注意:所有电池出厂前已荷电,所有安装工具使用前应当要缠上绝缘胶带,防止电池短路。
安装过程中一定要注意安全
2) 安装时注意电池间间隙,建议≥10mm。
3) 安装人员(或工程队)需要与客户明确工程细节(安装方式,承重情况等),确定最佳安装位置。
2.安装步骤
1)进行电池的开箱检查及配件的清点,装箱清单请督导人员签字并收回,配件箱中电池安装示意图、安装使用说明书等文件应收好,待安装工程结束后交由客户公司相关部门负责保管。
2)按照施工图纸检查电池在机房的摆放位置是否合理,是否预留了维护空间,是否和热源及可能产生火花的地方(如保险盒等)保持有0.5米以上的距离,如果不符合,应先请示用户是否修改,修改后需要有备忘录。
3)安装连接条前应保证极柱上的灰尘已擦干净。
安装后要逐个检查所有连接螺栓是否拧紧。
要指定专人检查,专人负责,确保所有螺栓处于拧紧状态(参考扭矩15N.m)。
4)安装检查结束后,测量并记录所有电池单体的开路电压和电池组的总电压。
5)蓄电池组连接完成后,将蓄电池接入蓄电池空开(空开保持断开)。
6)将蓄电池与UPS主机连接(UPS输出空开保持断开)。
7)将UPS主机接入市电输入空开(空开保持断开)。
9)安装、调试结束后,按照要求填写相关的表格,检查电池情况并记录,同时再检查各个连接螺栓有无拧紧,确保电池防震、防滑及电池间连接等方面的可靠性。
测量每个单体电池的浮充电压并记录,并测量每个电连接接触点的温升
(1小时率放电1小时不超过45℃),请客户进行签字认可。