洗碗机图纸 Model (1)
惠而浦洗碗机使用说明书

使用說明書Model : WFC3C26FUK 產品型號 : WFC3C26FUK User Manual2繁體中文316INDEXUSER MANUAL33GUIDETHANK YOU FOR BUYING A WHIRLPOOL PRODUCT.In order to receive a more complete assistance, pleaseregister your appliance on:Before using the appliance carefully read Health and Safety guide. PRODUCT DESCRIPTIONAPPLIANCE3.Multizone button with indicator light / Key lock4.Eco program indicator light5.Key lock indicator light6.Display7.Program number and remaining time indicator 10.Rinse Aid refill indicator light11.Salt refill indicator light12.Sani Rinse button with indicator light / Tablet (Tab)13.Delay button with indicator light14.Start/Pause button with indicator light / Drain outFIRST TIME USESALT, RINSE AID AND DETERGENTADVICE REGARDING THE FIRST TIME USEAfter installation, remove the stoppers from the racks and the retaining elastic elements from the upper rack.FILLING THE SALT RESERVOIRThe use of salt prevents the formation of LIMESCALE on the dishes and on the machine’s functional components.•It is important that the salt reservoir be never empty.•It is important to set the water hardness.The salt reservoir is located in the lower part of the dishwasher (see PROGRAMS DESCRIPTION)and should be lled when the SALT REFILL indicator light in the control panel is lit.1.Remove the lower rack and unscrew thereservoir cap (anticlockwise).2.Position the funnel (see gure) and ll the saltreservoir right up to its edge (approximately 1 kg);it is not unusual for a little water to leak out.3.Remove the funnel and wipe any salt residueaway from the opening.Make sure the cap is screwed on tightly, so that no detergent can get into the container during the wash program (this could damage the water softener beyond repair).Whenever you need to add salt, we recommend carrying out the procedure before the washing cycle is started.SETTING THE WATER HARDNESSTo allow the water softener to work in a perfect way, it is essential that the water hardness setting is based on the actual water hardness in your house. This information can be obtained from your local water supplier.The factory setting is for average (3) water hardness.•Switch on the appliance by pressing the ON/OFF button.•Switch o the appliance by pressing the ON/OFF button.•Hold down button START/PAUSE for 5 seconds, until you hear a beep.•Switch on the appliance by pressing the ON/OFF button.•The current selection level number and the salt indicator light both ash.•Press button P to select the desired hardness level (see WATER HARDNESS TABLE).•Switch o the appliance by pressing the ON/OFF button.Setting is complete!As soon as this procedure is complete, run a program without loading. Only use salt that has been speci cally designed for dishwashers.After the salt has been poured into the machine, the SALT REFILL indicator light switches o .If the salt container is not filled, the water softener and the heating element may be damaged as a result.FILLING THE RINSE AID DISPENSERRinse aid makes dish DRYING easier. The rinse aid dispenser A shouldbe lled when the RINSE AID REFILL indicator light in the1.2.Carefully introduce the rinse aid as far as the maximum (110 ml)reference notch of the lling space - avoid spilling it. If this happens,clean the spill immediately with a dry cloth.3.Press the lid down until you hear a click to close it.NEVER pour the rinse aid directly into the tub.ADJUSTING THE DOSAGE OF RINSE AIDIf you are not completely satis ed with the drying results, you can ad-just the quantity of rinse aid used.•Switch the dishwasher on using the ON/OFF button.•Switch it o using the ON/OFF button.•Press button START/PAUSE three times - a beep will be heard.•Switch it on using the ON/OFF button.•The current selection level number and rinse aid indicator light ash.•Press button P to select the level of rinse aid quantity to besupplied.•Switch it o using the ON/OFF button.Setting is complete!If the rinse aid level is set to 1(ECO), no rinse aid will be supplied. TheLOW RINSE AID indicator light will not be lit if you run out of rinse aid. Amaximum of 4 levels can be set according to the dishwasher model.The factory setting is for a medium level.•If you see bluish streaks on the dishes, set a low number (2-3).•If there are drops of water or limescale marks on the dishes, set ahigh number (4-5).FILLING THE DETERGENT DISPENSERopen the detergent dispenserthe amount of detergent formaximum quantity of liquid or powder detergent that can be addedto each cycle.2.Remove detergent residues from the edges of the dispenser andclose the cover until it clicks.3.Close the lid of the detergent dispenser by pulling it up until theclosing device is secured in place.The detergent dispenser automatically opens up at the right timeaccording to the program. If all-in-one detergents are used, werecommend using the TABLET button, because it adjusts the programso that the best washing and drying results are always achieved.Water Hardness TableLevel°dH°fH1Soft0 - 60 - 102Medium7 - 1111 - 203Average12 - 1721 - 304Hard17 - 3431 - 605Very hard35 - 5061 - 90measuring out the detergentEN PROGRAMS TABLE*) Not all options can be used simultaneously.**) The duration of the program shown on the display or in the booklet is an estimate calculated on standard conditions. The actual time may vary depending on many factors such as temperature and pressure of the incoming water, room temperature, amount of detergent, quantity and type of load, load balancing, additional selected options and sensor calibration. The sensor calibration can increase program duration up to 20 min. Standby consumption: Left-on mode consumption: 5 W - O mode consumption: 0.5 WPROGRAMS DESCRIPTIONInstructions on wash cycle selection.ECONormally soiled crockery. Standard program, the most e cient in terms of its combined energy and water consumption.6th SENSE ®For normally soiled dishes with dried food residues. Senses the level of soiling on the dishes and adjusts the program accordingly. When the sensor is detecting the soil level an animation appears in the display and the cycle duration is updated.INTENSIVEProgram recommended for heavily soiled crockery, especially suitable for pans and saucepans (not to be used for delicate items).DAILYNormally soiled crockery. Everyday cycle, that ensures optimal cleaning performance in shorter time.SILENTSuitable for night-time operation of the appliance. Optimum performance ensured.RAPID 30’Program to be used for lightly-soiled dishes with no dried food residues. Ideal for 2 place settings.CRISTALCycle for delicate items, which are more sensitive to high temperatures, for example glasses and cups.PRE-WASHCrockery to be washed later. No detergent to be used with this program.Notes:Optimum performance levels when using the “Rapid” program can be achieved by observing the maximum amounts of speci ed place settings.To reduce consumption even further, only run the dishwasher when it is full.OPTIONS AND FUNCTIONSOPTIONS can be selected directly by pressing the corresponding button (see CONTROL PANEL).MULTIZONEIf there are not many dishes to be washed, a half loadingmay be used in order to save water, electricity anddetergent.Select the program and then press the MULTIZONEbutton: the indicator over the button lights up and thesymbol of the chosen rack will appear on the display. Bydefault the appliance washes dishes in all racks.To wash only the speci c rack, press this buttonrepeatedly:shown on the display (only lower rack)shown on the display (only upper rack)shown on the display (only cutlery rack)shown on the display (option is OFF and the appliance willwash dishes in all racks).Remember to load the upper or lower rack only, andto reduce the amount of detergent accordingly.SANI RINSEThis option allows higher temperatures to be used.Select the washing program, press the SANI RINSEbutton; the indicator light will light up. To deselect theoption, press the same button again. Ideal to cleancrockery and feeding bottles. The dishwasher door mustbe kept shut for the entire duration of the program inorder to guarantee reduction of germs. If the door isopened the indicator lamp starts ashing.WARNING: the crockery and plates could beextremely hot at the end of the cycle.TABLETThis setting allows you to optimize the performance ofthe program according to the type of detergent used.Press the SANI RINCE button for 3 seconds(the corresponding symbol will light up) if you usecombined detergents in tablet form (rinse aid, salt anddetergent in 1 dose).If you use powder or liquid detergent, this optionshould be o .DELAYThe start of the program may be delayed for a period of time between 0:30 and 24 hours.1.Select the program and any desired options. Press the DELAY button (repeatedly) to delay the start of the program. Adjustable from 0:30 to 24 hours. With each press of the button, the delay start increases by: 0:30 if selection below 4 hours, 1:00 if selection is below 12 hours, 4 hours if selection is above 12 hours. If 24 hours reached, and the button is pressed, the delayed start is deactivated.2. Press the START/PAUSE button: the timer will begin counting down;3. Once this time has elapsed, the indicator light switches o and the program begins automatically.If at the time of the countdown the START/PAUSE button is pressed again the DELAY option is cancelled and the selected program starts automatically.The DELAY function cannot be set once a program has been started.KEYLOCKA long press (for 3 seconds) of MULTIZONE button, will activate the KEYLOCK function. The KEYLOCK function will block the control panel except the ON/OFF button. To deactivate the KEYLOCK, long press again.WATER TAP CLOSED – AlarmFlashes when there is no inlet water or water tap is closed.DRAIN OUTTo stop and cancel the active cycle, the Drain Out function can be used.A long press of START/PAUSE button, will activate the DRAIN OUT function. The active program will be stopped and the water in the dishwasher will be drained out.If an option is not compatible with the selected program seePROGRAMS TABLE, the corresponding LED ashes rapidly 3 timesand beeps will sound. The option will not be enabled.NaturalDryNaturalDry is a convection drying system which automatically opensthe door during/after drying phase to ensure exceptional dryingperformance every day. Door opens at the temperature that is safe toyour kitchen furniture, thus door will not be opened when the optionof SANI RINSE or TURBO are on.As additional steam protection, special designed protection foil isadded together with the dishwasher (depending on the model type -can be the need to buy it). To see how to mount protection foil pleaserefer to (INSTALLATION GUIDE).NaturalDry f unctionality could be disabled by the user as follows:•To DISABLE: Switch On, then switch Off the machine. Keep the "P"button pressed for 5 sec., at the end of 5 sec the dishwasher plays along beep. Switch On the machine, the display shows "o OF"•To ENABLE: Switch On, then switch Off the machine. Keep the "P"button pressed for 5 sec., at the end of 5 sec the dishwasher plays along beep. Switch On the machine, the display shows "oOn"EN DAILY USE1.CHECK WATER CONNECTIONCheck that the dishwasher is connected to the water supply and that the top is open.2.SWITCH ON THE DISHWASHERPress the ON/OFF button.3.LOAD THE RACKS(see LOADING THE RACKS)4.FILLING THE DETERGENT DISPENSER(see PROGRAMS TABLE).5.CHOOSE THE PROGRAM AND CUSTOMISE THE CYCLESelect the most appropriate program in accordance with the type of crockery and its soiling level (see PROGRAMS DESCRIPTION) by pressing the P button.Select the desired options (see OPTIONS AND FUNCTIONS).6.STARTStart the wash cycle by pressing the START/PAUSE button. When the program starts you hear a beep.7.END OF WASH CYCLEThe end of the wash cycle is indicated by beeps and the display shows END. Open the door and switch off the appliance by pressing the ON/OFF button.Wait for a few minutes before removing the crockery - to avoid burns.Unload the racks, beginning with the lower one.The machine will switch o automatically during certain extended periods of inactivity, in order to minimise electricity consumption. If the crockery is only lightly soiled or if it has been rinsed with water before being placed in the dishwasher, reduce the amount of detergent used accordingly.MODIFYING A RUNNING PROGRAMIf a wrong program was selected, it is possible to change it, provided that it has only just begun: press and hold the ON/OFF button, the machine will switch o . Switch the machine back on using the ON/OFF button and select the new wash cycle and any desired options; start the cycle by pressing the START/PAUSE button.ADDING EXTRA CROCKERYWithout switching off the machine, open the door (be ware of HOT steam!) and place the crockery inside the dishwasher. Close the door and press the START/PAUSE button the cycle will begin from the point at which it was interrupted.ACCIDENTAL INTERRUPTIONSIf the door is opened during the wash cycle, or if there is a power cut, the cycle stops. Once the door has been closed or the electricity supply is restored, to start again the cycle from where it was interrupted, press the START/PAUSE button.ADVICE AND TIPSTIPSBefore loading the baskets, remove all food residues from the crockery and empty the glasses. You do not need to rinse beforehand under running water.Arrange the crockery so that it is held in place rmly and does not tip over; and arrange the containers with the openings facing downwards and the concave/convex parts placed obliquely, thus allowing the water to reach every surface and ow freely.Warning:lids, handles, trays and frying pans do not prevent the sprayer arms from rotating.Place any small items in the cutlery basket.Very soiled dishes and pans should be placed in the lower basket because in this sector the water sprays are stronger and allow a higher washing performance.After loading the appliance, make sure that the sprayer arms can rotate freely.HYGIENETo avoid odour and sediment which can be accumulated in the dishwasher, please run a high temperature program at least one a month. Use a tea spoon of detergent and run it without the loading to clean your appliance.UNSUITABLE CROCKERY• Wooden crockery and cutlery.• Delicate decorated glasses, artistic handicraft and antique crockery. Their decorations are not resistant.• Parts in synthetic material which do not withstand high temperatures.• Copper and tin crockery.• Crockery soiled with ash, wax, lubricating grease or ink.The colours of glass decorations and aluminium/silver pieces can change and fade during the washing process. Some types of glass (e.g. crystal objects) can become opaque after a number of wash cycles too.DAMAGE TO GLASS AND CROCKERY• Only use glasses and porcelain guaranteed by the manufacturer as dishwasher safe.• Use a delicate detergent suitable for crockery.• Collect glasses and cutlery from the dishwasher as soon as the wash cycle is over.Load delicate and light dishes:glasses, cups, saucers, low saladbowls.(loading example for the upper rack)ADJUSTING THE HEIGHT OF THE UPPER RACKThe height of the upper rack can be adjusted: high position to place bulky crockery in the lower basket and low position to make the most of the tip-up supports by creating more space upwards and avoid collision with the items loaded into lower rack.The upper rack is equipped with a UpperRack height adjuster(see figure), withoutpressing the levers, lift it up by simplyholding the rack sides, as soon as the rackis stable in its upper position.To restore to the lower position, press thelevers A at the sides of the rack and movethe basket downwards.We strongly recommend that you donot adjust the height of the rack when itis loaded.NEVER raise or lower the basket on one side only.The side foldable flaps can be positioned atthree different heights to optimize thearrangement of crockery inside the rack.Wine glasses can be placed safely in thefoldable flaps by inserting the stem of eachglass into the corresponding slots.For optimum drying results incline thefoldable flaps more. To change theinclination, pull up the foldable flap, slide itslightly and position it as you wish.LOWER RACKFor pots, lids, plates, salad bowls, cutlery etc. Large plates and lids should ideally be placed at the sides to avoid interferences with theThe lower rack has tip-up supports which can be used in a verticalposition when arranging plates or in a horizontal position (lower) toload pans and salad bowls easily.CUTLERY RACKThe third rack was designed tohouse the cutlery.Arrange the cutlery as shownin the figure.A separate arrangement ofthe cutlery makes collectioneasier after washing andimproves washing and dryingperformance.Knives and other utensils with sharp edges must be positionedwith the blades facing downwards.The geometry of the rackmakes it possible to placesuch small items as coffeecups in the area in themiddle.FOLDABLE FLAPS WITH ADJUSTABLE POSITIONCLEANING THE FILTER ASSEMBLYRegularly clean the filter assembly so that the filters do not clog and that the waste water flows away correctly.The filter assembly consists of three filters which remove food residues from the washing water and then recirculate the water: to obtain the best washing results, you need to keep them clean.The dishwasher must not be used without filters or if the filter is loose.After several washes, check the filter assembly and if necessary clean it thoroughly under running water, using a non-metallic brush and following the instructions below:1.Turn the cylindrical filter A in an anti-clockwise direction and pull itout (Fig 1).2.Remove the cup filter B by exerting a slight pressure on the sideflaps (Fig 2).3.Slide out the stainless-steel plate filter C (Fig 3).4.Inspect the trap and remove any food residues. NEVER REMOVE theAfter cleaning the filters, re-place the filter assembly and fix itin position correctly; this is essential for maintaining the efficient operation of the dishwasher.CLEANING THE SPRAY ARMSOn occasions, food residue may become encrusted onto the spray arms and block the holes used to spray the water. It is therefore recommended that you check the arms from time to time and clean them with a small non-metallic brush.clockwise direction. The upper spray arm should be replaced so that the side with the greater number of holes is facing upwards.CLEANING THE WATER INLET HOSEIf the water hoses are new or have not been used for an extended period of time, let the water run to make sure it is clear and free of impurities before performing the necessary connections. If this precaution is not taken, the water inlet could become blocked and damage the dishwasher.MAINTENANCE AND TROUBLESHOOTING GUIDEFor more information, see the Use and Care Guide.The Use and Care Guide can be obtained by:•After-Sales Service, phone number see in warranty booklet.• Download from website: When you contact the After-Sales Service, you must provide the codes shown on the rating plate attached to the left or right side inside the door of the dishwasher. The phone number is listed in the warranty booklet or on the website: Your dishwasher may not work properly.Before contacting the Service Centre check if the problem can be solved by going through the following list. PROBLEMS POSSIBLE CAUSES SOLUTIONSThe dishwasher won’t start or does not respond to commands.The appliance has not been plugged inproperly.Insert the plug into the socket.Power outage.The dishwasher starts automatically when the power returns.The dishwasher door is not closed.Vigorously push the door until you hear the “click”.It does not respond to commands.Switch o the appliance by pressing the ON/OFF button, switch it back onafter approximately one minute and reset the program.The dishwasher won’t drain.The wash cycle has not nished yet.Wait until the wash cycle nishes.The drain hose is bent.Check that the drain hose is not bent (see INSTALATION INSTRUCTION). The sink drain pipe is blocked.Clean the sink drain pipe.The lter is clogged up with food residues.Clean the lter (see CLEANING THE FILTER ASSEMBLY).The dishwasher makes excessive noise.The dishes are rattling against each.Arrange the crockery correctly (see LOADING THE RACKS).An excessive amount of foam has beenproduced.The detergent has not been measured out correctly or it is not suitable foruse in dishwashers (see FILLING THE DETERGENT DISPENSER). Reset dish-washer by pressing the DRAIN button (see OPTIONS AND FUNCTIONS) andrun new program without detergent.The dishes are not clean.The crockery has not been arrangedproperly.Arrange the crockery correctly (see LOADING THE RACKS).The spray arms cannot rotate freely,being hindered by the dishes.Arrange the crockery correctly (see LOADING THE RACKS).The wash cycle is too gentle.Select an appropriate wash cycle (see PROGRAMS TABLE).An excessive amount of foam has beenproduced.The detergent has not been measured out correctly or it is not suitable foruse in dishwashers (see FILLING THE DETERGENT DISPENSER).The cap on the rinse aid compartmenthas not been shut correctly.Make sure the cap of the rinse aid dispenser is closed.The lter is soiled or clogged.Clean the lter assembly (see CARE AND MAINTENANCE).There is no salt.Fill the salt reservoir (see FILLING THE SALT RESERVOIR).CONTACTING AFTER-SALES SERVICEIMPORTANT TO BE READ AND OBSERVEDBefore using the appliance, read these safety instructions. Keep them nearby for future reference. These instructions and the appliance itself provide important safety warnings, to be observed at all times. The manufacturer declines any liability for failure to observe these safety instructions, for inappropriate use of the appliance or incorrect setting of controls.Very young children (0-3 years) should be kept away from the appliance. Young children (3-8 years) should be kept away from the appliance unless continuously supervised. Children from 8 years old and above and persons with reduced physical, sensory or mental capabilities or lack of experience and knowledge can use this appliance only if they are supervised or have been given instructions on safe use and understand the hazards involved. Children must not play with the appliance. Cleaning and user maintenance must not be carried out by children without supervision.CAUTION: the appliance is not intended to be operated by means of an external switching device, such as a timer, or separate remote controlled system.This appliance is intended to be used in household and similar applications such as: staff kitchen areas in shops, offices and other working environments; farm houses; by clients in hotels, motels, bed & breakfast and other residential environments.The maximum number of place settings is shown in the product sheet.The door should not be left in the open position - risk of tripping. The open appliance door can only support the weight of the loaded rack when pulled out. Do not rest objects on the door or sit or stand on it.WARNING:Dishwasher detergents are strongly alkaline. They can be extremely dangerous if swallowed. Avoid contact with the skin and eyes and keep children away from the dishwasher when the door is open. Check that the detergent receptacle is empty after completion of the wash cycle.WARNING: Knives and other utensils with sharp points must be loaded in the basket with their points down or placed in a horizontal position - risk of cuts.This appliance is not for professional use. Do not use the appliance outdoors. Do not store explosive or flammable substances (e.g. gasoline or aerosol cans) inside or near the appliance - risk of fire. The appliance must be used only to wash domestic dishes in accordance with the instructions in this manual. The water in the appliance is not potable. Use only detergent and rinse additives designed for an automatic dishwasher. When adding a water softener (salt), run one cycleThe appliance must be handled and installed by two or more persons - risk of injury. Use protective gloves to unpack and install - risk of cuts. Connect the dishwasher to the water mains using only new hose sets. The old hose sets should not be reused. All hoses must be securely clamped to prevent them coming loose during operation. All local waterboard regulations must be complied with. Water supply pressure 0.05 - 1.0 MPa. The appliance must be placed against the wall or built into furniture to limit the access to its rearside. For dishwashers having ventilation openings in the base, the openings must not be obstructed by a carpet.Installation, including water supply (if any) and electrical connections, and repairs must be carried out by a qualified technician. Do not repair or replace any part of the appliance unless specifically stated in the user manual. Keep children away from the installation site. After unpacking the appliance, make sure that it has not been damaged during transport. In the event of problems, contact the dealer or your nearest After-sales Service. Once installed, packaging waste (plastic, styrofoam parts etc.) must be stored out of reach of children - risk of suffocation. The appliance must be disconnected from the power supply before any installation operation - risk of electrical shock. During installation, make sure the appliance does not damage the power cable - risk of fire or electrical shock. Only activate the appliance when the installation has been completed.If installing the dishwasher at the end of a row of units making the side panel accessible, the hinge area must be covered to avoid risk of injury. The inlet water temperature depends on the dishwasher model. If the installed inlet hose is marked "25°C Max”, the maximum allowed water temperature is 25°C. For all other models the maximum allowed water temperature is 60°C.Do not cut hoses and, in the case of appliances fitted with a waterstop system, do not immerse the plastic casing containing the inlet hose in water. If hoses are not long enough, contact your local dealer. Make sure the inlet and drain hoses are kink-free and are not crushed. Before using the appliance for the first time, check the water inlet and drain hose for leaks. Make sure that the four feet are stable and resting on the floor, adjusting them as required, and check that the dishwasher is perfectly levelled using a spirit level. immediately with the machine empty, to avoid corrosion damage to internal parts. Store the detergent, rinse aid and salt out of reach of children. Shut off the water supply and unplug or disconnect the power before servicing and maintenance. Disconnect the appliance in the event of any malfunction.PERMITTED USE INSTALLATIONENHEALTH & SAFETY GUIDE。
洗碗机的结构及工作原理
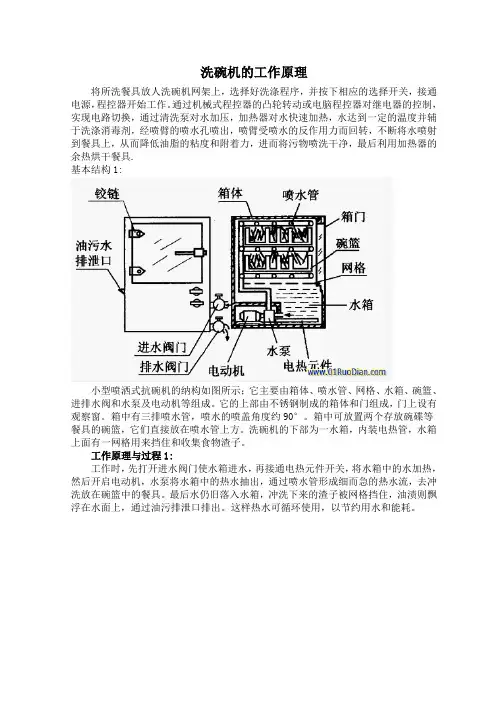
洗碗机的工作原理将所洗餐具放人洗碗机网架上,选择好洗涤程序,并按下相应的选择开关,接通电源,程控器开始工作。
通过机械式程控器的凸轮转动或电脑程控器对继电器的控制,实现电路切换,通过清洗泵对水加压,加热器对水快速加热,水达到一定的温度并辅于洗涤消毒剂,经喷臂的喷水孔喷出,喷臂受喷水的反作用力而回转,不断将水喷射到餐具上,从而降低油脂的粘度和附着力,进而将污物喷洗干净,最后利用加热器的余热烘干餐具.基本结构1:小型喷洒式抗碗机的纳构如图所示;它主要由箱体、喷水管、网格、水箱、碗篮、进排水阀和水泵及电动机等组成。
它的上部由不锈钢制成的箱体和门组成,门上设有观察窗。
箱中有三排喷水管,喷水的喷盖角度约90°。
箱中可放置两个存放碗碟等餐具的碗篮,它们直接放在喷水管上方。
洗碗机的下部为一水箱,内装电热管,水箱上面有一网格用来挡住和收集食物渣子。
工作原理与过程1:工作时,先打开进水阀门使水箱进水,再接通电热元件开关,将水箱中的水加热,然后开启电动机,水泵将水箱中的热水抽出,通过喷水管形成细而急的热水流,去冲洗放在碗篮中的餐具。
最后水仍旧落入水箱,冲洗下来的渣子被网格挡住,油渍则飘浮在水面上,通过油污排泄口排出。
这样热水可循环使用,以节约用水和能耗。
基本结构2:旋转喷臂台式洗碗机结构如图1所示(以万家乐WQP—900型洗碗机为例)。
它主要由箱体、控制机构、加热器、碗篮、洗涤装置、漂洗剂供料装置、进水及排污装置和门控开关等组成。
其箱体内胆采用不锈钢薄板制成,外壳采用冷轧薄钢板,表面喷涂洁白防锈漆,外观美观豪华。
机门设在机壳正面,上方设有暗藏式门扣,关上机门,门控开关触片受压闭合,电源接通,打开机门后,电源自动切断。
机门下方为控制机构,控制板右侧设有三挡水温选择开关。
洗涤时可根据餐具数量和脏污程度进行选择。
其中65 °C挡为热水“强洗”,适应于数量多而又脏的餐具;55° C挡为“普通洗”挡,是平时使用最频繁的一挡;常温挡为“简易洗”,适应于少量餐具的洗涤。
洗碗机的自动控制电路
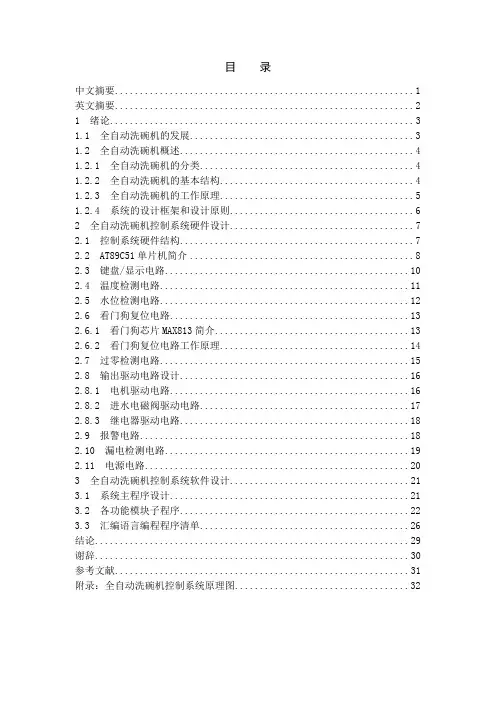
目录中文摘要 (1)英文摘要 (2)1 绪论 (3)1.1 全自动洗碗机的发展 (3)1.2 全自动洗碗机概述 (4)1.2.1 全自动洗碗机的分类 (4)1.2.2 全自动洗碗机的基本结构 (4)1.2.3 全自动洗碗机的工作原理 (5)1.2.4 系统的设计框架和设计原则 (6)2 全自动洗碗机控制系统硬件设计 (7)2.1 控制系统硬件结构 (7)2.2 AT89C51单片机简介 (8)2.3 键盘/显示电路 (10)2.4 温度检测电路 (11)2.5 水位检测电路 (12)2.6 看门狗复位电路 (13)2.6.1 看门狗芯片MAX813简介 (13)2.6.2 看门狗复位电路工作原理 (14)2.7 过零检测电路 (15)2.8 输出驱动电路设计 (16)2.8.1 电机驱动电路 (16)2.8.2 进水电磁阀驱动电路 (17)2.8.3 继电器驱动电路 (18)2.9 报警电路 (18)2.10 漏电检测电路 (19)2.11 电源电路 (20)3 全自动洗碗机控制系统软件设计 (21)3.1 系统主程序设计 (21)3.2 各功能模块子程序 (22)3.3 汇编语言编程程序清单 (26)结论 (29)谢辞 (30)参考文献 (31)附录:全自动洗碗机控制系统原理图 (32)摘要:目前我国家电产品普及程度已经相当高,然而家用洗碗机却一直是一块存在巨大市场潜力而又未被开发的领域。
这主要是由于传统的洗碗机不能适应中餐餐具的洗涤要求,并且能耗大,安全性不够。
针对这种问题,开发出一款节能环保安全型家用全自动自动洗碗机。
基于全自动洗碗机的功能要求,这款洗碗机在洗涤工艺、自动控制和安全保障三个方面作出了全新设计。
1. 自动控制方面,选择使用AT89C51单片机为控制核心,以各个部件的作用时间为逻辑顺序,实现了洗涤过程的智能化控制;2.洗涤功能方面,可提供三种不同的清洗方式,即普通清洗、标准洗和烘干,使清洗效果达到最佳; 3.安全保障方面,采用了漏电检测电路和看门狗复位电路,充分保障洗涤过程的安全性要求。
536 食堂餐具清洗机的设计(SW建模)
前 言近几年来,中国餐饮业市场逐年膨胀,发展势头十分迅猛。
2006年,中国餐饮业销售额首度突 破万亿元大关!但是,餐饮业的卫生状况不容乐观。
在繁荣背后,隐藏有严重问题。
许多中小型餐饮企业,对 于餐具的清洗、消毒,方法原始,意识落后,仅通过简单的洗涤,甚至未进行消毒即重新使用,造 成细菌滋生,催化各类传染病的交叉感染。
国家相关部门对此高度重视,社会舆论也是深度关注! 商机,在不经意间诞生。
当年,一次性卫生餐具的兴起,造就许多财富英雄。
而如今,一次性卫生 餐具由于破坏环提供给餐饮企业,由消费者有偿使用,这种多赢的商业模式受到市场热烈欢迎。
一 时间,投保,使用中易受污染等问题,已远远不能满足市场标准及要求。
国家逐渐出台:限制一次 性筷子的生产和销售。
在此背景下,专业消毒餐具企业应运而生。
消毒餐具厂把餐具集中消毒后, 资消毒餐具企业厂,成为市场中的热门项目,许多投资者瞬间暴富!质量高低不齐,更加深了消费 者的抱怨。
于是突然间,消毒餐具市场进入盘整洗牌阶段。
好项目不会让人失望。
很快,消毒餐具 市场在发展中壮大, 但在发展中遇到了一些问题。
首先, 有消费者对于有偿使用消毒餐具提出异议; 其次,由于投资者层次不一,造成消毒餐具市场的服务场再次火爆。
原因是:消费者的消费观念发 生变化,认识到中小型餐饮企业的清洗、消毒品牌连锁的餐具消毒企业通过规范流程及专业服务, 确立了市场地位,建立了良性循环;再加上,有些地方政府倡导使用餐具集中消毒,激发了投资者 的信心。
餐具毕竟无法和专业公司相比。
越来越多的消费者接受和选择有偿使用消毒餐具;其次, 有些关键词:餐具浸泡;清洗;运输;冲洗目 录1 绪论 (1)1.1 研究对象及内容.............................................................................................................................1 1.2 研究目的.........................................................................................................................................1 1.3 可行性分析.....................................................................................................................................1 1.5 本课题需要重点研究的、关键的问题及解决的思路.................................................................1 2 餐具清洗机的结构及工作原理. (2)2.1 清洗机的结构.................................................................................................................................2 2.2 清洗机的工作过程.........................................................................................................................2 2.3 清洗机的传动部分.........................................................................................................................3 3 动力源的选择 (3)3.1 电机的选择.....................................................................................................................................3 3.2 各级传动比的确定.........................................................................................................................4 3.3 运动参数及动力参数计算.............................................................................................................4 4 带传动的设计与计算. (5)4.1 设计功率.........................................................................................................................................5 4.2 选择带型.........................................................................................................................................5 4.3 确定大、小带轮的基准直径.........................................................................................................5 4.4 验算带速.........................................................................................................................................5 4.5V 带的基准长度 d L和中心距 a ....................................................................................................5 4.6 验算小带轮包角.............................................................................................................................5 4.7V 带根数.........................................................................................................................................5 4.8 作用在带轮轴上的压力.................................................................................................................6 4.9 带轮的结构设计.............................................................................................................................6 5 链轮的设计. (6)5.1 链轮齿数.........................................................................................................................................6 5.2 链条节数.........................................................................................................................................6 5.3 计算功率.........................................................................................................................................7 5.4 链条节距.........................................................................................................................................7 5.5 实际中心距,设中心距可调.........................................................................................................7 5.6 计算链速.........................................................................................................................................7 5.7 作用在轴上的压力.........................................................................................................................7 6 轴 3 的设计. (7)6.1 材料的选择.....................................................................................................................................7 6.2 轴上元件的定位.............................................................................................................................8 6.3 轴的扭转刚度校核计算.................................................................................................................9 7 清洗机主要部分. (9)7.1 清洗机的动力传动部...................................................................................................................10 7.2 清洗浸泡装置...............................................................................................................................11 7.3 传送洗刷装置...............................................................................................................................12 7.4 餐具接收装置...............................................................................................................................12 7.5 总体结构及其装置之间的连接...................................................................................................12 总 结.........................................................................................................................................................14 致 谢.........................................................................................................................................................15 参 考 文 献.. (16)1 绪论1.1 研究对象及内容清洗作为一种人们日常生活中的基本活动,大家已经习以为常,普遍到没有人重视。
最新洗碗机的工作原理详解(有图观看)
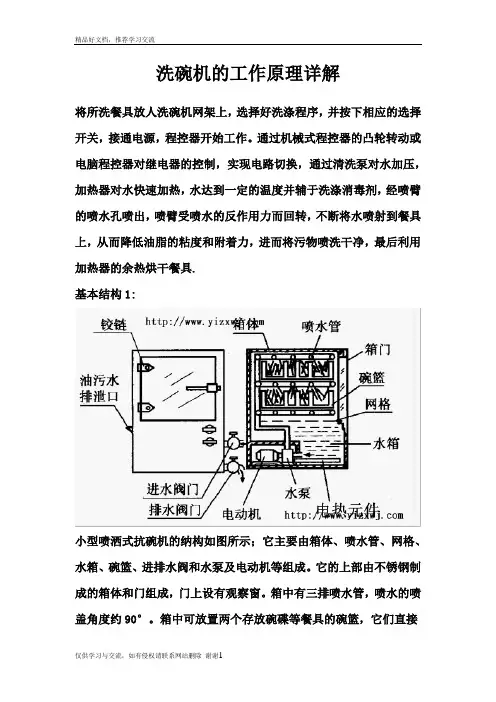
洗碗机的工作原理详解将所洗餐具放人洗碗机网架上,选择好洗涤程序,并按下相应的选择开关,接通电源,程控器开始工作。
通过机械式程控器的凸轮转动或电脑程控器对继电器的控制,实现电路切换,通过清洗泵对水加压,加热器对水快速加热,水达到一定的温度并辅于洗涤消毒剂,经喷臂的喷水孔喷出,喷臂受喷水的反作用力而回转,不断将水喷射到餐具上,从而降低油脂的粘度和附着力,进而将污物喷洗干净,最后利用加热器的余热烘干餐具.基本结构1:小型喷洒式抗碗机的纳构如图所示;它主要由箱体、喷水管、网格、水箱、碗篮、进排水阀和水泵及电动机等组成。
它的上部由不锈钢制成的箱体和门组成,门上设有观察窗。
箱中有三排喷水管,喷水的喷盖角度约90°。
箱中可放置两个存放碗碟等餐具的碗篮,它们直接放在喷水管上方。
洗碗机的下部为一水箱,内装电热管,水箱上面有一网格用来挡住和收集食物渣子。
工作原理与过程1:工作时,先打开进水阀门使水箱进水,再接通电热元件开关,将水箱中的水加热,然后开启电动机,水泵将水箱中的热水抽出,通过喷水管形成细而急的热水流,去冲洗放在碗篮中的餐具。
最后水仍旧落入水箱,冲洗下来的渣子被网格挡住,油渍则飘浮在水面上,通过油污排泄口排出。
这样热水可循环使用,以节约用水和能耗。
基本结构2:旋转喷臂台式洗碗机结构如图1所示(以万家乐WQP—900型洗碗机为例)。
它主要由箱体、控制机构、加热器、碗篮、洗涤装置、漂洗剂供料装置、进水及排污装置和门控开关等组成。
其箱体内胆采用不锈钢薄板制成,外壳采用冷轧薄钢板,表面喷涂洁白防锈漆,外观美观豪华。
机门设在机壳正面,上方设有暗藏式门扣,关上机门,门控开关触片受压闭合,电源接通,打开机门后,电源自动切断。
机门下方为控制机构,控制板右侧设有三挡水温选择开关。
洗涤时可根据餐具数量和脏污程度进行选择。
其中65 °C挡为热水“强洗”,适应于数量多而又脏的餐具;55° C挡为“普通洗”挡,是平时使用最频繁的一挡;常温挡为“简易洗”,适应于少量餐具的洗涤。
6洗碗机之一演示文稿
使用洗碗机的好处
• 1.省时省力。使用洗碗机洗涤餐具,可大大 省时省力。使用洗碗机洗涤餐具, 减轻繁琐的手工劳动。 减轻繁琐的手工劳动。只需将要洗涤的餐具 放入洗碗机,打开水龙头,一按电钮, 放入洗碗机,打开水龙头,一按电钮,尽可 放心地去做其它事情, 放心地去做其它事情,因为洗涤过程中不用 有人守候,能自动完成操作。 有人守候,能自动完成操作。 • 2.操作简便。洗涤自动化程度高,一般有几 操作简便。洗涤自动化程度高, 个程序可选择:例如标准洗、强洗、冲洗。 个程序可选择:例如标准洗、强洗、冲洗。 只要将餐具放入洗碗机内,选定一档, 只要将餐具放入洗碗机内,选定一档,洗碗 机则在设定的时间内,完成洗涤、漂洗、 机则在设定的时间内,完成洗涤、漂洗、消 烘干等选定的功能。 毒、烘干等选定的功能。
光亮剂
1、定义及作用:漂洗剂是洗涤剂的一种,为无色无毒 、定义及作用:漂洗剂是洗涤剂的一种, 的液体,能加速餐具干燥,提高餐具光亮度。 的液体,能加速餐具干燥,提高餐具光亮度。 2、使用说明:使用时顺时针旋转漂洗剂容器盒盖,将 、使用说明:使用时顺时针旋转漂洗剂容器盒盖, 漂洗剂倒入漂洗剂添加器, 漂洗剂倒入漂洗剂添加器,在最后清洗程序中利用程序 控制漂洗剂添加器,按预先调好的档次, 控制漂洗剂添加器,按预先调好的档次,洗碗机会自动 将漂洗剂加入水中。漂洗剂的用量调节:一般每次约2将漂洗剂加入水中。漂洗剂的用量调节:一般每次约 3毫升,调节时用螺丝刀调节漂洗剂容器盒盖下的剂量 毫升, 毫升 调节器(剂量调节器共分六档, 、 档为通用档 档为通用档, 调节器(剂量调节器共分六档,1、2档为通用档,3-6 档根据水质硬度由用户自己选择)。用量过多时, )。用量过多时 档根据水质硬度由用户自己选择)。用量过多时,餐具 上易出现白色水痕,可适当调小档位;用量过少时, 上易出现白色水痕,可适当调小档位;用量过少时,餐 具上易留下水珠,可适当调大档位。 具上易留下水珠,可适当调大档位。
洗碗机培训
▪ 洗碗机型号 ▪ 工作原理 ▪ 电路图 ▪ 安装调试 ▪ 参数设定及代码介绍 ▪ 故障代码含义及解决方案 ▪ 维修简明手册应用 ▪ 质量改进
门式洗碗机型号
WT65 WT55 WT60 WT50 WT1 WT38 WT30 WT830 WT850 LB1 LS6 LS9 LS14 LS12
洗碗机工作原理
▪ 新参数:
– tLE ( 参数组dPA): 若设置为 1,它将启用“ 热敏试纸” 模式( 同时禁用 “ 连续洗程序” 功能键)
– btL( 参数组 dPA):“ 热敏试纸” 模式中,锅炉的温度设定值 – ttL( 参数组 dPA): “ 热敏试纸” 模式中,水缸的温度设定值 – tHt( 参数组dPA): “ 热敏试纸” 模式中,水缸的滞后温度设定值 – tL1 ( 参数组 CY1): “ 热敏试纸” 模式中程序1 的长洗涤时间(分钟) – tS1 ( 参数组CY1): “ 热敏试纸” 模式中程序1 的短洗涤时间(秒钟) – tL2 ( 参数组CY2): “ 热敏试纸” 模式中程序2 的长洗涤时间(分钟) – tS2 ( 参数组 CY2): “ 热敏试纸” 模式中程序2 的短洗涤时间(秒钟) – tL3 ( 参数组 CY3): “ 热敏试纸” 模式中程序3 的长洗涤时间(分钟) – tS3( 参数组 CY3): “ 热敏试纸” 模式中程序3 的短洗涤时间(秒钟)
质量改进
改进了防水渗水的性能
一个塑料盒保护用户电子板受到水溅 及水滴的影响,改善了按钮接触点的稳 定性
质量改进
新的锅炉发热丝连接器
锅炉发热丝现在有了新的连接器(带螺 丝及套圈)取代了Rast5,改进了发热丝 的连接及对电网高峰的承受力
质量改进
电子板的新电压保护
洗碗机附件指南说明书
LG Dishwasher Leveling**
WATCH
*/us/support/lg-direct-service/parts-and-accessories ** https:///watch?v=yK4xsVBLbpI
A 60" Drain Hose is attached to the dishwasher. If an extension drain hose is required, use a 5/8" or 7/8" inside diameter, 2–3 ft. length hose and a coupler for connecting the two hose ends. Do not exceed 12 ft. distance to the drain.*
A 60" Drain Hose is attached to the dishwasher. If an extension drain hose is required, use a 5/8" or 7/8" inside diameter, 2–3 ft. length hose and a coupler for connecting the two hose ends. Do not exceed 12 ft. distance to the drain.*
Installation Parts that are included
If you want the dishwasher toe kick to match your cabinetry, you must purchase separately from a local fabricator or cabinet supplier.
(完整PPT)洗碗机知识大全
PART 3. 2 洗碗机安装
嵌入式
1.8米长的4分耐高 温排水管
1.4米长的10A普通三 角插座
6分螺纹进水管
24
PART 3. 2 洗碗机安装
嵌入式
25
PART 3. 2 洗碗机安装
嵌入式
一字型接法 L型接法
26
PART 3. 2 洗碗机安装
主要配件
嵌入式
进水管
盐斗
洗碗机底部垫脚, 调节机器高度和平衡
目 录
CONTENTS
01
洗碗机的认识
02
主推产品介绍
03
配件的认识与测量
CONTENTS
目
01
洗碗机的认识
录
洗碗机的认识“N套机”解释
按安装方式
按容量方式
以6套机为例,简单点说: 6个人上餐馆,每人一套个人餐具+6菜一汤公用餐具
洗碗机的命名方式
洗碗机
D A 8 S - 01G - P3
全自动
14
洗碗机主要程序 耗水吗?
按安装方式
按容量方式
备注:根据餐具的赃污程度,用户自行选择是否 添加标配用量的洗碗粉,如玻璃器皿等轻度赃污 餐具的清洗可无需添加。
PART 3. 1 洗碗机认识
耗电吗?
16
*使用一次,仅需0.53元水电费(节能洗)
*(以上数据参照友嘉DA8B-01S-V6标准,
以每吨水2.8元,每度电0.6元计算。不同 地区的居民电费收费不同,计算结果会所 差异。以上数据来自友嘉洗碗机测试中心)
PART 3. 1 洗碗机认识
噪音大吗?
噪音测试
实验对象:WQP8-W3906B-CN 最大功率:1380W 测试程序:强力洗 洗涤餐具:8套
AE-A2RD2洗碗机结构示意图说明书
文案大全AE-A2RD2 隧道式洗碗机结构设计入口段洗涤槽 1~2段 高温双冲洗烘干1段 烘干2段出口段强化1保障2保障1强化3强化2新增强化7强化6强化5强化4安全开关节流控制文案大全强项说明如下 :本机种在原节能光电控制节水节能省耗、双层钢板结构、高温冲洗热水回收、ABB 耐用不锈钢水泵等设计,强化并改善机种CE 之安规认证及HACCP 卫生安全认证,全机种采用SUS304不锈钢材质 CE 安全标规及耐高温高湿组件(施耐德),降底故障强化功能, 以加强输送带运转顺畅节能光电控制使耗水量仅360公升节能省耗50%W/30%E/65%C 及凹防堵洗臂匀称的上、下、冲洗功能设计 ,并强化每一喷洗臂之凹型防堵喷嘴喷洗力道达3Kg 扇形涵盖面洗涤, 让下洗及下吹更能充分获得功能洗涤槽每槽采用瑞士ABB 品牌2HP 洗泵 (上下洗臂)组及不锈钢前壳+不锈钢叶片,来增强冲洗力及耐力文案大全,以加强高温洗涤及消毒 ,并把产生的热水再回收使用 输送带采用不锈钢炼条已加强强韧性并防止锈蚀新增0.75kw 电机热风吹干2段, 为了让洗碗碟后加速烘干特别新增二段加强设计高风机组 , 使温度保持在约70℃ 并强化在高温洗涤消毒后加速烘干水分使外达到烘干风干效果,引进英国专利技术并结合本身生产洗碗涤机的国际认证专业技术及特殊设计,成功 发展世界上第一套无需耗材,长久持续有效,防止洗涤机洗涤室及升温器系统部生成水垢的功能治水性系统参数说明功能说明 : 双缸+高温双冲洗+双槽热风段尺 寸 :6250x910x2150 mm (入口950 + 洗槽2缸x800 + 喷淋段800 +烘干2段x800 + 出口1300 ) 入仓尺寸 :612x 420 mm (最大洗涤量及行进速度:约2.5~3公尺/分±3%。
) 电源供应 :全蒸气加热式:AE-A2RD2A.洗涤电机:1.5kw ±3% x 2 (水槽加热9kw x 2)B.输送带电机:0.55kw ±3% ×1C.双冲洗电机 : 0.25 kw ±3% ×1D.烘干段电机 : 0.75kw ±3% ×2 (烘干加热13.5kw x 2)E.各水槽加热采电加热(蒸气) 加热式、热烘干采电加热(蒸气)加热F.升温器采电加热(蒸气盘管式) 加热建于升温器(BOOSTER)中。