i7100反馈抑制器
elan-sc-100-quick-install-说明书
Quick Install Guide EL-SC-100QUICK INSTALL GUIDEThe EL-SC-100 Controller may be used as a standalone system controlleror as an Extender to any gSC OR SC controller or running g!6.6 or greater. Please check the ELAN Training Guide for EL-SC-100 control capabilities. The ELAN Training Guide contains valuable hardware and software reference documentation and is considered an important supplement to this document. Make sure you have the latest version by visiting the ELAN Dealer website at and follow the Dealer Resources link.Included in the box:• EL-SC-100 Controller• 12vDC Power SupplyImportant Safety Instructions:1. Read, understand and follow ALL safety and installation instructionsincluded in this manual. Failure to follow the included documentation may damage the product and will void manufacturer’s warranty.2. Follow ALL installation guidelines included with the product. Installationof the product in high humidity environments, in close proximity to heat sources and /or non-recommended locations will impede, interfere and/or damage the intended operation of the product3. Only use attachments and accessories which have been specified for useby the manufacturer.4. The use of abrasive, liquid or solvent based cleaning fluids will damagethe product. Please refer and follow all Product Care instructions included with the product.5. Product Servicing may only be completed by authorized or certifiedservice centers and personnel. For a complete list of product servicing options, please follow instructions included in the product documentation and /or contact original manufacturer for details.2EL-SC-100FCC and IC Information:This Class B digital apparatus complies with Part 15 of the FCC rules and with Canadian ICES-003 and RSS-247.Operation is subject to the following two conditions:1. This device may not cause interference and2. This device must accept any interference, including interference that maycause undesired operation of the device.Cet appareil numérique de classe B est conforme aux normes canadiennes ICES-003 et RSS-247. Son fonctionnement est soumis aux deux conditions suivantes : (1) cet appareil ne doit pas causer d’interférence et (2) cet appareil doit accepter toute interférence, notamment les interférencesqui peuvent affecter son fonctionnement.Warning:Changes or modifications to this unit not expressly approved by the party responsible for compliance could void the user’s authority to operate the equipment.FCC and IC Radiation Exposure Statement:This equipment complies with FCC radiation exposure limits set forth foran uncontrolled environment and meets the exemption from the routine evaluation limits in section 2.5 of RSS 102.1. This Transmitter must not be co-located or operating in conjunction withany other antenna or transmitter.2. This equipment complies with FCC RF radiation exposure limits setforth for an uncontrolled environment. This equipment should beinstalled and operated with a minimum distance of 20 centimeters from user and bystanders.3QUICK INSTALL GUIDE4Warning:The device meets the exemption from the routine evaluation limits in section 2.5 of RSS 102, and users can obtain Canadian information on RF exposure and compliance from the Canadian Representative Product Solutions Group at Tel: (519) 763-4538.FEDERAL COMMUNICATIONS COMMISSION INTERFERENCE STATEMENT:This equipment has been tested and found to comply with the limits for a Class B digital device, pursuant to part 15 of the FCC Rules.These limits are designed to provide reasonable protection against harmful interference in a residential installation. This equipment generates, uses and can radiate radio frequency energy and, if not installed and used in accordance with the instructions, may cause harmful interference to radio communications.However, there is no guarantee that interference will not occur in a particular installation. If this equipment does cause harmful interference to radio or television reception, which can be determined by turning the equipment off and on, the user is encouraged to try to correct the interference by one or more of the following measures:• Reorient or relocate the receiving antenna.• Increase the separation between the equipment and receiver.• Connect the equipment into an outlet on a circuit differentfrom that to which the receiver is connected.• Consult the dealer or an experienced radio/ TV technician for help.EL-SC-100 La puissance de sortie émise par l’appareil de sans fil est inférieure à la limite‘exposition aux fréquences radio d’Industry Canada (IC). Utilisez l’appareil de sans fil de façon à minimiser les contacts humains lors du fonctionnement normal.Ce périphérique a également été évalué et démontré conforme aux limitesd’exposition aux RF d’IC dans des conditions d’exposition à des appareils mobiles (antennes sont supérieures à 20 cm à partir du corps d’une personne). FCC and IC RegistrationsFCC ID: EF400186IC: 1078A-00186Z-Wave Operating FrequencyAustralia/New Zealand: 921.42/921.40/919.80MHzUS/Canada: 908.42/908.40/916MHzEuropean: 868.42/868.40/869.85MHzZ-Wave Developer’s Kit: 7.13.1This product can be operated in any Z-Wave™ network with other Z-Wave certified devices from other manufacturers. All mains operated nodes within the network will act as repeaters regardless of vendor to increase reliability of the network.In an ELAN SC Series System Controller, the host application controls the device reset feature.If this controller is the primary controller for your network, resetting it will result in the nodes in your network being orphaned and it will be necessary after the reset to exclude and re-include all of the nodes in the network. If this controller is being used as a secondary controller in the network, use this procedure to reset this controller only in the event that the network primary controller is missing or otherwise inoperable.5QUICK INSTALL GUIDE6EL-SC-100 OverviewDimensions: 6.95 in. x 4.94 in. x 1.30 in.PowerButton Status Indicator ResetEL-SC-10073 in.MountingThe EL-SC-100 is designed to mount on a shelf, hang in a cabinet or rack, or mount in a structured wiring enclosure with optional mounting bracket.Wall Mounting: The EL-SC-100 chassis has been designed to allowconvenient wall mounting in any orientation. Arrows on the rear panel may be used to mark the location for the screws. Mark the screw locations, mount the screws leaving approx. 3/16” (5mm) of screw exposed and slide the chassis over the screws.NOTE: Mounting height < 2 meters. Weight < 1 kg.Shelf Mounting: The EL-SC-100 has rubber feet to protect finished surfaces. Set the controller in a location that will allow you to properly manage connected wiring so that there is no tension on the connections.8EL-SC-1009Serial ConnectionConnect an RS-232 serial controlled device using an RJ45 connector (not included) to the RS232 port on the rear of the controller.The EL-SC-100 serial connector is not compatible with RS-485 serial devices. If your project requires RS-485 connections you will need to use a gSC10 controller.Below is the wiring pin-out for the RJ45 connector.12 (CD)3 (DTR)4 (SG)5 (RD)6 TD)7 (CTS)8 (RTS)12345678QUICK INSTALL GUIDESense Input ConnectionELAN sensors can be used to trigger events from 3rd party devices.The status is binary, either ON or OFF. This can be used to trigger an event map or as a condition of an event map. CONNECT ONLY an ELAN sensor to this port.Available ELAN sensors:Audio Sensor ...........................................P/N: AUDSENSORVideo Sensor............................................P/N: VIDSENSORContact Closure Sensor ...........................P/N: CTSENSORCurrent / Magnetic Field Sensor ...............P/N: CRSENSORLight / LED Sensor ...................................P/N: LTSENSORVoltage Sensor .........................................P/N: VTSENSORIR Output ConnectionThree discrete IR outputs are supplied to control third party devices.Each output is compatible with Xantech single and dual emitters10EL-SC-10011HDMI ConnectionThe EL-SC-100 includes an HDMI connector for an on screen display (OSD) interface. Connect the OSD output to an available HDMI input on a display or AVR.USB ConnectionThe USB connection is primarily designed for connecting the optional USB Z-Wave antenna. See the integration note for configuring Z-Wave devices through the EL-SC-100.LAN / PoE ConnectionThe EL-SC-100 has a Gigabit PoE compatible Ethernet port. Connect an Ethernet cable to an available port on the network.Note: The EL-SC-100 can be connected via Wi-Fi, however a wired connection is preferred.The EL-SC-100 can be powered over Ethernet (PoE). The minimum PoE requirement is IEEE 802.3at. 42.5 - 57 VDC, 600 mA maximum.RESET ButtonLocated on the right side of the controller, is the recessed pinhole button that can be used in three ways:1. 2 second press and release resets the controller to DHCP2. 20 second press and release removes all configuration information. Software version will be maintained.3. While applying power, a 10 second press and release will perform a full factory reset. Software will revert to factory default version. DO NOT remove power during a factory reset as it will permanently damage the unit. Allow the unit to reboot and become discoverable (about 4 minutes). Note: the LED will remain red during the reset process.WARNING! THESE ACTIONS CANNOT BE UNDONE!QUICK INSTALL GUIDEPowerOnce all other connections have been completed, connect an Ethernet cable connected to a PoE switch or the 12 VDC, 1A power supply to the DC input. Power ButtonWhen the controller is off, a short press powers unit onWhen the controller is on, a short press (less than three seconds)restarts controller.When the controller is on, a long press (3 seconds or longer)powers down the controllerLED Status IndicatorThe LED communicates the status of the controller:Blue = Connected OK / PowerBlue flashing = Boot upAmber = No network foundRed = Boot failureRed flashing = Self-check failure12EL-SC-100Network ConnectionThe EL-SC-100 is factory set to use DHCP. Connect to a wired network and use the ELAN Configurator to connect to the controller. Once connected, use configurator to set a static IP address or connect via Wi-Fi. Software UpdatePrior to configuring the controller, upgrade the software to the latest available version found on the ELAN Dealer Resources portal. Download and open the executable file and follow the on screen instructions.13QUICK INSTALL GUIDE Notes14EL-SC-100Limited WarrantyNortek Security & Control ( ‘NSC’ ) warrants the EL-SC-100 to be free from defects in materials and workmanship for the period of two years (2 years) from the date of purchase. If within the applicable warranty period above purchaser discovers that such item was not as warranted above and promptly notifies ‘NSC’ in writing, ‘NSC’ shall repair or replace the item at the company’s option. This warranty shall not apply (a) to equipment not manufactured by ‘NSC’,(b) to equipment which shall have been installed by other than an ‘NSC’ authorized installer,(c) to installed equipment which is not installed to ‘NSC’s’ specifications, (d) to equipment which shall have been repaired or altered by others than ‘NSC’, (e) to equipment which shall have been subjected to negligence, accident, or damage by circumstances beyond ‘NSC’s’ control, including, but not limited to, lightning, flood, electrical surge, tornado, earthquake, or other catastrophic events beyond ‘NSC’s’ control, or to improper operation, maintenance or storage, or to other than normal use of service. With respect to equipment sold by, but not manufactured by ‘NSC’, the warranty obligations of ‘NSC’ shall in all respects conform to the warranty actually extended to ‘NSC’ by its supplier. The foregoing warranties do not cover reimbursement for labor, transportation, removal, installation or other expenses which may be incurred in connection with repair or replacement. Except as may be expressly provided and authorized in writing by ‘NSC’, ‘NSC’ shall not be subject to any other obligations or liabilities whatsoever with respect to equipment manufactured by ‘NSC’ or services rendered by ‘NSC’. THE FOREGOING WARRANTIES ARE EXCLUSIVE AND IN LIEU OF ALL OTHER EX PRESSED AND IMPLIED WARRANTIES EXCEPT WARRANTIES OF TITLE, INCLUDING BUT NOT LIMITED TO IMPLIED WARRANTIES OF MERCHANTABILITY AND FITNESS FOR A PARTICULAR PURPOSE.ATTENTION: TO OUR VALUED CUSTOMERSTo ensure that customers obtain quality pre-sale and after-sale support and service, Nortek Security & Control products are sold exclusively through authorized dealers. Nortek Security & Control products are not sold online.The warranties on Nortek Security & Control products are NOT VALID if the products have been purchased from an unauthorized dealer or an online E-tailer. To determine if your Nortek Security & Control reseller is authorized, please call Nortek Security & Control at (707) 283-5900.15Main: 800-472-5555 | International: 707-283-5900 Mon-Fri 6am - 4pm ESTTech Support is closed every Tuesday between 1:20pm and 2:30pm PST for team development. 5919 Sea Otter Place, Suite 100, Carlsbad, CA, 92010For more information on Elan Control Systems, visit:©2021 Nortek Security & Control LLC. All rights reserved.Elan is a registered trademark of Nortek Security & Control LLC.P/N: 10024269 Rev-D。
竣工资料
河北华能京张高速公路有限责任公司是京张高速公路的项目法人,由中国华能集团公司、河北省高速公路开发有限公司、河北省建设投资公司、张家口市公路开发公司四家股东在平等互利、风险共担、利益共享的基础上,于1998年7月31日共同出资组建的。
公司按照BOT模式,以现代企业管理的要求,全面负责京张高速公路的建设、经营、管理,同期接管了110国道二级汽车专用线(怀来至宣化段)65.48公里的经营权。
大会议室面积约70.2平方米,主要进行华能京张公司日常会议的召开,同时可满足各种业务培训的综合性场所;同时还可以实现与河北省高速公路管理局进行视频会议,进而此会议室应设计定位有以下功能系统。
●音频扩声系统●视频显示系统●视频会议系统●装修改造●其他配套设施为两个会议室的会议设备配置1套UPS电源。
两个会议室设备的总功率为6500W,建议配置一台10KV A的UPS,我们选择的是深圳科士达UPS。
深圳科士达UPS市场占有率连续十年排名国产品牌第一。
本方案采用深圳科士达GP810UPS,该设备功率范围:1KV A~10KV A;配置蓄电池容量为65AH*32,可以供电两小时。
UPS工作方式为单进单出工频在线式。
特点如下:■高可靠性设计:·双变换在线式设计,使UPS的输出为频率跟踪、锁相稳压、滤除噪声、低失真度、不受电网波动干扰的纯净正弦波电源,使UPS对用户设备提供更为全面和完美的保护。
·输出零转换时间,满足精密设备对电源的高标准要求。
■对负载保护能力强·机内自带输出隔离变压器,抗干扰能力强,为用户设备提供更为全面、完美的保护。
·极小的零地电压差,满足精密仪器设备的供电需求,保护设备的安全运行。
·■环境适应性强·宽广的电压输入范围达150~310V AC(加A VR),避免频繁地切换至电池供电,适应于电力环境恶劣的地区。
■电池优化性能高·采用智能电池管理技术,从而延长电池的使用寿命,减少电池维护次数。
YAMAHA REV100效果器使用说明FBX-2420反馈抑制器的使用说明

YAMAHA REV100效果器使用说明鉴于目前很多场所在用YAMAHA REV100的效果器,现把该效果器的简易使用说明奉献给大家!YAMAHA--- REV100简易使用说明一、正确安装和连接YAMAHA--- REV100。
如使用单声道可只接左声道。
INPUT LEVEL:输入电平旋钮,调节此旋钮使峰值指示灯在正常工作时偶尔闪亮。
一直闪亮表示信号过强,声音会削波,过弱又会发生音质下降,因此调节适当的电平输入是使用好效果器的第一步,也是很重要的一步。
MIX BALANCE:效果混合旋钮,用来调节效果声和原声之间的比例。
PROGRAM:用来选择不同的程序,编辑程序存储。
二、改变效果程序:YAMAHA—REV100共有99种效果程序,用上下光标键选择。
混响程序名类型说明01 Vocal rev1 人声适用于人声混响02 Vocal rev2 大厅 3号程序的前期延长,混响时间短03 Vocal rev3 人声04 Room ambience1 盘子 04-08这些效果适用于鼓和打击乐音色,可作用于整个鼓组或某个鼓音色05 Room ambience2盘子06 Room ambience3盘子07 Wood booth1 人声08 Wood booth2 人声09 Acoustic piano plate 用于钢琴的混响10 Club piano 大厅用于钢琴的混响11 Booming kick1大厅用于底鼓的混响,强调低频12 Booming kick2 房间用于底鼓的混响,强调低频13 Loud snare房间用于军鼓的混响14 Acoustec steel guitar1 盘子钢弦原声吉它的混响15 Acoustec steel guitar2 盘子钢弦原声吉它的混响16 String plate 盘子弦乐的混响17 Acoustec gut guitar1 人声尼龙弦原声吉它混响18 Acoustec gut guitar2 人声尼龙弦原声吉它混响19 Btass room1 房间铜管乐器的混响20 Btass room 房间铜管乐器的混响立体声混响程序名类型说明21 Large hall1 大厅 Stage比hall的混响更明亮22 Large hall2 大厅 Stage比hall的混响更明亮23 Stage1 大厅 Stage比hall的混响更明亮24 Stage2 大厅 Stage比hall的混响更明亮25 Chamger1 人声模拟大房间,高顶的混响26 Chamger2 大厅模拟大房间,高顶的混响27 Church1 房间模拟大房间,高顶的混响28 Church2 大厅模拟大房间,高顶的混响29 Old gunnel 大厅模拟长通道中的混响,old暗、new明亮30 New tunnel 人声31 Large room1 房间房间混响,32比31低频更多32 Large room2 房间33 Slide reverb 房间混响的声像在右34 Huge room1 房间比房间混响更有力的混响35 Huge room2 房间比房间混响更有力的混响36 Bathroom 盘子短立体声的混响37 String ensemble 盘子用于弦乐的大混响38 Rude reverb1 人声粗混响39 Rude reverb2 人声粗混响40 Comcert grand piano 人声用于原钢琴的混响门混响程序名类型说明41 Small ambience1 大厅小房间反射混响,42比41的低频少42 Small ambience2 大厅43 Tight poom1 房间比上面两种效果更小的混响44 Tight poom 大厅比上面两种效果更小的混响45 Gate reverb1 盘子各种门混响46 Gate reverb2 人声各种门混响47 Gate reverb3 大厅各种门混响48 Gate reverb4 大厅各种门混响49 Stone room 房间石头房间混响50 Big curve 人声最长的门混响延迟程序名说明51 Analog delay1 软延迟52 Ping pong delay 声像左右变化的延迟53 Eighth note triplet 像8分三连音符的延迟54 Karaoke 用于卡拉OK的回声效果55 Short delay doubler 一次短的延迟56 Stereo long delay 左右声道同长的立体声延迟57 Sgereo medium delay 左右声道不等长的立体声延迟58 Stereo long delay 左右声道同长的短延迟59 Mono long delay 单声道输出的重复延迟60 Mono short delay 单声道输出的重复延迟延迟/混响程序名类型说明61 Electric piano 延迟+大厅常用于钢琴62 String pad 延迟大厅常用于背景音乐63 Synth 延迟人声用于弦乐背景64 Vocal1 64、65是用短延迟的长混响,适用于人声65 Vocal2 延迟大厅 64、65是用短延迟的长混响,适用于人声66 Vocal3 延迟房间 66是强调延迟的短混响67 Btinght vocal 延迟盘子有小延迟的亮混响68 Chorus 延迟+盘子一半混响,一半延迟69 Drum kit1 延迟+ 房间用于鼓和打击乐的混响70 Drum kit2 延迟盘子用于鼓和打击乐的混响混响/调制程序名类型说明71 Soft flange1 大厅+飘忽此效果结合了混响和小音高变化的飘忽,常用于合成音色背景音乐72 Soft flange2 大厅+飘忽此效果结合了混响和小音高变化的飘忽,常用于合成音色背景音乐73 Amgience flange1 房间飘忽短混响加飘忽74 Amgience flange2 房间飘忽短混响加飘忽75 Soft reverb flange 房间飘忽短混响加音高变化更大的飘忽76 Organ cabinet1 盘子飘忽用于风琴的飘忽效果77 Organ cabinet2 房间交响用于风琴的飘忽效果78 Symphonic reverb1 大厅+交响以混响为主的精致效果79 Symphonic reverb2 人声+交响以混响为主的精致效果80 Flange room1 房间+飘忽为鼓和打击乐加特效81 Flange room2 房间+飘忽为鼓和打击乐加特效82 Rolling flange1 盘子+飘忽为鼓和打击乐加特效83 Rolling flange2盘子+飘忽为鼓和打击乐加特效84 Big flange 人声飘忽喷气机效果85 Chorus rererb1 大厅+合唱 85,86是普通的混响+合唱,用途很广如用于钢琴86 Chorus reverb2 盘子+合唱87 Chorus reverb3 大厅+和唱88 Chorus reverb4 人声+合唱89 Tremolo reverb1 大厅+震音震音+混响的各种变化效果90 Tremolo reverb2 大厅震音震音+混响的各种变化效果91 Tremolo reverb3 盘子+震音震音+混响的各种变化效果92 Tremolo reverb4 人声+震音震音+混响的各种变化效果93 Tremolo reverb5 人声+震音震音+混响的各种变化效果94 Tremolo reverb6 大厅+震音震音+混响的各种变化效果95 Tremolo reverb7 大厅+震音震音+混响的各种变化效果96 Ambient slow pan1大厅+震音左右声像变化和短混响97 Ambient slow pan2 房间+震音左右声像变化和短混响98 Sequence pan1房间+震音根据乐曲速度而定的声像变化效果99 Sequence pan2房间+震音根据乐曲速度而定的声像变化效果编辑模式(Edit Mode)REV100的每个效果都具有多个参数,3个主要参数可通过面板上的旋钮控制。
百灵达反馈抑制器FBQ2496

N BANDWIDTH
用 BANDWIDTH 带宽键你可确定选出的参数滤波器 的频带宽度 (Q 因数 / 品质)。可调节的滤波品质包 括从 1/60 个八度音至 10 个八度音的范围。为此 FBQ2496 必须位于 PEQ 模式中 (PEQ 键上的发光 二极管发亮)。
FBQ2496 是市场上最快速的 (>0.2 秒)和同时唯一的 96 kHz 反馈抑制器。它具备超速和智能的反馈识别算法、 能够自动测定每条通道最多达 20 个的反馈频率的位置、 并通过极窄的陷波滤波器来抑制这些反馈频率、而有用信 号几乎不受影响。
“Set-and-Forget”(设定既忘)功能和紧急键功能确保了特 别简单和立即生效的反馈抑制。在自动模式中、混音被持 续监视、滤波器调节自动调整。而在手动模式中、可放置 最多达 40 个的全参数滤波器、其频率、频带宽度、抬高 / 下降可调节。开放的 MIDI 结构使今后能够进行软件的更新 升级、并方便了同数字式设备的交流。在现场使用时、你 可通过 不同的运 行方式来灵 活配合不同 的情形。此外、 FBQ2496 作为有创新力的声音制作工具也适合在录音室 中使用。
深圳市成海音响灯光设备有限公司
4
3. 操作元件和接口
FEEDBACK DESTROYER PRO FBQ2496
K PEQ
在 长时按 了 PEQ 键后 (PEQ 键上的发 光二极管 闪烁)、可用旋转钮调节参数滤波器的数量。数量始 终从滤波器 20 开始、可逐步增加至滤波器 1 (参见 图 4.2)。同时显示设置的单发滤波器。如 果 只 是 短 时按 PEQ 键 (PEQ 键上的发光二极管发亮)、可用 旋转钮选择每个滤波器。这时所选出的滤波器的编号 在显示器中显示、该滤波器发光二极管闪烁。现在可 显示放大、频带宽度和中心频率这几个参数。
S100说明书

DIgITech-DOD-S100数字效果器中文说明书S—100的使用手册前板1.配置矩阵:这个距阵展示在s—100中可利用的五个不同的效果配置2.输入表/效果显示:在节目中这个仪表显示进入该单元的输入信号。
在编辑中,它显示正在使用的效果。
3.数字显示器:在节目方式中,这个数字显示器将显示节目编号(小数点表示用户节目)。
在编辑方式中,该显示器将指示这些效果及参数值。
4.节目/数据轮盘:在节目方式中,这个轮盘用于改变节目的当前使用单元,在编辑方式中,被用于选择效果及改变参数。
5.节目按钮(program):使S100返回到按过时的节目方式。
6.存储按钮(store):用于S100中存储节目修改。
7.配置按钮(config):用于选择配置方式。
一旦按过之后,使用节目/数据轮盘以选择节目的不同效果配置。
8.混频/MIDI(mix/midi):该按钮用于旋转演习信号ON(接通)OFF(断开)及选择MIDI 通道,由此收到节目改变信息。
9.,a----g节目编辑按钮::这七个按钮用于对S100进行按键编辑修改,功能如下: 9---a 均衡器/控制电路(EQ/Gate)-----这个按钮(连同四个参数按钮)是用于调整三个频带均衡器及噪声门限和释放,按一次选择均衡器,按两次选择噪声控制电路. 9---b驱动A(Engine A)----这个按钮选择驱动器A效果模块。
当按下该按钮,可使用轮盘改变这个模块中使用的效果。
9---c驱动B(Engine B)----这个按钮选择驱动器B效果模块。
当按下该按钮,可使用轮盘改变这个模块中使用的效果。
9---d参数1(param1)/预置延迟(predelay):该按钮选择参数1,用于编辑连同轮盘一起使用。
同样也是混响效果的预置延迟参数。
9---e参数2(param2)/混响衰减(decay):该按钮选择参数2,用于编辑连同轮盘一起使用。
同样也是混响效果的混响衰减参数。
9---f参数3(param3)/阻尼(damping):该按钮选择参数3,用于编辑连同轮盘一起使用。
反馈抑制器连接方法
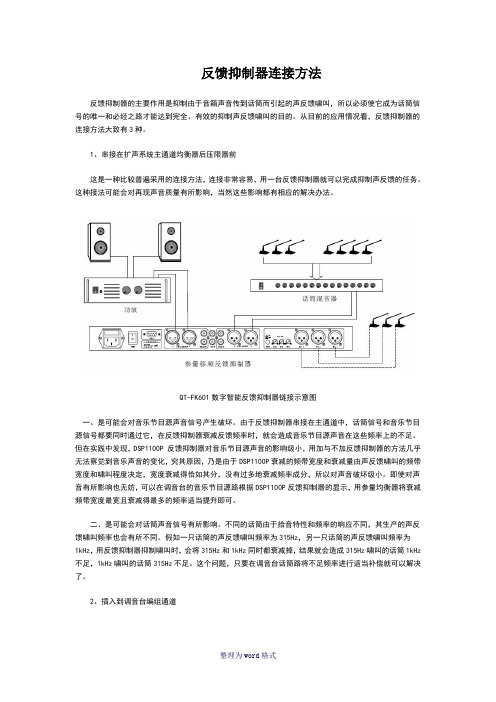
反馈抑制器连接方法反馈抑制器的主要作用是抑制由于音箱声音传到话筒而引起的声反馈啸叫,所以必须使它成为话筒信号的唯一和必经之路才能达到完全、有效的抑制声反馈啸叫的目的。
从目前的应用情况看,反馈抑制器的连接方法大致有3种。
1、串接在扩声系统主通道均衡器后压限器前这是一种比较普遍采用的连接方法,连接非常容易,用一台反馈抑制器就可以完成抑制声反馈的任务。
这种接法可能会对再现声音质量有所影响,当然这些影响都有相应的解决办法。
QT-FK601数字智能反馈抑制器链接示意图一、是可能会对音乐节目源声音信号产生破坏。
由于反馈抑制器串接在主通道中,话筒信号和音乐节目源信号都要同时通过它,在反馈抑制器衰减反馈频率时,就会造成音乐节目源声音在这些频率上的不足。
但在实践中发现,DSP1100P 反馈抑制器对音乐节目源声音的影响级小,用加与不加反馈抑制器的方法几乎无法察觉到音乐声音的变化,究其原因,乃是由于DSP1100P衰减的频带宽度和衰减量由声反馈啸叫的频带宽度和啸叫程度决定,宽度衰减得恰如其分,没有过多地衰减频率成分,所以对声音破坏级小。
即使对声音有所影响也无妨,可以在调音台的音乐节目源路根据DSP1100P反馈抑制器的显示,用参量均衡器将衰减频带宽度最宽且衰减得最多的频率适当提升即可。
二、是可能会对话筒声音信号有所影响。
不同的话筒由于拾音特性和频率的响应不同,其生产的声反馈啸叫频率也会有所不同。
假如一只话筒的声反馈啸叫频率为315Hz,另一只话筒的声反馈啸叫频率为1kHz,用反馈抑制器抑制啸叫时,会将315Hz和1kHz同时都衰减掉,结果就会造成315Hz啸叫的话筒1kHz 不足,1kHz啸叫的话筒315Hz不足。
这个问题,只要在调音台话筒路将不足频率进行适当补偿就可以解决了。
2、插入到调音台编组通道将所有话筒编组到调音台某编组通道,反馈抑制器插入(INS)到调音台的话筒编组通道,在这种情况下,只有话筒信号通过反馈抑制器,音乐节目源信号不经过它二直接进入主通道,故反馈抑制器对音乐信号不会产生任何影响。
SABINEFBX2020反馈抑制器说明书
【提要】本文较为详实地叙述了扩声系统中如何运用FBX20Plus双声道反馈抑制器消除回授啸叫现象,同时保持足够音量和良好音质的方法、过程。
【关键词】扩声系统消除啸叫在会议、演出、演讲、报告会等众多场合,扩声系统都是必不可少的。
良好的扩声效果,是成功举办这些活动的先决条件和有力保障。
好的扩声效果应当是声音清晰,频响均衡,声功率分布均匀,无回声现象,从而能满足听众对响度、清晰度的要求。
不过,在实际应用中,我们经常会遇到这样那样的问题,其中回授导致的啸叫现象是最常碰到也最令人头痛。
不但刺耳难听,而且可能对扬声器乃至功放系统产生巨大危害。
1声反馈产生原因扩声系统中之所以产生声反馈现象是由于传声器将扬声器重放出来的声音反复拾取且音量超过一定限度时,这种同频声信号就会引起放大电路回授,产生啸叫。
出现啸叫现象主要有三方面原因:一是传声器拾音入射角度与扬声器辐射角度接近,直接拾取重放声;二是扬声器与传声器距离较近,传声器间接拾取重放声;第三个原因是室内频响特性不好,存在驻波点,当按额定功率输出时,这一频率的声场就会高出其它频率许多,只要节目频率与其相同时,就会造成传声器间接拾取过多此频率信号,形成啸叫。
2抑制声反馈的手段早期,人们常利用分段均衡器(EQ)作为声反馈抑制设备。
由于EQ滤波器是固定不可变的,无法将其精确定位到回授点。
另外,由于EQ滤波器的带宽较宽,陷波深度较深,使用过程中将损失不少声功率。
FBX的出现克服均衡器作为声反馈抑制设备的很多不足。
与分段图形均衡器相比,它有三大优势:首先是FBX具有自动功能,设置好后,无须音响师手动调整;其次是FBX能够自动搜索、精确定位回授频点;第三个也是最重要的优点是FBX的宏滤波器不必做得很深或是很宽,它比多段EQ滤波器窄数十倍,这意味着音响师可在保证不发生啸叫情况下将系统增益推得更高。
FBX与31段图形均衡器(EQ)的频响特性比较如图1所示。
图1FBX与EQ频响比较3FBX的使用方法3.1连接方式FBX最常见的连接位置是在调音台和功放之间。
LM2950 1 100mA 低掉电电压调节器商品说明书
FEATURES● High accuracy output voltage ● Guaranteed 100 mA output ● Very low quiescent current● Extremely tight load and line regulation ● Very low temperature coefficient ● Current and thermal limiting ● Low dropout voltage ● Need only 1uF for stability ● Error flag warns of output dropout Pin 1 : Output ● Logi-control electronic shutdown Pin 2 : Ground ● Output programmable from 1.24 to 29V Pin 3 : Input● Moisture Sensitivity Level 3ApplicationsORDERING INFORMATION● High-efficiency linear regulator, voltage reference ● Battery powered systems ● Portable consumer equipment● Portable / Parm, Desktop / Notebook computers ● Portable Instrumentation, cordless telephones (XX= 1.5, 1.8, 2.8, 2.85, 3.0, 3.3, 5.0V,● Automotive Electronics, Radio control systems Adjustable)● SMPS Post-Regulator, AvionicsDESCRIPTIONThe LM2950/1 is a low power voltage regulator. This device excellent choice for use in battery powered application such as cordless telephone, radio control systems, and portable computers. The LM2950/1 features very low quiescent current (75㎂ Typ.) and very low drop output voltage (Typ. 400㎷ at light load and 380㎷ at 100㎃).This includes a tight initial tolerance of 0.5% Typ., extremely good load and line regulation of 0.05% Typ., and very low output temperature coefficient, making the LM2950/1 useful as a low-power voltage reference.The error flag output feature is used as power-on reset for warn of a low output voltage, due to following batteries on input. Other feature is the logic-compatible shutdown input which enable the regulator to be switched on and off. The LM2950/1 is available in 8-pin plastic packages.The regulator output voltage may be pin-strapped for a -XX volt or programmed from 1.24 volt to 29 volts with external pair of resistors. The LM2950/1 is offered in 3-pin to-92 package compatible with other fixed regulator.Dec. 2015 - Rev. 1.3HTCLM2950TA-XX LM2950-XX DEVICE SOP-8TO-92 (Tape)TO-92 (Bulk)PKGLM2951D-XX TO- 92 PKG SOP- 8 PKGPin : 1. Output 2. Sense 3. Shutdown 4. Ground 5. Error 6. Tap7. Feedback 8. Input1 2 3BLOCK DIAGRAM AND TYPICAL APPLICATIONS (LM2950)BLOCK DIAGRAM AND TYPICAL APPLICATIONS (LM2951)ABSOLUTE MAXIMUM RATINGSLead Temperature (Soldering, 5 seconds)Storage Temperature RangeOperating Junction Temperature Range Input Supply Voltage Feedback Input Voltage Shutdown Input Voltage Error Comparator OutputDec. 2015 - Rev. 1.3HTC-55℃ to +150℃-65℃ to +150℃260℃INTERNALLY LIMITED-0.3 to +30V-0.3 to +30V -1.5 to +30V -0.3 to +30V POWER DISSIPATIONELECTRICAL CHARACTERISTICS (at T a =25℃, V IN =15V, unles otherwise specified)Dec. 2015 - Rev. 1.3HTCNote 1 : Output or reference voltage temperature coefficients defined as the worst case voltage change divided by the total temperature range.Note 2 : Unless otherwise specified all limits guaranteed for T J = 25℃, V IN = V0+1V, I L = 100㎂ and C L = 1㎌. Additional condition for the 8-pin versions are feedback tied to -XX V tap and output tied to output Sense (V OUT=XX V) and V SHOUTDOWN≤0.8VNote 3 : Regulations is measured at constant junction temperature, using pulse testing with a low duty cycle. Changes in output voltage due to heating effects are covered under the specification for thermal regulation.Note 4 : Dropout voltage is defined as the input to output differential at which the output voltage drops 100 ㎷ below its nominal value measured at 1V differential. At very low values of programmed output voltage, the minimum input supply voltage(2.3V over temperature)must be taken into account.Note 5 : V REF≤V OUT≤(V IN-1V), 2.3V≤V IN≤30V, 100㎂≤I L≤100㎃, T J≤T JMAXNote 6 : Comparator thresholds are expressed in terms of a voltage differential at the feedback terminal below the nominal reference voltage measured at V OUT+1V input. To express these thresholds in terms of output voltage changed,multiply by the error amplifier gain = V OUT/V REF= (R1+R2)/R2. For example, at a programmed output voltage of 5V, the error output is guaranteed to go low when the output drops by 95 ㎷ x 5V / 1.235V = 384 ㎷. Thresholds remain constant as a percent V OUT as V OUT is varied, with the dropout warning occurring at typically 5% below nominal, 7.5% guaranteed.Note 7 : V SHUTDOWN≥2V, V IN≤30V, V OUT=0, Feed-back pin tied to -XX V Tap.Dec. 2015 - Rev. 1.3HTC。
i7100反馈抑制器
电源插头有两支宽扁金属插脚和第三支接地插脚。较宽的金属插脚(极性电源插头)或第三支 接地插脚(接地式电源插头)是为安全要求而制定的。如果随机所附的插头与您的插座不符, 请在更换不符的插座前,先咨询电工人员。 10. 请不要踩踏或挤压电源线,尤其是插头、便利插座、电源线与机身相接处。 11. 本机只可以使用生产商指定的零件/配件。 12. 本机只可以使用与本机搭售或由生产商指定的机柜、支架、三脚架、拖架 或桌子。在使用机柜时,请小心移动已安装设备的机柜,以避免机柜翻倒 造成身体伤害。 13. 在雷雨天或长期不使用的情况下,请拔掉电源插头。 14. 所有检查与维修都必须交给合格的维修人员。本机的任何损伤都须要检修,例如: 电源线或插 头受损,曾有液体溅入或物体掉入机身内,曾暴露于雨天或潮湿的地方,不正常的运作,或曾 掉落等。
选择声道........................................................................7 选择滤波器......................................................................7 选择抑制模式.....................................................................7 阈值............................................................................7 取消和保存预设..................................................................7 自动保存设置....................................................................7 锁定i7100.......................................................................7 应用..............................................................................8 监听路径........................................................................8 室内混音........................................................................9 频率表 ..........................................................................10 预设表...........................................................................11 规格.............................................................................15 尺寸.............................................................................16
反馈抑制器的使用与方法
均衡器1.均衡器的调整方法:超低音:20Hz-40Hz,适当时声音强而有力。
能控制雷声、低音鼓、管风琴和贝司的声音。
过度提升会使音乐变得混浊不清。
低音:40Hz-150Hz,是声音的基础部份,其能量占整个音频能量的70%,是表现音乐风格的重要成份。
适当时,低音张弛得宜,声音丰满柔和,不足时声音单薄,150Hz,过度提升时会使声音发闷,明亮度下降,鼻音增强。
中低音:150Hz-500Hz,是声音的结构部分,人声位于这个位置,不足时,演唱声会被音乐淹没,声音软而无力,适当提升时会感到浑厚有力,提高声音的力度和响度。
提升过度时会使低音变得生硬,300Hz处过度提升3-6dB,如再加上混响,则会严重影响声音的清晰度。
中音:500Hz-2KHz,包含大多数乐器的低次谐波和泛音,是小军鼓和打击乐器的特征音。
适当时声音透彻明亮,不足时声音朦胧。
过度提升时会产生类似电话的声音。
中高音:2KHz-5KHz,是弦乐的特征音(拉弦乐的弓与弦的摩搡声,弹拔乐的手指触弦的声音某)。
不足时声音的穿透力下降,过强时会掩蔽语言音节的识别。
高音:7KHz-8KHz,是影响声音层次感的频率。
过度提升会使短笛、长笛声音突出,语言的齿音加重和音色发毛。
极高音:8KHz-10KHz合适时,三角铁和立*的金属感通透率高,沙钟的节奏清晰可辨。
过度提升会使声音不自然,易烧毁高频单元。
2.平衡悦耳的声音应是:150Hz以下(低音)应是丰满、柔和而富有弹性;150Hz-500Hz(中低音)应是浑厚有力百不混浊;500Hz-5KHz(中高音)应是明亮透彻而不生硬;5KHz以上(高音)应是纤细,园顺而不尖锐刺耳。
整个频响特性平直时:声音自然丰满而有弹性,层次清晰园顺悦耳。
频响多峰谷时:声音粗糙混浊,高音刺耳发毛,无层次感扩声易发生反馈啸叫。
3.频率的音感特征:30~60Hz 沉闷如没有相当大的响度,人耳很难感觉。
60~100Hz 沉重80Hz附近能产生极强的“重感”效果,响度很高也不会给人舒服的感觉,可给人以强烈的刺激作用。
- 1、下载文档前请自行甄别文档内容的完整性,平台不提供额外的编辑、内容补充、找答案等附加服务。
- 2、"仅部分预览"的文档,不可在线预览部分如存在完整性等问题,可反馈申请退款(可完整预览的文档不适用该条件!)。
- 3、如文档侵犯您的权益,请联系客服反馈,我们会尽快为您处理(人工客服工作时间:9:00-18:30)。
手动设置的24种程序参数滤波器 单次操作模式可自动搜索和消除回授、锁定滤
波器直至再次手动操作 自动模式持续监听混音和自动预设滤波器 手动设定每声道滤波器的12种参数,频率,频
宽和增益 单次,自动,和手动模式 内建32位效果处理器,48KHz取样比 平衡式XLR和1/4”TRS输入输出 20种用户自定预设以及20种出厂设置 每声道10段LED电平表显示输出电平 操作简易 实时显示和参数调节 专业的内部电源供应设计 即使关闭电源仍可自动存储当前设置 锁定键可防止设置被不经意改变
注意: 任何未经本使用手册许可的操控,调整或设定步骤都可能产生危险的电磁幅射。
PHONIC CORPORATION
i7100
数字回授消除器
简介..............................................................................4 性能..............................................................................4 为什么使用i7100?...................................................................4 初级设置..........................................................................4 控制和连接........................................................................5 前面板............................................................................5 后面板............................................................................6 使用i7100.........................................................................7
消除回授相当简单。除了使用i7100,我们还建议 您将主调音区FOH系统设置成所需的音响效果。完 成预设后,您即可随心所欲的使用i7100回授消除 器。
产品特点
带24位A/D和D/A转换器和256/512次取样比的 headroom和解晰度
每声道高达12种频率的自动搜索回授功能并智 能消除所ห้องสมุดไป่ตู้频率
数字回授消除器
重要安全说明
1. 请在使用本机前,仔细阅读以下说明。 2. 请保留本使用手册,以便日后参考。 3. 为保障操作安全,请注意所有安全警告。 4. 请遵守本使用手册内所有的操作说明。 5. 请不要在靠近水的地方,或任何空气潮湿的地点操作本机。 6. 本机只能用干燥布料擦拭,请勿使用喷雾式或液体清洁剂。清洁本机前请先将电源插头拔掉。 7. 请勿遮盖任何散热口。确实依照本使用手册来安装本机。 8. 请勿将本机安装在任何热源附近。例如:暖气、电暖气、炉灶或其它发热的装置(包括功率
i7100功能复杂,但操作简便,主控制面板设计精 简,用旋钮和按键便可进行操作。i7100可更准确 迅速的搜索和消除回授,是您消除不必要的杂音的 理想选择!
本使用手册就i7100数字回授消除器为您提供最佳 的指导,内容浅显易懂。建议您使用产品前仔细阅 读本手册,读完后妥善保管,以便日后参阅。
为什么使用i7100?
控制和连接
Phonic i 7100回授消除器的操作极其简便。LCD显 示器和众多的LED指示器可清晰明了的显示操作, 编辑器可简便的操作各项选择和设置。
前面板
1、双LED电平表 Dual LED Level Meters 此LED电平表可以以dB显示输出信号的电平,指示音 频输出达到最大将产生失真前的headroom。开启旁通 时,此显示器将显示音频信号的输入输出电平。
产生回授的原因很多,最常见的是使用麦克风设备 (或PA系统)。麦克风可将声波转换成交变电流,后 输送至放大器,再将放大的信号输往音箱还原成声 音。但是,若信号仍含有高电平频率,将被麦克风 拾音,再次通过放大器和音箱,如此循环。此过程 循环迅速,将在各电路上放大信号,并产生自身的 频率,伴随回授产生刺耳的噪音。整个过程即所说 的环路,使用i7100可有效的消除回授,提供高保 真的音质。
CAUTION
RISK OF ELECTRIC SHOCK DO NOT OPEN
这个三角形闪电标志是用来警告用户,装置内的非绝缘危险电压足以造成使人触 电的危险性。
这个三角形惊叹号标志是用来警告用户,随机使用手册中有重要操作与保养维修 说明。
警告: 为减少火灾或触电的危险性,请勿将本机暴露于雨天或潮湿的地方。
8、阈值指示器 Threshold Indicator 阈值指示灯变亮时,即可使用功能编辑器在+10~50dB间对回授抑制进行编辑。
9、预设指示器 Preset Indicator 预设指示灯变亮时,即可使用编辑器在20个出厂预 设和20个个人存储预设中进行选择。
10、频率指示器 Frequency Indicator 频率指示器变亮时,即可选择频率进行编辑。 i7100回授消除器可将频率范围(20Hz~20KHz)分 成31段标准ISO中心频率。自动和单次模式中,频 率可自动监控,仅供参考用。
4、功能编辑器 Function Jog Wheel 此编辑器可对消除Kill”、“预设Preset”、“滤波 器Filter”、“阈值Threshold”功能进行选择。按下 即可选择您想选择的功能,再次旋转可改变参数或设 定选择功能,再一次按下编辑器即可完成设置。
5、Ch 1和Ch 2 键 Ch 1 and Ch 2 Keys 这些Ch键可选择左右音频声道。如果您想同时操作左 右声道(立体声模式),只需同时按下两个键即可。
2、24个LED滤波显示器 24 LED Filters Display LED滤波器可通过显示器旁边的指示器进行监控。 12个LED可指示每声道的滤波器的状态。LED是否变 亮可表示滤波器是否已经设置。循环闪亮的LED可 指示单次模式和自动模式下搜索的进行滤波器。
3、FQ/Mode编辑器 FQ/Mode Jog Wheel 此编辑器可用于选择频率、频宽、或增益功能。调节 功能参数和设置前,请先按下编辑器以编辑功能属 性,旋转旋钮可改变属性,按下即可确认设置。只有 在滤波器设置为参数模式时,才可编辑功能。自动模 式下,这些选项已被自动设定,只能供参考。
扩大机)。 9. 请注意极性或接地式电源插头的安全目的。极性电源插头有宽窄两个宽扁金属插脚。接地式
电源插头有两支宽扁金属插脚和第三支接地插脚。较宽的金属插脚(极性电源插头)或第三支 接地插脚(接地式电源插头)是为安全要求而制定的。如果随机所附的插头与您的插座不符, 请在更换不符的插座前,先咨询电工人员。 10. 请不要踩踏或挤压电源线,尤其是插头、便利插座、电源线与机身相接处。 11. 本机只可以使用生产商指定的零件/配件。 12. 本机只可以使用与本机搭售或由生产商指定的机柜、支架、三脚架、拖架 或桌子。在使用机柜时,请小心移动已安装设备的机柜,以避免机柜翻倒 造成身体伤害。 13. 在雷雨天或长期不使用的情况下,请拔掉电源插头。 14. 所有检查与维修都必须交给合格的维修人员。本机的任何损伤都须要检修,例如: 电源线或插 头受损,曾有液体溅入或物体掉入机身内,曾暴露于雨天或潮湿的地方,不正常的运作,或曾 掉落等。