Winplas中文使用说明书
微软软件许可及自动化辅助工具简介说明书
This brief applies to all Microsoft Licensing programs.ContentsSummary (1)Details (1)What is the difference between Robotic Process Automation and a bot? (1)What is the Microsoft 365 Unattended License? (2)Microsoft Licensing Scenarios (5)Example 1 - Call Center Automation (6)Example 2 - Finance Data Capture & Entry (6)Example 3 - HR Reporting (7)FAQ (7)SummaryAcross the software industry, numerous technology solutions help people do their job. But the widespread adoption of technology also means that businesses can end up with disconnected solutions that require them to patch together processes across siloed applications. In the past, joining disparate systems together was difficult or too costly because it required professional developers — especially when some of the data can still be on paper or locked in decades-old Windows or web applications.This brief explains how Robotic Process Automation impacts the licensing needs for Microsoft customers. Robotic Process Automation is a significant technological advancement over historical automation solutions, such as screen scraping, and it is important to understand the use and implications of licensing this service.DetailsWhat is the difference between Robotic Process Automation and a bot?It is important to note that a bot is a computer program that executes the steps in a Robotic Process Automation process. The Robotic Process Automation is the action and process performed by the bot, whereas the bot is the Licensing brief June 2022interface and “user” executing said actions. Bots are often utilized to assist a person to execute automation and repetitive tasks and cannot be utilized in order to reduce the number licenses that would typically be required for device or software use.“Robotic Process Automation”, otherwise known as “RPA”, refers to when an application, or any set of applications, are used to capture data and/or manipulate applications to perform tasks.Robotic Process Automation (RPA) is a form of business process automation technology based on metaphorical software robots (bots) or artificial intelligence (AI) workers. In traditional workflow automation tools, a software developer produces a list of actions to automate a task and interface to the back-end system using internal application programming interfaces (APIs) or dedicated scripting language. In contrast, RPA systems develop the action list by watching the user perform that task in the application's graphical user interface (GUI), and then perform the automation by repeating those tasks directly in the GUI.Bots can interface with any application through the UI the same way a user does. Such bots are “trained” by their users by being “shown” how to complete a task and typically follow logical rules such as “if/then” rules while reading & writing to databases. Bots also work with and drive existing applications by opening emails and attachments or inputting data to forms.You will find slight variations across the industry on bot definitions. Microsoft has its own definitions in order to provide clarity to customers for their specific needs and the potential software licensing implications when implementing RPA scenarios.What is the Microsoft 365 Unattended License?When we look at Microsoft’s view into licensing Robotic Process Automation solutions, we follow the same general outlines as the broader industry definitions. “Robotic Process Automation”, “RPA”, or “bots” means an application, or any set of applications used to capture data and manipulate applications to perform repetitive tasks. Specifically, when Windows client and/or Microsoft Office or Office 365 is involved, bots operate upon any UI element of Windows 10/11 within an OSE and/or operates upon any Office application in any OSE.The Office and Windows components here are key since Microsoft is providing license, bots use rights, and access to its software. Due to the ability for these RPA solutions and bots to perform tasks and access systems the same as a human user would, it is critical to understand this distinction.We also classify bots into two distinct categories –Attended and Unattended. Below are examples of Attended and Unattended bots. Examples that would require a Microsoft 365 - Unattended License are noted.“Attended bot”– An Attended bot assists a person to execute automation on the person’s local and/or remote workstations. It operates concurrently with the person on the same workstation/s to accomplish repetitive tasks and is triggered by explicit actions of that person. •i.e. cut & paste information from one screen to another•i.e. user triggering an action to auto-update customer contact information•i.e. user clicking a keyboard key in order to send a meeting invite for the next available time to a specified colleague“Unattended bot”–Any bot that doesn’t conform to the definition of “Attended bot” should be considered an “Unattended bot.”•i.e. running SQL queries and inputting data into forms•i.e. sending Excel reports at midnight through an automated process (requires RPA for M365 license) •i.e. having an application use Microsoft Word to automatically open submitted files and extract data to a CRM application (requires RPA for M365 license). Common Robotic Process Automation ScenariosThe following examples highlight the various methods to accomplish the same task with and without a Robotic Process Automation solution:Example 1:User receives a message from corporate and needs to send to multiple people in the organization.•With Attended RPA: If there is a macro that allows the user to click a button and send the message to all parties.•With Unattended RPA*: If there is a macro that runs autonomously by recognizing the mail and sends the message to all parties without the user performing any action.•Without RPA: If the user manually sends the message to all parties.Example 2: Web Site or Screen Scraping - When a site or screen contains information (stock, news, media, content, etc.) the page can be scraped by a bot for specific information pieces which can be consolidated and presented to the end user in order to make a decision at a later time.•With Attended RPA:If there is a macro that allows the user to click a button and specified content on the site or screen is captured and consolidated.•With Unattended RPA*: If there is a macro that runs autonomously by scanning for specified content on the site or screen and captures and consolidates.•Without RPA: If the user manually scans the site or screen to physically capture and consolidate the content.Example 3: Incoming Customer Email responses - Where an organization traditionally has a team that handles the first line of defense to respond to customer inquiries, an RPA solution can be implemented and tied to key words or phrases with canned answers or links to relevant information.•With Attended RPA:If there is a macro that allows the user to trigger a task to provide a pre-determined answer to the customer.•With Unattended RPA*: If there is a macro that automatically responds to customer emails with canned answers based on key words in the submission.•Without RPA: If the user manually reads and chooses the appropriate pre-determined answer to respond to the customer.Example 4: Onboarding new employees - An RPA solution can assist new employees to an organization that need pertinent information to get set up in their organizational system for a smooth onboarding process.•With Attended RPA: If there is a macro that managers can trigger in order to provide pertinent information to a new employee.•With Unattended RPA*: If there is a macro that recognizes when a new employee has started and automatically sends them pertinent information.•Without RPA: If the manager manually sends pertinent information to their new employee after they start.Example 5: Forms or data processing - An RPA triggers a macro to read information and write to systems instead of manual data entry.•With Attended RPA: If there is a macro that is triggered by the user to assist them in writing data into a system.•With Unattended RPA*: If there is a macro that runs overnight autonomously by reading a data source and writing to a new backup system.•Without RPA: If the user manually reads information and physically writes it another system.Example 6: Data transfer - Managing data transfer or backups with an RPA solution with source, destination, and credential information.•With Attended RPA: If there is a macro that is triggered by the user that reads data and transfers to another source destination.•With Unattended RPA*: If there is a macro that runs autonomously, logs in with credentials, and processesa data backup without user guidance.•Without RPA: If the user manually processes the data transfer and backups to another destination.*Each of the above Unattended RPA examples will require the Microsoft 365 – Unattended License if they are accessing an Office application or Windows client.The below examples include additional licenses not discussed in this brief. For an overview and further information, please go to for additional details.Example 1 - Call Center AutomationA call center has 50 customer service representatives. Each representative requires the ability to trigger UI automation as part of process for updating customer contact information. The automation will occur on each representative’s workstation.Licensing Solution: 50x Power Automate per user with attended RPA plan.Rationale: This scenario is setting up an RPA solution that is triggered by the customer service representative for an automated process, thus this is an Attended scenario. Since there are 50 users, 50 licenses are required.Example 2 - Finance Data Capture & EntryA finance department receives invoices attached to Outlook email messages. The department would like to automate the process of capturing data from the invoices and entering the information in a legacy procurement system. The automation will occur without an employee’s involvement across 5 VMs in order to accommodate the volume (anticipated 10,000 invoices/month).Licensing Solution: 1x Power Automate per flow plan, 5x Power Automate unattended RPA add-on, and 5x Microsoft 365 – Unattended License.Rationale: This scenario is setting up an RPA solution that is automated (unattended) and accessing an Office application (Outlook) and running on 5 machines. Due to the Office requirement, the Microsoft 365 – -Unattended License (x5) is required for each machine. In addition to this, each machine also requires the Power Automate unattended RPA add-on (x5). Finally, the Power Automate unattended RPA add-on also has a pre-req of the Power Automate per flow plan (x1).Example 3 - HR ReportingAn HR department has 10 users that send Excel reports daily. Each user will create a 3rd party bot that runs autonomously at midnight and distribute these reports. The automation will occur without employee involvement on each user's desktop.Licensing Solution: 10x Microsoft 365 – Unattended LicenseRationale: This scenario is setting up an RPA solution that is running autonomously (unattended) and accessing an Office app lication (Excel). Since this solution is not utilizing Microsoft’s Power Platform, the bot does not require any additional licenses.Q1: When do I need a Microsoft 365 – Unattended License for my RPA solution?A: The following scenarios require an RPA for Microsoft 365 license:•Utilizing an Unattended bot that interacts with and/or operates on Windows 10/11.•Utilizing an Unattended bot that interacts with and/or operates upon any Office application in any OSE. Q2: How does Robotic Process Automation impact multiplexing? Can I use bots to avoid licensing users, devices, and services?A: Multiplexing is when any type of automated process acts as an intermediary between different software or hardware to reduce direct connections with the software. Multiplexing does not reduce the number ofrequired licenses. Multiplexing rules still apply for RPA scenarios. Bots must be licensed in addition to the services and/or devices that they access must also have the proper licenses just as a normal user and/ordevice would.Q3: The Microsoft definition of bots varies from other industry definitions. Which one applies to me?A: Microsoft definitions and terms always apply if you are using relevant Microsoft products.Q4: I have created a bot that runs in unattended mode on more than one server at a time and interacts with Microsoft applications directly on the server. Is this allowed without licensing the bot?A:No, this is not allowed. Since the bot is unattended and accessing Microsoft applications on more than one OSE, it would require the Microsoft 365 – Unattended L icense. This license limits the bot’s interaction to only a single server at a time. If you need to access multiple servers at once, you will need to have multiple bots and multiple licenses.Q5: Is there licensing associated with development and testing of bots in production/nonproduction environments?A: A bot represents execution of a GUI-based process on a machine, so what matters is the dev/test/prod of the RPA which exists in current licensing today.Q6: What about the infrastructure needed to run an unattended bot in a virtual machine? Is that included in the unattended RPA add-on?A: No – running the unattended RPA bot in a VM requires the separate purchase of any necessary compute resources.Q7: What licenses do I need for an Unattended bot accessing a Windows environment but not using an Office application?A: A typical configuration would require 3 SKUs, the Microsoft 365 – Unattended License (Windows access), Power Automate unattended RPA add-on (unattended RPA license) which also has a pre-req of either the Power Automate per flow plan or Power Automate per user with attended RPA (depending if you want to license per user or per flow). Depending on how you have your OSE licensed, may impact the need for the Microsoft 365 – Unattended License.Q8: How can I reduce my current cost & license position for my employees by implementing an RPA solution?A:You cannot reduce licensing cost or position by implementing RPA. However, by implementing an RPA solution, you may see improved time savings, employee performance, or other efficiencies. These benefits may improve your corporation output and help you realize savings in other areas.Q9: Is there a scenario where I do not have to purchase a Microsoft license for my RPA solution?A: If the RPA solution interacts with Windows or Office, then you will need a license. There is no such thing as “unlicensed access” for RPA solutions. There are, however, various configurations possible depending on the RPA function and access requirements.For example, if there is no Windows client or Office then there is no requirement for the Microsoft 365 –Unattended L icense required. This does not mean there isn’t a bot runn ing, but rather a bot license is not required as it is not accessing or utilizing relevant Microsoft software or services.Q10: My company has developed a process that leverages components of Word (or Excel or any other desktop Office app) to complete a process on a server that is then sent to end users. In the past this was not allowed based on multiplexing and other limitations. Is this now allowed? If so, what must be licensed? All the end users? The hardware?A: The RPA solutions Microsoft has introduced do not break any preexisting rules. Each end user, hardware, server, and process must be appropriately licensed. You must first determine if the process is a bot that is attended or unattended, and this will determine the proper licensing required for your scenario. The new licenses introduced now enable you to properly license bots for scenarios that weren’t allowed before, but never reduce license requirements.Q11: How do I manage the application via Systems Center Products? Does it matter if the bot is attended or unattended?A:Bot implementation does not have any impact on application management. It may be possible toimplement an RPA solution to streamline this process, but that depends on how the RPA solution is built.Q12: We have been using SQL under the Server and CAL model to support an application where there is a Word document created, converted to PDF and then re-distributed manually by email. We are doing this to decrease the cost of the SQL instance and to eliminate the need for Frontline users to license for Word. Does this new licensing offer a less cumbersome process?A:No. This scenario is an attempt to reduce license position for my employees. Each employee must beproperly licensed, and bots cannot be utilized to reduce the need for CALs.Q13: I have a single bot that runs 3 different processes in which all have steps that require GUI automation in Office 365. To handle the high volume, I have 10 VMs set up to handle these processes. How many 365 – Unattended Licenses do I need to purchase?A: The Microsoft 365 – Unattended License allows access to a single virtual machine. Due to the bot running GUI automation in Office 365 on all 10 VMs, and each Microsoft 365 – Unattended License being allowed a single unique instance of Office 365, this translates to 10 Microsoft 365 – Unattended licenses. If the VMs are accessed at separate times, you are still limited by the activation limits for Windows Enterprise E3 and/or Office 365 E3.Q14: What is the difference between a Macro and a Bot?A: A Macro is a single instruction that expands automatically into a set of instructions to perform a specific task often triggered by an action. A bot can act automatically or be triggered by an action to use ororchestrate an application. Similarly, to the Attended and Unattended scenarios, a Macro would fall under the Attended definition and is largely covered by Microsoft product licensing. While a bot, if acting automatically, is an Unattended scenario and would require additional Microsoft licensing depending on the solution.Q15: If an unattended bot runs on a Virtual Machine (VM) that already has a Windows 10/11 License and DOES NOT use Office 365 as part of the scenario, is the M365 E3 unattended license still required?A: It depends on the solution implemented. Always be sure to read the Product Terms fully to understand your use rights.•Customers can license Win 10 per device and install it as one instance on a VM if they chose. These per device licensed OS’s can run unattended bots.•Alternatively, Customers could have a local on-prem server or other dedicated server that run Win 10 VM’s with unattended bots by assigning a Win 10 Enterprise per device w/ SA license.•Keep in mind that there are certain Windows SKUs which explicitly prohibit unattended use in the license terms (just as Office 365 does).Q16:If an unattended bot runs on a VM that already has a Windows 10/11 License and DOES use Office 365 as part of the scenario, is the M365 E3 unattended license still required?A: Yes - if O365 is used then you always need the M365 unattended license.Q17: Do these rules also apply to 3rd party providers implementing unattended scenarios?A: Yes, the exact same terms apply to any unattended scenario.© 2022 Microsoft Corporation. All rights reserved. This document is for informational purposes only. MICROSOFT MAKES NO WARRANTIES, EXPRESS OR IMPLIED, IN THIS DOCUMENT. This information is provided to help guide your authorized use of products you license; it is not your agreement. Your use of prod ucts licensed under your volume license agreement is governed by the terms and conditions of that agreement. In the case of any conflict between this information and your agreement, the terms and conditions of your agreement control. Prices for licenses acquired through Microsoft resellers are d etermined by the reseller.。
微软办公室移动版在Windows Phone 7上的产品指南说明书

目錄Microsoft Office Mobile:概觀 (1)Office Mobile:概觀 (2)Office Mobile:深入探討 (3)檢視及更新 Office 文件 (3)Office 整合中心 - 新功能! (3)使用者介面 - 改良功能! (5)註解 - 新功能! (6)檔案格式支援 - 改良功能! (7)產品相關要點 (8)Word Mobile (8)Excel Mobile (9)PowerPoint Mobile (10)更有效率地導覽文件 (11)大綱窗格 - 新功能! (11)導覽式目錄 - 新功能! (12)改良的尋找功能! (12)手勢支援 - 改良功能! (13)保持收件匣井然有序 (14)電子郵件帳戶設定 - 改良功能! (14)收件匣檢視 - 新功能! (16)電子郵件選擇模式 - 新功能! (16)全盤掌握行程 (17)行事曆檢視 - 全新及改良的功能! (17)「遲到」電子郵件 - 新功能! (19)排程工具 - 改良功能! (19)行駛路線 - 新功能! (20)隨時隨地記錄筆記並與他人共用 (22)筆記記錄工具 - 改良功能! (22)電子郵寄筆記 - 新功能! (23)OneNote 電子郵件附件 - 改良功能! (24)隨時皆可使用筆記及保持筆記的一致性 (24)與 Windows Live或 SharePoint 進行同步 - 新功能! (25)筆記方塊 - 新功能! (27)搜尋筆記 - 新功能! (27)筆記結構 - 改良功能! (28)從遠端參加 PowerPoint 簡報廣播 (29)檢視 PowerPoint 簡報廣播 - 改良功能! (29)電子郵寄 Office 文件 (30)存取及更新儲存在 SharePoint 中的資訊 (31)更新 Office 文件與筆記 - 改良功能! (31)管理 SharePoint 檔案 - 改良功能! (32)從「我的網站」匯入最愛的連結 - 新功能! (33)伺服器轉譯的文件 - 新功能! (33)Office Mobile:常見問題集 (35)功能的可用性/公開揭示 (36)Microsoft Office Mobile:概觀最近您可能都是仰賴行動裝置隨時獲取工作、親朋好友與外界的最新消息。
PILZ编程手册翻译

2.10.3 Access rights of the FS and ST section FS区和ST区的访问权限 ...............................2-36 2.11 ADDRESSING寻址方式 ..........................................................................................................2-36
2.11.1 Absolute addresses绝对寻址....................................................................................2-36 2.11.2 Tags 标签 .................................................................................................................2-38 2.11.3 Direct addressing 直接寻址.....................................................................................2-39 2.11.4 Indirect addressing 间接寻址 ..................................................................................2-40 2.11.5 Set addressing 集寻址 .............................................................................................2-41
质粒绘图的专业软件——Winplas 使用说明

质粒绘图的专业软件——Winplas 2.7使用说明作者:佚名来源:生物秀时间:2008-6-27实验仪器大全实验试剂大全Winplas作为一个质粒绘图的专业软件,功能强大,而且极易上手,它可以绘制出具有发表质量的质粒图谱。
可广范应用于论文、教程的质粒插图,它的特性包括:1,无论是否知道质粒的原始序列都能绘制质粒图,像Vector NTI等综合软件也能绘制质粒图,但有一个前提就是首先得知道质粒得原始序列;2,可读入各种流行得序列格式文件,能方便地导入各种序列信息;3,可自动在识别序列中的限制性酶切位点;4,可对序列进行各种编辑,如:从文件插入序列、置换序列、序列编辑、部分序列删除等5,绘图功能强大,如:位点标签、任意位置文字插入、生成彩图、线性或环形质粒图谱,可输出到剪贴板或图像文件。
软件下载地址:/Soft/2008/2571.htm一,在不知道序列结构时绘制质粒图:1,点击File菜单中地New命令,出现一个MapView窗口,同时工具栏中地绘图命令显亮。
2,点击“Insert”菜单中的“Blank Seqment”命令,出现一个“Create New Plasmid”对话框。
-在Title栏中填入质粒名称,如pUC18。
-在Base Pairs栏中填入质粒大小,如3000。
-在Type单选框中设制质粒图谱为线型还是环形。
3,点击OK后,在Map View窗口就会出现一个圆环,其中有质粒名称及质粒大小。
4,下面的工作就是向圆环上添加文字描述、标记及弧。
①点击“Insert”菜单中的“Text”命令,或直接点击工具栏中的“Text”按纽,出现“Edit Text object”对话框。
-在“Text”书签中填入“Text”的内容,如:This is PUB 18’s map,选择左右对齐及居中。
-选定相应字符可以加黒、斜体等。
-在Font书签中改变字体格式、大小及颜色。
-文字就出现在Map View窗口中,使用鼠标左健,就可以随意拖动其位置。
微软项目2021 指南与说明书
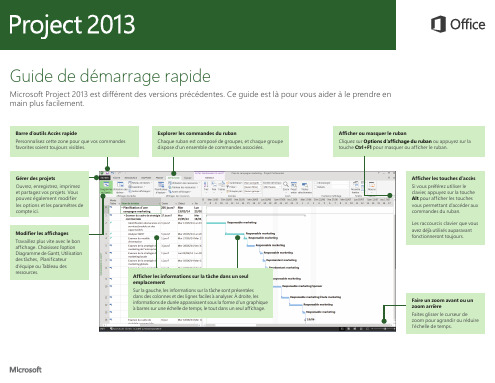
Afficher les informations sur la tâche dans un seul emplacement
Sur la gauche, les informations sur la tâche sont présentées dans des colonnes et des lignes faciles à analyser. À droite, les informations de durée apparaissent sous la forme d’un graphique à barres sur une échelle de temps, le tout dans un seul affichage.
Cliquez sur l’onglet Rapport (nouveauté de Project 2013), puis sélectionnez le rapport souhaité. La plupart des outils de dessin de rapport sont les mêmes que pour Excel, Word, PowerPoint et Project.
Les quatre étapes de la gestion
de projets
Si vous débutez avec la gestion de projets, Project 2013 peut vous donner un excellent point de départ avec le guide Project intégré. Pour commencer, cliquez sur Fichier > Nouveau > Mise en route.
微软Expression Web教程说明书
About the T utorialMicrosoft Expression Web is a full-featured professional tool for designing, developing, and publishing feature-rich websites that conform to web standards. Expression Web uses its own standard rendering engine, which is different from Internet Explorer's Trident engine. In the following chapters of this tutorial, we will look closely at Microsoft Expression Web and learn how it works.AudienceThis tutorial has been prepared for aspiring web designers to familiarize them with the interface and features of Microsoft Expression Web.After completing this tutorial, you will gain sufficient knowledge on Microsoft Expression Web from where you can take yourself to the next level.PrerequisitesIt is quite a simple tutorial written in a very user-friendly manner. You can make the most of it with a very basic knowledge of web designing and web development. Disclaimer & CopyrightCopyright 2018 by Tutorials Point (I) Pvt. Ltd.All the content and graphics published in this e-book are the property of Tutorials Point (I) Pvt. Ltd. The user of this e-book is prohibited to reuse, retain, copy, distribute or republish any contents or a part of contents of this e-book in any manner without written consent of the publisher.We strive to update the contents of our website and tutorials as timely and as precisely as possible, however, the contents may contain inaccuracies or errors. Tutorials Point (I) Pvt. Ltd. provides no guarantee regarding the accuracy, timeliness or completeness of our website or its contents including this tutorial. If you discover any errors on our website or inthistutorial,******************************************.T able of ContentsAbout the Tutorial (i)Audience (i)Prerequisites (i)Disclaimer & Copyright (i)Table of Contents .................................................................................................................................. i i 1.EXPRESSION WEB − OVE RVIEW (1)Microsoft Expression Web − History (1)System Requirements (2)2.EXPRESSION WEB − ENV IRONMENT SETUP (3)Installation (3)3.EXPRESSION WE B − NEW WEBSITE (6)Create a Website (6)4.EXPRESSION WEB − BLA NK WEB PAGE (14)Create a Blank Page (14)Create a CSS Page (17)5.EXPRESSION WEB − WEB PAGE LAYOUT (24)<div> tag (24)Example (25)6.EXPRESSION WEB − HTM L LAYOUT (37)7.EXPRESSION WEB − HOR IZONTAL NAVIGATION (42)8.EXPRESSION WEB − VER TICAL NAVIGATION (60)9.EXPRESSION WEB − VAL IDATE PAGES (74)Status Bar (76)Compatibility Report (78)10.EXPR ESSION WEB − DYNAMIC WEB TEMPLATE (80)The Need for Dynamic Web Templates (80)Create a Dynamic Web Template (80)11.EXPRESSION WEB − SEA RCH PAGE (86)Windows Live Search (86)12.EXPRESSION WEB − IMA GES (92)13.EXPRESSION WEB − HYP ERLINKS (99)Anchor Tag (99)14.EXPRESSION WEB − VID EO (109)15.EXPRESSION WEB − SQL DATASOURCE (114)16.EXPRESSION WEB − MIC ROSOFT WORD (135)17.EXPRESSION WEB − GRI DVIEW (141)18.EXPRESSION WEB − MAS TER PAGES (150)19.EXPRESSION WEB − DAT A TABLE (158)20.EXPRESSION WEB − PUB LISH (169)21.EXPRESSION WEB − BAC KUP WEBSITE (176)22.EXPRESSION WEB − ADD-INS (182)1.Microsoft Expression WebMicrosoft Expression Web is a full-featured professional tool for designing, developing, and publishing feature-rich websites that conform to web standards. You can use Expression Web to create web pages and sites that let you transfer files between your computer and your hosting account.Expression Web can design and develop web pages using HTML5, CSS 3, , PHP, JavaScript, XML+XSLT and XHTML.Expression Web 4 requires .NET Framework 4.0 and Silverlight 4.0 to install and run. Microsoft Expression Web − HistoryMicrosoft released the first Community Technology Preview (CTP) version of Expression Web on May 14, 2006.Microsoft Expression Web 4 was released on June 7, 2010.∙It added the option of HTML add-ins and access to a web-based functionality for testing pages on browsers that cannot be installed on the user's system, such as Mac OS X or Linux browsers.∙It also provides an SEO Checker using which you can analyze already created websites against the best practices for getting the highest possible search engine rankings.Expression Web Service PacksExpression Web 4 Service Pack 1 was released in March 2011 and added support for IntelliSense for HTML5 and CSS.Expression Web 4 Service Pack 2 was released in July 2011. It fixed a number of issues and introduced new features such as∙jQuery IntelliSense support∙ a panel for managing snippets∙Interactive Snapshot Panel∙comment/uncomment functionality in Code View, and∙workspace and toolbar customization.In December 2012, Microsoft announced that Expression Studio will no longer be a stand-alone product. Expression Blend is being integrated into Visual Studio, while Expression Web and Expression Design will now be free products.Microsoft Expression WebSystem RequirementsTo create a website using Microsoft Expression Web, your computer should meet the following requirements:∙You should have at least Windows XP with Service Pack 3 or the latest operating systems.∙You should have a PC with 1 GHz or faster processor.∙Your PC should have 1 GB of RAM or more.∙Your PC should have 2 GB or more of available hard disk space.∙You should have .NET Framework 4.0 and Silverlight 4.0.∙Your PC should support Microsoft DirectX® 9.0 graphics.∙You should have DVD compatible drive.∙You should have 1024 x 768 or higher resolution monitor with 24-bit color.∙Some product features require Firefox 3.0 or later, Internet Explorer 8. So you should have the same version.Actual requirements and product functionality may vary based on your system configuration and operating system.2.Microsoft Expression WebMicrosoft provides a free version of Microsoft Expression Web which can be downloaded from https:///en-pk/download/details.aspx?id=36179.InstallationStep 1: Before you can install Expression Web, you will need to have .NET Framework 4.0 installed.Step 2: Once downloading is complete, run the installer. The following dialog will be displayed.Step 3: Click the Accept button.Step 4: Select the Yes radio button and then click Next.Step 5: You can choose other location as well for installation. Select the location and click the Install button.The installation process starts.Once the installation is complete, you will see the following dialog. Step 6: Click Finish to continue.3.Microsoft Expression WebIn the previous chapter, we have installed Microsoft Expression Web and now we are ready to start working on it. In this chapter, we will learn how to create a new website from scratch.Create a WebsiteTo create a new website, let’s open Microsoft Expression Web.Next, you need to follow the steps given below.Step 1: Select Site -> New Site… menu option.Step 2: It will open the following dialog from which you can create or import different types of website.Step 3: For simplicity let’s select General -> One Page Site.∙Specify the location or you can browse to the location where you want the new website to be created.∙Type in the name of your web in the name field and click OK.Step 4: The new web will be created with one page named default.htm. L et’s rename it to index.html with a right-click on the file and clicking on the Rename option.Step 5: The default doctype used in Expression Web is:You can see it by just switching to the code view.You can change the doctype from Tools-> Page Editor Options -> Authoring.Step 6: Now, let’s add <h1> tag inside the body tag and some text as shown in the following code.Step 7: To see our web in a browser, let’s go to the File menu and select the Preview in Browser -> Any browser, let’s say, Internet Explorer.It will open our web in Internet Explorer.4.Microsoft Expression WebAs we have already created our website, now we will need to create our Home Page. In the previous chapter, we have created a one-page website, and our Home Page was created at that time automatically by Expression Web. So, if you have created a blank website, then you will need to create a Home Page for your site.Microsoft Expression Web can create the following types of pages:∙HTML∙ASPX∙ASP∙PHP∙CSS∙Master Page∙Dynamic Web Template∙JavaScript∙XML∙Text FileIn this chapter, we will create an HTML page and its corresponding style sheet. Create a Blank PageTo create a blank page, you can simply go to File menu and select New -> Page…menu option.From the new dialog, you can create different types of blank pages such as HTML page, ASPX page, CSS page, etc. and click OK.As you can see here, the default code is already added by Microsoft Expression Web.As you can see, your newly created page has the file name Untitled_1.html or Untitled_1.htm. You will need to save the page by pressing Ctrl + S and specify the name.As our website already contains an index.html page, we don’t need another one. However, if you have created an Empty website, then name this page index.html.To see your web in a browser, let’s go to the File menu and select the Preview in Browser -> Any browser, let’s say Internet Explorer.Create a CSS PageLet’s take you through the step-by-step process of creating a CSS page.Step 1: To create a CSS page, go to the File menu and select New -> Page… menu option.Step 2: Select General -> CSS and click OK.Step 3: Save the page and type a name for the style-sheet.Step 4: Click the Save button.Step 5: Now, l et’s go to the index.html page.Step 6: In the Manage Styles Panel, click Attach Style Sheet.Step 7: Browse to your style-sheet and select the Current page from “Attach to” and Link from “Attach as” and click O K.Step 8: Now, you will see that a new line is added automatically in the index.html page.Step 9: The body element defines the document's body. To style the <body> tag, we need to create a new style. First, select the body tag in Design View and then click on the New Style… in Apply Styles panel or Manage Styles panel, which will open the New Style dialog.Here, you can define the different options for your style. The first step is to select the body from the Selector dropdown list and then select the Existing style sheet from “Define in” dropdown list.Step 10: From the URL, select the sample.css file. On the left side, there is a Category list like font, background, etc. and currently the Font is highlighted. Set the Font related information as per your requirements as shown in the above screenshot and click Ok. Step 11: Now you can see in the design view that the background color and the font has changed to what we have selected. Now, if you open the sample.css file, you will see that all the information is automatically stored in the CSS file.Let’s preview our web page in a browser. You will observe that the style is applied from the CSS file.End of ebook previewIf you liked what you saw…Buy it from our store @ https://。
STEMicroWIN_V_SP使用说明书
项目四编程软件及其使用内容涵括:1、编程软件的初步使用2、编程软件的功能及编程方法3、调试及运行监控一、能力目标熟悉掌握V4.0 STEP 7 MicroWIN SP3的使用和编程方法,调试及运行监控。
二、所需的材料、工具和设备PLC实验板、装有STEP 7软件的计算机、数字量输入/输出模块。
三、项目要求熟练掌握可编程序控制器编程元件的符号、意义和使用,掌握各基本指令的意义和使用,学会编程软件的安装和使用。
四、学习形式以老师课堂讲解的形式学习,以学生小组的形式到实验室动手的形式实践五、原理说明STEP 7 - Micro/WIN是西门子公司专门为S7 - 300系列PLC设计开发的编程软件,可在全汉化的界面下进行操作。
它基于Windows操作系统,为用户开发、编辑、调试和监控自己的应用程序提供了良好的编程环境。
其目前最新的版本是STEP7 - Micro/WIN V 4.0 SP5 (V4.0. 5.08)。
该版本除了支持CPU的新功能外,其本身的功能也比以前的版本增强了很多。
4.1 编程软件的初步使用4.1.1计算机的配置要求STEP 7 - Micro/WIN要在PC机上运行,它对PC机的最小配置要求如下:(1)操作系统Windows 2000 SP3以上; Windows XP Home; Windows XP Professional;(2)硬盘至少40 MB以上空间。
4.1.2软件的安装与卸载1. STEP 7 - Micro/WIN V4.O份妥革步骤(1)将安装光盘插入CD-ROM,在光盘目录里双击Setup,进入安装向导。
(2)按照安装向导的提示完成软件的安装。
软件程序安装路径可以使用默认子目录,也可以用"浏览"按钮弹出的对话框中任意选择或新建一个子目录。
(3)出现PG/PC Interface窗口单击OK按钮。
(4)在安装结束时,会出现下面的选项:是,我现在要重新启动计算机(默认选项) ;否,我以后再启动计算机。
vensim ple 快速参考与自学手册p
Arrow(箭头指标):在窗口中建立直线或曲线箭头指针。点压起始变量,然后移动到目标变量再点压之,则形成一直线箭头指针。(注意:不要从起始变量拖曳到目标变量)在箭头指针或移动/改变大小指针工具下,拖曳直线箭头指针手把(小圆圈)就可形成曲线箭头指针。(注意:快捷方式方式,点压起始变量,在空白部分点压一下,然后再到目标变量点压一下即可形成曲线箭头指针。
Delete(删除键):在窗口中,删除结构,变量或批注。
Equations(方程式键):使用方程式编辑器来建立与编辑模块方程式。在方程式键工具下尚未建立方程序的变量会反白。点压变量即用方程式编辑器来建立之。
Analysis Tools(分析工具栏)
按钮
说 明
Causes Tree(因果树图):建立一个树状的变量因果图。
Uses Tree(使用树图):建立一个使用过变量的树状因果图。
Loops(循环图):显示所有变量的回馈循环说明。
Documents(文件说明):显示该模块变量之方程式,定义与单位说明。
Build Windows – show/circulate(建立窗口-循环显示):使得绘图工作区的窗口能够显示。
Output Windows – show/circulate(显示窗口-循环显示):使得输出工作区的窗口能够显示。可循环显示已建立之输出工作区的窗口。
Control Panel(控制键盘窗口):显示控制键盘窗口。用来选择变量,调整图形的时间轴及规格型态,管理数据集与图形。
Rate(流程指针):在窗口中建立流程指针包含垂直漏斗、空管,如需要,来源或池子(云图)。点压起始变量,然后移动到目标变量再点压之即形成流程指针。如果在空白部分点压,然后云图即产生在起始变或目标的所在。在Rate工具下,点压起始变量,再到空白部分,同时按Shift键与鼠标左键即可产生直角转折。按压鼠标右键可改变空管的格式。
EXPRESSCLUSTER X3.0 中文手册 Windows版 开始指南
Single Point of Failure的排除 ................................................................................................................24
共享磁盘 .......................................................................................................................................................25
46最新信息的确认46集群系统的设计46集群系统的构建46开始操作集群系统后的故障对策46第篇发布备忘录最新信息47iiexpresscluster第3章expresscluster的运行环境49硬件运行环境50所需规格50expressclusterserver的运行环境50支持os50所需内存容量和磁盘容量51监视可选软件已经确认完毕的应用程序信息52虚拟机资源的运行环境54builder的运行环境55运行确认完毕的os浏览器55java执行环境55所需内存容量磁盘容量55支持的expresscluster版本55webmanager的运行环境56运行确认完毕的os浏览器56java执行环境56所需内存容量磁盘容量56统合webmanager的运行环境57运行确认完毕的os浏览器57java执行环境57所需内存容量磁盘容量57第4章最新版本信息59expresscluster和手册的对应一览表60最新版本60功能强化信息61第5章注意限制事项62研究系统配置时63关于builderwebmanager的运行os63关于镜像磁盘共享型镜像磁盘的需求63关于共享磁盘的需求64niclinkupdown监视资源64关于镜像磁盘共享型镜像磁盘的write性能64关于非同步镜像的历史文件64关于多个非同步镜像间的数据一致性65关于multiboot65安装expresscluster前65关于文件系统65通信端口号66时钟同步的设置67关于共享磁盘67关于镜像磁盘用的分区67关于共享型镜像磁盘用的分区68vos启动时间的调整68网络的确认68关于与esmproautomaticrunningcontroller结合使用69关于ipmiutil70关于在servercore的安装70创建expresscluster的配置信息时71组资源非激活异常时的最终运行71延迟警告比例71关于磁盘监视资源和共享型镜像磁盘tur监视资源的监视方法tur71关于webmanager的画面更新间隔71关于心跳资源的设置72关于能用于脚本注释等的2字节系字符编码72操作expresscluster后72恢复运行中的操作限制72关于命令篇中没有记载的可执行文件或脚本文件73集群关机集群关机重启73特定服务器的关机重启73从网络分区状态的恢复73关于webmanager74关于builder74关于expressclusterdiskagent
WinPAC ISaGRAF PAC 快速上手手冊说明书
WinPAC ISaGRAF PAC 快速上手手冊WinPAC-8xx7或WP-8xx7 為 WP-8147/8447/8847/8137/8437/8837的簡稱。
WinPAC-8xx6或WP-8xx6 為 WP-8146/8446/8846/8136/8436/8836的簡稱。
重要1. WP-8xx7/8xx6 的插槽0 ~ 7 只支援高卡的 I-8K 與 I-87K I/O 模組。
請參考 WP-8xx7 CD: \napdos\isagraf\wp-8xx7\chinese_manu\“chinese_wp-8x47_datasheet.pdf”2. WinPAC-8xx7 需設定為固定 IP 位址。
(不可使用 DHCP)3. 如果不使用 WP-8xx7的 LAN2,需將 LAN2 設定為 Disable (請參考附錄D)。
4. 建議使用工業級乙太網路交換器NS-205或NS-208來連接WP-8xx7/8xx6。
注意泓格科技股份有限公司對於因為使用本系列產品所造成的任何損害並不負任何法律上的責任,本公司並保留在任何時候修訂本書且不需通知的權利。
泓格科技股份有限公司將儘可能地提供本系列產品可靠而詳盡的資訊。
然而,本公司並無義務需提供此系列產品詳盡的應用資訊,或對因非法使用本系列產品所遭受的損害負任何責任。
商標與著作權本書所提所有公司商標,商標名稱及產品名稱分別屬於該商標或名稱的擁有者所有。
開發軟體兩種選項:- ISaGRAF: 3.4x或3.5x版,符合IEC 61131-3標準。
LD, ST, FBD, SFC, IL 與 FC。
- 非ISaGRAF: Microsoft EVC++4.0 或 2008/2005/2003 (, C#.net)。
參考資料- ISaGRAF English User’s Manual:WinPAC-8xx7 CD: \napdos\isagraf\wp-8xx7\english_manu\"user_manual_i_8xx7.pdf" 與 "user_manual_i_8xx7_appendix.pdf"(附錄)- ISaGRAF中文進階使用手冊:WinPAC-8xx7 CD: \napdos\isagraf\wp-8xx7\chinese_manu\"chinese_user_manual_i_8xx7.pdf" 與"chinese_user_manual_i_8xx7_appendix.pdf"(附錄)- 更多網頁資訊: /products/PAC/i-8000/isagraf_c.htm技術支援請連絡當地的經銷商或 E-mail 問題至****************** .常見問答集請參考FAQ : /faq/isagraf.htm版本: 1.1 版, 2009年 7月著作者: Chun Tsai; 編譯者: Eva Li版權所有泓格科技股份有限公司,2009年7月起,保留所有權利。
- 1、下载文档前请自行甄别文档内容的完整性,平台不提供额外的编辑、内容补充、找答案等附加服务。
- 2、"仅部分预览"的文档,不可在线预览部分如存在完整性等问题,可反馈申请退款(可完整预览的文档不适用该条件!)。
- 3、如文档侵犯您的权益,请联系客服反馈,我们会尽快为您处理(人工客服工作时间:9:00-18:30)。
本程序用来绘制发表质量的质粒图,可广泛应用与论文、教材的质粒插图。
其特性包括:
●知道序列或不知序列结构均能绘制质粒图
●可读入各种流行序列格式文件引入序列信息。
●自动识别限制位点
●可构建序列结构,功能包括:从文件插入序列、置换序列、序列编辑、部分序列删
除等。
●绘图功能强大,功能包括:位点标签说明、任意位置文字插入、生成彩图、线性或
环形序列绘制、可输出到剪贴板、可输出到图像文件。
●限制酶消化分析报告输出与序列输入报告功能。
1. 不知序列结构绘制质粒图
从菜单或工具栏选择File New,出现一个空白文件,再在菜单或工具栏选择Insert Blank,出现一个对话框,如下:
输入质粒标题与碱基对数,选择为线性或环形序列,单击OK键,便出现质粒图,可继续进行编辑,但因为不知其序列,所以有一些功能无法进行。
2. 从一个GenBank文件建立一个质粒图
选择File New后,在菜单或工具条中选择Insert GenBank File,便打开对话框,由你选择一个指定文件,确定后,便根据此序列生成质粒图,进行进一步编辑。
3. 从一个其它序列格式文件建立质粒图
选择File New后,在菜单或工具条中选择Insert Sequence File,便打开对话框,由你选择一个指定文件,确定后,便根据此序列生成质粒图,进行进一步编辑。
支持的序列格式包括:Stanford, NRBF, EMBL, Fasta, GCG, DNAStrider, Fitch, Pearson, Zuker, Olsen, Phylip, ASXII/RAW, PIR, CODA TA, MSF, DNAStar,若是多序列文件,将由你选择哪一条序列进行作图。
4. 标记限制酶切位点
菜单或工具条中中选择Restriction Enzymes命令,用来标记目前序列中发现的限制酶切位点。
出现以下窗口:
左边的队列为按字母排列的限制酶,数字为发现的位点数量,右边让用选择显示何种限制酶显示在左面的队列中,选项如下:
Single Cutter:在队列中只显示对本序列有一个酶切位点的限制酶。
All Cutter:在队列中显示所有对本序列有一个或一个以上酶切位点的限制酶。
All Enzymes:显示所有的限制酶,不管是否对本序列有酶切位点。
Cuts _____ to _____ times:显示指定有几个切点的酶。
用鼠标左键选择所有需要作标记的酶的名称,单击OK,便自动在质粒图上标记出酶切位点与酶名称。
5 自动标记GenBank文件指定的特征序列
菜单或工具条中中选择Sequence Features命令,用来标记目前GneBank序列文件中含有的特征序列。
选择此命令后打开一个对话框,用鼠标选择希望程序标记在质粒图上的特征序列,单击OK,便自动在质粒图上标记这些选定的特征序列。
6 插入文字内容
在菜单或工具条中中选择Text命令,便可插入文字内容,可定义大小,粗细,字体等,插入的文字内容可用鼠标拖动,放置在质粒图的任意位置。
7. 将线性序列图变成环形序列图或将环形序列图变成线性序列图
在菜单或工具条中中选择Close Sequence命令或Open Sequence命令,便可在二者之间转换。
8. 标记碱基对
在菜单或工具条中中选择Marker命令,定义碱基对与标记文字后,单击OK即可。
9. 定义弓形结构Arc
在菜单或工具条中中选择Arc命令,定义碱基对位置、长度、文字、弓形结构颜色、填充色、形状、宽度等内容,单击OK即可。
10. 限制酶数据库
程序本身含有一个限制酶数据库,选择菜单命令Edit Enzymes可以编辑限制酶数据库,包括,修改、增加、删除、从DNASIS.格式文件引入。
限制序列可以模糊定义,模糊代码表示如下:
A A A
C C C
G G G
T T T
U U U
R G or A G, A, R
Y C or T C, T, Y
M A or C A, C, M
K G or T G, T, K
S G or C G, C, S
W A or T A, T, W
B C, G, or T C, G, T, B, Y, K, S
D A, G, or T A, G, T, D, R, K, W
H A, C, or T A, C, T, H, Y, M, W
V A, C, or G A, C, G, V, R, M, S
N Any Any
11. 工具栏图标含义依次为:
File New 打开一个新文件
File Open...打开一个原存盘文件
File Save文件存盘
File Save As...文件另存为
File Print...打印
Edit Copy拷贝到剪贴板
Edit Close Sequence线性序列转化为环形
Edit Open Sequence环形序列转化为线性
Insert WinPlas File...插入WinPlas文件
Insert Blank Segment...插入空片段
Insert Sequence file...插入序列文件
Insert GenBank file...插入GenBank文件
Insert Delete Region...删除选定区域
Insert Text...插入文字
Insert Marker...插入标记
Insert Arc...插入弓形结构
Sequence Restriction Enzymes...序列限制酶
Sequence Features...特征序列
Help About...帮助。