fenix3 中英文对照说明书
fenix PD32 V2.0 用户手册说明书
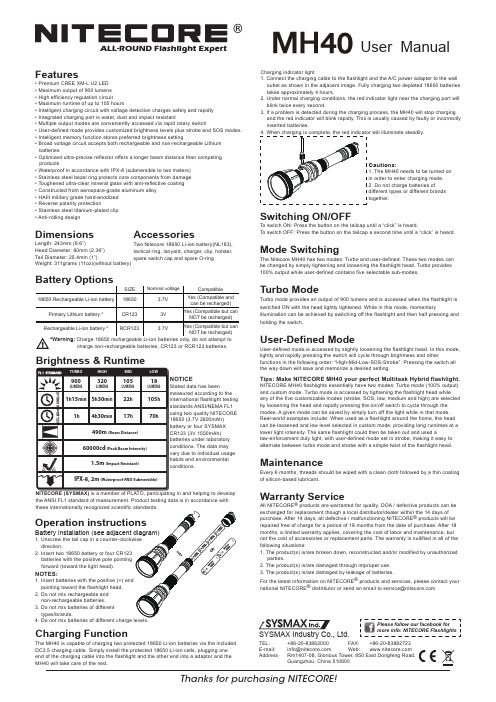
®User ManualFeatures• Premium CREE XM-L U2 LED • Maximum output of 900 lumens • High efficiency regulation circuit • Maximum runtime of up to 105 hours• Intelligent charging circuit with voltage detection charges safely and rapidly • Integrated charging port is water, dust and impact resistant• Multiple output modes are conveniently accessed via rapid rotary switch• User-defined mode provides customized brightness levels plus strobe and SOS modes.• Intelligent memory function stores preferred brightness setting• Broad voltage circuit accepts both rechargeable and non-rechargeable Lithium batteries• Optimized ultra-precise reflector offers a longer beam distance than competing products• Waterproof in accordance with IPX-8 (submersible to two meters)• Stainless steel bezel ring protects core components from damage • Toughened ultra-clear mineral glass with anti-reflective coating • Constructed from aerospace-grade aluminum alloy • HAIII military grade hard-anodized • Reverse polarity protection• Stainless steel titanium-plated clip • Anti-rolling designDimensionsLength: 243mm (9.6”)Head Diameter: 60mm (2.36”)Tail Diameter: 25.4mm (1”)Weight: 311grams (11oz)(without battery)Thanks for purchasing NITECORE!SYSMAX Industry Co., Ltd.TEL: +86-20-83862000 FAX: +86-20-83882723 E-mail: *****************Web: Address :Rm1407-08, Glorious Tower, 850 East Dongfeng Road,Guangzhou, China 510600ALL-ROUND Flashlight Expertdirection.2. Insert two 18650 battery or four CR123 batteries with the positive pole pointing forward (toward the light head).NOTES:pointing toward the flashlight head.2. Do not mix rechargeable and non-rechargeable batteries.3. Do not mix batteries of different types/brands.Charging indicator light1. Connect the charging cable to the flashlight and the A/C power adapter to the wall outlet as shown in the adjacent image. Fully charging two depleted 18650 batteries takes approximately 4 hours.2. Under normal charging conditions, the red indicator light near the charging port will blink twice every second.3. If a problem is detected during the charging process, the MH40 will stop charging and the red indicator will blink rapidly. This is usually caused by faulty or incorrectly inserted batteries.4. When charging is complete, the red indicator will illuminate steadily.AccessoriesTwo Nitecore 18650 Li-ion battery(NL183), tactical ring, lanyard, charger, clip, holster, spare switch cap and spare O-ring charge non-rechargeable batteries, CR123 or RCR123 batteries.Brightness & RuntimeTURBOHIGHMIDLOWLUMENS320LUMENS900LUMENS105LUMENS18105h 22h 1h 15min 4h 30min5h 30min70h17h1h490m (Beam Distance)60000cd (Peak Beam Intensity)IPX-8, 2m (Waterproof AND Submersible)1.5m (Impact Resistant)4×CR1232×18650NOTICEStated data has beenmeasured according to the international flashlight testing standards ANSI/NEMA FL1 using two quality NITECORE 18650 (3.7V 2600mAh) battery or four SYSMAX CR123 (3V 1550mAh) batteries under laboratory conditions. The data may vary due to individual usage habits and environmental conditions.NITECORE (SYSMAX) is a member of PLATO, participating in and helping to develop the ANSI FL1 standard of measurement. Product testing data is in accordance with Cautions:1. The MH40 needs to be turned on in order to enter charging mode.2. Do not charge batteries ofdifferent types or different brands together.Switching ON/OFF To switch ON: Press the button on the tailcap until a “click” is heard.To switch OFF: Press the button on the tailcap a second time until a “click” is heard.Mode SwitchingThe Nitecore MH40 has two modes: Turbo and user-defined. These two modes can be changed by simply tightening and loosening the flashlight head. Turbo provides 100% output while user-defined contains five selectable sub-modes.Turbo ModeTurbo mode provides an output of 900 lumens and is accessed when the flashlight is switched ON with the head lightly tightened. While in this mode, momentaryillumination can be achieved by switching off the flashlight and then half pressing and holding the switch.User-Defined ModeUser-defined mode is accessed by slightly loosening the flashlight head. In this mode, lightly and rapidly pressing the switch will cycle through brightness and otherfunctions in the following order: “High-Mid-Low-SOS-Strobe”. Pressing the switch all the way down will save and memorize a desired setting.Tips: Make NITECORE MH40 your perfect Multitask Hybrid flashlight.NITECORE MH40 flashlights essentially have two modes: Turbo mode (100% output) and custom mode. Turbo mode is accessed by tightening the flashlight head while any of the five customizable modes (strobe, SOS, low, medium and high) are selected by loosening the head and rapidly pressing the on/off switch to cycle through the modes. A given mode can be saved by simply turn off the light while in that mode. Real-world examples include: When used as a flashlight around the home, the head can be loosened and low level selected in custom mode, providing long runtimes at a lower light intensity. The same flashlight could then be taken out and used alaw-enforcement duty light, with user-defined mode set in strobe, making it easy to alternate between turbo mode and strobe with a simple twist of the flashlight head.MaintenanceEvery 6 months, threads should be wiped with a clean cloth followed by a thin coating of silicon-based lubricant.Warranty ServiceAll NITECORE ® products are warranted for quality. DOA / defective products can be exchanged for replacement though a local distributor/dealer within the 14 days of purchase. After 14 days, all defective / malfunctioning NITECORE ® products will be repaired free of charge for a period of 18 months from the date of purchase. After 18 months, a limited warranty applies, covering the cost of labor and maintenance, but not the cost of accessories or replacement parts. The warranty is nullified in all of the following situations:1. The product(s) is/are broken down, reconstructed and/or modified by unauthorized parties.2. The product(s) is/are damaged through improper use.3. The product(s) is/are damaged by leakage of batteries.For the latest information on NITECORE ® products and services, please contact your national NITECORE ®**********************************************Charging FunctionThe MH40 is capable of charging two protected 18650 Li-ion batteries via the included DC3.5 charging cable. Simply install the protected 18650 Li-ion cells, plugging one end of the charging cable into the flashlight and the other end into a adaptor and the MH40 will take care of the rest.Please follow our facebook for more info: NITECORE Flashlights。
FISICA 3B SCIENTIFIC 微伏特表 用户手册说明书
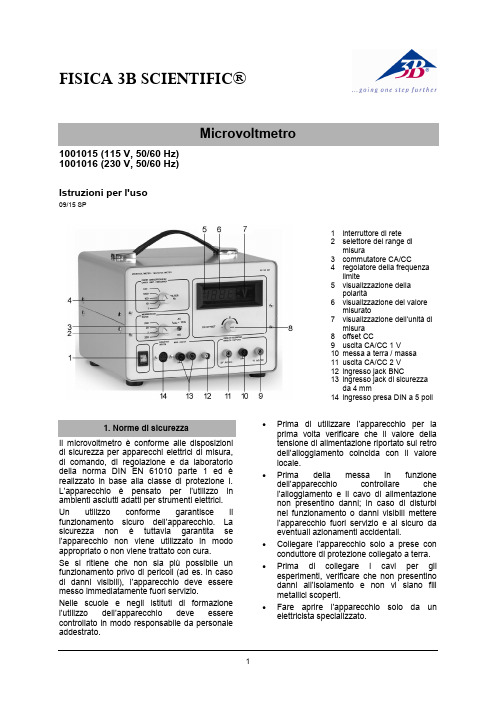
FISICA 3B SCIENTIFIC®11001015 (115 V, 50/60 Hz) 1001016 (230 V, 50/60 Hz)Istruzioni per l'uso09/15 SP1 interruttore di rete2 selettore del range dimisura3 commutatore CA/CC4 regolatore della frequenzalimite5 visualizzazione dellapolarità6 visualizzazione del valoremisurato7 visualizzazione dell’unità dimisura 8 offset CC9 uscita CA/CC 1 V10 messa a terra / massa 11 uscita CA/CC 2 V 12 ingresso jack BNC13 ingresso jack di sicurezzada 4 mm14 ingresso presa DIN a 5 poliIl microvoltmetro è conforme alle disposizioni di sicurezza per apparecchi elettrici di misura, di comando, di regolazione e da laboratorio della norma DIN EN 61010 parte 1 ed è realizzato in base alla classe di protezione I. L’apparecchio è pensato per l’utilizzo in ambienti asciutti adatti per strumenti elettrici. Un utilizzo conforme garantisce il funzionamento sicuro dell’apparecchio. La sicurezza non è tuttavia garantita se l’apparecchio non viene utilizzato in modo appropriato o non viene trattato con cura.Se si ritiene che non sia più possibile un funzionamento privo di pericoli (ad es. in caso di danni visibili), l’apparecchio deve essere messo immediatamente fuori servizio.Nelle scuole e negli istituti di formazione l’utilizzo dell’apparec chio deve essere controllato in modo responsabile da personale addestrato.∙Prima di utilizzare l’apparecchio per la prima volta verificare che il valore della tensione di alimentazione riportato sul retro dell’alloggiamento coincida con il valore locale.∙Prima della messa in funzione dell’apparecchio controllare che l’alloggiamento e il cavo di alimentazione non presentino danni; in caso di disturbi nel funzionamento o danni visibili mettere l’apparecchio fuori servizio e al sicuro da eventuali azionamenti accidentali.∙ Collegare l'apparecchio solo a prese con conduttore di protezione collegato a terra. ∙Prima di collegare i cavi per gli esperimenti, verificare che non presentino danni all’isolamento e non vi siano fili metallici scoperti.∙Fare aprire l’appa recchio solo da un elettricista specializzato.3B Scientific GmbH ▪ Rudorffweg 8 ▪ 21031 Hamburgo ▪ Germania ▪ Con riserva di modifiche tecniche © Copyright 2015 3B Scientific GmbHL'apparecchio consente di misurare e amplificare tensioni continue e alternate estremamente piccole (max. 2 V), come ad es. tensioni a induzione, termiche e ottiche. La misurazione viene indicata su un display a LED. Inoltre è possibile collegare anche un misuratore dimostrativo. Il segnale di misura viene alimentato mediante un jack BNC o un jack di sicurezza da 4 mm. Un commutatore consente di eseguire misurazioni in CA o CC. Nell'ingresso di misura è possibile collegare un filtro per il livellamento del segnale o per la limitazione superiore della frequenza di misura. Si possono impostare 4 frequenze fisse. Il filtro consente di ridurre le tensioni di disturbo durante le misurazioni di tensioni continue e alternate. Una presa DIN supplementare permette di collegare facilmente delle sonde di Hall.L’apparecchio 1001015 è progettato per una tensione di rete di 115 V (±10 %), 1001016 per 230 V (±10 %).Tensione di uscita: 0 – ±2 V Corrente di uscita:max. 1 mAResistenza d'entrata: range CC: 100 k Ω range CA: 900 k ΩVisualizzazione misura: display LED a 3,5 cifre Collegamenti in ingresso: 2 jack di sicurezzada 4 mm ,jack BNC presa DIN a 5 poliCollegamenti in uscita: 3 jack di sicurezza da4 mmTensione di alimentazione: vedere sul retrodell’alloggiamentoFusibile primario: vedere sul retrodell’alloggiamentoDimensioni: 235 × 250 × 180 mm³ Peso: ca. 3,3 kg4.1 Funzionamento come misuratore CC ∙ Applicare la tensione di esercizio. ∙ Impostare il commutatore su CC.∙Impostare il range di misura (200 μV –200 mV).∙ Mettere in cortocircuito l’ingresso e regolare il punto zero con l’offset CC.∙ Rimuovere il cortocircuito e collegare ilcarico all’ingresso.4.2 Funzionamento come misuratore CA ∙ Applicare la tensione di esercizio. ∙ Impostare il commutatore su CA.∙ Impostare il range di misura (200 μV –200 mV).∙Collegare il carico all’ingresso.4.3 Funzionamento come amplificatore dimisura CC∙ Applicare la tensione di esercizio. ∙ Impostare il commutatore su CC.∙ Impostare il range di misura (200 μV –200 mV).∙ Mettere i n cortocircuito l’ingresso e regolare il punto zero con l’offset CC.∙Rimuovere il cortocircuito e collegare il misuratore dimostrativo (visualizzazione analogica, range di misura fino a 2 V) all’uscita.∙Collegare il carico all’ingresso.4.4 Funzionamento come amplificatore dimisura CA∙ Applicare la tensione di esercizio. ∙ Impostare il commutatore su CA.∙ Impostare il range di misura (200 μV –200 mV).∙Collegare il misuratore dimostrativo (visualizzazione analogica, range di misura fino a 2 V) all’uscita.∙Collegare il carico all’ingresso.∙ Smaltire l'imballo presso i centri di raccolta e riciclaggio locali. ∙Non gettare l'apparecchio nei rifiuti domestici. Perlo smaltimento delle appare- cchiature elettriche, rispet- tare le disposizioni vigenti a livello locale.∙Non gettare le batterie esaurite nei rifiuti domestici. Rispettare le disposizioni legali locali (D: BattG; EU: 2006/66/EG).。
佳明 Fenix3 HR中、英文菜单对照 V4.0
模式
2.Mass Storage 大容量存储模式
14.Restore Defaults 恢复默认设置
15.Software Update 软件更新
16.About 关于
1.My Workouts 我的训练
2.Training Calendar 训练日程
3.Intervals 间歇训练 1.Do Workout 开始训练
置格式
2.Daturn 大地基准面
11.Format 格式/ 坐标格式
3.Spheroid 参考椭球体
1.Pace/Speed Preference 配速/速 度偏好
2.Start of Week 每周起点
2.Training 训 练
12.Date
1.Every Second 每秒
Recording 数据记 2.Smart 智能 录 B Mode USB 1.Garmin Garmin模式
6.Wi-Fi
1.Connnect to Wi-Fi 连接到Wi-Fi
2.Auto Upload 自动上传
7.Activity Tracking 1.Status 状态
活动监测
2.Move Alert 久坐提醒
3.Goal Alert 自动目标
4.Go to Sleep 睡眠追踪
8.Navigation 导航
2.Keys 按键光
3.Alerts 警示/警示光
4.Gesture 手势光
7.Sounds 声音 8.Units 单位
5.Timeout 省电超时/待机超时/超时 6.Brightness 亮度 1.Key Tones 按键音 2.Alert Tones 警示音 3.Vibration 振动 1.Distance 距离
佳明飞耐时3心率英文版版(Fenix 3 HR)

中文操作手冊
目錄
產品介紹............................................. 3
按鍵......................................................................... 3 為fēnix 3充電......................................................... 3 配對手持裝置與 fēnix 3 ....................................... 3 支援與更新............................................................. 4 Garmin Express設定............................................. 4 腕式心率................................................................. 4
ANT+感測器...................................... 27
配對ANT+感測器................................................. 27 佩戴心率感測器 (選購)....................................... 27 步頻感測器校正................................................... 28 踏頻感測器 (選購)............................................... 28
佳明Fenix3HR菜单英中文对照(Version4.50)
User pfofile (用户配置文件)
四级菜单 DataScreen(屏幕) Alerts(警报) Metronome(节拍器) Auto lap(自由计圈) Auto pause(自动暂停) Auto climb(自动记录海拔) 3D Speed(空间速度) 3D Distance(空间距离) Auto Scroll(自动滚动) GPS(全球定位) Power Save(省电模式) Background Color(背光颜色) Accent Color(重点颜色) Status(状态) Move Up(向上移动) Move Down(向下移动) Remove(删除) Rname(重命名)
Training (训练)
Alarm Clock (闹钟) Clock (时钟)
Off,Once
Add Alarm(添加) Timer(倒计时器) Stopwatch(秒表) Alerts (警报) Save Location Til Sunset(日落) Til Sunraise(日出)
Courses (轨迹)
五级菜单
Calibrate(校准) Display(显示)
North Ref.(北向选择) Calibrate(校准) Plot 48-Hour Storm Alert(风暴预警) Status(状态)(打开关闭)
Bluetooth (蓝牙)
WIFI (无线) Activity Tracking (活动跟踪)
Connect to WI-FI(连接到WIFI) Auto Upload(自动上传)(打开关闭) Status(状态) Move Alert(移动警报) Goal Alert(目标提醒) Go to Sleep(去睡觉)
轨迹名称
fenix3_HR
目录
产品介绍....................................................... 1
按键..................................................................................... 1 为设备充电......................................................................... 1 与手机配对......................................................................... 1 支持和更新......................................................................... 1 心率监测............................................................................. 2 跑步动态............................................................................. 2 生理指标参数..................................................................... 3
知识产权声明
本机功能及内容仅提供本产品购买人使用,不得私自转载、 转印、复制、更改内容、扫描存储提供给他人,或用作其他用 途。本机所标示的商品文字或图片均为辅助说明的用途,并 非作为商标使用,原商品商标的知识产权仍为原权利人所 有。
注意事项
军拓铁腕3智能户外手表用户手册电子版
目录1 产品须知 (1)2 产品介绍 (5)3 监测工具 (10)4 运动模式 (19)5 关于地图 (20)6 通知提醒 (21)7 疑难解答 (22)1 产品须知1.1 特别声明本中文用户手册版权属深圳市龙腾飞通讯装备技术有限公司所有。
任何个人及单位未经我司书面授权并在官网公开发布授权书,不得私自将说明书包含的文字及图片复制转载或者更改内容发布用作销售使用。
本产品外观由军拓全球运营中心、军拓工业设计中心、中国载人航天工业设计团队联合设计,产品外观专利。
深圳市龙腾飞通讯装备技术有限公司为军拓品牌的所有者,拥有更改或提升本产品功能的所有权利。
●在线售后/ 登陆军拓运动APP或军拓JTOUR 官方微信●电话售后/ 全国免费服务热线400-900-86501.2 基于北斗卫星的双模定位与授时北斗卫星导航定位系统,是中国自行研制开发的区域性有源三维卫星定位与通信系统BDS 。
卫星导航系统是重要的空间基础设施,它综合了传统天文导航定位和地面无线电导航定位的优点,在测绘、电信、水利、公路交通、铁路运输、渔业生产、勘探、森林防火和国家安全等诸多领域逐步发挥重要作用。
建成独立自主、开放兼容、技术先进、稳定可靠的覆盖全球的北斗卫星导航系统,能够促进卫星导航产业链形成,形成完善的国家卫星导航应用产业支撑、推广和保障体系,推动卫星导航在国民经济社会各行业的广泛应用。
综合考虑到用户的使用习惯与相关联应用的兼容性,本产品附加了GPS 全球定位。
1.3 免责声明佩戴设备时,由于使用的场合、环境及应用方式不同,使用者必须特别注意下列事项或说明:●本机属于精密穿戴设备,由于使用者错误的操作方式、外在干扰或故障因素等,可能导致不安全的后果,使用者需掌握佩戴电子产品的基本常识,并自行承担佩戴风险。
●本机广泛用于多种环境及系统自带的七大运动,使用者佩戴时,需自行考虑安装位置的安全性,另外运动进行中的操作使用也需自行注意及承担安全责任,产品制造商及运营商不承担任何责任。
三频火焰探测器说明书

警示: 除了 DIP 开关,不要触摸内部元件(静电敏感装置(ESD)参考附件 A)
继电器 Phoenix 使用两组 DIP 开关 DIP 开关 #1 用于定义敏感性和延迟时间 DIP 开关#2 用于定义继电器设置;它只能用于继电器模式,并且只有位置 2 是可以用的。 见表格 7 和 8. 模拟 模拟(无继电器)Phoenix 只使用 DIP 开关#1 来定义敏感性和延迟时间的设置。DIP 开 关使用说明见表 7.
导线须使用外壳和保护层来使得每根导线周围都有密封。这能防止空气,气体和水从外壳的 里面泄漏到外罩的外面。
建议使用防爆排管和通透导管。温度和大气压的变化会导致‘渗透’使得水蒸汽进入导管。 连接头不足以防止通透渗漏。
连接 Phoenix 可以是模拟,模拟/数显,继电器或数显模式。各种模式的特定链接参考以下表格。 有需要的话,终端接线盒也可以由 Net Safety 提供。
功能 接地 Vdc (+) Com (-) 绝缘电源(+) 4-20mA 信号输出
功能 接地(GND) Vdc (+) Com (-) 报警继电器 报警继电器 故障继电器 故障继电器
警示: 如果在 Net Safety 多功能接线盒中制作了终端口,特殊终端设计请参考 MAN-0081
注意: 当和模拟/继电器接线盒(JB-IR3SAR-A/S)一起使用模拟装置(IR3S-A), 能使用 外置磁铁来重新设置和接线盒连接在一起的报警。 使用说明书见 MAN-0081。
零延迟时间只能用在须即时作出反应,控制地非常好,并且允许产生少量误报警的应用中。
延迟时间设为 3,5,10 秒 延迟时间设置是指探测器在发出火焰报警之前,火焰信号必须持续出现的时间长度。 当火 焰持续至设定的延迟时间,报警会在 5 秒之内发出。这一延迟到 5 秒的设置是用户不能自己 调节的。
- 1、下载文档前请自行甄别文档内容的完整性,平台不提供额外的编辑、内容补充、找答案等附加服务。
- 2、"仅部分预览"的文档,不可在线预览部分如存在完整性等问题,可反馈申请退款(可完整预览的文档不适用该条件!)。
- 3、如文档侵犯您的权益,请联系客服反馈,我们会尽快为您处理(人工客服工作时间:9:00-18:30)。
Going for a Pool Swim .开...始....泳...池...游...泳.......................................... 3 Swim Terminology .游...泳...术...语................................................... 3 Stroke Types .泳...姿...类....型.......................................................... 3 Resting During Pool Swimming .室...内...游...泳....休...息...时...间.................. 3 Training with the Drill Log .以...训....练...记...录...模...式....游...泳....................... 3
Multisport History .复...合...运....动...的...历...史...记....录...................................... 10 Viewing Your Time in Each Heart Rate Zone .各...心...率..区...间...的...时...间. 10 Viewing Step Totals .查...看...步....总...计.................................................... 10 Viewing Data Totals查....看...总...计...资...料.................................................. 10 Deleting History .删....除...历...史...记...录....................................................... 10
History .历...史...记...录.......................................... 10 Using History .使...用....历...史...记...录........................................................... 10
fēnix® 3
Owner’s Manual
翻译仅供参考,如有错误之处,请不吝指出,联系QQ:12594065 (SUNG),随时交流修正
February 2015
Printed in Taiwan
190-01840-00_0B
Table of Contents
Setting a Training Target .设...定....训...练...目...标........................................... 7 Cancelling a Training Target .取...消...训...练...目....标................................. 7
Going Cross-Country Skiing .越...野...滑....雪....................................... 2 Going Downhill Skiing or Snowboarding .滑...降...滑....雪...和...单...板...滑....雪..... 2
Viewing Your Ski Runs .查...看...滑...雪....记...录..................................... 2 Hiking .徒...步...................................................................................... 2
Setting up Garmin express 设...置.... G...a..r.m..i.n.. .e..x.p..r.e..s.s....................... 1
Activities .运...动..................................................................... 1 Starting an Activity .开...始...活...动............................................................ 2 Stopping an Activity .停...止...活...动.......................................................... 2 Skiing .滑...雪...................................................................................... 2
Going for a Run .开...始...跑...步............................................................ 2 Running with the Metronome .使...用...节...拍...器....跑...步............................. 2 Biking .骑...车...................................................................................... 3 Going for a Ride .开...始...骑...车........................................................... 3
Introduction .介..绍.................................................................. 1 Keys .按...键........................................................................................ 1 Charging the Device ..充...电.............................................................. 1 Pairing Your Smartphone with Your Device .与...智....能...手...机...配...对........... 1 Support and Updates .支...持...与...更....新.................................................... 1
Viewing Your Personal Records .查...看...个....人...记...录........................... 7 Restoring a Personal Record .恢...复....到...上...一...次...个....人...记...录................... 7 Clearing a Personal Record .删...除...一...项....个...人...记...录............................ 7 Clearing All Personal Records .删...除...所....有...的...个...人...记....录.................... 7 Running Dynamics ..跑...步...动...态........................................................... 7 Training with Running Dynamics ..利...用...跑...步...动....态...进...行...训...练............. 8 Color Gauges and Running Dynamics Data .颜..色...区...间...和...跑..步...动...态... 8 Tips for Missing Running Dynamics Data跑...步....动...态...小...窍...门........... 8 About VO2 Max. Estimates .关...于....最...大...摄...氧...量..................................... 8 Getting Your VO2 Max. Estimate for Running .跑..步...的...最...大...摄..氧...量... 8 Getting Your VO2 Max. Estimate for Cycling .骑...车...的...最...大..摄...氧...量.... 9 VO2 Max. Standard Ratings .最...大....摄...氧...量...评...估.............................. 9 Viewing Your Predicted Race Times .比...赛...预....测.......................... 9 Recovery Advisor ..恢...复....顾...问............................................................ 9 Turning On the Recovery Advisor .开...启...恢....复...指...导...功...能................... 9 Viewing Your Recovery Time ..查...看....你...的...恢...复...时....间........................ 9 About Training Effect ..训...练...效...果....................................................... 9