HEW安装和新建项目和仿真调试说明1B4
HEW自动生成文件介绍

M16C族单片机编程入门作者:快乐水牛M16C族单片机为原三菱电机生产的16位CISC微控制器。
主要特点为:低电压,低功耗,抗干扰性强具备大容量FLASH ROM, SRAM丰富的外设,如定时器,AD,DA,CAN控制器等所有这些特性,使M16C广泛应用汽车,电动车,工业设备及家电产品上。
下面我们讲讲如何在M16C平台下编程。
1. 使用HEW新建一个工程。
打开HEW,选择Create a new project workspace,点OK。
选择CPU family,这里我们选择M16C选项。
工具链Tool chain我们默认选择Renesas M16C Standard。
好了,接下来我们要输入一个工程名字,在workspace name里输入m16c_test。
接下来,注意,也是最重要的一步,在左边的project types下面,我们选择C source startup Application这个选项,该选项的含义是你将建立一个C语言开始的工程。
当然,如果选择第一个Application,则为汇编语言开始的工程。
考虑到大多数朋友对M16C的汇编不是很熟悉,我们这里以C语言工程为参考。
点确定后,继续选择工具链版本5.43.00,CPU Series我选择为M16C/60, CPU Group我选择为6N4,然后点next,继续点next使用默认选项,最后选择targets为M16C E8a SYSTEM,这是是你的CPU要用到的仿真器,我们一般使用瑞萨产的小型ON Chip debugger仿真器E8a. 点next,最后点Finish。
OK,我们的一个C语言工程已经建好了。
2. 工程源文件分析我们发现我们建的m16c_test工程里面有一些源代码文件。
下面我们对这些文件进行分析。
(注意:建立工程时,选择不同的选项可能会产生不同的源代码文件,不过这不影响我们的使用)m16c_test.c源代码:/*****************************/void main(void){}该文件是main()函数。
hyperworks基本操作

hyperworks基本操作1.引言1.1 概述概述部分可以简要介绍本篇文章所涵盖的内容和目的。
具体可以参考以下内容撰写:本文将介绍HyperWorks基本操作的相关知识和技巧。
HyperWorks 作为一款广泛应用于工程仿真和设计领域的软件平台,拥有丰富的功能和工具,能够帮助工程师们进行结构优化、流体力学仿真、疲劳分析等多个方面的工作。
对于初次接触HyperWorks的人来说,掌握基本的操作技巧是学习和使用该软件的关键。
本篇文章将从HyperWorks的简介开始,介绍了其主要的功能和应用领域,然后重点关注于HyperWorks的基本操作方面。
我们将深入研究HyperWorks的界面设置、工程模型的导入和几何处理、材料属性的定义、载荷和边界条件的设定,以及分析和后处理结果的查看等关键步骤。
通过详细的讲解和演示,读者将能够掌握使用HyperWorks进行工程仿真和分析的基础技能。
本文的目的是帮助读者快速入门并熟练掌握HyperWorks的基本操作。
通过了解和掌握这些基本操作,读者可以更高效地使用HyperWorks 进行工程设计和分析工作,提高工作效率和质量。
同时,这也为读者进一步学习和掌握更高级的应用和技术奠定了基础。
总之,本文将逐步介绍HyperWorks的主要功能和基本操作,帮助读者建立起对该软件的扎实基础,为后续的学习和工作打下坚实的基础。
对于正在接触HyperWorks的读者来说,本文将是一份很好的参考资料和学习指南。
1.2文章结构【1.2 文章结构】本文将通过以下几个章节详细介绍HyperWorks的基本操作。
首先,在引言部分将对文章的概述进行说明,包括对HyperWorks的简要介绍和文章的目的。
接着,在正文部分,将展开对HyperWorks的详细介绍,包括其功能和特点。
其中,将重点介绍HyperWorks的基本操作,包括软件安装、界面布局、常用工具的使用等等。
最后,在结论部分将对本文所介绍内容进行总结,并展望HyperWorks在未来的发展前景。
HEW 培训教材--项目生成介绍

1. 什么是项目生成器?
HEW 的一个可迅速建立项目工作空间的功能 将使用中的目标器件的重要信息提供给IDE
CPU 类型? ROM 大小? 堆栈大小? 是否使用仿真器?
创建相关启动代码 为指定目标创建会话
4
Confidential – Level 3
©2009. Renesas Technology Singapore Pte. Ltd., All rights reserved.
创建新的项目工作空间的步骤 (1)
选择 “Create a new project workspace” (创建新的项目工作空间) 来生成 新的项目。
6
Confidential – Level 3
©2009. Renesas Technology Singapore Pte. Ltd., All rights reserved.
创建新的项目工作空间的步骤 (3)
选择目标 CPU,工具链版本
(1) 选择 [Toolchain version] (工具链版本)
(2) 选择 [CPU Series] (CPU 系列) (3)选择 [CPU Group] (CPU组群)
根据CPU系列及组群,相应的包含器件外围 设备地址的输入输出文件将被生成
当根据ROM大小被连接时,确保ROM属性段被适当地定位 从V.5.42起,可依据指定的ROM大小调整ROM的起始地址。
(2) 使用 [Standard I/O Library] (标准输入 输出库)
当使用标准功能库时,请选取此框
(3) [Use Heap Memory] (使用堆存储器)
当使用存储器管理功能库时,请选取此框
也可添加用户的C 源文件至新项目。
惠尔兰引擎工程公司无线调试器的安装及使用说明(PDF)说明书
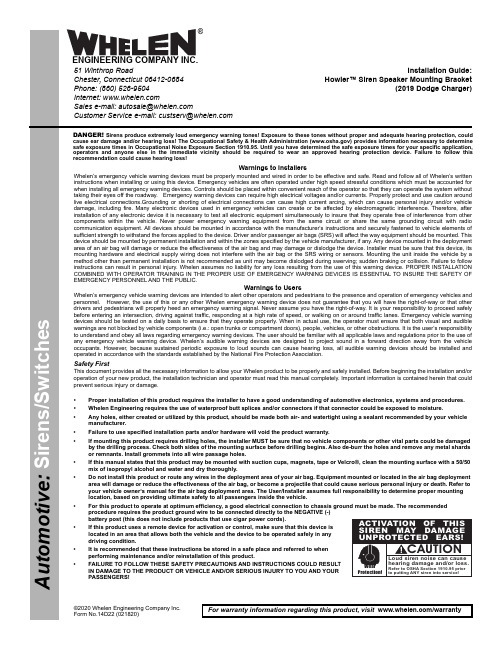
©2020 Whelen Engineering Company Inc.Form No.14D22 (021820)A u t o m o t i v e : S i r e n s /S w i t c h e sInstallation Guide:Howler™ Siren Speaker Mounting Bracket(2019 Dodge Charger)51 Winthrop RoadChester, Connecticut 06412-0684Phone: (860) 526-9504Internet: Sales e-mail: autosale@Customer Service e-mail: custserv@®ENGINEERING COMPANY INC.For warranty information regarding this product, visit /warrantyDANGER! Sirens produce extremely loud emergency warning tones! Exposure to these tones without proper and adequate hearing protection, could cause ear damage and/or hearing loss! The Occupational Safety & Health Administration () provides information necessary to determine safe exposure times in Occupational Noise Exposure Section 1910.95. Until you have determined the safe exposure times for your specific application,operators and anyone else in the immediate vicinity should be required to wear an approved hearing protection device. Failure to follow this recommendation could cause hearing loss!•Proper installation of this product requires the installer to have a good understanding of automotive electronics, systems and procedures.•Whelen Engineering requires the use of waterproof butt splices and/or connectors if that connector could be exposed to moisture.•Any holes, either created or utilized by this product, should be made both air- and watertight using a sealant recommended by your vehicle manufacturer.•Failure to use specified installation parts and/or hardware will void the product warranty.•If mounting this product requires drilling holes, the installer MUST be sure that no vehicle components or other vital parts could be damaged by the drilling process. Check both sides of the mounting surface before drilling begins. Also de-burr the holes and remove any metal shards or remnants. Install grommets into all wire passage holes.•If this manual states that this product may be mounted with suction cups, magnets, tape or Velcro®, clean the mounting surface with a 50/50 mix of isopropyl alcohol and water and dry thoroughly.•Do not install this product or route any wires in the deployment area of your air bag. Equipment mounted or located in the air bag deployment area will damage or reduce the effectiveness of the air bag, or become a projectile that could cause serious personal injury or death. Refer to your vehicle owner’s manual for the air bag deployment area. The User/Installer assumes full responsibility to determine proper mounting location, based on providing ultimate safety to all passengers inside the vehicle.•For this product to operate at optimum efficiency, a good electrical connection to chassis ground must be made. The recommended procedure requires the product ground wire to be connected directly to the NEGATIVE (-) battery post (this does not include products that use cigar power cords).•If this product uses a remote device for activation or control, make sure that this device is located in an area that allows both the vehicle and the device to be operated safely in any driving condition.•It is recommended that these instructions be stored in a safe place and referred to when performing maintenance and/or reinstallation of this product.•FAILURE TO FOLLOW THESE SAFETY PRECAUTIONS AND INSTRUCTIONS COULD RESULT IN DAMAGE TO THE PRODUCT OR VEHICLE AND/OR SERIOUS INJURY TO YOU AND YOUR PASSENGERS!CAUTIONLoud siren noise can cause hearing damage and/or loss.Refer to OSHA Section 1910.95prior to putting ANY siren into service!Wear Protection!ACTIVATION OF THIS SIREN MAY DAMAGE UNPROTECTED EARS!Warnings to InstallersWhelen’s emergency vehicle warning devices must be properly mounted and wired in order to be effective and safe. Read and follow all of Whelen’s written instructions when installing or using this device. Emergency vehicles are often operated under high speed stressful conditions which must be accounted for when installing all emergency warning devices. Controls should be placed within convenient reach of the operator so that they can operate the system without taking their eyes off the roadway. Emergency warning devices can require high electrical voltages and/or currents. Properly protect and use caution around live electrical connections.Grounding or shorting of electrical connections can cause high current arcing, which can cause personal injury and/or vehicle damage, including fire. Many electronic devices used in emergency vehicles can create or be affected by electromagnetic interference. Therefore, after installation of any electronic device it is necessary to test all electronic equipment simultaneously to insure that they operate free of interference from other components within the vehicle. Never power emergency warning equipment from the same circuit or share the same grounding circuit with radio communication equipment. All devices should be mounted in accordance with the manufacturer’s instructions and securely fastened to vehicle elements of sufficient strength to withstand the forces applied to the device. Driver and/or passenger air bags (SRS) will affect the way equipment should be mounted. This device should be mounted by permanent installation and within the zones specified by the vehicle manufacturer, if any. Any device mounted in the deployment area of an air bag will damage or reduce the effectiveness of the air bag and may damage or dislodge the device. Installer must be sure that this device, its mounting hardware and electrical supply wiring does not interfere with the air bag or the SRS wiring or sensors. Mounting the unit inside the vehicle by a method other than permanent installation is not recommended as unit may become dislodged during swerving; sudden braking or collision. Failure to follow instructions can result in personal injury. Whelen assumes no liability for any loss resulting from the use of this warning device. PROPER INSTALLATION COMBINED WITH OPERATOR TRAINING IN THE PROPER USE OF EMERGENCY WARNING DEVICES IS ESSENTIAL TO INSURE THE SAFETY OF EMERGENCY PERSONNEL AND THE PUBLIC.Warnings to UsersWhelen’s emergency vehicle warning devices are intended to alert other operators and pedestrians to the presence and operation of emergency vehicles and personnel. However, the use of this or any other Whelen emergency warning device does not guarantee that you will have the right-of-way or that other drivers and pedestrians will properly heed an emergency warning signal. Never assume you have the right-of-way. It is your responsibility to proceed safely before entering an intersection, driving against traffic, responding at a high rate of speed, or walking on or around traffic lanes. Emergency vehicle warning devices should be tested on a daily basis to ensure that they operate properly. When in actual use, the operator must ensure that both visual and audible warnings are not blocked by vehicle components (i.e.: open trunks or compartment doors), people, vehicles, or other obstructions. It is the user’s responsibility to understand and obey all laws regarding emergency warning devices. The user should be familiar with all applicable laws and regulations prior to the use of any emergency vehicle warning device. Whelen’s audible warning devices are designed to project sound in a forward direction away from the vehicle occupants. However, because sustained periodic exposure to loud sounds can cause hearing loss, all audible warning devices should be installed and operated in accordance with the standards established by the National Fire Protection Association.Safety FirstThis document provides all the necessary information to allow your Whelen product to be properly and safely installed. Before beginning the installation and/or operation of your new product, the installation technician and operator must read this manual completely. Important information is contained herein that could prevent serious injury or damage.IMPORTANT! READ THESE WARNINGS BEFORE CONTINUING!The Howler™ Supplemental Siren was designed for use in high-risk areas such as an intersection. It is not intended to be, nor should be operated as a replacement or alternative to the vehicle’s primary siren.The low-frequency tones of the Howler demonstrate significantly different audio characteristics as compared to those of a traditional higher-frequency siren. While the low-frequency tones are better able to penetrate other vehicles, thus alerting drivers to the presence of the responding emergency vehicle, these tones may also penetrate into the responding vehicle itself. This could potentially expose the operator to increased noise levels.To help eliminate overexposure, the Howler siren has been designed with a built-in timing circuit. The Occupational Safety & Health Administration (OSHA) () provides information necessary to determine safe exposure times in Noise and Hearing Conservation, Section 1910.95 (Occupational Noise Exposure). Until you have determined the safe exposure times for your specific application, this siren should be configured for the minimum operating time and operators should be required to use an approved hearing protection device. FAILURE TO FOLLOW THIS RECOMMENDATION COULD CAUSE HEARING LOSS!IMPORTANT: It is the responsibility of the installation technician to make sure that the installation and operation of this product will not interfere with or compromise the operation or efficiency of any vehicle equipment!Note: The Howler siren speaker may only be installed on the driver-side of a2020 Dodge Charger.1.Remove and discard the existing brackets and hardware (if present) fromyour Howler Siren Speaker (Fig. 1).2.With the bracket and Howler speaker properly oriented (with screened ventopenings facing downwards), route the speaker wires through the wirepassage hole in the bracket and secure the speaker onto the bracket usingthe hardware provided (Fig. 2).3.Following the factory recommended procedure, remove the front bumperfascia.4.Locate and remove the two M8 bumper bolts from the far left end of thebumper. Replace these bolts with the longer M8 bolts included with this kitand tighten to the manufacturers recommended torque value. Note: Theadditional length of these bolts requires the plastic trim panel adjacent tothese bolts to be trimmed as shown in Fig. 3.5.Return this panel to its original, installed location after trimming (Fig. 4).6.Place the bracket/speaker assembly into its mounting location. Whenproperly positioned, the two, outermost bracket mounting holes will bealigned with two vacant holes in the bumper structure. The two innermostbracket mounting holes will fit onto the bolts installed in step 4.7.Locate the two 5/16-18 x 3/4” Hex Head bolts, two 5/16 flat washers andtwo, 5/16-18 Elastic Stop Nuts included with this kit. Install the bolts throughthe bumper structure and through the bracket. Now install a washer andelastic stop nut onto each bolt and tighten firmly (Fig. 5).8.Locate the two, M8 x 1.25 elastic stop nuts. Install the two remaining flatwashers and the M8 Elastic stop nuts onto the two bolts installed in step 4and tighten firmly (Fig. 6).9.Extend the BLACK (-) negative and WHITE (+) positive speaker wires toyour amplifier and connect as outlined in the amplifier instructions.IMPORTANT! When routing wires, it is important to choose a path that willkeep the wires away from any excessive heat or from any vehicle equipmentthat could compromise their integrity such as trunk lids or door jams.10.Be sure to test the siren for proper operation before returning the vehicle toactive service.Refer to your Howler Siren Amplifier manual for detailed operatinginformation and procedures.Fig. 1Fig. 2Fig. 3Fig. 4Fig. 5Fig. 6。
华为Hyperlynx仿真教程培训
6 交互式 SI 仿真模式.....................................................................................14 6.1 过冲仿真..............................................................................................14 6.2 串扰仿真..............................................................................................18 6.3 辐射仿真..............................................................................................20
E-WT使用指南

风力发电(Wind Turbine)仿真设备使用指南一、启动软件双击WTSim.exe文件,启动E-Wind Turbine软件。
二、软件主界面软件的主界面分为以下几个部分:风机三维显示画面、工具栏、俯视图窗口和侧视图窗口。
1. 风机三维显示画面风机三维显示画面通过虚拟现实手段显示风机运行状态、背景及关键参数的实时数据。
运行时双击风机塔架,将进入风机浏览模式。
点击键盘A、D、W、S、R、F键,可从空间各个角度观察风机状态。
A键:左侧视角D键:右侧视角W键:俯视视角S键:仰视视角R键:放大视图F键:缩小视图双击风机轮毂,可使桨叶消失,观察轮毂内部;再次双击风机轮毂,桨叶将重新出现。
双击风机机舱,可打开机舱外壳,观察机舱内部结构:发电机、传动系统及齿轮箱、偏航系统、冷却系统等;再次双击风机机舱,机舱外壳将重新出现。
双击传动系统及齿轮箱外壳,可打开传动系统及齿轮箱,观察其内部结构;再次双击传动系统及齿轮箱,外壳将重新出现。
2. 工具栏工具栏上的按钮说明如下:#新建按钮:新建实验工程,选择风电机组类型。
#打开按钮:打开已存在的实验工程。
#保存按钮:保存正在运行的实验工程,同时保存当前的工况。
#运行按钮:启动当前的实验工程,或从暂停重新恢复运行。
#暂停按钮:停止当前的实验工程。
#复位按钮:实验工程恢复冷态。
#内控按钮:使用内部控制程序对风电机组进行自动控制。
#外控按钮:接收外部控制器控制信号,对风电机组进行控制。
#风模型配置按钮:打开风模型配置对话框,进行风速和风向的设置。
#故障设定按钮:打开故障模式设置列表,进行故障设定。
#ProfiBusDP通讯配置按钮:打开ProfiBusDP通讯配置对话框。
#ProfiBusDP通讯数据显示按钮:打开ProfiBusDP通讯时的实时数据显示对话框。
#评分系统配置按钮:打开评分系统配置对话框。
#退出按钮:退出E-Wind Turbine软件。
新建或打开一个实验工程后,首先进行风模型配置,选择风速和风向;然后选择是内部程序控制还是外部控制器控制,如果是外部控制器控制,确认ProfiBusDP通讯配置正确;最后点击运行按钮,启动风电机组并对其进行控制。
横河DCS软件安装说明
CENTUM VP R5.01 安装指导文档1.CENTUM VP R5.01与其他版本的区别VP R5.01 与之前的软件安装方法有所不同,软件安装和授权管理是分开的。
软件安装部分较之前简单一点,但是授权管理则是一个难点。
2.软件安装:(详细步骤请参照帮助文档)***软件安装前确认计算机操作系统是否符合要求:•Windows Vista Business Edition SP2•Windows 7 Professional SP1 (64-bit)•Windows Server 2003 SP2 Standard Edition (Can be used as the file server only) •Windows Server 2003 R2 SP2 Standard Edition (Can be used as the file server only) •Windows Server 2008 SP2 Standard Edition•Windows Server 2008 R2 SP1 Standard*****本次安装使用的是•Windows 7 Professional SP1 (64-bit)***外围支持软件版本安装光盘:•CENTUM VP software medium (Format name: LHSKM50)•CENTUM VP license medium安装软件前确认已经HIS/ENG等已经安装VF702/VF701, VI702/VI701 专用网卡并完成拨码(跳线)工作.*安装和拨码(跳线) 与之前版本方法一致.特别提示: YOKOGAWA 官方帮助文档还是建议为计算机增加虚拟内存,优化系统为最快速系统.详情请参照帮助文档.网卡驱动安装:选择相应的驱动安装. 我们已VI701/VI702(Vnet/ip)为例.一路OK .特别提示:****IP地址也与之前的版本一致. 下一步安装系统软件:确认驱动已经安装.用户名,组织,安装位置,语言(没有中文)选择站类型HIS/ENG or PC数据库名称正式使用应填写ENG站名字:HIS0164 选择站机型: PC专用键盘安装端口:USB重启动.安装完成3.安全设置:YOKOGAWA 使用了新的安全体系,同时也兼容旧的安全体系.我们安装按照旧的体系来.新安全体系设置详见帮助文档.选择[Legacy Model]. 旧体系.按照默认选项设置特别提示:登陆用户名字为CENTUM 首次登陆密码为Yokogawa1 (注意大小写)登陆有需要修改默认密码。
HyperMesh入门教程[3]
![HyperMesh入门教程[3]](https://img.taocdn.com/s3/m/f7022dfd09a1284ac850ad02de80d4d8d05a0141.png)
HyperMesh入门教程HyperMesh的安装和启动HyperMesh的界面和工具栏HyperMesh的文件管理和导入导出HyperMesh的几何建模和编辑HyperMesh的网格划分和质量检查HyperMesh的材料和截面定义HyperMesh的单元和集合管理HyperMesh的加载和约束设置HyperMesh的输出控制和求解器选择HyperMesh的后处理和结果分析HyperMesh的安装和启动要安装HyperMesh,您需要先HyperWorks套件的安装程序,然后按照提示进行安装。
安装过程中,您需要输入您的许可证信息,选择您需要的组件(包括HyperMesh),以及指定安装路径。
安装完成后,您可以在开始菜单或桌面上找到HyperMesh的图标,双击即可启动软件。
启动HyperMesh后,您会看到一个欢迎界面,上面有几个选项,如下图所示:![HyperMesh欢迎界面]New:创建一个新的HyperMesh项目,需要指定项目名称、工作目录、单位系统和求解器类型。
Open:打开一个已有的HyperMesh项目,需要选择项目文件(扩展名为.hm)。
Import: 导入一个外部文件,可以是几何文件(如.iges, .step, .stl等),网格文件(如.nas, .inp,.cdb等),或结果文件(如.op2, .odb, .h3d等)。
Recent:显示最近打开或创建的HyperMesh项目列表,可以直接其中一个进行打开。
Exit: 退出HyperMesh软件。
HyperMesh的界面和工具栏当您创建或打开一个HyperMesh项目后,您会进入主界面,如下图所示:![HyperMesh主界面]标题栏:显示当前项目的名称、单位系统和求解器类型。
菜单栏:提供各种菜单选项,如File, Edit, View,Tools等,可以进行文件管理、视图控制、工具设置等操作。
工具栏:提供各种快捷按钮,如New, Open, Save, Undo,Redo等,可以进行常用操作。
- 1、下载文档前请自行甄别文档内容的完整性,平台不提供额外的编辑、内容补充、找答案等附加服务。
- 2、"仅部分预览"的文档,不可在线预览部分如存在完整性等问题,可反馈申请退款(可完整预览的文档不适用该条件!)。
- 3、如文档侵犯您的权益,请联系客服反馈,我们会尽快为您处理(人工客服工作时间:9:00-18:30)。
显示变量值
查看C语言变量值
单步执行后 变量 count=0
查看C语言变量值
PC指针全速运到断点 处count=1001
瑞萨HEW仿真调试操作说明
把光标移到需要设置断点 处 在点击箭头指示手掌, 见右边棕色小圆点
把光标移动到需要取消 断点处再点击左上角手 掌则取消断点见右边箭 头
鼠标点击PC指 针全速执行程 序
鼠标点击PC 指针就单步 执行程序,
点击断开或连 接MCU板
复位MCU(PC 指针重新放置 程序最开始处)
黄色箭头
点击此图标出现箭头下面 查看变量值框
框里面点击鼠标右 键,,出现ADD (增加)
输入变量
显示变量值
设置断点
取消断点设置
仿真调试方法介绍
鼠标点击就单步 执行遇到子程序 则全部执行子程 序
黄色箭头PC指 针
查看C语言变量值
此图标出现箭头下面 查看变量值框
查看C语言变量值
查看C语言变量值