
HP(惠普)2230S
HP Compaq 2230s笔记本电脑
HP Wireless Assistant Intel® WiFi Link 5100适配器(802.11a/b/g/draft-n) Broadcom 802.11a/b/g/draft-n、b/g WiFi适配器 采用蓝牙®无线技术的惠普集成模块
12.7毫米(固定) DVD,DVD-CDRW Combo, DVD+/-RW Supermulti DL 支持“无ODD选项”
光区存储/备用存储
扩展槽 音频 端口
1个PCI-Express卡插槽 (54毫米) 1个SD/MMC Flash卡插槽 ADI 1981HD Azalia 内置麦克风 ,2个立体扬声器 VGA、USB2.0(3个)、RJ45、RJ11、立体声麦克风输入、立 体声耳机/输出、电源接口、S视频输出 无1394端口,无扩展坞接口,无旅行电池接口
HP Compaq 2230s笔记本电脑 产品介绍
Laser Lee AUG 2008
© 2006 Hewlett-Packard Development Company, L.P. 本文所含信息如有更改,恕不另行通知。
要点综述
业务目标 • 通过为注重价格的客户提供有竞争力的便携式 产品,增加市场份额与赢利 • 惠普创新科技与新外观设计,帮助我们的产品 在竞争中脱颖而出 客户需求 • 优化的轻薄外形,实现出色的移动性 • 方便的内置光驱、易于使用 • 有竞争力的价格 • 出色的电池续航力 • 无线连接 目标市场 • 需要从主流到入门级超轻笔记本电脑的商用/消 费者类客户 • 大型企业、中小企业、个人用户 • 高中与大学学生 • 在家办公人员 • 女性移动专业人士
1.72千克/4.07磅(4芯,含ODD)
(重量因配置不同而有所差异) 尺寸
28毫米[前端] x 306毫米x 228毫米(1.10英寸[前端] x 12.05英 寸x 8.95英寸)
(重量因配置不同而有所差异) 1.1英寸(前端)x 11.57英寸 x 8.9英寸/28 毫米(前端) x 294毫米 x 226毫米 30W像素VGA Webcam摄像头(可选, 10月开放)、全 尺寸防渗漏键盘、带滚动区的触摸板带IMR的塑料按钮、 触敏控制 全球有限联保,一年免费部件和人工保修,送修, 主电池一 年有限保修
硬盘
• • •
端口
•
主要选件
•
保修
•
Webcam摄像头 摄像头
•
电池
• •
电源
•
•
外部智能65瓦3针AC适配器
5
2008年7月21日星 期一
2007 – 2008主要特性对比
HP Compaq 2210b笔记本电脑
处理器 英特尔®酷睿™2双核(2.6 GHz,6 MB二级高速缓存); 3英特尔赛扬(2.13 GHz,1 MB高速二级缓存)
安全产品 HP ProtectTools BIOS配置 HP ProtectTools证书管理器 证书管理器 HP ProtectTools驱动器加密 驱动器加密 增强型驱动器锁 enhanced driver lock 增强的启动前安全 (多用户/多重身份验证) HP ProtectTools文件粉碎机 File Sanitizer 文件粉碎机 HP Disk Sanitizer HP ProtectTools安全管理器 HP SpareKey 一步登录 HP ProtectTools安装向导 安装向导 面向笔记本电脑的Computrace BIOS支持 惠普指纹识别器
输入设备/摄像头
全尺寸防渗漏键盘、带滚动区的触摸板橡胶按钮、触敏控 制 限于澳大利亚,新西兰,中国大陆,中国香港,中国台湾,韩 国,泰国,印度,一年免费部件和人工保修,送修,一年 ADP意外保障,主电池一年有限保修
中国大陆保修政策
11
2008年7月1日星期 二惠普来自密惠普专业创新 — 安全性
标准( ) 标准(s)
HP Compaq 2230s笔记本电脑
英特尔®酷睿™2双核(高达2.8 GHz,3/6 MB 二级高速缓 存,1066Mhz FSB前端总线),英特尔®酷睿™2双核(高达 2.0GHz,2 MB 二级高速缓存,800Mhz FSB前端总线),英 特尔赛扬(1 MB高速二级缓存), 带有ICH9M的移动式英特尔®GE45 Express芯片组 Intel® Mobile GMA 4500MHD;最高可共享512MB系统内 存 DDR2 SDRAM、800 MHz、支持双通道内存的双插槽、 1024/2048/4096 MB SODIMMs、最大支持8 GB内存 SATA硬盘: 120/160/250/320 GB 5400 rpm、 160GB 7200rpm (10月开放) HP 3D DriveGuard
4芯(37 WHr)锂电池续航3.5小时 8芯(73 WHr)锂电池,CQ4开放 HP 65W智能AV适配器. HP快速充电技术 12英寸WXGA AG防眩目 (1280 × 800) 、12英寸WXGA BV 高亮 (1280 × 800) 集成指纹识别器,HP ProtectTools Security Kensington锁.
显示屏 安全性 重量
12英寸WXGA AG防眩目 (1280 × 800) 集成指纹识别器,HP ProtectTools Security Kensington锁,惠普防窥膜
最小重量:1.68千克/3.70磅(4芯,无ODD)
1.85千克/4.07磅(4芯,含ODD)
最小重量:1.62千克(4芯,无ODD)
芯片组 显卡 内存 主存储
带有ICH8M的移动式英特尔®GM965 Express芯片组 英特尔® GMA X3100,最高可共享384MB系统内存 DDR2 SDRAM、667 MHz、支持双通道内存的双插槽、 512/1024/2048 MB SODIMM、最大支持4 MB内存 SATA硬盘: 80/120/160/250 GB 5400 rpm、80/120 GB 7200 rpm HP 3D DriveGuard
•
定价范围 • 6,000– 10,000RMB 命名 • HP Compaq 2230s笔记本电脑
3
2008年7月21日星 期一
主要特性
• •
英特尔® Montevina 体系架构
•
65W智能3针直流适配器
• • • • • • • • •
英特尔® GM45 Express +ICH9M芯片组,内 • 惠普指纹识别器 置高清视频解码功能 支持Blu-Ray/HD-DVD • HP Webcam(10月开放) 标识 • HP DriveGuard & HP 3D DriveGuard 支持英特尔® 酷睿TM2 双核 P8 T9、赛扬®、 • 镁质 显示器外壳 英特尔® 酷睿TM2 双核 T5处理器 • 起重为1.62公斤(不带ODD、4芯电池) DDR2 800Mhz – 最高可达8GB 或1.72公斤(带ODD、4芯电池) 宽屏显示屏– 12.1英寸WXGA防眩或WXGA BrightView • 新的名称: 支持Centrino 2和Vista Premium − 2230s 2 spindle 外形、12.7毫米SATA固定光驱 2.5英寸SATA 5400RPM硬盘 千兆以太网络控制器 SD/MMC读拉器 34毫米PCI Express卡
12.7毫米(固定) DVD;DVD-CDRW Combo;DVD+/-RW Supermulti DL Lightscribe;BD蓝光 Combo 支持“无ODD选项” 1个PCI-Express卡插槽 (34毫米) 1个SD/MMC Flash卡插槽 ADI 1984HD Azalia 双阵列数字麦克风 2个立体扬声器 VGA、USB2.0(3个)、RJ45、RJ11、立体声麦克风输入、立 体声耳机/输出、电源接口、HDMI端口 无1394端口,无扩展坞接口,无旅行电池接口,无S视频输出 Marvell PCI-e千兆以太网PCI控制器(10/100/1000网卡)
4
2008年7月21日星 期一
产品规格
外形
• • • •
光驱
• • • • • •
输入设备
• • •
2-spindle设计,支持ODD weightsaver(无 光驱减重模块) 296毫米 x 226毫米 x 28 – 33/36毫米 *估 计值,非最终确认 1.62千克(不含ODD,含4芯电池) 1.72千克(不含ODD,含4芯电池) 英特尔GM45 + ICH9M芯片组 英特尔Penryn 酷睿2双核T9 P8系列处理 器 英特尔Penryn赛扬处理器 英特尔Penryn酷睿2双核 T5系列处理器 12.1” WXGA AG 12.1” WXGA BV 英特尔集成显卡 X4500MHD DDRII 667, 800MHz 2个内存插槽 总内存可达8GB 9.5毫米、SATA 用户可拆卸 HP 3D DriveGuard 4芯、锂离子、主电池、2.55Ahr/37Wh 惠普快速充电技术
集成通信
• • • • • •
显示屏
• •
显卡
•
操作系统(预装) 操作系统(预装) • Windows Vista Home 32 • Windows Vista Business 32 • Windows XP Professional( Vista business downgrade) • FreeDOS(仅限特定国家) • LLinux (CQ4 开放) 安全产品
通信
Broadcom NetLink千兆以太网PCI控制器(10/100/1000网 卡)支持NIC power down 56K V.92调制解调器
HP Compaq 2230s

产品信息
眵 价格 p 厂商 睁 电话 ≯ 网址
7500 元 中国惠普有限公 司
800 — 8 20 - 2 255
W W W hp . c o m c n
惠普面 向中小型 企 业商 业 用 户推 出的H P C 0 m P a q 2 2 3 0 s 笔记本 电脑 隶属于 惠普 商务笔记 本S 系列 , 并且 也 是 目前为止 身型 最为小巧 的S 系 列 产 品 。 它 有 着S 系 列 的典 型 模具— — 通 身黑色的设 计令产 品 显 得十分 紧凑 ; 下 沉 式转轴 的采用将S 系列与商务产品 中 的其他 系列区分开来 ; 键盘上 方 的轻触 式快 捷键 有着 白色 的背景光 , 使得H P C o m p a q 2 2 3 0 s 具 备一 丝 灵 气 ; 与掌托 一 体化 的触摸板便于 清理 , 且 手 感不错 。
A im e r S o ft iP h o n e V id e C v t
▲ 得 分越 高越 好 v 得 分越 低 越 妤
AV I to M P E G 2 A V I C o m p r e s s io n AV I to ip h o n e
_ 砧r哪
p.
c
~r
o
.C Oi
l] c .
n
2 2 _ 个人电脑 * 2 0 0 8 年1 1 月
鬻蝴
CPU
主板 显示卡
HP C o m p a q 2 2 3 0 s
编辑评价
中小企 业 在选购笔记 本 电脑 时不 妨考 虑这 款 产品 , 除去 那 些 性能不 错 的1 4 或 1 5 英寸产 品之外 . 在 出差时 带上 一 款 1 2 英寸的超便携笔记 本才是明 智之 举 . 何况HP Co m p e q 2 2 3 0 s 并不会让 你花费很 多。
4000左右笔记本参考

华硕A43XI231SV-SL
屏幕尺寸:14英寸 1366×768处理器型:Intel 酷睿i3 2310M 处理器主:2.1GHz 内存容量:2GB DDR3 1333MHz硬盘容量:320GB 5400转,SATA显卡芯片:NVIDIA GeForce GT 54操作系统:Windows 7 Home Basic摄像头:集成摄像头 光驱类型:DVD刻录机 支持DVD S无线网卡:支持802.11b/g/n无线笔记本重:2.2Kg 蓝牙:支持蓝牙功能 网卡描述:1000Mbps以太网卡 上市时间:2011年07月 产品定位:全能学生本 核心类型:Sandy Bridge 三级缓存:3MB 产品类型:家用
Acer 4750G-2412G50Mnkk
屏幕尺寸:14英寸 1366×768处理器型:Intel 酷睿i5 2410M 处理器主:2.3GHz 内存容量:2GB DDR3硬盘容量:500GB 5400转,SATA显卡芯片:NVIDIA Geforce GT 54操作系统:Windows 7 Home Basic摄像头:集成130万像素摄像头 光驱类型:DVD刻录机 支持DVD S无线网卡:支持802.11b/g/n无线笔记本重:2.2Kg 网卡描述:1000Mbps以太网卡 上市时间:2011年01月 产品定位:全能学生本 核心类型:Sandy Bridge 三级缓存:3MB 产品类型:家用 处理器系:英特尔 酷睿i5 2代
华硕X88E667VD-SL采用14英寸1366×768分辨率显示屏,配备英特尔酷睿2双核T6670(2.2GHz主频)处理器,2GB内存,320GB硬盘,DVD刻录光驱,NVIDIA GeForce GT 320M 1GB显存独立显卡,机身总重约2.39Kg。
惠普(HP)各型号打印机冷复位,清零,恢复出厂设置方法讲解
惠普(HP)各型号打印机冷复位,清零,回复出厂设置方法HP 2100 :按住job cancel 键开机直到3灯全HP 1320:关机状态按住机身后网卡上RESET键开机,等5-30秒松手,网卡冷复位。
5分钟后打印配置页。
HP 5000:按住GO开机,持续按住直到出现COLD RESET。
HP Jetdirect 内置网络打印服务器冷复位步骤1 、关闭打印机的电源并取下网线;2 、给打印机作冷复位(具体步骤请参考下表);3 、将打印机静置静置 3-5 分钟后插上网线,并再静置约 3 分钟。
以下为可连接 HP Jetdirect 内置网络打印服务器的打印机作冷复位的步骤, HP Jetdirect 内置网络打印服务器在给打印机作冷复位的过程中也同时被复位。
HP Color LaserJet 1500 series按住 GO 键开机,持续按住到三灯齐亮,大约 5 秒后,注意灯熄灭,松手,但注意不要超过 15 秒。
N/AHP Color LaserJet 2550 series同时按下滚动滚筒键和粉红色键,但注意这个冷复位在指示灯上没有任何反映。
N/AHP Color LaserJet 2500 series按住 GO 键开机,持续按住到三灯齐亮,大约 5 秒后,注意灯熄灭,松手,但注意不要超过 15 秒。
N/AHP Color LaserJet 2600 series and 2605 series再 Ready 的状态下,按“对钩”,再向右找到“ Service ”,再按三下“对钩”键。
Restore defaultHP Color LaserJet3000/3600/3800 series and3500/3550/3700 series and 4650/5550 series and 9500 series开机后当出现内存检测时迅速按下√ 键,直到 3 灯齐亮,松手,面板显示 select language ,选到 cold reset ,按下√ 键。
HP ProDisplay P223 21.5英寸显示器产品说明书
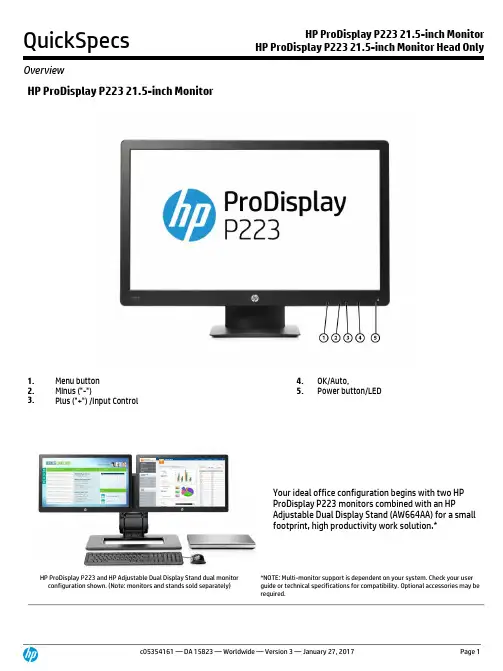
HP ProDisplay P223 21.5-inch Monitor1. Menu button 4. OK/Auto,2. Minus ("-") 5. Power button/LED3. Plus ("+") /Input ControlYour ideal office configuration begins with two HPProDisplay P223 monitors combined with an HPAdjustable Dual Display Stand (AW664AA) for a smallfootprint, high productivity work solution.*HP ProDisplay P223 and HP Adjustable Dual Display Stand dual monitor configuration shown. (Note: monitors and stands sold separately)*NOTE: Multi-monitor support is dependent on your system. Check your user guide or technical specifications for compatibility. Optional accessories may be required.OverviewPut your HP Pro PC content front and center on an ample 21.5-inch diagonal FHD screen with the HP ProDisplay P223 21.5-inch Monitor.Key features:∙Share your content in crisp, clear color on the 21.5-inch diagonal screen with 1920 x 1080 resolution, and 3000:1 contrast ratio.1∙Experience stunning FHD picture quality, ultra-fast graphics refresh, and vivid colors with DisplayPort™.∙Attach your HP PC or select HP Thin Client directly behind the display.2∙Reduce power consumption and help lower your costs with an energy-efficient design.∙Get a stable product lifecycle and minimum one-year lifespan, plus Global Series availability around the world.∙Free up valuable desk space with mounting options3 enabled by the 100-mm VESA pattern.∙Customize a total solution with options3 designed for your display.∙Design the screen for how you work with HP Display Assistant software, which enables screen partitioning and helps deter theft by deactivating a display that’s disconnected without approval.∙Rest assured that your IT investment is supported by a three-year standard limited warranty. Add HP Care services4 to extend your protection beyond the standard limited warranties.1All performance specifications represent the typical specifications provided by HP's component manufacturers; actual performance may vary either higher or lower.2Requires HP Quick Release, sold separately. See product QuickSpecs for exact PC and thin client compatibility.3Each accessory sold separately. Mounting hardware sold separately. Head only model sold separately and availability varies by region.4HP Care Pack Services are sold separately. Service levels and response times for HP Care Pack Services may vary depending on your geographic location.Service starts from date of hardware purchase. Restrictions and limitations apply. See /go/cpc for details. HP Services are governed by the applicable HP terms and conditions of service provided or indicated to Customer at the time of purchase. Customer may have additional statutory rights according to applicable local laws, and such rights are not in any way affected by the HP terms and conditions of service or the HP Limited Warrantyprovided with your HP Product.Models:X7R61AA - HP ProDisplay P223 21.5-inch MonitorZ4L11AA - HP ProDisplay P223 21.5-inch Monitor Head OnlyPanel Type 21.5-inch VA w/LED backlightViewable Image Area(diagonal)54,61 cm (21.5-inch) widescreen; diagonally measuredPanel Active Area(W × H)47,6 x 26,7 cm (18.74 × 10.51 in)Resolution 1920 x 1080 @ 60 HzAspect Ratio 16:9Viewing Angle Up to 178° horizontal/178° vertical typicalBrightness 250 cd/m2Contrast Ratio (Typical) 3000:1 Static; 5,000,000:1 Dynamic (DCR)Response Time* 5 ms typical (gray to gray)Pixel Pitch .248 mmPixels Per Inch (PPI) 102.4 DPIBacklight Lamp Life(to half brightness)30,000 hours minimumColor Support Up to 16.7 million colors with the use of FRC technologyColor Gamut (Typical) 72%* Product default is 8ms response time and can be adjusted to as low as 5ms in the display menu.See user guide for more information. All performance specifications represent the typicalspecifications provided by HP's component manufacturers; actual performance may vary eitherhigher or lower.User Controls Buttons or Switches Menu, Minus ("-"), Plus ("+")/Input Control, OK/Auto, PowerLanguages10 (English, Spanish, German, French, Italian, Netherlands, Portuguese,Japanese, T-Chinese and S-Chinese)On Screen Display (OSD) User Controls Brightness, Contrast, Input Control, Color Control, Image Control, Power Control, OSD control, Management, Language, Information, ExitUser ProgrammableModesYes, 10 Audio Controls N/ASignal Interface/ Performance Horizontal Frequency24-80 kHzVertical Frequency50-60 HzNative Resolution1920 x 1080 @ 60 HzPreset Graphic Modes(non-interlaced)640 x 480 @ 60Hz720 x 400 @ 70Hz800 x 600 @ 60Hz1024 x 768 @ 60Hz1280 x 720 @ 60Hz1280 x 800 @ 60Hz1280 x 1024 @ 60Hz1440 x 900 @ 60Hz1600 x 900 @ 60Hz1680 x 1050 @ 60Hz1920 x1080 @ 60HzAnti-Glare YesVideo/Other Inputs Plug and Play YesInput Connectors(1) DisplayPort™ 1.2, (1) VGAHDCP support on DisplayPort™USB N/AVideo Cables Included(1) DisplayPort™1,8 m (5.9 ft)(1) VGA 1,8 m (5.9 ft)Audio N/AMultimedia Speakers N/APower Power Supply InternalInput Power100 - 240 VAC 50/60 HzMaximum Power 28 WTypical Power 20 WSleep Power 0.5 WPower Cable Length1,9 m (6.2 ft)Mechanical Dimensions(W × D × H) Unpacked w/stand(highest setting)51,5 x 19,12 x 38,9 cm(20.28 x 7.53 x 15.32 in) Unpacked w/o stand(head only)51,5 x 5,49 x 32,7 cm(20.28 x 2.16 x 12.87 in) Packaged 58,9 x 14 x 42 cm(23.19 x 5.51 x 16.54 in)Weight Head Only 2,9 kg (6.4 lb)Unpacked with stand 3,5 kg (7.7 lb)Packaged4,7 kg (10.4 lb)Ergonomic Features (not available on head only model)Detachable Stand Yes, ships detached Height Adjustment N/ATilt Range-5° to + 22° vertical Swivel N/APivot N/AEnvironmental Temperature -Operating5° to 35° C (41° to 95° F)Temperature - Non-operating–20° to 60° C (-4° to 140° F)Humidity - Operating 20% to 80% non-condensingHumidity - Non-operating5% to 95%, 38.7° C max wet-bulbAltitude - Operating 0 to 5,000 m (0 to 16,404 ft)Altitude – Non-operating0 to 12,192 m (0 to 40,000 ft) White LED Backlights YesCCFL Panel NoArsenic-Free DisplayGlassYesLow Halogen1Yes (except cables) Mercury-Free DisplayBacklightingYesEco-Label Certifications & declarations This product has received or is in the process of being certified to the following approvals and may be labeled with one or more of these marks:∙IT ECO declaration∙US ENERGY STAR®∙TCO or TCO Certified Edge∙EPEAT® Gold registered in the United States. See for registration status in your countryEnergy Consumption(in accordance with USENERGY STAR® testmethod)115VAC, 60Hz 230VAC, 50Hz 100VAC, 50HzNormal Operation 14.5 W 14.5 W 14.5 WSleep 0.3 W 0.3 W 0.3 WOff 0.1 W 0.2 W 0.1 WHeat Dissipation* 115VAC, 60Hz 230VAC, 50Hz 100VAC, 50HzNormal Operation 50 BTU/hr 50 BTU/hr 50 BTU/hrSleep 1 BTU/hr 1 BTU/hr 1 BTU/hrOff 1 BTU/hr 1 BTU/hr 1 BTU/hr*NOTE: Heat dissipation is calculated based on the measured watts, assuming the service level isattained for one hour.Additional Information ∙This product is in compliance with the Restrictions of Hazardous Substances (RoHS) directive - 2002/95/EC.∙This HP product is designed to comply with the Waste Electrical and Electronic Equipment (WEEE) Directive – 2002/96/EC.∙This product is in compliance with California Proposition 65 (State of California; Safe Drinking Water and Toxic Enforcement Act of 1986).∙This product is in compliance with the IEEE 1680 (EPEAT) standard at the <Gold> level, see ∙Plastics parts weighing over 25 grams used in the product are marked per ISO 11469 and ISO1043.∙This product contains 18.8% post-consumer recycled plastic (by wt.)∙This product is 98.1% recycle-able when properly disposed of at end of life.Packaging Materials External: PAPER/Corrugated 580 g Internal: PLASTIC/Polystyrene Expanded - EPS 202 gPLASTIC/Polyethylene Expanded - EPE 28 gRoHS Compliance HP, Inc. is committed to compliance with all applicable environmental laws and regulations,including the European Union Restriction of Hazardous Substances (RoHS) Directive. HP’s goal isto exceed compliance obligations by meeting the requirements of the RoHS Directive on aworldwide basis. By July 1, 2006, RoHS substances will be virtually eliminated (virtually = tolevels below legal limits) for all HP electronic products subject to the RoHS Directive, exceptwhere it is widely recognized that there is no technically feasible alternative (as indicated by anexemption under the EU RoHS Directive).Material Usage This product does not contain any of the following substances in excess of regulatory limits(refer to the HP General Specification for the Environment at/hpinfo/globalcitizenship/environment/pdf/gse.pdf):∙Asbestos∙Certain Azo Colorants∙Certain Brominated Flame Retardants – may not be used as flame retardants in plastics∙Cadmium∙Chlorinated Hydrocarbons∙Chlorinated Paraffins∙Formaldehyde∙Halogenated Diphenyl Methanes∙Lead carbonates and sulfates∙Lead and Lead compounds∙Mercuric Oxide Batteries∙Nickel – finishes must not be used on the external surface designed to be frequentlyhandled or carried by the user.∙Ozone Depleting Substances∙Polybrominated Biphenyls (PBBs)∙Polybrominated Biphenyl Ethers (PBBEs)∙Polybrominated Biphenyl Oxides (PBBOs)∙Polychlorinated Biphenyl (PCB)∙Polychlorinated Terphenyls (PCT)∙Polyvinyl Chloride (PVC) – except for wires and cables, and certain retail packaging hasbeen voluntarily removed from most applications.∙Radioactive Substances∙Tributyl Tin (TBT), Triphenyl Tin (TPT), Tributyl Tin Oxide (TBTO)Packaging HP follows these guidelines to decrease the environmental impact of product packaging:∙Eliminate the use of heavy metals such as lead, chromium, mercury and cadmium inpackaging materials.∙Eliminate the use of ozone-depleting substances (ODS) in packaging materials.∙Design packaging materials for ease of disassembly.∙Maximize the use of post-consumer recycled content materials in packaging materials.∙Use readily recyclable packaging materials such as paper and corrugated materials.∙Reduce size and weight of packages to improve transportation fuel efficiency.∙Plastic packaging materials are marked according to ISO 11469 and DIN 6120 standards.End-of-life Management and Recycling Hewlett-Packard offers end-of-life HP product return and recycling programs in many geographic areas. To recycle your product, please go to: /go/reuse-recycle or contact your nearest HP sales office. Products returned to HP will be recycled, recovered or disposed of in a responsible manner.The EU WEEE directive (2002/95/EC) requires manufacturers to provide treatment information for each product type for use by treatment facilities. This information (product disassembly instructions) is posted on the Hewlett Packard web site at: /go/recyclers. These instructions may be used by recyclers and other WEEE treatment facilities as well as HP OEM customers who integrate and re-sell HP equipment.HP, Inc. Corporate Environmental Information For more information about HP’s commitment to the environment:Global Citizenship Report/hpinfo/globalcitizenship/gcreport/index.htmlEco-label certifications/hpinfo/globalcitizenship/environment/productdesign/ecolabels.ht mlISO 14001 certificates:/V2/GetDocument.aspx?docname=c04755842and/hpinfo/globalcitizenship/environment/pdf/cert.pdfOptions(each sold separately)HP LCD Speaker Bar—Part number NQ576AAPowered directly by the connected PC, the Speaker Bar seamlesslyattaches to the monitor's lower bezel to bring full audio support toselect HP flat panel monitors. Features include dual speakers with fullsound range and dual external headphone jacks. Sold separately. Formore information, refer to the product’s QuickSpecs.HP Adjustable DualDisplay Stand—PartNumber AW664AAPremium space-saving dual screen solution provides access to moremonitor real estate and makes it possible to manage multipleapplications simultaneously. Weight adjustable for dual monitors from17-24”. Rotate displays into portrait/landscape positions.HP Single MonitorArm—Part numberBT861AAThe flexible design of the HP Single Monitor Arm provides a seeminglyendless range of display adjustments with an amazing 13 inches of lift,75 degrees of tilt, and 360 degrees of pan and rotation – all at yourfingertips -- helping you stay comfortable and productive throughoutthe day.HP DisplayPort™ CableKit —Part numberVN567AAConnects a DisplayPort™ connector on an HP Business Desktopcomputer to a DisplayPort™ connector on a monitorHP LCD Monitor QuickRelease —Part numberEM870AA4An easy-to-use, VESA-compliant, LCD monitor mounting solution thatallows you to quickly and securely attach an LCD monitor to a varietyof stands, brackets, arms or wall mounts. For more information, referto this product's QuickSpecs document.HP Business PC SecurityLock V2 Kit —Partnumber N3R93AAHelp prevent chassis tampering and secure your PC and display inworkspaces and public areas. Simply route the cable through the PC’slock slot and your display, anchor to a desk, table, or other fixedsurface, and lock with your individual key. A master key configurationis also available upon request.What’s in the box?Monitor andAccessories HP ProDisplay P223 21.5-inch Monitor, AC power cord (1.9 m) 6.2 ft, DisplayPort™ cable (1.8 m), VGA cable (1.8 m) 5.9 ftDocumentation CD (includes user guide, warranty, drivers)Software HP Display AssistantOther User Guide Languages English, Arabic, S. Chinese, T. Chinese, Czech, Danish, Dutch, Finnish,French, German, Greek, Hungarian, Italian, Japanese, Kazakh, Korean,Norwegian, Polish, Brazilian Portuguese, Russian, Slovenian, Spanish,Swedish and Turkish.Warranty Languages English, Arabic, S. Chinese, T. Chinese, Czech, Danish, Dutch, Finnish,French, German, Greek, Hungarian, Italian, Japanese, Kazakh, Korean,Norwegian, Polish, Brazilian Portuguese, Russian, Slovenian, Spanish,Swedish and Turkish.Color BlackVESA Mounting100 mm VESA mountSecurity Lock-Ready YesCountry of Origin ChinaCertification and Compliance TCO Certified, CEL Grade 2, Microsoft WHQL Certification (Windows 10, Windows 8.1, Windows 7), ENERGY STAR® Qualified, EPEAT® Gold2, CE, CB , KC, KCC, NOM, PSB, ICE, TUV-S, CCC, CECP, SEPA, EPA, ISC, VCCI, FCC, Taiwan: BMSI, SmartWay Transportation Partnership for NA ModelCompatibility Compatible with platforms using the VESA standard video modes. Recommended for use with HP products.Service and Warranty Protected by HP, including a 3 year standard limited warranty. Optional HP Care Pack Services are extended service contracts that extend your protection beyond the standard warranties.31.External power supplies, power cords, cables and peripherals are not Low Halogen. Service parts obtained after purchase may not beLow Halogen.2.EPEAT ® registered where applicable. EPEAT registration varies by country. See for registration status by country. SeeHP’s 3rd party option store for solar energy accessory /go/options.3.Service levels and response times for HP Care Packs may vary depending on your geographic location. Service starts on date ofhardware purchase. Restrictions and limitations apply. For details, visit: /go/cpc.4.The HP Quick Release has been designed to support a maximum of up to 24 lbs (10.9 kg) for all devices mounted. Because mountingsurfaces vary widely and the final mounting method and configuration may vary, mounting fasteners are not supplied (other than the VESA-compliant screws). HP recommends that you consult with a qualified engineering, architectural or construction professional to determine the appropriate type and quantity of mounting fasteners required for your application and to ensure that your mounting solution is properly installed to support applied loads.Copyright © 2017 HP Development Company, L.P.The information contained herein is subject to change without notice. The only warranties for HP products are set forth in the express limited warranty statements accompanying such products. Nothing herein should be construed as constituting an additional warranty. HP shall not be liable for technical or editorial errors or omissions contained herein.ENERGY STAR is a registered trademark owned by the U.S. Environmental Protection Agency. DisplayPort™ and theDisplayPort™ logo are trademarks owned by the Video Electronics Standards Association (VESA®) in the United S tates and other countries.。
hp 2230s

HP 2230sIntroductionThe HP 2230s is a laptop computer manufactured by HP that was released in [YEAR]. It is part of the HP 2000 series and is designed for business and professional use. This document will provide an overview of the HP 2230s, including its specifications, features, and benefits.SpecificationsThe HP 2230s comes with a range of specifications to meet the needs of business users. Some of the key specifications include:1.Processor: The HP 2230s is equipped with an IntelCore 2 Duo processor, providing powerful performance for multitasking and demanding applications.2.Memory: It comes with [X] GB of RAM, ensuringsmooth performance even when running multipleapplications simultaneously.3.Storage: The laptop offers a [X] GB hard drive,providing ample storage space for files, documents, andmultimedia content.4.Display: The HP 2230s features a [X]-inch displaywith a resolution of [X] pixels, delivering crisp and clearvisuals for work presentations and media consumption.5.Graphics: It is equipped with an integrated Intelgraphics card, providing decent graphics performance for everyday tasks and basic gaming.6.Connectivity: The laptop offers a range ofconnectivity options, including USB ports, HDMI output,and Wi-Fi, making it easy to connect to external devices and networks.7.Operating System: It comes pre-installed with[OPERATING SYSTEM], providing a user-friendly interface and access to a wide range of software applications.FeaturesIn addition to its impressive specifications, the HP 2230s also offers a range of features that enhance the user experience. Some notable features include:1.Design: The laptop features a sleek and professionaldesign, making it ideal for business professionals. It islightweight and portable, making it convenient to carryaround.2.Security: The HP 2230s comes with built-in securityfeatures such as a fingerprint scanner and TPM (TrustedPlatform Module), ensuring data protection and secureaccess.3.Battery Life: With its efficient power management,the laptop offers a long-lasting battery life, allowing users to work uninterrupted for extended periods.4.Keyboard and Trackpad: The laptop features a full-size keyboard with a comfortable typing experience. The trackpad is responsive and supports multi-touch gestures.5.Audio and Webcam: It comes with integrated stereo speakers and a webcam, making it suitable for video conferencing and multimedia playback.BenefitsThe HP 2230s offers several benefits to business users:1.Performance: The powerful processor and ample memory ensure smooth performance, enabling users to multitask and run demanding applications without slowdowns.2.Portability: With its lightweight and portable design, the laptop is easy to carry around, making it suitable for business travel.3.Security: The built-in security features provide peace of mind, ensuring that sensitive data is protected.4.Connectivity: The range of connectivity options allows users to connect to external devices and networks easily, increasing productivity and flexibility.5.Versatility: The HP 2230s is suitable for a wide range of tasks, from word processing and spreadsheet management to presentations and multimedia consumption.ConclusionThe HP 2230s is a reliable and efficient laptop computer designed for business professionals. With its powerful performance, useful features, and user-friendly design, it provides a seamless computing experience for both work and entertainment purposes. Whether you are a small business owner or an executive on the go, the HP 2230s can meet all your computing needs.。
HP 2230S 维护&拆机手册

4Removal and replacement proceduresPreliminary replacement requirementsTools requiredYou will need the following tools to complete the removal and replacement procedures:I Flat-bladed screwdriverI Magnetic screwdriverI Phillips P0 and P1 screwdriversI Torx T8 screwdriverService considerationsThe following sections include some of the considerations that you must keep in mind during disassembly and assembly procedures.Plastic partsCables and connectorsCables must be handled with extreme care to avoid damage. Apply only the tension required to unseat or seat the cables during removal and insertion. Handle cables by the connector whenever possible. In all cases, avoidbending, twisting, or tearing cables. Be sure that cables are routed in such a way that they cannot be caught orsnagged by parts being removed or replaced. Handle flex cables with extreme care; these cables tear easily.Drive handlingdrive, or loss of information, observe these precautions:I Before removing or inserting a hard drive, shut down the computer. If you are unsure whether the computer is off or inHibernation, turn the computer on, and then shut it down through the operating system.I Before handling a drive, be sure that you are discharged of static electricity. While handling a drive, avoid touching theconnector.I Before removing a diskette drive or optical drive, be sure that a diskette or disc is not in the drive and be sure that the opticaldrive tray is closed.I Handle drives on surfaces covered with at least one inch of shock-proof foam.I Avoid dropping drives from any height onto any surface.I After removing a hard drive, an optical drive, or a diskette drive, place it in a static-proof bag.I Avoid exposing a hard drive to products that have magnetic fields, such as monitors or speakers.I Avoid exposing a drive to temperature extremes or liquids.I If a drive must be mailed, place the drive in a bubble pack mailer or other suitable form of protective packaging and labelthe package "FRAGILE."Grounding guidelinesElectrostatic discharge damageElectronic components are sensitive to electrostatic discharge (ESD). Circuitry design and structure determine the degree of sensitivity. Networks built into many integrated circuits provide some protection, but in many cases, ESD contains enough power to alter device parameters or melt silicon junctions.A discharge of static electricity from a finger or other conductor can destroy static-sensitive devices ormicrocircuitry. Even if the spark is neither felt nor heard, damage may have occurred.An electronic device exposed to ESD may not be affected at all and may work perfectly throughout a normal cycle.Or the device may function normally for a while, and then degrade in the internal layers, reducing its lifeexpectancy.precautions:I Keep components in their electrostatic-safe containers until you are ready to install them.I Use nonmagnetic tools.I Before touching an electronic component, discharge static electricity by using the guidelines described in this section.I Avoid touching pins, leads, and circuitry. Handle electronic components as little as possible.I If you remove a component, place it in an electrostatic-safe container.The following table shows how humidity affects the electrostatic voltage levels generated by different activities.Packaging and transporting guidelinesFollow these grounding guidelines when packaging and transporting equipment:I To avoid hand contact, transport products in static-safe tubes, bags, or boxes.I Protect ESD-sensitive parts and assemblies with conductive or approved containers or packaging. I Keep ESD-sensitive parts in their containers until the parts arrive at static-free workstations. I Place items on a grounded surface before removing items from their containers. I Always be properly grounded when touching a component or assembly.I Store reusable ESD-sensitive parts from assemblies in protective packaging or nonconductive foam. IUse transporters and conveyors made of antistatic belts and roller bushings. Be sure that mechanizedequipment used for moving materials is wired to ground and that proper materials are selected to avoid static charging. When grounding is not possible, use an ionizer to dissipate electric charges.Workstation guidelinesFollow these grounding workstation guidelines:I Cover the workstation with approved static-shielding material.I Use a wrist strap connected to a properly grounded work surface and use properly grounded tools and equipment.I Use conductive field service tools, such as cutters, screwdrivers, and vacuums.I When fixtures must directly contact dissipative surfaces, use fixtures made only of static-safe materials. I Keep the work area free of nonconductive materials, such as ordinary plastic assembly aids and Styrofoam. I Handle ESD-sensitive components, parts, and assemblies by the case or PCM laminate. Handle these items only at static-free workstations.I Avoid contact with pins, leads, or circuitry.ITurn off power and input signals before inserting or removing connectors or test equipment.Typical electrostatic voltage levelsRelative humidityEvent10% 40% 55% Walking across carpet 35,000 V 15,000 V 7,500 V Walking across vinyl floor 12,000 V 5,000 V 3,000 V Motions of bench worker 6,000 V 800 V 400 V Removing DIPS from plastic tube 2,000 V 700 V 400 V Removing DIPS from vinyl tray 11,500 V 4,000 V 2,000 V Removing DIPS from Styrofoam 14,500 V 5,000 V 3,500 V Removing bubble pack from PCB 26,500 V 20,000 V 7,000 V Packing PCBs in foam-lined box21,000 V11,000 V5,000 VEquipment guidelinesGrounding equipment must include either a wrist strap or a foot strap at a grounded workstation.IWhen seated, wear a wrist strap connected to a grounded system. Wrist straps are flexible straps with aminimum of one megohm ±10% resistance in the ground cords. To provide proper ground, wear a strap snugly against the skin at all times. On grounded mats with banana-plug connectors, use alligator clips to connect a wrist strap.IWhen standing, use foot straps and a grounded floor mat. Foot straps (heel, toe, or boot straps) can be used at standing workstations and are compatible with most types of shoes or boots. On conductive floors ordissipative floor mats, use foot straps on both feet with a minimum of one megohm resistance between the operator and ground. To be effective, the conductive strips must be worn in contact with the skin. The following grounding equipment is recommended to prevent electrostatic damage:I Antistatic tapeI Antistatic smocks, aprons, and sleeve protectors I Conductive bins and other assembly or soldering aids I Nonconductive foamI Conductive tabletop workstations with ground cords of one megohm resistance I Static-dissipative tables or floor mats with hard ties to the ground I Field Service Kits I Static awareness labels I Material-handling packagesI Nonconductive plastic bags, tubes, or boxes I Metal tote boxesIElectrostatic voltage levels and protective materialsThe following table lists the shielding protection provided by antistatic bags and floor mats.Unknown user passwordIf the computer you are servicing has an unknown user password, follow these steps to clear the password:1.Shut down the computer. If you are unsure whether the computer is off or in Hibernation, turn the computer on, and then shut it down through the operating system.2.Disconnect all external devices connected to the computer.3.Disconnect the power from the computer by first unplugging the power cord from the AC outlet and then unplugging the AC adapter from the computer.4.Remove the battery (see “Battery” on page 4-7).5.Remove the real-time clock (RTC) battery (see “RTC battery” on page 4-36).6.Wait approximately 5 minutes.7.Replace the RTC battery and reassemble the computer.Material Use Voltage protection level Antistatic plastic Bags 1,500 V Carbon-loaded plastic Floor mats 7,500 V Metallized laminateFloor mats5,000 V8.Connect AC power to the computer. Do not reinsert any batteries at this time.9.Turn on the computer.All passwords and all CMOS settings have been cleared.Component replacement proceduresThis chapter provides removal and replacement procedures.There are as many as 71 screws, in 14 different sizes, that must be removed, replaced, or loosened when servicing the computer. Make special note of each screw size and location during removal and replacement.Serial numberWhen ordering parts or requesting information, provide the computer serial number and model descriptionprovided on the service tag.Item Component Description1Product name This is the product name affixed to the front of the computer.2Serial number (s/n)This is an alphanumeric identifier that is unique to each product.3Part number/Product number (p/n)This number provides specific information about the product'shardware components. The part number helps a servicetechnician to determine what components and parts are needed.4Model description This is the number used to locate documents, drivers, andsupport for the computer.5Warranty period This number describes the duration of the warranty period for thecomputer.Computer feetThe computer feet are adhesive-backed rubber pads. The feet are included in the Plastics Kit, spare part number 493274-001. There are 5 rubber feet that attach to the base enclosure in the locations illustrated below.BatteryDescription Spare part number4-cell, 37-Wh Li-ion 493202-0018-cell, 73-Wh Li-ion 501935-001Before disassembling the computer, follow these steps:1.Shut down the computer. If you are unsure whether the computer is off or in Hibernation, turn the computer on,and then shut it down through the operating system.2.Disconnect all external devices connected to the computer.3.Disconnect the power from the computer by first unplugging the power cord from the AC outlet and thenunplugging the AC adapter from the computer.Remove the battery:1.Turn the computer upside down on a flat surface, with the battery bay toward you.2.Slide the battery release latch 1 to release the battery.3.Remove the battery 2 from the computer.Install the battery by inserting it into the battery bay until you hear a click.Hard driveBefore removing the hard drive, follow these steps:1.Shut down the computer. If you are unsure whether the computer is off or in Hibernation, turn the computer on, and then shut it down through the operating system.2.Disconnect all external devices connected to the computer.3.Disconnect the power from the computer by first unplugging the power cord from the AC outlet and then unplugging the AC adapter from the computer.4.Remove the battery (see “Battery” on page 4-7).Remove the hard drive:1.Position the computer with the front toward you.2.Loosen the four Phillips PM2.0×5.0 captive screws 1 that secure the hard drive cover to the computer.3.Place your finger in the tab area 2 on the rear edge of the hard drive cover and lift it up and forward 3 to remove the cover. The hard drive cover is included in the Plastics Kit, spare part number 493274-001.Description Spare part number 320-GB, 5400-rpm 493199-001 250-GB, 5400-rpm 493198-001 160-GB, 7200-rpm 513695-001160-GB, 5400-rpm 493197-001 120-GB, 5400-rpm493196-0014.Loosen the Phillips PM2.5×10.0 captive screw 1 that secures the hard drive to the computer.5.Grasp the Mylar tab 2 on the hard drive and slide the hard drive 3 away from the hard drive connector.6.Remove the hard drive 4 from the hard drive bay.7.If it is necessary to replace the hard drive bracketa.Remove the two Phillips PM3.0×3.0 hard drive bracket screws 1 from each side of the hard drive.b.Lift the bracket 2 straight up to remove it from the hard drive.Reverse this procedure to reassemble and install the hard drive.Memory moduleDescription Spare part number2048-MB (PC2-5300, 667-MHz, DDR2) 493195-0011024-MB (PC2-5300, 667-MHz, DDR2) 493194-001Before removing the memory module, follow these steps:1.Shut down the computer. If you are unsure whether the computer is off or in Hibernation, turn the computer on,and then shut it down through the operating system.2.Disconnect all external devices connected to the computer.3.Disconnect the power from the computer by first unplugging the power cord from the AC outlet and thenunplugging the AC adapter from the computer.4.Remove the battery (see “Battery” on page4-7).Remove the memory module:1.Position the computer with the front toward you.2.Loosen the four Phillips PM2.0×5.0 captive screws 1 that secure the cover to the computer.3.Place your finger in the tab area 2 on the rear edge of the hard drive cover and lift it up and forward 3 toremove the cover. The memory module cover is included in the Plastics Kit, spare part number 493274-001.4.Spread the retaining tabs 1 on each side of the memory module to release the memory module. (The edge ofthe module opposite the slot rises away from the computer.)5.Remove the memory module 2 by pulling the module away from the slot at an angle.Memory modules are designed with a notch 3 to prevent incorrect insertion into the memory module slot.Reverse this procedure to install a memory module.WLAN moduleDescription Spare part numberBroadcom802.11a/b/g/n WLAN modules:I For use in Canada, the Cayman Islands, Guam, Puerto Rico, the U.S. Virgin Islands,487330-001and the United StatesI For use in Afghanistan, Albania, Algeria, Andorra, Angola, Antigua and Barbuda,487330-002Argentina, Armenia, Aruba, Australia, Austria, Azerbaijan, the Bahamas, Bahrain,Bangladesh, Barbados, Belarus, Belgium, Belize, Benin, Bermuda, Bhutan, Bolivia,Bosnia and Herzegovina, Botswana, Brazil, the British Virgin Islands, Brunei,Bulgaria, Burkina Faso, Burundi, Cameroon, Cape Verde, the Central AfricanRepublic, Chad, Chile, People's Republic of China, Colombia, Comoros, the Congo,Costa Rica, Croatia, Cyprus, the Czech Republic, Denmark, Djibouti, Dominica, theDominican Republic, East Timor, Ecuador, Egypt, El Salvador, Equitorial Guinea,Eritrea, Estonia, Ethiopia, Fiji, Finland, France, French Guiana, Gabon, Gambia,Georgia, Germany, Ghana, Gibraltar, Greece, Grenada, Guadeloupe, Guatemala,Guinea, Guinea-Bissa, Guyana, Haiti, Honduras, Hong Kong, Hungary, Iceland,India, Ireland, Israel, Italy, the Ivory Coast, Jamaica, Japan, Jordan, Kazakhstan,Kenya, Kiribati, Kyrgyzstan, Laos, Latvia, Lebanon, Lesotho, Liberia, Liechtenstein,Lithuania, Luxembourg, Macedonia, Madagascar, Malawi, Malaysia, the Maldives,Mali, Malta, the Marshall Islands, Martinique, Mauritania, Mauritius, Mexico,Micronesia, Monaco, Mongolia, Montenegro, Morocco, Mozambique, Namibia,Nauru, Nepal, the Nether Antilles, the Netherlands, New Zealand, Nicaragua, Niger,Nigeria, Norway, Oman, Pakistan, Palau, Panama, Papua New Guinea, Paraguay,Peru, the Philippines, Poland, Portugal, the Republic of Moldova, Romania, Russia,Rwanda, Samoa, San Marino, Sao T ome & Principe, Saudi Arabia, Senegal, Serbiaand Montenegro, the Seychelles, Sierra Leone, Singapore, Slovakia, Slovenia, theSolomon Islands, Somalia, South Africa, South Korea, Spain, Sri Lanka, St. Kitts &Nevis, St. Lucia, St. Vincent & Grenada, Suriname, Swaziland, Sweden,Switzerland, T aiwan, T ajikistan, T anzania, T ogo, T onga, T rinidad and T obago,T unisia, T urkey, T urkmenistan, T uvalu, Uganda, Ukraine, the United Arab Emirates,the United Kingdom, Uruguay, Uzbekistan, Vanuatu, Venezuela, Vietnam, Y emen,Zaire, Zambia, and Zimbabwe(Continued)Description Spare part number Broadcom 802.11b/g WLAN modules:459263-001I For use in Canada, the Cayman Islands, Guam, Puerto Rico, the U.S. Virgin Islands,and the United StatesI For use in Afghanistan, Albania, Algeria, Andorra, Angola, Antigua and Barbuda,459263-002 Argentina, Armenia, Aruba, Australia, Austria, Azerbaijan, the Bahamas, Bahrain,Bangladesh, Barbados, Belarus, Belgium, Belize, Benin, Bermuda, Bhutan, Bolivia,Bosnia and Herzegovina, Botswana, Brazil, the British Virgin Islands, Brunei,Bulgaria, Burkina Faso, Burundi, Cameroon, Cape Verde, the Central AfricanRepublic, Chad, Chile, People's Republic of China, Colombia, Comoros, the Congo,Costa Rica, Croatia, Cyprus, the Czech Republic, Denmark, Djibouti, Dominica, theDominican Republic, East Timor, Ecuador, Egypt, El Salvador, Equitorial Guinea,Eritrea, Estonia, Ethiopia, Fiji, Finland, France, French Guiana, Gabon, Gambia,Georgia, Germany, Ghana, Gibraltar, Greece, Grenada, Guadeloupe, Guatemala,Guinea, Guinea-Bissa, Guyana, Haiti, Honduras, Hong Kong, Hungary, Iceland,India, Ireland, Israel, Italy, the Ivory Coast, Jamaica, Japan, Jordan, Kazakhstan,Kenya, Kiribati, Kyrgyzstan, Laos, Latvia, Lebanon, Lesotho, Liberia, Liechtenstein,Lithuania, Luxembourg, Macedonia, Madagascar, Malawi, Malaysia, the Maldives,Mali, Malta, the Marshall Islands, Martinique, Mauritania, Mauritius, Mexico,Micronesia, Monaco, Mongolia, Montenegro, Morocco, Mozambique, Namibia,Nauru, Nepal, the Nether Antilles, the Netherlands, New Zealand, Nicaragua, Niger,Nigeria, Norway, Oman, Pakistan, Palau, Panama, Papua New Guinea, Paraguay,Peru, the Philippines, Poland, Portugal, the Republic of Moldova, Romania, Russia,Rwanda, Samoa, San Marino, Sao T ome & Principe, Saudi Arabia, Senegal, Serbiaand Montenegro, the Seychelles, Sierra Leone, Singapore, Slovakia, Slovenia, theSolomon Islands, Somalia, South Africa, South Korea, Spain, Sri Lanka, St. Kitts &Nevis, St. Lucia, St. Vincent & Grenada, Suriname, Swaziland, Sweden,Switzerland, T aiwan, T ajikistan, T anzania, T ogo, T onga, T rinidad and T obago,T unisia, T urkey, T urkmenistan, T uvalu, Uganda, Ukraine, the United Arab Emirates,the United Kingdom, Uruguay, Uzbekistan, Vanuatu, Venezuela, Vietnam, Y emen,Zaire, Zambia, and ZimbabweIntel 802.11a/b/g/n WLAN module:I For use in Canada, the Cayman Islands, Guam, Puerto Rico, the U.S. Virgin Islands,480985-001 and the United StatesIntel 802.11a/b/g WLAN module:I For use in Pakistan, Russia, and Ukraine482957-001Before removing the WLAN module, follow these steps:1.Shut down the computer. If you are unsure whether the computer is off or in Hibernation, turn the computer on,and then shut it down through the operating system.2.Disconnect all external devices connected to the computer.3.Disconnect the power from the computer by first unplugging the power cord from the AC outlet and thenunplugging the AC adapter from the computer.4.Remove the battery (see “Battery” on page4-7).Remove the WLAN module:1.Position the computer with the front toward you.2.Loosen the Phillips PM2.0×5.0 captive screw 1 that secures the WLAN module compartment cover to thecomputer. The screw is identified by the wireless icon.3.Lift the right side of the cover 2 and remove the cover.4.Disconnect the WLAN antenna cables 1 from the terminals on the WLAN module.The black WLAN antenna cable is connected to the WLAN module “Main” terminal. The white WLAN antenna cable is connected to the WLAN module “Aux” terminal.5.Remove the two Phillips PM2.5×4.0 screws 2 that secure the WLAN module to the computer. (The edge of themodule opposite the slot rises away from the computer.)6.Remove the WLAN module 3 by pulling the module away from the slot at an angle.WLAN modules are designed with a notch 4 to prevent incorrect insertion.Reverse this procedure to install the WLAN module.Optical driveBefore removing the optical drive, follow these steps:1.Shut down the computer. If you are unsure whether the computer is off or in Hibernation, turn the computer on, and then shut it down through the operating system.2.Disconnect all external devices connected to the computer.3.Disconnect the power from the computer by first unplugging the power cord from the AC outlet and then unplugging the AC adapter from the computer.4.Remove the battery (see “Battery” on page 4-7).Remove the optical drive:1.Position the computer with the right side toward you.2.Remove the Torx T8M2.5×6.0 slotted screw 1 that secures the optical drive to the computer.3.Insert a flat-bladed screwdriver or similar tool into the optical drive tab access 2 and push the tab forward to release the optical drive from the computer.4.Remove the optical drive 3 from the computer.DescriptionSpare part number DVD/CD-RW Combo Drive 493200-001 DVD-ROM Drive493201-001DVD±RW SuperMulti Double-Layer Drive with LightScribe 493961-001Blu-ray ROM DVD±RW SuperMulti DL Drive497536-0015.If it is necessary to replace the optical drive bracket:a.Position the optical drive with the rear toward you.b.Remove the two Phillips PM1.5×3.0 screws 1 that secure the optical drive bracket to the optical drive.c.Remove the optical drive bracket 2.Reverse this procedure to reassemble and install an optical drive.KeyboardDescription Spare part number For use in Belgium493960-A41For use in Canada493960-121For use in the Czech Republic493690-221For use in Denmark493960-081For use in France493960-051For use in Greece493960-DJ1For use in Germany493960-041For use in Hungary493960-211For use in Iceland493960-DD1For international use493960-B31For use in Italy493960-061For use in Israel493960-BB1For use in Japan 493960-291For use in Latin America493960-161For use in Norway493960-091For use in Portugal493960-131For use in Russia493960-251For use in Saudi Arabia493960-171For use in Slovakia493960-231For use in Slovenia493960-BA1For use in Spain493960-071For use in Sweden and Finland493960-B71For use in Switzerland493960-BG1For use in South Korea 493960-AD1For use in T aiwan 493960-AB1For use in Thailand 493960-281For use in T urkey493960-141For use in the United Kingdom493960-031For use in the United States 493960-001Before removing the keyboard, follow these steps:1.Shut down the computer. If you are unsure whether the computer is off or in Hibernation, turn the computer on,and then shut it down through the operating system.2.Disconnect all external devices connected to the computer.3.Disconnect the power from the computer by first unplugging the power cord from the AC outlet and thenunplugging the AC adapter from the computer.4.Remove the battery (see “Battery” on page4-7).5.Remove the following components:a.Hard drive (see “Hard drive” on page4-8)b.Memory module (see “Memory module” on page4-10)c.WLAN module (see “WLAN module” on page4-12)d.Optical drive (see “Optical drive” on page4-16)Remove the keyboard:1.Turn the computer upside down, with the front toward you.2.Remove the three Torx T8M2.5×6.0 slotted screws that secure the keyboard to the computer.3.Turn the computer display-side up, and open the computer.4.Lift the rear edge of the keyboard 1 and rotate the keyboard toward you 2 until it rests upside down on the topcover.5.Release the zero insertion force (ZIF) connector 1 to which the keyboard cable is attached, and disconnect thekeyboard cable 2 from the system board.6.Remove the keyboard.Reverse this procedure to install the keyboard.Top coverBefore removing the top cover, follow these steps:1.Shut down the computer. If you are unsure whether the computer is off or in Hibernation, turn the computer on, and then shut it down through the operating system.2.Disconnect all external devices connected to the computer.3.Disconnect the power from the computer by first unplugging the power cord from the AC outlet and then unplugging the AC adapter from the computer.4.Remove the battery (see “Battery” on page 4-7).5.Remove the following components:a.Hard drive (see “Hard drive” on page 4-8)b.Memory module (see “Memory module” on page 4-10)c.WLAN module (see “WLAN module” on page 4-12)d.Optical drive (see “Optical drive” on page 4-16)e.Keyboard (see “Keyboard” on page 4-18)Remove the top cover:1.Close the computer and turn it upside down, with the front toward you.2.Remove the following:Remove the four rubber screw covers on the front of the computer. Note that three of the screw covers are the same 1 and one screw cover 2 is different. The rubber screw covers are included in the Plastics Kit, spare part number 493274-001. Description Spare part number Top cover (includes caps lock light, capacitive board, fingerprint reader board and cable, T ouchPad, and T ouchPad cable)493278-0013.Remove the ten Torx T8M2.5×6.0 slotted screws.4.Remove the three Phillips PM2.0×2.0BH screws in the battery bay.5.Remove the three Phillips PM2.0×3.0 screws in the optical drive bay.6.Turn the computer right-side up, with the front toward you.7.Open the LED board cable ZIF connector 1, and then disconnect the cable.8.Open the TouchPad cable ZIF connector 2, and then disconnect the cable.9.Remove the two Torx T8M2.5×6.0 slotted screws 3 that attach the top cover to the base enclosure.10.Lift the rear edge and sides of the top cover 1 to release it. Move the top cover backward 2 and hold it.11.Disconnect the fingerprint reader cable 1 and remove the top cover 2.Reverse this procedure to install the top cover.Description Spare part numberSpeaker assembly 493273-001Before removing the speaker assembly, follow these steps:1.Shut down the computer. If you are unsure whether the computer is off or in Hibernation, turn the computer on,and then shut it down through the operating system.2.Disconnect all external devices connected to the computer.3.Disconnect the power from the computer by first unplugging the power cord from the AC outlet and thenunplugging the AC adapter from the computer.4.Remove the battery (see “Battery” on page4-7).5.Remove the following components:a.Hard drive (see “Hard drive” on page4-8)b.Memory module (see “Memory module” on page4-10)c.WLAN module (see “WLAN module” on page4-12)d.Optical drive (see “Optical drive” on page4-16)e.Keyboard (see “Keyboard” on page4-18)f.Top cover (see “Top cover” on page4-21)Remove the speaker assembly:1.Disconnect the speaker assembly cable 1 from the system board.2.Remove the Phillips PM3.0×4.0 screw 2 that attaches the left speaker to the base enclosure.3.Remove the speaker cables from the clips on the system board, and then remove the speaker assembly 3 fromthe base enclosure.Reverse this procedure to install the speaker assembly.Description Spare part number12.1-inch, WXGA 493186-00112.1-inch WXGA (with integrated webcam)501932-00112.1-inch, WXGA BrightView 493187-00112.1-inch, WXGA BrightView (with integrated webcam)501933-001Before removing the display assembly, follow these steps:1.Shut down the computer. If you are unsure whether the computer is off or in Hibernation, turn the computer on,and then shut it down through the operating system.2.Disconnect all external devices connected to the computer.3.Disconnect the power from the computer by first unplugging the power cord from the AC outlet and thenunplugging the AC adapter from the computer.4.Remove the battery (see “Battery” on page4-7).5.Remove the following components:a.Hard drive (see “Hard drive” on page4-8)b.Memory module (see “Memory module” on page4-10)c.WLAN module (see “WLAN module” on page4-12)d.Optical drive (see “Optical drive” on page4-16)e.Keyboard (see “Keyboard” on page4-18)f.Top cover (see “Top cover” on page4-21)g.Speaker assembly (see “Speaker assembly” on page4-25)Remove the display assembly:1.Open the computer as far as possible.2.Disconnect the display panel cable 1 from the system board.3.Remove the WLAN antenna cable 2 from the opening in the base enclosure.4.Disconnect the microphone cable 3 from the system board. Remove any tape that may be used to secure thecable to the system board.。
AL2230S
AL2230SSingle Chip Transceiver for 2.4GHz 802.11b/g Applications(AIROHA)This document is commercially confidential and must NOT be disclosed to thirdparties without prior consent.The information provided herein is believed to be reliable. But production testing may not include testing of all parameters.AIROHA Technology Corp. reserves the right to change information at any timewithout notification.INDEX1 Features (4)2 Description (5)3 Pin Assignment (6)4 Block Description (7)4.1 General Description (7)4.2 Receiver (7)4.3 Transmitter (8)4.4 PA (8)4.5 Synthesizer (8)5 Absolute Maximum Ratings (9)5.1 DC Specifications (9)6 Package Dimensions (10)AL2230S – Single Chip Transceiver for 2.4GHz 802.11b/g Applications1 FeaturesHighly integrated 2.4GHz band transceiver with Direct Conversion architectureReceiver with 40dB RF selectable gain range and 60dB baseband variable gain range Integrated baseband filters with programmable bandwidth for Transmitter and Receiver Three-wire control interfaceIntegrate PA with 20dBm output power for 11b and 17dBm for 11gIntegrate RF detector for APCSingle-ended LNA input without the need of external balunOn-chip DC offset correctionEmbedded IQ mismatch calibrationSmall QFN-48 package (7mm×7mm)2 DescriptionAL2230S is a highly integrated RF transceiver IC for 2.4GHz band 802.11b/g applications, and combines all functions of the transceiver in a single chip. AL2230S also integrates on-chip PA and PLL to help you to minimize the use of external components to design an RF subsystem.The receive path implements a direct down-conversion architecture to eliminate additional IF filters. It includes a single-ended input Low Noise Amplifier (LNA), a direct down-conversion mixer with DC-offset cancellation, and a variable gain amplifier with a baseband low-pass filter.The transmitter consists of a direct up-conversion quadrature modulator with a baseband low pass filter, a variable gain amplifier, a power amplifier and a power detector to complete the whole transmit path function.A power-on calibration procedure is established to correct the TX DC offset and filters mismatch.These functions are housed in a 48-pin QFN package.3 Pin Assignment4 Block Description4.1 General DescriptionThe AL2230S is a 2.4GHz-band transceiver for 802.11b/g applications. There are five main blocks – power amplifier, transmitter, receiver, synthesizer and three-wire interface.The control pins: PLLON, TXON, RXON and PAON are responsible for the power control of the chip. The whole chip is powered up when PLLON is set to High, and the synthesizer is enabled at the same time. After the chip powered-up, the transmitter or receiver block is enabled when TXON or RXON being set to High, respectively. The PA block is controlled by the PAON pin independently, irrelative to the state of PLLON.4.2 ReceiverThe receiver implements a direct-conversion architecture, which is composed with two parts: RF front-end and Zero-IF baseband. The RF front-end part comprises a LNA and a quadrature mixer. The ZIF baseband part comprises a low-pass filter (LPF) for channel filtering, a variable gain amplifier (VGA) and a RSSI log amplifier for RSSI output.At the RF front-end part, the LNA input is single-ended without the need of external balun. The front-end gain could be adjusted through control pins or 3-wire interface, and thus reduce the probability of bit errors caused by poor signal-to-noise ratio.external SAW filters.At the ZIF baseband part, t he down-converted baseband signal is first low-pass filtered by the LPF, and then amplified by the VGA. The 3dB bandwidth of the LPF could be set from 7.5MHz to 20MHz through 3-wire interface.The VGA provides variable gain with 60dB dynamic range, and could be controlled through control pins or 3-wire interface.The Rx I/Q output are designed to be directly connected ( DC-coupled ) to I/Q ADC inputs of the baseband IC. The common voltage of RX I/Q outputs is 1.2V.The RF front-end provides 5dB system noise figure, –17dBm IIP3, and a RF gain step of 22dB/18dB. The baseband provides 60dB gain range from maximum to minimum. The overall voltage gain control range is 100dB.4.3 TransmitterThe transmitter implements a direct-up-conversion architecture, which comprises a LPF, a modulator and a VGA stage. The TX baseband I/Q interface is designed as differential analog inputs directly connected ( DC-coupled ) to the I/Q DAC outputs of the baseband IC.A LPF is implemented to attenuate the second sidelobe of signal spectrum and unwanted oversampling clock or spurious signals. The 3dB bandwidth of the LPF could be set from 10MHz to 30MHz through 3-wire interface.The VGA provides variable gain with 30dB dynamic range, and could be controlled through control pins or 3-wire interface.4.4 PAThe gain of the power amplifier can be adjusted via bias current, which is controlled through 3-wire interface. Output power is +20dBm for 11b and +17dBm for 11g.An on-chip power detector is integrated to measure the output power strength. Power detector samples the peak voltage of the output power and generates a voltage proportional to the output power.4.5The AL2230S includes a fractional-N synthesizer. The reference frequency is fed from an external 20/40MHz oscillator.5 Absolute Maximum RatingsAL2230S could be damaged by any stress in excess of the absolute maximum ratings listed below.MAX.ITEM MIN.Power supply voltage (Vcc) -0.3V 4.0VPin voltage -0.3V Vcc + 0.3VMaximum power dissipation - 2WOperating temperature -40°C +85°CStorage temperature -65°C +150°CLNA input level - +10 dBmPA output load mismatch - 10:1TABLE 1 Absolute Maximum Ratings5.1 DC SpecificationsTypical values are at VCC=3.3V(PA)/2.8V(TRX), Ta=25 o C unless otherwise specifiedMax.Typ.Unit Item ConditionMin.Power Amplifier 3 3.3 3.6V Power supply voltageTransceiver (V DD) 2.8Logic High (V IH) 0.7V DD V DD+0.3V Digital input voltageLogic Low (V IL) - 0.3V DDPLLON=L, PD1=PD2=1 5Shut down currentµAPLLON=L, PD1=PD2=0 800Standby current PLLON=H 50 mARx current PLLON=RXON=H 81 mAPLLON=TXON=H 96Tx currentmAPLLON=TXON=PAON=H 227 / 249*TABLE 2 DC Specifications*note:227mA under Pout 16dBm OFDM mode, 249mA under Pout 19dBm CCK mode.6 Package Dimensions PUNCH QFN 48LD7x7x0.9 PKG 0.5 PITCH PODAL2230S2.4GHz 802.11b/g Single Chip TransceiverAL2230S Datasheet MP v1.00 - 11 -Jan.16,2006。
如何区分惠普家用笔记本和商用笔记本
如何区分惠普家用笔记本和商用笔记本惠普笔记本好用吗?如何区分惠普家用笔记本和商用笔记本呢?下面是店铺跟大家分享的是如何区分惠普家用笔记本和商用笔记本,欢迎大家来阅读学习。
如何区分惠普家用笔记本和商用笔记本方法/步骤很多小伙伴都会有一个疑问,惠普工程师口中的商用笔记本和家用(消费类)笔记本,到底要怎么区分呢?本篇文章就来介绍如何区分商用和家用笔记本。
最直观的方法可以通过笔记本的产品名称来区分。
HP笔记本的产品可以在笔记本屏幕右上角、右下角或键盘左下方查看到。
如下图所示:如在笔记本上面找不到相关信息,可以查看保修卡上面的产品基本配置。
如下图所示:如果产品名称中包含如下关键字,则属于商用产品:HP EliteBook/ ProBook/ ZBook(最常见)HP Compaq 笔记本电脑例如:HP Compaq 2230s/6910p/8510w等;Compaq 300/400/500/600 系列HP 笔记本电脑例如:HP 520/HP 530/HP 541等HP 210/240/250/340等商用超薄笔记本电脑HP ENVY Pro /EliteBook Folio Ultrabook/ Folio 13-2000Pro HP Spectre 13 Pro/ Spectre 13 x2 Pro Ultrabook/ Spectre XT笔记本电脑系列如果您的产品不包含以上关键字,那么一般都是属于家用消费类产品了。
比如最常见的:Compaq Presario 笔记本电脑HP Pavilion 笔记本电脑HP G Notebook PCsHP ENVY 笔记本电脑Ultrabook 和 SleekbookHP Spectre 笔记本电脑HP ChromebookHP TouchSmart 笔记本电脑HP HDX 笔记本电脑HP Pavilion x360 家用笔记本电脑HP Folio 13-1000Voodoo Envy133 笔记本电脑系列。
九大品牌笔记本命名解析!!假期买本子的同学注意啦~
九大品牌笔记本命名解析!!假期买本子的同学注意啦~·宏碁(Acer)笔记本的型号解析在近两年中,宏碁笔记本的表现十分抢眼,通过一系列成功的经营策略(收购Gatewa y、首推CULV本、升级主流本显卡),它的市场份额快速增长,目前已经稳居全球第二的位置,目标直指龙头老大惠普公司。
此外,它还是2012年奥运会PC行业唯一的赞助商,因此在未来的几年里,我们有理由对这个品牌寄予更多的期待。
需要注意的是,“碁”字的读音应该是“qí ”(二声),它是简体中文里“棋”的繁体写法。
“碁”是个象形字,因为古代的棋盘都画在石板上;施振荣本人爱好围棋,所以当初创办宏碁的时候起了“碁”这个名字。
我们既可以称呼它为“hóng qí ”,也可以直呼其英文名Acer(A读“eī”、而不是“啊”)。
宏碁笔记本目前主要有四个系列:注重多媒体影音娱乐的Aspire系列、偏重商务办公的TravelMate系列、充满个性的Ferrari系列、面向3C卖场渠道的Extensa系列。
其中,大家最熟悉的是Aspire系列,它的具体型号包括主型号和括号内的副型号两部分,请看下图:主型号:第一位数字代表屏幕尺寸,比如“4”代表14英寸,“5”代表15.6英寸等等。
第二位数字代表产品定位,数字越大往往代表做工越精细,配置通常也较高;不过如果这里是“5”,则代表它采用了AMD处理器(比如Aspire 4540G)。
第三位和第四位数字要连起来看,代表新老机型的承接关系,比如4720的接班人是4 730,然后是4735、4740......以此类推。
不过,最近也出现了4741和4745同期发布的情况,此时第四位数字则代表产品定位,4745比4741定位更高一些。
(备注:上面这款4820TG型号中有个字母T,属于Timeline轻薄系列,要从上一代的4810T往后推算,所以第三位和第四位数字为20)。
第五位如果有字母G,则代表它配备了独立显卡,如果没有则为集成显卡;倘若出现了字母Z,则代表它采用了奔腾双核处理器;倘若出现了字母D,则代表它支持3D屏幕显示。
惠普笔记本代理价格-----购机重要参考
地址:北京市海淀区中关村大街18号中关村数字物
全新金属拉丝设计,轻薄,含光驱/6芯电池仅重2.15kg ,提供1年国
4321S-WP414PA
4321S-XY389PA HP ProBook s-series 4331s
全新金属拉丝设计,轻薄,含光驱/6芯电池仅重2.15kg ,提供1年国
4331S-QC543PA HP ProBook 4326s 商用笔记本 4326S-LV467PA HP ProBook 4436s 商用笔记本 4436s-QC536PA HP ProBook 4421s 商用笔记本 4421S-LJ726PA 4421S-XL205PA HP ProBook 4431s 商用笔记本 4431s-LX002PA 4431s-LX003PA 4431s-QG641PA 4431s-XZ699AV 4431s-XZ699AV HP ProBook 4720s 商用笔记本 NEW! 4720s-WP422PA 6460B 商用笔记本 NEW! 17英寸 14.1英寸 14.1英寸 13.3英寸 13.3英寸
ATH P360/13.3" HD BV/2G(1D/1066)/640GB(7200rpm)/ATI HD6370 1G GDDR3/DVDRW LS/802.11bgn(broadcom)/W7 home basic/Camera/1-1-0 4436s 商用笔记本 13.3英寸
A4/14" HD AG/2G(1D/1333)/640GB(5400rpm)/ATI6480-1G/DVDRW LS/802.11bgn(broadcom)/W7B/Camera/1-1-0 4421s 商用笔记本 14.1英寸 i5-480M(2.66G/3M)/2G 1066(1D)/500G(7200rpm)/DVDRW LS/ATI 6370 1G/14.0HD(BV)/802.11bgn/Camera/W7B Core i5-450M(2.4GHz/1066/3MB)/2048M 1066(1D)/320G(7200rpm)/DVDRW LS/14.1'HD(bv)/512M_ATI/802.11bgn(Medoc)/Camera/W7B 4431s 商用笔记本 14.1英寸 I3-2310M(2.1GHz/1333/3MB)/14.0"W AG/2G 1333(1D)/500G(7200rpm)/ATI HD6470 1G DDR5/DVDRW LS/802.11 bgn+BT(Atheros)/W7B/1-1-0 I5-2410M(2.3GHz/1333/3MB)/14.0"W AG/4G 1333(2D)/750G(7200rpm)/ATI HD6470 1G DDR5/DVDRW LS/802.11 bgn+BT(Atheros)/W7B/1-1-0 I5-2430M(2.3GHz/1333/3MB)/14.0"W AG/4G 1333(2D)/750G(7200rpm)/ATI HD6490 1G DDR5/DVDRW LS/802.11 bgn+BT(Atheros)/W7B/1-1-0 I5-2410M(2.3GHz/1333/3MB)/14.0"W AG/4G 1333(2D)/640G(7200rpm)/ATI HD6470 1G DDR5/DVDRW LS/802.11 bgn+BT(Atheros)/W7B/1-1-0 I7-2620M(2.7GHz/1333/3MB)/14.0"W AG/4G 1333(2D)/640G(7200rpm)/ATI HD6470 1G DDR5/DVDRW LS/802.11 bgn+BT(Atheros)/W7B/1-1-0