海尔洗衣机XQB90-Z826U1说明书
海尔洗衣机配件清单说明书

Page
4 7 9 12 15 17 20 22 24 26 30 32 35 38 40 41
UPDATING GUIDE:
Aug. 22: EAZ0088G96A_C > EAZ0144G44A_A
Index
3
4
5
Pos Code
Designation
1 EAA0332G26A
p version Pedal, 2 switch
10 1-22623A
SCREW, PHIL PAN H.TAPP.
11 1-13026A
SCREW FOR PLASTIC
12 EAW0282G98A Led lamp cable
13 EAC0060G00A
VIBRATORY SYSTEM HOLES CUP
Désignation
VIS CHc KIT PLAN PORTE-POIDS Boite électronique VIS AUTOTARAUD. POUR PLASTIQUE VIS CHc SUPPORT D'ECLAIRAGE DEL PANNEAU LAMPES DEL FENETRE D'ECLAIRAGE DEL VIS AUTOTAR. VIS POUR PLASTIQUE Câble de lampe DEL BOUCHON, GROUPE MESURE
Electronic box L.E. Video
4 1-09326A
SCREW FOR PLASTIC
5 1-16609A
SCREW TCEI
7 EAC0103G85A
LED LIGHTING SUPPORT
8 EAP0290G30A
海尔智能洗衣机用户手册说明书

Adding special salt
To avoid damage to the appliance, only add special salt to the dispenser for special salt just before the programme starts. 1. Unscrew the lid of the dispenser for special salt
washers. Remove large remnants of food from 3. Switch on the appliance .
the tableware. Check that the spray arms can ro-
4. Select the programme. 5. Start the programme . 6. Remove the tableware at the end of the pro-
gramme.
7. To cancel the programme, press
for
approx. 4 seconds.
The programme is cancelled and ends after ap-
prox. 1 minute.
Cleaning filters
1. After each wash check the filters for
3. Press
repeatedly until the right
water hardness has been set.
4. To save the settings, press
for 3 seconds.
3. Add the special salt to the dispenser. The water in the dispenser is displaced and forced out. Never add detergent.
海尔洗衣机XQB100-BZ826说明书

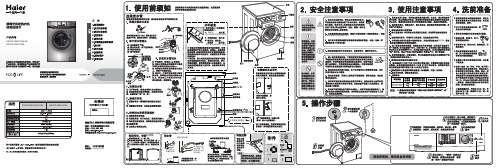
适用型号全自动洗衣机使用说明书
·使用前请仔细阅读本说明书·本公司保留说明书解释权·产品外观请以实物为准·阅后请与发票一并妥善保存
·如遇产品技术或软件升级,恕不另行通知·本产品只适合在中国大陆销售和使用
扫描二维码 智享科技魅力
XQB100-BZ826
版次:2019年 第1版 专用号:0030515735厂家代码:
在线报修地址:
售后服务热线:4006 999 999
网址:
Q/0212HRE 007《家用电动洗衣机》GB 4706.1《家用和类似用途电器的安全 第1部分:通用要求》GB 4706.24《家用和类似用途电器的安全 洗衣机的特殊要求》
选择童锁功能,洗衣机开始启动后,所有按键将被锁定。
锁定后,按键不可操作,不能改变程序设定
若在洗涤时上盖被强制打开后,本机将E2报警,停止运行并会在10秒钟后自动进行排水。
若确认安全后,请合上上盖,并按“启动/暂停”按键,洗衣机将继续运行。
若10分钟内未进行上述操作,洗衣机将自动关机。
按动“启动/暂停”按键,启动洗衣机
如果在洗衣机工作时按下该按键,则洗衣机将暂停。
海尔全自动滚筒洗衣机说明书
窗帘
轻触“烘干”按键可设定是否
选择烘干功能,程序不同,
窗帘
超柔
超柔
6
781026
78206
7
8
10
2
功能可选择不同,有些程序不能选择烘干。
3
用户使用的洗涤程序。
和漂洗时进水量。
,无操作,12小时后脱水。
排水阀内掉入硬币、发卡等异物导致阀塞不封水而边进边排(清除异物)
70-HBX12266 SN
窗帘窗帘
由
下可打开机门;若水位高于观察窗下沿,
拉住拉环向下轻拉,听到轻微的响声后,可打开机门并添加衣物或取出衣物,之后将底部小门复位。
则需要打开洗衣机底部小门,将一个盛水容器放于流尽管处,拔掉管堵将水排出,待水位低于观察窗下沿可打开机门。
开机门时,需要向下拉动底部小盒内的拉杆,排水阀
75
异常报警
异常报警
是否过高(应小于5cm)
(放平排水管,清除异物)
超柔。
海尔洗衣机说明书

4additional information (ʑDrum light(depending on model) –goes out automatically when the washing machine door is opened or closed and after the programme Do not trap any items of washing!ServiceflapWashing machine door with handleEnd of programme ...When the display button.Rinse holdIf Rinse hold –select Inicio ––Select Washing1.To prevent unused detergent from flowing into the outlet2.Consumption valuesProgramme Load Current***Water***Programme Programme Additional function Load consumption consumption–Insert laundry–––SoakingDose detergent with i-DOS or pour into dispenserinstructions. Select the required programme. Select IStarchingSelectaccording to manufacturer's specifications (if required clean beforehand). Select ILoad displayThe load sensor detects the load level in the washing machine. The washing is not balanced.Load adjustIndependently of the load display, the load adjust. uses other sensors to optimally adjust thewater and power consumption and the programme duration in each programme – dependingon textile type and load.ReloadSelect Inicio/after the programme starts. The machine checks whether a top-up is possible. Follow theinformation on the display panel#11Filling dispenserWhen selecting your detergent and care product, follow the manufacturers instructions.We recommend the use of standard, universal and color liquid detergents for all machine-washable, coloured textiles made of cotton and synthetic materials.Do not use any solvent-based, corrosive or gas-emitting products (e.g. liquid beach).To prevent product from drying, do not leave the fill cover open for a long time.Changing dosage strength:setting isThe selection (OFF/light/normal/strong) of i-DOS1 and i-DOS2 is retained for eachprogramme until the next change occurs, even if the machine is switched off.ʑTo adjust the basic dosages:13Intelligent Dosage System (i-DOS)ʑConverting i-DOS2 dispenser contentsInstead of softener, a second liquid detergent can also beused in dispenser i-DOS2.1.PressÙopc.(Options) button to select i-DOS2: content.2.Press / modificar(Change) buttons to switch betweensoftener and detergent.finished in 2:26Ēi-DOS2: content®)c softener–An additional changeable insert for a second detergent is enclosed and can be fitted in thefill cover. a Page 11–When the dispenser contents are changed, the basic dosage is reset to the correspondingfactory setting. If required, adjust the basic dosage.Manual dosage in dispenser B/C1.Set intelligent dosage to – (OFF). a Page 122.Dose in dispenser B/C according to amount of washing,manufacturer’s specifications and existing water hardness.B/C = Powder/liquid detergent–Do not manually dose liquid detergent for programmes with Prewash and/or withend time programme option.–For programmes with Prewash pour in detergent. a Page 9Do not open detergent drawer while water is being supplied.Customer serviceʑIf you cannot rectify the fault yourself (a separate Installation/Maintenance instructions,What to do if ...), please contact our customer service. We will always finds a suitable solutionto avoid unnecessary visits by technicians.ʑYou can find the contact data for your nearest customer service here or in the customerservice list (depending on model).–GB–IE***********(Calls from a BT landline will be charged at up to 3 pence per minute. A call set-upfee of up to 6 pence may apply.)01450 2655 0.03€ per minute at peak. Off peak 0.0088€ per minute.ʑPlease give customer service the product number (E-Nr.) and the production number (FD)of the appliance.Product number Production numberThese instructions can be found on:inside of washing machine door */openservice flap * and rear of the appliance.* depending on modelʑRely on the competence of the manufacturer. Contact us.You can therefore be sure that the repair is carried out by trained service technicians whocarry original spare parts.en operating instructionsWashing machinewith Intelligent Dosage SystemWAS28890EEObserve the safety instructions on page 8.Read these instructions and the separate installationinstructions before operating the washing machine.12Buttons, display panela Page 6Handle of the detergent drawerYour washing machineCongratulations – You have opted for a modern, high-qualitydomestic appliance manufactured by Bosch. The washing machine is distinguished by its economical consumption of water, energy and detergent.Each appliance which leaves our factory is inspected thoroughly to ensure that it functions properly and is in perfect condition.Every machine has been preset at the factory for the intelligent dosage system. You can start washing immediately!Changes to the standard settings. a Page 12, 13Further information on our products, accessories, spare parts and services can be found at: °C Select the temperature – – (cold) up to 90°; by pressin i-DOS1Select the detergent dosage. a l = light, ll = normal, lll = strong,i-DOS2Select the softener or detergen l = light, ll = normal, lll = strong,Select the spin speed (revolution 0 to 1600 * (* depending on mÙ opc.(Options)Select standard settings. a Pa opc.(Options)Select programme options. a / Change Change settings in the options.i-DOS1i-DOS1 selected/reload display.a Page 11 – 13Detergent i-DOS2i-DOS2 selected/reload display.a Page 11 – 13Softener or Detergentʋfor household use only,ʋfor washing machine-washable textiles and hand-washable wool in the apropriate detergent,ʋwhen dosage any detergents/cleaning aids andcleaning agents, always follow manufacturer’s instructions,ʋto be operated with cold drinking water andcommercially available detergents and care products which are suitable for use in washing machines.–Do not leave children unattended near the washing machine!–Children must not use the washing machine!–Keep pets away from the washing machine!Intended useIntelligent Dosage System (i-DOS)Your washing machine features an intelligent dosage system for liquid detergent and softener. Dispensers i-DOS1 and i-DOS2 (1.3 l/0.5 l) in the detergent drawer are used for this. You can select whether you want to use one liquid detergent and one softener or two liquid detergents. a Page 13Automatic programmesAutomatic adjustment of the wash programme and intelligent dosage depending on the detected washing type and soiling. a Page 10ContentsPageʋIntended use.......................................................................................1ʋPreparing your washing machine...................................................2ʋBefore 1st wash..............................................................................2/3ʋBefore each wash..........................................................................3/4ʋAfter each wash..............................................................................4/5ʋSelect options and change settings/Display panel.....................6ʋOverview of programmes.................................................................7ʋSafety instructions..............................................................................8ʋConsumption values..........................................................................8ʋImportant information........................................................................9ʋInformation on programmes/options ...........................................10ʋIntelligent Dosage System (i-DOS)........................................11–13ʋManual dosage.................................................................................13ʋCustomer service (13)Protection of the environment/conservation tips–Utilise the maximum load of washing for each particular programme.–Wash normally soiled fabrics without prewash.–The selectable temperatures apply to the care labels on thetextiles. The temperatures in the machine may deviate from this so that you get the optimum mix of energy-saving and washing results.–Detergent dosage using the intelligent dosage system helps save detergent and water.–Energy saving mode: The display panel light goes out after several minutes, Inicio /Pausa+Carga (Start /Reload) flashes. To activate the light, select any button.–If the washing is then dried in the tumble dryer, select spin speed according to the instructions of the dryer manufacturer.Automatic stain treatmentSpecial treatment of 16 different stain types is possible.No pretreatment of the stains is required – washing machine adjusts the washing process. a Page 10Preparing your washing machineCorrect installation according to separate Installation/Maintenance instructions.Checking the machine–Never switch on a damaged machine!–Inform your customer service!Insert mains plug–With dry hands only!–Take hold of the plug only!Turn on the tap34Start/ReloadProgramme selectorDrum light(depending on model) –goes out automatically when the washing machine door is opened or closed and after the programme starts.Open the washingmachine door 1.Sort the washing2.According to the information on the care labels.According to type; colour; soiling and temperature.Follow manufacturer’s care information!Do not exceed maximum load. a Page 7Follow important instructions! a Page 9Select a programme3.Programme selector for switching the machine on and offand for selecting the programme. Can be rotated in either direction.If childproof lock active, a Deactivate, Page 9Follow the information on thedisplay panel!Max. 8kg Cottons Insert laundryInsert laundry4.Observe load display on the display panel.a Page 90 Load: Max. 8kgCottons Insert laundryClose the washing machine door5.Do not trap any items of washing!finished in 2:26Cottonsi-DOS1: II i-DOS2: IIIntelligent dosage has been preset at the factory:i-DOS1 : ll = Detergent dosage : normal i-DOS2 : ll = Softener dosage : normalChange dosage a Page 12Select programme settings6.All buttons are sensitive, they only need to be touched gently!Temperature/Spin speed a Page 2Programme options (menu) a Page 6Stain selection a Page 10Manual dosage a Page 13Start programme7.B /C dispenser for manuali-DOS1 dispenser fo liquid detergenti-DOS2 dispenser for in softener or liquid detergWashinDetergent drawer with:ng / Change buttons.a Page 12, – = OFF; by pressing / modificar (Change) buttons.nt dosage. a Page 12, – = OFF; by pressing / modificar (Change) buttons.ns per minute, 0 = no spin while the programme is running). model); by pressing / modificar (Change) buttons.age 6Page 6. a Page 6Before each washHandle of the detergentdrawerWashinFill dispensers i-DOS1 and i-DOS2a Page 11Wash once without any washing1.To prevent unused detergent from flowing into the outletduring the first wash: Pour 1 litre of water into dispenser B /C and start the >Empty programme.2.Wash once using L Cottons 90 °C programme withoutany washing .Before 1stwashadditional information (ʑServiceflap Washing machine door with handle End of programme ...When the displaybutton.Rinse holdIf Rinse hold–selectInicio––Selectng56–Insert laundry–––Soaking Dose detergent with i-DOS or pour into dispenser instructions. Select the required programme. Select I Starching Select according to manufacturer's specifications (if required clean beforehand). Select I Load displayThe load sensor detects the load level in the washing machine. The washing is not balanced.Load adjustIndependently of the load display, the load adjust. uses other sensors to optimally adjust the water and power consumption and the programme duration in each programme – depending on textile type and load.ReloadSelect Inicio/after the programme starts. The machine checks whether a top-up is possible. Follow the information on the display panel #When selecting your detergent and care product, follow the manufacturers instructions.We recommend the use of standard, universal and color liquid detergents for all machine-washable, coloured textiles made of cotton and synthetic materials.Do not use any solvent-based, corrosive or gas-emitting products (e.g. liquid beach).To prevent product from drying, do not leave the fill cover open for a long time.11Changing dosage strength:setting is The selection (OFF/light/normal/strong) of i-DOS1 and i-DOS2 is retained for each programme until the next change occurs, even if the machine is switched off.ʑTo adjust the basic dosages:13Intelligent Dosage System (i-DOS)ʑConverting i-DOS2 dispenser contentsInstead of softener, a second liquid detergent can also be used in dispenser i-DOS2.1.Press Ùopc.(Options) button to select i-DOS2: content .2.Press / modificar (Change) buttons to switch betweensoftener and detergent.finished in 2:26Ēi-DOS2: content ®)c softener–An additional changeable insert for a second detergent is enclosed and can be fitted in the fill cover. a Page 11–When the dispenser contents are changed, the basic dosage is reset to the corresponding factory setting. If required, adjust the basic dosage.Manual dosage in dispenser B /C1.Set intelligent dosage to – (OFF). a Page 122.Dose in dispenser B /C according to amount of washing,manufacturer’s specifications and existing water hardness.B /C = Powder/liquid detergent–Do not manually dose liquid detergent for programmes with Prewash and/or with end time programme option.–For programmes with Prewash pour in detergent. a Page 9Do not open detergent drawer while water is being supplied.Customer serviceʑIf you cannot rectify the fault yourself (a separate Installation/Maintenance instructions, What to do if ...), please contact our customer service. We will always finds a suitable solution to avoid unnecessary visits by technicians.ʑYou can find the contact data for your nearest customer service here or in the customer service list (depending on model).–GB –IE***********(Calls from a BT landline will be charged at up to 3 pence per minute. A call set-up fee of up to 6 pence may apply.)01450 2655 0.03€ per minute at peak. Off peak 0.0088€ per minute.ʑPlease give customer service the product number (E-Nr.) and the production number (FD)of the appliance.Product number Production numberThese instructions can be found on: inside of washing machine door */open service flap * and rear of the appliance.* depending on model ʑRely on the competence of the manufacturer. Contact us.You can therefore be sure that the repair is carried out by trained service technicians who carry original spare parts.enoperating instructionsObserve the safety instructions on page 8.Read these instructions and the separate installationinstructions before operating the washing machine.。
海尔波轮洗衣机基础知识-内部资料ppt课件

自编程
技术原理:用户可以根据需要自行设定漂洗次数、浸泡、洗涤、脱水时 间,智能程序随意组合,实现随心洗涤。 讲解口径:有了自编程功能,实现洗衣随心所欲,想怎么洗,就怎么洗。
17
速洗 童锁
技术原理:不太脏的衣物,可以根据衣物脏净程度,选择速洗功能, 洗衣机相应减少洗涤时间和漂洗次数。 讲解口径: 有了速洗功能,在衣物不太脏的情况下,调整洗涤时间, 有效洗净衣物,避免衣物磨损,省时省水省电。
独创的“双净力”洗涤模式,冲浪 瀑布水流(或运动浸泡模式),结 合高筋波轮产生的万向飓风水流, 实现双重净力洗涤,强劲去除衣物 污垢,洗净比国标提高30%
3.超越“军用标准”一台顶两台
以军用标准为参考开发设计,实 现双净力洗衣机无故障运行 10008次,超越军用标准(注: 军标中要求洗衣机需无故障运行 ≥5000次)
双曲波轮拨水叶中间高四周低,形成向上 聚合趋势,辅助形成上下翻转水流。适合 匀动力洗涤方式。 代表机型: XQY70-B228
10(4).过滤网的类别类型名称网兜式
好处
网兜式过滤网,成本低、易损坏、过滤效 果较差。目前行业及海尔早期型号普遍应 用。
魔术式
魔术过滤网,多采用双网过滤,过滤效果 好。目前广泛应用于海尔洗衣机各系列产 品。 代表机型:XQS60-Z1128
漂甩二合一 (喷淋漂洗)
漂洗时一边注水一边甩干,脱水桶高 速旋转时,漂洗水穿过衣物被甩出。 代表机型: XQS70-Z9288
备注:目前大部分普通波轮及双动力漂洗方式均采用一次蓄水漂洗 和多次漂甩二合一的方式,在次基础上用户可自行选择溢水漂洗。
15
二.波轮洗衣机基础功能
智能模糊 预约功能 自编程功能 速洗功能
23
(3).手搓洗衣机原理及优势 洗涤时,波轮靠水流惯性带动内桶反向 旋转,产生反向水流,如同手搓时的力 度与节奏,双倍搓洗,降低衣物磨损的 同时有效防止衣服缠绕。
海尔洗衣机说明书-海尔洗衣机使用说明书
海尔洗衣机说明书篇一:海尔波轮全自动洗衣机操作使用说明海尔波轮全自动洗衣机操作使用说明一.洗前准备1. 确认衣物有无特殊洗涤要求,不易吸水的衣物请用手按入水中。
2. 清理衣袋,将硬币、砂子、发夹等物品取出3. 将长带打结、纽扣扣好、拉链拉好4. 洗涤物不应过量,投入前衣物展开抖松5. 洗衣机运转时,衣物的纽扣可能会发出声音,为慎重起见,将带有纽扣的衣物放在衣物当中二.洗涤剂的使用1. 洗衣粉a 模糊程序(标准)及预约洗涤时,建议将洗衣粉直接投入洗衣粉盒使用b 在洗衣机内直接融化(不适用于模糊程序(标准)及预约洗涤):注入少量水(选择最低水位)→放入洗衣粉,运转约30秒钟,使之充分溶化后按动“启动/暂停”→放入洗涤物,选择合适水位,再次按动“启动/暂停”c 准备约30℃的温水和容器→边搅拌边放入洗衣粉,使之充分溶化→将溶解液倒入洗衣机d洗衣粉用量参考洗衣粉说明,建议不要使用高泡洗衣粉2. 漂白剂注水至规定水位后,将漂白剂用容器稀释后,慢慢倒入液体洗涤剂注入口。
3. 液体洗涤剂将液体洗涤剂倒入液体洗涤剂注入口。
三.投放洗涤物一次洗涤以放入适量洗涤物,洗涤过程中洗涤物能正常翻转为宜。
1.0kg以下的布量不要选择高水位,以防水滴飞溅。
四.洗涤程序操作操作流程:电源/暂停→程序→水量→启动/暂停流程说明:1.按动“电源开/关”按钮,开启电源2.按动“程序”按钮,选择合适的全自动程序,默认为“大物”3.按动“水量”按钮:选择适合衣物洗涤的用水量,注意“快速”程序和“脱水”程序均无法选择水量。
4.按动“启动/暂停”按钮五.关闭上盖在脱水过程中,如打开上盖,洗衣机会停止运行并报警。
六.洗衣结束洗衣过程结束后,洗衣机蜂鸣报警,然后自动断电。
★注意事项:1. 不要洗涤雨衣、自行车罩等防水性衣物,以免异常振动或损坏衣物。
2. 不要将如何热的、重的物品、湿的衣物放在洗衣机上,尤其是程序操作面板上。
3. 不要使用50℃以上的热水洗衣物。
海尔电子洗衣机产品说明书

Section 6: Parts DataDC50X264310131211216547Cabinet GroupKey Part Number Description Quantity * 9960-285-008Door Assy., Loading Complete-Wht (2)* 9960-285-011Door Assy., Loading Complete-SS (2)* 9960-285-007Door Assy., Loading Complete-Chrome/BLK/SS (2)1 9960-284-002Door Assy., Loading-SS(ring only) (2)1 9960-284-004Door Assy., Loading-Chrome(ring only) (2)2 9982-353-002Plate Assy., Hinge (Wht) No Pin (2)2 9982-353-001Plate Assy., Hinge (SS) No Pin (2)* 9545-012-015Screw, Hinge to Door (8)* 8640-413-002Nut, Hinge to Door (8)3 9212-002-004Glass, Door (2)4 9206-413-002Gasket, Glass Black (2)* 9548-117-000Support, Door Glass (2)5 9206-420-005Gasket, Outer Rim Black (2)6 9244-082-001Handle, Loading Door (2)* 9545-018-017Screw, Handle 1/4-20 x 3/8 (4)* 9531-033-003Stud, Door Catch (2)* 8640-413-001Nut, Hex (2)* 8640-413-003Nut, Acorn (2)* 9086-015-002Catch, Loading Door (2)* 8638-190-009Pop Rivet for mtg. catch (4)* 8641-582-006Lockwasher (4)* 8640-399-001Spring Nut (6)7 9989-521-003Panel Assy., Front- Lower (Wht) (1)7 9989-521-001Panel Assy., Front- Lower (SS) (1)8 9989-517-003Panel Assy., Front- Upper (Wht) (1)8 9989-517-001Panel Assy., Front- Upper (SS) (1)* 9277-054-001Insulation Front Panel, half moon (top) (2)* 9277-054-002Insulation Front Panel, half moon (bottom) (2)9 9545-008-014Screw, FLHDCR, 10B x 1 (14) (6)* 8641-585-001 Lockwasher* 8640-399-001Nut, Spring (12)10 9544-069-002Strap, Hinge (Wht) (2)10 9544-069-005Strap, Hinge (SS/Black) (2)* 9545-012-028Screw, Hinge to Panel (8)11 9545-052-001Screw, Door to Hinge Strap (Special Black Type) (2)12 8641-436-003Washer, Fiber (2)13 9021-041-001Acceptor, Coin (1)* 9486-149-001Retainer, Coin Acceptor (2)14 9545-053-002Screw (4)* 9801-099-001Switch, Optical (1)Cabinet Group ContinuedKey Part Number Description Quantity15 9994-032-001Escutcheon, Upper (1)16 9435-039-002Trim, Overlay-Upper Blue (1)16 9435-039-001 Trim, Overlay-Upper Black (1)17 9994-033-001Escutcheon, Lower (1)18 9435-023-001Trim, Overlay-Lower Blue (1)18 9435-031-001Trim, Overlay-Lower Black (1)* 9545-020-009Screw (20)19 9412-167-002Nameplate Stack Dryer Express Blue (1)19 9412-167-001Nameplate Stack Dryer Express Black (1)20 9866-005-001Lint Drawer Assembly Blue (2)20 9866-005-004Lint Drawer Assembly Black (2)21 9435-024-001Overlay Trim, Lint Drwr-Blue (1)21 9435-032-001Overlay Trim, Lint Drwr-Black (1)* 9532-074-003Felt Seal ( back of lint screen assembly ) (2)* 9805-033-002Lint Screen Assembly ONLY (no front) (2)* 9555-057-008Replaceable Lint Screen Only (2)22 8650-012-004Lock and Key, Lint Drawer (2)* 6292-006-010Key 6101 only (2)* 9095-043-001Cam, Lock (2)* 9545-008-001Lint Screen Strap Hold Down Screws 10Bx 1/4 (32)23 9857-198-001Controls Assy, Blue (1)23 9857-198-003Controls Assy, Black (1)* 9627-869-001Harness, Electronic Control (1)24 8650-012-003Lock and Key, Control (1)* 9095-041-001Cam, Lock (1)* 6292-006-007Key only 6324 (1)* 9627-855-003Harness, Heat Sensor (1)* 8640-276-002Wire Nut Connector Grey (4)25 9501-004-003Sensor Temp Control (2)26 9501-008-001Bracket for Heat Sensor Mounting (Under Basket) w/ sensor..2* 9545-045-005Screw, Round Head (Mounts sensor; phillips head) (2)* 9209-037-002Gromm.et, 3/16 ID (2)* 8544-006-001Leg, Leveling 1/2” (4)* 9074-320-001 Cover, Cabinet (Top) (1)* 9277-041-017 Insulation Cabinet Cover (1)* 9732-276-001Kit for Dryers without Neutral and using 208-240 volt (1)* 9732-102-013LP Kit for 50Lb Stk Dryers (1)* 9732-243-001Stack Dryer Trunion Puller (1)* 9544-041-002 Strap - Bead Tie (1)27 9942-038-005 Vault, Coin Box (1)* 9545-008-024 Screws, Mounting-Coin Vault (2)28 9897-099-002 Coin Box Assy, Large Blue (1)28 9807-099-004 Coin Box Assy, Large Black (1)191526252792531089Control Parts GroupKey Part Number Description Quantity * 9857-198-001Controls Assy, Electronic Mounted With Membrane Switch, BLU (1)* 9857-198-003Controls Assy, Electronic Mounted With Membrane Switch, BLK (1)1 9826-008-001 Trough Assembly (1)2 9032-062-002 Button-Push, Control, Blue (2)2 9032-062-001 Button-Push, Control, Black (2)3 9538-166-011Spacer-Metal, 4mm (4)4 9486-158-001 Retainer-Push Button (2)5 8640-424-002Nut-Hex, Elastic stop, #4-40 (4)6 8652-130-038Terminal-Grounding clip (1)7 9534-365-001Spring-Flat, Control (1)8 9545-008-001Screw-Hex, #10B x 1/4 (2)9 9545-044-010 Screw-Hex, #10B x 1/4 (10)9 8641-582-005Washer-External tooth, #6 (10)10 9435-038-001Overlay-Control, Coin, Black (1)10 9435-038-002Overlay-Control, Coin, Blue (1)11 9021-041-001Acceptor-Coin, Optical (1)* 9486-149-001Retainer, Coin Acceptor (1)12 9545-053-002Screw (4)* 9801-099-001 Optical Sensor, Replacement (1)Note: Jumpers required if using 1.5 Control on Older Machines (P9 Connection)* 8220-155-001 Wire Assy, Jumper, 30Lb Stack Coin (1)* 8220-155-002 Wire Assy, Jumper, 50Lb Stack Coin (1)Door Switch GroupPart NumberDescription Quantity9539-487-001Door Switches (2)Hinge Plate Cover1 9074-340-002 Cover-Hinge, Black .....................................................................22 8636-008-010 Screw-TRHDCR, 10B x 3/8, Black.. (4)12Bearing Housing GroupKey Part Number Description Quantity J1 9241-189-002 Housing, Bearing (2)J2 9036-159-003Bearing, Ball Rear..................................................................... .2 * 9538-183-001 Spacer, Bearing (2)* 9036-159-001Bearing, Ball Front .................................................................... .2 J5 9545-017-017Bolt, 1/2 x 3/4 . (8)J7 8640-417-002Nut, 1/2 (8)* 9803-201-001Bearing Housing Complete Ass’y (includes bearings,spacer) (2)J4 9545-017-018Screw 1/2 x 1 1/2 (4)Burner Housing GroupKey Part Number Description Quantity * 9803-207-001 Housing Assembly, Burner (2)1a 9452-730-001Service Burner Plate Front... (2)1 9452-729-001 Service Plate baffl e Recirculation Chamber Clean Out (2)* 9545-008-006Screws (8)2 9545-008-001Screw (16)18 9003-220-001Angle, Burner Support (2)* 9545-008-006Screw (4)17 9048-020-002Burner, Main (4)* 9545-008-006Screw 10AB x 3/8” (4)* 9454-824-001 Panel, Back Burner Housing (2)4 9545-008-001Screw 10B x1/4” (8)5 9875-002-003Electrode Assy, Ignition (2)19 9545-045-001Screw, Electrode Mtg 8B x 1/4” (4)7 9379-186-001Valve, Gas Shut Off (1)8 9857-134-001Control Assy, Gas (2)9 9381-012-001Manifold, Assy (2)* 9425-069-021Orifi ce, Burner-Natural #27 (4)* 9425-069-022Orifi ce, Burner-LP #44 (4)10 9029-175-001Bracket, Manifold (2)22 8615-104-038Pipe Plug in end of Burner Manifold (2)* 9545-008-006Screw (4)12 9576-203-002Thermostat, Hi-Limit (2)* 9538-142-001Spacer, Hi-Limit (4)* 9545-045-007 Screw 8B x 3/4” (4)13 9074-329-001Cover, Hi-Limit Stat Ignitor (2)* 9545-008-006Screw (6)* 9576-207-008Thermostat, Safety Shutoff (2)* 9545-008-006Screw (4)15 9825-062-001Cover, Safety Stat (2)* 9545-008-024Screw (6)16 9857-116-003Control, Ignition Fenwall (3 trybox) (2)* 9732-102-013Kit, LP Conversion 50Lb Stack Kit (2)* 9838-018-003Welded One Piece Gas Pipe Assembly (1)Part # 8533-085-001 9/14Burner Housing Group Photos10221092221851A141594851613Rear ViewKey Part Number Description Quantity * 9627-861-001Wire Harness Overtemperature Switch/Air Switch (2)* 9801-098-001Switch Assy, Air Flow (2)1 9539-461-009Switch, Air Flow (2)2 9029-200-001 Bracket, Switch- Air Flow (2)3 9008-007-001Actuator, Switch (2)4 9451-169-002Pin, Cotter (2)5 9545-020-001Screw 4-40 x 5/8” (4)* 8640-401-001Nut, Special Twin .#4-40 (2)* 9550-169-003Shield, Switch (2)6 9376-322-001Motor, Drive (2)7 9452-770-001Plate, Motor Mounting (1)* 9545-029-008Bolt 3/8” - 16 x 3/4” (8)* 8641-582-003Lockwash Spring 3/8 (8)8 9545-018-019Screw, Motor Plate to Back Assy. 1/4-20x 2 1/2 (8)* 8641-582-007Lockwasher 1/4 (8)9 9538-163-006Spacr (8)* 8641-581-017Flat Washer 1/4 x 7/8 (24)* 9209-086-002Rubber Grommet (8)* 9538-166-006Grommet Spacers (8)* 9545-028-013Screw, Set (4)10 9962-018-002Back Assy, Blower Hsg (2)11 9991-053-001Support Assy, Intermed. Pulley (2)12 9545-029-010Bolt, Rd Hd 3/8-16 x 1 1/4 (6)12 8640-415-004Nut Flange Wizlock 3/8” - 16 (6)12 8641-581-035Washer, Flat (6)13 9545-029-003Bolt, 3/8-16 x 1 1/2 (2)14 9861-022-001Arm Assy-Tension, Complete (2)* 9487-200-003Ring-Retaining (6)15 9908-048-003Pulley Assy, Intermediate with bronze fl ange bearing (2)* 9036-145-002Bronze Flange Bearing (4)16 9908-047-002Pulley Driven Tumbler (2)17 9040-076-009Belt, Drive Motor (2)18 9040-073-011Belt, Driven Intermediate to Tumbler (2)19 9534-151-000Spring, Tension (2)20 9099-012-005Chain, Tension (2)21 9248-022-002Hook, Tension (2)* 9451-146-001Pin, Damper Hinge (2)* 9074-334-001 Cover Duct Upper (1)22 9973-032-001 Heat Recirculation Assembly Duct (2)* 9453-169-013Motor Pulley - Driver (1)* 9545-028-013Set Screws (2) (2)* 9278-043-001Impeller23 8641-581-026Washer, Flat 1/2” for Tumbler Pulley (2)24 9545-017-009Bolt, 1/2”-13 x 1 1/4 (2)25 8641-582-016Washer, Star 1/2” for Tumbler Pulley (2)* 9545-008-001Screw 10 Bx 1/4” (6)* 9545-014-004Bolt, 5/16-18 x 5/8” (8) (8)5/16-18* 8640-400-003Nut,* 9538-184-001Spacer, Shaft (2)* 9487-234-005Ring Tolerance (2)* 9125-007-001Damper Inside Duct Exhaust (2)* 9125-007-002Damper Inside Duct Exhaust (1)* 8520-141-000Nut, Spring (4)* 9074-335-001Cover Duct Lower (1)* 9545-008-024Screw 10ABx 3/8” (72)* 9029-173-001Bracket for Wire Harness Under Burner Housing (2)Part # 8533-085-001 9/14Part # 8533-085-001 9/14Rear View Photos1264722Rear Panel & Cover GroupKey Part Number Description Quantity19208-090-001Rear Guard Side Panel 1 (2)4 9545-008-024Screws 10 AB x 3/8 (30)5 8502-649-001Label - Connection Electrical (1)8 9208-089-001Rear Guard Back Panel (2)10 8502-600-001Label Warning & Notice (1)11 8502-645-001Label - Instructions (1)12 9109-113-001Transition Assembly Outlet (1)13 9074-320-001 Top Cover Dryer Panel (1)14 9550-188-001 Top Burner Housing Heat Shield Inlet (1)15 9074-321-001 Top Panel Burner Housing Cover (1)Part # 8533-085-001 9/141851113121514Tumbler GroupKey Part Number Description Quantity 9848-131-001Tumbler Assembly Galvanized w/spider (2)G2 9568-013-001Spider Assembly (2)G3 9497-226-002Rod, Tumbler (6)G4 8640-417-005Nut, 1/2 - 13 (6)G6 8641-590-002Washer, Special (6).............................................................................AR G7 9552-013-000Shim* 9848-130-002Tumbler Assembly Stainless Steel (2)G1 9848-130-001Tumber Assembly Galvanized (2)Part # 8533-085-001 9/14Control Assembly GroupKey Part Number DescriptionQuantity* 9857-189-001 Control Assmbly Complete (all below included) .............................1* 9108-117-001 Control Box Cover ..................................................................... 1* 8220-001-478 Wire Assembly Green 7” ............................................................ 1* 8639-621-007 Screw #10-32 x 12 Green ............................................................1* 8641-582-006 Lockwasher Ext Tooth #10 ..........................................................13 9897-026-002 Terminal Block Main Power Middle ...............................................14 9897-026-001 Terminal Block ............................................................................2* 9545-045-012 Screw #8 ABx 1/2 for terminal block ............................................6 5 8711-011-001 Transformer Ignition ...................................................................2* 9545-008-024 Screws 10AB x 3/8” ...................................................................46 9982-348-001 Plate Assembly MTG Ignition Control............................................2* 9545-008-024 Screws 10B x 1/4” MTG Above Plate and Others ...........................47 9857-116-003 Ignition Control ..........................................................................2* 8640-411-003 #6-32 Nuts ................................................................................48 9631-403-009 Wire Assembly High Voltage Upper ..............................................19 9627-860-001 Wire Harness Ignition Control Upper ............................................110 9627-860-002 Wire Harness Ignition Control Lower ............................................1* 9053-067-002 Bushing Wire 7/8” .......................................................................413 9200-001-002 Fuseholder Assembly ..................................................................314 8636-018-001 Fuse 1.5 Amp .............................................................................315 5192-299-001 Relay Power ...............................................................................216 9897-035-001 Terminal Block Assembly Main Power Inlet ...................................1* 9545-008-024 Screw #8 AB x 1/2” ....................................................................2* 8220-062-036 Wire Assembly Red/Black 14” ......................................................1* 8220-062-037 Wire Assembly Red/White 14” .....................................................1* 8220-062-038 Wire Assembly White 14” ............................................................221 9627-864-004 Wire Harness Motor Extension .....................................................2* 9527-007-001 Stand Off - Wire Saddle / Arrowhead ..........................................13* 9545-031-005 Screw 6 B x 3/8” ........................................................................422 9558-029-003 Strip Terminal Marker (Behind Input Power) ..................................124 9627-863-001 Wire Harness Main Extension Access Under Burner Housing .........123 9631-403-008 Wire Ass’y - High Voltage Lower ..................................................125 9627-859-001 Wire Harness - Main Power (1)Part # 8533-085-001 9/14Control Assembly GroupPart # 8533-085-001 9/1416252223245Coin AccecptorKey Part Number Description Quantity1 9021-041-001Coin Accecptor, Optical (1)Replacement (1)2 9801-099-001Sensor-Optical,3 9545-039-002Screw, Heighth Bar, 3mm (2)* 9486-136-001 Retainer, Coin Acceptor (1)* 9545-053-002 Screw (4)Part # 8533-085-001 9/14NotesPart # 8533-085-001 9/14NotesPart # 8533-085-001 9/14Section 7: VoltageConversionPart # 8533-085-001 9/14Part # 8533-085-001 9/14Instructions - Convert a Dual Voltage Stack Dryer from 120V to 208-240V with Neutral Wire Only1. Remove incoming power from the dryer. Use a known working voltmeter to check power.2. Remove the cover of both the upper and lower control box assemblies from the dryer using a 5/16” wrench.3. Move the black/blue wire from the N position of the main power terminal block to the L2 position of the mainpower terminal block in the upper control box assembly. See Figure 6 below.4. Move the white wire of the upper motor harness to an upper inner left terminal in the middle terminal block in thelower control box assembly. See Figure 6 below.5. Move the orange wire of the upper motor harness to an upper inner left terminal in the middle terminal block inthe lower control box assembly. See Figure 6 below.6. Move the white wire of the lower motor harness to a lower inner left terminal in the middle terminal block in thelower control box assembly. See Figure 6 below.7. Move the orange wire of the lower motor harness to a lower inner left terminal in the middle terminal block in thelower control box assembly. See Figure 6 below.8. Reconnect power to the dryer and test to ensure proper operation; one line voltage to L1, one line voltage to L2,the neutral to N, and the earth ground to E.9. Reinstall the cover of both the upper and lower control box assemblies from the dryer using a 5/16” wrench.Part # 8533-085-001 9/14NotesPart # 8533-085-001 9/14Section 9: MaintenancePart # 8533-085-001 9/14MaintenanceDaily1. Clean lint screen by unlocking and sliding out in their tracks for access. Use soft brush ifnecessary. Failure to do so will slow drying and increase gas usage and temperatures through out the dryer.2. Check lint screen for tears. Replace if necessary.Monthly1. Remove lint accumulation from end bells of motor.2. Clean lint from lint screen compartment.3. Remove lint and dirt accumulation from top of the dryer and all areas above, and around theburners and burner housing. Failure to keep this portion of the dryer clean can lead to a buildup of lint creating a fi re hazard.4. Inspect Recirculation burner housing for excessive buildup.5. Place a few drops of light oil on top and bottom pivots of the clothes door hinge.6. Grease bearings and shaft of intermediate drive pulley.Quarterly1. Check belts for looseness, wear or fraying.2. Inspect gasket of door glass for excessive wear.3. Check tightness of all fasteners holding parts to support channel.4. Check tightness of tumbler shaft retaining nut. MUST MAINTAIN 150 FOOT LBS.5. Remove lint accumulation from primary air ports in burners.6. Grease pivot pins and tension arms where in contact with each other.Semiannually1. Remove and clean main burners.2. Remove all orifi ces and examine for dirt and hole obstruction.3. Remove all lint accumulation. Remove front panel, lint screen housing and remove lintaccumulation.Annually1. Check intermediate pulley bearings for wear.2. Check and remove any lint accumulation from exhaust system.NOTE: DRYER MUST NOT BE OPERATED WITHOUT LINT SCREEN IN PLACE。
- 1、下载文档前请自行甄别文档内容的完整性,平台不提供额外的编辑、内容补充、找答案等附加服务。
- 2、"仅部分预览"的文档,不可在线预览部分如存在完整性等问题,可反馈申请退款(可完整预览的文档不适用该条件!)。
- 3、如文档侵犯您的权益,请联系客服反馈,我们会尽快为您处理(人工客服工作时间:9:00-18:30)。
适用型号
XQB80-F826XQB90-F826U1XQB90-Z826U1XQB100-F826
版次:2017年第2版专用号:0030509626Q
厂家代码:V14252
地址:青岛市高科技工业园海尔工业园内
在线报修地址:
售后服务热线:4006 999 999
网址:
青岛 洗衣机有限公司
该产品执行标准:
Q/0212HRE 007《家用电动洗衣机》
GB 4706.1 《家用和类似用途电器的安全 第1部分:通用要求》
GB 4706.24 《家用和类似用途电器的安全 洗衣机的特殊要求》
全自动洗衣机使用说明书
一、使用前须知
二、附件
三、安全注意事项 四、洗前准备 五、操作步骤
六、操作按钮说明
七、清洁/维护 八、疑问解答 目录:
九、保修说明 十、技术数据
关注海尔智能洗衣机微信公共账号
方法一方法二在微信公共账户中搜索“海尔智能洗衣机”,并进行
关注
扫描二维码,对“海尔智能洗衣机”
进行关注
尊敬的海尔用户:
感谢您使用海尔家用洗衣机,我公司将按照《中华人民共和国消费者权益保护法》的有关规定,凭电子保修卡(扫描封面二维码选择电子保修卡下载、安装后,录入
发票注册产品,保修无忧,一键家电管理,报装、报修,方便快捷)或发票,为您提供下列服务:
一、家庭用洗衣机的整机免费保修三年。
二、下列情况不属于免费保修范围:
1.用户因运、装、用、管不当而损坏的;
2.自行拆卸产品的;
3.涂改发票或无购机发票的;
4.因异常电压、火灾等外部原因损坏的;
5.未按说明书、洗衣机主体注意标牌等注意事项要求使用的。
家庭用以外的洗衣机使用提示:
该产品为家用,除家庭以外(如:学校、公寓、部队、企业、医院、洗衣房、洗浴中心、酒店、宾馆、招待所等团体)使用的洗衣机,不属于免费保修范围。
为了您更好的使用,请定期与海尔售后服务联系维护保养,以免使用不当造成损失。
备注:1、本产品有结构变化,数据变化,恕不另行通知。
2、根据需要,以下零件可供选购: 进水管加长管 排水管加长管。