ATEQ检漏仪参数说明
ATEQ-F520参数设定简易指导书

MAI N MENU RUN PROG. : 0 0 5 PARAMET ERS SPE CYCL E: Re g u l
RUN/ Pr : 0 0 1 PRESS = 3 5 5 . 5 mb a r REGUL AT OR 1 ADJ UST
测试(D. MODE)和操作者测试 (OPERATOR)﹔详情请参阅下文
将光标指到欲选择的测试方法前然 后按输入键确认
PARAM/ T YPE
L EAK TEST CROSSI NG T EST D. MODE
泄漏测试
泄漏测试最适合测量微小泄漏(压降)﹐下列公式是用来将以流量单位表示的泄漏转换成压降﹕
使用调压阀来调整压力值
_
+
CYCL E/ Pr : 0 0 1 PRESS = 5 0 0 mb a r
REGUL AT OR 2 ADJ UST
一旦压力设定完成﹐请按重设 键以停止特殊循环
RUN/ Pr : 0 0 1 PRESS = 0 . 0 0 0 b a r
READY
错误讯息
如果发生操作问题﹐ATEQ F520 会显示错误讯息
PARAMET ERS Co p y - Pa s t e Pr : 0 0 1 - - - - - - - - - Pr : 0 0 2 - - - - - - - - - -
1.测试类型的选择: 四种测试种类供使用
在参数选单可选择四种测试方法﹕ 泄漏测试(LEAK TEST)﹑压力测 试(CROSSING TEST)﹑减敏模式
设定目标压力
ATEQ-F520中文说明书

第一章仪器安装1. ATEQ F510 外观N.T R F520CATEQ F510 是安装于整组烤漆铁板壳内﹐下接四个橡皮支脚。
外壳的形状已做了修改﹐所以仪器能轻易而合身地装入壳内﹐随机附有电源供应器。
'.'.N . TR_+C2. ATEQ F520 外观F520The ATEQ F520 是安装于整组烤漆铁板壳内﹐下接四个橡皮支脚。
上盖以两根螺丝锁在 主体上。
外壳的形状已做了修改﹐所以仪器能轻易而合身地装入壳内﹐随机附有电源供应器。
3. 仪器安装3.1. F510 机壳上的接头配置图仪器侧面图仪器底面图3.2. F520 机壳上的接头配置图J1J3 O O O O O O S S S S T T T TI I I I I I I O O O O O00'.'.3.3. 接头说明3.3.1. 电子接头ATEQ F510 和 F520 可应用下列方式﹐使用 24V DC 电压来操作﹕ ✓ 使用本仪器所提供的 24V DC 变压器﹔ ✓ 或当本仪器是从属端时透过网络线连接。
3.3.1. 1) J1 接头(温度感应器/输出码/模拟输出)1 2 3 4 5 6 7 8 9 10 11 12 13 14 15 16接脚 1 共通点 (输出 1,2,3 号)输出编号24V DC100 mA 最大输出接脚 2 输出 1 号 接脚 3 输出 2 号 接脚 4 输出 3 号 接脚 5 共通点 (输出 4,5,6 号)接脚 6 输出 4 号 接脚 7 输出 5 号 接脚 8 输出 6 号 接脚 9 共通点 (模拟输出 1)模拟输出接脚 10 模拟输出 1 号 接脚 11 共通点 (模拟输出 2 号)接脚 12 模拟输出 2 号 接脚 13 0V 电源供应温度感应器接脚 14 12V 电源供应 接脚 15 感应器输入 1 号 接脚 16感应器输入 2 号3.3.1. 2) J2 接头电话插座﹐未使用'.3.3.1. 3) J31 2 3 4 5 6 7 8 9 10 11 12 13 14 15 16接脚 1 复归(输入 1)干接点输入接脚 2 共通点 (+ 24 V) 接脚 3 激活(输入 2) 接脚 4 共通点 (+ 24 V) 接脚 5 输入 3 (程序选择) 接脚 6 输入 4 (程序选择) 接脚 7 输入 5 (程序选择) 接脚 8 输入 6 (程序选择) 接脚 9 输入 7 (可程序输入)接脚 10 共通点 干接点输出 最大 60V AC / D C 最大 200mA接脚 11 零件 OK 输出 接脚 12 测试件 NG 输出 接脚 13 标准件 NG 输出接脚 14 警告输出 接脚 15 循环结束输出接脚 160 V3.3.1. 4) 从J3 输入接头激活程序欲从J3 输入接头激活程序﹐您必须选择接脚5 到9(一或多个)。
ateq f620 快速入门指南说明书
Quick Start Guide2 /02Table of contents Safety advisory / WarrantyGood practices and safety instructionsAir quality requirementsPreambleATEQ F620, a universal leak testerLeak testPrinciple of a cycleYour ATEQ F620Front panelConnectors on the back panel (with all options) Power supply connectorsDigital linksAnalog outputsDigital inputs/outputsPneumatic connectorsPneumatics configurationUser interfaceOverviewKeysDisplayStarting upPower upPreparing a programModifying a parameterSelecting a programStarting and stopping current cycleUser adjustmentsOptions of the menus SpecificationsCharacteristicsQSG_F620.283.00_EN_01 / 2019-02-20QSG_F620.283.00_EN_01 / 2019-02-203 /46ATEQ Manufacturer Plants - Measurement Solution, Global Leader.We continuously work on improving our products. This is why information contained in this manual, the device and the technical specifications may be modified without prior notification.Pictures and figures in this manual are non-contractual.Safety advisory / Warranty4 /46Safety recommendationsIf the device is supplied with 100 / 240 V AC, it is mandatory to connect it to the ground witha good link to the ground, to protect against electric hazard or electrocution.It is dangerous to change the status of the outputs.They can control power actuators or other equipment (mechanical, pneumatic, hydraulic,electrical or other) which can cause serious personal injury and damage to surrounding material.For safety and quality measurement reasons, it is important, before powering on the device,to ensure that it is air supplied with a minimum operating pressure (0.6 MPa (87 PSI) ± 15%).Recommendations for the test environmentKeep the test area as clean as possible.Recommendations for operatorsATEQ recommends that the operators who use the devices have training and a level ofqualification that correspond to the job to perform.General recommendations—Read the user manual before using the device.—All electrical connections to the device must be equipped with safety systems (fuses, circuit breakers, etc.) adapted to the needs and in accordance with the applicablestandards and rules.—To avoid electromagnetic interference, electrical connections to the device must be shorter than 2 meters.—Power supply plug must be grounded.—Disconnect the device from the mains before performing any maintenance work.—Shut off the compressed air supply when working on the pneumatic assembly.—Do not open a connected device.—Avoid splashing water on the device.ATEQ is at your disposal for any information concerning the use of the device undermaximum safety conditions.We draw your attention to the fact that ATEQ cannot be held responsible for anyaccident related to a misuse of the measuring instrument, the workstation or non-compliance of the installation with safety rules.In addition, ATEQ declines any responsibility for the calibration or the fitting of theirinstruments that is not done by ATEQ.ATEQ also declines any responsibility for any modification (program, mechanical orelectrical) of the device done without their written consent.QSG_F620.283.00_EN_01 / 2019-02-20QSG_F620.283.00_EN_01 / 2019-02-205 / 46The air supplied into the device must be clean and dry. Even though the device is provided with a filter, the presence of dust, oil or impurities may cause malfunction.Air quality requirements according to ISO standard 8573The air must be clean and dry.The presence of impurities, oil or humidity in the air may cause deterioration which will not be covered by the warranty.When the instrument is working in vacuum conditions, impurities must be prevented from being drawn into its internal components.For this purpose we strongly recommend that a suitable airtight filter is installed between the part under test and the instrument.ATEQ recommends the following characteristics for the air supplied into the device.Recommended additional equipmentATEQ recommends the installation of this additional equipment: —Air dryer to provide dry air at less than - 40°C dew point —25 micron and 1/100 micron double filter.Preamble6 /46ATEQ F620 is a leak detector that tests the airtightness of parts.ATEQ F620 can memorise 128 different test programs.QSG_F620.283.00_EN_01 / 2019-02-20QSG_F620.283.00_EN_01 / 2019-02-207 / 46Direct measurement principleThe part under test 3 and the reference part 5 are filled to an identical pressure.A differential sensor 4 measures the pressure variation between the part under test 3 and the reference part 5. In some applications, the reference part can be replaced by a cap.1 Device2 Pressure sensor3 Part under test4 Differential pressure sensor5 Reference partDesensitized testThis mode is used for the measurement of large leaks, when the reject level required isabove the full scale of the differential sensor.The test pressure is applied to the input of the test part 3.The measurement is performed by the pressure sensor 2.1 Device2 Pressure sensor3 Part under test4 Cap on the reference connectorOther types of test are available in option (Burst test, Volume, Operator...).The measurement cycle is made of 4 main phases: fill, stabilization, test, dumping.8 /460Waiting phase1Fill phase2Stabilization phase3 Test4 DumpingQSG_F620.283.00_EN_01 / 2019-02-20Your ATEQ F6209 /46 The user interface is located on the front panel.1 Display2Cycle keys3Navigation keys4USB connectors5Quick connector6Mechanical RegulatorFor more information, refer to User interfaceQSG_F620.283.00_EN_01 / 2019-02-2010 /46QSG_F620.283.00_EN_01 / 2019-02-2011 /46 * These connectors are not operational. They are provided for future development of ourdevices.12 /46The device can be connected to an external power supply (24 V DC - 2 A) or provided with an internal power supply (100 / 240 V AC) (option).External supply24 V DC connector (J7)The device can be connected to a 24 V DC - 2 A power supply through a M12 4 pins type connector.24 V DC on the relay board connector (J11) (option)The device can also be connected to a 24 V DC - 2 A power supply through J11 connector on the relay board.Apply 24 V DC to the pin 2 or 4.13 /46Internal supply only100 / 240 V AC connector (J7) (option)The device can be connected to a 100 / 240 V AC power supply (option).This connector has a ON/OFF button.It is mandatory to connect the device to the ground with a good link to the ground, to protectagainst electric hazard or electrocution.1 ON 0 OFF14 /46PC USB connectors (on front face)USB connectors can be used for connecting miscellaneous compatible USB devices.The USB connectors are located under the rubber cover 1 (see figure).1Rubber cover2USB connector to PC3USB connector to USB keyDo not connect two USB devices at the same time.Do not use a cable longer than 2 m.Push the rubber cover 1 slightly forward for an easy access to USB connectors 2 and 3.Only use this connection for temporary communication. Connection to a PC cannot be usedpermanently because the communication can be disconnected by the PC.Printer RS232 connector / Modbus (option) or Profibus (option)(J12)RS232 - SubD 9 pins male connector (printer)RS232 for printer, bar code reader, PC connection.15 / 46RS232 - SubD 9 pins female connector (Profibus) optionProfibus: SubD 9 pins female connector.Devicenet connectors (J5) (J6) (option)M12 type connector - 5 pins male connector (J5) (Devicenet input)For connection to others ATEQ devices.M12 type connector - 5 pins female connector (J6) (Devicenet output)For connection to others ATEQ devices.Profinet connectors (J5 + J6) (option)M12 D coded type connector - 4 pins female connector (J5 + J6)16 /46Standard connection Ethernet TCP / IP protocol.—Ethernet IP—Profinet—Ethercat (J5 = Input J6 = Output).M12 type connector - 8 pins female connector (J1)17 /4618 /46The 24V DC power supply for the digital inputs can be provided by 2 means:—The internal power supply of the device (0.3A max)—An external power supply provided by the customer.Inputs default mode is PNP. NPN mode is available on request.Relay board connector (J11) (option)Characteristics—Inputs• Activation: + 24 V DC.—Outputs• Dry contacts• 60 V AC / DC max - 200 mA max.19 /46The device can be energized through the J11 connector of the relay board (except if internal supply option):0 V to the pin 1624 V DC to the pin 2 or 4.Program selection extension connector (J10) (option)The J10 connector is an extension of the J11 connector that enables the selection of 128 programs.Characteristics—Inputs•Activation: + 24 V DC.20 /46Program selection (J11 and J10)The connectors J11 and J10 (option) enable you to select a program from digital inputs.Combinations of connector pins to activate for program selection* X is equal to 0 or 1 in function of the program number.21 /46Valve codes and auxiliary outputs board connector (J9) (option)Characteristics—Outputs:• 24 V DC - 100 mA max per output. —Inputs:•Activation: + 24 V DC.22 /46Pneumatic connectors used to connect the part under test are located on the back panel of the device.Pneumatic supplyThe pneumatic supply has to meet specific requirements recommended by ATEQ. Refer to Good practices and safety instructions section.A specific filter may be necessary.The air is supplied via the filter located on the back panel of the device.Metal air filterThe metal filter is used for 1 MPa(145 PSI) range.The maximum pressure admissible is1.2 MPa (174 PSI).Plastic air filterThe plastic filter is used for 0.5 MPa(72.5 PSI) range (direct and indirectmodes) or 2 MPa (290 PSI) range (forpilot valves input).The maximum pressure admissible is690 kPa (100 PSI).23 /46Quick connector (on front face) (option)Use this function to check the calibration.As this connector is part of the measurement circuit, all its connections must be air tight.Test and reference outputsThe outputs enables parts to be connected (test and reference)1 Test connector2 Reference connector3 Not used4 Exhaust output5 Pressurization outputMetallic fitting available for test (1) and reference (2) connectors: —2.7/4 mm —3/5 mm —4/6 mm —6/8 mmDifferential sealed part connectors (option) (V1 and V2)External volume (closed tube) connection.Metallic fitting available for V1 and V2 connectors: —2.7/4 mm24 /46Other inputs / outputsThe outputs enables parts to be connected (test and reference)1Pilot pressure input or test pressureinput (according configuration)2Test pressure output (indirect mode)(from 0.5 to 2 MPa (72.5 to 290 PSI)according configuration)3Pneumatic input or output (accordingconfiguration)4Exhaust output (indirect mode)Pneumatic output 0.6 MPa (87 PSI) (option)A and B: automatic connectors option. Theseconnectors are used to drive pneumaticcaps on the part under test.Air supply input for optionsInstant fitting: 6 mm diameter—Vacuum input for vacuum range—External regulated pressure (accordingconfiguration)Calibration check by volume variation connector (option) (V)External volume (closed tube) connection.25 /46 Direct mode - Low rangePressure: from 0 to 500 kPa (72.5 PSI)ConnectionsDirect mode - Medium rangeMaximum pressure: 1 MPa (145 PSI)26 /46ConnectionsDirect mode - High rangeMaximum pressure: 2 MPa (290 PSI)27 /46ConnectionsIndirect modeMaximum pressure: 1 MPa (145 PSI)28 /46Connections29 /46Direct mode - Sealed part testPressure: from 0 to 500 kPa (72.5 PSI)This configuration can be used for test of small test part volumes.Protect volumes and pipes from air blowing and temperature variations.ConnectionsDirect mode - Sealed part differential volume testPressure: from 0 to 500 kPa (72.5 PSI)30 /46ConnectionsDirect mode - Option test check by pressure dropPressure: from 0 to 500 kPa (72.5 PSI)31 /46ConnectionsUser interface32 /46The user interface comprises a display and user keys located on the front panel.1 Display2Cycle keys3Navigation keysKEYSCycle keysThe cycle keys are used to start and to stop a measurement cycle.33 /46Navigation keysThe navigation keys are used to select menus/options and change parameter values.Smart keySmart key is a programmable key that provides direct access to a function selected bythe user.This key is programmable through the MAIN MENU screen:MAIN MENU > CONFIGURATION > MISCELLANEOUS > SMART KEYDISPLAYThe device uses 4 main screens.The Program screenUse the Program screen to select a test program.1Current program name (here NAME )2 Current program number (here 001)3 Test type (here LEAK TEST )Access at start-up of the instrument or by pressing several times Esc .34 /46The Measurement cycle screenThe Measurement cycle screen displays the different values of the current test (or last one).1Test pressure measurement2Test result or step phase3Test reject value4Vertical line test result5Remaining time of the current phaseor ready status6Leak measurement7Measurement unit8Current program9Vertical line test resultA star (*) can be displayed after the measurement unit 7 when the standard conditions function is validated.Refer to the Reference Manual.The MAIN MENU screenThe MAIN MENU screen gives access to different sections for managing the device and the test parameters.Access: from the Program screen, press .MAIN MENUSPE CYCLEPARAMETERSCONFIGURATIONSERVICERESUL TSUSB35 / 46Starting up1. Make sure that all the necessary connections are in place.Electrical: such as power supply, inputs/outputs Pneumatic: including line pressure supply2. Power up your device.When power-up is completed, the Program screen is displayed with last program used on screen.Use this procedure to configure a new test program.On the MAIN MENU screen:ACCESSING THE PARAMETERS1.Select PARAMETERSusing the up/downkeys and press .MAIN MENUPARAMETERS CONFIGURATIONSERVICE RESUL The program list is displayed.SELECTING A PROGRAM NUMBER 2. Select the program to configure and press.A list of the available measurement types is displayed: —LEAK TEST type—BLOCKAGE type (option)—DESENSITIZED TEST type (option) —OPERATOR type (option) —BURST TEST type (option) —VOLUME type (option)36 /46CONFIGURING THE ASSOCIATED MEASUREMENTS3.Select a measurement type and press .The parameters of the selected measurement type aredisplayed.4. Define the measurement cycle parameters.See: Modifying a parameter.Use this procedure to complete the test program setup.The protection of the parameters is configurable. If the icon is displayed at the bottom of the screen, you must insert the USB unlocking device or enter a password before modifying a parameter.On the PARAMETERS screen of the program (see: Preparing a program):1. Press up/down to select the parameter tomodify, and press.An arrow is displayed on the right of the parameterbeing modified.2. Use the up/down up/down keysto modify the parameter value, and press tovalidate.The arrowreturns to the left of the modified parameter.3. Repeat these steps until all parameters are set.4. To return to the MAIN MENU screen, press Escas many times as necessary.37 / 46If necessary, you can select another program.1. Pressup/down.Use the front panel keys to start/stop a measurement cycle.With the desired program displayed on the Program screen:STARTING A MEASUREMENT CYCLE 1. Press Start.The cycle phases of the program are successively displayed:FILLSTABILISATION TEST DUMPAt the end of the cycle, the results are displayed and READY appears at the bottom right of the screen.During the measurement cycle, you may press to access the MAIN MENU screen and set parameters for a next measurement cycle.STOPPING A CYCLE2. Press Reset to immediately stop the current measurement cycle and return to the Program screen.User adjustments38 /46Different menus are accessible on the MAIN MENU screen.For more information, refer to the Reference Manual.SPE CYCLE menuUse this menu to carry out specific procedures necessary to ensure the proper operationof specific measurement cycles (for example, adjustment of pressure regulator).Some parameters are displayed when specific functions are activated.39 /46TO START SPECIAL CYCLES...1. On the SPECIAL CYCLE MENU screen, select acycle, and press to validate.2. PressStart to start the cycle.3. To stop the current cycle pressReset .PARAMETERS menuUse this menu to configure the measurement cycle associated to each test program.Default parameters of the LEAKtype testsSome parameters are displayed when specific functions are activated.40 /46Additional functions41 /46Some functions are available depending on software version.42 /46CONFIGURATION menuUse this menu to configure your ATEQdevice.Start on the instrument frontpanel. Programs can only be started from the instrumentConfiguration of the assigned function to theSmart key43 /46SERVICE menuUse this menu to do the maintenance of your device (status check, internal tests...).RESULTS menuIn this section, manage measurements results.44 /46USB menuThis section describes save and restore parameters on an external USB device.Specifications45 /46 Technical characteristics of the device.Main characteristics46 /46。
试漏仪标定说明、
NO. 导出部门 : 试验技 术中心 整车系统开发部 B
特提出该测量设备以下具体计量要求: 具体计量要求 序号 计量项目 测量范围 准确度 等级 最大允许 误差 测量 不确 定度 分辨力 重复性 稳定 性 备注
1 2 3 4
①
工艺技术员/日期:
计量工程师/日期:
科领导/日期:
审核/日期:
部门领导/日期:
批准/日期:
与计量员确认如何填写?
公司计量网信息:
2011年计量要求登记库
序 使用部 测量设 型号 号 门 备名称 规格
测量设备编号
制造 类 登记表 具体计量要求 厂 别 编号
计量 校准类 校准科 要求 别 室 类别
备注
130
发动机 C173-1105/C173试漏仪 F520 ATEQ 公司 1525/C173-0983 发动机 试漏仪 F520 公司 C173-170首次
自校
校准科
371
发动机 试漏机 F520 C173-1622/1621 ATEQ B 公司
首次
自校
校准科
发动机 C173372 试漏机 F520 ATEQ B 公司 1620/1712/1677
首次
自校
校准科
373
发动机 C173试漏机 F520 ATEQ B 公司 1615/1704/1616
首次
自校
校准科
发动机 374 试漏机 F520 公司
C173-1618
ATEQ B
首次
自校
校准科
2010年计量要求登记库 测量 序 使用 型号规 制造 登记表 设备 测量设备编号 类别 号 部门 格 厂 编号 名称 C1731030/C173发动 F520/L 试漏 1031/533203 机事 S机 2009业部 1822A 22F/5332008-22F 计量要 校准 校准 求类别 类别 科室
法国ATEQ测漏仪密封性测漏操作规程
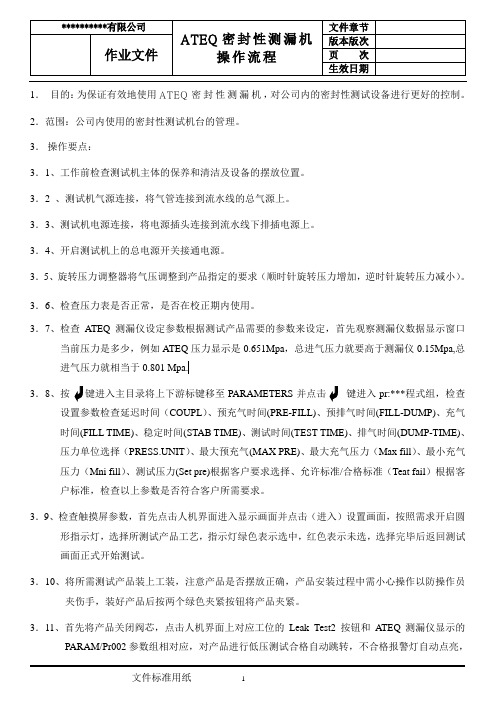
1.目的:为保证有效地使用ATEQ密封性测漏机,对公司内的密封性测试设备进行更好的控制。
2.范围:公司内使用的密封性测试机台的管理。
3.操作要点:3.1、工作前检查测试机主体的保养和清洁及设备的摆放位置。
3.2 、测试机气源连接,将气管连接到流水线的总气源上。
3.3、测试机电源连接,将电源插头连接到流水线下排插电源上。
3.4、开启测试机上的总电源开关接通电源。
3.5、旋转压力调整器将气压调整到产品指定的要求(顺时针旋转压力增加,逆时针旋转压力减小)。
3.6、检查压力表是否正常,是否在校正期内使用。
3.7、检查ATEQ测漏仪设定参数根据测试产品需要的参数来设定,首先观察测漏仪数据显示窗口当前压力是多少,例如ATEQ压力显示是0.651Mpa,总进气压力就要高于测漏仪0.15Mpa,总进气压力就相当于0.801 Mpa.3.8、按键进入主目录将上下游标键移至PARAMETERS并点击键进入pr:***程式组,检查设置参数检查延迟时间(COUPL)、预充气时间(PRE-FILL)、预排气时间(FILL-DUMP)、充气时间(FILL TIME)、稳定时间(STAB TIME)、测试时间(TEST TIME)、排气时间(DUMP-TIME)、压力单位选择(PRESS.UNIT)、最大预充气(MAX PRE)、最大充气压力(Max fill)、最小充气压力(Mni fill)、测试压力(Set pre)根据客户要求选择、允许标准/合格标准(Teat fail)根据客户标准,检查以上参数是否符合客户所需要求。
3.9、检查触摸屏参数,首先点击人机界面进入显示画面并点击(进入)设置画面,按照需求开启圆形指示灯,选择所测试产品工艺,指示灯绿色表示选中,红色表示未选,选择完毕后返回测试画面正式开始测试。
3.10、将所需测试产品装上工装,注意产品是否摆放正确,产品安装过程中需小心操作以防操作员夹伤手,装好产品后按两个绿色夹紧按钮将产品夹紧。
ATEQ泄漏测试

2.间接测量法(收集测量法) •
层流管放置在待测件之后,其出口与大气相通。根据工件的情况, 可使用一罩体将工件罩住(就象用一罩体将淋浴喷头的水流汇集一样)。 此法只有在使用罩体收集气流简单的情况下才能使用。
在使用该法进行测量时,气流在通过层流管时已经稳定且出口 压力等于大气压力,故能节省测量时间。
• ④被测物和大气的温度差(被测物温度高低不等的情况)
• 在生产线上经过高温清洗、干燥、焊接等工序后进入泄漏测试时,被测 物的温度有时会比所接触的密封夹具的温度高,某些情况下也可能低于 周围大气的温度。此时被测物的温度变化,会引起充入空气的温度发生 变化。
• 2> 容积变化引起的影响:
• 在泄漏测试的测试行程中,一旦被测物一侧或标准品一侧的空气回路的 容积发生变化,就会产生差压并引起测试误差。这种情况经常发生在被 测物被夹紧时引起的压力变动,因此有必要在使用O形密封圈的密封部设 置挡块以防止其发生微小变动。
在检出行程中,一旦密封空气回路中的温度发生变化,根据
Charle法则会引起压力的变化,从而给泄漏测试带来较大的误差。
在检出行程(DET)中,被测物一侧的空气回路的空气温度变化和差
压的关系是:
平均空气温度 :t(℃)
⎫
测试压 :P(kPa) 温度变化 :Δt(℃) 由温度变化引起的差压变化
⎪
⎪⎪⎬于是 ⎪
• 经过以上两步发现设备不正常时,应该检查:a)气源压力是否正常;b )封堵及测试管路有没有泄漏;c)测试仪工作是否正常。在排除故障 以后,再从第(1)步做起。
• ATEQ提醒您:
• 标准泄漏头是很精密的。空气中的灰尘、水、油等等都会使它 的泄漏值发生变化。使 用完毕以后应立即放入特制的盒子中妥 善保管,最好放在干净干燥之处保存,以免损坏它的泄漏值。
ATEQ测试操作说明

文件变更记录
序号版本页号修订日期修定理由内容摘要修订人审批人01 A 1/1 2008.1.23 首版发行 ATEQ气密操作说明
BBQ事业部
工作说明书
制订部门 BBQ/品管部制订日期2007/01/23编号WI-QC-058 标题 ATEQ气密操作说明版本 A 页次1/1 一、 适用范围:
适用于本厂所有关于密封性能的工件(气炉的瓦斯管路)。
二、 操作步聚:
1、将瓦斯管路的进口夹紧于气密测试仪之夹具上,并确认是否夹好。
2、启动气密测试机,开始测试(测试前已设定好充气、夹持、稳定、检出时间
分别为2sec、1 sec、6 sec、2 sec;设定允许泄漏量为20pa/sec)。
3、当气密测试仪器右面之显示屏亮绿灯,并且显示之数据低于20 pa/sec,此被
测工件判定合格;
4、当气密测试仪器右面之显示屏亮红灯,并且显示之数据大于20 pa/sec,此被
测工件判定不合格;
5、当气密测试仪器右面之显示屏亮红灯,且显示屏显示FEEE,此测试工件为大
量漏气。
三、 保养:
每星期定期清理测试设备上的灰尘。
修订内容:核准:审核:制订:
首版发行。
ATEQ检漏仪参数说明

ATEQ检漏仪参数说明检漏仪参数说明PR09 参数L42F(翻译)TYPE:LEAK TEST 泄露测试(气密测试)DESENSITIZED TEST :畅通测试1、COUPL A:0.1S A口加紧时间(碳罐的夹紧时间)2、COUPL B:0.0S B口等待时间3、PRE-FILL:16.0S 预充气时间(快速充气)4、PRE DUMP:0.0S 预排气时间5、FILL TIME:17.0S 充气时间6、STAB TIME:18.0S 稳定时间7、TEST TIME:5.0S 测试时间8、INTER-CYC:1.0S 等待循环时间1S后执行下一条程序9、PRESS UNIT:KPa 压力单位10、M a X PREFIL:24.46 最大预充气11、M a X FILL:13.62 最大充气压力12、MIN FILL: 4.70 最小充气压力13、SET PREFIL:19.90 设定预充气压力14、SET FILL:7.00 设定充气压力15、Leak UNIT:Pa 泄露单位16、TEST FAIL:0090 测试失败值17、REF FAIL:0037 参考失败值18、FUNCTIONS 功能键(按功能键后转至下面)NAME:L42F(下面YES:设置有效NO:设置无效)1、PR:SEQUENCE :YES/NO 链接顺序2、FILTER:YES/NO 过滤(检测数据过滤)3、AUTO CONNECT:YES/NO (后面板的夹紧A口,YES后A 口才有气)4、PRE-FILL:YES/NO 预充气压力5、V ALVE CODES:YES/NO(阀打开/关闭控制后面板J1端子前两脚有24V)6、24V OUTPUTS:YES/NO 一般不用7、FLOW LEVEL:YES/NO (流量等级)一般不用8、COUNT DOWN:YES/NO 倒计时9、DUMP OFF:YES/NO 排气打开、关闭Pr9+后缀……表示链接目标,表示Pr9程序段做完后继续做后面的。
- 1、下载文档前请自行甄别文档内容的完整性,平台不提供额外的编辑、内容补充、找答案等附加服务。
- 2、"仅部分预览"的文档,不可在线预览部分如存在完整性等问题,可反馈申请退款(可完整预览的文档不适用该条件!)。
- 3、如文档侵犯您的权益,请联系客服反馈,我们会尽快为您处理(人工客服工作时间:9:00-18:30)。
ATEQ检漏仪参数说明
1.检测范围:ATEQ检漏仪可以检测的气体种类和泄漏范围。
常见的气体包括氢气、氧气、氮气、甲烷等。
检测范围一般以气体浓度的最低限度来表示。
2.灵敏度:ATEQ检漏仪的灵敏度代表了其对气体泄漏的检测能力。
一般以最小检测浓度来表示,较小的数值代表更高的灵敏度。
3.测量方法:ATEQ检漏仪的测量方法包括负压法、正压法和吸引法等。
负压法是通过在被测物体周围建立负压环境来检测泄漏,正压法是通过在被测物体内部施加正压来检测泄漏,吸引法是通过吸引空气中的气体来检测泄漏。
4.检漏方式:ATEQ检漏仪的检漏方式可以分为主动检测和被动检测两种。
主动检测是通过仪器主动向被检测物体施加气压,然后监测气体泄漏情况。
被动检测是仪器通过接收被检测物体自然散发的气体来监测泄漏情况,无需施加气压。
5.响应时间:ATEQ检漏仪的响应时间是指从检测到气体泄漏到报警的时间间隔。
响应时间越短,代表仪器对泄漏的检测速度越快。
6.报警方式:ATEQ检漏仪的报警方式包括声音报警和光提示两种。
声音报警通常是通过内部蜂鸣器发出报警声音,光提示则是通过LED指示灯等发出光信号进行提示。
有些高级的ATEQ检漏仪还可以通过蓝牙或WiFi功能将报警信息发送到手机或电脑上。
7.显示方式:ATEQ检漏仪的显示方式通常为数码显示屏或液晶显示屏。
一般会显示泄漏的气体种类、泄漏的位置以及泄漏的浓度等信息。
8.电源方式:ATEQ检漏仪可以通过电池、充电器或电源适配器等方式供电。
有些高级的ATEQ检漏仪还可以通过USB连接电脑进行供电和数据传输。
9.尺寸和重量:ATEQ检漏仪的尺寸和重量直接影响了其便携性和携带方便性。
一般来说,小尺寸和轻量级的仪器更易于携带和操作。
10.其他功能:除了以上常见的参数外,ATEQ检漏仪还可能具备其他的功能,如数据存储功能、报表生成功能、数据传输功能等。
这些功能可以提高检测的效率和便捷性。
总之,ATEQ检漏仪的参数描述了其在检测气体泄漏方面的性能和功能。
不同型号和品牌的检漏仪可能会有不同的参数配置,根据具体的需求选择适合的仪器非常重要。